Shipping Availability Check is a Marketplace add-on for the Magento 2, which allows the users to find out product availability using zip codes. The users can simply enter a zip code on the product page to know whether the product is available in that zip code or not.
The admin and the sellers can add different regions, upload zip code CSV file, and select available regions for the products.
Zip Code Validator also works with Assigned Products, where the different sellers can add regions for the assigned products. The users can enter a zip code and find the product availability for the assigned products.
Note: This is a Marketplace add-on, please install Webkul Magento 2 Multi Vendor Module first.
Watch the video tutorial below to understand the extension workflow:
Features
- Admin can enable or disable the module.
- Admin can select the shipping check field to be visible on all products or certain products.
- Allow orders only for validated zip codes.
- Shipping Availability Check module also works with the Marketplace Seller Price Comparison module.
- Seller and admin can create multiple shipping regions
- Upload zip codes CSV file for each shipping region.
- Download sample zip code shipping CSV file.
- Select available shipping regions in a product.
- Enable/disable or edit a shipping region.
- Update the zip codes list by updating the CSV file.
- Admin and seller can delete a zip code from the list.
- Use the filter option to find any region or a zip code.
- Saved address zip code automatically appears for logged-in customers.
- Customers can see the recent history of zip code search.
- Supports multiple language translations.
- Module source code is open for customization.
- Compatible with the Hyva Theme for seamless integration.
Install Extension from Webkul Store
#1 Download Module
Firstly, you need to log in to Webkul Store, go to My Account>My Purchased Products section, verify and then download and extract the contents of this zip folder on the system.
#2 Upload Folder
Once the module zip is extracted, follow path src>app and then copy the app folder into the Magento 2 root directory on the server as shown below:

#3 Run Commands
After uploading the module folder, you need to run the following commands in the Magento 2 root directory:
php bin/magento setup:upgrade
php bin/magento setup:di:compile
php bin/magento setup:static-content:deploy
php bin/magento indexer:reindex
php bin/magento cache:flush
Install Extension from Magento Marketplace
If you have purchased this extension from the Magento Marketplace then please follow the below process.
#1 Get Access Keys
You need to get access keys, navigate to My Profile in Magento Marketplace, then choose Access Keys in the My Products section.

Go to Magento 2 and then you need to copy both the Access Keys – Public Key and Private Key. These access keys will be needed in the next steps for authentication.

If access keys are not created earlier, click Create A New Access Key, enter any name and click OK.

#2 Update composer.json File
To know the component name and version number, go to your Magento Marketplace account section, My Profile>My Purchases, then find this extension to view the details.
Note: Below is an example image, every extension will have its unique component name and version.

After that, navigate to your Magento project directory and update your composer.json file in the following format.
composer require <component-name>:<version>
For example, to install version 5.0.0 of this extension you need to run the following command:
composer require webkul/marketplace-shipping-availability-check:5.0.0
#3 Enter Access Keys
Now you will need to enter the Access Keys that you obtained as explained in the first step #1 Get Access Keys. Wait for Composer to finish updating your project dependencies and make sure there aren’t any errors.
#4 Run Command
You need to run the following commands:
php bin/magento setup:upgrade
php bin/magento setup:di:compile
php bin/magento setup:static-content:deploy
php bin/magento indexer:reindex
php bin/magento cache:flush
Multi-Lingual Configuration
For Multilingual support, please navigate through Store > Configuration->General > Locale Options and select your desired language from the locale option.

Module language translation
If you need to do the module translation, please navigate the path app/code/Webkul/MpZipCodeValidator/i18n and edit the file named en_US.csv as shown in below screenshot.

Once you have opened the file for editing, replace the words after the comma (,) on the right with your translated words.

After editing the CSV file, save it and then upload it to the same path app/code/Webkul/MpZipCodeValidator/i18n. The module will now get translated into your desired language. It supports both the LTR and RTL languages.

Module Configuration Shipping Availability Check
Once you have installed the module, go to Stores > Configuration > Webkul > Marketplace Zip Code Validator. Following options will be available:
Enable – Select Yes option to use this module. If No is selected, the zip code validator field will not be visible on the storefront.
Allow orders only for saved zip codes – If Yes is selected, a customer can place orders only for the validated zip codes set by the admin or a seller. So it means if a zip code does not match from the zip codes list, an order cannot be placed.
But, if No option is selected, a customer can place an order for any zip code entered during the checkout process. Zip code validation rule will not work in this case.
Zip Code Validator Availability- The admin here can select among two options either the individual product or all products to make the shipping check field visible on the product page.
Apply To Individual Product

Meanwhile, if the admin has selected apply to Individual products then the admin and seller need to Enable Validation for each product to select the region on the product edit page. So, as to specify the region of shipping.
Admin End – Product Edit Page

Seller End – Product Edit Page

Apply To All Products
Further, if the admin has selected Apply to All Product then the shipping check filed will be visible on all the products.
Select the Regions: The admin can select the regions for the product available in a particular region.
Zip Code Validator Message: The admin can enter a message to check the zip code availability.

Further, in the Zip Code Validator availability configuration, if the admin selects apply to all products a zip code validation dropdown will appear which includes the following options :
1. Apply default configuration: If this option is selected by the admin, all regions selected by the admin at the default module configuration will be assigned to the product.

2. Select Specific: Under this section, the admin will select specific regions from the drop-down options available. The admin can select multiple regions as shown in the image below:

3. No Validation: If this option is selected by the admin, the product will be delivered to any region. In addition, the product will be available for all regions and the zip code, the entry field will not be visible at the front end.

4. All Regions: If the admin selects “All Region” in “Zip Code Validation” for Admin product, then all available admin’s regions will be assigned to that product.
If the Admin selects “All Region” in “Zip Code Validation field“, for seller product, then all available seller’s regions will be assigned to that product.

Note:
- If a seller doesn’t have any regions then only ” No Validation” and “Apply default configuration” options will be visible in Zip code validation” dropdown.
- When the seller will have regions, the “Apply Default Configuration” will not be applicable to the seller’s product.
Manage Shipping Region – Admin
The admin can navigate through Marketplace Management > Shipping Availability Check > Manage Shipping Region. Here the admin can manage all the regions of its store. The admin can view information such as – region Id, region name, status, and region zip codes.
Click the Add Region button to create a new region.
Use Actions drop-down menu option to enable or disable any region status.
Filter options can be used to search for any particular region from the list.
Use the Click link to view all the zip codes of the region.

To update an existing region click the Edit link.
Seller Name – Admin can view the seller name.
Region Name – Admin can view the region.
Status – Admin can view the status as Enabled or Disabled.
View All Zip Codes – Admin can view the list of all the zip codes of the selected region. Every zip code has an Id assigned to it.
Actions – Use this option for deleting any zip code(s) from the list.

To find any particular zip code from the list, use the Filter option.
Add Region
To add a new region click the Add Region button as shown in the previous screenshot. After arriving at the New Region page, you can fill in the region information details. The admin can download a sample zip code CSV file for the reference.

Region Information:
Region Name – Enter the title for the region.
Status – Set the status as Enabled to use this region, else select Disabled if don’t want to use.
CSV – Click the choose file button to browse and upload your new zip code CSV file.
The CSV file will be the same as the image shown below:
This file will include the list of zip code ranges. The list includes the initial zip code and the final valid zip code detail.

Further, the admin can assign the product to a particular region.

Admin can assign products to particular regions while creating/editing regions, for this, he just needs to select the Assign product option then select products through checkboxes and lastly hit the Save button.
New Product:

The regions can also be configured for an existing product. Select the region(s) from the available regions option as shown in the below screenshot.
Existing Product:

Seller management
Seller Add New Region:
To add a new region navigate through My Account section, and then select the Add Regions tab. After arriving at the Marketplace Add Regions page, the seller will fill in the region information details. The seller can download a sample zip code CSV file for the reference.

Region Name – Enter the title for the region.
Status – Set the status as Enabled to use this region, else select Disabled if you don’t want to use it.
CSV – Click the Choose file button to browse and upload your new zip code CSV file.
Click the Save Region button to add this region to the list.
After the region is created, it will be listed under the View All Regions Tab, as shown in the image below:

Moreover, the seller can view the list of all the zip codes of the selected region. Every zip code has an Id assigned to it. For this, the seller will select the click option under the View All Zipcodes attribute for the desired region.

Actions – Use this menu option for deleting any zip code(s) from the list.
After that, to find any particular zip code from the list, use the search option.
Add New Product:
The seller can add the new product by clicking on the New Products tab from the seller panel.

Edit Existing Product:
The seller can edit the existing product by selecting the My Product list and then viewing the desired product on Edit mode under the action tab.

After that, the edit page will be shown in the image below:

Buyer management Shipping Availability Check
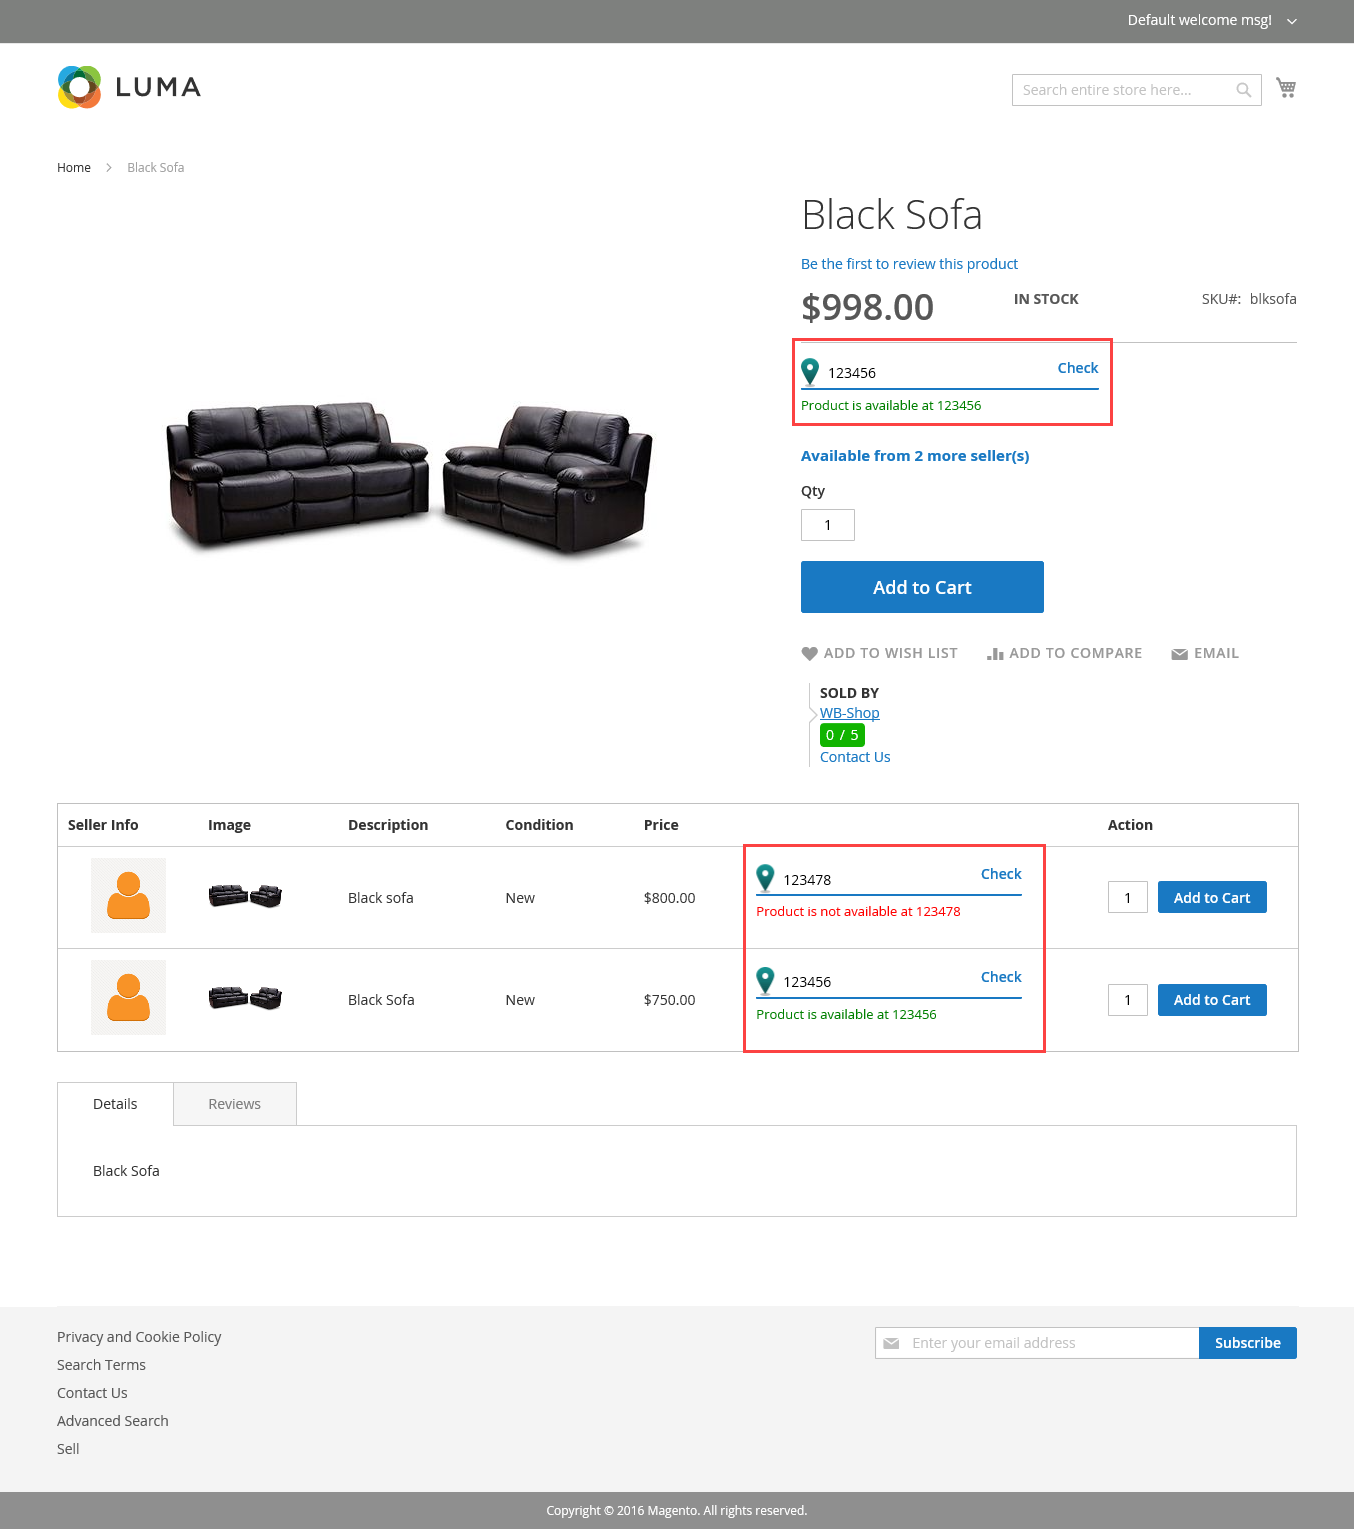
The front-end users can simply enter the zip code on the product page to find product availability for that zip code. After entering the zip code, the users can click the Check button as shown in below screenshot. A small message will appear under the entered zip code, as Product is available at (zip code).

If the entered zip code does not match the product zip code list, it will show the message as Product is not available at (zip code).

If a Logged In user uses the zip code validator for finding the product availability, its shipping details will automatically appear in the field. The users can view the recent zip code search history for the product.

The users who are not Logged In can also view the recent zip code search history for the product.

If the customer adds the product and product is not available for the particular region then checkout page show like the below image:

Shipping Availability Check for Assigned Products
The Shipping Availability Check Marketplace add-on also works with the Seller Price Comparison module, where different sellers can add regions for their assigned products.
The users can search for product availability by entering the zip code for each seller product separately.
Note: Seller Price Comparison is a separate Marketplace add-on, it is not a part of Shipping Availability Check.
The seller can simply navigate through My Account->Assign Product and select the Available Regions from the option as shown in below screenshot:

Moreover, the front-users can enter the zip codes for different seller products and find the product availability as shown in the below screenshot.
Support
Thank you for viewing the Shipping Availability Check blog, please feel free to share your views and comments. If you have any queries or doubts reach us at at our HelpDesk System. You may also browse other Magento 2 marketplace addons and our quality Magento 2 extensions.
Current Product Version - 5.0.6
Supported Framework Version - Magento 2.0.x, 2.1.x, 2.2.x,2.3.x, 2.4.x

Be the first to comment.