Marketplace Correios Shipping For Magento 2 extension provides the Correios Shipping method for shipping the products.
Correios shipping manages the Brazilian postal code system.
Using this shipping module vendors/sellers can manage their shipping and order from the vendor panel, print invoices, enter tracking ID, and complete shipping management from their seller panel.
Note:
- This module is an add-on to Webkul’s Marketplace Module. To use this module, you must have purchased and installed Magento 2 Marketplace Extension first.
Check the overview of the plugin –
Features
- Set the Correios Shipping method name that will be shown from the front end.
- The admin can also add delivery time from their end.
- Set the Handling fee as Fixed or Percentage.
- The seller can enter the tracking ID by which the buyer can track their order.
- The seller can print the Invoice for the individual orders.
- Ability to download Invoice and Shipping Slip easily.
- The seller can add Invoice & Packing Slip, address, VAT, TAX information.
- Compatible with rest api of Correios shipping.
Installation – Marketplace Correios Shipping For Magento 2
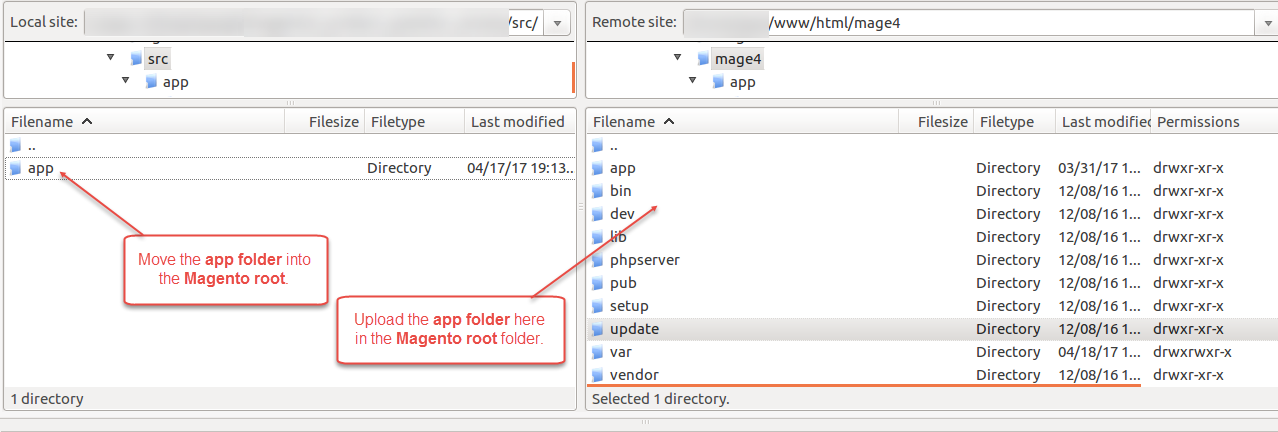
Customers will get a zip folder and they have to extract the contents of this zip folder on their system.
The extracted folder has an src folder, inside the src folder you have the app folder. You need to transfer this app folder into the Magento 2 root directory on the server as shown below.
After the successful installation, you have to run these commands in the Magento 2 root directory.
php bin/magento setup:upgrade
php bin/magento setup:di:compile
php bin/magento setup:static-content:deploy
php bin/magento indexer:reindex
php bin/magento cache:flush
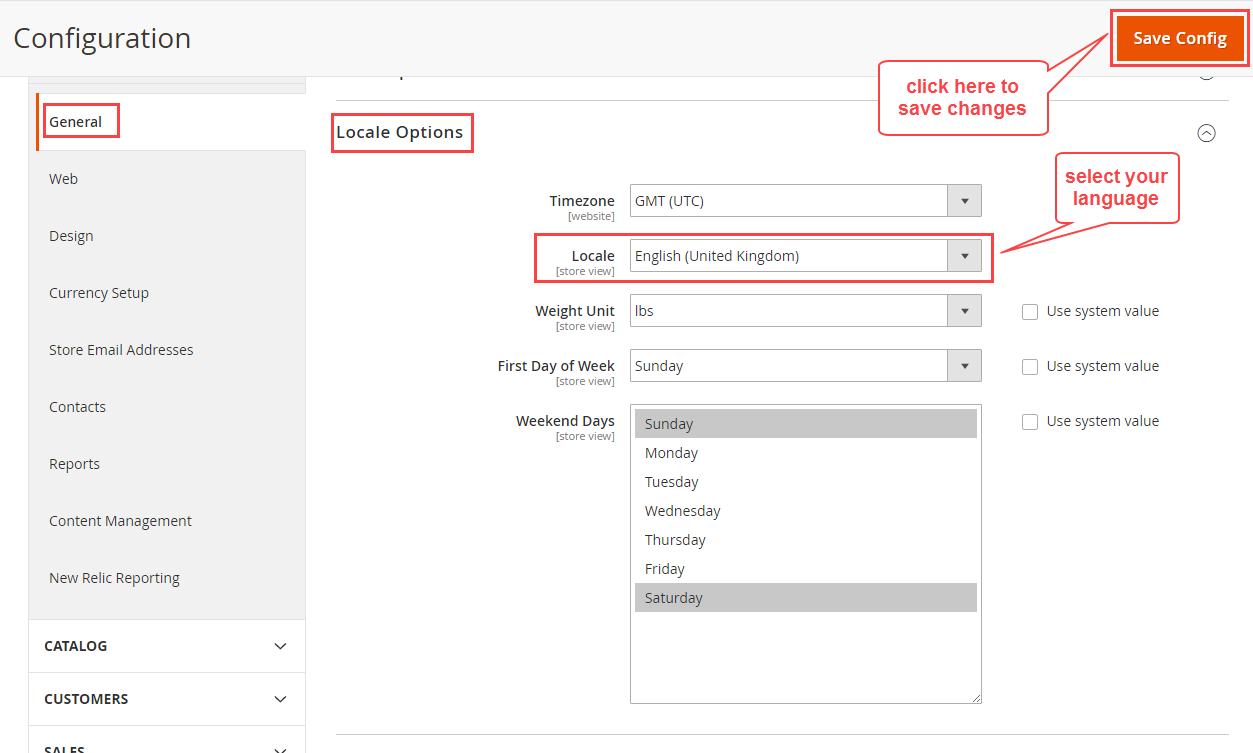
Multi-Lingual configuration
For Multilingual support, please navigate. Store->Configuration->General ->Locale Options. And select your desired language from the Locale option.
Language Translation – Marketplace Correios Shipping For Magento 2
If you need to do the module translation, please navigate the path app/code/Webkul/MpCorreiosShipping/i18n in your system. Open the file named en_US.CSV for editing as shown in the below screenshot.

Once you have opened the file for editing. Replace the words after the comma(,) on the right with your translated words.

After editing the CSV file, save it and then upload it to the same folder. Now, your module translation is complete.

User – Registration at IdCorreios
The admin can go to – page to create an account with Correios shipping service. Further, follow the below steps to complete profile and registration.
Firstly, the user needs to select his/her profile type from the checkbox and then click proceed.

Next, the user needs to provide the Registration data – i.e Identifier and Contact number, as shown below Since here we have chosen the profile type as Company based outside brazil.
Note:
- Based on the selection of profile type the user will be asked to provide registration data to complete the registration process.
- The purpose of this document is to present the Term of Use of the Services and the Term of Digital Privacy Policy for the use of idCorreios.

Finally, click the Complete Registration button. As a result, the below success message will be displayed.

Activate Account – idCorreios – Registration Confirmation
The user will be sent an email right after it. Simply click the Ativar conta i.e Activate Account to confirm the registration.

As a result, the user will be redirected to the below page. Simply click on the button Access IdCorreios to use the system.

At last, whenever the user will try to log into the Correios shipping account by entering the login details they will be taken to the below welcome page.

Configuration
On successfully installing the Marketplace Correios Shipping module, you will be able to see the configuration option under marketplace management side panel option.

Apart from that, the admin can also navigate to configuration settings via Stores > Configuration > Sales > Delivery Methods > Webkul Marketplace Correios Shipping.
Further, the admin can set the configurations under Webkul Marketplace Correios shipping as under:

- Enable or Disable the shipping method.
- Set the Title of the Shipping method that will be displayed at the front end.
- Set the User Account and API Access Code for the Correios Shipping account.
- Enter the Postage Card number and then the Access Token with the expiry of the access token.
- Select the Shipping Methods from the available – Without Contract(If you do not have an account with the Correios Shipping) and With Contract(If you have an account with the Correios Shipping).

- Add the Delivery Time.
- Select to Show the Delivery Time(At the frontend).
- Configure the Handling Fee as – Fixed or Percentage.
- Set the Handling Fee.

- The admin can set the Sort Order.
- The admin can select to show the shipping method (if not applicable) if selected Yes.
- Enter an error message that will be displayed in case the shipping method is not available.
- Lastly, the admin will click the “Save” configuration button to save the settings.
Admin’s End
Correios Shipping Method Marketplace addon works for the admin’s product as well.
The admin can save Correios configuration details from the admin panel as discussed above.
Also, for the admin products, the Height, Width, and Length has to be setup.
When the buyers place an order, they can see the Webkul Correios Shipping Method at the checkout page.

Note: As soon as the customers select an option from the alternative under the Correios shipping the estimated shipping time is also visible to them in the shopping cart.

Lastly, The Customer can choose to purchase the admin’s product and can place an order for the same by opting for Webkul Correios Shipping as the delivery method on the shopping cart page.
Further, the admin can manage the order and can generate the shipping.
Further, the customer can make the payment to complete the order. The customer can see the shipping method used and the estimated shipping time here as well.

From the Admin Panel, the admin can view and manage the orders by navigating through Sales -> Order.

Moreover, the admin can generate an invoice for his orders as shown below.

Invoice Slip:

After that, the admin will be able to generate the shipment for the admin’s product.

In the end, the admin can successfully print the Shipping Slip for the order to be shipped by Correios Shipping Method.
Shipping Slip:

Seller’s End Workflow
Once the installation of this module is complete, the seller will have to mention the Product – Height, Width, and Length for Correios shipping.
This can be done for a new product under the “Add New Product” section or an already created product as well.

The Marketplace Correios Shipping module is enabled, then the seller can set the Invoice & Shipping address, VAT, TAX information under Marketplace > Manage Print PDF Header Info.

Customer Order – Marketplace Correios Shipping
Firstly, the buyer can select the shipping method available under the Correios shipping options in the cart.

At the checkout page, the buyer can see the Marketplace Correios Shipping method as per the below snapshot. During checkout, the buyer can find their selected shipping method under the “Order Review”.
 Note: In the Marketplace Correios Shipping module, the shipping rate will be calculated according to the seller’s product weight and seller origin address.
Shipping Management
When the order is placed, the seller can see the order under “My Order History”.

If the admin sets the “Allow Seller to Manage Order” option as “Yes” then the seller can manage the orders from the front-end.
Now the seller can generate invoices for their ordered products, generate tracking numbers and shipment for the orders of their products.
Even the seller can notify the customers by sending them emails, cancel/refund the order and even print the order.


Once the seller generates the shipment and invoice, the seller will able to see complete order details as per the snapshot below.

Shipping information:
The seller can download the Shipping and Invoice slip very easily.
Shipping Slip:
Invoice Slip:
Support
That’s all for the Marketplace Correios Shipping For Magento 2 extension. Still have any issue feel free to add a ticket and let us know your views to make the module better at our Helpdesk system.
Current Product Version - 5.0.3-p2
Supported Framework Version - Magento 2.0.x, 2.1.x, 2.2.x,2.3.x, 2.4.x

Be the first to comment.