Marketplace Aramex Shipping For Magento 2 extension will allow the sellers to provide Aramex shipping method for shipping their products to the customers.
Aramex is one of the best shipping providers in the world, and it is fast, reliable, and trusted by millions of customers around the globe.
Note:
- This module is an add-on to Webkul’s Multi-Vendor Marketplace module. To use this module, you must have installed Magento 2 Marketplace Extension first.
- The Aramex COD will be available for Domestic Shipping methods only.
Check the video mentioned below for an overview of the plugin itself –
Features of Marketplace Aramex Shipping For Magento 2
- The admin will set the Aramex shipping method name which is visible at the front end.
- If the admin enables it, the shipping rates are tabulated as per the volumetric weight of the package.,
- The seller can generate the Aramex label.
- The dynamic shipping method is used for freight calculation.
- The seller is allowed to manage his order from his account.
- The admin can add COD rates with this shipping method.
- The seller will add Invoice & Packing slip address, VAT, and TAX information.
- Ability to download Invoices and Shipping Slips easily.
- The seller can generate the tracking ID by which the buyer can track their order.
- The seller will be able to print the Invoice of individual orders.
- The code is fully open and easy to use.
Install Extension from Webkul Store
#1 Download Module
Firstly, you need to log in to Webkul Store, go to My Account>My Purchased Products section, verify and then download and extract the contents of this zip folder on the system.
#2 Upload Folder
Once the module zip is extracted, follow path src>app and then copy the app folder into the Magento 2 root directory on the server as shown below:

#3 Run Commands
After uploading the module folder, you need to run the following commands in the Magento 2 root directory:
php bin/magento setup:upgradephp bin/magento setup:di:compilephp bin/magento setup:static-content:deployphp bin/magento indexer:reindexphp bin/magento cache:flush
Install Extension from Magento Marketplace
If you have purchased this extension from the Magento Marketplace then please follow the below process or visit this link.
#1 Get Access Keys
You need to get access keys, navigate to My Profile in Magento Marketplace, then choose Access Keys in the My Products section.

Go to Magento 2 and then you need to copy both the Access Keys – Public Key and Private Key. These access keys will be needed in the next steps for authentication.

If access keys are not created earlier, click Create A New Access Key, enter any name and click OK.

#2 Update composer.json File
To know the component name and version number, go to your Magento Marketplace account section, My Profile>My Purchases, then find this extension to view the details.
Please note – Below is an example image, every extension will have its unique component name and version.

After that, navigate to your Magento project directory and update your composer.json file in the following format.
composer require <component-name>:<version>
For example, to install version 4.0.0 of this extension you need to run the following command:
composer require webkul/marketplace-aramex-shipping:5.0.0
#3 Enter Access Keys
Now you will need to enter the Access Keys that you obtained as explained in the first step #1 Get Access Keys. Wait for Composer to finish updating your project dependencies and make sure there aren’t any errors.
#4 Run Command
You need to run the following commands:
php bin/magento setup:upgradephp bin/magento setup:di:compilephp bin/magento setup:static-content:deployphp bin/magento indexer:reindexphp bin/magento cache:flush
How to get Aramex Credentials?
- Email Aramex sales representative and cc
[email protected]
Tell Aramex you need to integrate Aramex Shipping Services API and Rate Calculator API. - Aramex will provide Aramex Developer guides and two separate sets of credentials for sandbox and production environments:
Account Number,Username,Password,Account PinandAccount Entity
Module Configuration Settings – Admin Backend
After the successful installation of the Marketplace Aramex Shipping Magento 2, the admin will able to find the configuration panel under;
Stores-> Configuration ->Sales ->Delivery Methods -> Webkul Marketplace Aramex Shipping.
The admin can set the configurations as under:
Enabled for Checkout: The admin can set the Aramex shipping to enable/disable on checkout.
Sandbox Mode: The admin can set the shipping mode as Test or Live.
Title: The admin can define the title of the Shipping method as desired.
Account Email: The admin needs to enter the registered Aramex Email in this field.
Account Pin: The admin needs to fill the Account Pin in the following field.
Password: Add the Aramex Account Password.
Account Number: Here the admin can add Aramex account number.
Account Entity: The Account Entity is filled here.
Country Code: The admin will add the country code from which the Aramex account is being created.
Weight Unit: The admin can set the weight unit( Pound or Kilogram) for Aramex shipment.
The configurations are set as follows:
Allowed Domestic Methods: To select the selective methods that will use for domestic shipping.
Allowed International Methods: To select the methods that will use for International shipping.
Enable COD Service: To enable the Cash On Delivery service for shipments in Aramex or not.
The settings for the above configurations are as under:
COD Instructions: To add the instructions for the Cash On Delivery for the shipments.
COD Charge: The charges that will apply on the Cash On Delivery.
Ship To Specific Countries: The admin will be able to select the countries in which shipment can deliver.
Ship To Applicable Countries: The admin can select the specific countries for the delivery or can select all the countries.
Displayed Error Message: The admin can set the text that will display whenever the error will occur.
Handling Fee: The admin can add the handing fee for the shipment.
The configurations are set by the admin as follows:
Volumetric Weight Enabled: If enabled by the admin, then shipping will be calculated on the basis of volumetric weight.
Note:
- If the products that are to be ship are more in number, then the shipping rate shall be less as the rate is tabulate on the basis of the volume of the shipment.
Allow Seller To Save Aramex Details: If set “Yes” then the seller will able to set their own Aramex Details.
Show Method If Not Applicable: If set “Yes” then the method will display on the front end.
Debug: The admin can set the debug as Yes / No as desired.
Admin’s End:-
Aramex Shipping Method Marketplace addon works for the admin’s product as well.
The admin can save Aramex configuration details from the admin panel as discussed above. When the buyers place an order, they can see the Webkul Aramex Shipping method on the shopping cart page, as shown below:

The customer can choose to purchase the admin’s product and can place an order for the same by opting for Webkul Aramex Shipping as the delivery method on the shopping cart page. Further, the admin can manage the order and can generate shipping.
 From the Admin Panel, the admin can view and manage the orders by navigating through Sales -> Order.

Moreover, the admin can generate an invoice for his orders as shown below:

After that, the admin will be able to generate the shipment for the admin’s product.

This is how the created Shipment will appear.

In the end, the admin can successfully print the Shipping Label for the order to be ship by Aramex Shipping Method.

Workflow – Seller & Customer’s End
The sellers can save their Aramex configuration details if the admin has set the option “Allow Sellers To Save Aramex Details” to Yes from the backend.
When the buyers place an order, they can see the Webkul Aramex Shipping method at the shopping cart page, as shown below:
 Buyers can also see the Webkul Aramex Shipping method under the available shipping methods on the checkout page.
For the reference, check the below snapshot:
 Webkul Aramex shipping method is also visible on the order review page as shown below in the screenshot:
 NOTE: The shipping rate for Aramex Shipping rates are calculated based on the weight of the product(s) and the address of the Buyer.
Order Management – Seller’s End
After the buyer has placed the order, the seller can see the order under “My Order History” as shown below in the screenshot.
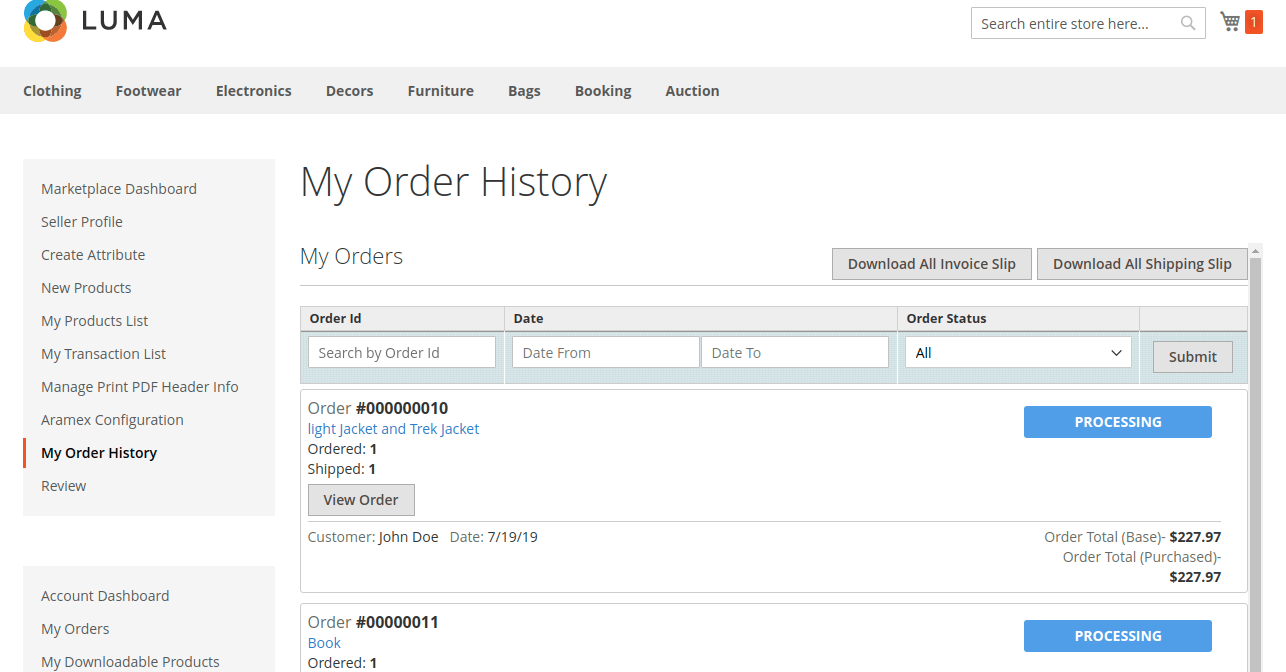
After that, the seller will able to generate invoices for their ordered products, generate the tracking number and shipment for the orders of their products.

Even the seller can notify the customers by sending them emails, cancel/refund the order and also print the order.
Once the seller generates the shipment and invoice, the seller will able to see the complete order details.
Shipment Information :
The seller can see the complete details of the shipment as shown below in the screenshot.
Aramex Shipping Slip:
The seller can click on “Aramex Shipping Slip,” and then the label will get download as shown below.
Sellers can download the Shipping and Invoice slip very easily.
In the slip, you can also see the company logo and address, vat, tax information which is enter by the seller under the Manage Print PDF Header Info. Menu item in the seller’s panel.
Shipping Slip –
Invoice Slip –
The seller can also download the PDF of shipping slip and Invoice slip under Marketplace -> My Order History.

After clicking on Download All option, a pop-up window will open up.
Here you will enter the date up to which you want to download shipping and invoice slip and click the “Submit” button to download the slips.
When Aramex COD is enabled
Now let’s see how this shipping method will work when Aramex COD is enabled from the back-end.

On the checkout page, the customer can view the shipping method like the image below.
The customer can choose any of the Aramex method desired and the Aramex COD payment method will available for them.

At the checkout page, the customer can view the Payment Information like the image below.

The rest of the process for order management will remain the same and it is described above.
Thus, that’s all for the Marketplace Aramex Shipping For Magento 2.
Still, have any issues feel free to add a ticket and let us know your views to make the module better at Webkul Support System.
Current Product Version - 5.0.3
Supported Framework Version - Magento 2.0.x, 2.1.x, 2.2.x,2.3.x, 2.4.x

just a question, can we make the shipping control to be from the admin side only ?