Magento 2 Custom Option Template extension will allow the admin to create an unlimited number of custom options from the admin back-end.
After creating the custom options, the admin can easily add these custom options to the products. Apart from that, the admin can add multiple custom options to each product as well.
As per default functionality, the admin of the website had to create custom options by going individually to each of the products and then adding the custom options for each of the products separately.
Now, using this extension the store admin can create multiple numbers of custom options and then can assign these custom options to the products as required.
Similarly, if you are running a jewellery online store and looking for a feature where your customers can build their custom rings and then add to their cart them, you can check Magento 2 Custom Ring Building.
Watch the below video tutorial to understand the extension workflow:
Features
- Create an unlimited number of custom options templates.
- Can add multiple custom options on each product.
- Assign the single custom options to multiple products.
- Can delete the custom options.
- As per each template, the admin can set the title and option type.
- Add different types of custom options using the option types – text (field, area), file, select (drop-down, radio buttons, check-box, and multi-select), and date (date, date & time, time).
- The admin can edit custom options.
- As per each custom option, the admin can set title, price, price type, SKU.
- The admin can also unassign the custom option template.
Installation
Customers will get a zip folder then they have to extract the contents of this zip folder on their system.
The extracted folder has an src folder, inside the src folder you have the app folder. You need to transfer this app folder into the Adobe Commerce Cloud root directory on the server as shown below.

# Run Commands
Now run this command on Adobe Commerce root directory –
php bin/magento setup:upgrade
After running above two commands, run this command in the Adobe Commerce Cloud Root –
php bin/magento setup:di:compile
Also, run this command into the Adobe Commerce Root –
php bin/magento setup:di:compile
After running the commands, you have to flush the cache from the Adobe Commerce Cloud admin panel by navigating through ->System->Cache management as shown below in the snapshot.

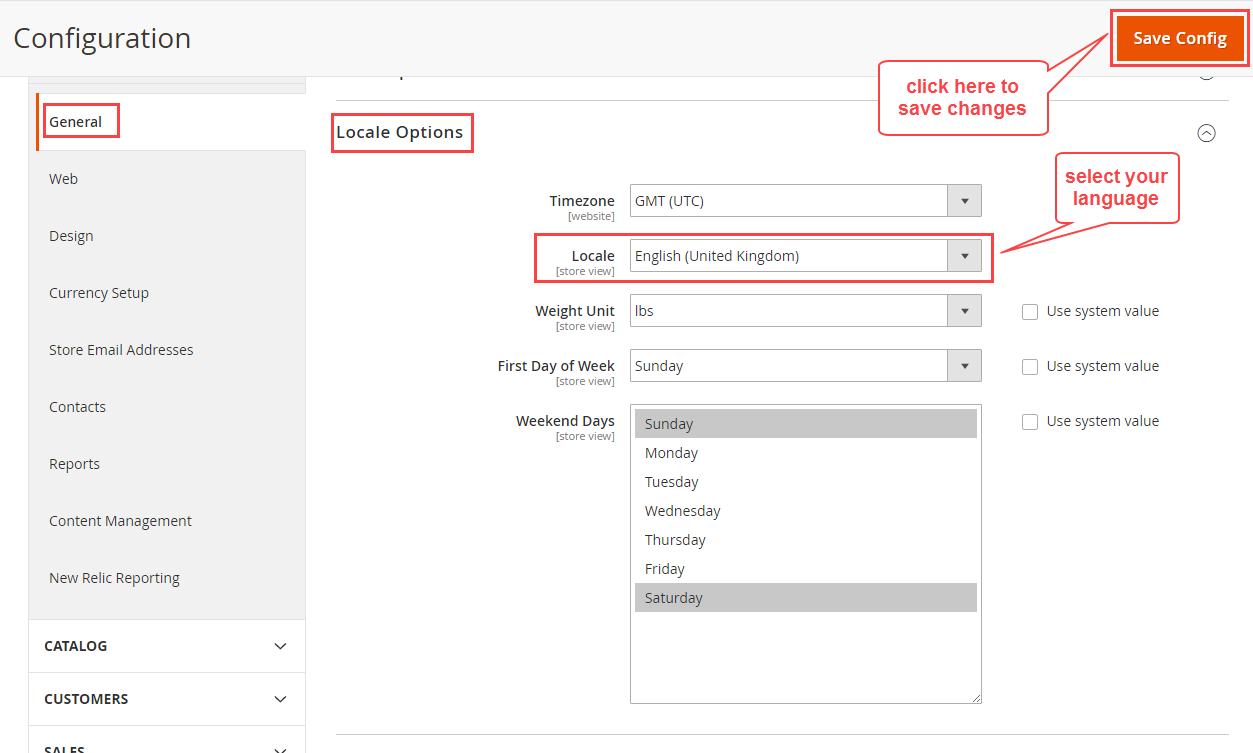
Multi-Lingual configuration
For Multilingual support, please navigate. Store->Configuration->General ->Locale Options. Then select your desired language from the Locale option.
Language Translation
If you need to do the module translation, please navigate the following path in your system. src/app/code/Webkul/CustomOptionTemplate/i18n. Open the file named en_US.CSV for editing as shown in below screenshot.

Once you have opened the file for editing. Replace the words after the comma(,) on the right with your translated words.

After editing the CSV file, save it and then upload it to the same folder. Now your module translation is complete.

How To Use
After the successful installation of the extension, the admin will navigate to the Custom Option Template.

Clicking the menu option “Custom Options Templates” will bring up another page to manage the custom options as shown below:

Create the custom options under the section Customizable Options and then by clicking the “Add Option” button. Here, the admin can create the custom options using the Option Types –
- Text – Field, Area
- File – File
- Select – Drop-Down, Radio Buttons, Check-Box, and Multi-Select
- Date – Date, Date & Time, Time
and can make the custom options as required by checking the “Required” checkbox field.
Example: Now, we will try creating a custom option- Color with the Option Type as “Radio” button with values Blue and Black as shown below in the snapshot.
After entering all the required information, click the Save button to save this custom option and its option values.

Now, after creating the custom options the admin can add these custom options for each of his products by going to the Assign Custom Options to Products section –
- Here, select the Products for which you want to add the custom options.
- Select Assign Option from the drop-down.

- Select the Custom Option to add.
- Click the “Submit” button to apply the Custom Options.
Now, on the front-end, the customers can find the custom options on the product page as shown below:

Other product to which we have applied the same custom options.

Unassign Custom Options to Products
After the successfully assign custom options to the product, the admin can also unassigned the product in the backend.
For that, first admin can go to the Manage custom option.
- Here, select the Products for which you want to add the custom options.
- Select UnAssign Option from the drop-down.

- Select the Custom Option to unassign.
- Click the “Submit” button to apply the Custom Options.
Assigned Custom Option Product List
Lastly, after assigning the created custom options to the products you can see a list displaying all of the products to which you have added the custom options.

Now, on the front-end, you can see that on the product page custom option are not available as shown below:

Important Note
If the changes made in the existing template show the old custom template as well along with the newly added template too when re-assign the updated template to the respective products.
Hence to remove the old custom option admin has to delete that custom option from the particular edit product page at the admin panel.
For example, you have changed the Drop-Down option type into a Radio_Buttons option type and saved it. Then assigned the newly added custom option to the product.

Reflection of the changes in custom options on the storefront product page:

Now you need to remove the old custom option from the particular product page of admin-end. Because unassigned feature will not work in this case as now you have two custom options with the same name:

After removing the old custom option:

In conclusion, that’s all for Magento 2 Custom Option Template plugin. Also you can take benefits of our Magento 2 Theme development and Magento 2 Services.
Still, have any issues feel free to add a ticket then let us know your views to make the module better at webkul.uvdesk.com
Current Product Version - 4.0.2-p1
Supported Framework Version - Magento 2.0.x, 2.1.x, 2.2.x,2.3.x, 2.4.x

2 comments
Can you please elaborate your query in more detail at [email protected].