With the use of Magento 2 B2B Customer Approval module, the admin can manage the customer registration and login into the store.
This module enables the admin to approve/disapprove any customer who registers in the store.
This Magento 2 Extension allows the admin to restrict the customers from logging in to the store after registration.
Additionally, the customer login restriction applies if account approval is pending by the store admin.
Additionally, the admin can send email notifications upon account approval and disapproval. The Magento 2 Customer Approval module is also compatible with Adobe Commerce Cloud Edition.
Watch the video tutorial below to know the module workflow:
Features
- Enable / disable the customer approval feature.
- Allows admin to manage customer approval.
- Admin may check the customer’s current status as pending, reject, or approved.
- Supports customer auto approve or manually approve feature.
- Configure the message for the customers when account approval is required and they are trying to log in.
- Configure the custom message for the customers after registration.
- Select email templates for customer approval.
- Custom email templates for customer disapproval.
- Custom email templates for customer registration.
- The customer gets a notification about the approval or disapproval from the store owner’s end.
- The store owner can approve or disapprove multiple customers as per requirement.
Installation
Customers will get a zip folder for Magento 2 Customer Approval module. Thus, they need to extract the contents of this zip folder on their system.
However, the folder has an src folder, inside the src folder you have the app folder. So, you need to transfer this app folder into the Magento2 root directory on the server as shown below.

Hereafter the successful installation, you have to run these commands in the Magento2 root directory.
First command –
php bin/magento setup:upgrade
Second Command –
php bin/magento setup:di:compile
Third Command –
php bin/magento setup:static-content:deploy
Henceforth post running the commands, you have to flush the cache from the Magento admin panel by navigating through->System->Cache management as shown below.

Multi Lingual Configuration
For Multi lingual support, please navigate to Store> Configuration> General > Locale Options. Additionally, select the language of choice from the Locale option.

Language Translation
For module translation, navigate to the following path in your system app/ code/ Webkul/ CustomerApproval/ i18n/ en_US.csv.
Open the file with the name en_US.CSV for editing as shown in the below screenshot.


Then replace the words after the comma(,) on the right in the file with your translation words.
After editing and translating the CSV file, you need to save the file name with translation according to your region language and country code such as – de_DE.CSV.
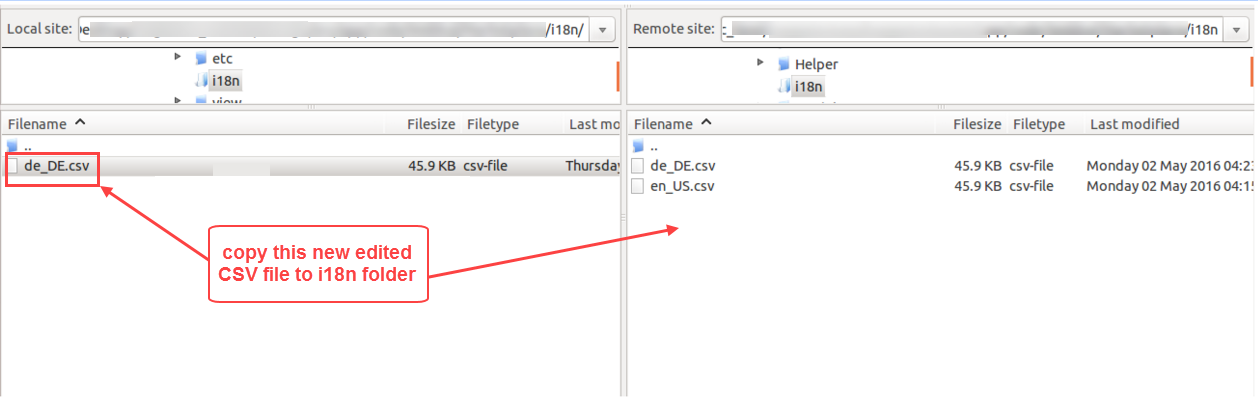
Henceforth, then upload the file with the translation to the same folder from the same location. Now your module translation is complete.
Module Configuration
After the installation, the Adobe Commerce admin can navigate to Stores -> Configuration -> Webkul -> Customer Approval as per the below image.

Here, the admin will –
General Settings:
- Enable Auto Approval for Customers: Set this to “No”, if want the customer’s account to be approved after registration. Else, set this to “Yes”, if want the auto-approval for the customer accounts.
- Account Pending Status Message: Define the display message for the customers when their account is still in the pending state.
- Account not Approved Message After Login: Define the display message for the customers when their account is not approved and try to log in.
- Account not Approved Message After Registration: So, define the display message for the customers after their registration and their account needs to approve.
Apart from that the admin can also configure the module by simply navigating Customer Approval->Configuration Settings.

Email Templates:
- Customer Account Approval Email Template: Select the email template for the mail which will be sent to the customers when their account gets approved.
- Customer Account Disapproval Email Template: Now, select the email template for the mail which will be sent to the customers when their account gets disapproved.
- Customer Account Pending Email Template: Select the email template for the mail which will be sent to the customer when their account is still in the pending state.
- Admin Notification Email Template on Customer Registration: Select the email template for the mail which will be sent to the admin on customer registration.
- After Registration Email to Customer Template: Select the email template for the mail which will be sent to the customers after their registration.
Note: The admin can even create various custom email templates by navigating to the Marketing -> Communication -> Email Templates.

Admin Notification
- Name- The customer will receive an mail with the same name as per the specification of this section.
- Email- The recipient customer will see the admin mail id on mail as per the specification of this field.
And, lastly will hit the Save Config button to save the module configuration successfully.
Customer Approval Registration
If the admin has set the “Enable Auto Approval for Customers” option to “No”. Then at the front end, the customer will get a message after their registration as per the below image.

After the registration, the customer will get a mail on their mail Ids as per the below image.

The message and mail will notify the customers that their account needs approval first. So, that the customers can log in into their accounts successfully.
Customer Approval Login
If the admin has set the “Enable Auto Approval for Customers” option to “No”. Then at the front end, the customer login will have the following workflow as per –
When Account Is Not Approved:
The customers cannot log in and will get an error message when tries to log in. Because their account is not approved yet.

When Account is Approved:
When the customer accounts get approved by the admin, they will get a mail as per the below image.

Once the account gets approved, the customers can log in to their account easily by navigating to the login page.

Note: The customers also get notified via mail when they are disapproved by the admin.

Customer Approval Management
The admin can easily approve or reject any customer. So, for this, the admin navigates to Customers -> All Customers.


Here, the admin can:
- View the complete list of the customers.
- Select the customers from the list whose accounts the admin wants to approve or reject.
- So, the Next step is to select the “Customer Approval” option from the “Action” drop-down list then admin will get two options Approve and Reject.
- Select the “Approve” option from the “Customer Approval” if want to approve the customer.
- Else, select the “Reject” option from the “Customer Approval” drop-down if want to disapprove the customer.
- And, a pop-up will appear asking for the confirmation as shown below-

- The admin will hit the OK button to confirm the action.
- Customer status has preset “Pending” after their registration to the store.
- So, customer Status will be “Pending” until the status has changed as a “Rejected” or “Approved” by admin.

NOTE: The customer gets a mail notification of approval or rejection by the store owner.
Thus, another way of approving or disapproving the customer is by navigating to the Customer Information page as shown below-

So, under the Account Information section, the admin will have the Customer Status field. However, the admin will set this option to “Approve” if want to approve the customer.
Otherwise, set this option to “Reject” if want to disapprove the customer.
That’s all for Magento 2 B2B Customer Approval module. Still, have any issue please feel free to add a ticket at https://webkul.uvdesk.com/
Current Product Version - 4.1.3
Supported Framework Version - Magento 2.0.x, 2.1.x, 2.2.x,2.3.x, 2.4.x

Be the first to comment.