Laravel eCommerce Table Rate Shipping allows the admin to create custom shipping methods at the back end.
Also, admin can upload the shipping information via CSV files, including product weight, zip code range, and alphanumeric zip codes.
The admin can even create super shipping sets from their end. Table Rate Shipping module helps the admin to manage the shipping efficiently.
Complete Features List
- Admin can add shipping rates using CSV file for table rates.
- Admin can create sub-methods for Table Rate Shipping.
- The admin can create Super Shipping Set.
- Shipping cost is calculated based on the product price.
- Shipping will be calculated based on Postcode and the Weight of the product.
- The Admin can confirm the order and can set the tracking ID for the order.
- Shipping rates are dynamically fetched from the CSV file and applied during checkout.
- Option to export a shipping CSV file from the back-end.
- Allows downloading invoices and shipping slips for orders.
- TableRate Shipping supports alphanumeric zip codes.
Installation of Laravel eCommerce Table Rate Shipping
Bagisto Version: v2.4.2
Step 1: Extract Package
Unzip the extension package and merge the packages folder into your project root.
Step 2: Register Service Provider
Go to: bootstrap/providers.php file and add the following line under ‘providers’
use Webkul\TableRate\Providers\TableRateServiceProvider;

return
[
 TableRateServiceProvider::class,
 ]
- Goto composer.json file and add the following line under ‘psr-4’
"Webkul\\TableRate\\": "packages/Webkul/TableRate/src"
- Run these commands below to complete the setup
composer dump-autoload
php artisan table_rate_shipping:install
Admin Configuration
After the successful installation of the module, the admin will see the Table Rate Shipping under Configure>>Sales>>Shipping Methods.

Title:- Provide the name for the shipping method.
Description:- Provide the description for the shipping method that will be visible in the checkout page.
Type:- The admin can select between the Per Unit and Per Order.
Status:- The admin can active or inactive the module from this field.
Afterwards, the admin also needs to manage the table rate shipping by navigating>>table rate shipping as shown in the image below:-

Add Super Set
The admin needs to click on the Add Super set button then following page will appear that will look like shown below:-

Here, the admin will set the general setting
- Code: Here the admin will set the code of superset.
- Name: Enter the name of the superset.
- Status: Select to active superset.
Lastly, the admin will save the superset by hitting the save superSet button.
As shown in the below image the admin will find all the Supersets list here, by selecting the superset admin can easily update or delete it from the drop-down.

Superset Rates
After successfully added the Superset Methods now the admin will Add the Superset Rates under the Superset Rates section.

After clicking the Add Superset Rate Button, the following page will appear.
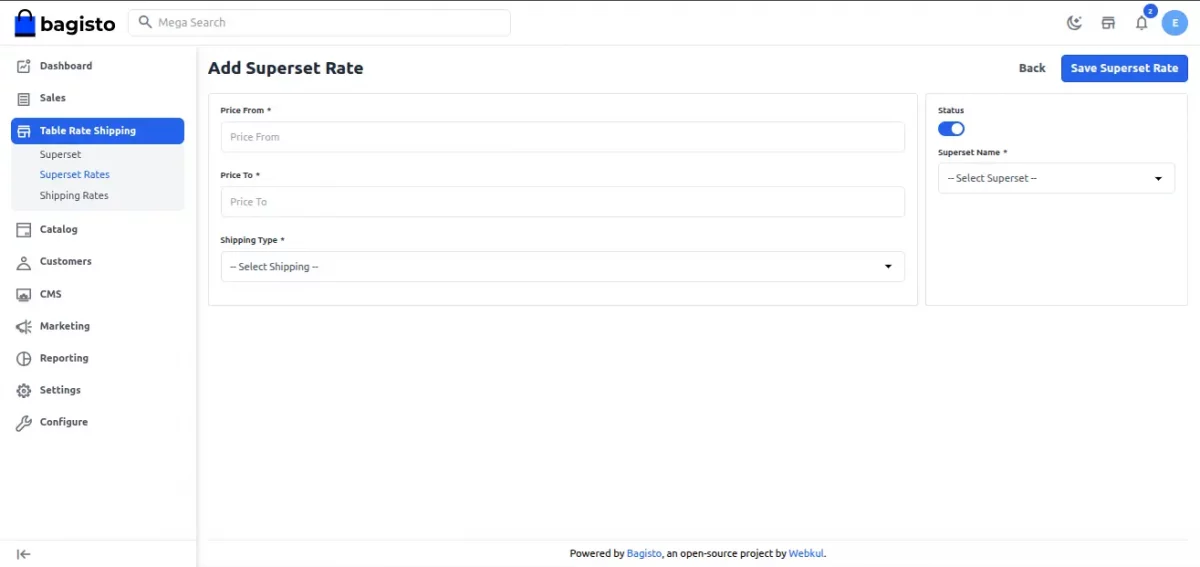
Here the admin needs to fill in the superset rate details as follows:
- Price From – Set the minimum price of the cart to use this shipping set.
- Price To – Set the maximum price of the cart for this shipping set.
- Shipping Type – Select Fixed option to enter the shipping price, else select Free option to allow free shipping.
- Superset Methods – From the drop-down select the superset methods.
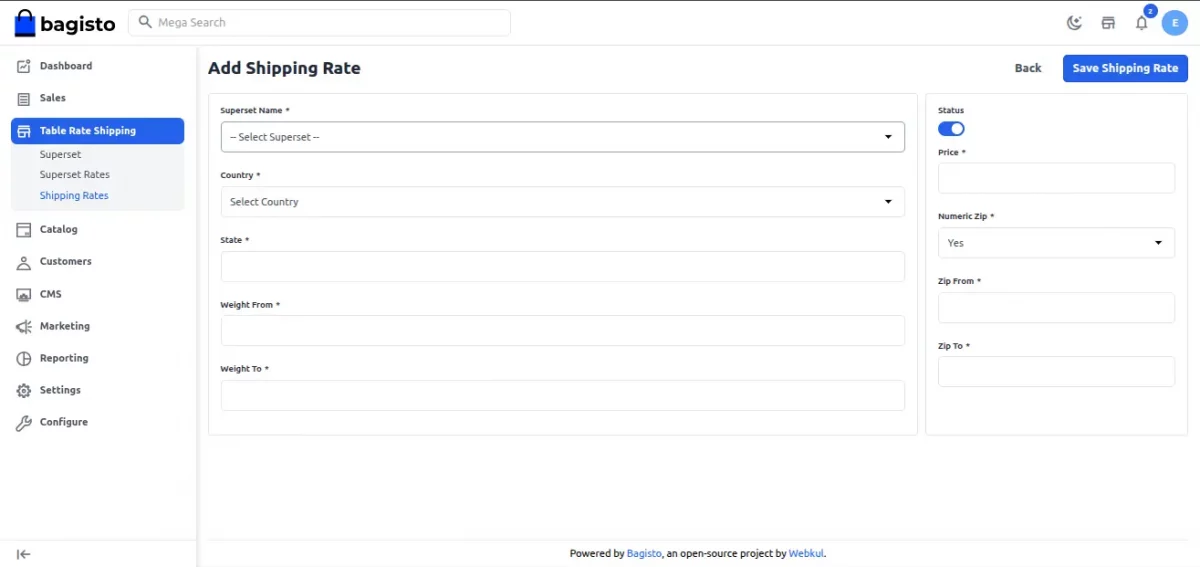
Shipping Rate
Theadmin can see all the shipping rates already set up.

Also, the admin can easily add new rates by clicking the “Add Shipping Rate” option.
The admin can upload the Table rate Shipping CSV. First, the admin need to download the sample CSV file by clicking on the Import Button.

After clicking on the Import the below pop-up will be shown.

Under the below CSV the admin can easily set the shipping rate. Every filed is mandatory to fill. Above grid of shipping rates will be visible as a table matrix of the CSV.

- Superset_code: A code associated with the shipping service category.
- Code: The destination country for the shipping rate.
- State: Geographical region or area.
- Zip_from: Starting zip code or range.
- Zip_to: Ending zip code in a range.
- Price: The cost of the shipping service.
- Weight_from: Minimum weight for the shipping rate.
- Weight_to: Maximum weight for the shipping rate.
- is_zip_range: Indicates if the zip code is a range (Yes/No).
- zip_code: Specific zip code (if applicable).
IS Zip Range (Numeric Zip Code) – Select “1” if want to enter the numeric zip code else select “0” to enter the alphanumeric zip code.
Zip Code (Alphanumeric Zip Code)- The admin can enter the alphanumeric zip code if the Numeric code option is set “No” or else enter the numeric zip code if “Numeric zip code” option is enabled.
Note: Country Code must be as per the official ISO-2 (alpha-2) two-letter country codes.
Front End
Now after all the configurations are completed from the admin panel, customers can use the table rate shipping in their checkout process.
Now, customers can choose products for purchase directly from the store.

After that, the customer can select the Table Rate Shipping method during the checkout process.

Note: In the Laravel eCommerceTable Rate Shipping module, the shipping rate will be calculated according to the product weight and the customer’s delivery address.
Click On the Place Order button.

Now the order is successfully placed by the customer, as shown in the above image.
In the end, the customer can also check the details of their orders under their account with the total shipping charges as shown below.

Order Management
The admin can manage the order under the admin panel by navigating to Sales>>Orders where the admin can see all the orders as shown below:-

By clicking on the edit icon the admin can see the details of any order:-

Moreover, to create an invoice click on the Invoice button a page that generates will look like shown below:-

After that, click on Create Invoice to generate the invoice and move the order to the processing stage.

Customers can view invoice details in the invoice section below image :

Now the admin needs to click on the ship button to create a shipment.

While creating the shipment the admin needs to enter the Carrier Title, Tracking Number. The admin also needs to select the inventory source and enter the quantity to ship.

After that, the admin can view the shipment in the shipments section.

The admin can view the invoice and the Shipment for the product by clicking on the edit icon of the order whose status is completed.

Support
So, that was much about the User Guide of Laravel eCommerce Tablerate Shipping.
If you have any queries or doubts reach out to us at [email protected]. You can also raise a ticket at our HelpDesk System.
Please explore our Laravel Development Services and Quality Bagisto Extensions.
Current Product Version - v2.4.2
Supported Framework Version - v2.4.2

Be the first to comment.