Laravel eCommerce Multi-Tenant SaaS Module is like a virtual shopping mall, where different vendors can register and create their own online stores using their own domain names.
Bagisto is an online e-commerce platform that allows anyone to quickly launch their own online store without needing any technical skills.
The merchant doesn’t need to add any plugin to create their store, it is the full end-to-end integration. You have to just sign up then you can start your business.
Feature of Laravel eCommerce Multi-tenant SaaS Module
- Admin can easily set up and manage saas based eCommerce solution
- Flexibility and scalability for your business
- Multiple eCommerce merchants can access at a time
- The super admin can view the product list of their merchant’s store
- Super admin will get the email notification whenever a customer orders a product from his merchant’s store
- The super admin can also view the customer data of their merchant’s store
- Manage multiple businesses with custom domains or self-provided domains
- Super admin can also view the orders of their merchant’s store
- The Merchant can Change the domain from channel settings
- The Merchant manages their own store using their own dedicated admin dashboard
- Supported the Bagisto Velocity theme
- Supported all product types of Bagisto Framework including Simple, Downloadable, Grouped, Bundle, Configurable, Virtual, and Booking.
- Every merchant will also receive the mail whenever a customer orders from his store
- High security in a session
- Easy Customisation
- Easy Updates of Laravel Multi-Tenant SaaS.
- ACL system for the Super admin users.
- CMS pages support at super admin.
- Add an option to register a tenant account from the super admin end.
- Theme configuration options are available.
- Implemented Full Page Cache support to improve performance.
- Added support of Laravel Octane to enhance application speed and efficiency.
- Added Dark theme support, providing users with the option to switch to a darker color scheme for improved visibility in low-light environments.
Note:-
- Do not install Bagisto until you have configured this extension.
- Clone Bagisto from the official repository: Bagisto v2.4.1 . Unzip the Multi-Tenant SAAS Extension into the Bagisto root directory.
- Do not seed the database using “
php artisan db:seed“.
Installation of Laravel eCommerce Multi-Tenant SaaS Module
Customers will get a zip folder after purchasing the extension. After that, Unzip the respective extension zip and then merge the “package” folder into the project root directory.
Step 1: Install Composer Dependencies
Run the following command from the root directory:
composer create-project
Step 2: Configure the .env File
Locate the .env file in the root directory and update the APP_URL to match your mapped domain:
APP_URL=http://example.com
Also, configure your Mail and Database settings inside the .env file.
Step 3: Configure the Composer Autoload
Open composer.json and add the following line under the psr-4 key:
"Webkul\\SAASCustomizer\\": "packages/Webkul/SAASCustomizer/src"
Step 4: Run the Following Commands
Execute the following commands from the root directory:
composer dump-autoload
Step 5: Register the SAAS Customizer Service Provider
Open bootstrap/providers.php and add the following line:
Webkul\SAASCustomizer\Providers\SAASCustomizerServiceProvider::class,
Step 6: Register Middleware
Open bootstrap/app.php and add the following line after $middleware->append(CanInstall::class);:
$middleware->web(\Webkul\SAASCustomizer\Http\Middleware\ValidatesDomain::class);
Step 7: Register Module Service Provider
Open config/concord.php and add the following line in the module array:
Webkul\SAASCustomizer\Providers\ModuleServiceProvider::class,
Step 8: Run the Following Commands
Execute the following commands from the root directory:
php artisan saas:install
Step 9: Access the Super Admin Panel
Once installed, you can access the Super Admin Panel at:
http://example.com/super/login
Let’s discuss the few DNS Record
CNAME :- CNAME stands for Canonical Name. It is a type of DNS record that maps one domain name to another.
While every website has an IP address to connect to the internet, a CNAME allows you to use multiple domain names that point to the same IP, making domain management easier.
Where we need more than one domain on a single IP address, their Cname will be useful to map the multiple domains on a single IP address.
For example, If you have your domain shop.mydomain.com and you want this domain point on your main domain(shop.com).
Then you have to just replace the IP address of mydomain.com with shop.com so that your CNAME record will be created.
Wildcard:- A Wildcard DNS record allows you to handle requests for non-existent subdomains. It is represented by an asterisk (*) and matches any subdomain that isn’t explicitly defined.
For example, *.example.com will match shop.example.com, blog.example.com, or any other subdomain under example.com that doesn’t have a specific DNS record.

Super-Admin Panel
Once the SaaS module is successfully installed, you can open your super admin panel (enter the example.com/super/login).
Then the next page will be open like below then you have to enter your credentials then click on Sign in.

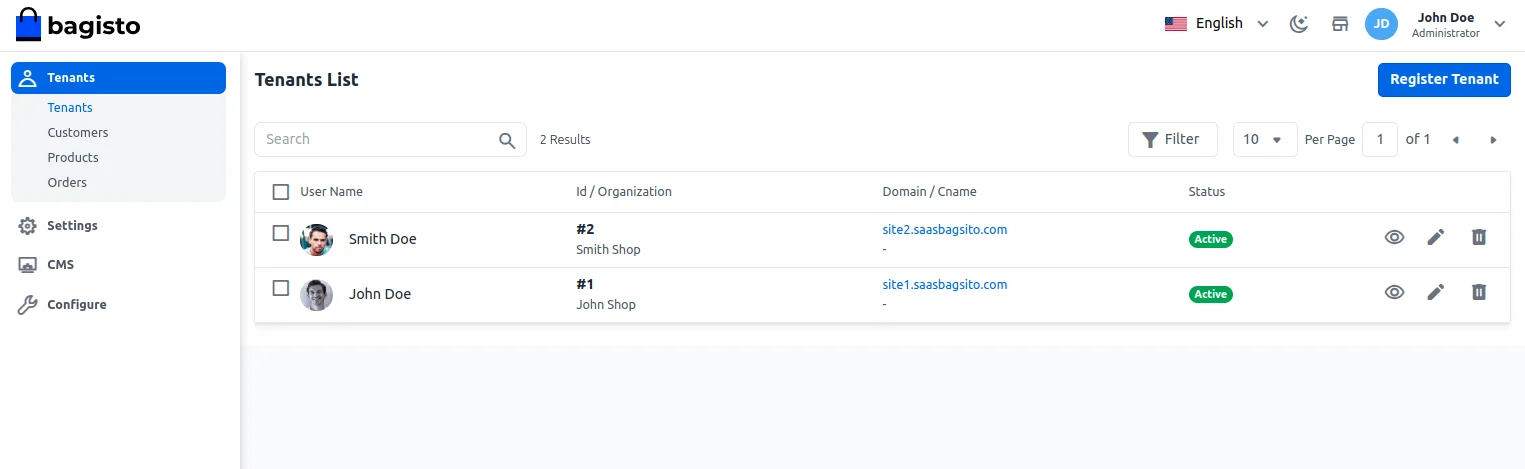
After successfully signing in, the super admin dashboard will be open like below. Super-admin can view all the company which is registered on their SaaS Panel.

In addition to this, the super admin can also register the tenant from the super admin panel itself by tapping the Register Tenant button on the top right-hand corner.
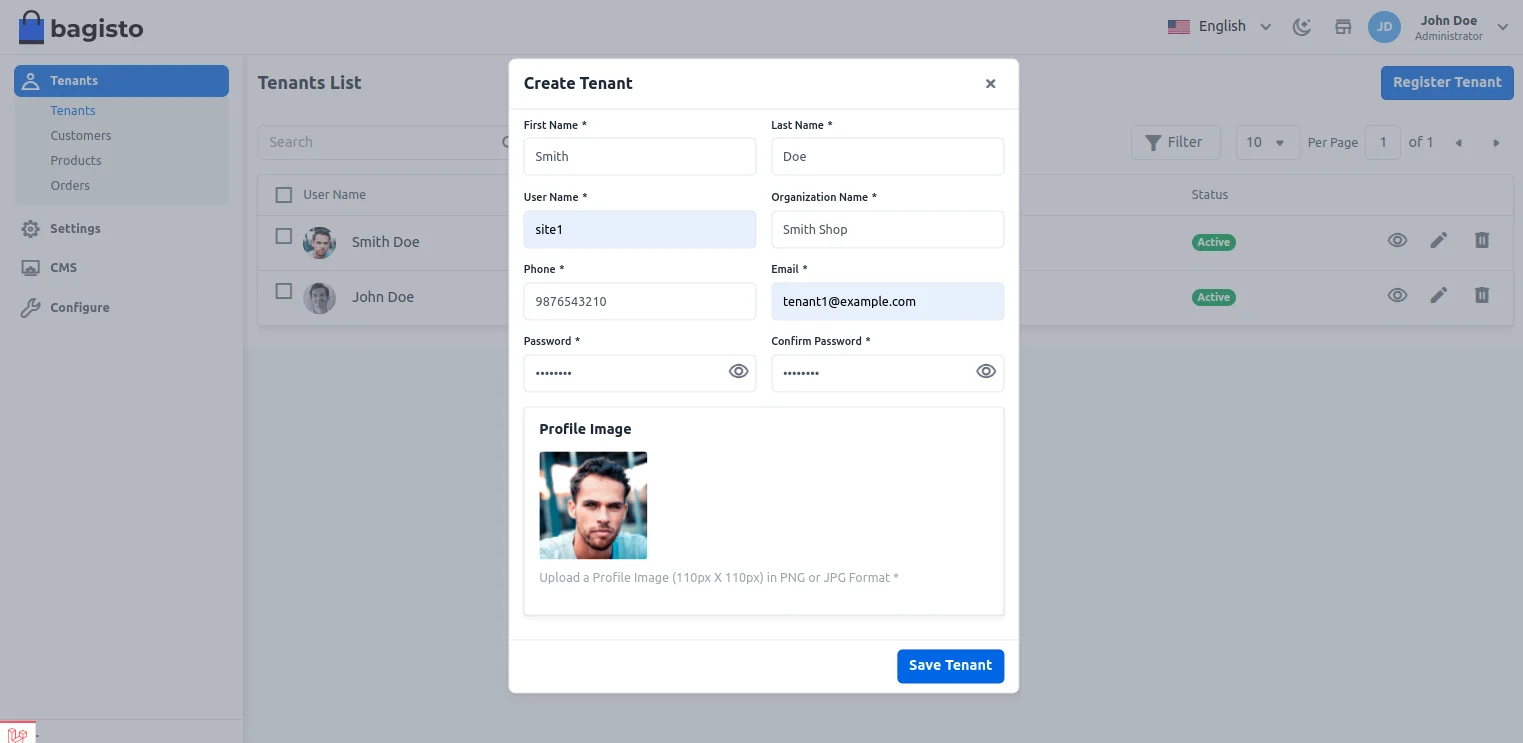
Here the super admin has to enter the below details :
First Name: Enter the first name.
Last Name: Enter the last name.
Phone: Provide the phone number.
User Name: Enter the user name.
Organization Name: Mention the organization name.
Email Address: Provide the email.
Password: Provide the password.
Confirm Password: Confirm the password.
Profile Image: Add the profile image.
Lastly, tap the Save Tenant button to save the new tenant.
Once you click on the eye-icon on any particular company then you can view company/tenant insights
Tenant’s Insights
Under the tenant’s insights super admin can see all the information about their tenant store as shown in the below image :
Domain Information – Details of the tenant.
Attribute Information:- No of attributes of the tenant.
Attribute Family Information – Number of attribute families of the company.
Product Information:- Number of products available on that company.
Category Information: Number of categories available to that company
Customer Information: Number of customers available
Customer Group Information:- Number of customer groups of the tenant
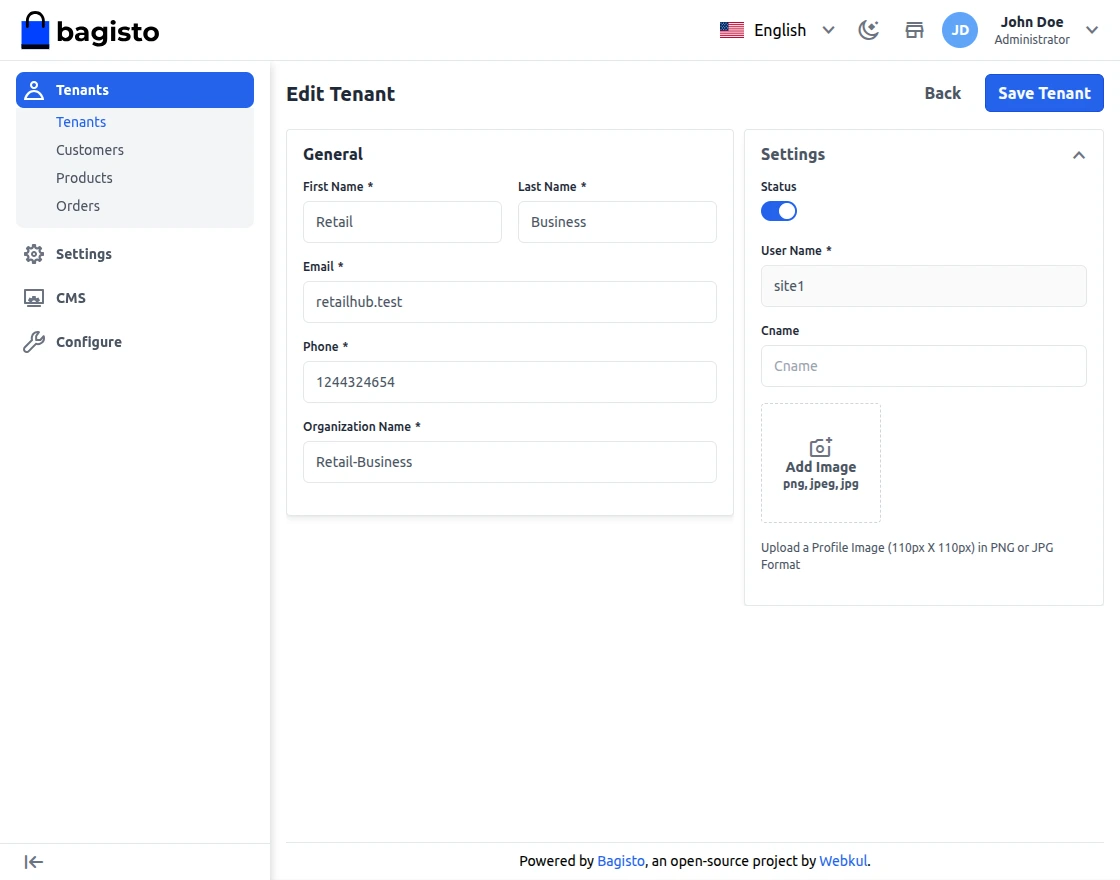
Edit Tenant Detail
The super admin can also edit their tenant details as per the below image.
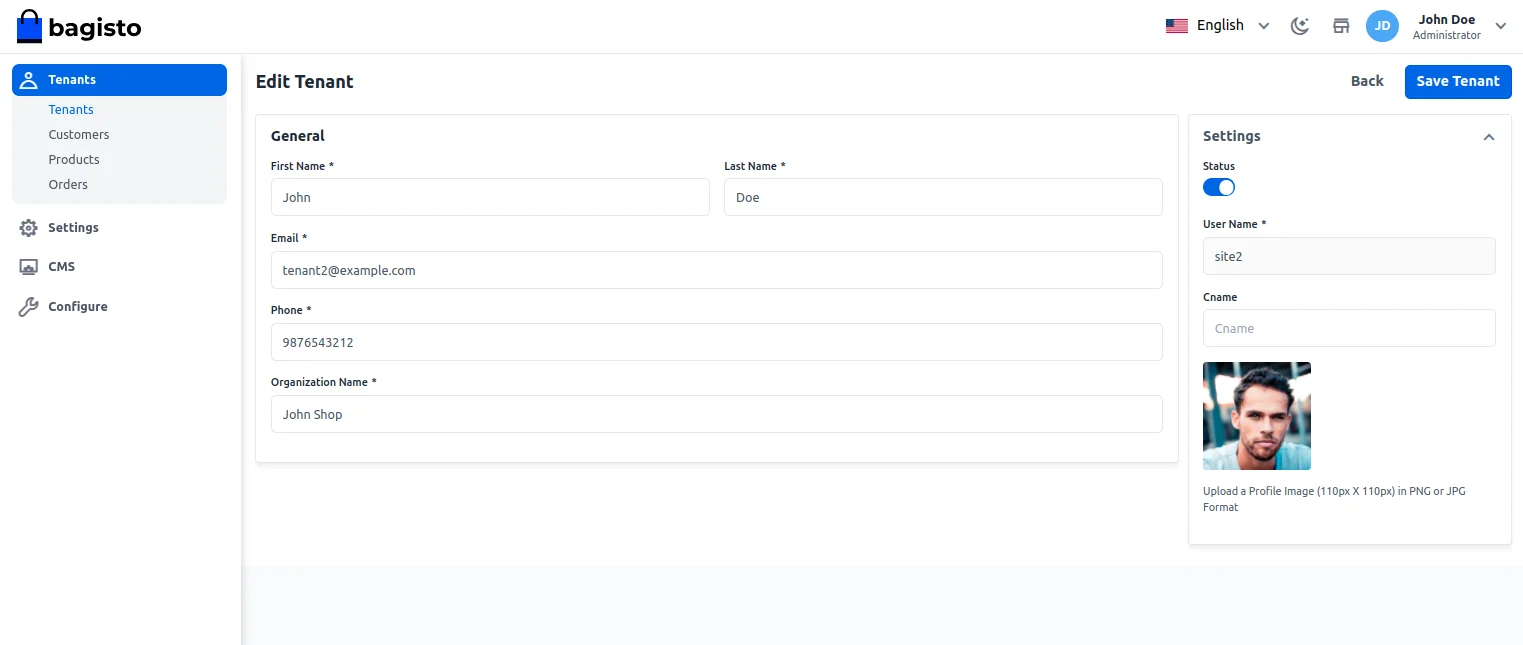
However, the super admin can also delete the tenant as well, as per their requirement by tapping the delete button for the respective tenant.

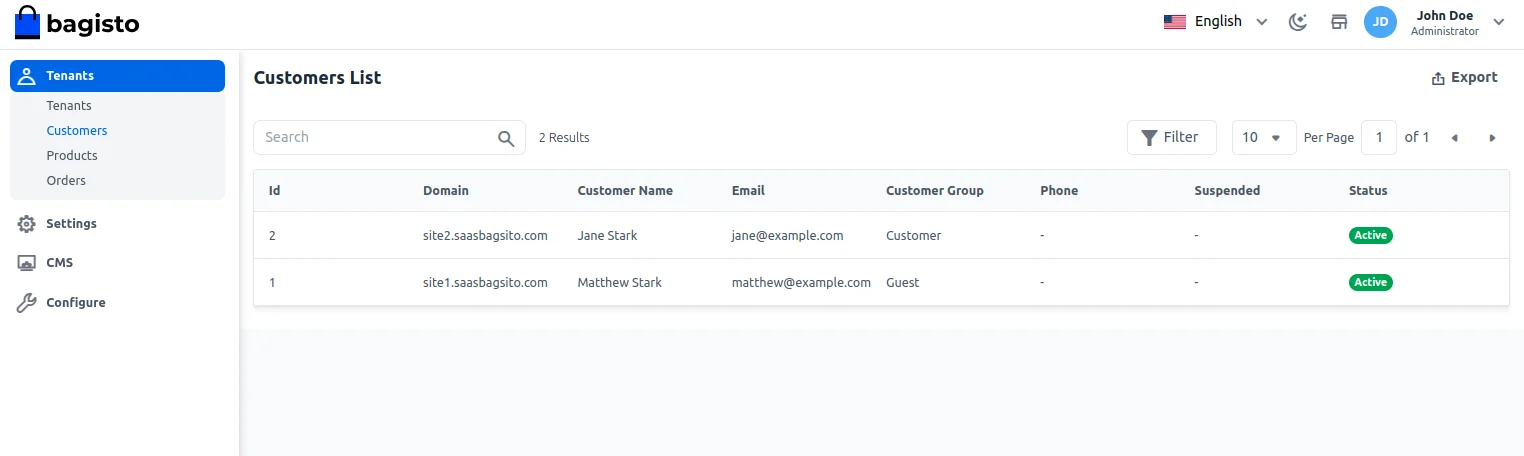
Tenant’s Customer
The super admin can see all the customer lists of their tenants as shown in the below image
Tenant’s Products
The super admin can also see all the product lists of their tenants as shown in the below image

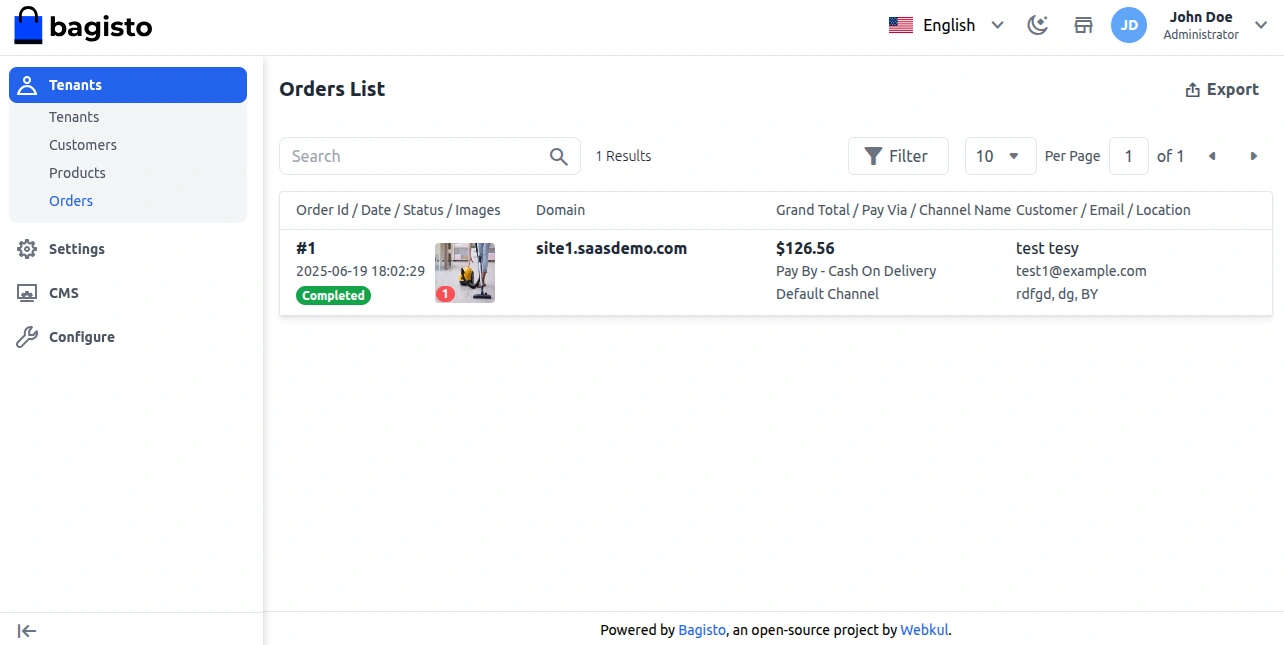
Tenant’s Order
By navigating to Tenants>Tenant’s Order super admin can see all the orders of their tenants as shown in the below image.
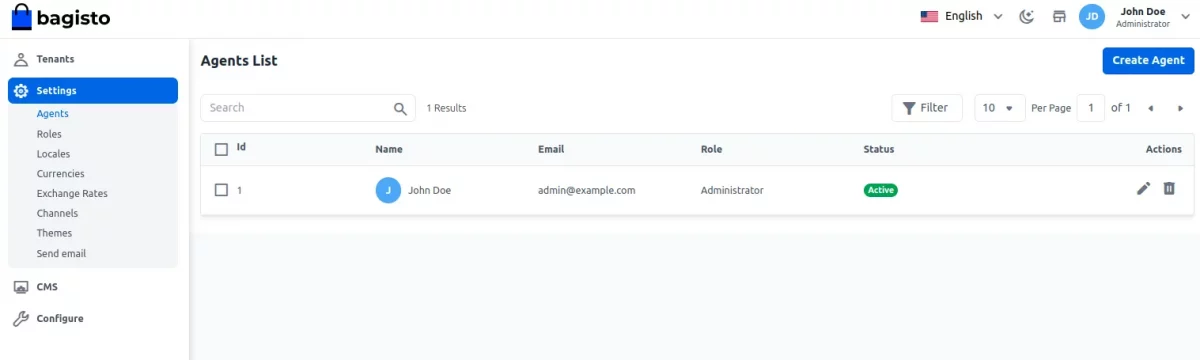
Agents
By navigating to Settings>Agents the super admin can see the agent list if already created.

Add Agent
By hitting the Create Agent button the super admin can add the agent by providing the below information.

First Name: Enter the first name.
Last Name: Enter the last name.
Email: Enter the email id.
Password: Set the password.
Role – Choose the role for the agent.
Status: Select the status of the agent.
Profile Image: Add the profile image.
Roles
Under the Roles, the super admin can create many roles with custom permissions for assigning to the agents whilst creating them.
Add Role
To add a role tap the Add Role button.

After that, you can create the role as required with the permissions that you want to allow for the agent’s role.
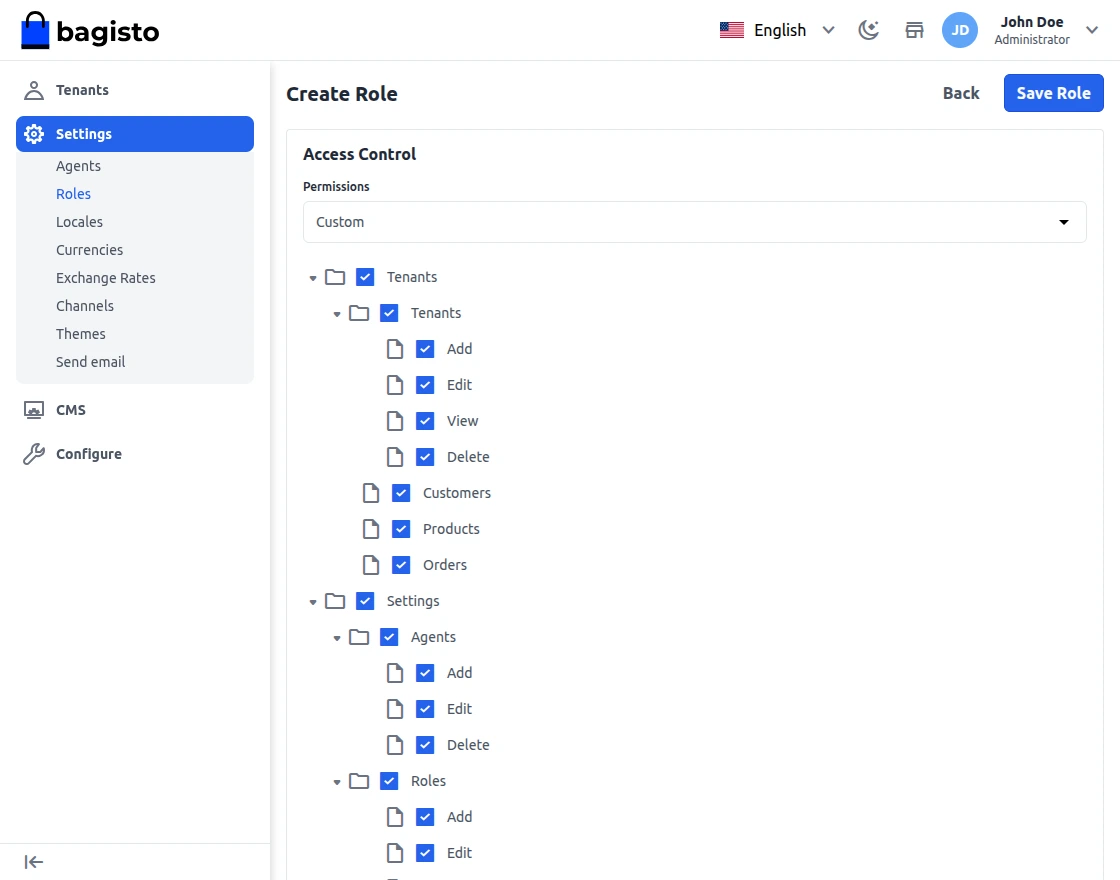
If you select custom then you have to select what type of permission you want to provide that rule.
Name:- You have to enter the role name.
Description:- Enter a description of the role.
Permission:- You have to select the permission type for that particular role Custom or All. Once you select All then all the administrator access will be given.
Lastly, save the role.
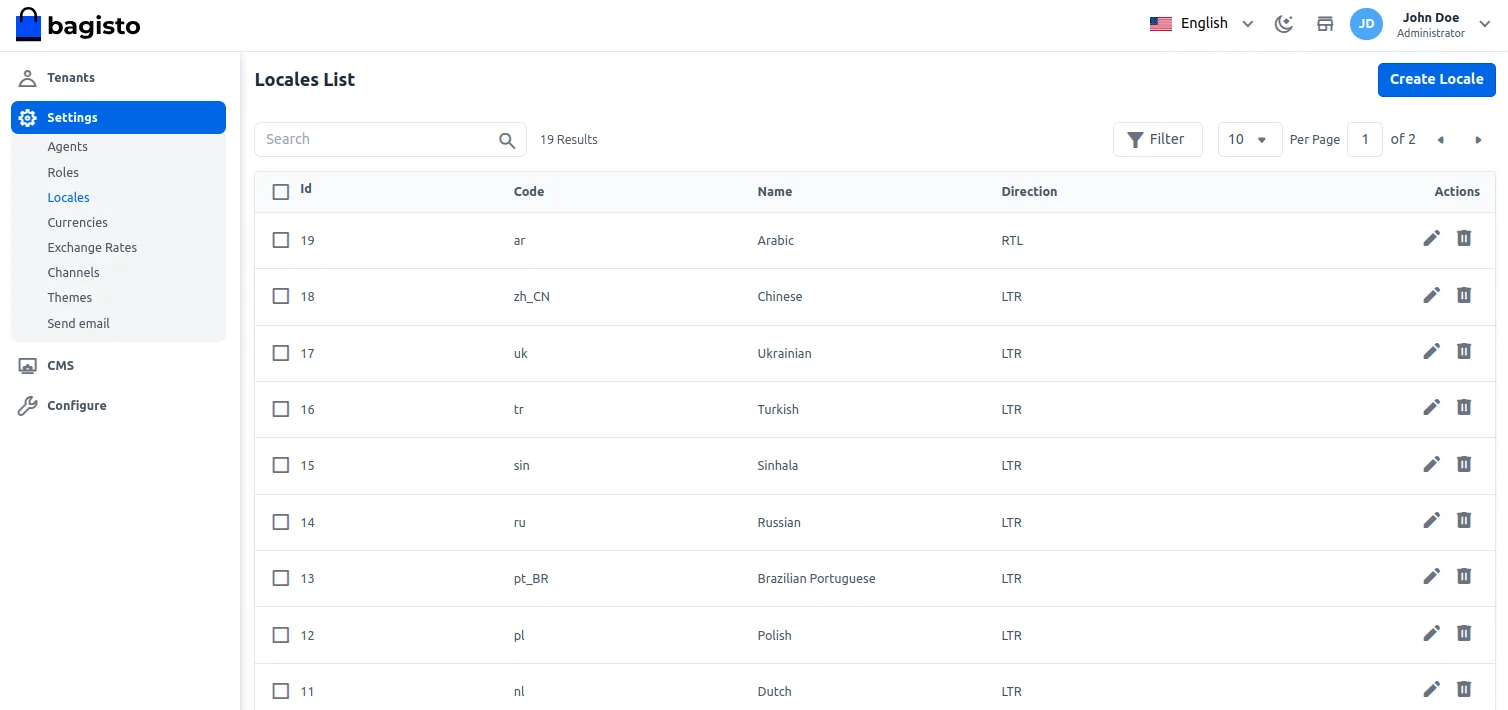
Locales
Now the super admin can add the locale by clicking on Setting>>Locales>>Create Locale.
After tapping the Create Local the below section appears.
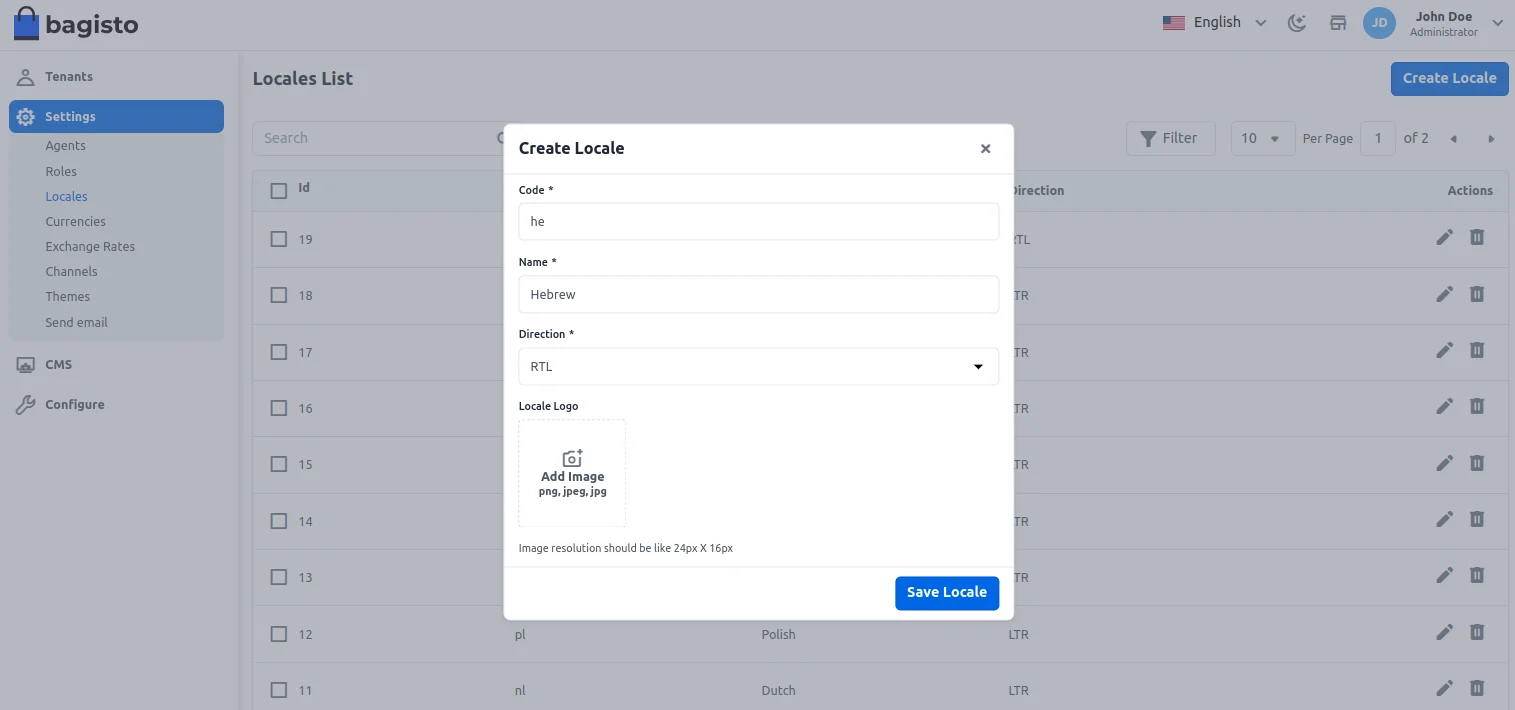
Code: Enter the code.
Name: Enter the name.
Direction: Choose the direction – LTR or RTL(Only available when locale selected is Arabic).
Locale Logo: Add the Locale logo.
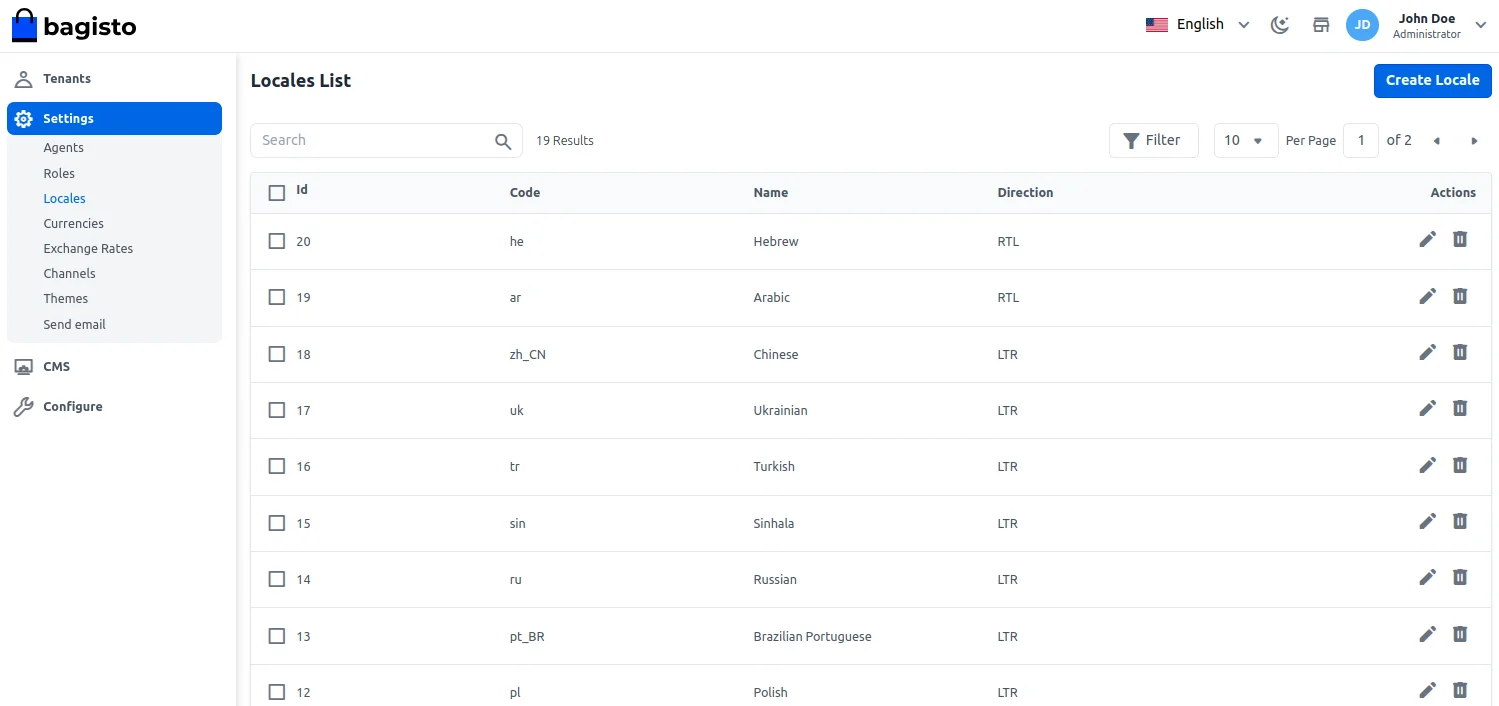
After that click on the Save Locale button and the locale gets saved.
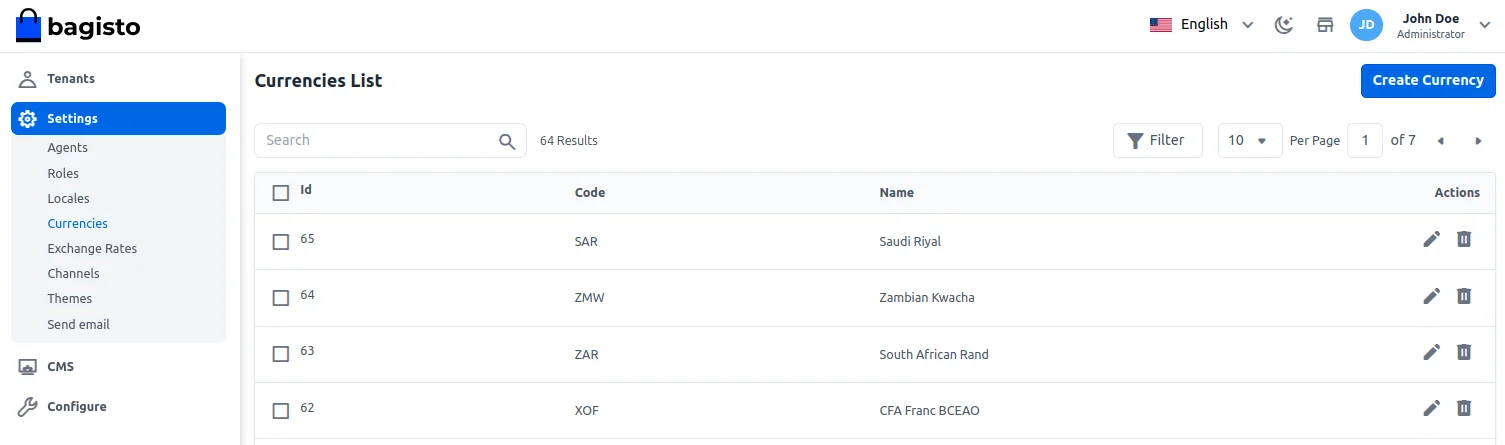
Currencies
To add a currency navigate through Setting>>Currencies>>Create Currency.
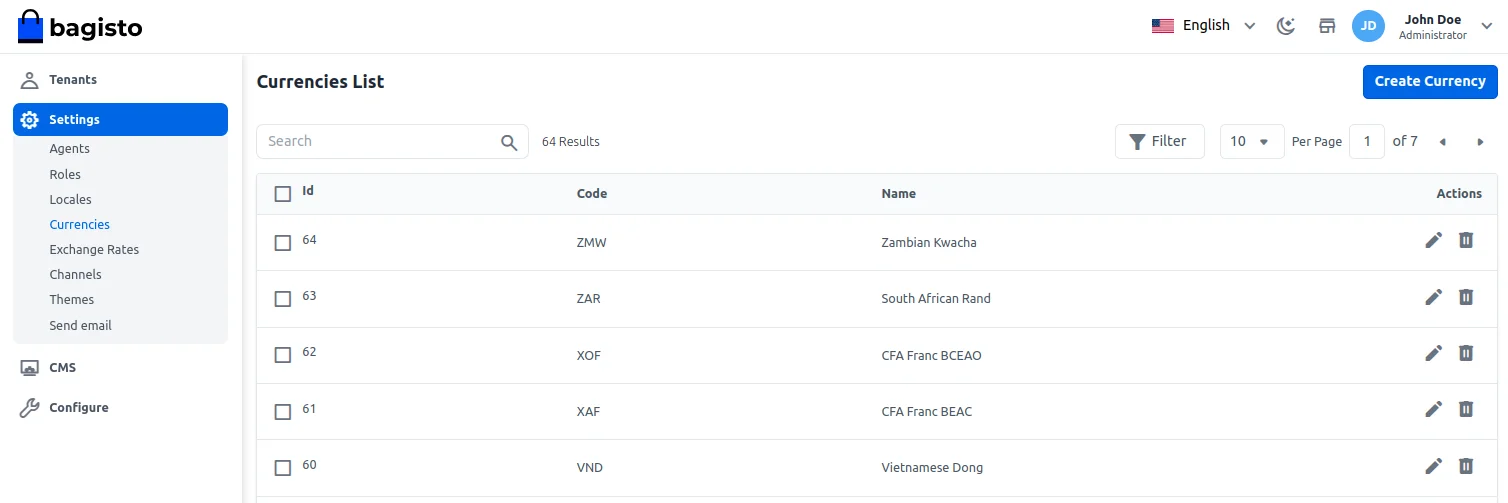
This brings up the below section.
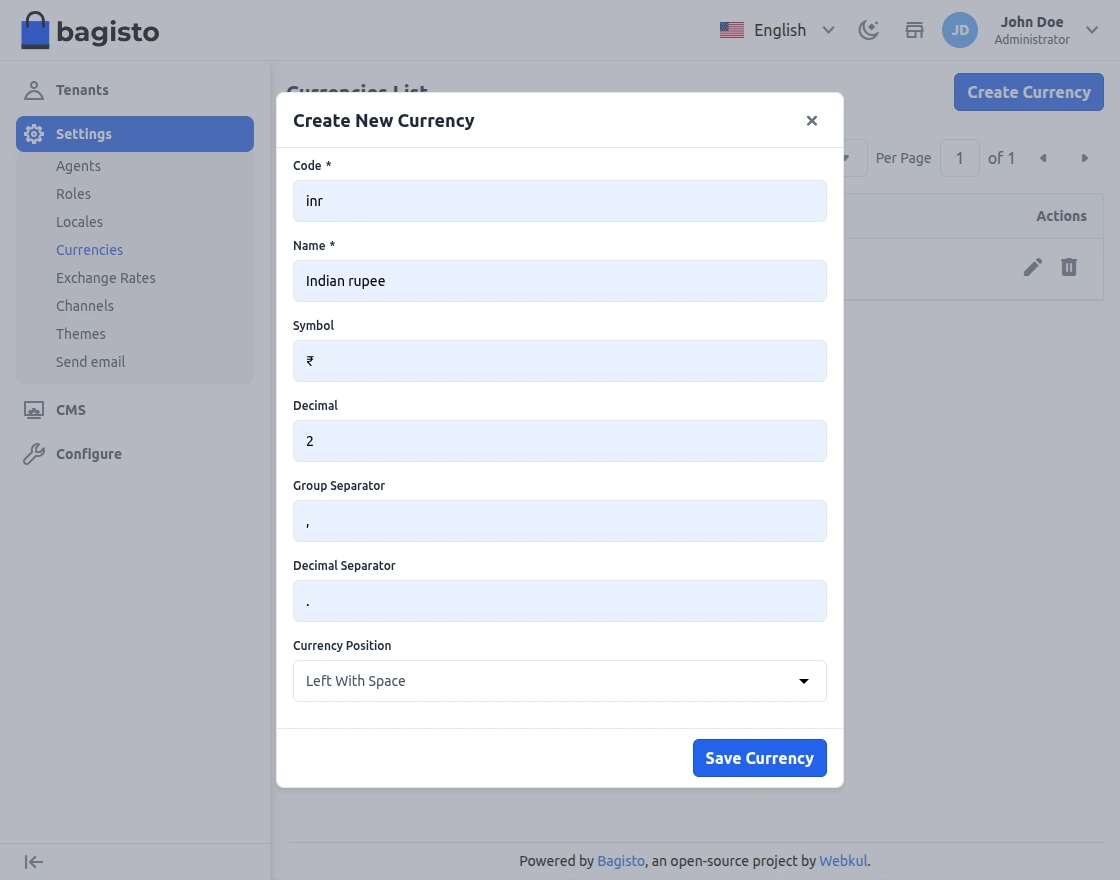
Here for the available options –
Code: Enter the code
Name: Enter the name
Currency Symbol: Add the Currency Symbol
Decimal: Set the decimal value for the currency.
Group Seprator- It helps to separate the currency by “,”. For example – 2,50,000
Decimal Separator- It helps to separate decimal values. For example, if you enter 3 decimal values then the currency will be 200.000
Position- It helps to position the currency left, right etc.
After saving the currency it is visible in the respective list.
Exchange Rates
Here You can find the currency exchange rate list as shown in the below image.
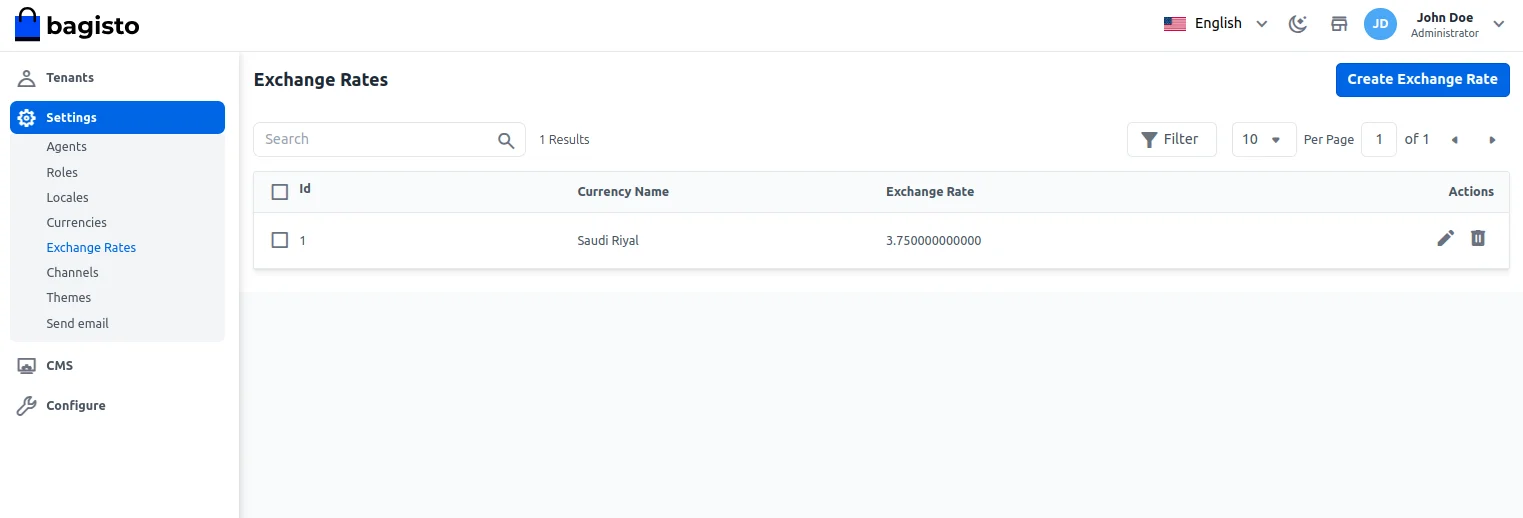
Super admin can easily edit/delete the currency
Adding Exchange Rate
Here super admin can add the exchange rate. Click on Setting>>Exchange Rates>>Create Exchange Rate.
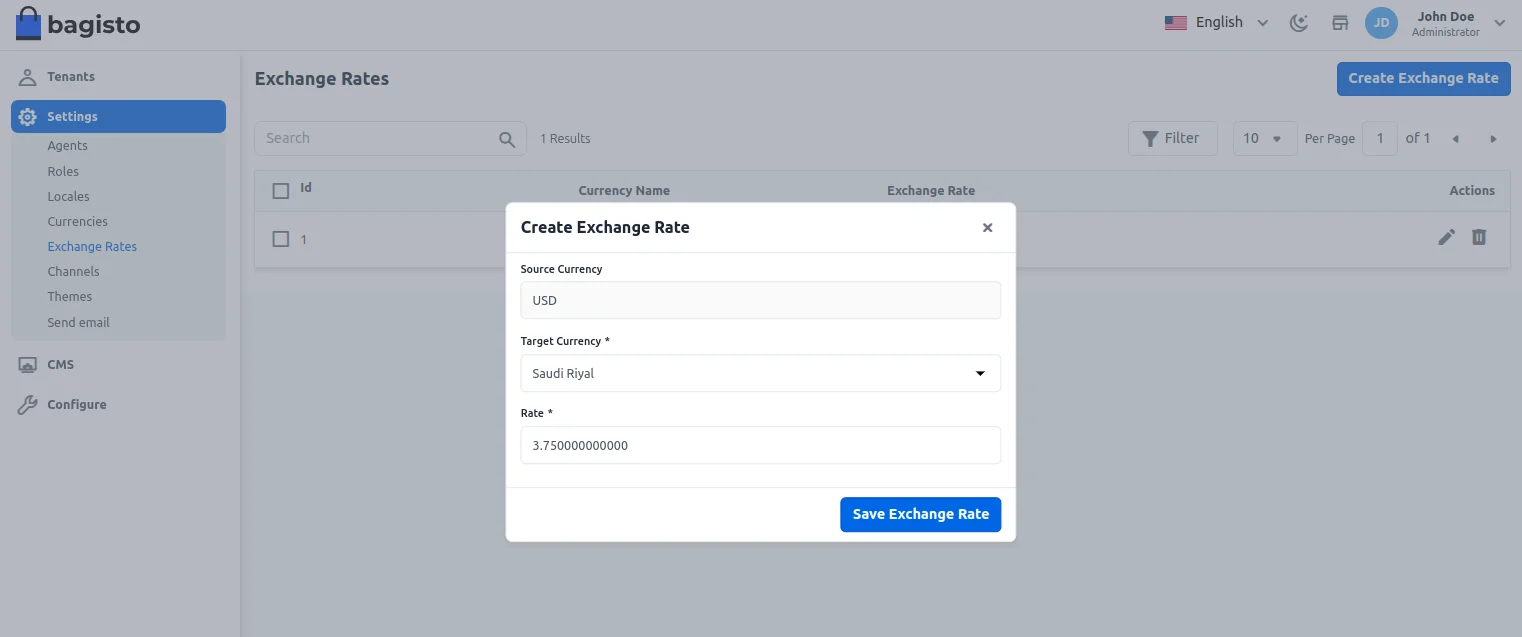
Select Target Currency, enter the rate click on Save Exchange Rate
Channels
Here the super admin can see all their created channel list. They can also edit his channel once they click on the pencil icon under the action section.

By navigating to Settings>>Channels>>Channels List>>Edit Mode under the action field, the super admin can edit the below settings.
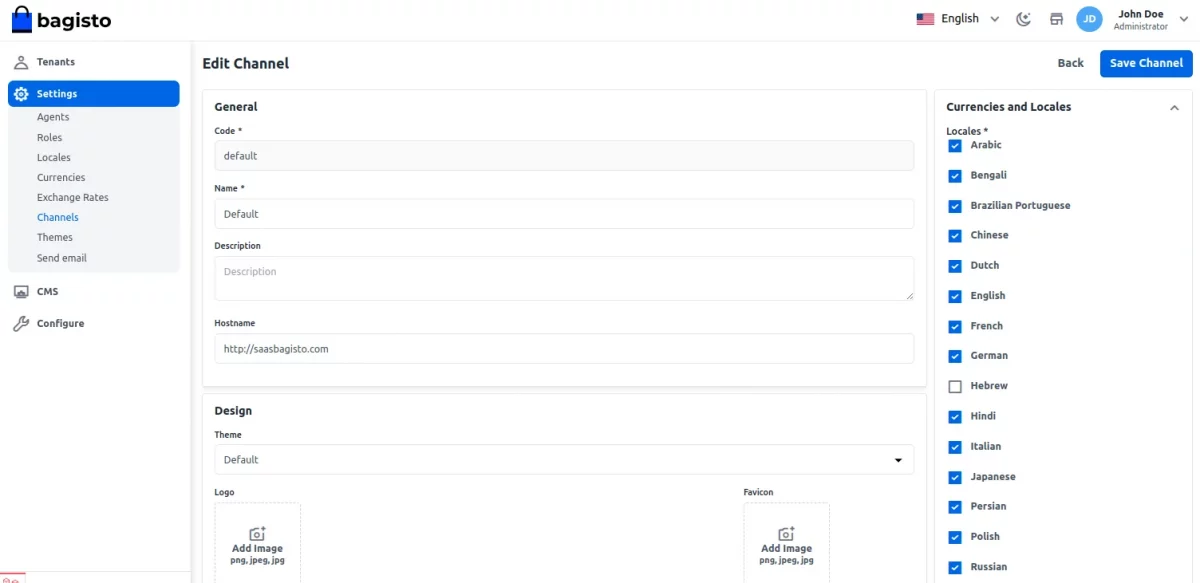
General
Here super admin can find the Code, Name, description, and Hostname of the channel.
Currencies and Locales
The next step is to set your locales on a particular channel. Check the locales that you want to set.
The super admin can also choose the default locale for the storefront.
Currencies
- Currency:- You can select or multi-select currency as per your choice.
- Default Currency:- You have to set your default currency that will be applicable throughout your eCommerce ecosystem
Once the channel setting has been done click on Save Channel.
Design
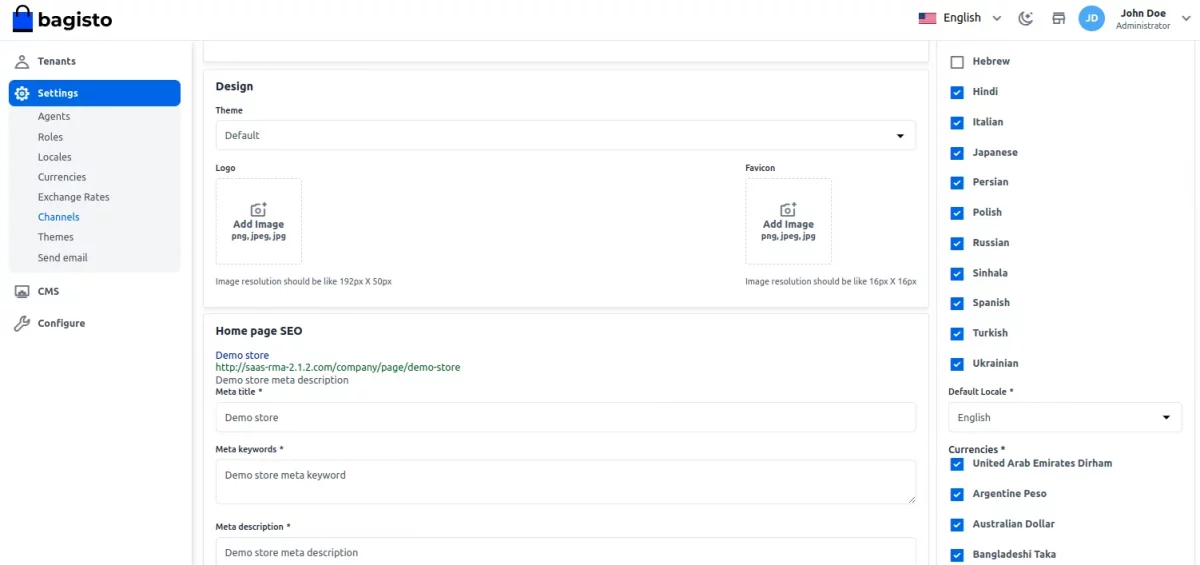
Theme
Choose the theme that you want to apply.
Logo and Favicon
Add the logo and favicon image.
Home page SEO
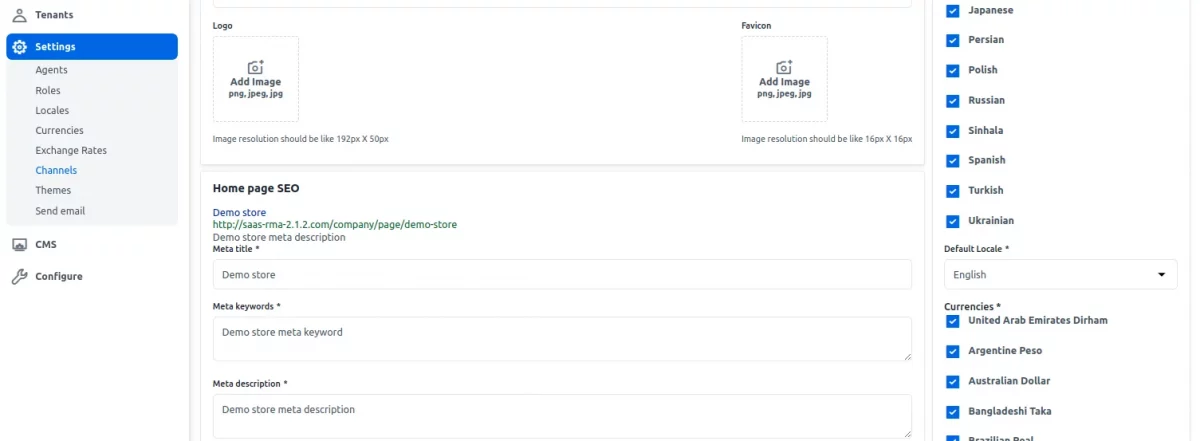
Enter the Meta Title: Super meta title
Meta Keywords: Enter super meta keywords
Meta Description: Super meta description
Theme
Under this section, the super admin can configure the website theme as required.
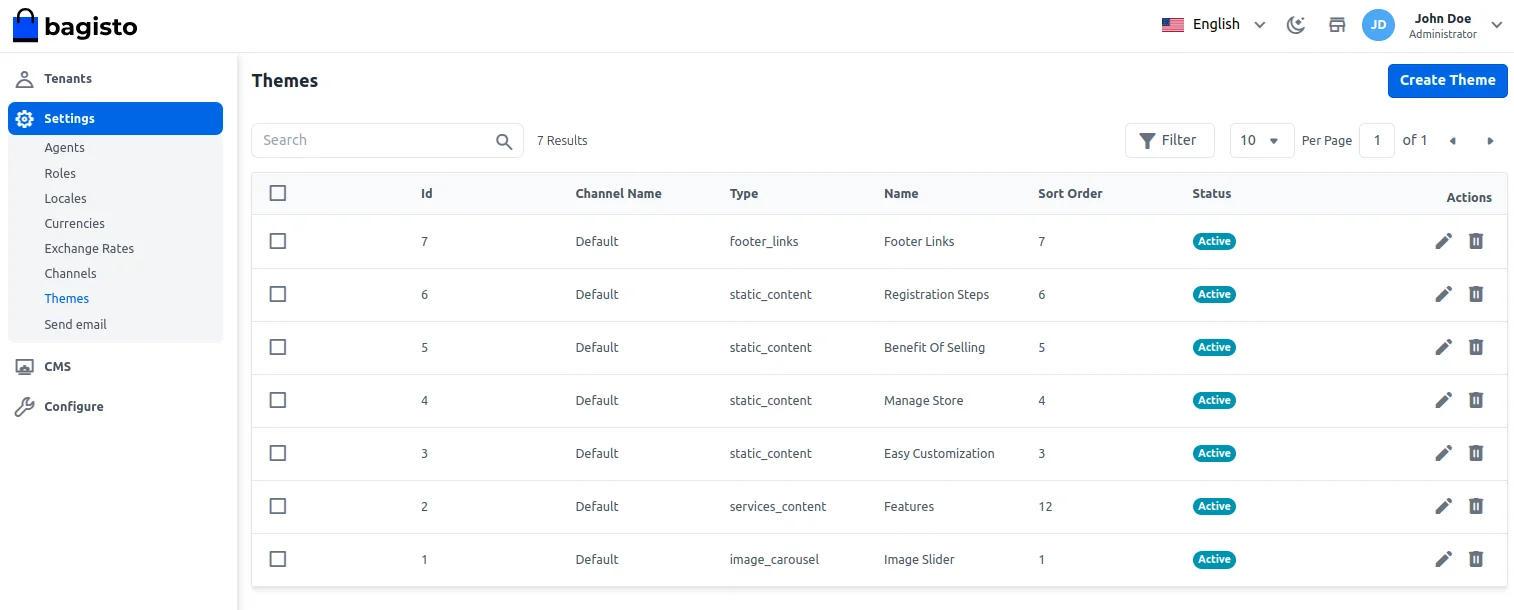
To create a theme, just tap on the Create Theme button that brings up the below section.
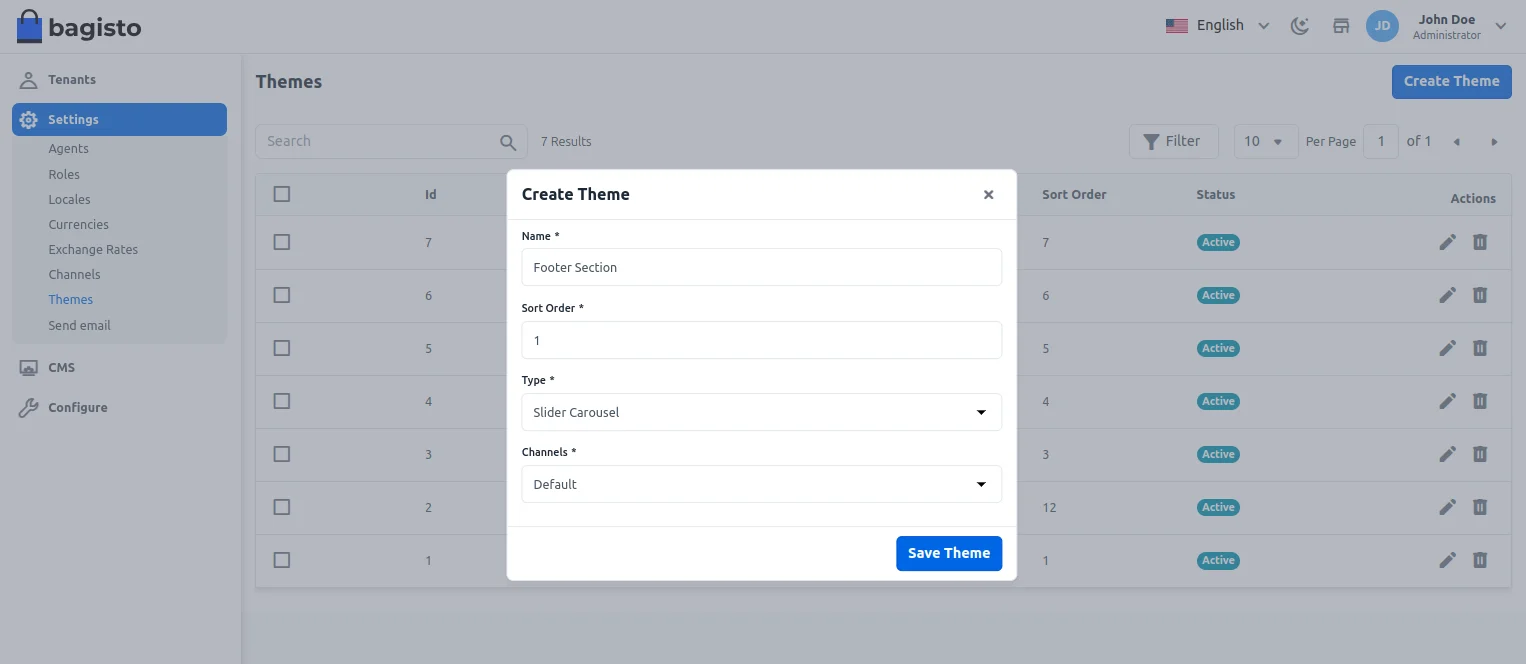
Here, for the theme to create –
- Set the name.
- Choose the sort order.
- Choose the type from the available ones – Slider Carousel, Static Content, Footer Links, and Services Content.
- Select the channel as required.
Lastly, save the theme by tapping the Save Theme button.
For the footer links, you can add the links and title as well.
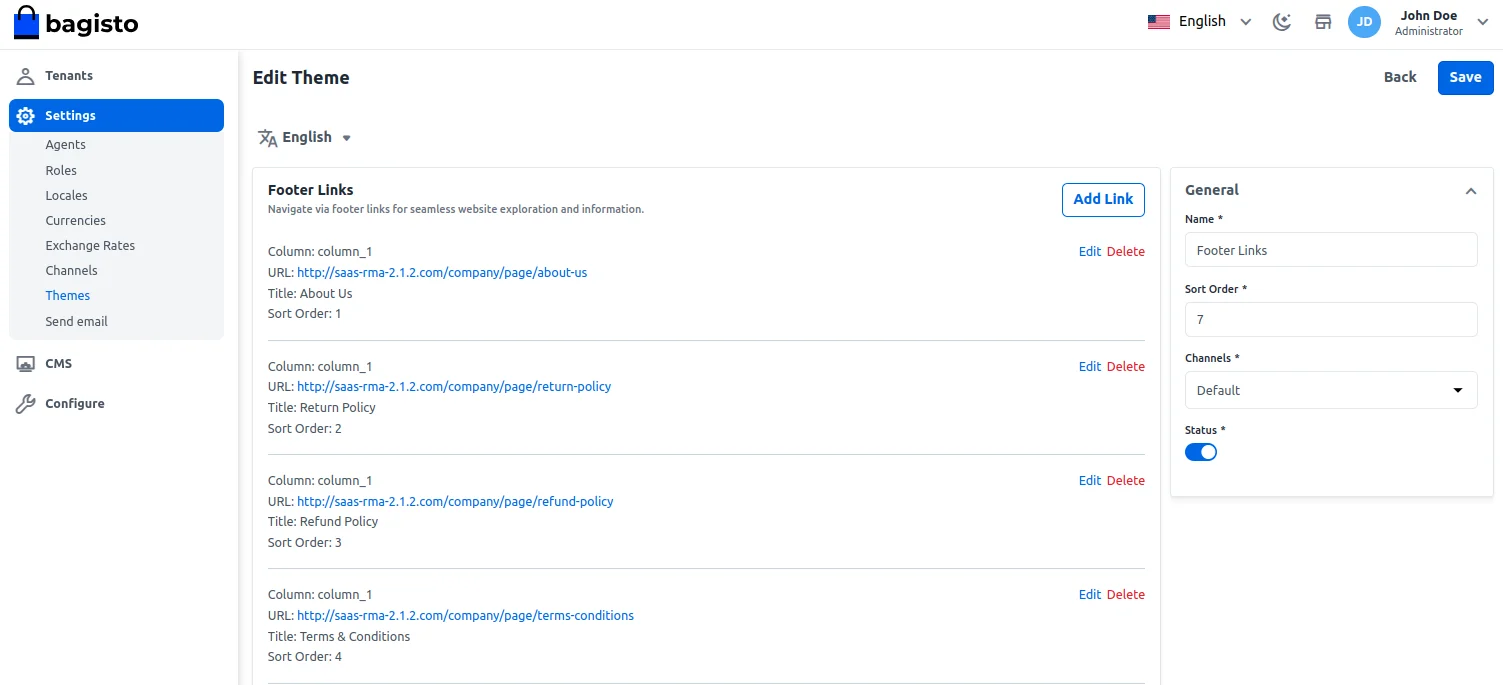
Then the same is visible on the storefront.

Apart from that, you can also set the static content to be displayed.
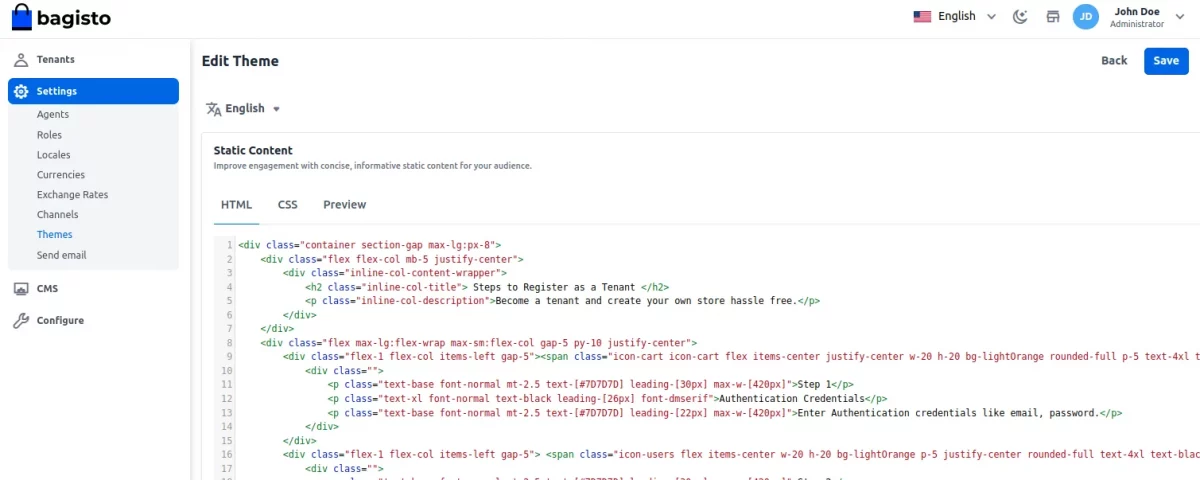
You can also set the CSS, and preview the static content added.
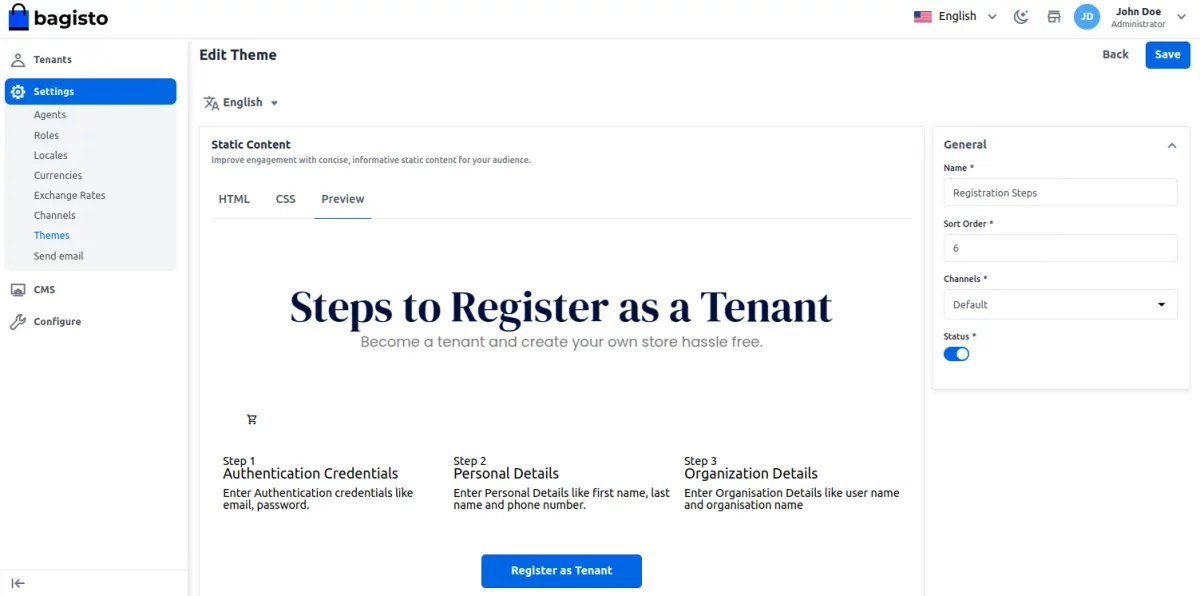
Now, the respective static content is visible as shown below in the snapshot.
For the image carousel, you can add multiple images as required.
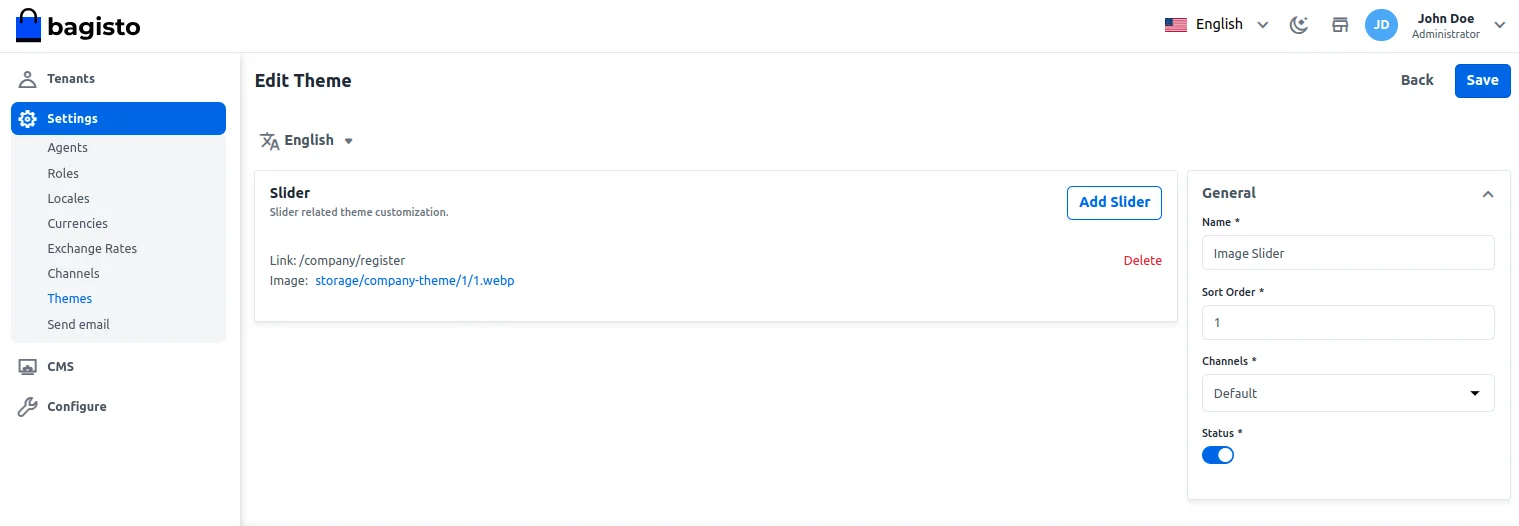
Now the added slider images are visible on the tenant home page from where the tenants can register.

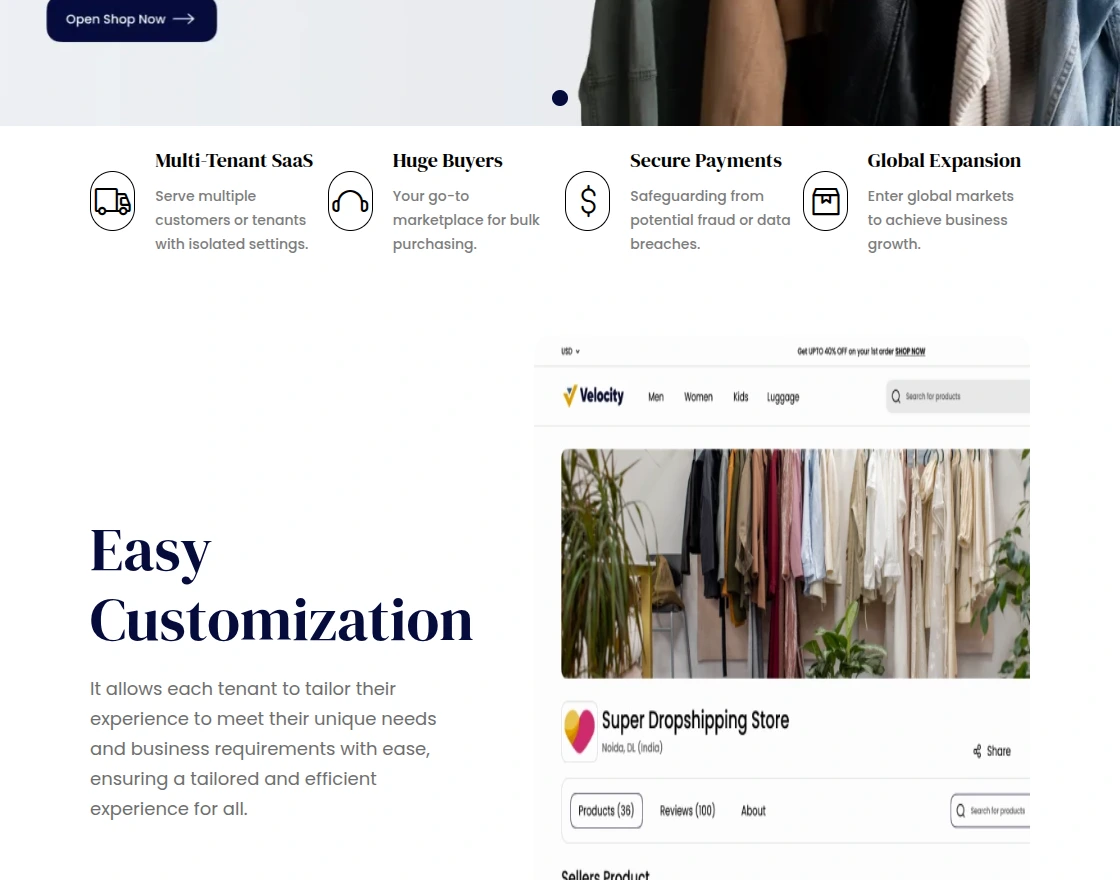
The service page content icons can be configured as required.

You can change the icon by editing and the below section appears. Here, you can change the icon and update it as required.
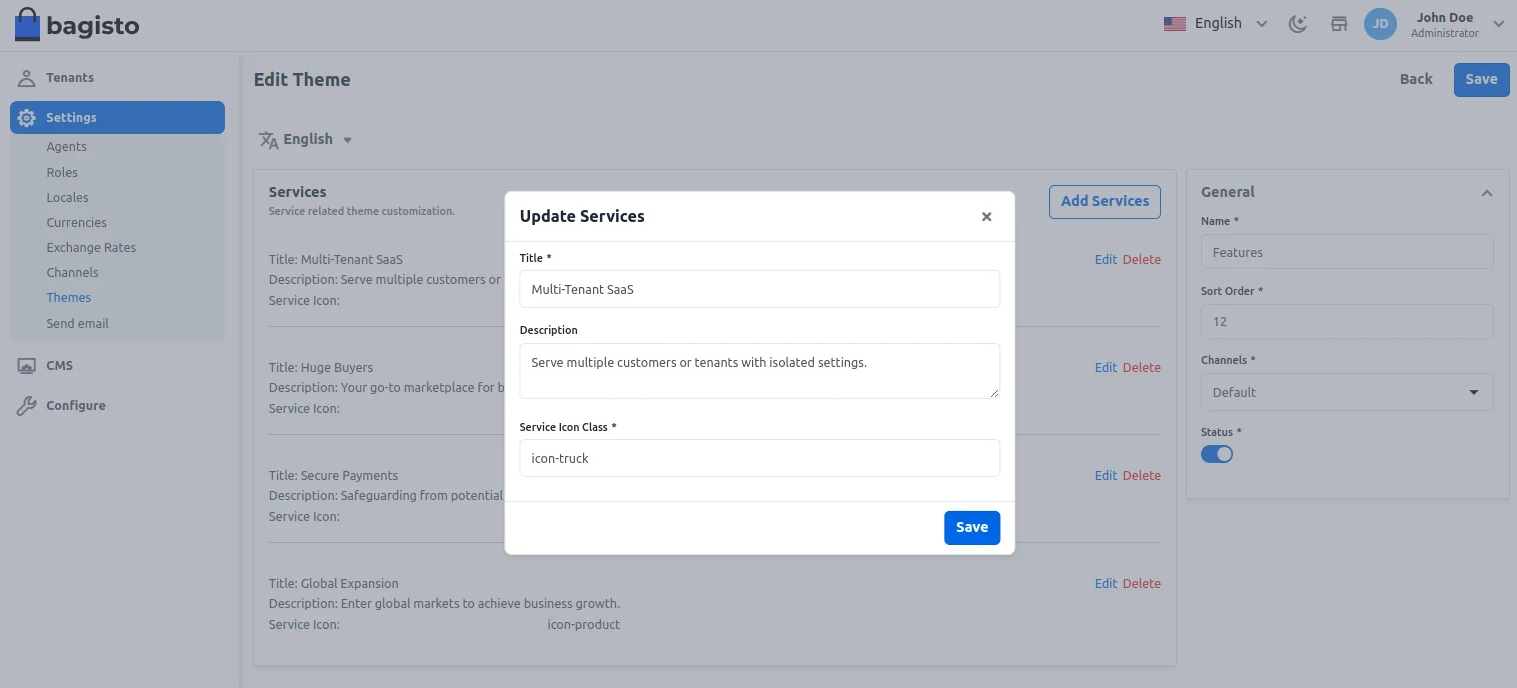
The added icons are then visible on the services page.
Send Email
Now the super admin can send emails to all their tenants with just one click as you can see in the below image :
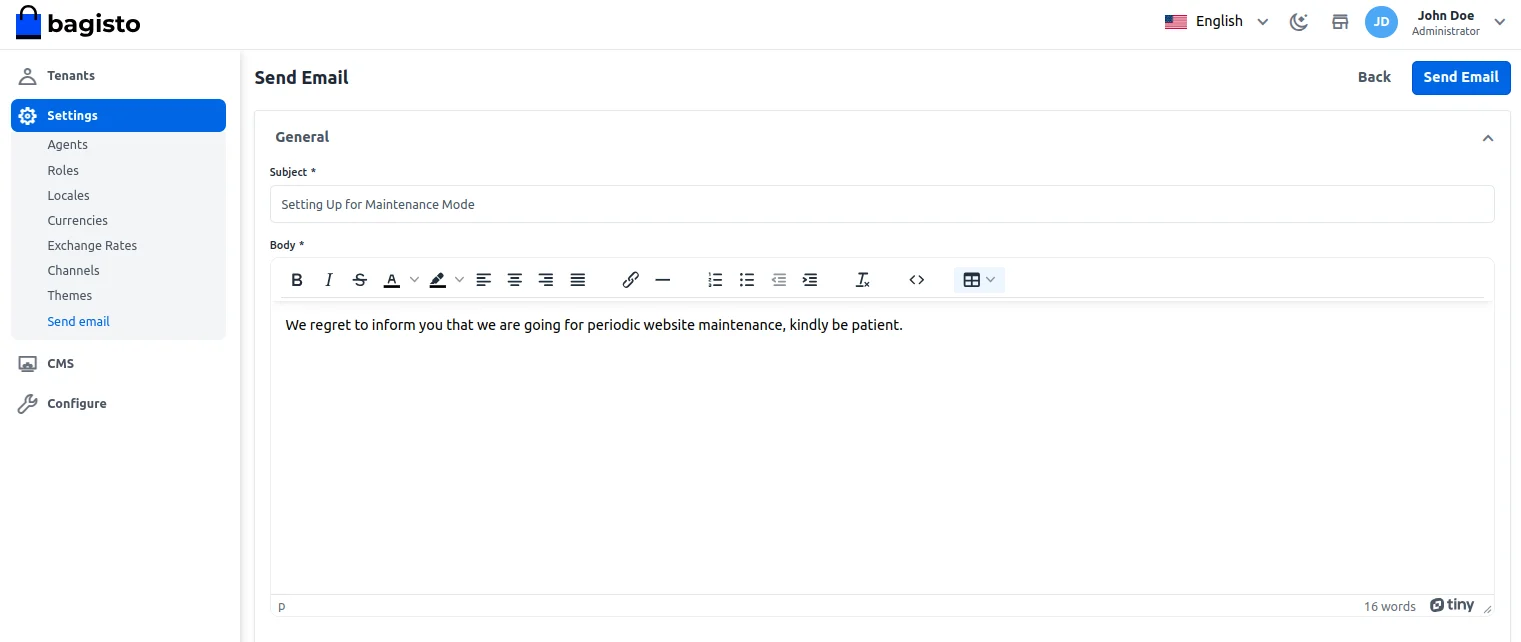
After that, all the tenants will receive the email sent from the super admin.
CMS
With the help of CMS(content management system), the super admin can create a new page, and edit the page as required for their store.
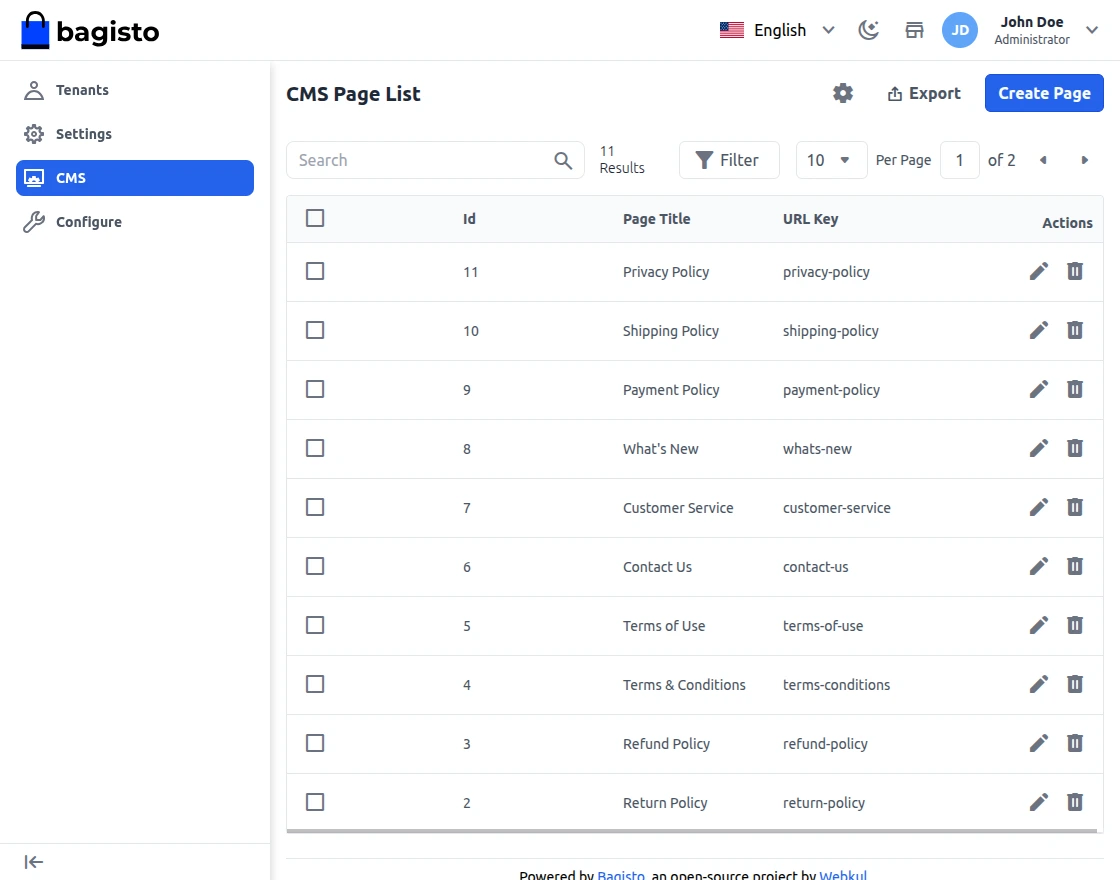
How To Create a CMS Page
To Create a CMS page, open the Super Admin Panel then follow the below step
Add A New Page
On Super Admin Sidebar, click on CMS>>Create Page
After clicking on the Create Page, below is the list of fields you need to fill.
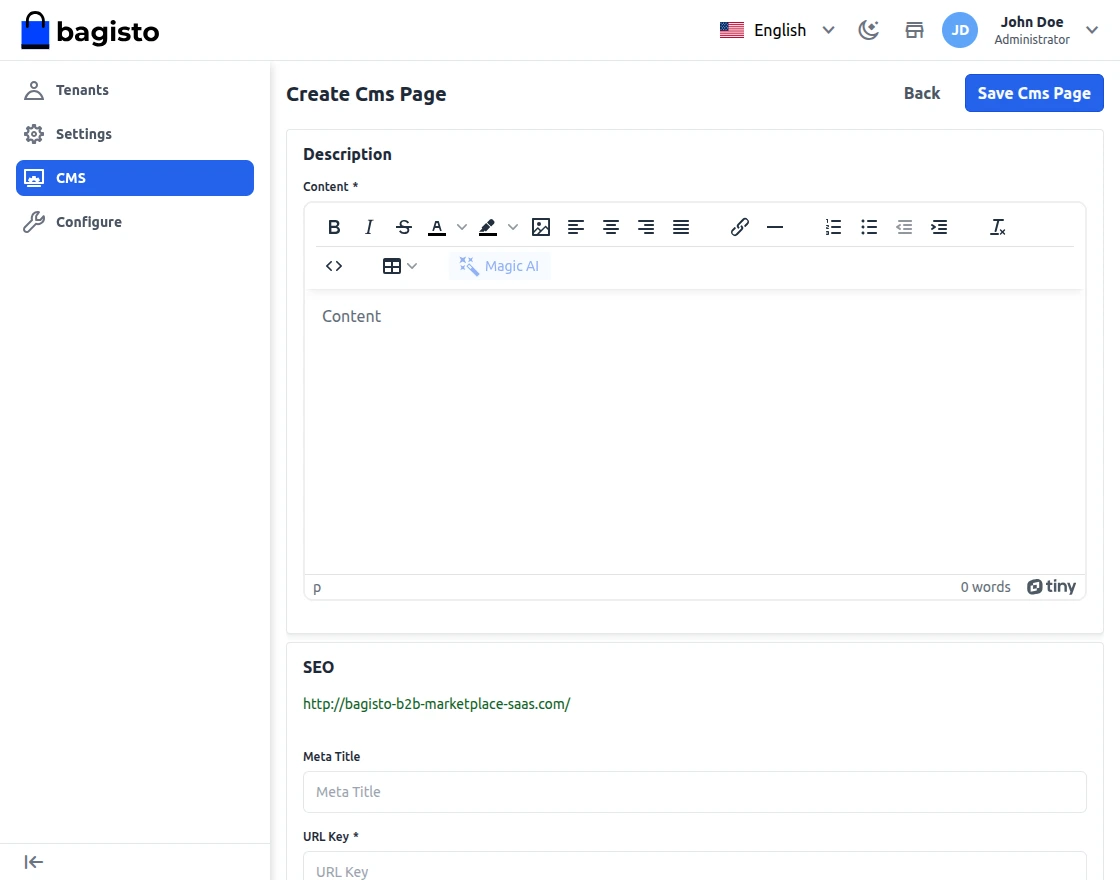
Page Title:-You have to fill in the page title.
Channel:- Select the channel.
Content:- In this section, you have to write the content which you want to show on this page.
Enter The SEO Details
Meta Title:-
Provide the main title of the page by which your page will be known.
URL Key:-
Enter the page URL key
Meta Keywords:-
The meta keyword for the page needs to be provided to improve its searchability on the search engine for specific keywords.
Meta Description:-
Enter the description so that the page can easily appear in search engine listing.
Configuration
Under Configuration, the super admin can manage – Design, Super Agent, Content, Shipping, and Payment methods using the Laravel Multi Tenant SaaS module.

Note: The shipping and Payment method settings will only work with the SaaS Shipping & Payment add-ons only.
Design – Here, set the logo and favicon icon.

Super Agent
Here super admin will enter the Email Address of the Super agent to receive the email notifications.

Content
Under the content section, the super admin can add the footer text for their Landing Page.

Super Admin Landing Page

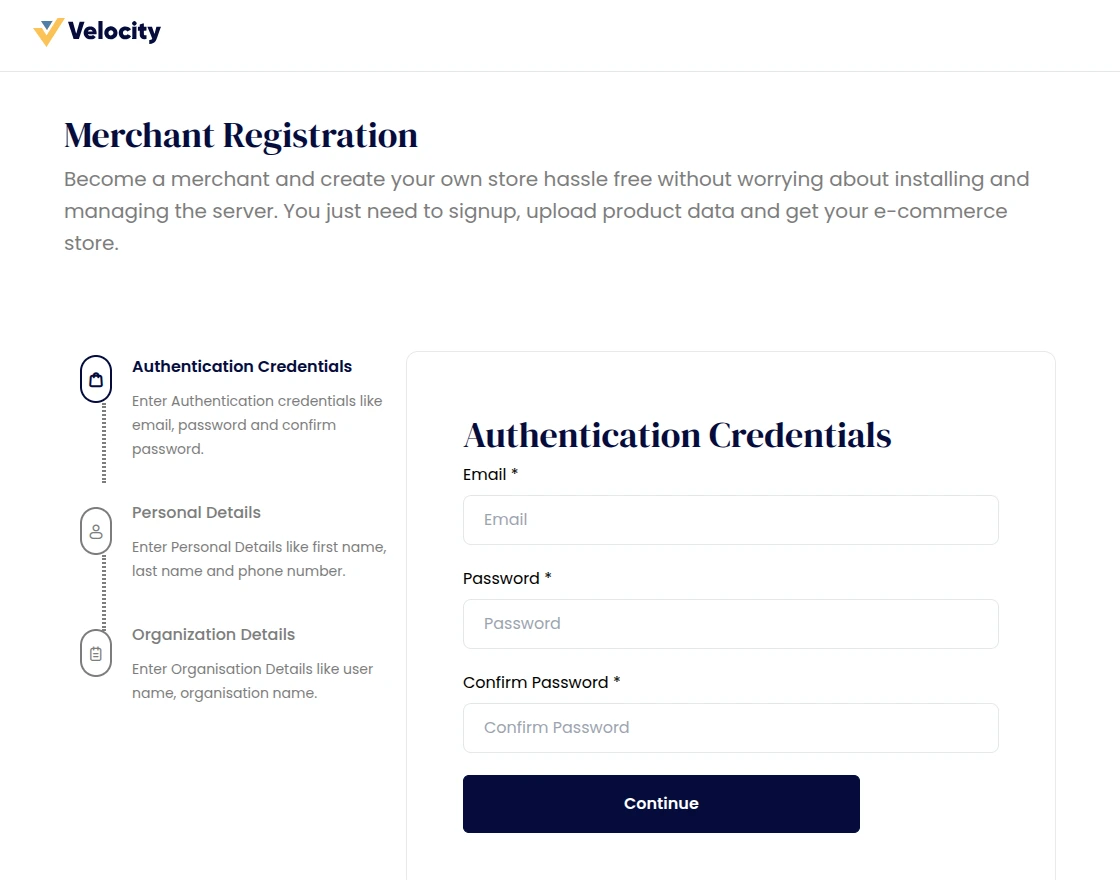
Merchant Registration
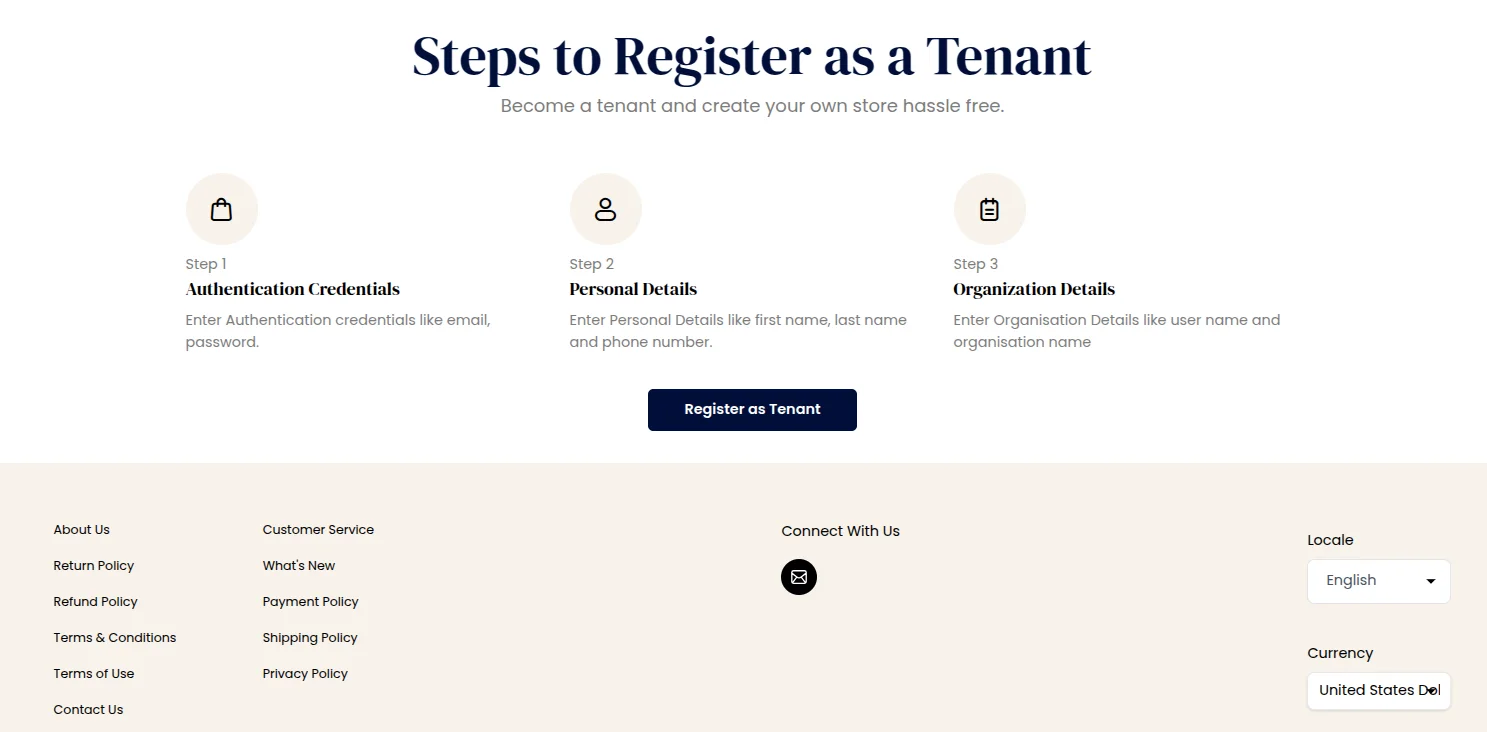
There are three steps to register on the SaaS module.
1: The merchant has to enter the Authentication Credentials like email, the password, confirm the password then click on Continue.
2: The merchant has to enter the Personal details like First Name, Last Name, Phone number.
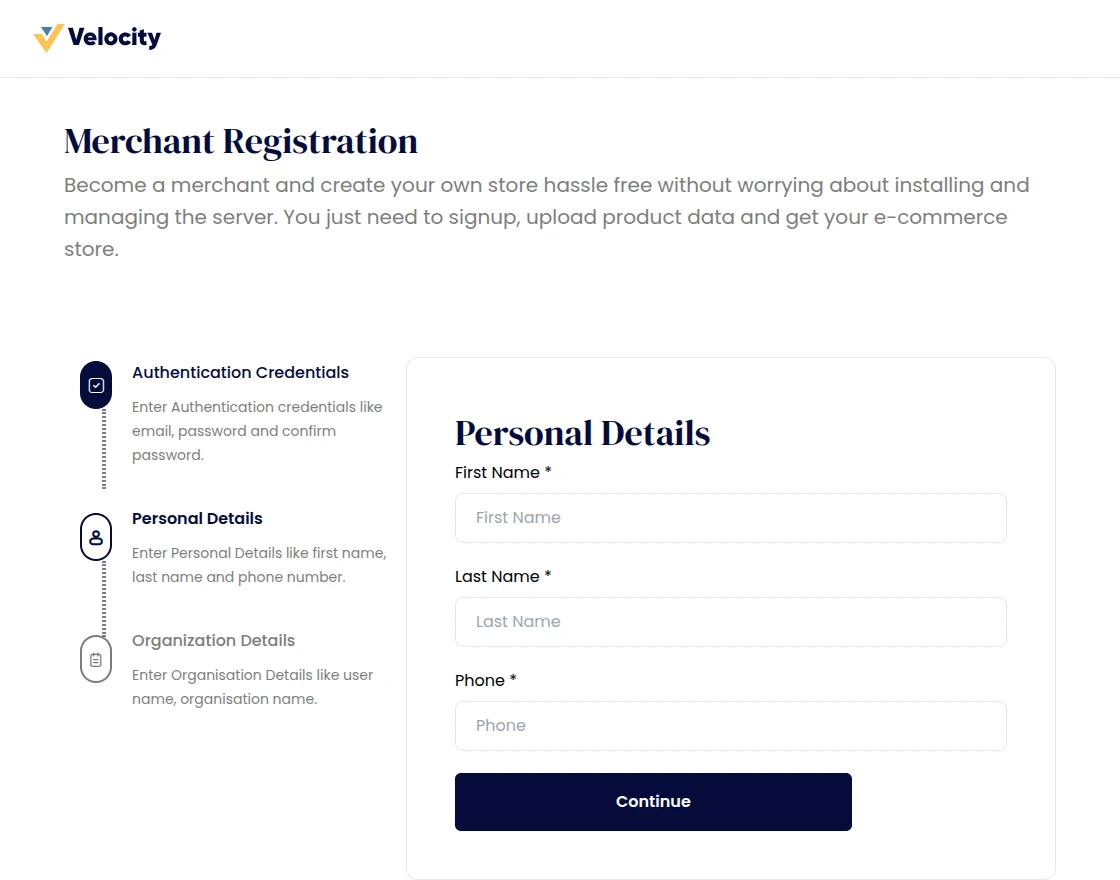
3: The merchant has to enter the Organization details like user name and Organization name.

Merchant Front end
Now successfully tenant’s front end was created like below.

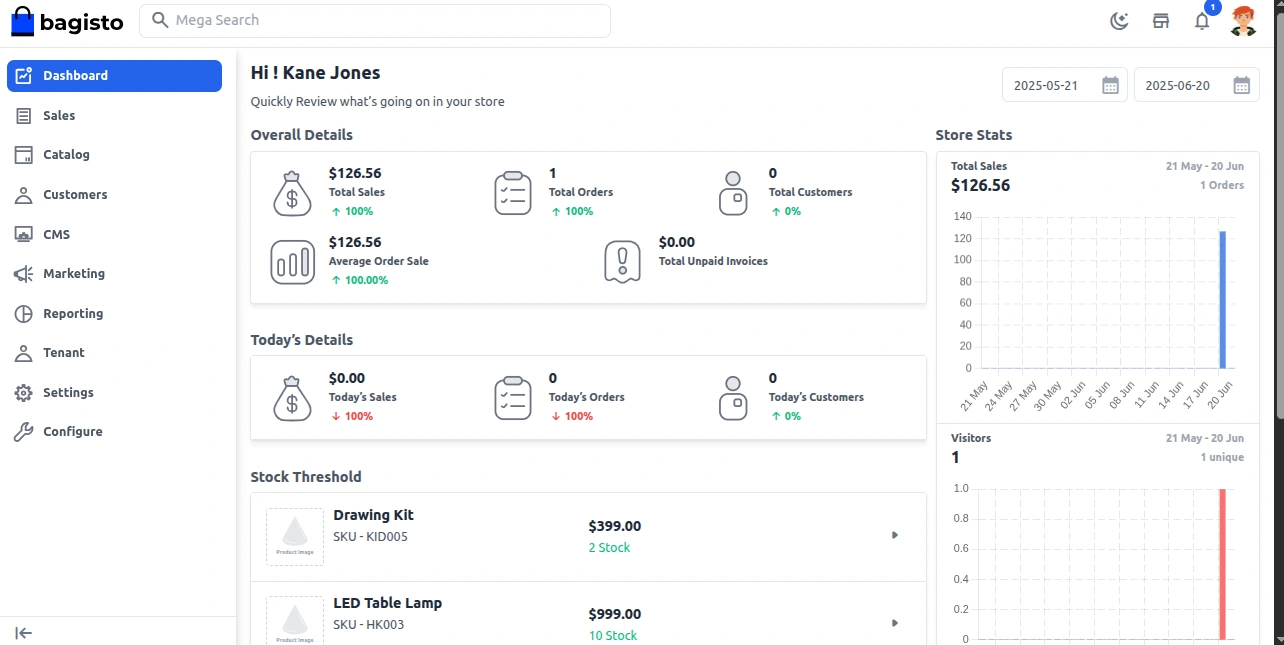
Merchant Admin Panel
The merchant can enter their admin panel with a URL like abc.test.com/admin/login such as below. You will get the backend likewise Bagisto.
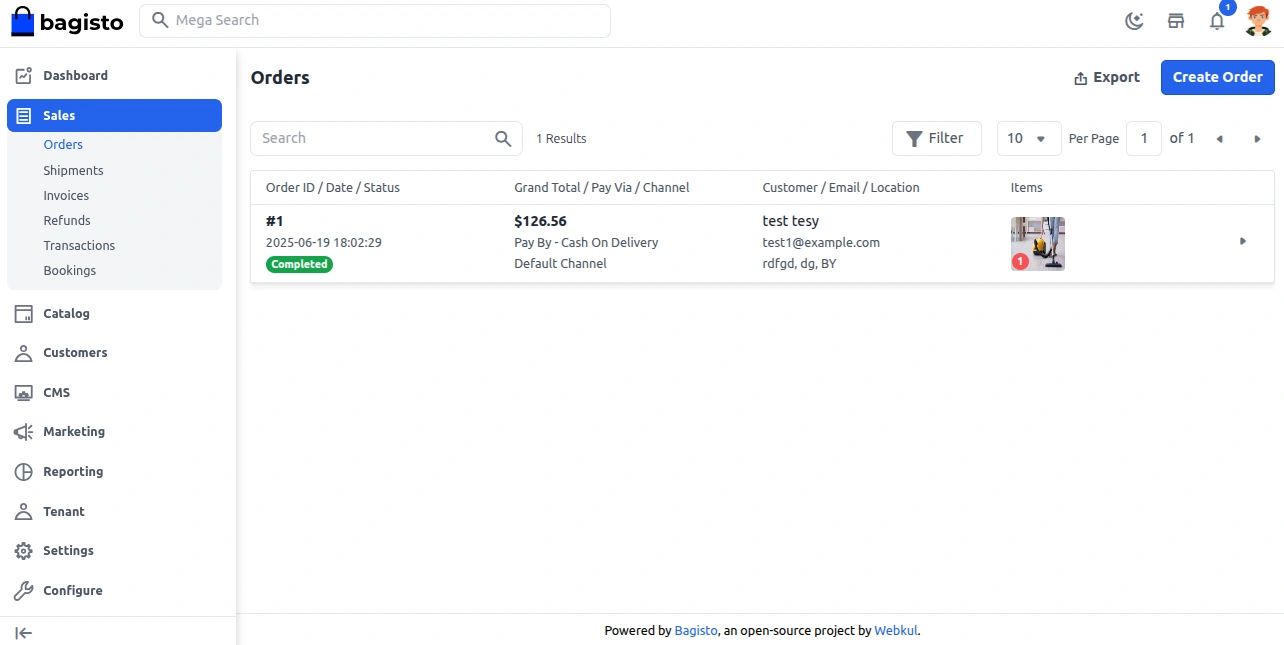
Merchants can manage their orders.
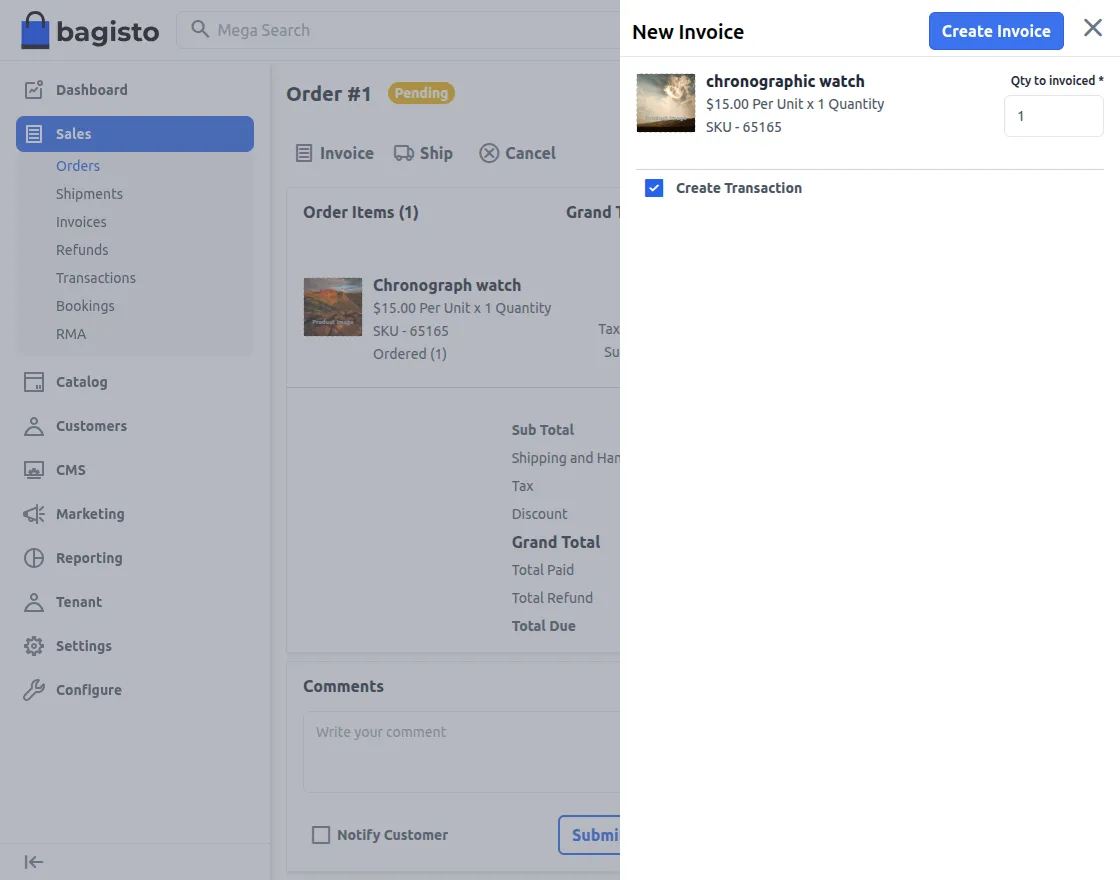
They can generate invoices by tapping the Invoice and then create Invoice button.
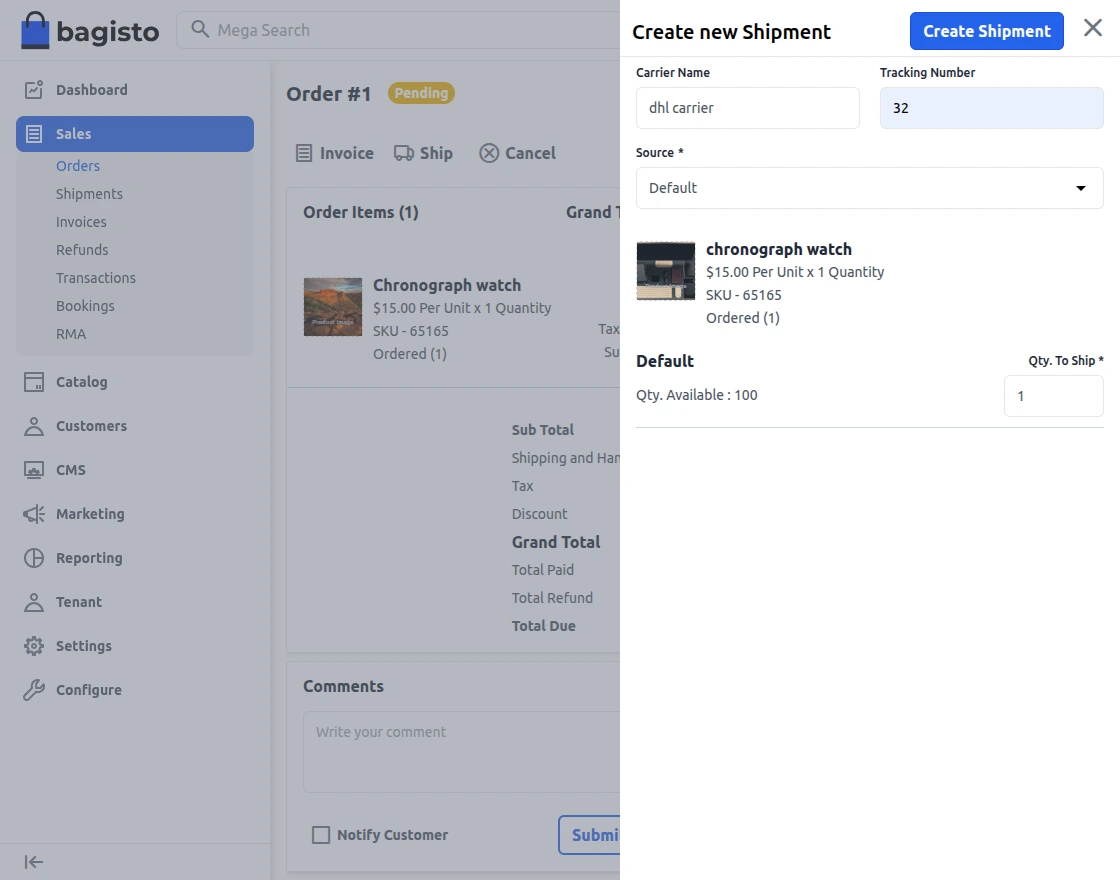
Similarly, they can create the shipments for their orders as well.
Merchants can also create, edit, and delete the products for their store.
Apart from that, they can create – categories, attributes, attribute families as required.

Under the Tenant side menu option, the merchants can manage their details.

Apart from that, there are many other menu options as well to manage the store.
Custom Domain
In the Laravel multi tenant saas module, Merchant can run their website on their own domain and they will get all benefits of the Custom domain. They will get benefits like –
- Website will more flexible using own domain
- Merchant can host their website where they want
- No more hosting provider restrictions on your website
- URLs and email addresses are entirely your own
Domain Mapping is the most important so that customers can access their portal through their custom domain. So let’s discuss a few technical components which are used for domain mapping.
DNS:- DNS stands for Domain name system. DNS is used to translate the IP address into a domain name.
For example, if any can run “example.com” on their browser then the browser will perform a DNS query against the DNS server.
So that the DNS server can take the hostname and resolve it to a numeric address so that the web browser can connect with the related IP address.
There is a component DNS Resolver which is used to checking the hostname is available or not in the local cache. Then return to the browser or application.
That’s all for Laravel eCommerce Multi-Tenant SaaS Module, still, have any issues feel free to contact us.
Also, you can raise a ticket at https://bagisto.uvdesk.com/en/
Current Product Version - 2.4.1
Supported Framework Version - Bagisto: v2.4.1

Is it compatible with version 1.0 of bagisto?
Regards,