Introduction
The Magento 2 Blog Manager module enables the customers to add their posts to the blog form in the Magento 2 Webstore.
Customers can also edit or delete the post. Store owner can permit or restrict any customer to write blogs.
The store owner can fully manage blogs i.e store owner can approve/ reject or delete any blog or its comments.
Magento 2 Blog Plugin will enhance the feature of adding blogs to your store. Therefore, it will help to create a strong relationship between the store and the customers.
Wonder How The Module Works? Watch the below Video
Features of The Blog Manager Module
Admin End
- The admin can give permission or restrict the customer to write the blog.
- The admin can set the limit of words to be displayed on a particular blog on the List view page of blogs.
- Admin can add any number of blog categories.
- Store owners can fully manage the blogs and their comments by approving/un-approving or by deleting them.
- The admin can manage all blogs and their comments.
- The admin can view all blogs at once as well as blogs by particular users.
- Admin can perform approved/reject/delete action for a particular blog’s comment.
- Categories can be created by admin only.
- Admin can view, enable, disable, and delete the categories.
- There are two modes for posting comments i.e. Auto and Manual.
- In manual mode, the comment is displayed only after getting approved by admin.
- Admin receives an email when a comment is added in manual mode.
- Under manual mode, the customer needs to get approved by admin.
- In manual mode, an e-mail is sent to admin from customer who requests for the blog.
- Admin receives an email when a customer subscribes for blogs in manual mode.
- There are two modes for subscribing blogs i.e. Auto and Manual.
Customer/Blogger End
- A customer can subscribe to blogs at the time of registration or after registration.
- The permitted customer can add the blog, edit or delete their own blog.
- Store owners can fully manage the blogs and their comments by approving/un-approving or by deleting them.
- By using this module customers can write/update his posts on the blog page.
- Proper blog management like add/edit/deletes from the customer’s account.
- Each customer can see a blog by visiting the blog page.
- Any logged-in customer can comment on any post of the customer.
- Store owner can delete any blog.
- Store Owner also provides permission to customers for adding posts on the blog.
- There are two modes for posting comments i.e. Auto and Manual.
- The customer receives Email at comment approval.
- When a new comment is made, an e-mail is sent to the blogger who wrote that blog.
- A customer can subscribe to blogs at the time of registration or after registration.
- In auto mode, the customer is approved as soon as he subscribes to blogs.
- In auto mode, the comment is displayed as soon as it is posted.
- A customer receives an email when he is permitted for adding posts on the blog in manual mode.
- The guest customers can view the blog and can add comments as well.
- Blogger can add meta keywords and meta description
- Blogger can set Preview Content for showing on list
Module Installation – Blog Manager
Customers will get a zip folder and they have to extract the contents of this zip folder on their system. The extracted folder has an src folder, inside the src folder you have the app folder.
You need to transfer this app folder into the Magento 2 root directory on the server as shown below.

After the successful installation, you have to run these commands in the Magento 2 root directory.
First command –
php bin/magento setup:upgrade
Second Command –
php bin/magento setup:di:compile
Third Command –
php bin/magento setup:static-content:deploy
Fourth Command –
php bin/magento indexer:reindex
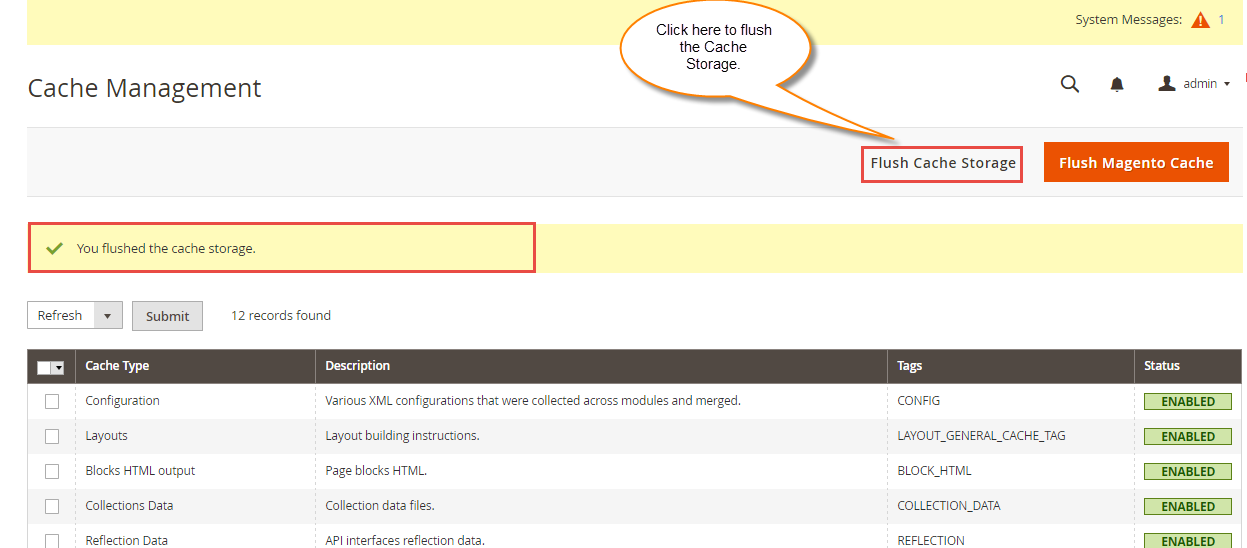
Right after, running the commands you have to flush the cache from the Magento admin panel by navigating through->System->Cache management as shown below.
Configuration For Multi-lingual Support
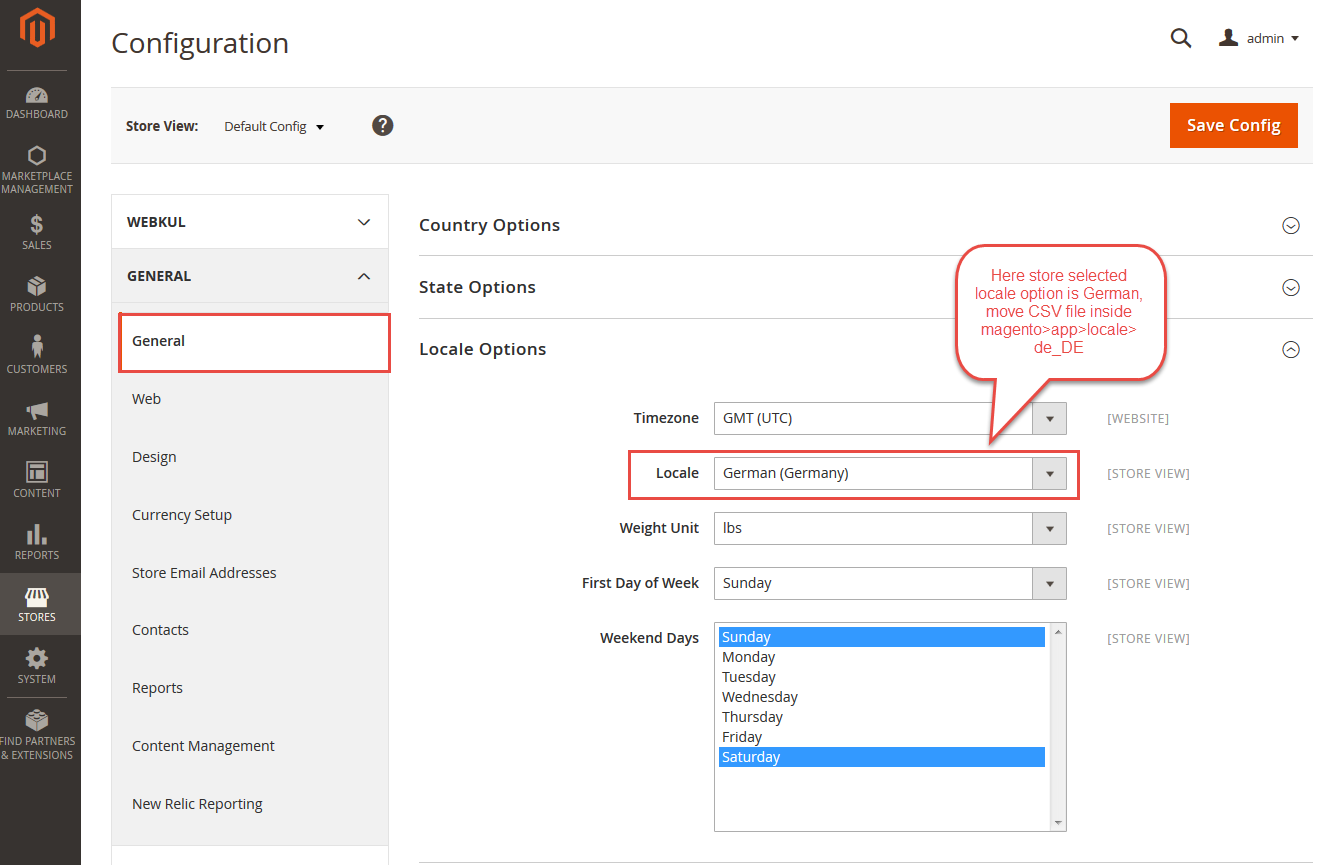
For the multilingual support, the admin will navigate through Store->Configuration->General ->Locale Options and select the locale as German (the language into which admin wants to translate his store content).
Module – Translation
However, if a user wants to translate their module from English to German then they need to follow the path app/code/Webkul/Blog/i18n in their unzipped Magento 2 Blog folder and will get a CSV file with name “en_US.csv”.
Now they will rename that CSV as “de_DE.csv” and translate all right side content after the comma in the German language.
After editing the CSV, save it and then upload it to the path app/code/Webkul/Blog/i18n where they have installed Magento 2 on the server.
After that, the module will get translated into the German Language. It supports both RTL and LTR languages.


The user can edit the CSV like the image below.

Admin Management
The store owner will configure the module by navigating through Stores –> Configuration –> Webkul –>Webkul Blog.
General Blog Settings
Here, the store owner can set & select various options as shown below.

Display character limit for blog content that will be visible on the blog list page.
Select comment approval method as Auto or Manual.
Select blogger approval method as Auto or Manual.
At last, Select blog approval method as Auto or Manual.
Blog Manager Email Settings
Under the Blog Manager Email Settings, the admin can select the email templates that will be used for sending the notification emails as shown below.
Here, the admin can select the email notification Templates for –
- Blogger Request
- Blogger Approved
- Comment Approval
- Comment Approval Request
- Blogger Disapproved
- Blog Notification
- Blog Approval
- Comment Notification Template
Blog Management
The store owner can easily manage the blog system from the backend. Moreover, the store owner can give permission or restrict the customer to write the blog.
As a result, the store owner has to approve the blog and its comments, then only it can be displayed at the front end.
Further, the admin can also delete any blog or blog comments and create, manage the categories for the blogs.

Blog Manager
The store owner can view the list of all the blogs present in the store by going to Webkul Blog –> Manage Blog. The store owner can delete any blog, can see who created the blog, and at what time and can view the comments made on it.

By clicking View Full Blog the admin can view the complete blog.
On clicking View Comments, the store owner will be redirected to the comments page where all the comments made on that particular blog are listed.
Here, the store owner can approve/reject or delete the comments from Action option after selecting the comments 
Manage The Bloggers
The store owners can manage bloggers by going to Webkul Blog –> Manage Bloggers.
From here store owner can see all the customers that are there in the web store and can allow or restrict (is permitted or is not permitted) any customer for creating the blog.
The store owner can also view all the blogs for any customer simply by clicking on View Blogs.

On clicking View Blog, the store owner will be redirected to the page where all the blogs of that particular customer are displayed.

The admin can also view the comments made on the blog by the readers. The admin can approve, reject, and delete the comment too.

Manage The Blog Categories
Admin can create new categories for the blogs under Dashboard-> Webkul Blog-> Manage Categories. Here the admin can enable, disable, or delete a category. Admin can also edit the categories from here.

The admin can also add a new category by clicking on the ” Add New” button as shown below – 
Customer End
Subscription for Blogs
A new customer can easily subscribe to blogs by selecting the ‘Subscribe for Blogs’ option as ‘Yes’ at the time of registration.
If a customer has not subscribed to the blogs at the time of registration, then there is an option for subscribing to blogs by going to My Account –> Subscribe For Blogs.
The customer will be able to see a link for Blog after the store owner has allowed the customer to add the blogs in the web store.

Add New Post
The customer can add a new blog post by going to Blog –> Add New Post. Here customer has to fill up all the details related to the Blog post. The user has to select a Category for the Blog post from all the categories that are present in the drop-down.
View My Posts
Customers can view all their posts with details by going to Blog –> View Post. They can also edit or delete their post from here. Customer can add a new blog by clicking on” Add New Post“.

View Blogs
The customer can view all the blog in the web store by going to the drop-down menu on the top right-hand side and then selecting the menu item Blog.
The user can even search through the list of all the blogs and can modify their search according to the category, seller, and tags.
After that customer can click on any Blog title name to open that blog post.
Customer can even leave a comment on any blog post which will be displayed once the store owner approves it.
To comment on a blog post, the customer can enter a website URL which will link to their name, and then they can give the feedback in the comment after which they can submit the comment by clicking on ‘Comment’.

The comment will be displayed at the front end once the store owner approves it.
Guest Users
Clicking the blog link present in the footer of the webpage, the guest or registered users can view all blog posts and the added comments by the other customers.
Also, can even add their own comments to the blog post.
If guest want to comment on any post then they need to enter the customer name, website name, and feedback

Therefore, the guest user has to enter the email id to add the comment as shown below image. 
In conclusion, that’s all for the Blog Manager For Magento 2. If you still have any issue feel free to add a ticket and let us know your views to make the module better https://webkul.uvdesk.com
Current Product Version - 5.0.0
Supported Framework Version - Magento 2.0.x, 2.1.x, 2.2.x,2.3.x, 2.4.x

6 comments
Hello,
Thanks for your appreciation!