Magento 2 QuickBooks Connector allows you to create sales receipts for your store orders on the QuickBooks – Manually or Automatically.
Therefore, all the information that is related to the orders such as customer name, email address, items ordered, billing address, etc gets synchronized with your QuickBooks account.
Please Note:
- You need to create API credentials – Client ID and Client Secret.
- At the moment Magento 2 Quickbooks Online integration extension supports one-way synchronization from Magento 2 to QuickBooks.
- Magento 2 QuickBooks is fully compatible with QuickBooks Online and Adobe Commerce.
You can also go through the below video to get to know the working of the connector,
Features Of QuickBooks Connector
- One can place Auto-Sync Orders from the Magento 2 Store to the QuickBooks.
- The admin can manually synchronize the Magento 2 store – Orders.
- Select when to create Sales Receipt in QuickBooks – Order Place, Invoice Create, or Order Complete.
- Select which orders to sync with QuickBooks – Pending, Processing, or Complete.
- The admin can set the QB product name & description to get export as per the name, SKU, short or long description respectively.
- The QuickBooks sales receipt number is the same as Magento 2 order/invoice number.
- Sync customer name, email, billing address, order date, product name, quantity, rate, amount.
- Magento 2 QuickBooks integration extension helps in Syncing the TAX details to QuickBooks with orders.
- Sync the already placed orders within your store that were not synced with QuickBooks before as well.
- Added functionality to include the tracking class details in Sales Receipts and Credit Memos during export to QuickBooks.
- This enhancement ensures accurate financial categorization and reporting in QuickBooks by mapping tracking class information directly from Magento transactions.
- Appealing Export orders in the process window with a detailed execution message with the number of orders to synchronize.
- The sales receipt of the Magento 2 order is exported to QuickBooks with a payment method description.
- The admin can also check the automatically or manually exported credit memos.
- Downloadable products are created as Non-Inventory products in QuickBooks.
- Sync Guest and Customer orders from Adobe Commerce to QuickBooks.
-
Introduced Tax Mapping functionality in the QuickBooks Connector.
-
This allows the admin to map Magento tax rates with corresponding QuickBooks tax codes, ensuring accurate tax calculations during order export.
Installation
Firstly, customers get a zip folder. Then they have to extract the contents of this zip folder on their system.
The extracted folder is having an src folder, inside the src folder you have the app folder.
Further, you need to transfer this app folder into the Magento2 root directory on the server as shown below.
After that, you have to run these commands in the Magento2 root directory.
composer require quickbooks/v3-php-sdk:6.1.1
php bin/magento setup:upgrade
php bin/magento setup:di:compile
php bin/magento setup:static-content:deploy
php bin/magento indexer:reindex
php bin/magento cache:flush
Multi-Lingual Configuration of Adobe Commerce
For Multilingual support, please navigate to Store>Configuration>General >Locale Options. And select your desired language from the Locale option.
Language Translation
In order, to translate the module language, navigate through app/code/Webkul/QuickbooksConnect/i18n, and edit the en_US.csv file.
Thereafter, rename the CSV as “en_SA.csv” and translate all right side content after the comma in the Arabic language. After editing the CSV, save it.
Then upload it to the path app/code/Webkul/QuickbooksConnect/i18n where the Magento2 is installed on the server.
The module gets translated into the Arabic Language. It supports both RTL and LTR languages.
How to get QuickBooks API Credentials – OAuth2
For OAuth2:
- In order, to get the Client Id and Client Secret for the OAuth2 authentication navigate to Intuit Developer Homepage.
- Now, create a new account even if you already have an account by clicking the SignUp button
 .
. - Now, enter the details required for registration and then click the “Create Account” option on the registration page.

- Further, the user will receive the 6-digit verification code sent to the entered mobile number.

- On clicking the Continue button, your account gets created on QuickBooks. The user will land on the QuickBook Homepage as shown in the image below:

- After that, the user will navigate to Dashboard > Create an App as shown in the image below:

- Further, the user will see a page that is having an option as QuickBooks Online and Payments, Click on it to process further.
 8. After clicking on the same, the user will get to see the following page. Here, the user will enter the Name of the application. Then select a Scope from the Accounting or Payments option.
9. After that, go to the “Keys & OAuth” menu option to find your – Client ID and Client Secret 10. Copy these keys from QuickBook Connector’s end and paste them into the Magento configuration while using the OAuth2.
Note:
1. You must set the redirect URL. To set the redirect URL click the Add URL link, enter the redirect URL, and click the save button after that.
As shown below, example.com is your site URL.
https:/example.com/quickbooksconnect/oauth/oauth2

2. If you are using the application in the sandbox mode then you can make use of Development keys.
But if you are using the application in the Live mode then you can make use of the Production keys.
Adding Tracking Class in Sales Receipt and Credit Memo for QuickBooks Export
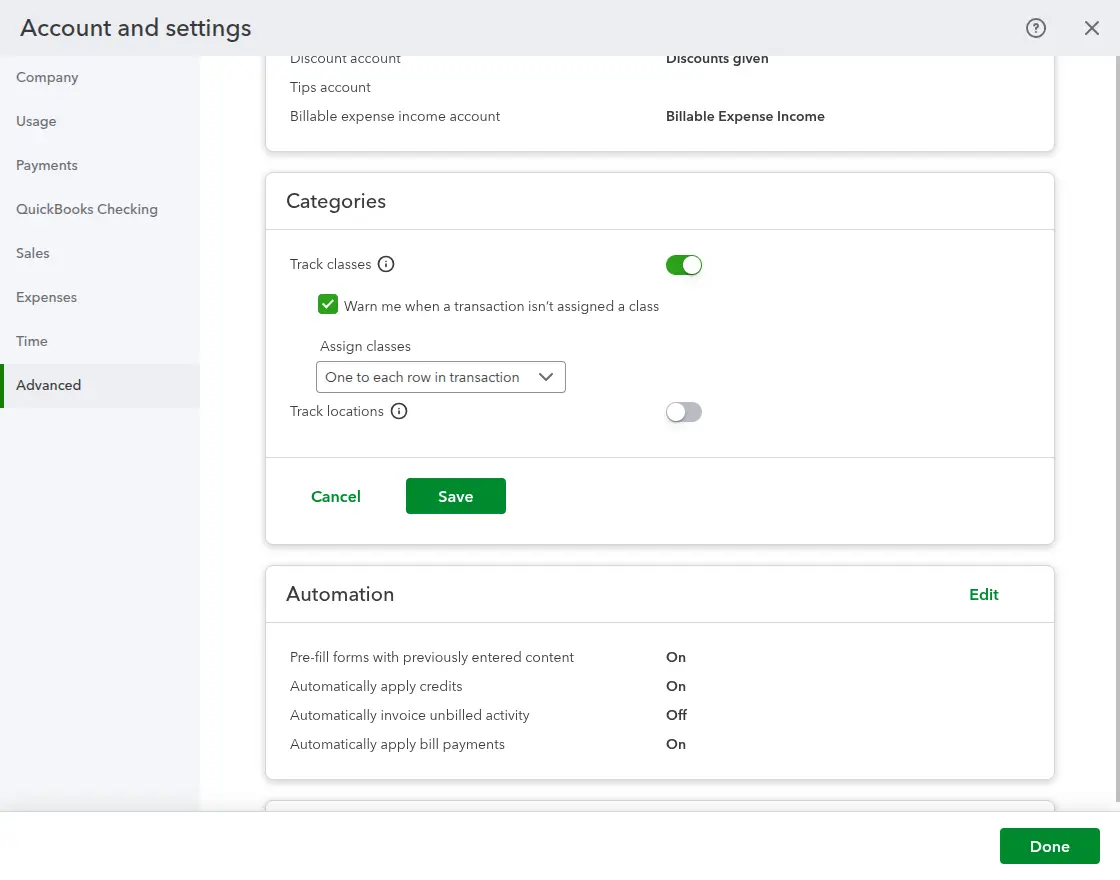
1. Go to Account and Settings → Advanced → Categories in your QuickBooks Sandbox, enable Track classes.
After that under Assign classes, choose either One to entire transaction or One to each row in transaction, then click Save.
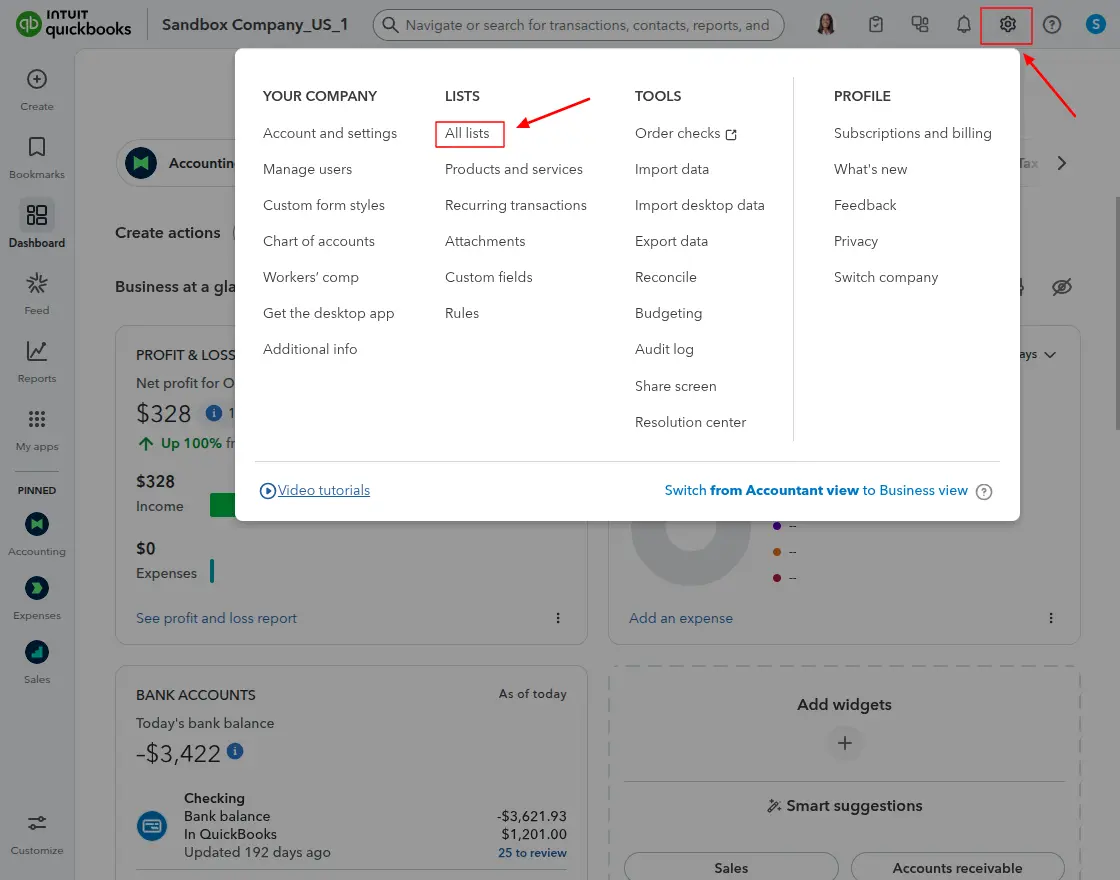
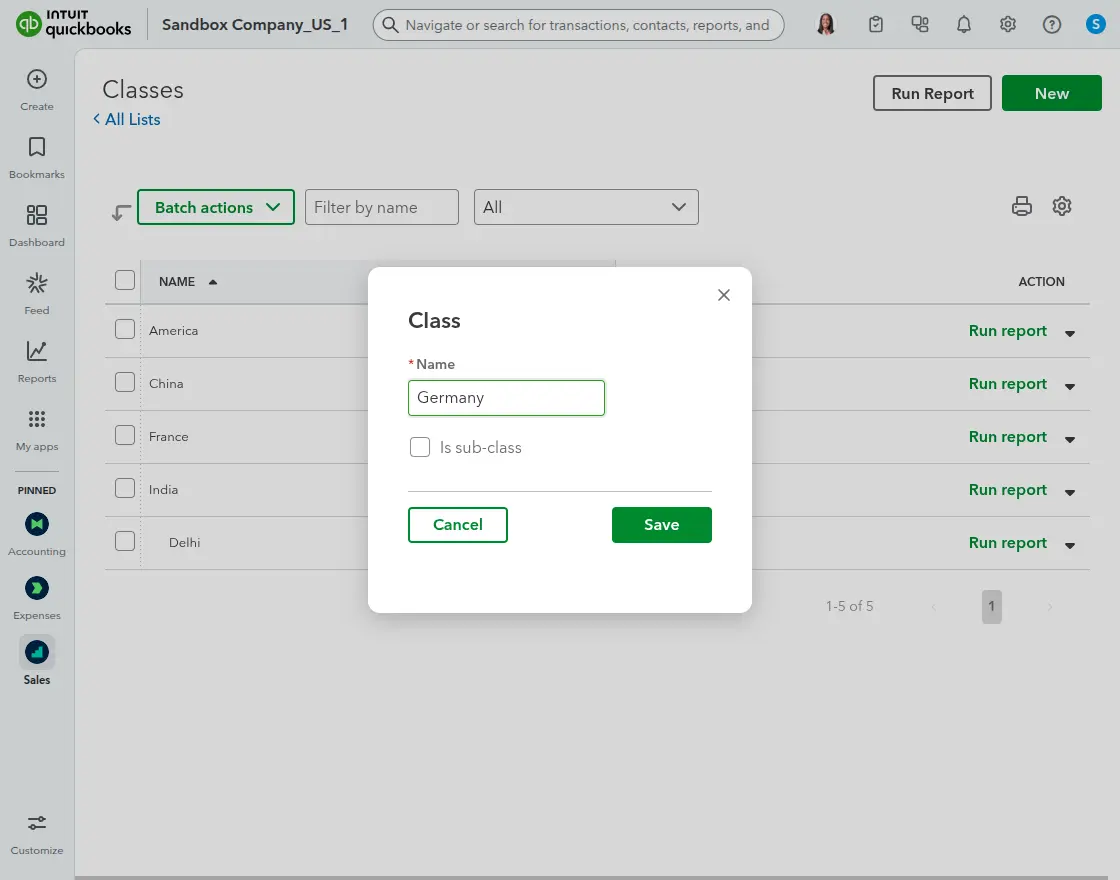
2. Go to Settings → All Lists → Classes to create the classes for the same.
3. In the Classes tab, you can create either a normal class or a sub-class as per your requirement.
Configuration
Finally, after the successful installation of the Adobe Commerce 2 QuickBooks Connector, you can see the configuration panel under Store -> Configuration -> Webkul -> Magento QuickBooks Connect.

General Settings:-
- Enable: From here the admin can enable or disable the module.
- Sales Receipt Create on Quickbooks: Select one of the options from – Order place, Invoice Create, or Order Complete to automatically generate the receipts in QuickBooks.
- Initial Order Status for Sales Receipt: Select one of the options from – Pending, Processing, and Complete.
To set the order statuses that should be synchronized with the QuickBooks when synchronizing manually to create the sales receipt on QuickBooks.
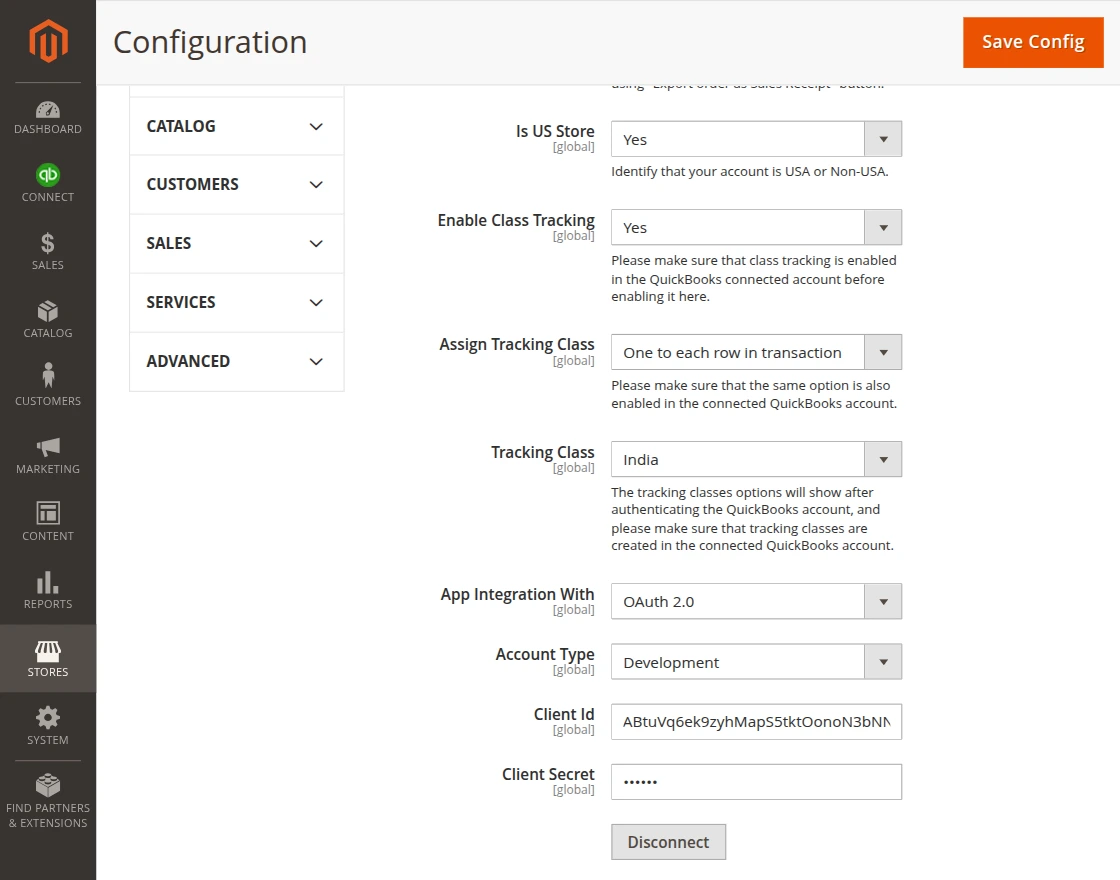
- Is US Store: Select ” Yes” If you are using a USA QuickBooks account else ” No”
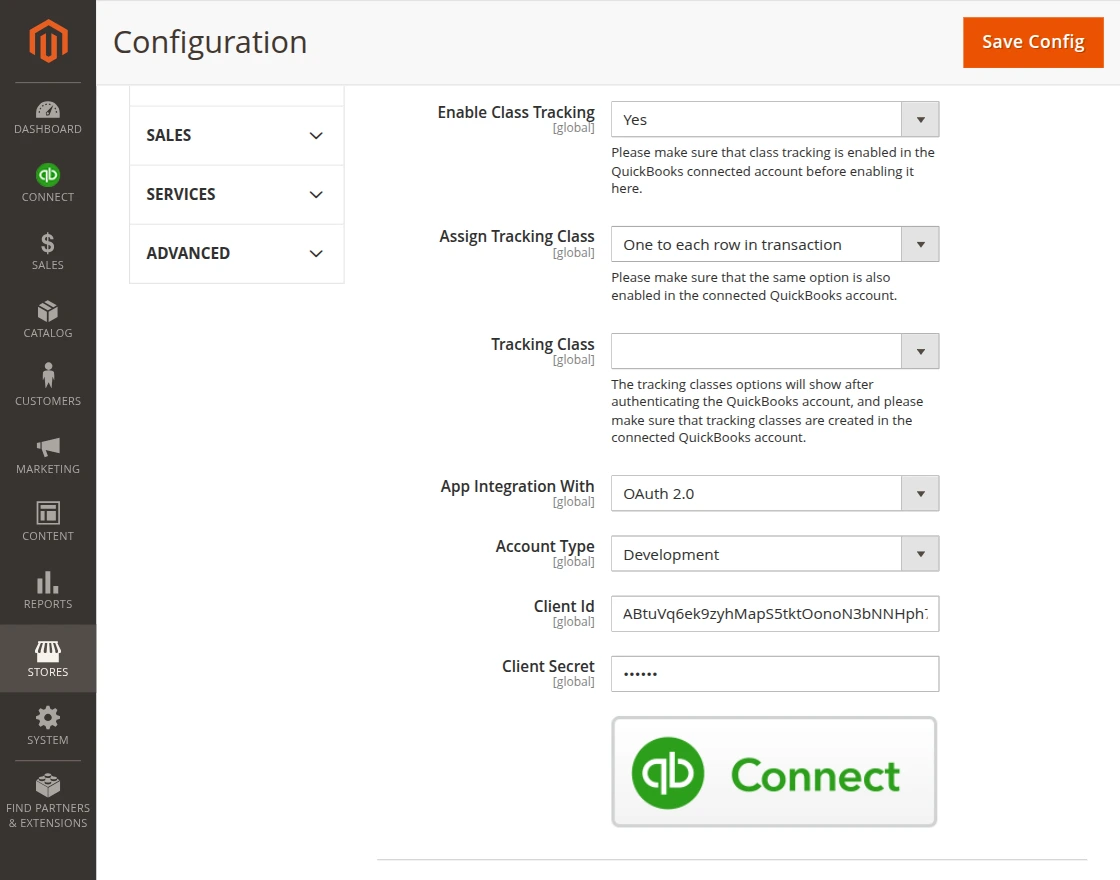
- App Integration With Select the OAuth Authorization type as – OAuth 2.0 or OAuth 1.0
- Select the Account Type as – Development or Production as required.
- Enter the Client Id and Client Secret.
After setting up the general settings the admin needs to save the configuration then tap on the option “Connect“.
Set Up Extension To Connect With QuickBooks
For instance, you can see a window pop up from where you select the company to set up with Magento 2 & then click on the Next button.

On the next screen to authorize the Magento module with the QuickBooks app.
Click on the Connect button to allow Magento 2 Connect to view and update your QuickBooks Online data

Now after clicking on the connect button on the next screen, a pop-up appears with an account successfully authorize message & notification to refresh the window.

Finally, you get redirected back to the admin configuration settings for the module.
Afterward, refresh the page and you find that you are now connected and authorized as per the below screenshot.
Also, after the authorization process, a disconnect button appears whose work is to disconnect the connection between the extension & QuickBooks if clicked.
Accounts For Inventory

Inventory Other Asset Account
Now from here select the account for the products created in QuickBooks.
The selection made here for the asset account gets to reflect on product information in QuickBooks.
It’s an account to which a product belongs so that it allows for easy management at a later time.
Income Account
Select the account for the products created in QuickBooks. The selection made here for the income account gets to reflect on product information in QuickBooks.
It’s an account to which a product belongs so that it allows for easy management at a later time.
Expense Account
Here, select the account for the products created in QuickBooks. The selection made here for the expense account gets to reflect on product information in QuickBooks.
It’s an account to which a product belongs so that it allows for easy management at a later time.
Export Product Field

From here the admin can set:-
- The QB Product Name which gets export to QuickBooks end as per the options available as Store Product SKU or Store Product Name.
- QB Product Description which gets export to QuickBooks end as per the options available as Store Product Name, Store Product Description, or Store Product Short Description.
Notification for Sync the Tax Rates

The admin needs to create the same tax rates on Quickbooks end to sync tax details with orders.
You can add a different name of the tax rate but the tax rate must be the same on Quickbooks as well.
How to Synchronize Orders Manually & automatically
Sale Receipt Created Automatically
In the case of automatic synchronization, it depends on what the admin has selected in the module configuration settings.
If the admin selects the option of “Sales Receipt Create On QuickBooks” as “Order Place“, then all the orders when placed in your store get synchronized with the QuickBooks automatically.
Similarly, if the admin selects – “Invoice Create” then when the admin creates the invoice for the orders, the orders get synchronized automatically.
The same is the case if the admin selects -“Order Complete” the orders get synchronized with the QuickBooks.
When the status of the order turns to “Order Complete” i.e invoice and shipping have been generated.
For Example:
If the admin has selected the option “Sales Receipt Create On QuickBooks” as “Order Place“.
Then whenever an order gets a place on your store, be it a guest or a registered user it will automatically get synchronized with your QuickBooks account.
Sale Receipt Created Manually
Using the manual sync, you can also sync the already placed orders within your store that were not synced with QuickBooks before as well.
To add the orders in QuickBooks manually, the admin needs to navigate to the Sales -> Orders.
On the Orders page, the admin finds the complete list in a grid view of Orders placed on the Website with different order statuses like pending, closed, etc.

Now to manually synchronize this data, the admin selects the desired order, tap on the Action option, and select the Export on QB option.
At this time all the orders that are selected get synchronized with QuickBooks.

After clicking the “Export on QB option you see an execution message with the number of orders to synchronize.

The admin finds the Map Sales Receipt, MapCredit Memo, and Configuration, under the menu item QuickBooks Connect, under the admin panel as per the screenshot below.

By clicking on the “Configuration” menu option, the admin redirects to the same QuickBooks configuration page. Similarly as shown above.
After clicking the menu option – “Map Sales Receipt“, you’ll see a complete list of synced/Map orders of your store with the QuickBooks as shown below in the snapshot.
Map Sales Receipt

Using the map sales receipt, you can sync the already placed orders within your store that were placed before installing the extension as well.
The admin can also delete the Order Map Record if required.
To check the order details for any particular order just click on the View Order link.
Manual Synchronize Of Data
Now to manually synchronize this data, you will tap on the option “Export Orders as Sales Receipt “.
At this time all the orders that have the status (As selected during configuration) will get synchronized with the QuickBooks.
Also, you can change the settings in the module back-end if you want to choose a different order status to be synchronized.
You can select from three order statuses – Pending, Processing, and Complete.
If you select pending status then all the orders with the status “Pending” will get synchronized. Similar is the case with the other two statuses.
After clicking the “Export Orders As Sales Receipt” option you see an execution message with the number of orders to synchronize.

Check The Order Details:
In order, to check the order details navigate to QuickBooks Connect-> Map Sales Receipt.
Now, tap on the “View Order” link for the respective order for which you want to check the order details.

Tap the “View Order” link, the order details will appear as shown below.


Check the Synchronized Order Details on QuickBooks
Go to your QuickBooks account and navigate to the Sales section and then tap the same order number.

Tap on the Order Number, you can see the complete order details that are synchronized as shown below in the snapshot.


At Quickbooks online go to the products and services tab under the sales menu.

After clicking the Edit link for a product, you can see the various accounts that are related to this product under the product/service information section as per the snapshot below.

How to add Tax rates in QuickBooks?
First, you need to click on the Taxes option as shown below image –

Further, click on the Sales Tax Settings option to check the details of the Tax Agencies.

By clicking on the Add Agency button the user will be able to add the new agency. Also, they will provide the information shown in the image below:

Moreover, click on the “Edit” button present under the Action grid for the respective agency to edit the details:
Further, the user can add new custom rates and edit/ deactivate already created tax rates. Click on Add rate for adding the new custom rate.

After that, add the details for the new customs rate as shown in the image below:

Moreover, click on the “Edit” button present under the Action grid for the respective custom rate to edit the details:

1. How it works with the special prices?
Special Price: For example, you have a product for $30, that has a special price applicable of $20.
Now, when the order gets purchased and the sales receipt created at QuickBooks end the receipt has $20 visible on the receipt of the product.
2. How it sync payment methods?
The payment methods which is used at the store end for making the payment, that gets reflected.
3. Does it creates sales receipts for bundle products?
However, for the bundle product, all of the constituent products are created as individual products within the sales receipt.
Map Credit Memo
The Map Credit Memo lists down all the credit memos generated by the admin. The credit memo gets exported automatically as per the configuration.
Below is the list available for all such credit memos.

The admin can also view the memo and check the details as shown in the image below:


Credit Memo at QuickBook’s End
The same will be visible at QuickBook’s end and the type of that specific entry will be Credit Memo as shown in the image below:

Here also the user can view the credit memo with their specific ID. All the refund details will be visible here.


Map Credit Memo Manually
The admin can also export the Credit Memos manually under the credit memo section by navigating to Sales > Credit Memos.
Further, under the Action dropdown, the admin will click on the Export Credit Memos on QB option for exporting the credit memos.

After that, the popup will be visible for confirmation as shown in the image below:

The process will take time for that the admin must wait and stay on the same page as shown in the image below:

After the completion, the credit memos will be visible under the map credit memo section by navigating to Connect > Map Credit Memo.

In conclusion, that’s all for the Magento 2 QuickBooks Connector(Adobe Commerce) if you still have any issues feel free to add a ticket.
Let us know your views to make Magento 2 QuickBooks integration module better at webkul.uvdesk.com.
Current Product Version - 4.0.5
Supported Framework Version - Magento 2.0.x, 2.1.x, 2.2.x,2.3.x, 2.4.x

I currently use my Magento website for my clients to place orders. I have to manually type in and make invoice on Quickbooks for each order placed on our Magento 2 website. Am I able to use your Magento 2 Quickbooks Connector to generate invoice automatically on my Quickbooks every time when my client place an order on our Magento 2 website? If your answer is yes, I will buy one.
Looking forward to your reply,
Thanks!