Introduction
Magento 2 Store Locator extension enables customers to pick up their online orders from a preferred nearby store.
Magento 2 Store Pickup allows merchants to optimize logistics, reduce delivery costs, and offer customers greater flexibility in fulfillment options.
Boost up the store sales, save shipping time, provide a faster delivery in one round, and minimize the product return rate using the store pickup module for e-commerce stores.
Note:
- MSI must be enabled to use this module.
Check how the plugin works:
Features of Magento 2 Store Pickup Extension
- Buyers can see all the nearest pickup stores on Google Maps.
- Shoppers can see the distance and route to the pickup store from their location on Google Maps.
- Consumers can choose the nearest pickup store where he/she can pick up their order.
- The customer will get notified by email when the order is scheduled/re-scheduled by Admin.
- The owner can create multiple pickup stores.
- Store merchants can schedule the pickup for customers.
- Customers can view “Pickup Scheduled At” information.
- Admin can set holidays on specific dates as well as in the date range.
- Store admin can set store timings in different modes.
- Merchant can see a list of pickup stores order.
- Store owners can set a specific range in kilometers for the nearest pickup stores.
- The owner can assign multiple products to pickup stores.
- Admin can assign multiple pickup stores to products.
- Merchant has an option to close the store urgently.
- This extension uses the MSI Distance algorithm for calculating distance.
- Magento 2 Store Pickup module can calculate the distance in offline mode also.
Magento 2 Store Pickup Module Installation
Customers will get a zip folder and they have to extract the contents of this zip folder on their system.
The extracted folder has an src folder, inside the src folder you have the app folder. You need to transfer this app folder into the Magento 2 root directory on the server as shown below.

Post the successful installation, you have to run these commands in the Magento2 root directory.
First command –
php bin/magento setup:upgrade
Second Command –
php bin/magento setup:di:compile
Third Command –
php bin/magento setup:static-content:deploy
Cache Management
After running the commands, you have to flush the cache from the Magento admin panel by navigating through ->System->Cache management as shown below in the snapshot.

Multi-Lingual Configuration
For Multilingual support, please navigate to Store > Configuration > General >Locale Options. And select your desired language from the Locale option.

Language Translation
If you need to do the module translation, please navigate to the following path in your system app/code/Webkul/StorePickup/i18n. Open the file named en_US.CSV for editing as shown in the below screenshot.

Once you have opened the file for editing. Replace the words after the†comma(,)†on the right with your translated words.

Post-editing and translating the CSV file, you need to save the translated file name according to your region language and country code such as – de_DE.CSV.
Then upload the translated file to the same folder from where you have obtained it. Now your module translation is complete.

Magento 2 Store Pickup Configuration
After successful installation of the module, the admin needs to navigate to Stores => Configuration => Sales => Delivery Methods => Store Pickup for the configuration.

- Enabled – dropdown to enable or disable the module.
- Title – Put the module title.
- Method Name – Give an appropriate name to the method.
- Calculate Handling Fee – Fixed or Percentage, define calculate handling fee.
- Handling Fee – Determine the handling fee amount.
- Within Range (Kilometers) – Define the range in kilometers, by default it is 25. Minimum 1 and Maximum 50.
- Show Pickup Stores Page – Select, Yes, or No to show the pickup stores page (Distance Provider must be set to Google Map [Catalog > Inventory > Google Distance Provider]. Google Direction API and Google Maps API must be enabled.)
- Address Search Enable – Enable address search for store customers.
- Scheduling Emails – Enable email scheduling to auto-send activity-based emails.

- Order Scheduling Template – Pick the appropriate scheduling email template.
- Displayed Error Message – Show a custom message to customers if pickup is not available.
- Ship to Applicable Countries.
- Choose Specific Countries to ship to.
- Show Method if Not Applicable – Select Yes to show the method if not applicable
- Sort Order – Requirement-based sort of the order.
Choosing Offline or Online Modes
Once the basic configurations are set, the admin needs to configure the Online or the Offline Modes of Distance Calculation.
For that, the admin needs to navigate to Stores > Configurations > Catalog > Inventory, in the admin panel.
The admin will find a section namely, Distance Provider for distance Based SSA, under which the admin needs to choose either Google Map or Offline Calculation against the Provider field as shown below.
It is important to mention that the admin must select Google Map for Online distance calculation and the Offline Calculation option for calculating distance offline.
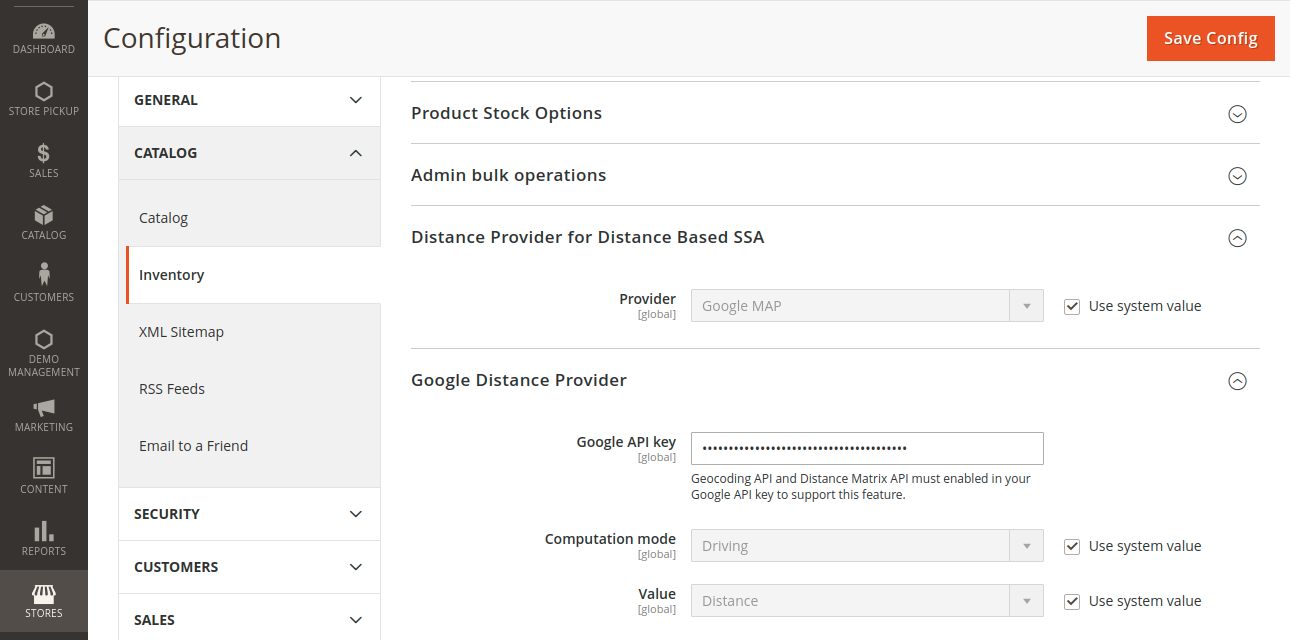
If the admin configures Google Map against the Provider field, then a few more fields are to be configured under Google Distance Provider. These are-
Google API Key: Add the Google API Key against this field.
Computation Mode: Define the mode of Computation against this field.
Value: The admin may either choose value as Distance or Time to destination.
Further, the admin can even select Offline Calculation against the Provider field as shown in the image below.

In this case, the distance is calculated on the basis of the country’s zip code. For that, one must run the command given below in the Magento 2 root directory.
Command –
php bin/magento inventory-geonames:import <country code>
Note:
- The Offline Mode of Distance Calculation will not be accurate as the Online Mode of Calculation.
Administering the Store PickUp Menu Option
Meanwhile, in the admin dashboard, the admin would find a Store PickUp menu option, under which three more sub-menu options are given, these are-
- Manage Stores
- Pickup Stores Orders
- Manage Holidays

Let us study each sub-menu option in detail.
Manage Stores
Clicking the Manage Stores sub-menu option redirects the admin to the Stores page, which displays the listing of the PickUp Stores as shown below.
The admin will find the details such as ID, Name, Enabled, Latitude, Longitude, Created At, regarding each store.
Further, the admin can navigate to the Actions Column, and either Edit or Delete the respective store.

Moving on, the admin can also add new pickup stores by simply clicking the Add Store button, present on the Stores page.
On clicking the Add Store button, it redirects the admin to the New Store page as shown in the image below.

The admin configures the details under Store Info as under-
- Enabled – Enable the status of the store.
- Store Name – Provide a title for the store.
- Latitude – The pickup store’s latitude.
- Longitude – The pickup store’s longitude.
- Description – Add a description for the store (this description will not be visible on the front-end).

The admin configures the details under Store Timing as under–
- Urgent Closed – The admin can choose to enable or disable this option, as likewise, it will display to the customers.
- Store Opens – The admin can either choose 24*7, Custom Days with Same Timing, or Custom Days with Custom Timing.
Let’s define the “Store Opens” field in detail as per case –
1: When the admin selects 24*7
- In this case, the store would open 24 hours a day and for all 7 days of the week.
Case 2: If the admin selects Custom Days with Same Timing
- In this case, the admin must choose the days from the given chart and define the Opening and the Close timings of the pickup store under Timing as shown in the image below.
- For instance, in the image below, the days from Monday to Saturday have been chosen by the admin, and the timing is 8:00 AM to 10:00 PM.
- Please note, that the timing will remain the same for all of the chosen days (here, Monday to Saturday).

Case 3: If the admin selects Custom Days with Custom Timing
- In this case, the admin needs to select the weekdays and for each day the admin can define specific custom timings.
- For instance, the admin selects Monday and defines the timings as 7:00 AM to 5:00 PM in the evening.
- The timing is different for each day and hence the name!

Furthermore, the admin can configure the settings under Store Holidays.

Store Holidays
- Holidays List – The admin can choose holiday(s) from the respective holiday list.
Contact Info
- Person Name -Add the name of the contact person of the store.
- Email – The admin adds the email address of the pickup store.
- Mobile – Add the contact number of the respective store.
- Fax – Add the fax number.
Address Data
- Country – The admin can select the country of the pickup store.
- State/province – Choose the state/province for the given store.
- City – Add the city for the respective pickup store.
- Street – Define the street address of the pickup street.
- Postcode – The postcode of that particular country/ area.
Product Assignment
- This section allows the admin to assign products to the respective store. The admin must click on the Assign Product button for the same.
PickUp Store Orders
Under this sub-menu option, the admin can monitor all the orders of the pickup stores. The admin can find the details such as ID, Purchase Point, Purchase Date, Grand Total (Base), Grand Total (Purchased), and Status.
On clicking the View link, it redirects the admin to the Order & Account Information page of the respective order.

Manage Holidays
The next sub-menu option is Manage Holidays. As the admin clicks on Manage holidays, it redirects to the Holidays listing page as shown below.
On this page, the admin can find the list of holidays and their details such as ID, Holiday Name, From Date, To Date, and Status.
Also, the admin can Edit or Delete any holiday, if need be, by clicking the Select link under the Action column.

The admin can also add a new holiday by simply clicking the Add New Holiday button as shown in the above image.

The admin can define the following configurations under the New Holiday page-
- Enable– The admin can set the status of the holiday.
- Holiday Name– Title or name of the holiday.
- Date Type – The admin can choose either Single Day or Date Range. For Single Day, the admin needs to add a date. For Date Range, the admin will define the From and To dates.
Order Scheduling
Admin can schedule a pickup for the customer and for that admin needs to navigate Store Pickup => Pickup Store Orders as shown in the below-given image:

Now admin needs to open the particular order for which the admin needs to schedule a pickup. Check the below-given image for more information:

Customer End View – Pickup Schedule At
Customers can also view pickup schedule information as shown in the image:

Assign Pickup Store On Product Page
Store admin can assign the pickup store while adding the product or while editing the product.

Assign Pickup Store To a Product
Furthermore, the admin can assign pickup stores to the product. For that, the admin must navigate to Catalog > Products, in the admin panel.
On choosing the product from the list, the admin needs to Edit it and in the Edit Product Page, the admin will find the Assign Pickup Stores section.
In this section, the admin must click on the Assign Pickup Stores button to assign the stores to the respective product.

Store Pickup for Buyers
The pickup feature works for both users be it guest or registered. The storefront, category comes us with the pickup point search feature and also the pickup locations list.
Manual Location Setup to Get Nearest Pickup Store

Address Search Feature to Fetch the Nearby Pickup Points

List of Pickup Locations for Buyers

Pickup Point – Store Details

Pickup Store Selection
Customers can choose the respective shipping address and can choose a nearest available store and proceed with the next step to place the order.

Store Pickup Shipping in Order Summary
Meanwhile, buyers will be able to see store pickup shipping in the order summary while placing the order.

Hence, that’s all for Magento 2 Store Pickup Module. You may also check our quality Magento 2 Extensions.
Looking to optimize your Magento store further? Collaborate with a professional Magento development company to build, customize, and scale your online business effectively.
Still, have any issues feel free to add a ticket. Let us know your views to make the module better https://webkul.uvdesk.com/en/
Current Product Version - 5.0.1
Supported Framework Version - Magento 2.0.x, 2.1.x, 2.2.x,2.3.x, 2.4.x

Be the first to comment.