Introduction
Magento 2 Affiliate System module is frequently overlook by advertisers. Also, the Affiliate System is a type of performance-based marketing module.
Magento 2 Affiliate Module allows an online merchant to pay a commission to the affiliate user for sending them traffic.
This module facilitates the affiliate user to be reward. Earn a reward for one or more affiliate’s clicks for each visitor or customer brought.
Note –
- Only the live site URL is display as a referring URL in the traffic summary at the admin and the customer end.
- If any affiliate customer makes any changes in the blog link after approval by the admin then the affiliate customer needs to be approve by the admin again.
Check the storefront working of the plugin –
Check the backend working of the plugin –
Features of Magento 2 Affiliate Plugin
- Management of Affiliate Configuration by Admin.
- Enable/disable affiliate registration by admin.
- Control Affiliate General Commission Rates by admin.
- Handle rewards for Unique Click, Per Click, and Affiliate Order by Admin.
- Manage transactions by admin.
- The owner can Approve/Disapprove the Affiliate.
- Merchant can set the Payment Method for the Affiliate.
- Admin can Create/Delete the Text Banners.
- The admin can set the commission based on category.
- Handle Affiliate User, Payment, Traffic, Sales, and Statistics by admin.
- Manage advertisement by affiliate user.
- Fully open-source and easy to use.
Install Extension from Webkul Store
#1 Download Module
Firstly, you need to log in to Webkul Store, go to My Account>My Purchased Products section, verify and then download and extract the contents of this zip folder on the system.
#2 Upload Folder
Once the module zip is extracted, follow path src>app and then copy the app folder into the Adobe Commerce root directory on the server as shown below:

#3 Run Commands
After uploading the module folder, you need to run the following commands in the Adobe Commerce root directory:
php bin/magento setup:upgradephp bin/magento setup:di:compilephp bin/magento setup:static-content:deployphp bin/magento indexer:reindexphp bin/magento cache:flush
Install Extension from Magento Marketplace
If you have purchased this extension from the Magento Marketplace then please follow the below process or visit this link.
#1 Get Access Keys
You need to get access keys, navigate to My Profile in Magento Marketplace, then choose Access Keys in the My Products section.

Go to Adobe Commerce and then you need to copy both the Access Keys – Public Key and Private Key. These access keys will be needed in the next steps for authentication.

If access keys are not create earlier, click Create A New Access Key, enter any name and click OK.

#2 Update composer.json File
To know the component name and version number, go to your Magento Marketplace account section, My Profile>My Purchases, then find this extension to view the details.
Please note – Below is an example image, every extension will have its unique component name and version.

After that, navigate to your Magento project directory and update your composer.json file in the following format.
composer require <component-name>:<version>
For example, to install version 4.0.0 of this extension you need to run the following command:
composer require webkul/affiliate-system:4.0.0
#3 Enter Access Keys
Now you will need to enter the Access Keys that you obtained as explained in the first step #1 Get Access Keys.
Wait for Composer to finish updating your project dependencies and make sure there aren’t any errors.
#4 Run Command
You need to run the following commands:
php bin/magento setup:upgradephp bin/magento setup:di:compilephp bin/magento setup:static-content:deployphp bin/magento indexer:reindexphp bin/magento cache:flush
Language Translation
For translating the module language, navigate through src/app/code/Webkul/AffiliateSystem/i18n and edit the en_US.csv file.
Thereafter, rename the CSV as “en_SA.csv” and translate all right side content after the comma in the Arabic language. After editing the CSV, save it.
Then upload it to the path src/app/code/Webkul/AffiliateSystem/i18n where the Magento2 is installed on the server.
The module gets translated into the Arabic Language. It supports both RTL and LTR languages.

The user can edit the CSV like the image below.

Module Configuration of Magento 2 Affiliate System
Post the successful installation of the Affiliate System module, the admin can see the configuration panel. Admin can get the configuration panel under Stores->Configuration->Webkul->Affiliate System.
Affiliate System General Settings :

Here the admin will –
- Allow affiliate registrations – Firstly, select Yes to enable the affiliate registrations else select No.
- Automatically approve affiliates – Then, select Yes to approve the affiliates automatically else select No to manually approve the affiliates.
- Set Commission Priority – Also, the admin can set the commission priority based on the Category or Customer.
- Minimum payout balance – Now, set the minimum payout balance to be credit into the customer’s account.
- Payment day of the month – Then, you can set it to any day 1 to 31 of a month.
- Blog URL Hint – After that, enter the hint for the blog URL that is visible to the affiliate users at the time of registration.
- Affiliate-
- Manage E-mail – Then, enter the Affiliates email address.
- user notification by admin email template – Then, select the email template that will be used when the seller sends any notification to the user.
- E-mail campaign template – After that, select the template for the email campaign.
- Manager email template – Then, select the email template for notifying the admin when affiliate sales orders approve
- Payment credit notification email template – Now, select the email template for notifying the affiliate when the affiliate user payment is credited into his bank.
- Affiliate user email template on order approval – Finally, select the email template for notifying the affiliate of the sales order complete notification.
Payment Information :
Here, the admin will –
Sandbox – Select the mode as Sandbox(testing) or not.
Assign Payment Methods – Select the payment methods that will be available to the affiliates from the list payment methods.

Manage Affiliate General Commission Rate :

Here the admin can configure the below points :
Pay Per Click – Can configure payment amount per click.
Per Unique Click – Can configure the payment for every unique click.
Set Commission Type For Sale – Can configure the commission type for the sale whether it is Fixed or Percentage.
Set Commission – Can set the commission as per the requirement.
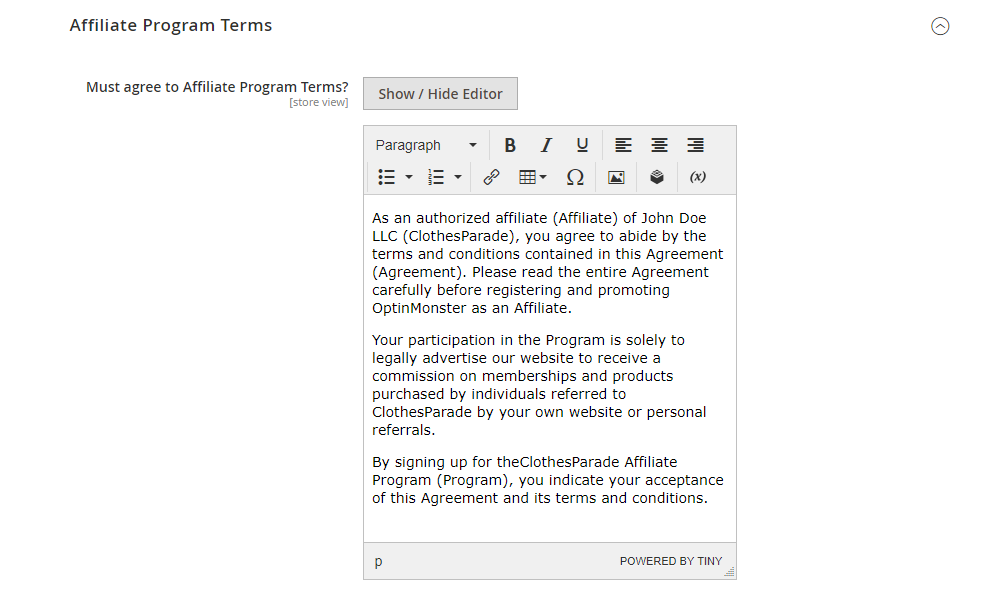
Affiliate Program Terms :
Now, the admin will set the Affiliate program terms, and that needs to be accept before a user can register himself as an affiliate.
Category Commission of Magento 2 Affiliate System
For a particular category, the admin can add the affiliate commission type (Fixed or Percent) as shown in the image below.
Storefront Functionality Affiliate System
So, already register customers can directly login via the sign-in option available at the front-end.
Therefore the customer login into their account, they can see the “Become Affiliate User” link under his account menu as shown below in the snapshot.
For clicking on the “Become Affiliate User” affiliate will have to enter his Blog URL (Where affiliate wants to post the ads and banners). And then will agree to the terms & conditions and click save to save his blog link as shown below.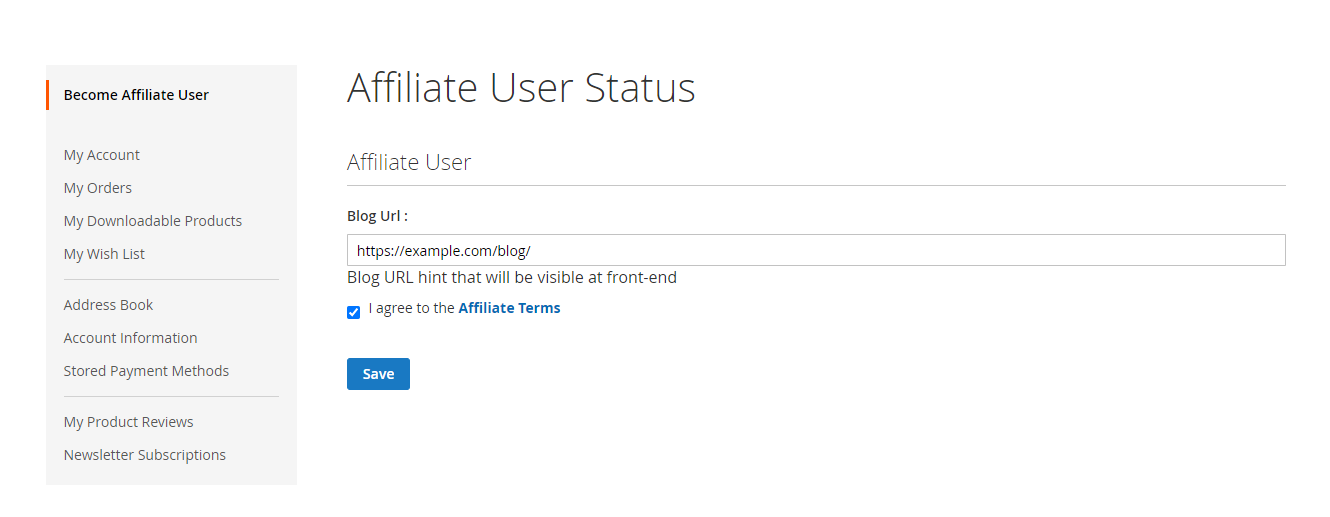 Now, after clicking the Save button above. The affiliate will be able to see his complete affiliate account menu and the success message in the case of auto-approval.
Else, the admin needs to approve the affiliate manually. Check the below-given screenshot for more details.

Affiliate Registration :
Hence for new customers, there is an Affiliate Registration link in the footer block. A user can register themselves as shown below in the screenshot.
Thus, clicking the Affiliate Registration link, the affiliate registration page will open up as shown below in the screenshot.

By clicking the Affiliate Terms, a user can view the affiliate terms as well. The terms will appear inside a popup as shown below.

Forthwith, the affiliate will be able to see his complete affiliate account menu in my account as below image.
Summary :
All details for the affiliate are shown in the Summary Page as shown below in the screenshot.


Banners & Ads :
Now, the affiliate can add banners & ads under the My Account > Banners & Ads menu item. Here affiliate can check his Product Ads and Banners/Text Ad.
Now, the affiliate can click on Copy Html Code and paste it into the website where he wants to put it.
Product Ads :

A preview can be displayed as below image by clicking Preview.

Momentarily, you can see the advertisement site snapshots with the banner as shown below.

Banners/Text Ad :

Click on Preview to check the preview of the banner.

On front-end at affiliate’s website it will be displayed as below image :

When a user clicks on banner or purchases the products then the affiliate user gets a reward. Affiliate user gets reward for the referred click based on the pre-decided commission rate.
The customer gets the commission only when the order is completed and the admin approved that affiliate status.
E-mail Campaign :
An affiliate user can send emails to multiple users. As an e-mail campaign.

Traffic :
Also, the affiliate user can check all the traffic details under the Traffic section of the account.

Sales :
Sales of an affiliate can be view in the Sales section.

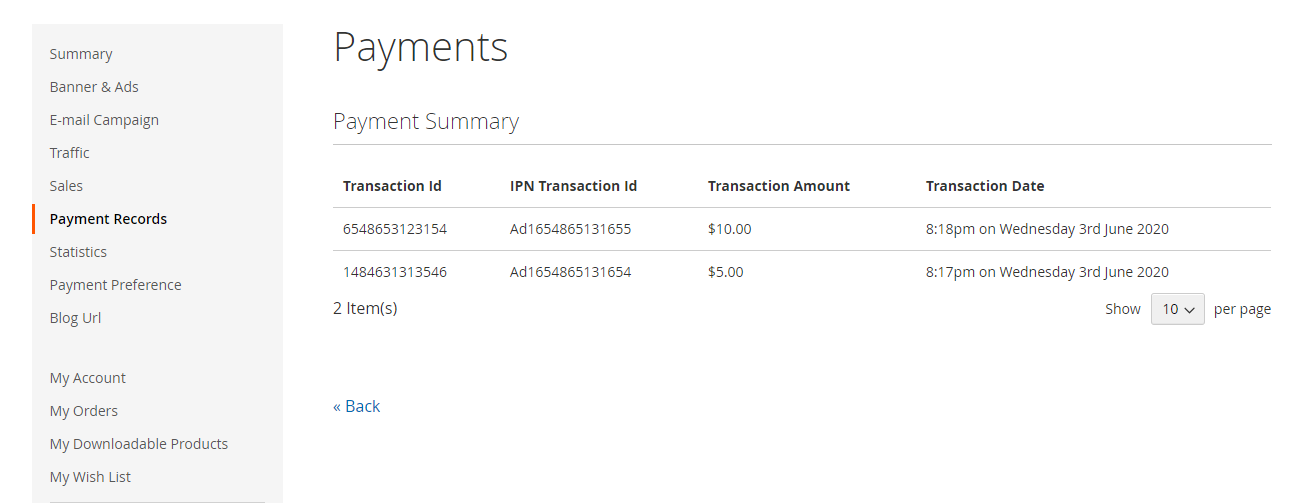
Payment Records :
Even the affiliates can check their payment records by clicking the “Payment Records” tab as shown below in the snapshot.
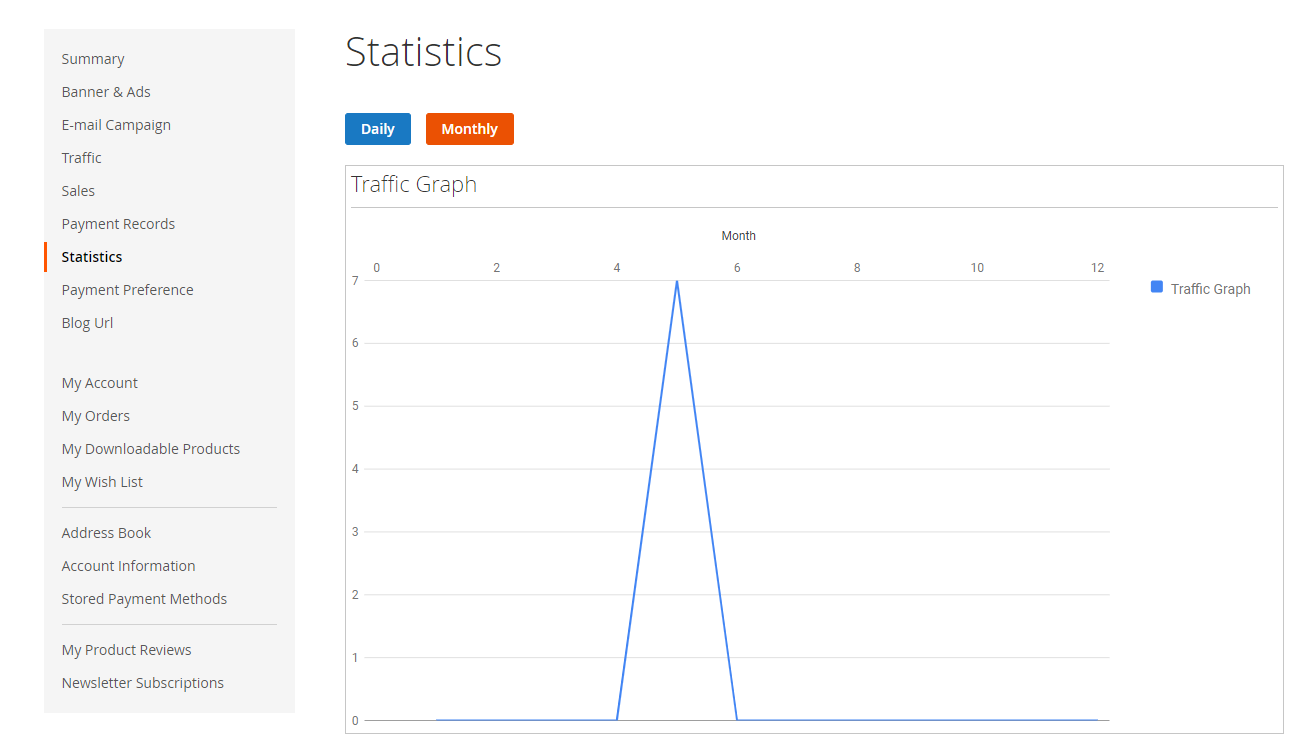
Statistics :
Moreover, the affiliates can see Statistics for traffic in his account as shown below in the screenshot.
Payment Preference :
For making payments or transactions for admin, the affiliate user needs to set the payment method. Affiliate users can set it from their “Payment Preference” tab under their account.
Check the below-given screenshot for more details.
Here the seller can select any one payment method from the admin allow payment methods – Check/Money Order, Bank Transfer Payment, and PayPal Standard Payment.

The affiliate can opt for any of the options. Below we have select Banks Transfer Payment :

If Affiliate Payment is done by the admin, then the affiliate user can check the transaction history from his payment grid in his account panel.
Admin Management of Magento 2 Affiliate System
Admin will be able to create Text Banners/Ads for the affiliates –
To add the text banner admin will navigate through Affiliate ->Affiliate Banner->Banner/Text Ad as per the below screenshots.

After clicking the “Banner/Text Ad” menu item, a page with an option to add the new text banner appears as per the below screenshot.
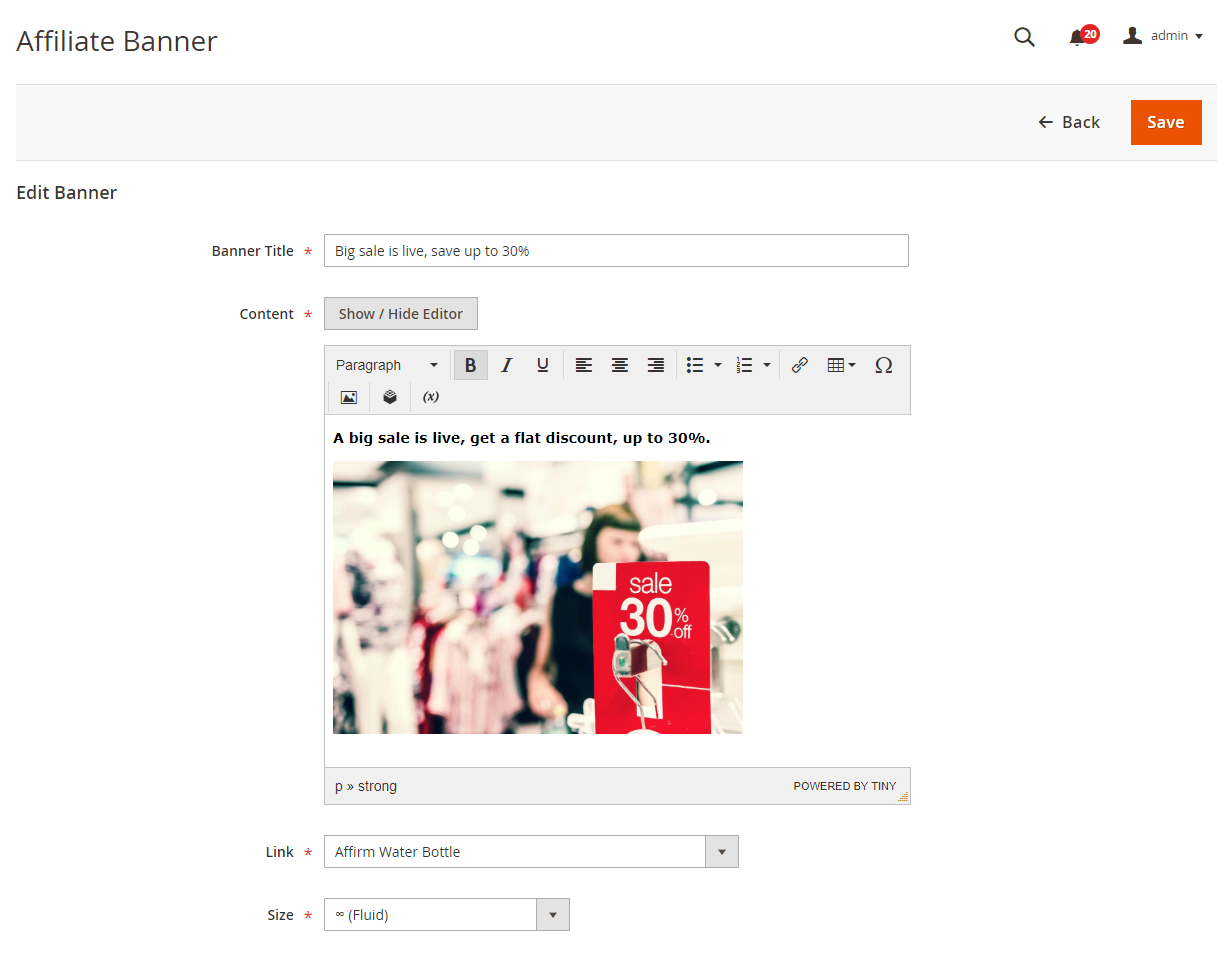
Banner/Text Ad :

Here, by clicking the “Add New Banner” button a page to create the text banner appears. Here the admin will enter the Banner Title, Content, Link, and the Size of the banner as shown below.
The added banner will be display as below image in the Affiliate Banner List :

Moreover, the admin can also see the preview of the banner by clicking the “Preview” as shown below in the screenshot.

Manage Affiliate :
At the backend, admin can manage the affiliate user – Approve/Reject as shown in the below snapshots under Affiliate > Affiliate Manage > Manage Affiliate.

Thus, the admin will pay the commission amount of the affiliate user by clicking the “Pay To Affiliate” button as shown below.

By clicking on the Pay To Affiliate a pop-up appears to enter the transaction details as per the selected payment method by the affiliate.

So, when the transaction is done then admin can see the transaction history for that affiliated user. Admin can check transaction history from the payment record list.
Email Affiliate :
Admin can send emails to the affiliate users as shown below by navigating to Affiliate > Affiliate Manage > Email Affiliate.

Payment Records :
The admin can navigate through the path Affiliate-> Statistics-> Payment Records like in the below snapshot.

Traffic :
Even, the admin can see the Traffic Record list from the admin panel. So, navigate through Affiliate->Statistics->Traffic as shown below in the snapshots.

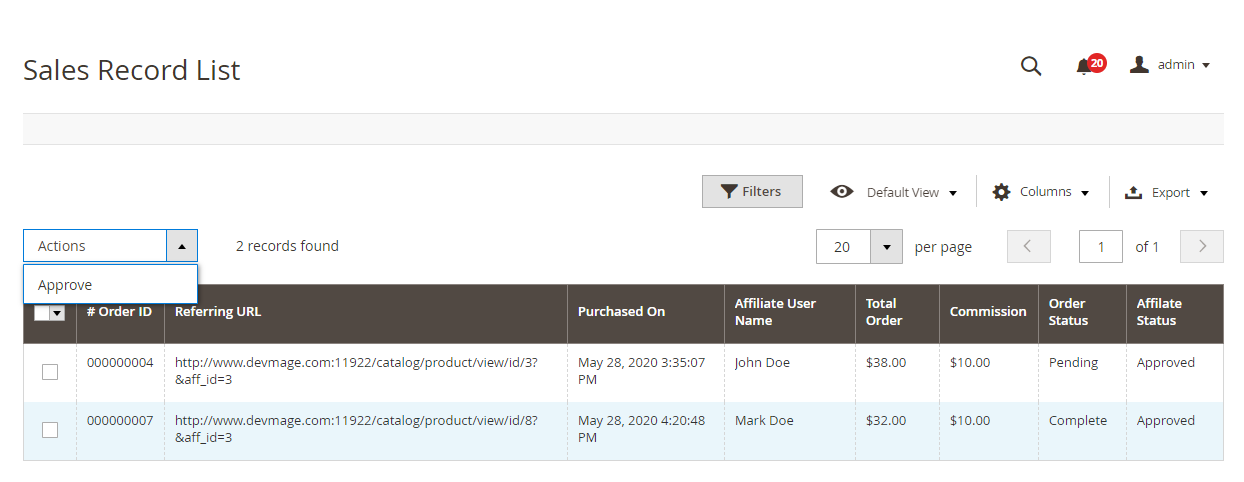
Sales :
Now, the admin can see the Sales Record list from the admin panel by navigating through Affiliate->Statistics->Sales.
Here the admin can approve an affiliate Sales Record Status after which the affiliate user gets the commission for that order.
Moreover, check the below-given screenshot for more details.
Statistics Graph :
Moreover, the admin can see Statistics Graph showing the Traffic Graph Monthly. Additionally, the Traffic Graph Daily under the Statistics Graph section as per the below snapshot.

Also, the admin will be able to see the payment preference method that has been selected by every individual affiliate.
Thus, navigate through Customers >All Customers> and clicking the edit button as shown below in the snapshot.

Affiliate Information :
After this, the admin will go to the menu option Affiliate Detail to individually change the commission type or amount of commission.
Pay Per Click and Pay Per Unique Click amount values. Thus, enable or disable the affiliate for each individual affiliate user.

Forthwith, the admin can also see the affiliate payment preference details. That is, the payment method has been selected by each individual affiliate user as shown below in the snapshot.

So, that’s all for the Magento 2 Affiliate Extension. If you still have any issues feel free to add a ticket. Also, let us know your views to make the module better at webkul.uvdesk.com
Explore the Adobe Commerce Cloud development service by Webkul. You may also browse other Magento 2 marketplace add-ons. Also our top-quality Magento 2 extensions.
Current Product Version - 4.0.4
Supported Framework Version - Magento 2.0.x, 2.1.x, 2.2.x,2.3.x, 2.4.x

1 comments