CS-Cart Web Push Notification:
This impressive add-on allows admin to send push notification directly to the browser. The biggest benefit of push notification is the ability to deliver notifications immediately. Unlike emails that sometimes fail to deliver or go to a spam folder, its prompt and assured content delivery feature ensure that notifications are for sure delivered to the user. As long as the browser is running, a subscribed user gets a pop-up message from the website without having the site open. This improves the user engagement and retention.
Please Note- In order to allow Web Push Notifications for Safari browsers, you will require the Safari Certificates. If you do not own the certificate then you can purchase it from Webkul. The validity of that certificate will be 5 Years.
If you want to create your own certificate, then you need to have Apple’s developer account with an individual membership plan worth $99 USD per membership year. For knowing how to create your own certificate for Safari Web Push Notifications, please continue reading this blog post.
Check a brief overview of the plugin –
Features
- Well integrated with CS-Cart & Multi-Vendor.
- Works well with Mozilla Firefox, Chrome, and Safari (only for Apple devices) browsers.
- Designed to work only with the SSL certificate websites that means Web push notification works only in https sites.
- No monthly subscription required for notifying customers.
- An unlimited number of customers can subscribe to your site.
- Functionality to create and delete notifications at admin end.
- Option to add icon and target URL for notifications.
- Allows notification to all subscribed user as per the configuration made at admin end.
- Functionality to view and delete the notification logs.
- Advanced notification logs view providing logs related to each browser separately.
Benefits Of CS-Cart Web Push Notification
- No need to have a mobile app to get the benefit of mobile push notifications.Users can subscribe to push notifications right from the mobile website.
- You can reach out to those users who are not on your website.
- You can notify your user whenever required.
- If the user is offline at the time of sending a notification, he will see the notification as soon as he comes online and opens the browser.
- Web push notifications don’t need a user’s email or other contact details.
- Prompt and assured content delivery, the moment you click on “Notify”, it will be delivered to the users immediately.
- Push notifications are clickable. So you can send people directly to any URL on your website.
- Drive more traffic to your website.
How To Upload and Install
Go to “Manage add-ons”, click on “+” to upload and install the zip file as shown below.

Click on “Local” to browse the zip file and then click on “Upload & Install” as shown below in snapshot.

Global Settings
Once the add-on is installed, click on “Settings” to configure the add-on as shown below.
There are different settings fields which includes:
- General Settings
- Chrome Settings
- Safari Settings
- General Settings:
- Subscription Request– There are two options for requesting the user for allowing Push Notification. You can either request on Website Load or by adding a notification bell icon. To add the icon you simply need to add a template block in the layout as explained in this post further.
- App Name- Give the application name for the manifest file.
- Chrome Settings:
- Enter the sender id for Firebase Cloud Messaging.
- Enter the Legacy Server Key for Firebase Cloud Messaging (FCM). (You will get to know how to get these credentials later in this blog post.)
- Check the box to Create Chrome manifest.json file. You need to create this file every time you change the settings.
- Safari Settings:
- Enter the Certificate’s import password which is kept while exporting the CSR file. If you have not kept any then you may keep this field as blank.
- Website Push ID is a unique identifier to identify your website. It should be your unique reverse-domain string, such as web.com.example.domain (must start with web.). (You will get to know how to get these credentials later in this blog post.)
- Enter the Allowed Domains in quotes (” “) separated by a comma (,).
- Upload the Key file and Information file.
How to get API Key and FCM Sender Id
Please go through the below steps to get Legacy Server Key and FCM Sender id :
1. Go to the link https://console.firebase.google.com/ and log in with your Gmail account.
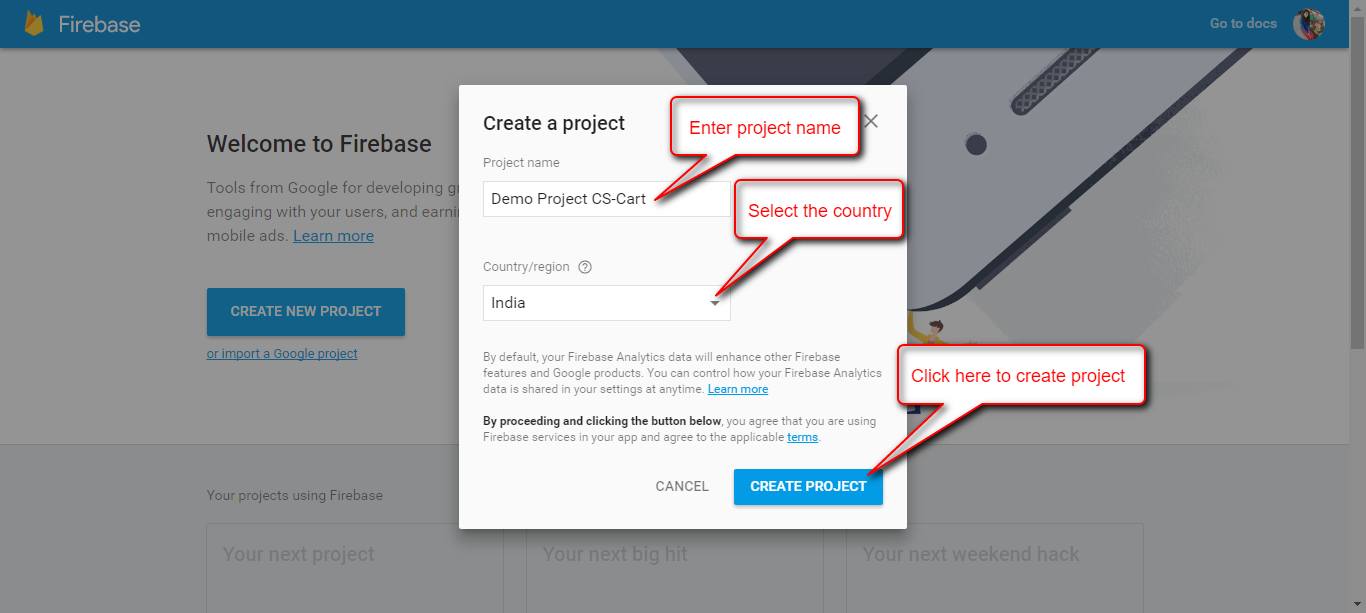
2. Click on “Create New Project” button as shown below in the snapshot.
3. Enter the name of the project, select the country and click on “Create Project” button as shown in the snapshot.
4. Once the project is created click on “Project settings” as shown below.
5. Click on CLOUD MESSAGING for FCM Sender Id & Legacy Server Key. Here you can get FCM Sender Id & Server Key as shown below in the Snapshot.
How to Get Web Push Certificate
To get push notification certificate, you need to register A website Push Id and create a certificate based on that push ID. Here are the steps below to get the same.
Step 1: Create Push Id-
1: Login to the developer portal and navigate to Certificates, Identifiers & Profiles. Now, go to Website Push IDs to add a new push Id.
2: On clicking + button, you will get a form with two fields,
- Enter the description of Web Push Id (Just for the developer portal. Neither your safari browser nor the Users and Server will be able to see this.)
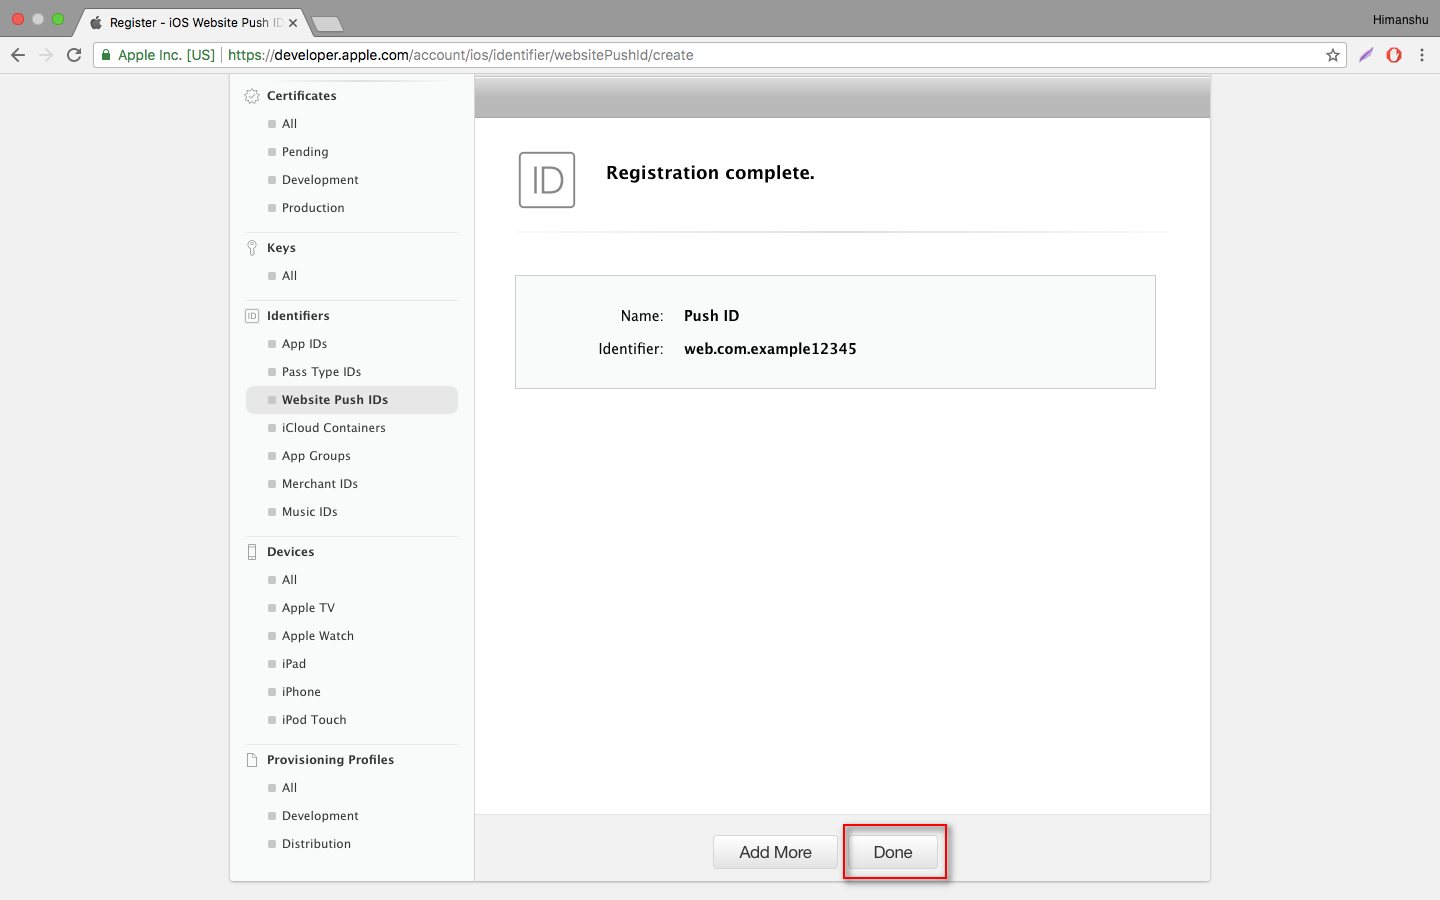
- Enter the identifier so that the code may identify your website. It is recommended to enter the reverse domain name style string as shown below in the image. (The identifier will start with the string “web.”) This identifier will be used in the Safari Settings of the add-on.
Now click on the Register button as shown below.
Registration Complete!
Just click on continue. This is how you can create Push Id.
Step 2: Generate The Certificates.
1: Go to Settings as shown below & click to Create Certificate.
2: You will see some instructions to create a CSR (Certificate Signing Request). Just read and create a CSR file. Further, click to Continue as shown.
3: Upload the CSR file here & click to continue.
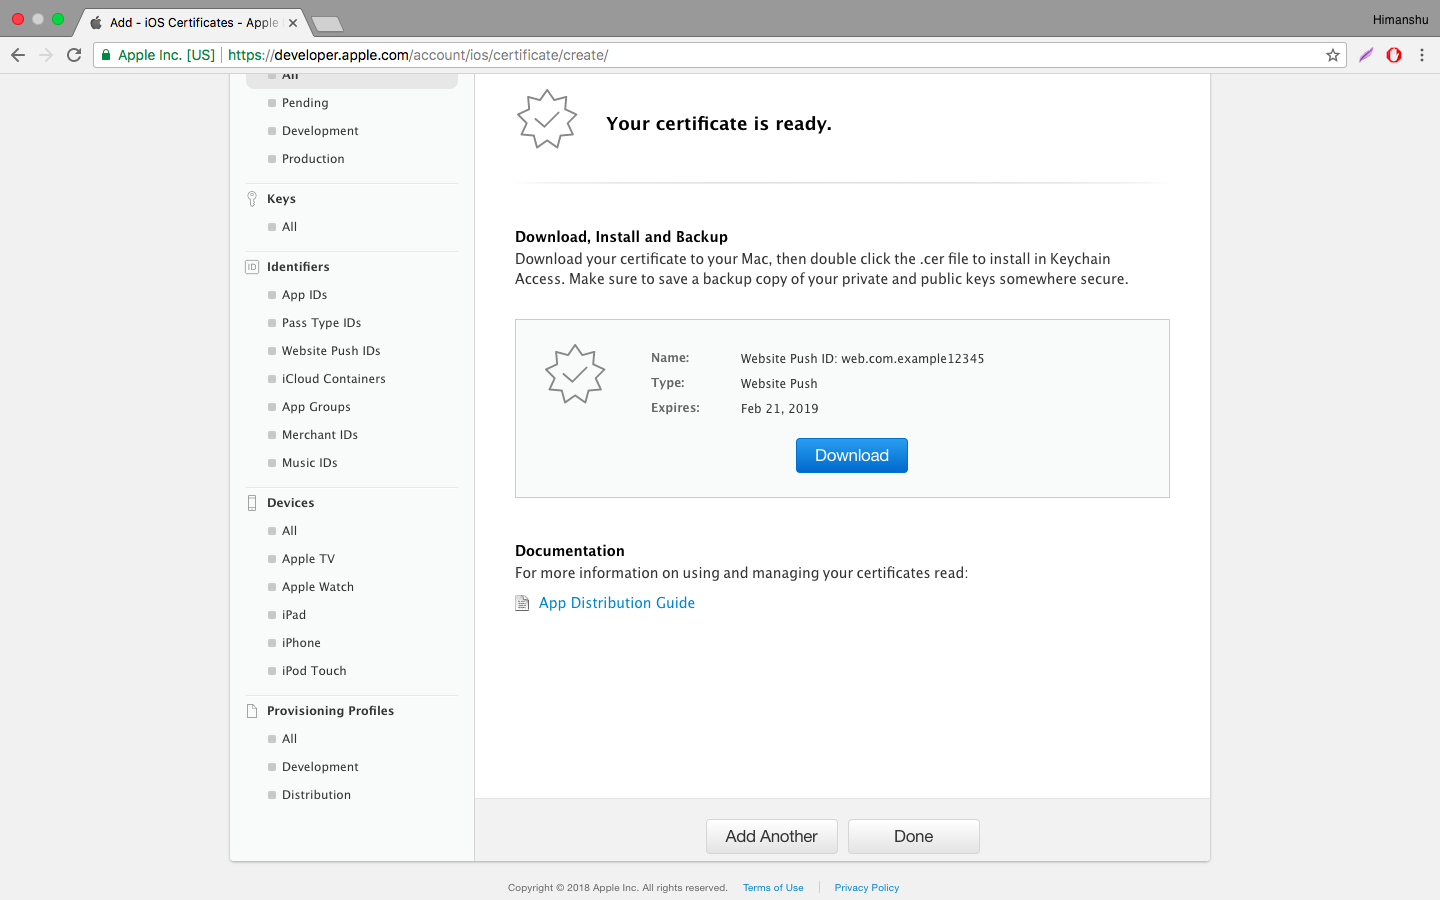
4: The certificate will be generated as shown below. Just download this.
5: Further, you need to install the certificate in Keychain Access. Just right-click to export the certificate with a p12 extension.
6: Just give a name to the certificate and Save.
Further, you need to create PEM Certificate. Open the terminal of your mac. Go to saved .p12 file location & run the below command.
openssl pkcs12 -in Certificates.p12 -out Certificates.pem -nodes -clcerts
Back End View
Go to “Marketing” tab and click on “Web Push Notification” as shown below.

Click on “+” button. There will be 2 options as shown below in the snapshot.
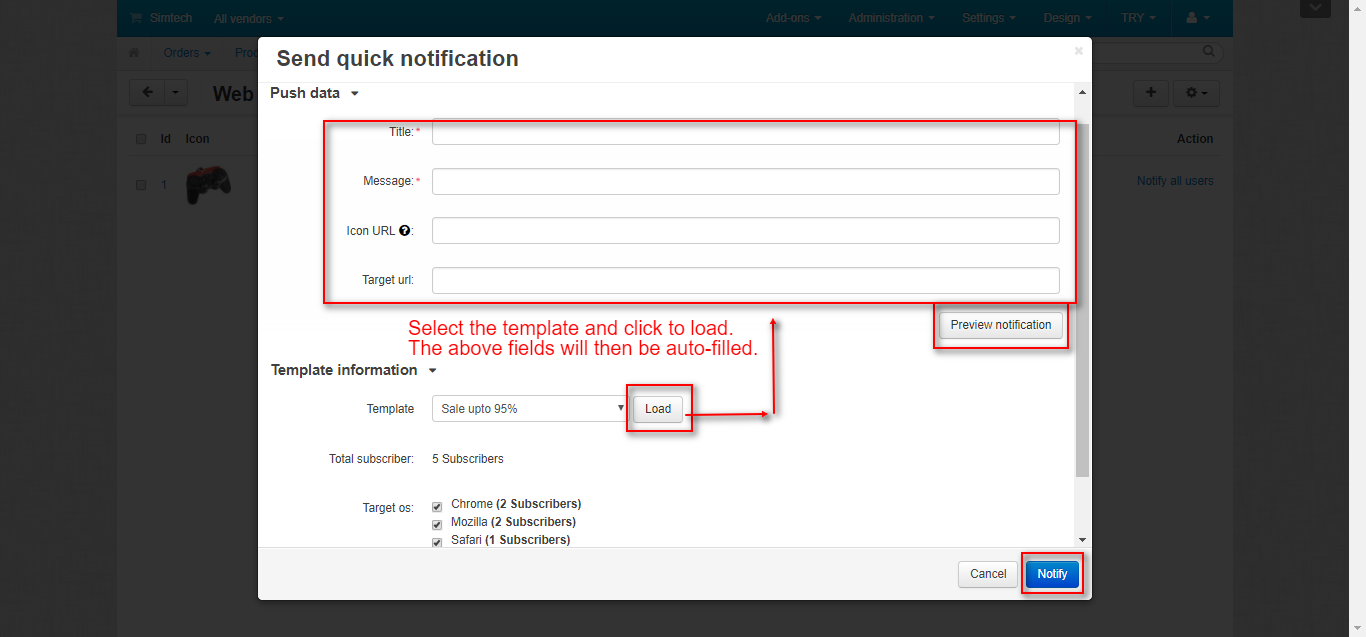
To send a quick notification to the user click on the option “Send quick notification“. You will get a pop-up.
The pop-up fields include Push Data & Template information. If you want to send the already created template then just select the template from the template drop-down & click to Load. Or simply add a new notification content & click to notify. You can also preview the notification by clicking Preview notification button.
Please refer the below screenshot for more details.
To create a new template click on the “Add notification template” option. Enter the following parameters to create a notification as shown below in the snapshot.
- Enter the title of notification.
- Write down the notification messages.
- Click on “Local” to add an icon.
- Enter the target URL for the notification.
- Click on “Create” button to add the notification.
Notifications added will be listed under Web Push Notifications as shown below.
- Click on the drop-down to “Edit” or “Delete” the notification.
- Click on “Notify” to send the notification. Statistics alert will appear for sent notification as shown below.
Notification Logs Management:
Go to “Marketing” tab and click on “Push Notification Log” to view the logs as shown below.
All the logs will be listed as shown below. To delete the logs, select them by clicking on the checkbox and click on “Delete Selected” as per the below screenshot.
Subscribers Management :
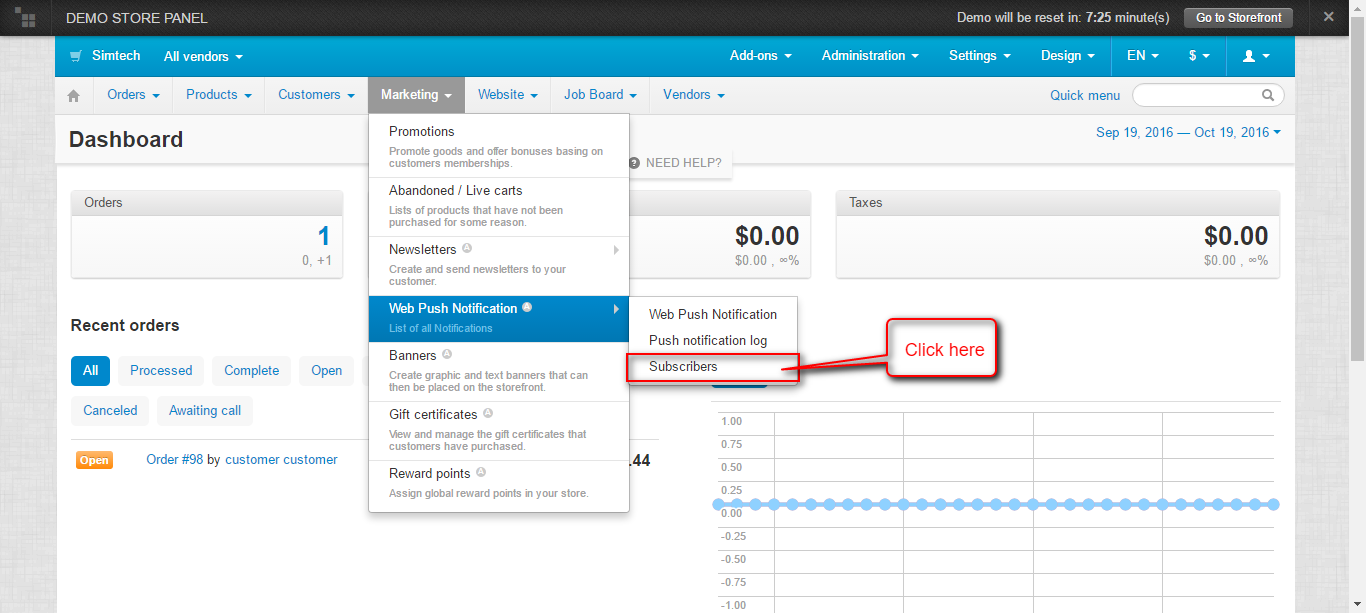
Go to “Marketing” tab and click on “Subscribers” to view the subscribers as shown below.
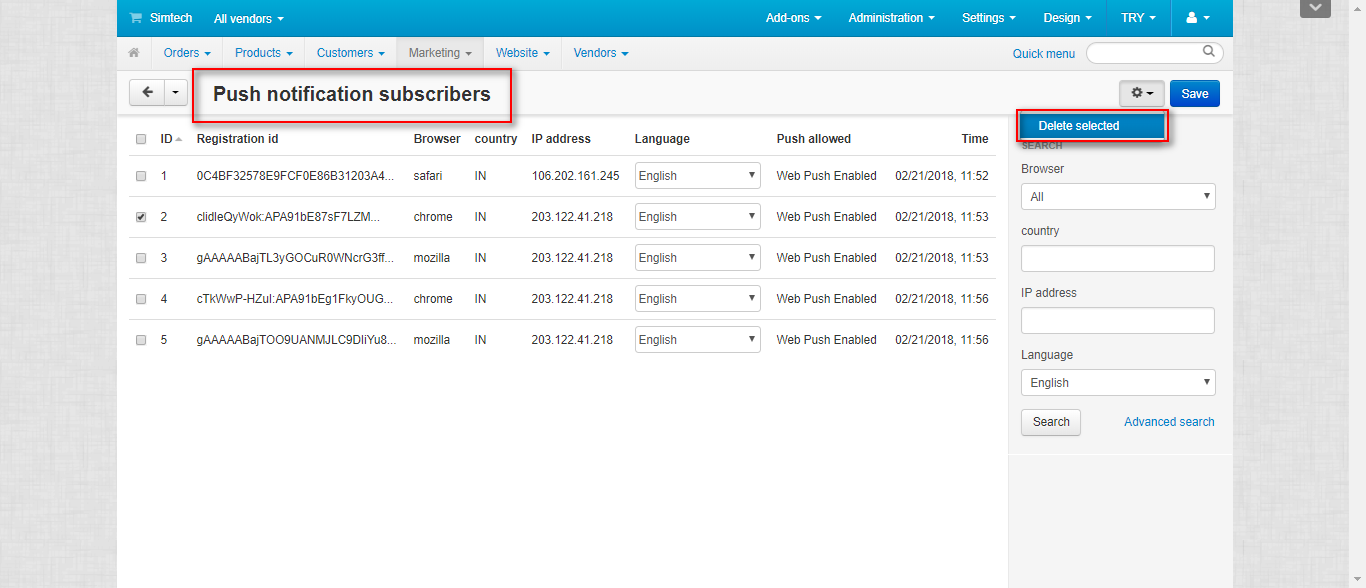
Here’s the list of all the subscribers. To delete subscribers, select them by clicking on the checkbox and click on “Delete Selected” as per the below screenshot.
Please Note that: “Push allowed column will be updated only for safari browser and not for Chrome or Mozilla”
In order to get a notification icon at frontend, just add a template block in the layout by keeping the template as Push subscription as shown below.
Front End View
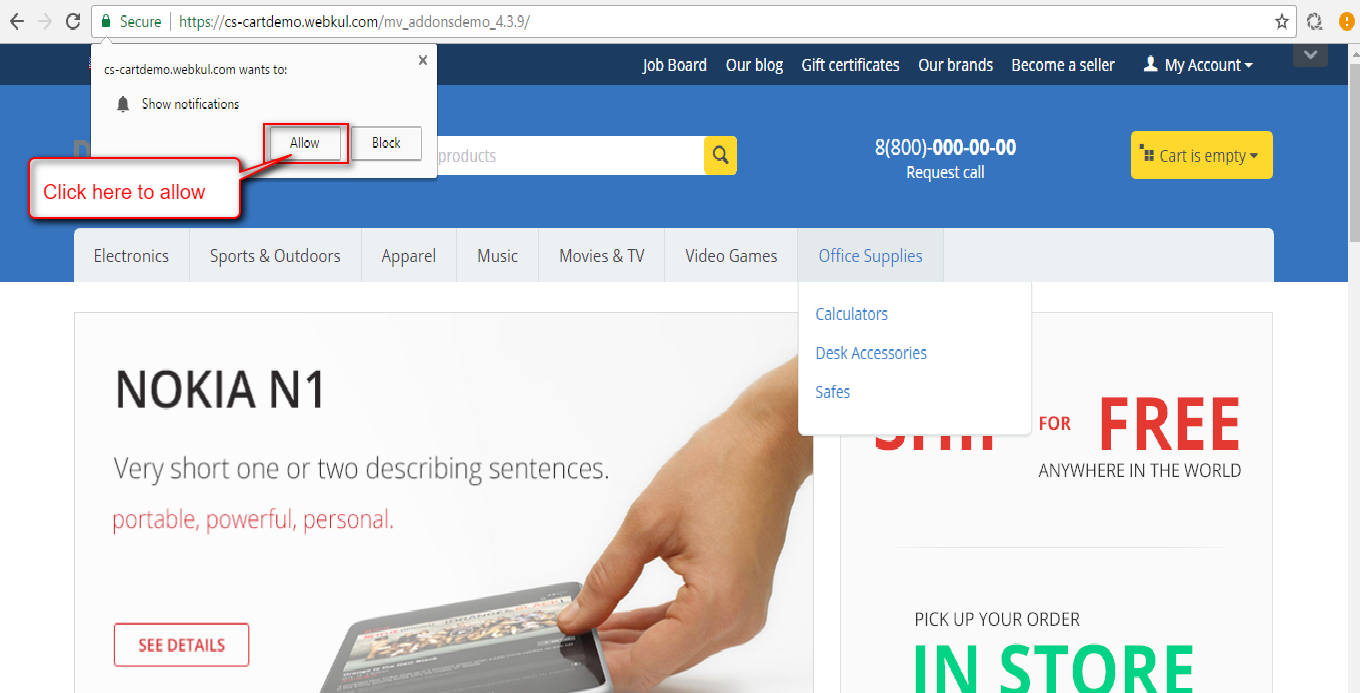
Once the user opens the storefront, a pop up is originated if in the add-on settings you have set Subscription Request on Website Load. But if you have set Request on clicking the bell icon, then this pop-up will be displayed only when the icon is clicked.

Click on “Allow” button to allow the notification.
On allowing user will get subscribed to receive the notifications.
Notification View :
Once the admin sends the notification, Subscriber will get the same even when he is not actively using the store. Here’s the view of notification received while the Chrome and Mozilla Firefox browsers are active.
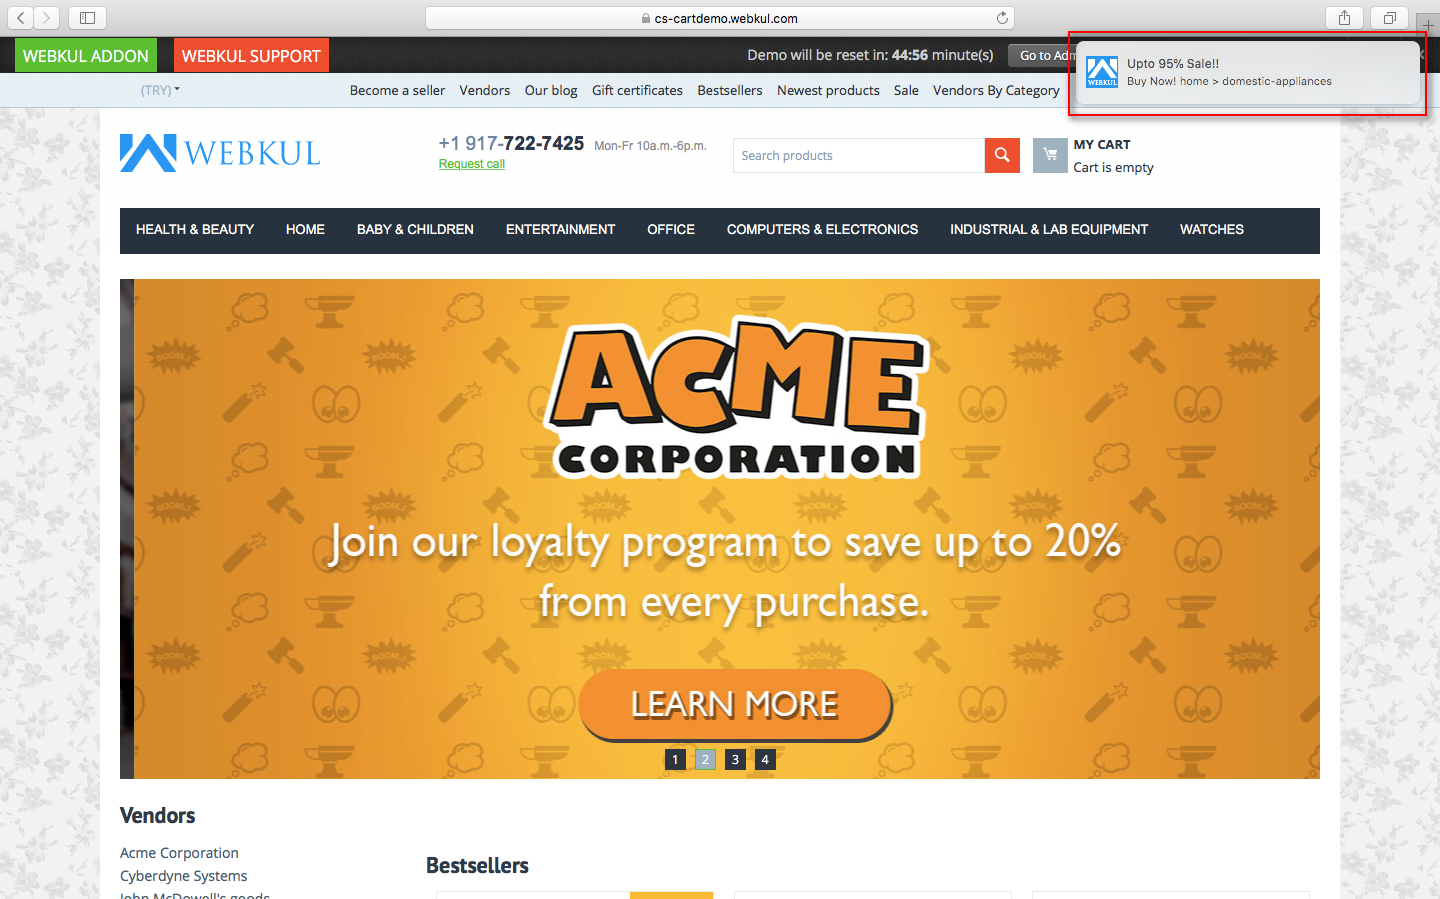
Notification Pop-up in the Safari Browser:
Received Notification On Safari Browser:
Please note that the received notification will have the message title and body along with the images which need to be set prior to add-on installation. You will require the icon images with specific name and dimensions as mentioned below. These are specifically for Safari Browsers only & will be used in notifications, Notification Center, Safari, and System Preferences.
So, the images for all the notifications on Safari Browser will be same as the icon set here.
- icon_16x16.png
- icon_32x32.png
- [email protected]
- icon_128x128.png
- [email protected]
Support
This is all about CS-Cart Web Pust Notification module. Still, have any issue, feel free to contact us at http://webkul.uvdesk.com and let us know your views to make the module better.
Please explore our cs-cart Development Services and Quality cs-cart add-ons.
Current Product Version - 2.0
Supported Framework Version - 4.13.x, 4.14.x, 4.15.x













Be the first to comment.