Setting up Magento 2 PWA Studio Setup can look simple in documentation, but in real projects you often face version issues, OpenSSL errors, and environment mismatches.
In this guide, I am sharing a practical, working method to set up Magento 2 PWA Studio using Venia storefront
What are Progressive Web Apps?
The popularity of PWA is growing at very fast in the field of e-commerce, business, online news portal and other fields because of its peculiar characteristics listed below follows:
1. Faster User Interface Support
Web developers can now load an entire website to a browser after just one pageview even on slow networks.
2. Home Screen Shortcut
Mobile users can install the PWA site on their home screen like a Native App.
3. Offline Support
Implementation of service workers makes it able to work offline. The website can now be accessible even to users who lost internet connectivity.
PWA sites cache content to ensure that some content can be served when a user is offline.
4. Background Processes
If the user facing poor connectivity or offline, the browser store all the form submission data and requests, When connectivity returns it re-sent all the data in the background.
5. Secure
PWA sites use HTTPS connections for enhanced security.
Why Use Magento 2 PWA Studio?
Magento PWA Studio helps you build a fast, headless, React-based storefront for Magento.
It improves:
- Page speed and performance
- Mobile experience
- SEO and Core Web Vitals
- User experience and scalability
Venia is the default reference storefront provided by Adobe.
System Requirements
For this Magento PWA Studio setup, the following versions were used:
- Node.js: 20.20.0
- NPM: 10.8.2
- Yarn: 1.22.22
Step 1: Clone the PWA Studio Repository
First, clone the official Magento PWA Studio repository from GitHub.
git clone https://github.com/magento/pwa-studio.git
This will download the complete PWA Studio workspace into your system.
Now move inside the project directory.
cd pwa-studio
Step 2: Install PWA Studio Dependencies
Install all required packages using Yarn.
yarn install
This step may take a few minutes depending on your internet speed and system performance.
After this, all node modules will be available locally.
Step 3: Generate SSL Certificate for Local Domain
Now generate a custom local SSL certificate for Venia.
yarn buildpack create-custom-origin packages/venia-concept
This command creates a secure local domain required by PWA Studio.
Common Error: OpenSSL Digital Envelope Issue
You may get this error:
error:0308010C:digital envelope routines::unsupported
This happens due to OpenSSL compatibility issues with Node 20+.
Solution for OpenSSL Error
export NODE_OPTIONS=--openssl-legacy-provider
This will fix the OpenSSL issue permanently for the session.
Step 4: Create the Environment File (.env)
Now generate the environment configuration file.
yarn buildpack create-env-file packages/venia-concept
This command will create the .env file inside the Venia package.
Step 5: Configure Magento Backend URL
Edit this file:
pwa-studio/packages/venia-concept/.env
Now set your Magento backend URL:
MAGENTO_BACKEND_URL=https://your-magento-domain.com/
Make sure:
- The URL is publicly accessible
- GraphQL works correctly on this domain
Step 6: Start the Venia Development Server
Build artifacts
Before starting the server, generate the Venia build artifacts by running the following command from the PWA Studio project root directory.
yarn run build
Run the server
Now start the PWA development server.
yarn watch:venia
This command will:
- Build the PWA storefront
- Start the local dev server
- Provide a dynamic frontend URL
Access Your Magento PWA Frontend
After the build finishes, the terminal will show a URL like:
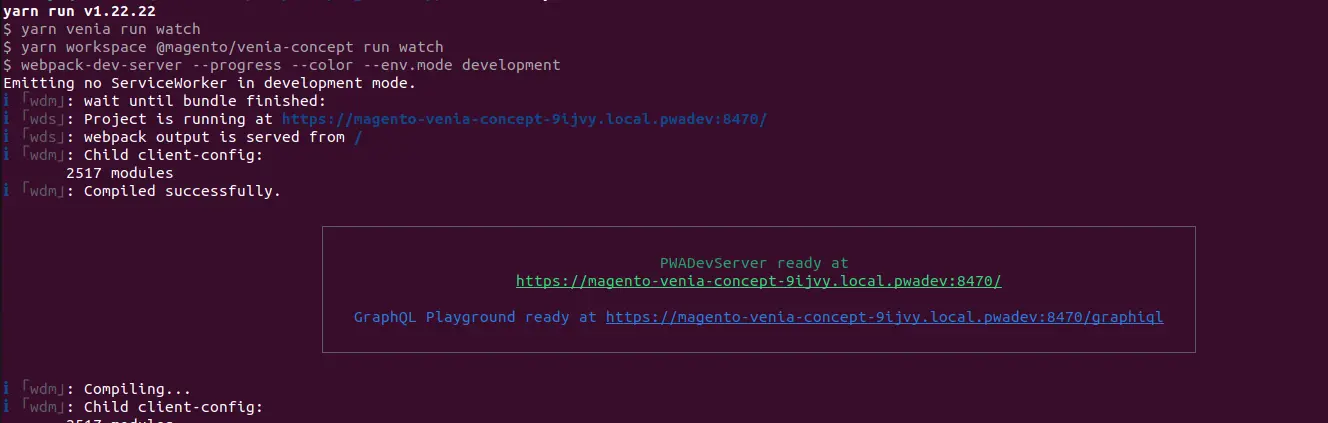
https://magento-venia-concept-9ijvy.local.pwadev:8470/
Open this URL in your browser to see the Venia storefront running.
Thank you for reading the dev doc article on how Magento 2 PWA Studio setup. If you need any help, please reach out to our team via a support ticket.
Find the complete range of Magento 2 extensions including PWA and Headless PWA.
Current Product Version - pwa-buildpack: 11.4.2
Supported Framework Version - Magento 2.0.x, 2.1.x, 2.2.x,2.3.x, 2.4.x

36 comments
when i run “yarn buildpack create-custom-origin packages/venia-concept”
i got this result:” error Command “buildpack” not found.”
has somebody already meet this issue ?
Thx
i made a git clone of https://github.com/magento/pwa-studio.git but it’s the develop branch
So i made a git checkout to the master branch
bash deployVeniaSampleData.sh
above command throws below error
[Composer\Downloader\TransportException]
The ‘https://repo.magento.com/packages.json’ URL required authentication.
You must be using the interactive console to authenticate
Thanks
What additional settings required?
Resources used,
Magento 2.3.2
node & yarn latest version
SSL installed on server
https://prnt.sc/oic1th
When I run this command:- yarn run build && npm run stage:venia
I get following error, but build is run successfully :-
WARNING in asset size limit: The following asset(s) exceed the recommended size limit (244 KiB).
This can impact web performance.
Assets:
js/client.js (411 KiB)
js/vendor~client-44e0557f49cb4cedfacb.js (305 KiB)
js/10-c42c77dd37dbff0743c3.js (327 KiB)
WARNING in entrypoint size limit: The following entrypoint(s) combined asset size exceeds the recommended limit (244 KiB). This can imp act web performance.
Entrypoints:
client (716 KiB)
js/vendor~client-44e0557f49cb4cedfacb.js
js/client.js
Please let me know how to resolve this.
my project is set with health365[.]local/ url and venia-concept/.env file has configuration below:-
MAGENTO_BACKEND_URL= health365[.]local/”
output of build stage is:-
ℹ 「wdm」: wait until bundle finished:
ℹ 「wds」: Project is running at magento-venia-concept-ofxov . local . pwadev:10000/
ℹ 「wds」: webpack output is served from magento-venia-concept-ofxov. local . pwadev:10000/
ℹ 「wdm」: Version: webpack 4.29.6
Time: 4808ms
Built at: 06/18/2019 3:45:16 PM
ℹ 「wdm」: Compiled successfully.
┌─────────────────────────────────────────────────────────────────────────────────────────────────┐
│ │
│ PWADevServer ready at magento-venia-concept-ofxov[.]local.pwadev:10000/ │
│ GraphQL Playground ready at magento-venia-concept-ofxov[.]local.pwadev:10000/graphiql
Please use this command: yarn run build && yarn run stage:venia
same issue for me but build successful.
I can see below URL but it’s not opening browser. How can see the PWA website. Please help us.
magento-venia-concept-vtych[.]local[.]pwadev:9786/
Thanks,
Murali
thanks,
Murali
Check the step 6 to 7.1, in step 6, check .env file in pwa-studio/packages/venia-concept directory. if file not exists, then create a .env file from env.dist.
Now see the step 7, find MAGENTO_BACKEND_URL which will be you Magento instance ex: mahesh[.]webkul[.]com/ or mahesh[.]webkul[.]com/demo3.
Now Run step 7.1 step command from pwa root directory. Make sure you are using latest pwa-studio clone from git: @magento/pwa-buildpack v3.0.0
Then read the Section: Setup Venia Project On Production Server, in that I have explained that you need to edit .env file accordingly.
Make sure additional port is open on server which you giving in .env file
it is showing me Skipping upward-js build… & Skipping upward-spec build… on yarn run build command, is this an error or what?
https://i.imgur.com/As3tFFs.png
Do you know any docker have setup environment for magento 2.3.1?
Thanks
http://prntscr.com/nsp8qe
I installed magento 2 on xampp windows 10
Still error 🙁
You must have a version of node.js >= 8.0.0, and a version of npm >= 5.0.0
ex:ln -s /home/users/myuser/www/html/pwa/pwa-studio/packages/pwa-module app/code/Magento/Pwa
Above command is not working in the window so can you please let me know how to do it in the window.
following the given steps.
Can you provide me gitub link of pwa-studio that have pwa-module directory