User guide of Prestashop Point of Sale System
Table of Content
Prestashop Point of Sale System is a web-based POS solution that facilitates the store owner to manage multiple physical stores and synchronize them to your eCommerce store.
Synchronize your store data (orders, customers, product listings) with POS outlets.
Create multiple sales agents and assign them to the respective POS outlets.
POS panels for physical stores from where sales agents can search the products, place orders, manage customers, apply vouchers, process returns.
Connect your POS system with the barcode scanner, printer, and cash drawer to speed up the purchase process on your physical stores.
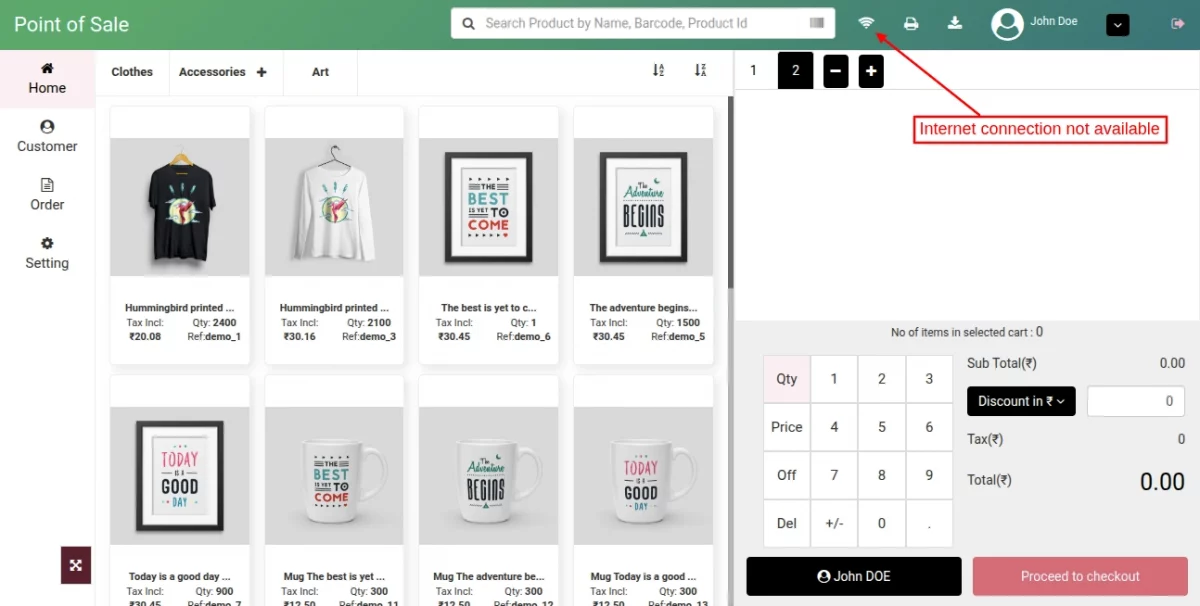
Also, our POS system works in an offline mode. So, even if the internet connection is not available your sales agents can process the orders.
Offer multiple payment methods such as cash, debit or credit card to the customers.
Also, there is a split payment option that enables the customers to use more than one payment method to pay for the order.
Track the transactions done via various payment methods in POS with cash register. Record cash withdrawal & deposit, and set closing balance at the time of closing the register.
Note: Prestashop Point of Sale System module is compatible with PrestaShop multi-store feature.
Features of Prestashop Point of Sale system
- Add multiple physical stores and associate products with them.
- Add multiple sales agents and assign them to POS outlets.
- A separate panel for sales agents from where they can manage sales and customers.
- Add products to the POS cart in two ways: on clicking the product or by scanning the barcode.
- Update product quantity, price, and apply the discount on products & orders.
- Add customer profile from POS panel by entering the basic details.
- Edit customer details while processing an order.
- Create order from POS panel in an offline mode.
- POS system automatically syncs offline orders to online after restoring of internet connection.
- Customers can choose to pay for their orders via cash or card or in split form(partial payment via cash or card).
- Add the POS payment method from the back office.
- Put an order on hold and retrieve it to complete the order at a later stage.
- Set initial load capacity of product, orders and customer on POS end.
- View a list of transactions done via different payment methods in POS with cash register.
- Add note while closing the cash register balance.
- Set total number of orders to display on POS screen.
- Auto-rotate POS screen in mobile browser.
- Our POS system supports multiple languages and currencies.
- Seach orders via various parameters, like customer name, price, mode of payment, etc.
- Print the sales receipt after the completion of the order.
- Upload the POS outlet logo to be displayed on the POS invoice.
- Connect cash drawer to POS printer to open after printing the sales receipt.
- Synchronize Prestashop product quantity with POS outlet quantity.
- Display stock quantity for each product in POS panel.
- Display number of products added in cart in the POS panel.
- Provide a fixed or percentage discount on the complete POS cart.
- Display product’s original price and stock location on POS panel.
- Configure order status to assign to the order upon its validation in POS.
- Automatically generate barcode for products.
- Automatically assign product to a specific outlet when it is created in the back office.
- A new stock update button is added to the POS panel to synchronize stock between PrestaShop store and POS.
- POS dashboard to view sales, the number of orders received, and net profits from a particular POS outlet.
- Also, view top cashier and top selling products in the POS dashboard.
- POS system supports guest checkout.
- Option given to add custom product on POS at run time.
- Ability to redeem voucher partially.
- It supports the PS Specific Price Rule.
- Always a notification sound when any error on POS panel.
- Use keyboard shortcuts and number keys for the on-screen keypad.
How to Install PrestaShop Point of Sale System
- Firstly, Go to Module Manager in Back office and click on ‘upload a module’.
- Now, Drag and drop the module file or select the file from the system.
- In this way, the module installation will be successful.


POS Management – Admin’s End
After the successful installation of the module, a new tab “Manage POS” adds to configure the module settings. Please note that the module configuration can be set in multi languages.
General Configuration

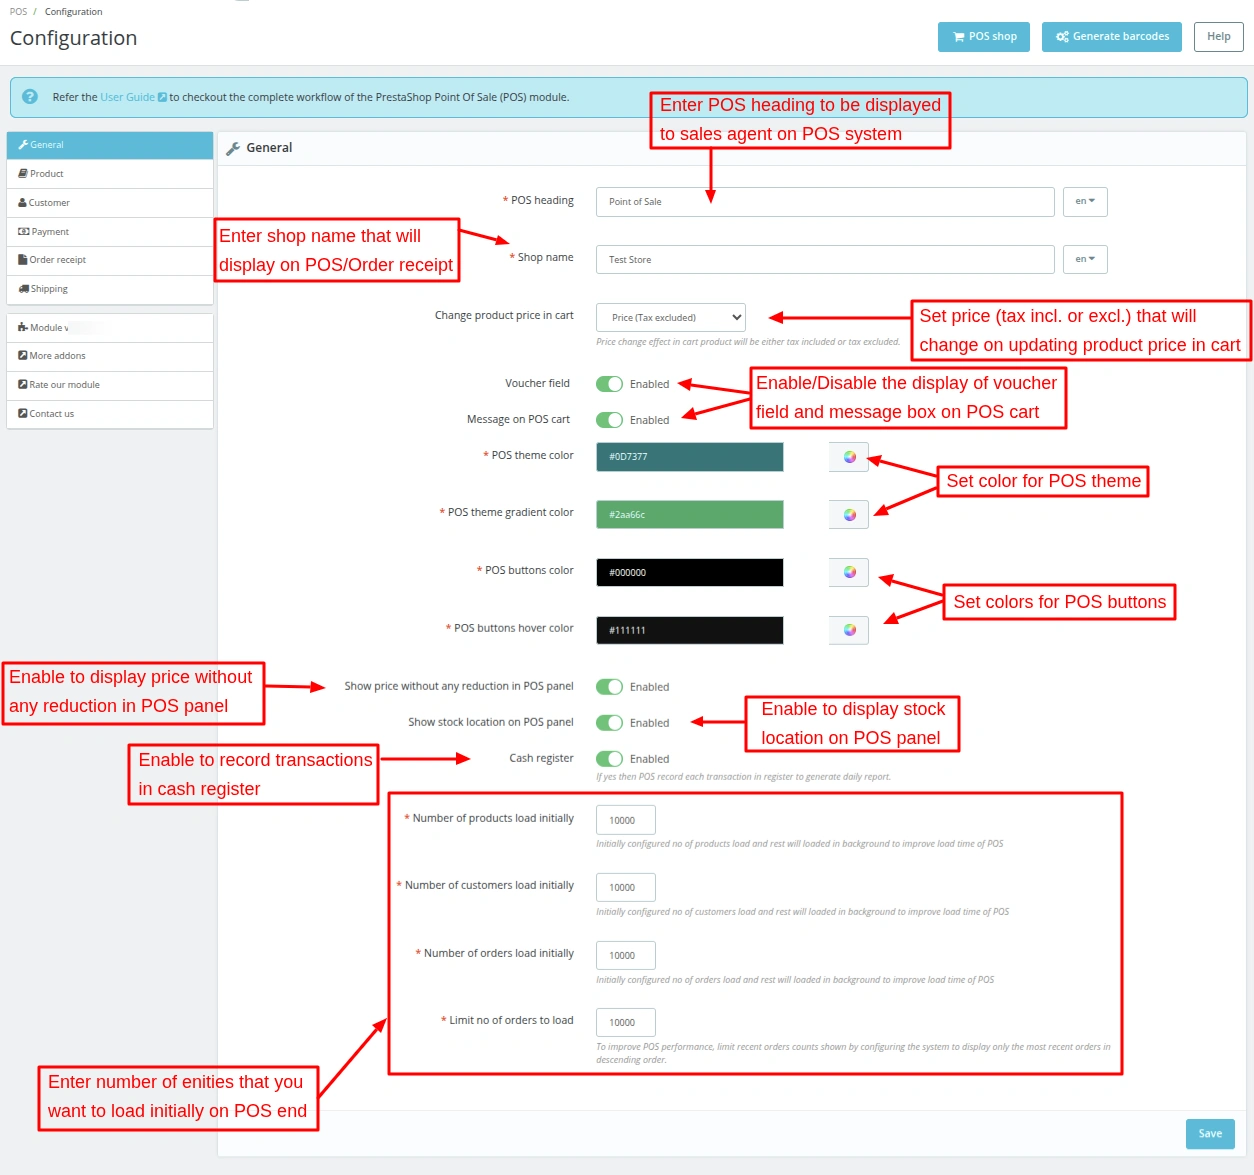
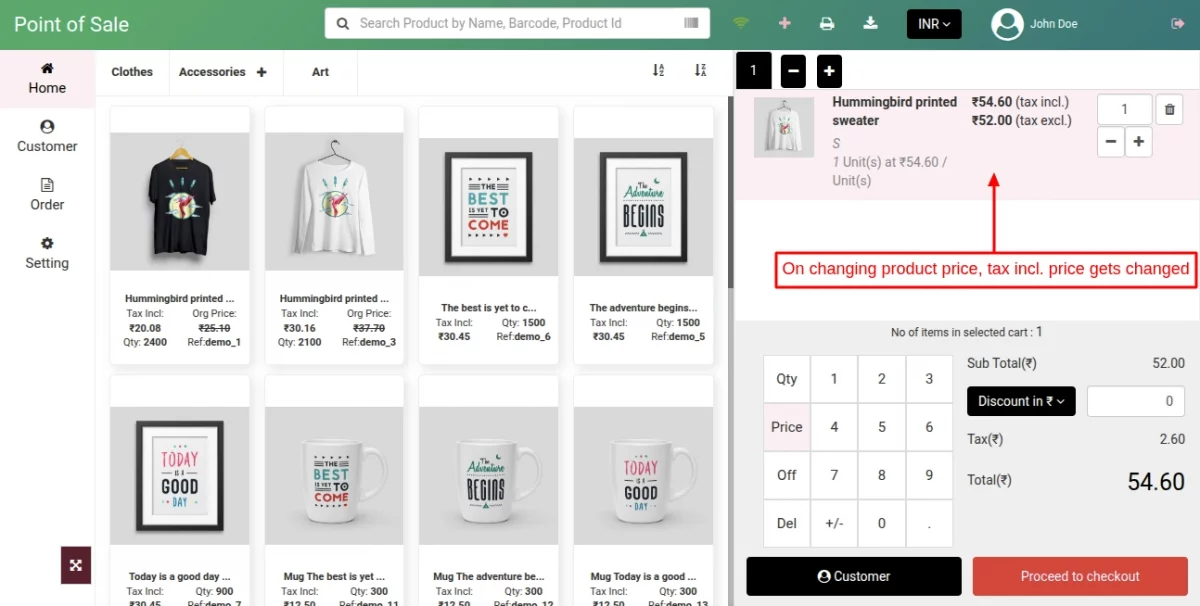
Change product price in cart
Suppose, an employee has added a product to the cart.

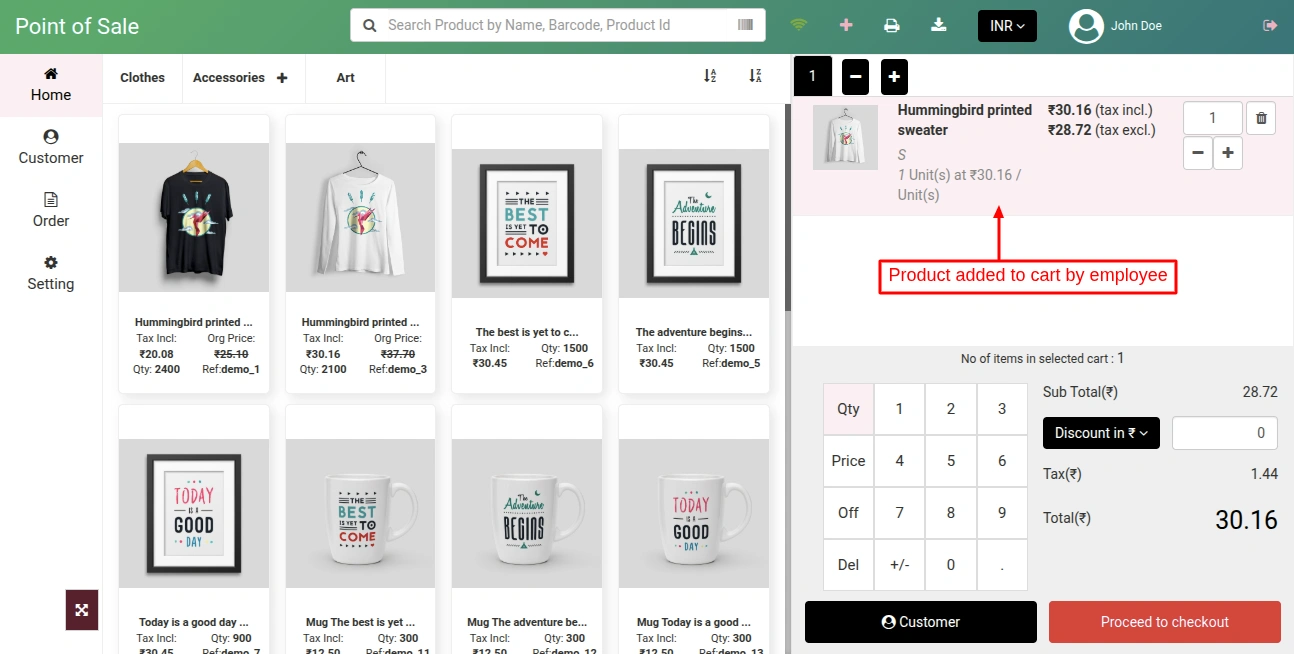
Admin has selected “Price (Tax Excluded) in “Change Product Price in cart” field. Now, when the POS agent changes the product price, the “tax excluded price” will also change as shown below:
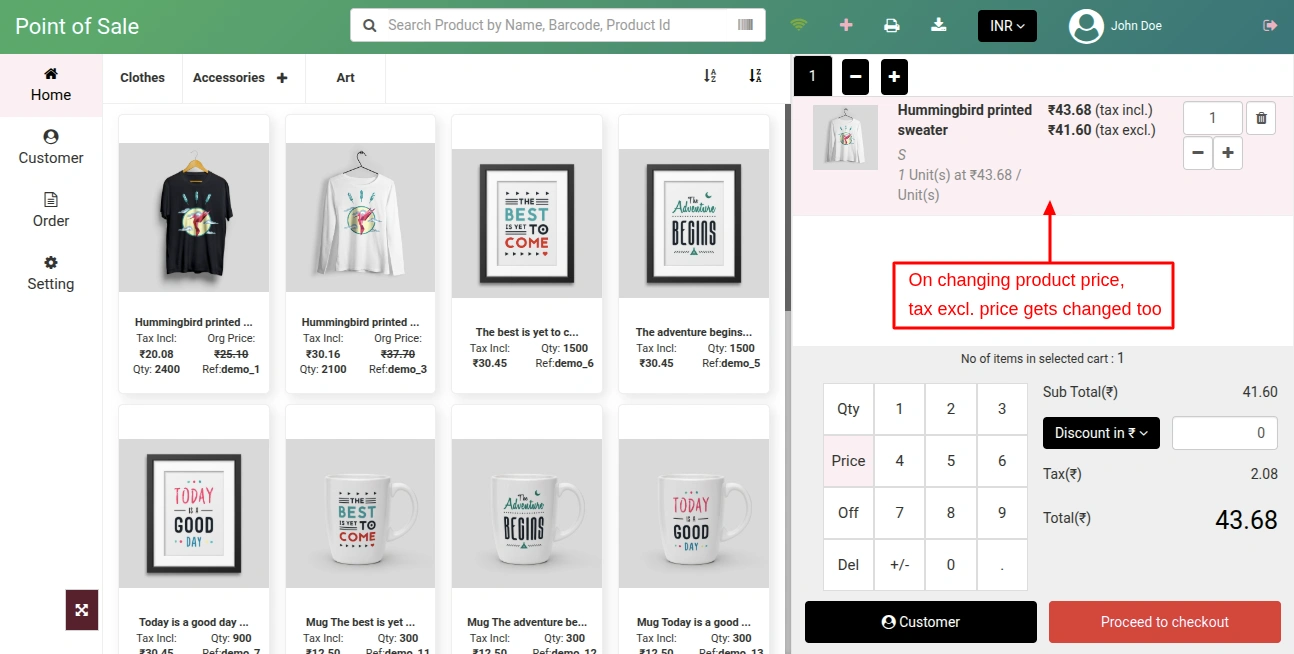
If admin has selected “Price (Tax Included) in “Change Product Price in cart” field. Now, when an employee changes the product price then “tax included price” will also change as shown below:

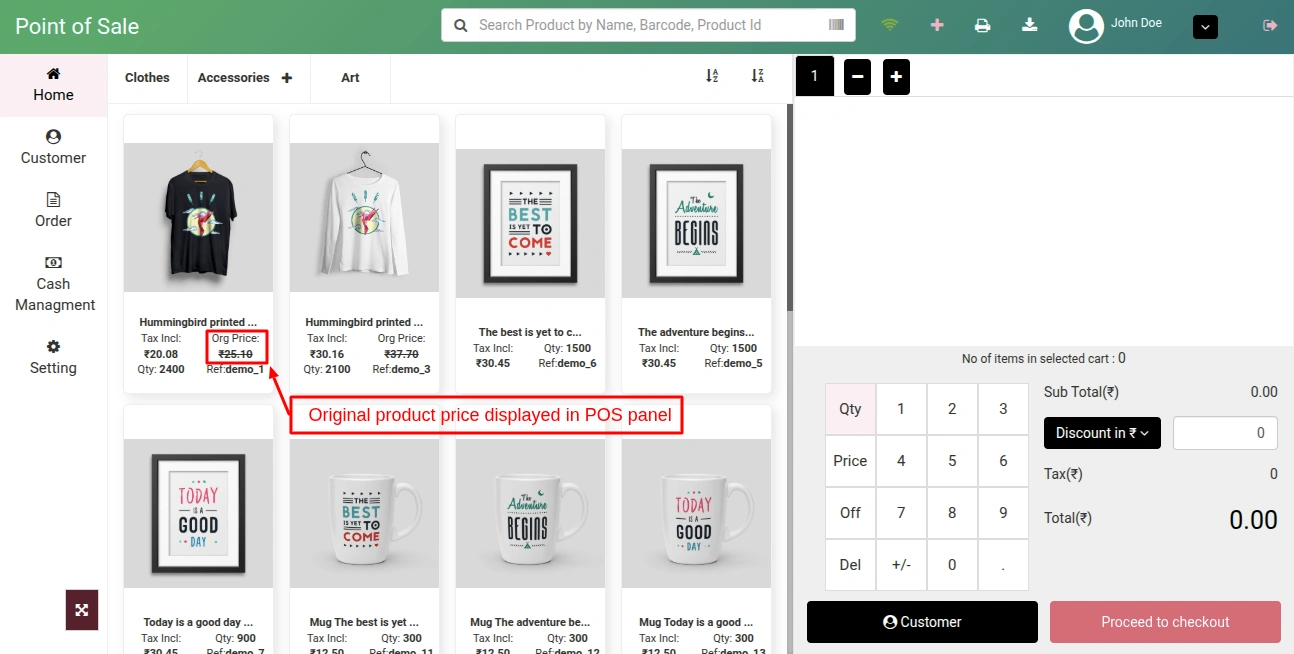
Show price without any reduction in POS panel
If enabled, then the original price of the product will also display in POS panel.
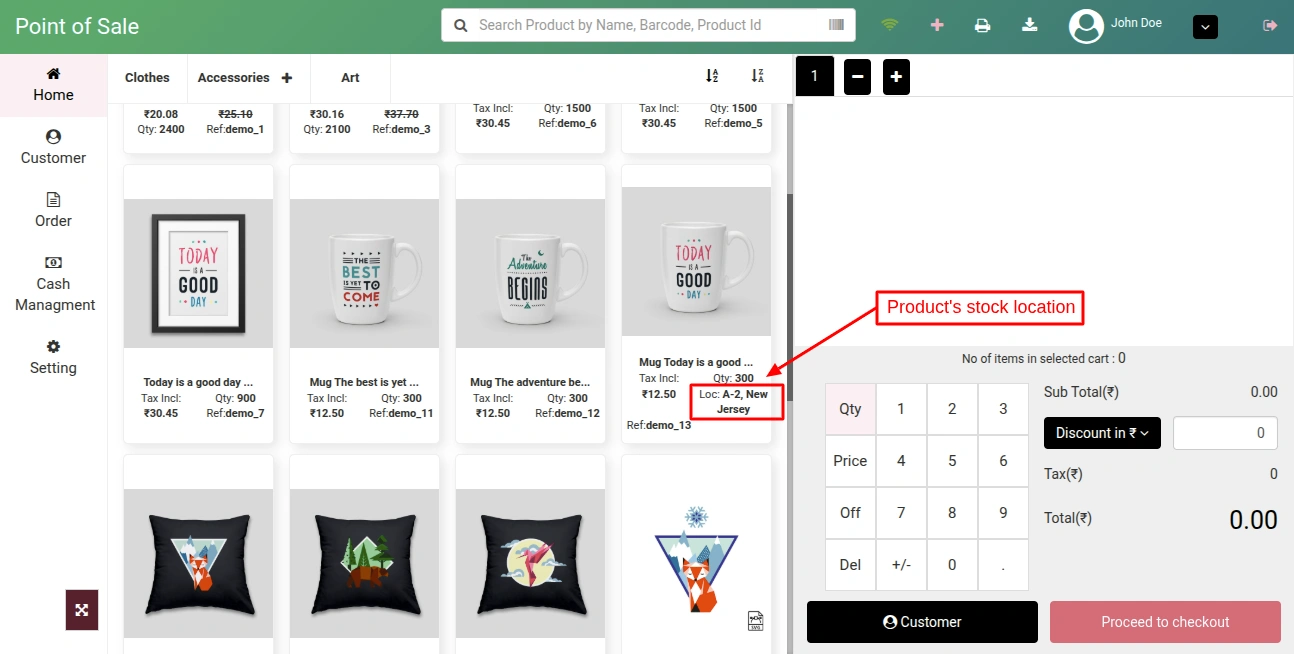
Show stock location on POS panel
If enabled, then product’s stock location will displayed in POS panel as show in the below screenshot.
Cash Register
The admin can enable cash register to:
- Track the transactions done on POS in the register.
- View a list of orders placed via specific payment method.
- Record opening balance to calculate the earning in a day.
- Record cash withdrawal and deposit.
- Set closing balance for payment modes.
Once the admin has enabled cash register field, a new tab “Cash Management” gets available in the POS panel where the sales agent can view the incoming and outgoing transactions of the POS outlet.
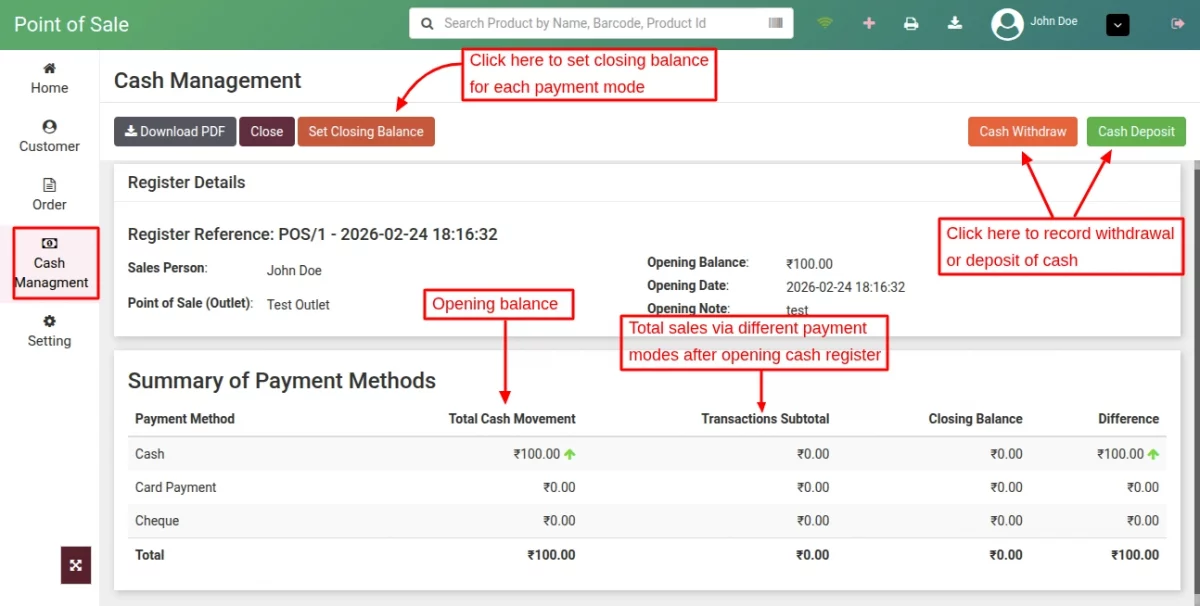
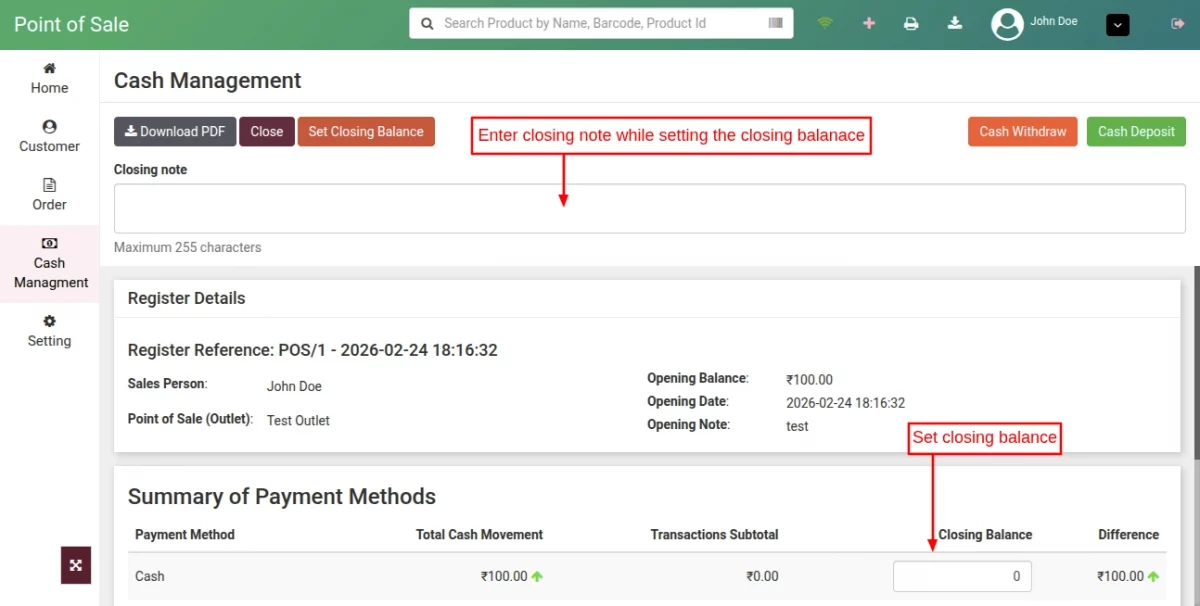
Closing balance:
At the end of the day, the POS agent can close the cash register by setting the closing values of each payment option.
To understand the functionality of cash register in detail, please go through the link.
Product Configuration
While configuring the “Product Settings”, admin has to:
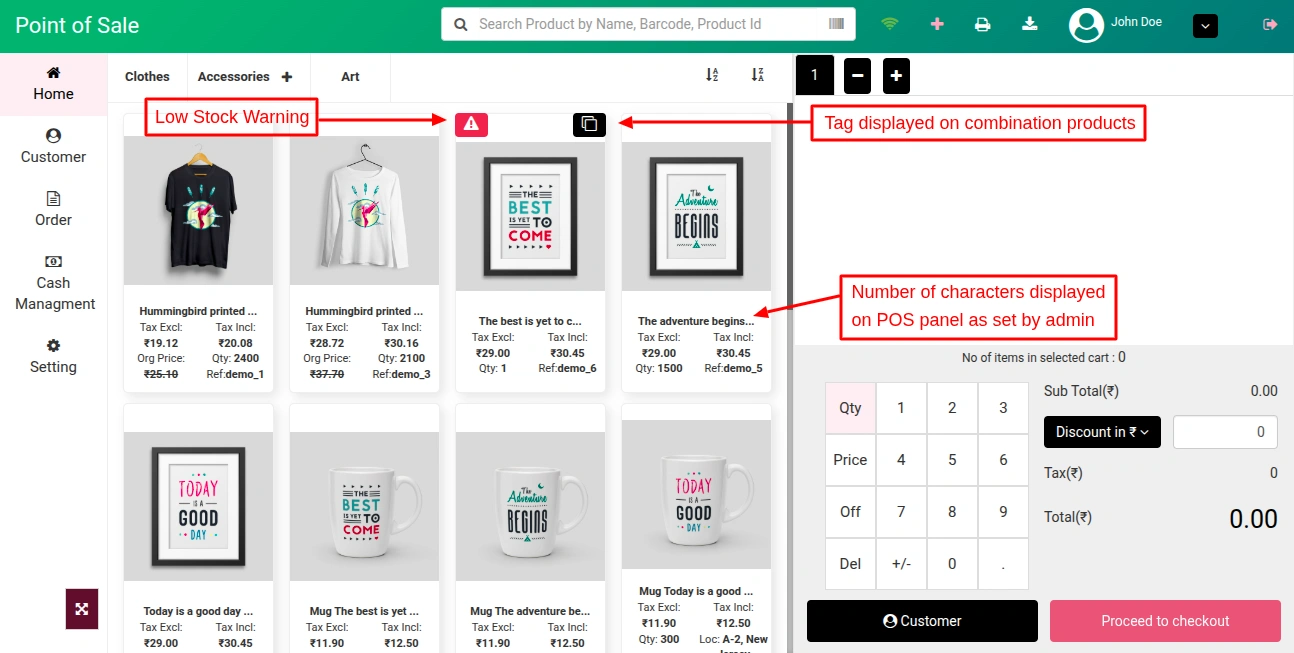
- Set number of characters for product name which will be visible on POS.
- Specify the product quantity for a low stock warning so that once the product quantity gets equal to or less than this quantity then a low stock warning sign will display on POS.
- Select the parameters with which an employee can search for a product on POS.
- Select barcode search type either UPC or EAN.
- Enable/Disable the display of tag on combination products on POS.
Note: This POS module is not compatible with Advance Stock Management feature of Prestashop 1.6.

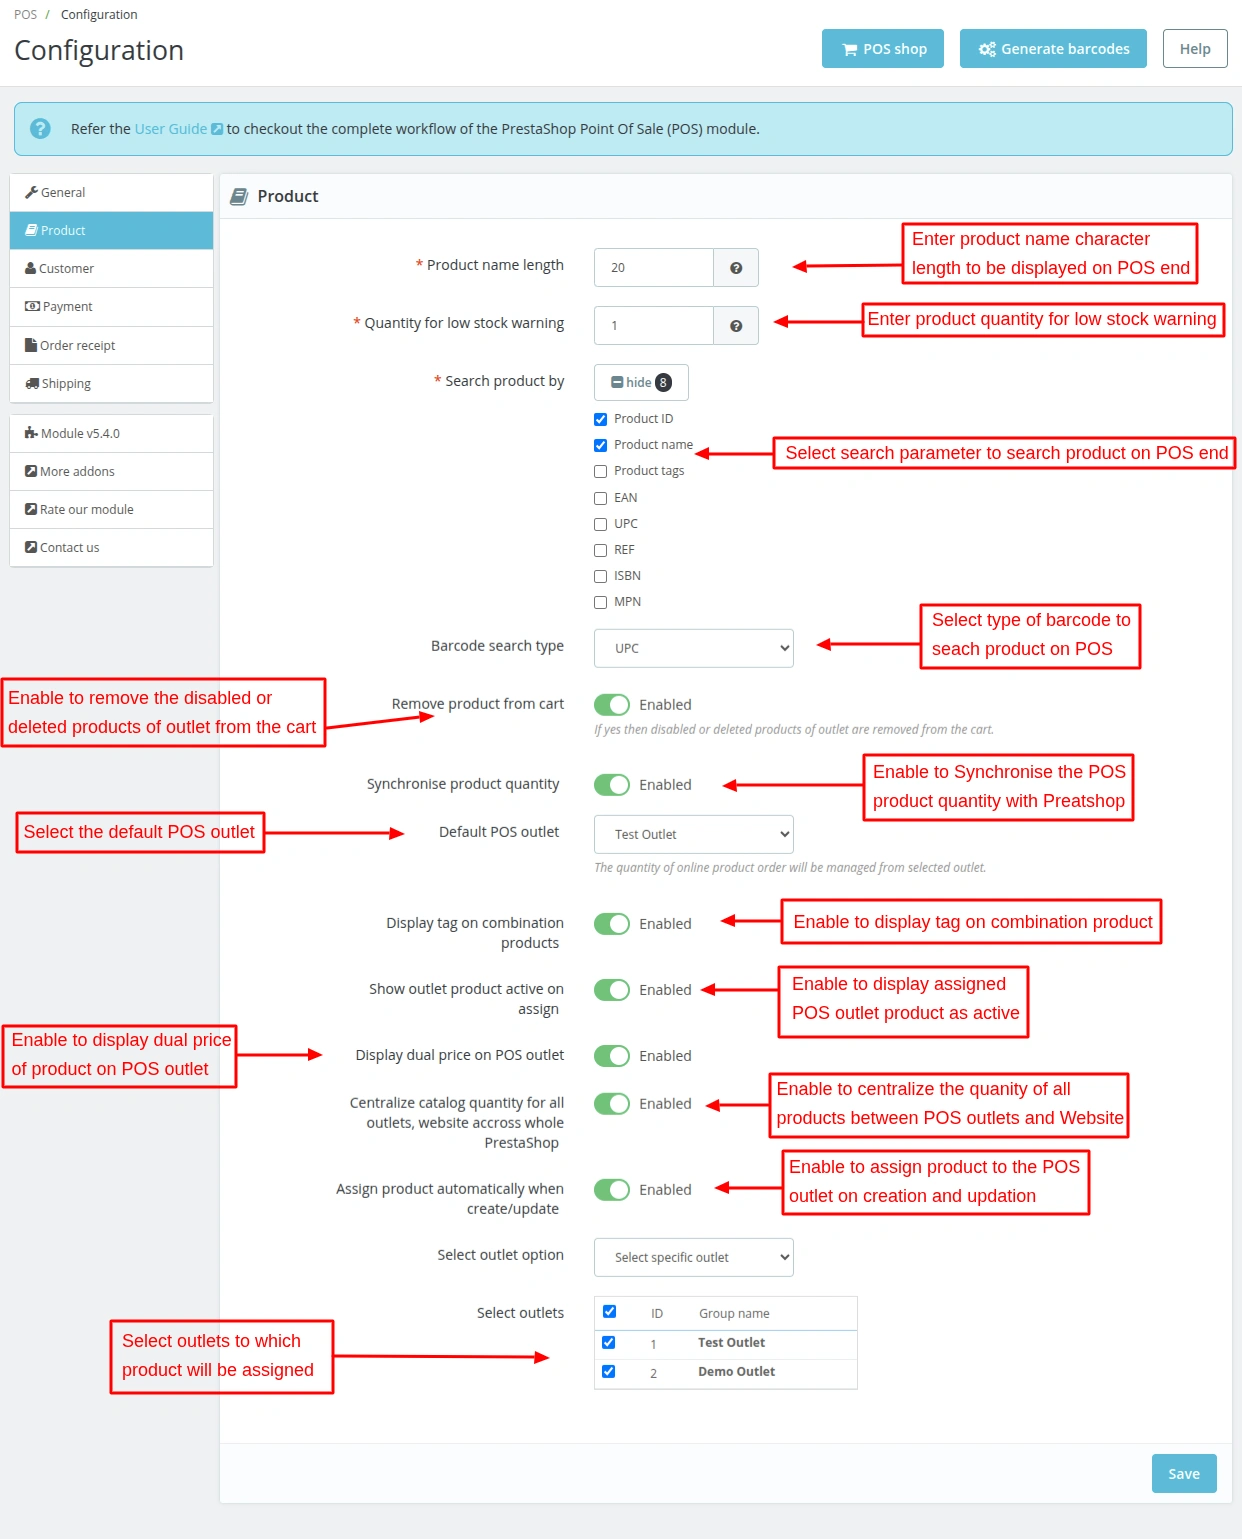
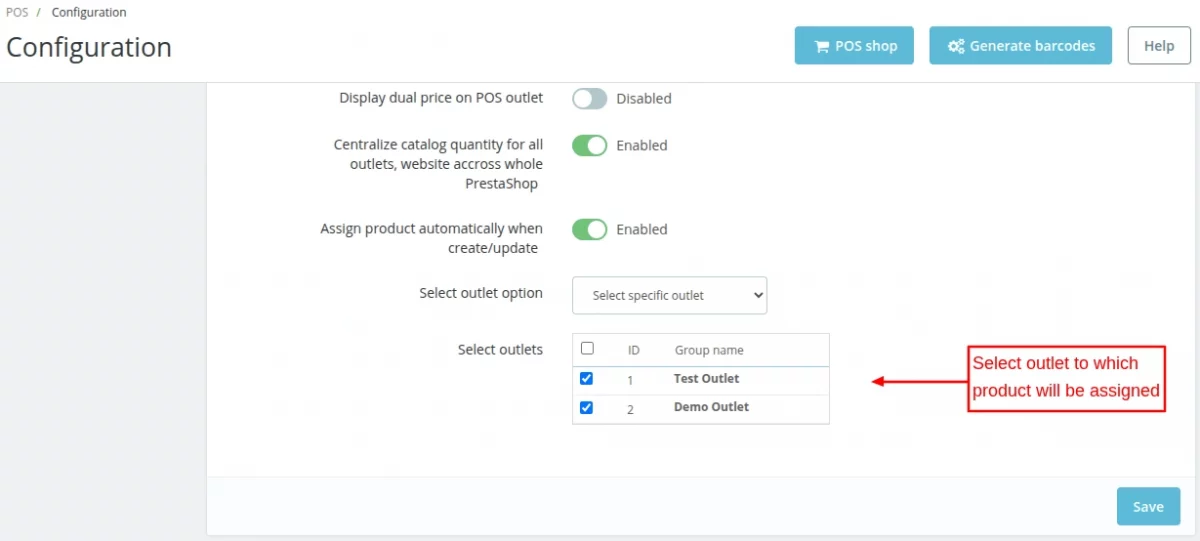
Centralize catalog quantity for all outlets, website accross whole PrestaShop
If the admin enables this option, all POS outlets and the PrestaShop catalog will share a common product quantity.
For example: If Product A is assigned to three POS outlets and has a total available quantity of 15 in the back office.
Any sale made from any POS outlet or the website will automatically update the product quantity across all POS outlets and the back office.
This ensures real-time stock synchronization across all sales channels.
Assign product automatically when create/update
When admin creates a product in the back office, that product will automatically assigned to the selected outlet if this field is enabled.
Also, if admin updates a product, then the product will assign to the outlet if its not assigned.

Front End View

Show Outlet Product Active on Assign
If enabled, then after assigning the product to an outlet the POS status will be active which means that the product assigned to an outlet is active on POS.
Sale product on pos or online
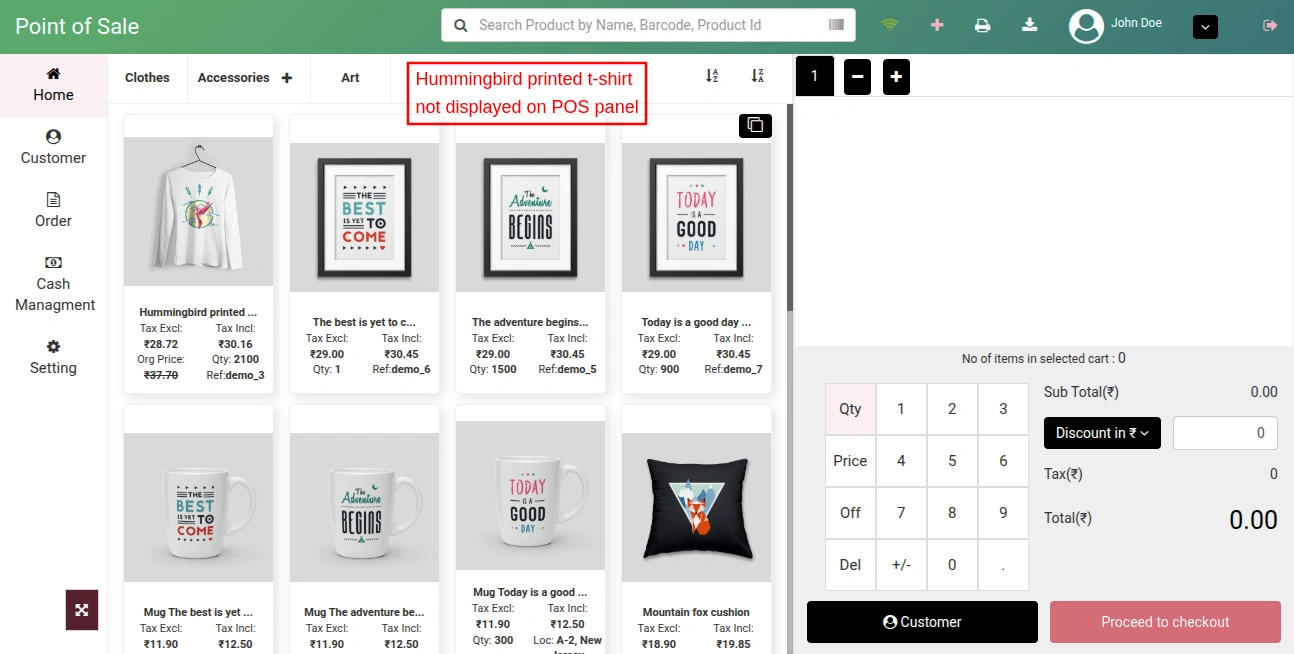
The admin can choose whether he wants to sell the product on PrestaShop website, POS, or both under Options tab on edit product page.

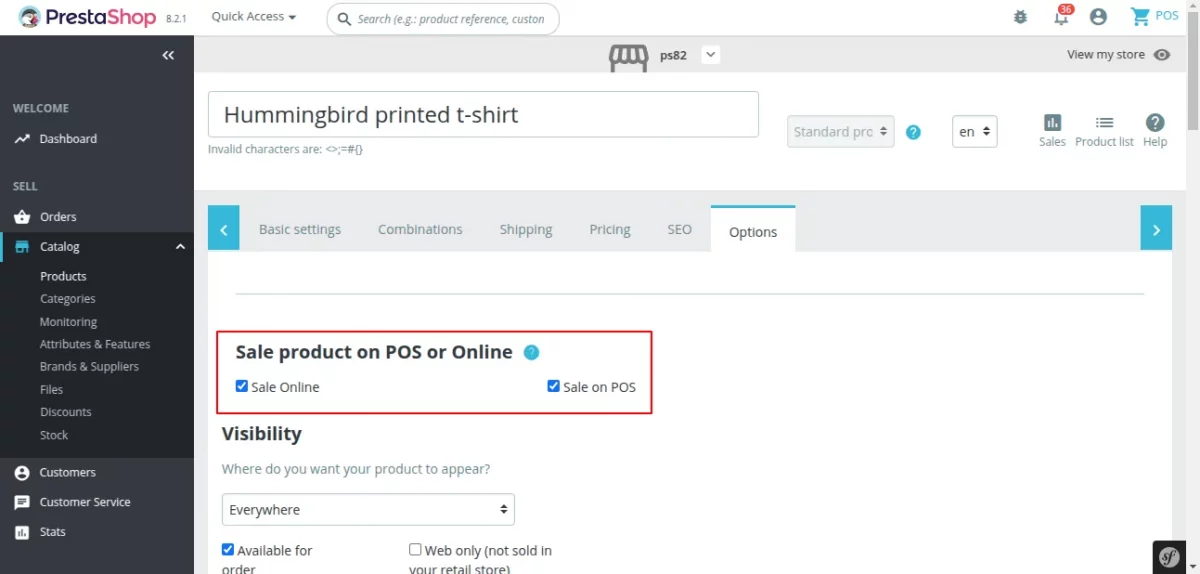
If selected “Sale on POS”, then product will display on POS panel.
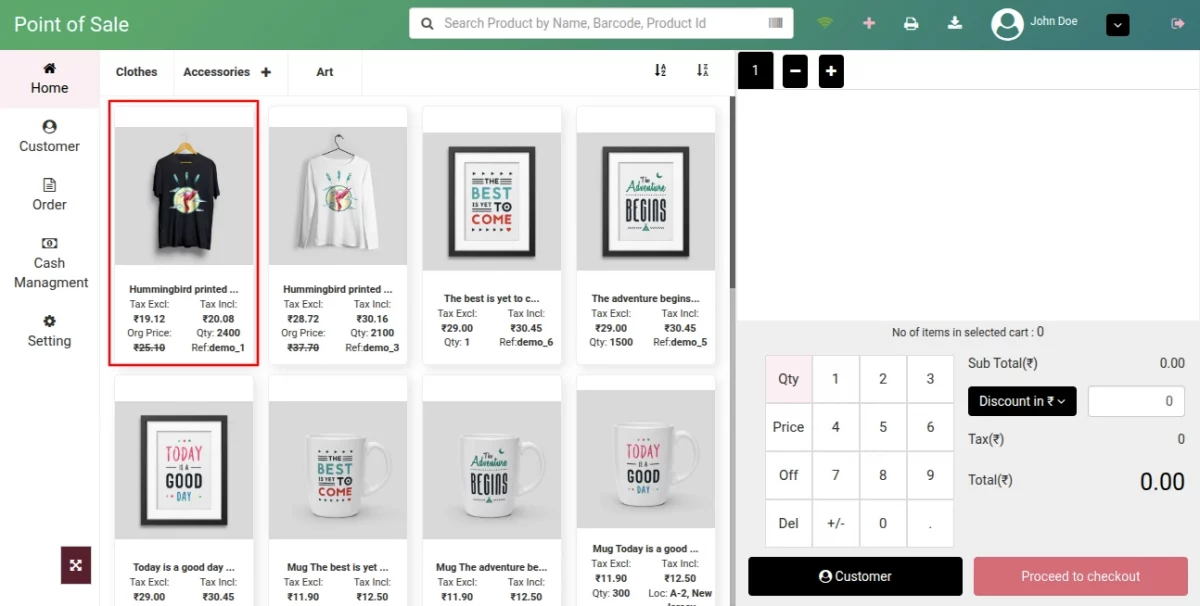
If unselected, then product will not show on POS panel.
Customer
By default, the guest checkout is disabled in Prestashop point of sale system as only the registered customers can place an order.
Admin can enable guest checkout by setting up a default email id which can be used for placing all the guest orders. Also, select the default parameter to search the customer at POS end.


If you enable customer group selection, then you can assign groups to the customer at POS end. To do so, edit the customer detail and assign the group.


Now, you can also search the customer by their name, email and phone number. This will enhance the customer search functionality at POS end.


Payment Methods
Under “Payment Methods”, the admin can:
- Select payment modes which that will be available to employees on POS.
- Choose payment method to be used in case of order return.
- Configure order status that will assign to the order upon validation on POS.


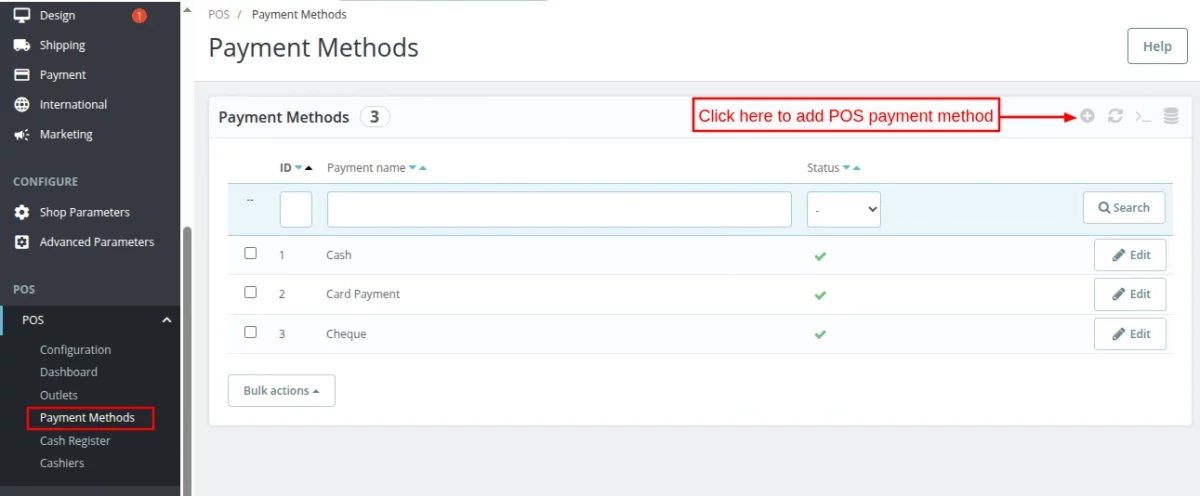
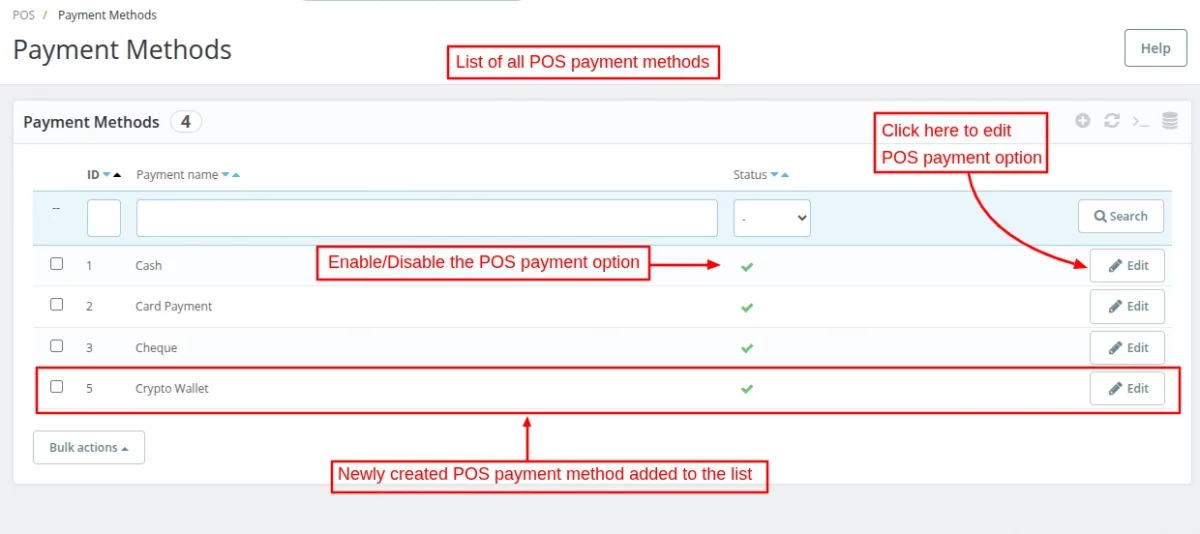
Add POS Payment methods:
The admin can also add the POS payment methods from the back office by clicking on the “Payment Methods” tab, available in the POS section.
Now, the admin has to click on the “Add” icon to add the POS payment option.

Then a new page will be displayed, where the admin has to enter the payment method name and activate the option to display the newly added payment option on the POS checkout.

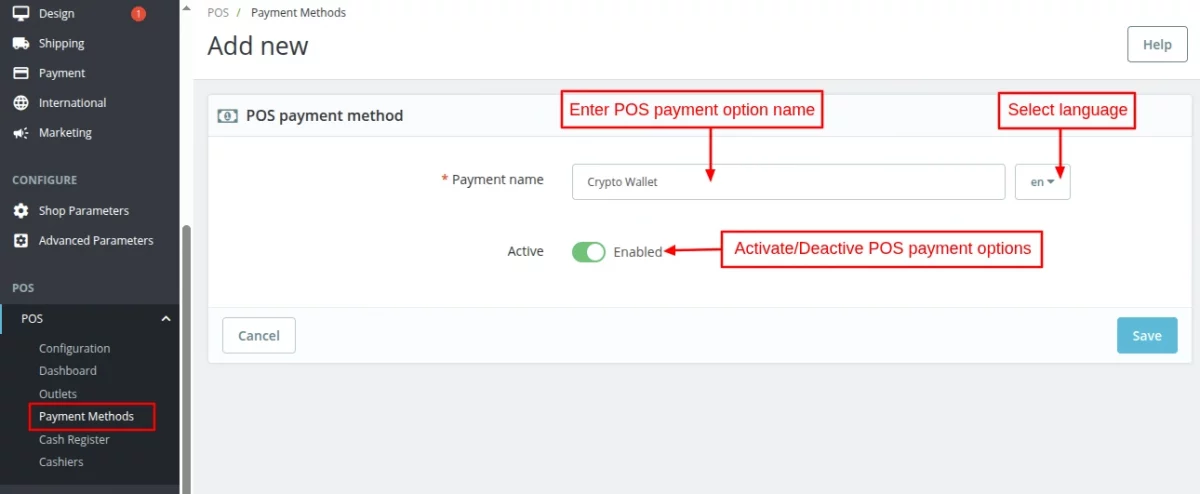
After successfully creating the POS payment method, it will be displayed in the POS payment method listing page.

Order Receipt
Under “Order Receipt” admin can:
- Choose which type of printing you want to use.
- Enter the printer name with which system gets connected.
- Enable/Disable the display of product discount, order discount, and barcode on order receipt.
- Enable/Disable sending of email to customer through POS when his order gets placed.
- Enable cash drawer to open it on the command of invoice printing. Cash drawer is an integral part of the POS which is used to manage daily cash transactions of the shop.
Raw printing
Our module supports ESCPOS language. For raw printing, the POS printer/ thermal printer which you are using must support ESCPOS language.
How to configure Printer
Before using the printer, follow the instructions given below:
- Install Java 8 or the higher version from the link: https://java.com/en/download/
- Download the QZ tray from the link: https://qz.io/download/
- Install it as a typical program on your PC
- Launch the QZ tray application
- Configure the printer name in the backend POS configuration page.
In order to check the compatibility of the POS printer with our POS. Please open the link. Then, select ESC/POS language and then print.


HTML printing
The module also supports HTML printing.


Front End View
In the case of raw printing, the following page opens at the POS end.


In the case of HTML printing, the following page will open at POS end. Here, the sales agent can choose to simply save this file as PDF or print it via a selected printer.


Payment method, tendered amount, and change amount will display on invoice receipt.
Shipping
In case the products need to be delivered, the admin can enable shipping and select the shipping methods that will be available on POS.


If shipping is enabled, then customer’s delivery address will display on invoice receipt.
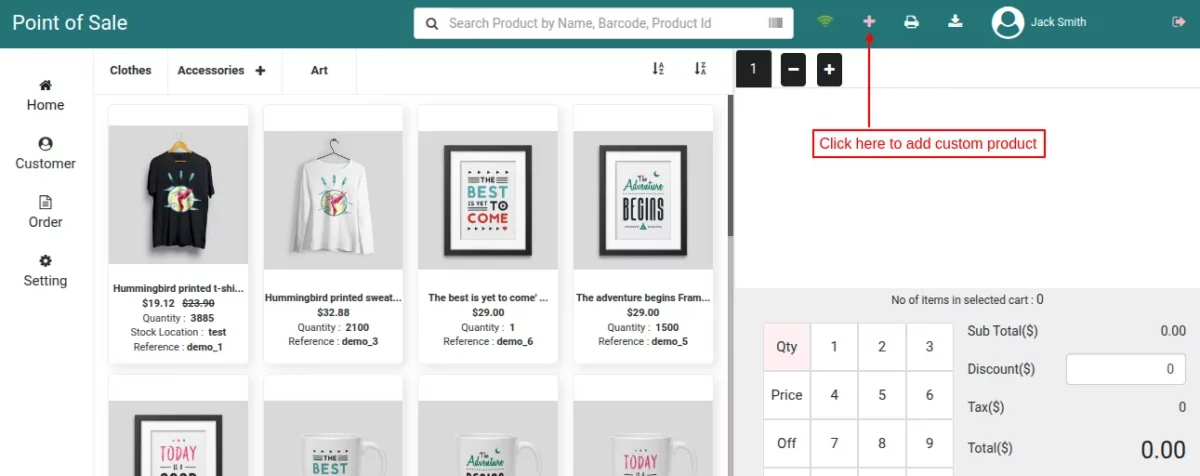
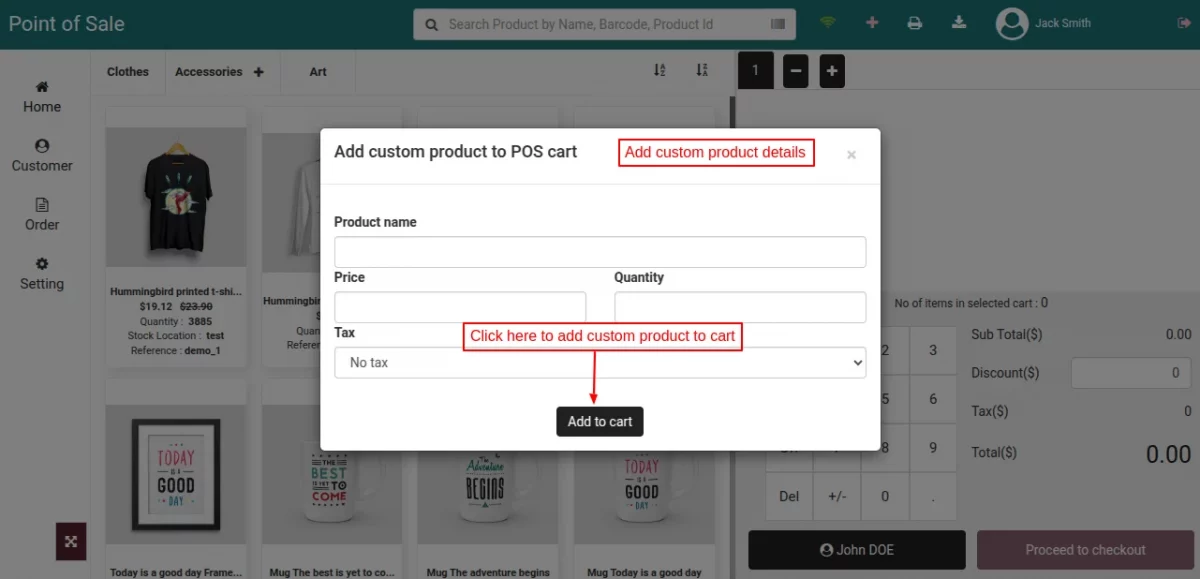
Add Custom Product
The POS cashier/employee can quickly create items not yet available in stores and add them to shopping cart in seconds.


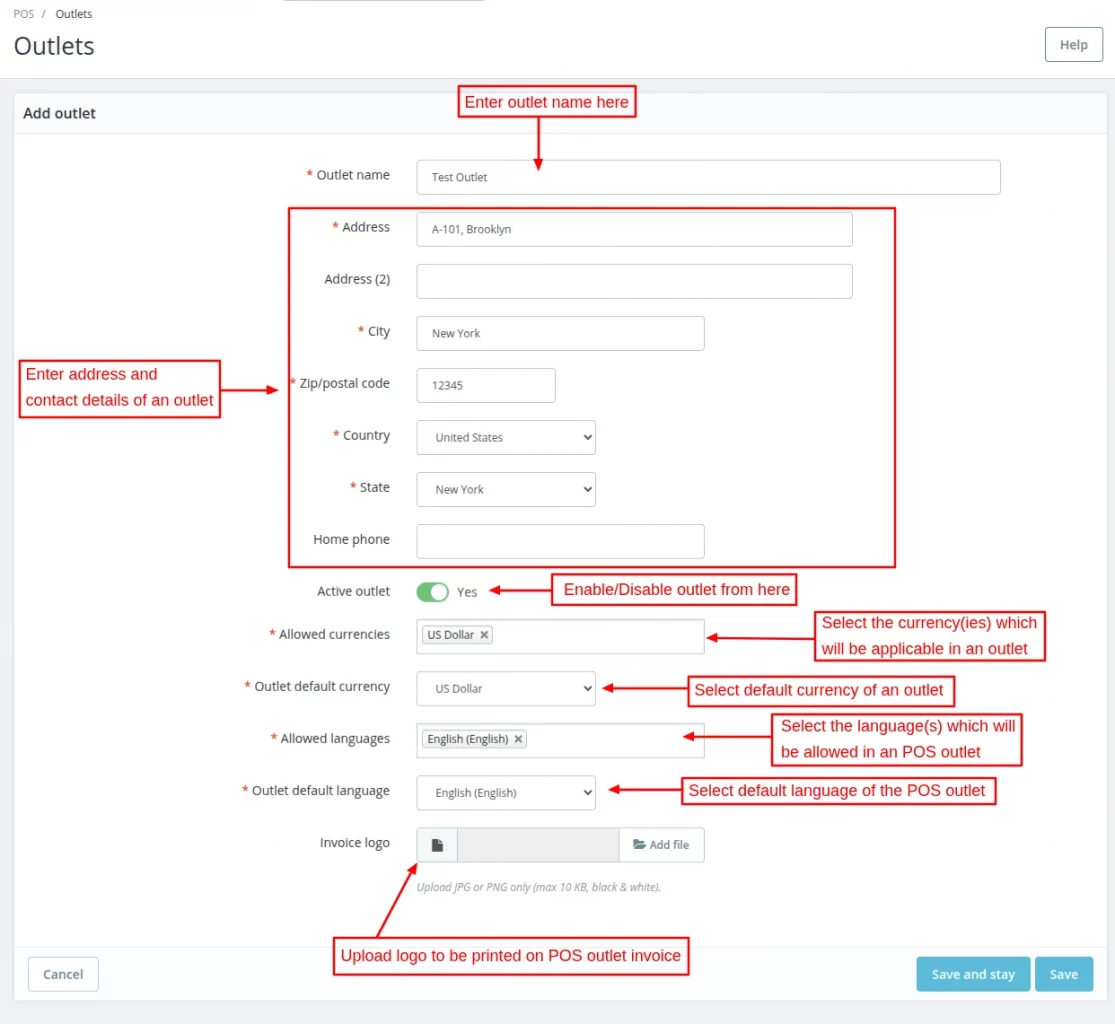
Add/Manage Outlets
Admin can add/manage outlets by navigating through Manage POS->Outlets.


Assign Products to Outlet
Once added, the admin can assign products to the outlet. The admin can assign products to the outlet from Outlets list or edit outlet page.

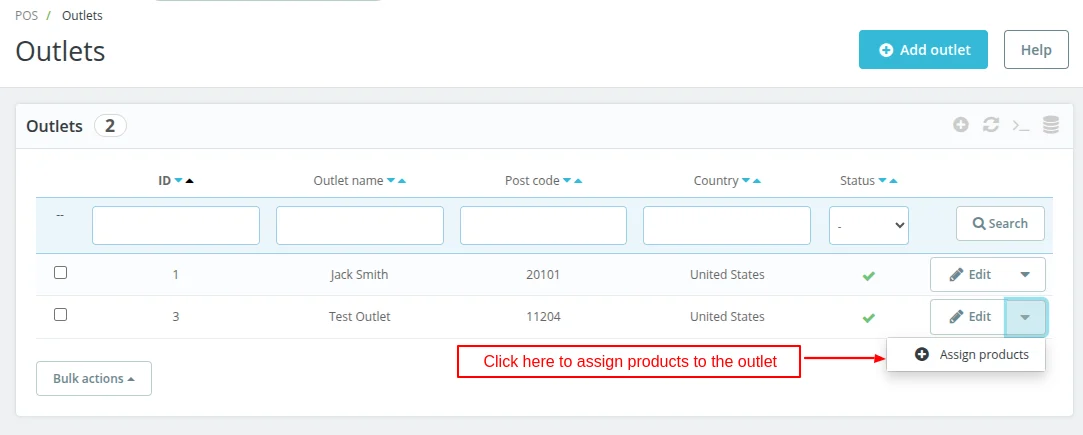
Click on ‘Assign products’ button under Edit option in Outlets tab.

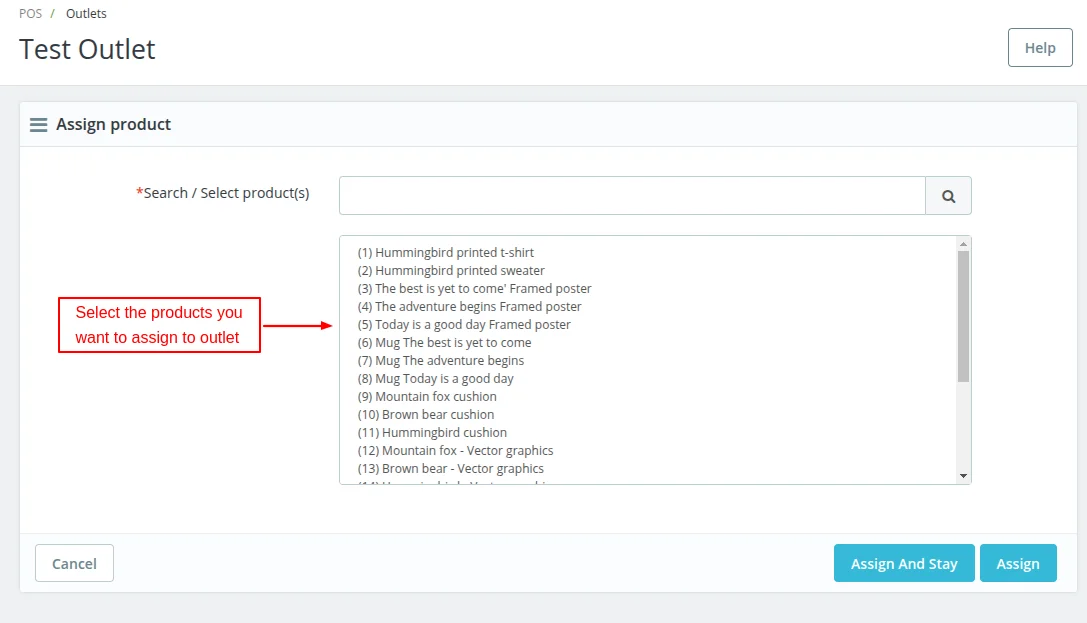
Admin can assign all the Prestashop products to an outlet at once or specific products from the edit outlet page.
Click on ‘Assign All Product’ button to assign all the products to the outlet.


Admin can also assign specific products to the outlet by clicking on “Assign Product” button.


POS Dashboard


In POS Dashboard, admin can view the complete statistics for POS. Admin can view total sales, number of orders, average cart value, and net profit from POS as well as the Prestashop store.
Sales
Admin can check the total sales that have generated from POS as well as the Prestashop store.


Number of orders received
Admin can view the number of orders received from POS as well as the Prestashop store.


Average Cart Value
In POS dashboard, admin can also view the average cart value for POS and Prestashop store as well.


Net Profits
In POS dashboard, admin can also view the Net profits earned from POS as well as the Prestashop store.


Top Cashier


Top Selling Products


Assigning Customer Groups
After the installation of the module, a POS Customer group gets automatically added.


Adding Sales Employees
Admin can add the sales employee by navigating through Configure->Advanced parameters->Team->Employees.


While adding a new employee admin can assign him/her to the outlet.


If admin has set permission profile as “POS” then no employee will able to access the tabs and a message will display to them as shown below:


If the admin has not assigned any POS Outlet to an employee, then that employee will not be able to log in to POS.


The following message will display on screen if an employee has not assigned to any POS outlet by admin.


POS System – Front End Flow
First of all, an employee or sales agent has to log in to the POS System by entering email address and password.


Once the employee has successfully logged in he will redirect to the POS System.
Start New Session
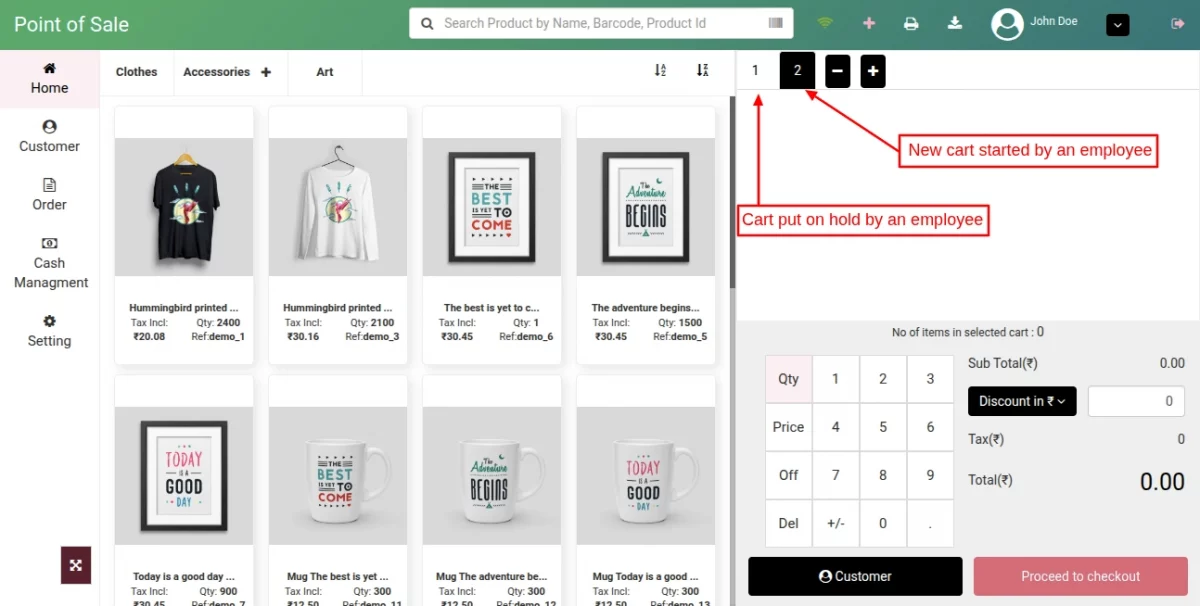
If an employee clicks on “Start New Session“, then the products which were added in the cart by an employee during the previous session will be removed and a new session will get started.
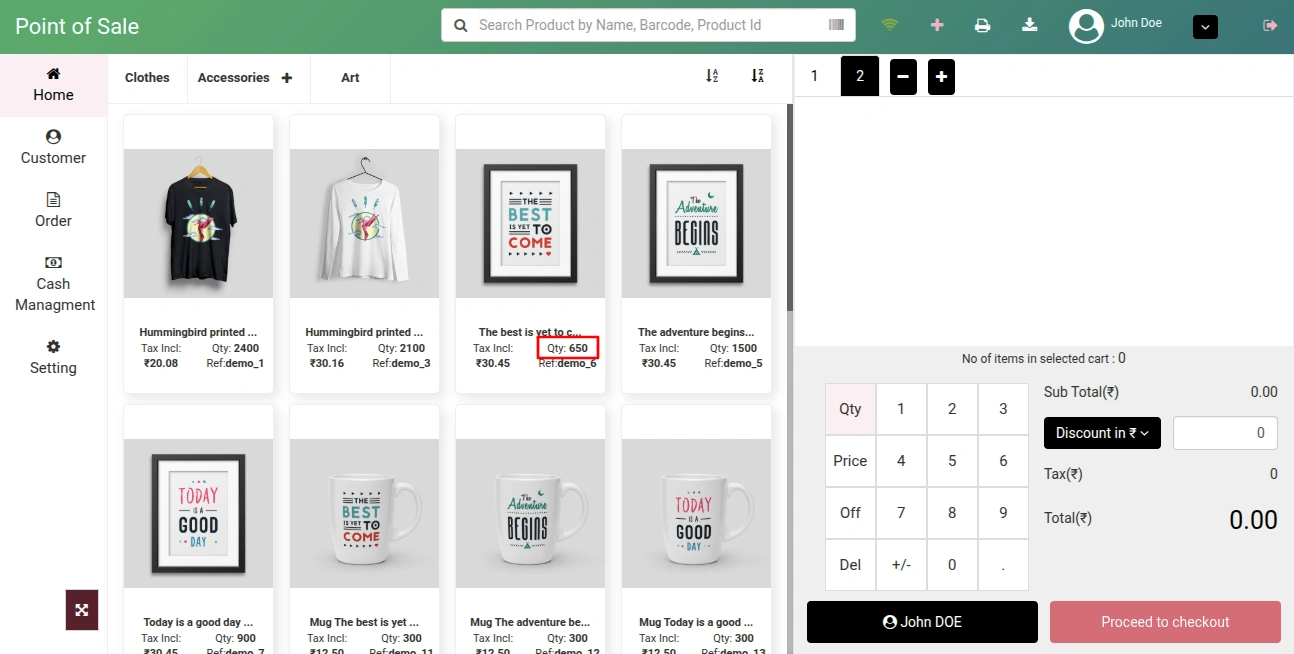
After login to POS shop, an employee can view the products, categories and checkout panel. Also, the available stock for each product displayed in the POS panel.
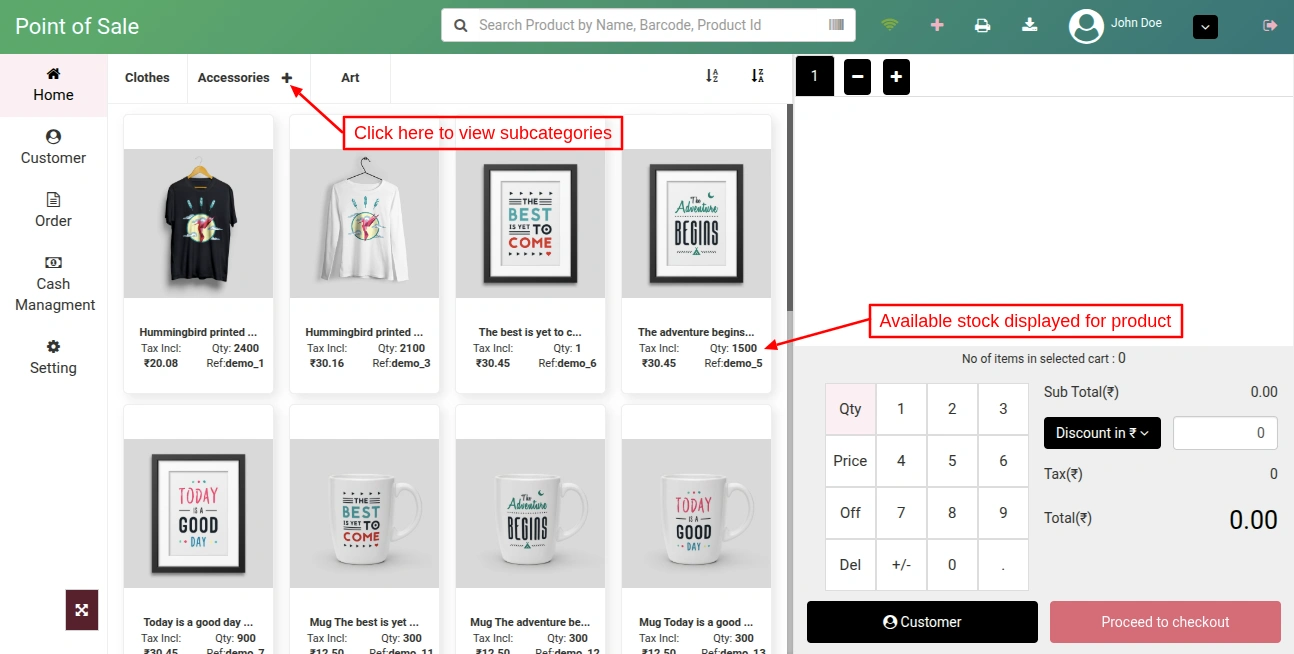
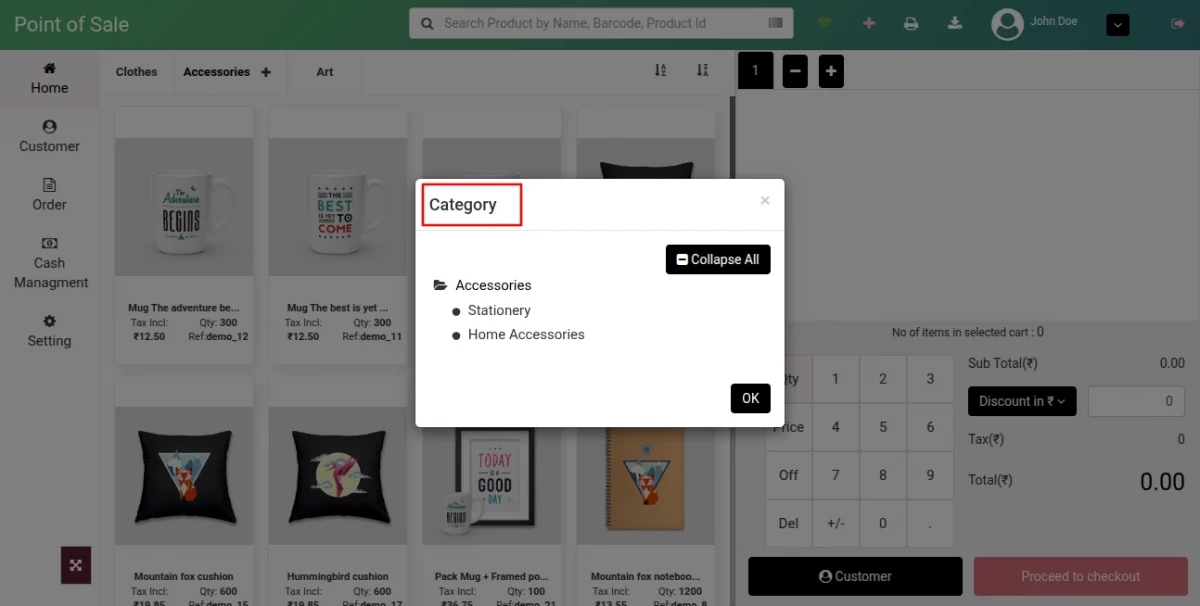
On clicking the ‘+’ icon, a popup appears on POS panel where all the subcategories are displayed.
An employee just needs to click on a product for adding it to the cart.
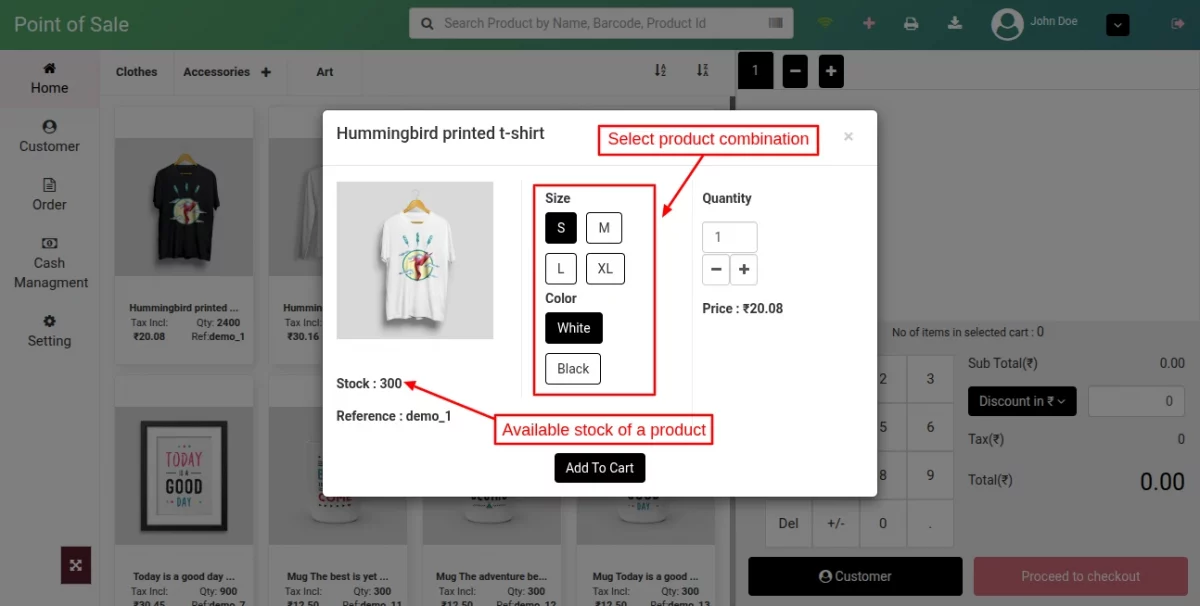
In case of a combination product when an employee clicks on the product, a popup appears on screen where he has to select a combination, enter its quantity and then click on “Add To Cart” button.
The stock available for a product also displays in the popup.
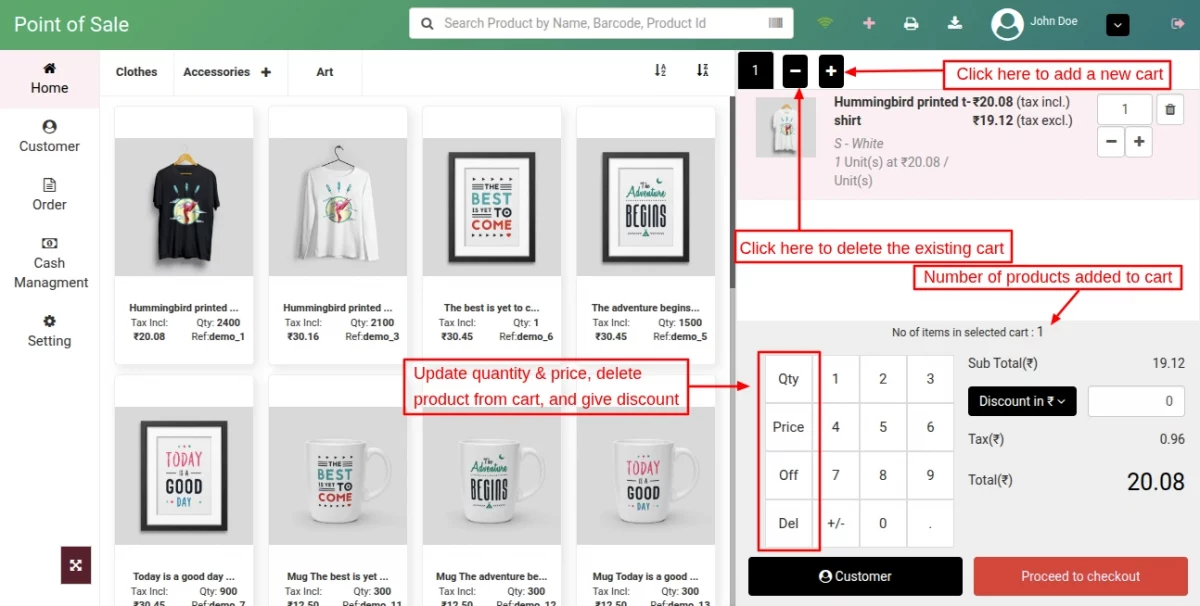
Once the products have added to cart, then an employee can:
- Update the quantity of the products.
- Update the Price of the products.
- Give a discount on the products.
- Give Cash discount on an order.
- Remove products from the cart.
- View the number of products added to cart.
During checkout, if a customer wishes to purchase something else then an employee can put his cart on hold and start a new cart.
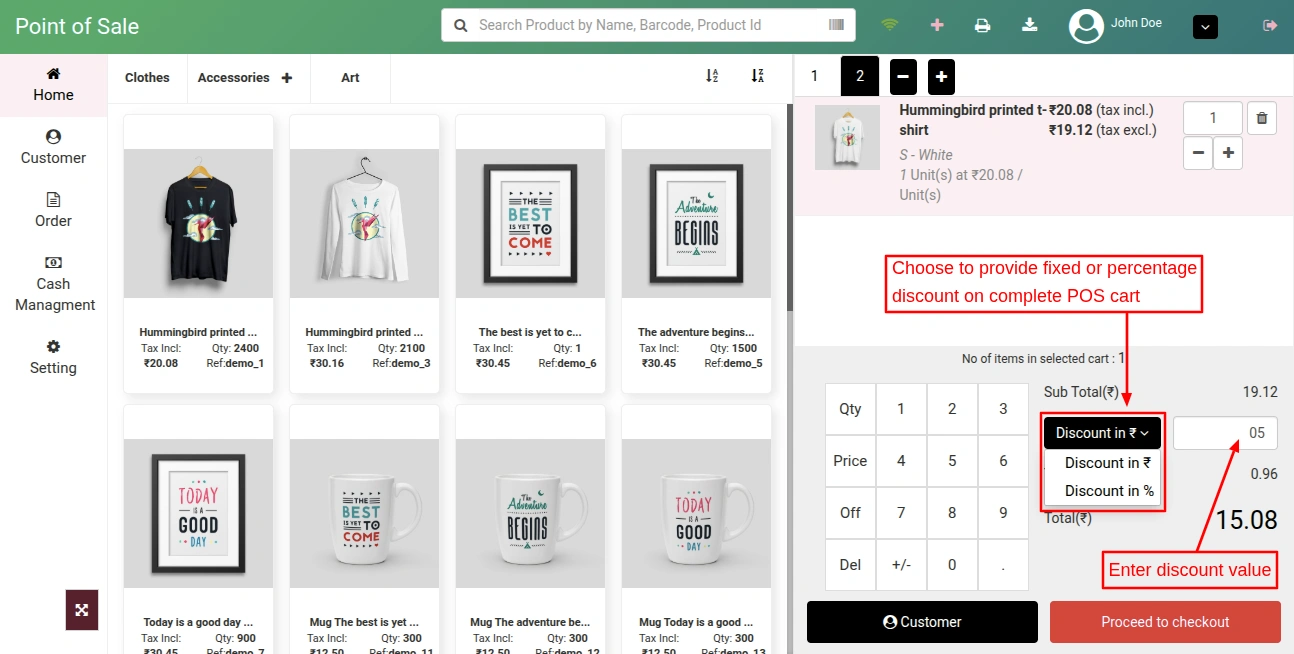
The POS agent can provide either a fixed or a percentage discount on the POS cart value during checkout.
When an employee clicks on “Proceed to checkout” button he’ll redirect to “Customer” page where he has to select a customer.
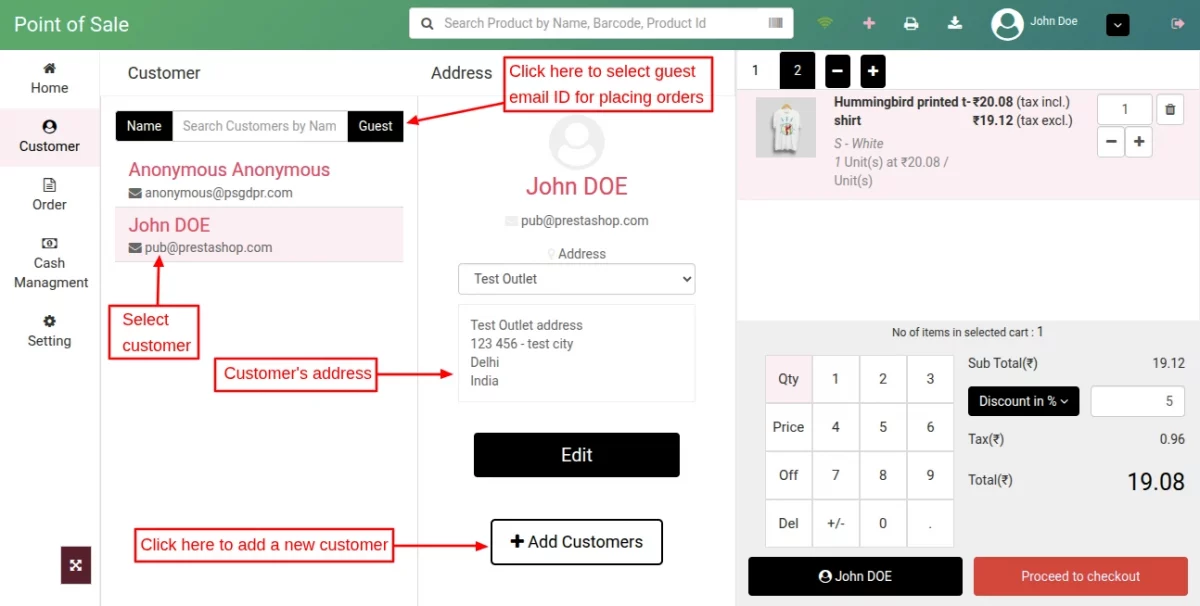
After selecting a customer, when an employee clicks on proceed to checkout button he’ll redirect to payment page.
On Payment page, an employee can apply voucher on a cart, enter message about an order for reference, and select payment method for processing the payment.


Note: A voucher can also be redeemed partially.

When an employee clicks on “Validate” button for completing the payment, invoice for an order will generate with the mentioned details.


In Prestashop POS, a customer can pay using more than one payment method.
Suppose if the order amount is $29, then a customer can pay $10 via cash and the remaining amount i.e. $19 via card payment or cheque.


Orders
An employee can check the list of orders under” Orders” tab.
Also, the POS agent can search the orders via various parameters, like customer name, price, mode of payment, order reference etc on POS end.


Offline Orders
In POS system, an employee can process the orders even if the internet connection is not available in the system.
In case internet connection is not available, then the employee can add products in cart and complete the order.
Note: Only cash payment method will be available in POS in case of no internet connection.
Employee can view all the orders which he has processed offline under “Offline Order” tab.


Once the internet connection gets established in the POS system, all the orders which processed offline will synchronize to online orders as shown below:


Update Stock
A new button is added to the POS panel to synchronize the stock between PrestaShop store and POS.
Suppose the PrestaShop admin updates the stock of specific products and its not getting reflected on the POS panel.
When the POS agent clicks on the button, the updated stock will display on POS panel.

Note: Add this custom hook to maintain & sync the stocks automatically.
File: src/Core/Stock/StockManager.php
Hook:
$hookManager-> exec('actionWkUpdateQuantity',array('id_product' =>$product->id,'id_product_attribute' => $id_product_attribute,'quantity' => $stockAvailable->quantity,'delta_qty' => $delta_quantity));
In line 197, After this hook:
$hookManager->exec('actionUpdateQuantity',['id_product' => $product->id,
'id_product_attribute' => $id_product_attribute,'quantity' => $stockAvailable->quantity,
]
);
Order Return
In the POS system, an employee can place a request to return an order and refund the amount under the “Order History” tab.


Return order stock assigned to the same outlet.
Setting
An employee can change the password of his POS shop account under the “Setting” tab.


Order Message
Now, you can also add a message with the order while placing it on the POS.

This message is also available in the order details section.


So, this was all about the PrestaShop Point of Sale module. I hope this document will help you in checking the functionality of the module in a better way.
Also, do let us know about your views in the comments.
In case, if you are also looking for a module with similar functionality for your marketplace, then do check out the blog.
Support
For any kind of technical assistance or query, please raise a ticket at http://webkul.uvdesk.com or send us a mail at support@webkul.com
Also, please explore our vast range of featureful PrestaShop Addons.
Point of Sale Extensions
We have developed a range of POS extensions that can help you improve inventory/transactions management, user experience, and increase revenue. To know more about those addons, visit the link.