User Guide for Odoo Multi Vendor Mobile App
Live Demo
Introduction
Odoo Multi Vendor Mobile App brings your Odoo marketplace to customers’ mobile devices, providing a convenient way to browse products, explore marketplace sellers, and shop from anywhere. The app is designed to provide a seamless shopping experience while allowing customers to interact with marketplace products and sellers.
Customers can browse products, view seller shops and ratings, check product reviews, add products to the cart, and complete purchases through the checkout process. They can also manage their account information, addresses, and orders directly from the mobile app.
For sellers, the app provides access to their marketplace activities, including their shop profile, order status, and product approval requests, allowing them to manage their marketplace operations conveniently from their mobile devices.
Check a brief overview of the Android mobile app –
Odoo eLearning Marketplace helps you bring classes online so students can learn from home. With this module, you can invite teachers to put their courses online. You can then approve or disapprove these courses. Students can choose the courses they want and pay for them.
Features
Below is a concise list of the Mobile App’s features. To learn about these features in detail, you can Visit Our Store Page:
- Designed for both Android and iOS platforms.
- Customers can browse products or use the search bar to quickly find products.
- Supports voice search for convenient product discovery.
- Customers can search for products by scanning barcodes through the app.
- Displays products along with their respective sellers on the Seller Profile page.
- Provides real-time synchronization with the Odoo marketplace backend, ensuring that product, order, and other data changes are reflected in the mobile app.
- Supports multiple languages, including RTL language support.
- Allows Odoo administrators to enable notification alerts for customers.
- Sellers can access their marketplace dashboard directly from the mobile app.
- Sellers can view the status of their products and orders from their account.
- Allows interested users to complete the seller registration process through the mobile app.
- Sellers can contact the Odoo administrator through the Ask To Admin form.
You can also check our module Odoo Mobile App (Wrapper) which enables administrators to manage all Odoo operations directly from their mobile devices, seamlessly merging all data with the app.
Workflow
Configuration Settings For Admin
Once you have installed Odoo Multi Vendor Marketplace module in Odoo, go to Mobikul >> Settings.

Here, under Other Addons, tick on the checkbox next to Odoo multi vendor Marketplace to enable marketplace feature on Odoo multi vendor mobile App.
To view the customers’ orders placed on the mobile app, click on orders.

You can also manage Mobikul marketplace products. Click on the products. Now open any product. If the product belongs to any seller, The informative message shows up on the product form.

Now, click on the seller dashboard to manage the sellers. Here you can approve or reject the sellers’ request for registering products and profiles on the marketplace.

Seller Dashboard in the Odoo backend
The seller needs to login to the Odoo using his/her credentials. Once logged in, they need to go to the seller dashboard.
Here, they can see their profile by clicking on ‘My Profile’.

My Profile shows the various details to the seller such as personal information, shop and payment settings., etc.
The seller can also manage the orders placed on the Odoo marketplace, both through app and website by clicking on orders.

The products section lets the seller create new marketplace products. They can also check the list of approved and non-approved products requests.

Customer’s View of the Odoo Multi Vendor Mobile App
1. Walkthrough Page
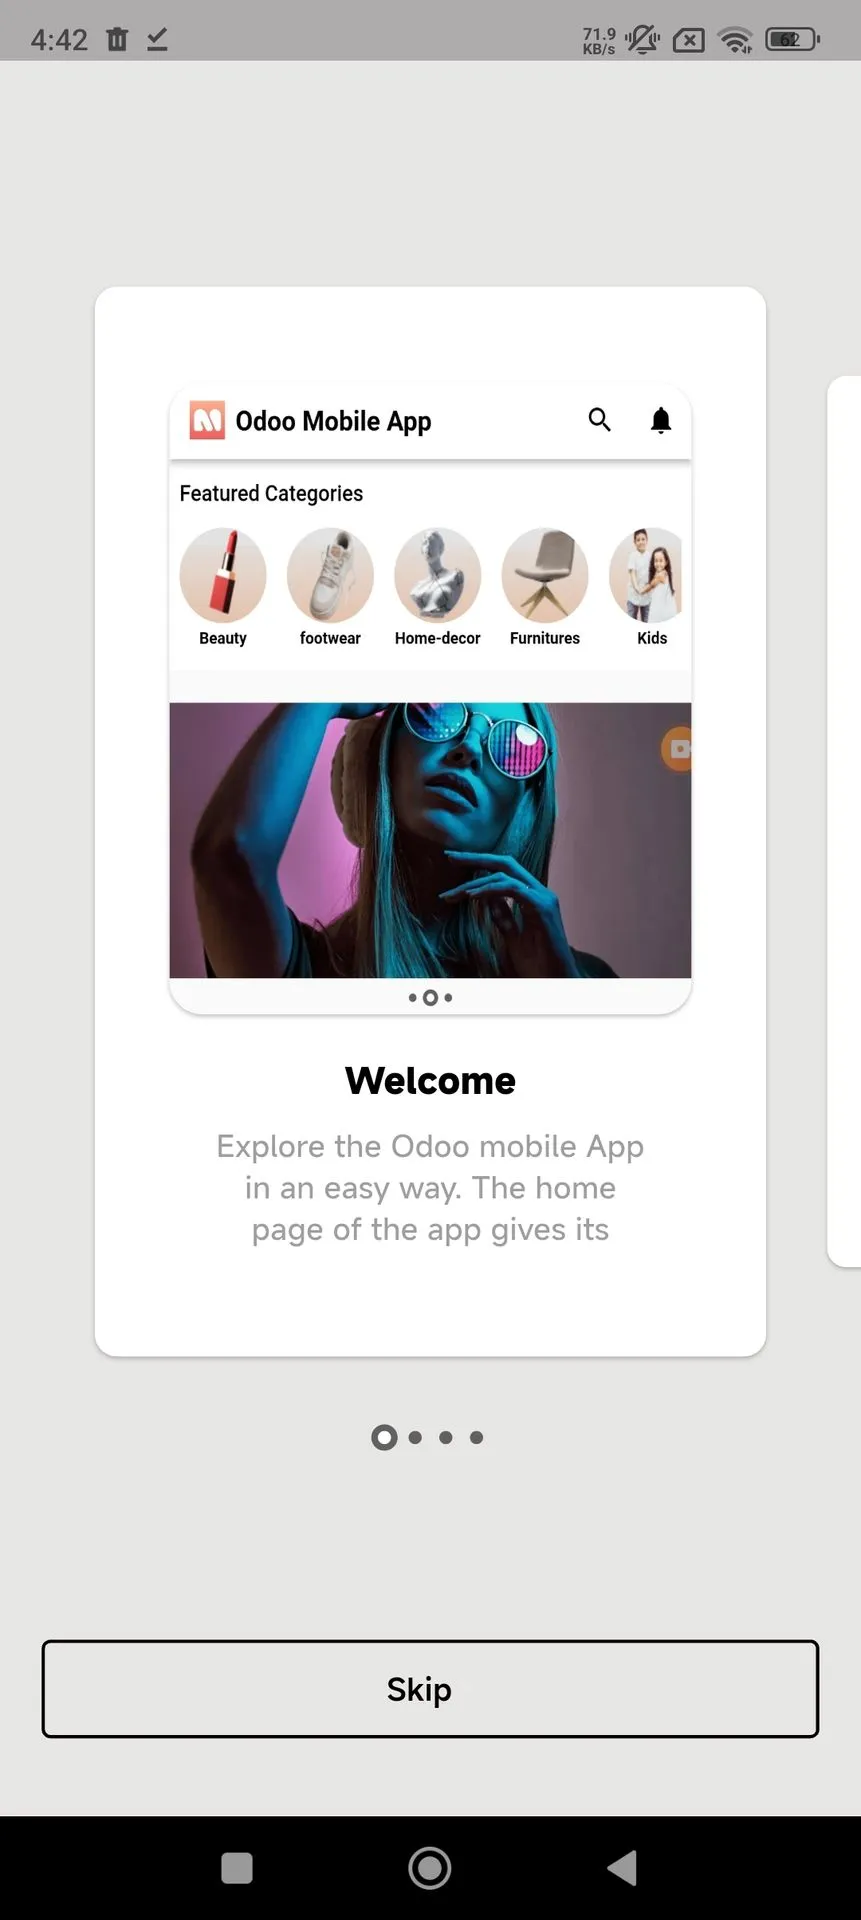
When you open the Odoo Multi-Vendor Mobile App, the Walkthrough Page appears first. It introduces the app and gives users a quick overview before they access the marketplace.
Swipe through the walkthrough screens to explore the available information. Once you finish the walkthrough, continue to the Sign In or Register screen to access the app.
Walkthrough Page
Introduces users to the Odoo Multi Vendor Mobile App and highlights the key features available in the app. Users can go through the introduction or skip it to continue.

2. Sign In or Register
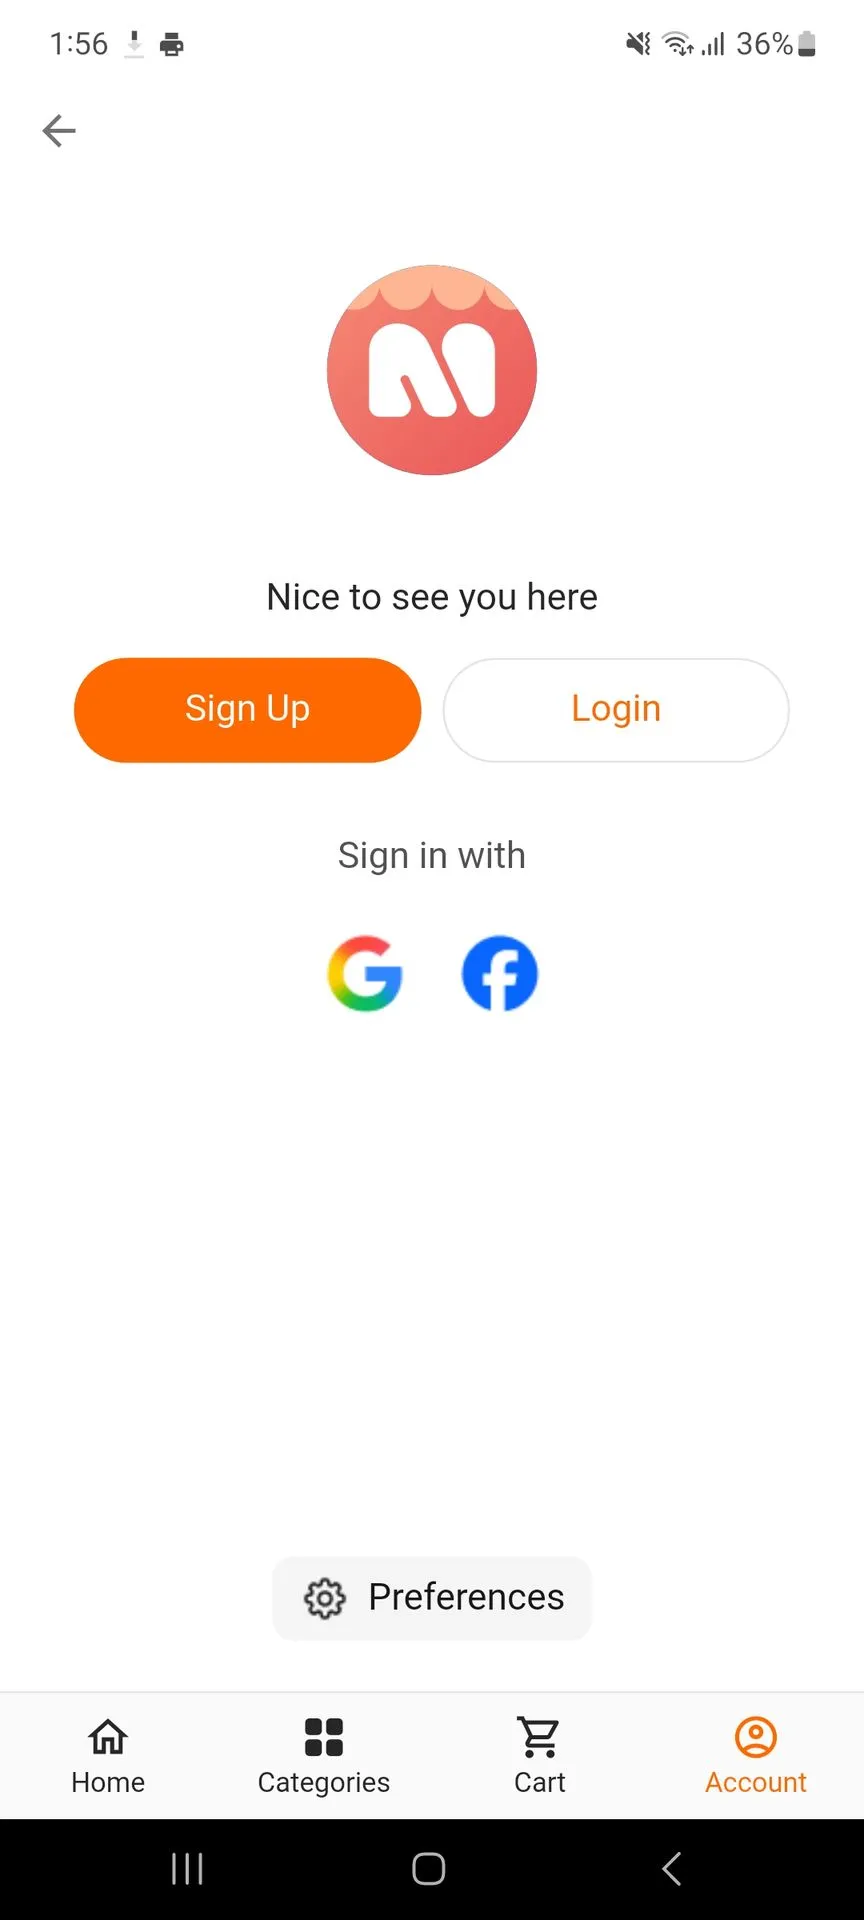
After completing the walkthrough, users are taken to the Sign In or Register screen. Existing users can tap Login to access their account, while new users can select Sign Up to create a new account.
Users can also sign in using their Google or Facebook account. The Preferences option is available to manage the app preferences before continuing.
Sign In or Register
Allows users to sign in to their existing account or register as a new customer. The screen also provides social sign-in options for quick access.

3. Create an Account
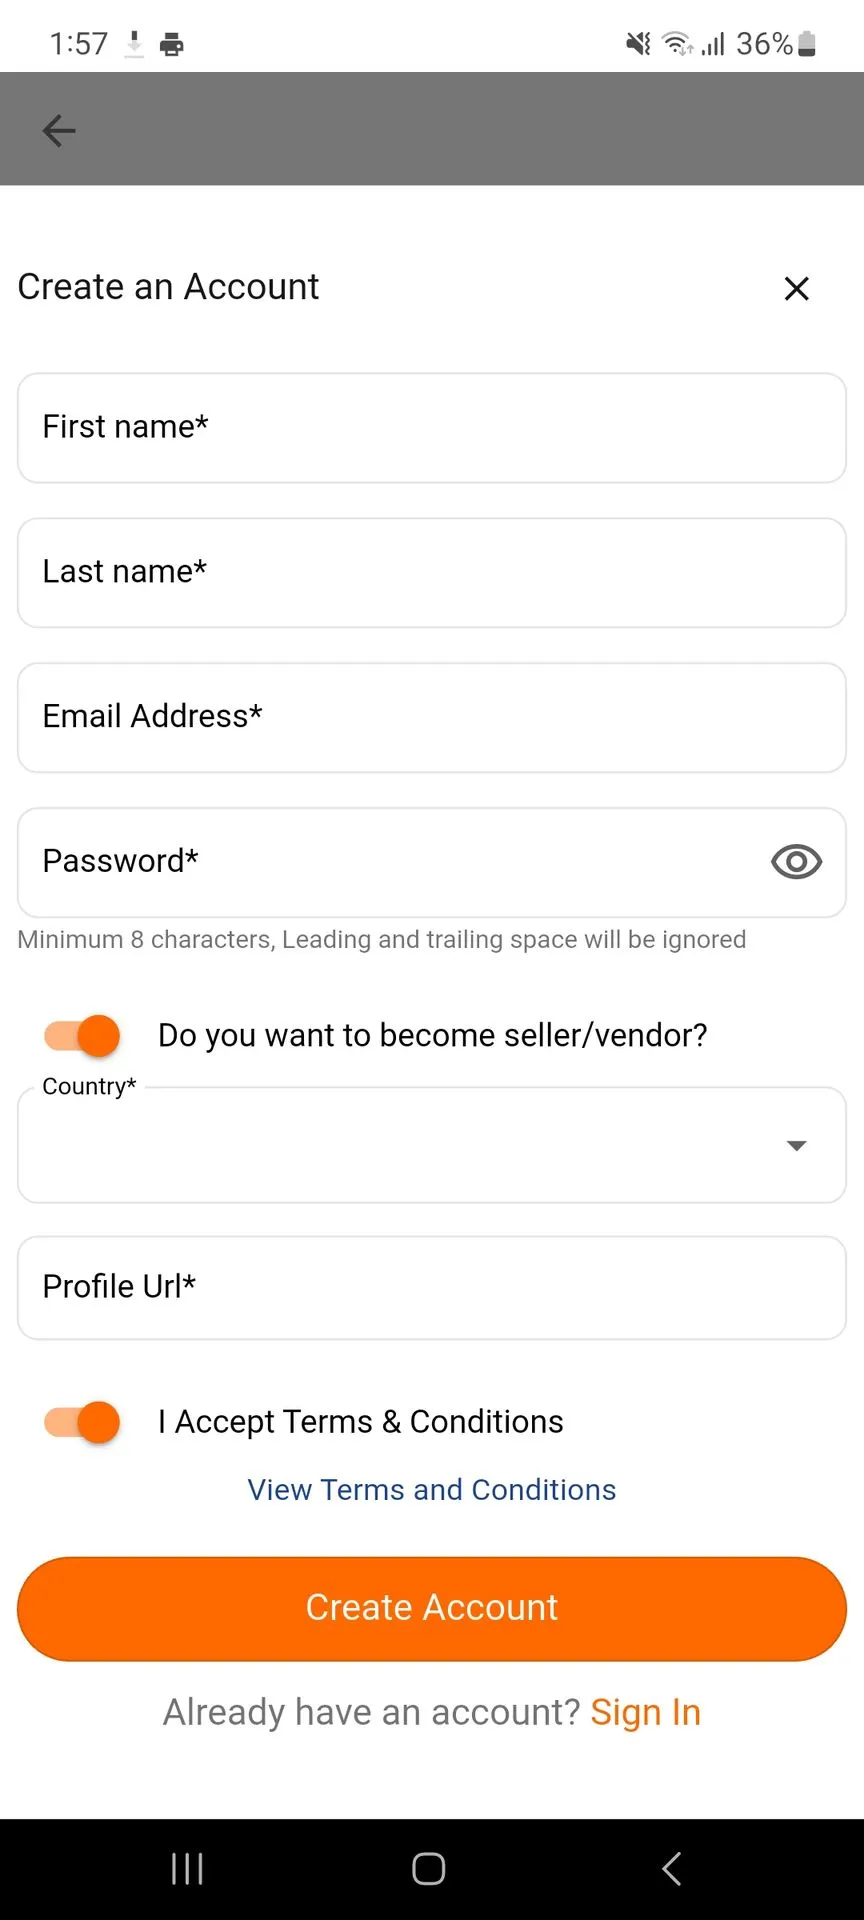
New users can create an account by entering their first name, last name, email address, and password. To register as a marketplace seller, enable the “Do you want to become seller/vendor?” option and provide the required seller details.
Select the country, enter the Profile URL, accept the Terms & Conditions, and tap Create Account to complete the registration. Existing users can tap Sign In to access their account.
Create an Account
Enables new users to create an account by entering their basic details, email address, and password. Users can also choose whether they want to become a seller/vendor.
4. Home Page
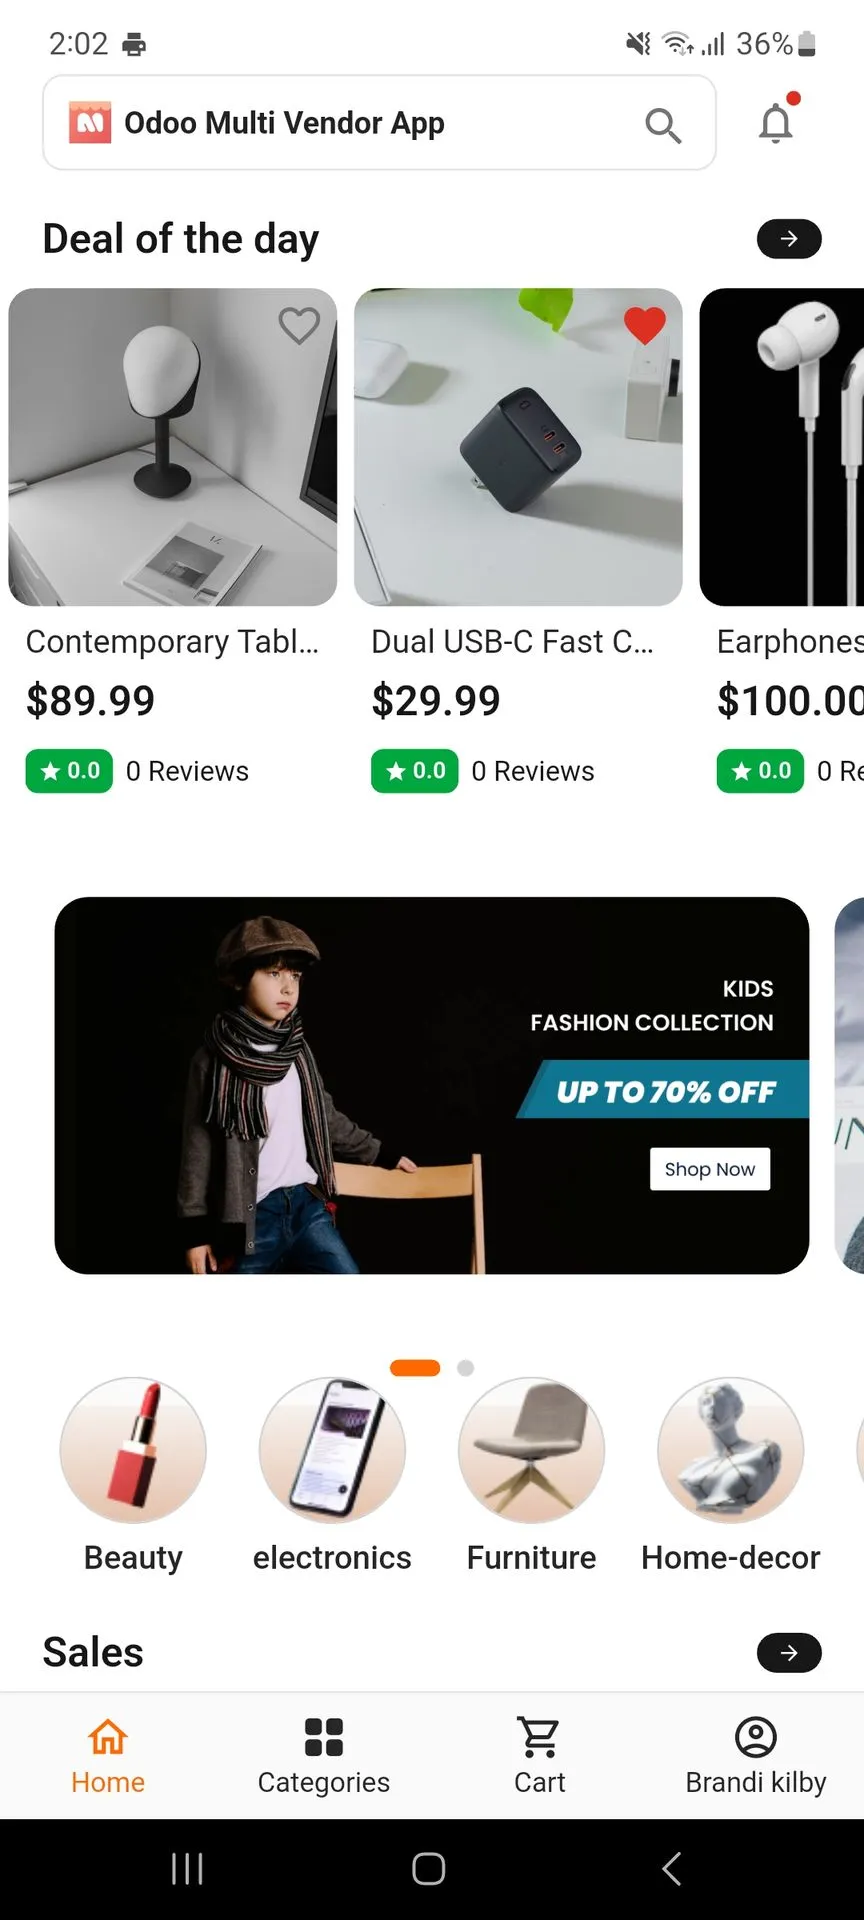
After signing in, the customer is taken to the Home Page. Here, customers can browse the Deal of the Day, featured products, promotional banners, and product categories such as Beauty, Electronics, Furniture, and Home-decor.
Customers can also use the search bar to find products quickly and access the Home, Categories, Cart, and Account sections from the bottom navigation bar.
Home Page
Provides an overview of the store with featured products, deals, promotional banners, and product categories. Users can browse products and access different sections directly from the home screen.
5. Category Page
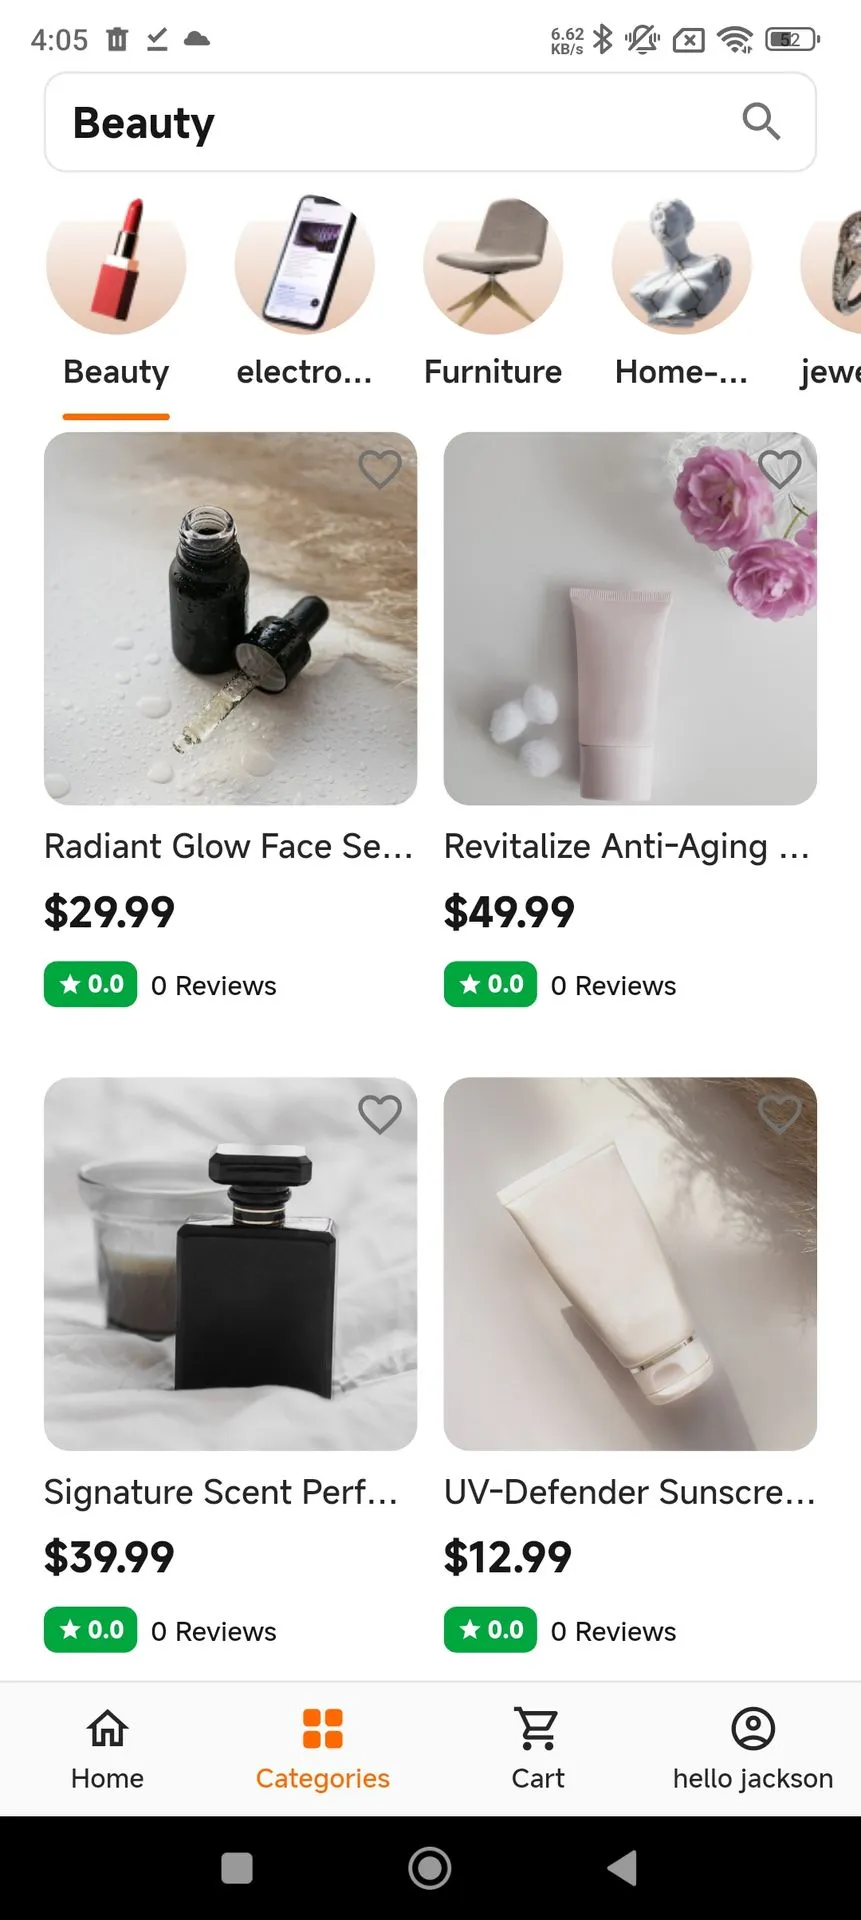
From the bottom navigation bar, tap Categories to browse products by category. Select a category such as Beauty, Electronics, Furniture, or Home-decor to view the available products.
The selected category displays products with their images, names, prices, ratings, and review counts. Customers can also use the search icon to find products within the category.
Category Page
Displays products available under the selected category along with their prices and ratings. Users can browse products and add desired items to their wishlist.
6. Profile
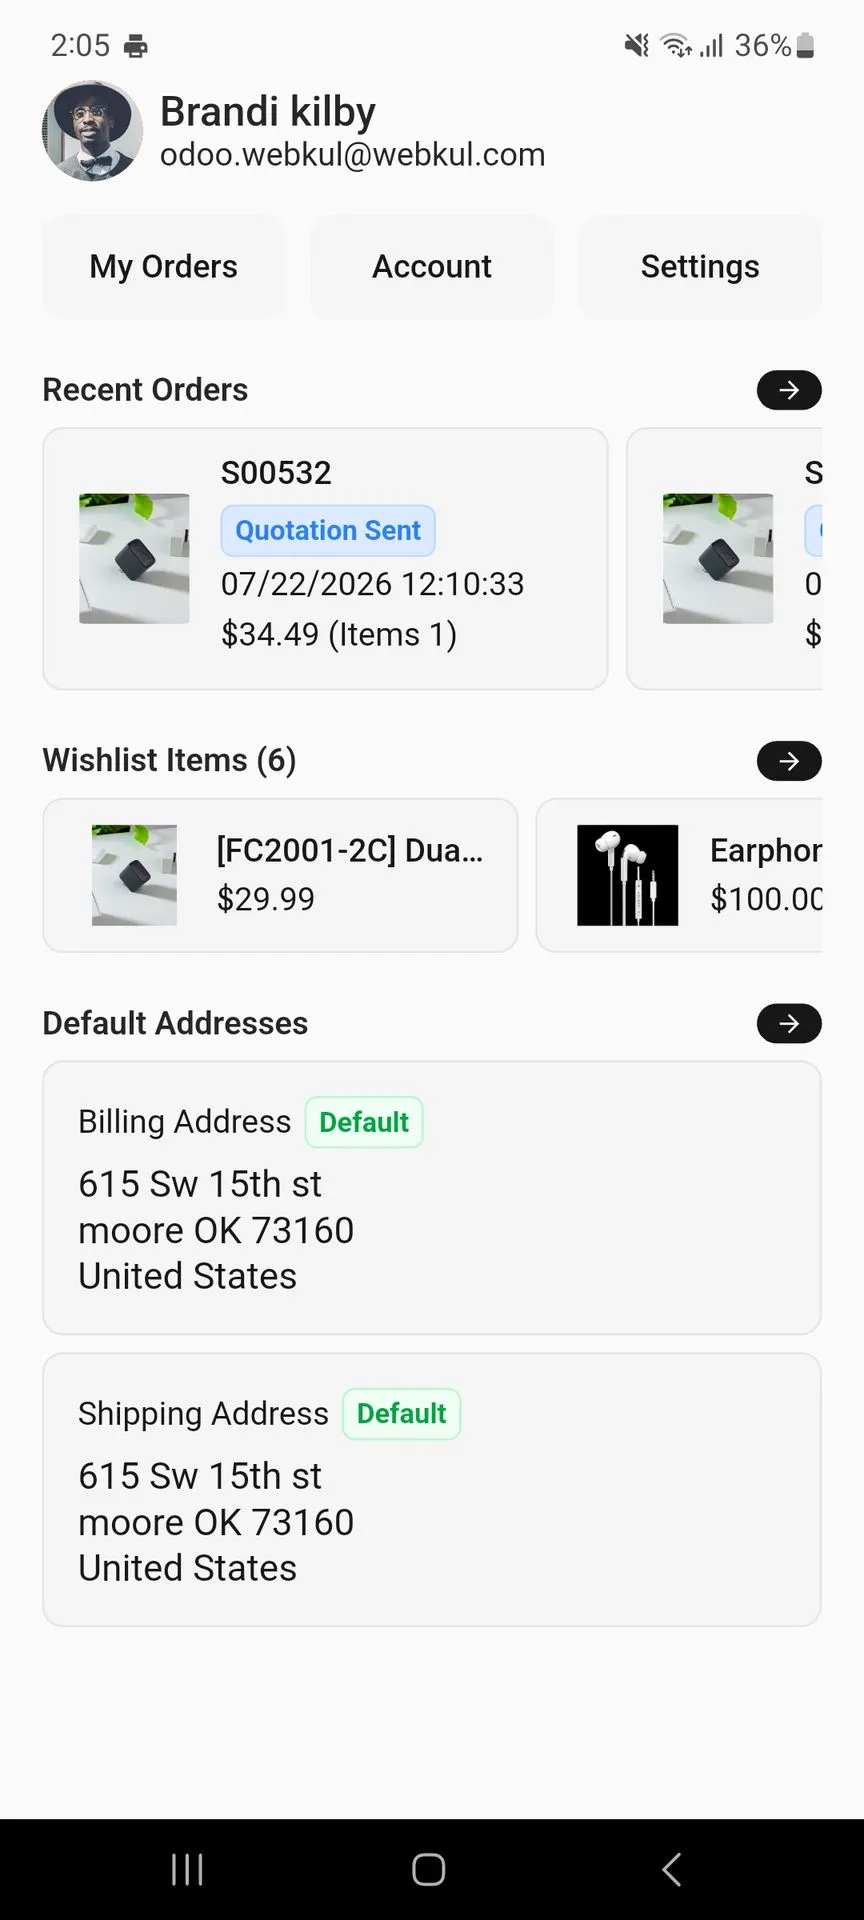
After signing in, tap the Account icon from the bottom navigation bar to open your profile. The profile page displays your name, email address, My Orders, Account, and Settings options.
It also provides quick access to Recent Orders, Wishlist Items, and Default Addresses, allowing you to review your purchases, saved products, and billing or shipping addresses from one place.
Profile
Provides quick access to the user’s orders, account information, settings, wishlist, and other account-related options. It also displays the user’s basic profile information.
7. My Orders
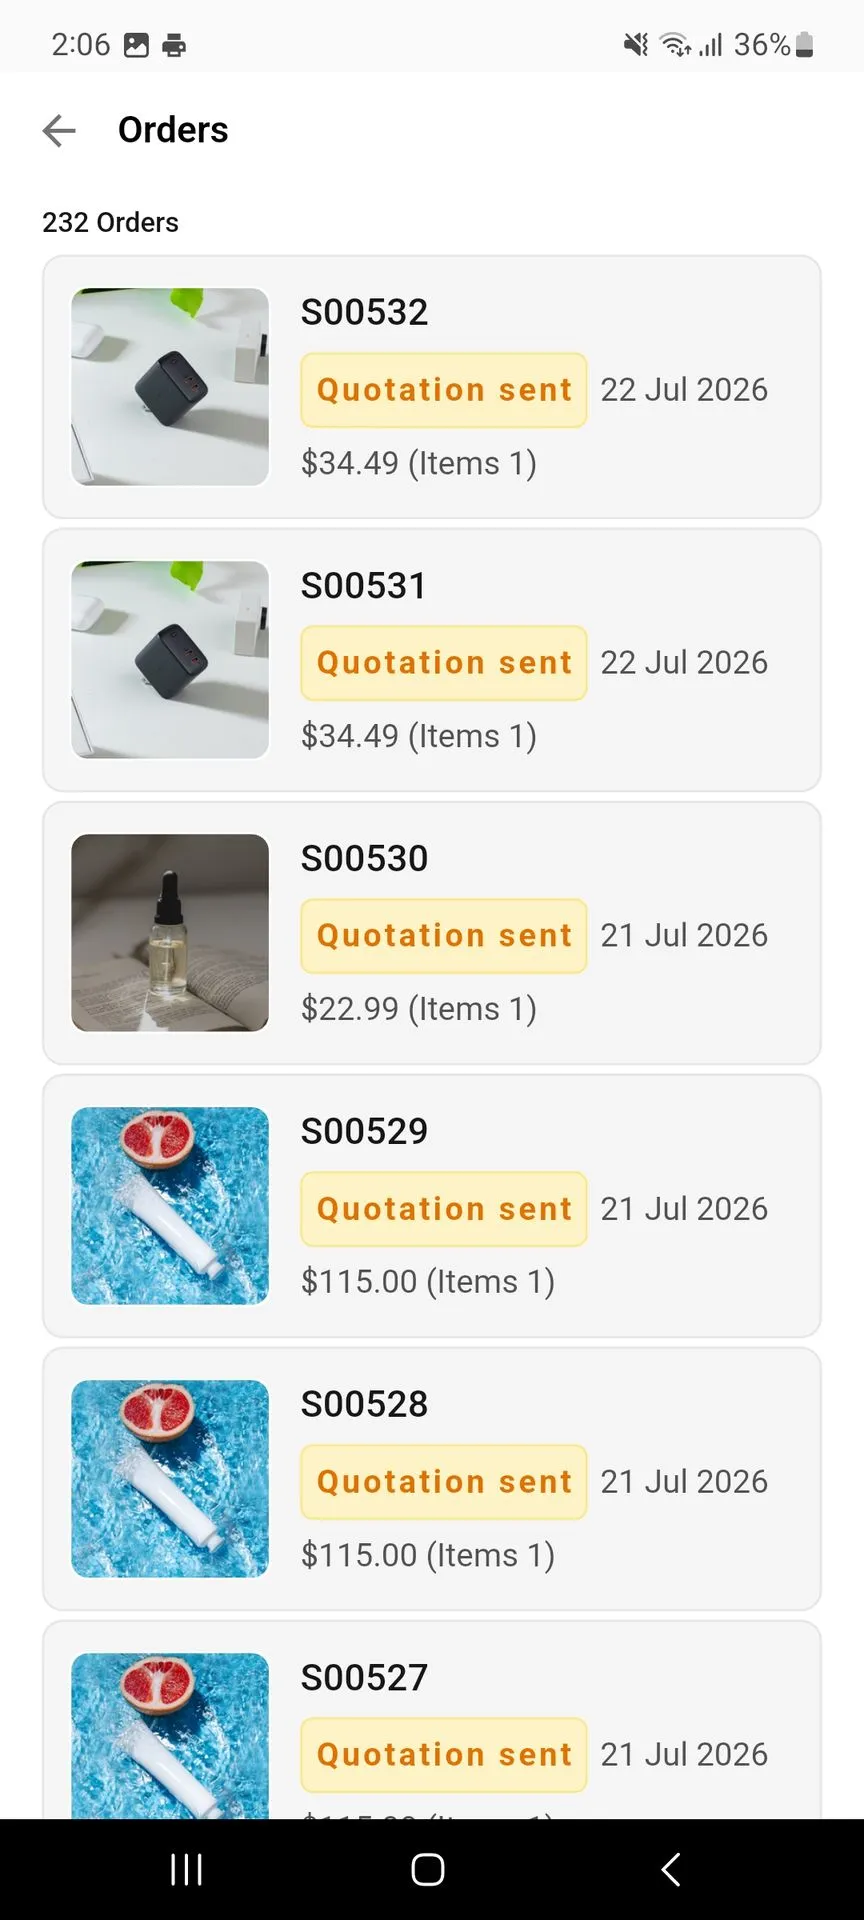
From the Profile section, tap My Orders to view all the orders placed through the mobile app. The Orders page displays the total number of orders along with each order’s order number, status, date, total amount, and number of items.
Customers can review their previous orders and tap an order to view its detailed information.
My Orders
Displays the customer’s complete order history with order numbers, order status, dates, and order amounts. Users can select an order to view its detailed information.
8. Account Settings
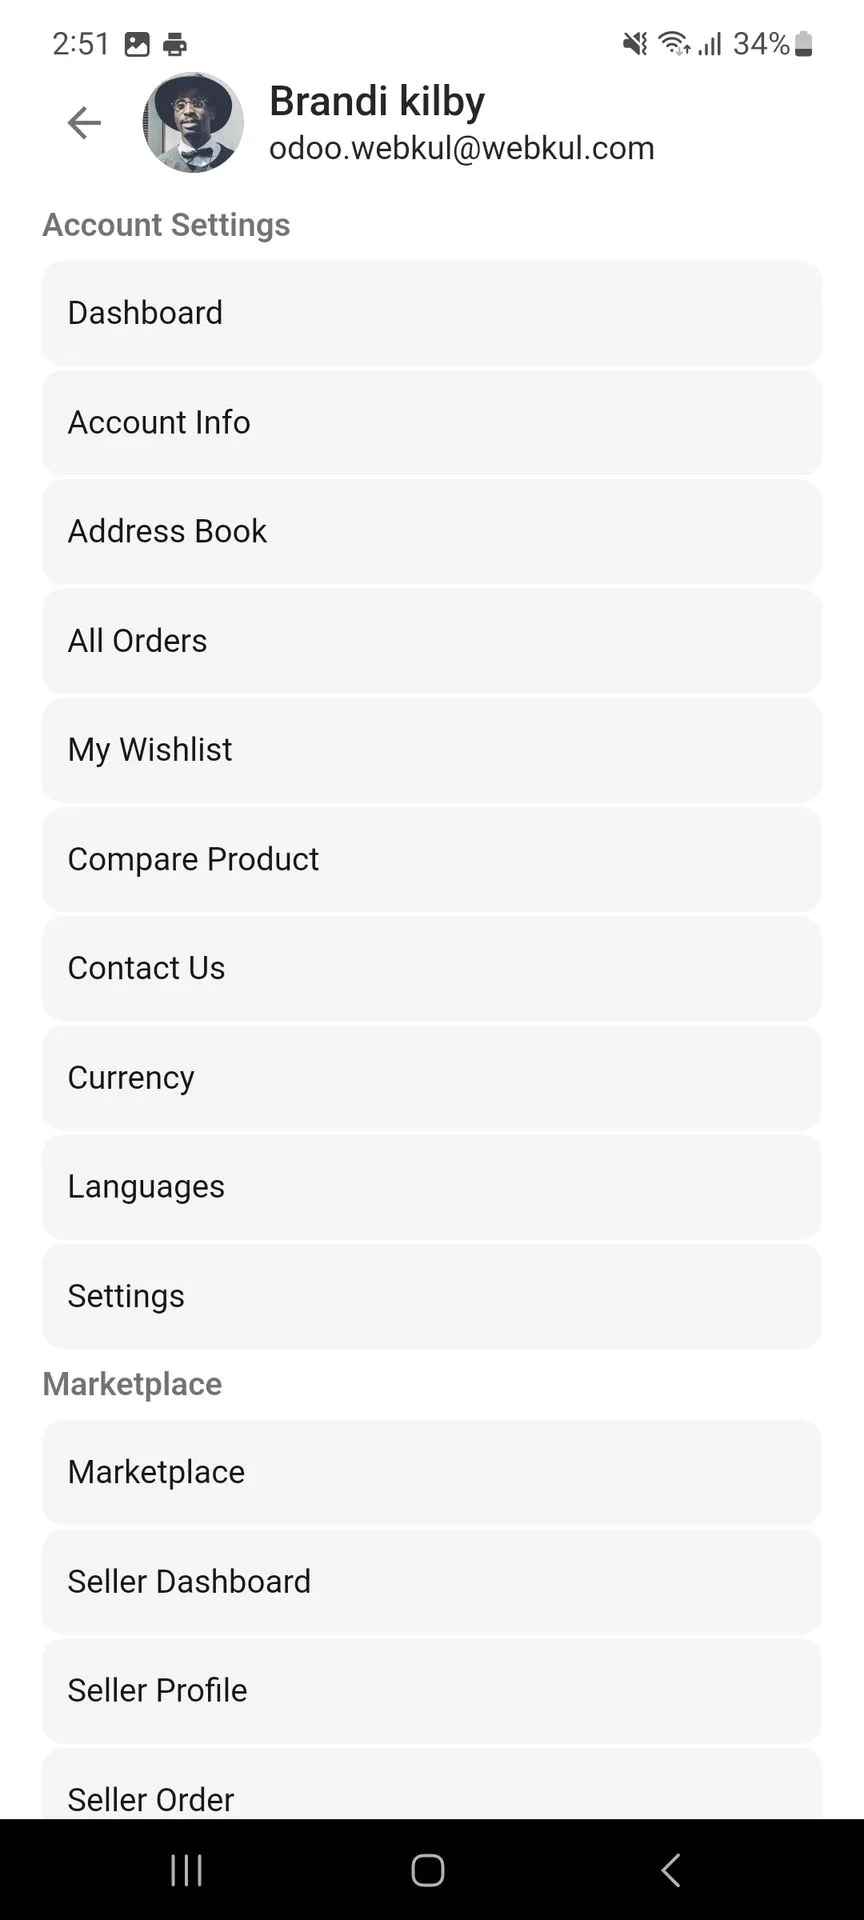
From the Profile section, tap Account to open the Account Settings page. Here, you can access different account-related options, including Dashboard, Account Info, Address Book, All Orders, My Wishlist, Compare Product, Contact Us, Currency, Languages, and Settings.
The Marketplace section also provides quick access to Marketplace, Seller Dashboard, Seller Profile, and Seller Order.
Account Settings
Provides access to customer account options such as Account Info, Address Book, All Orders, Wishlist, Compare Product, Contact Us, Currency, Languages, and Settings.
9. Account Info
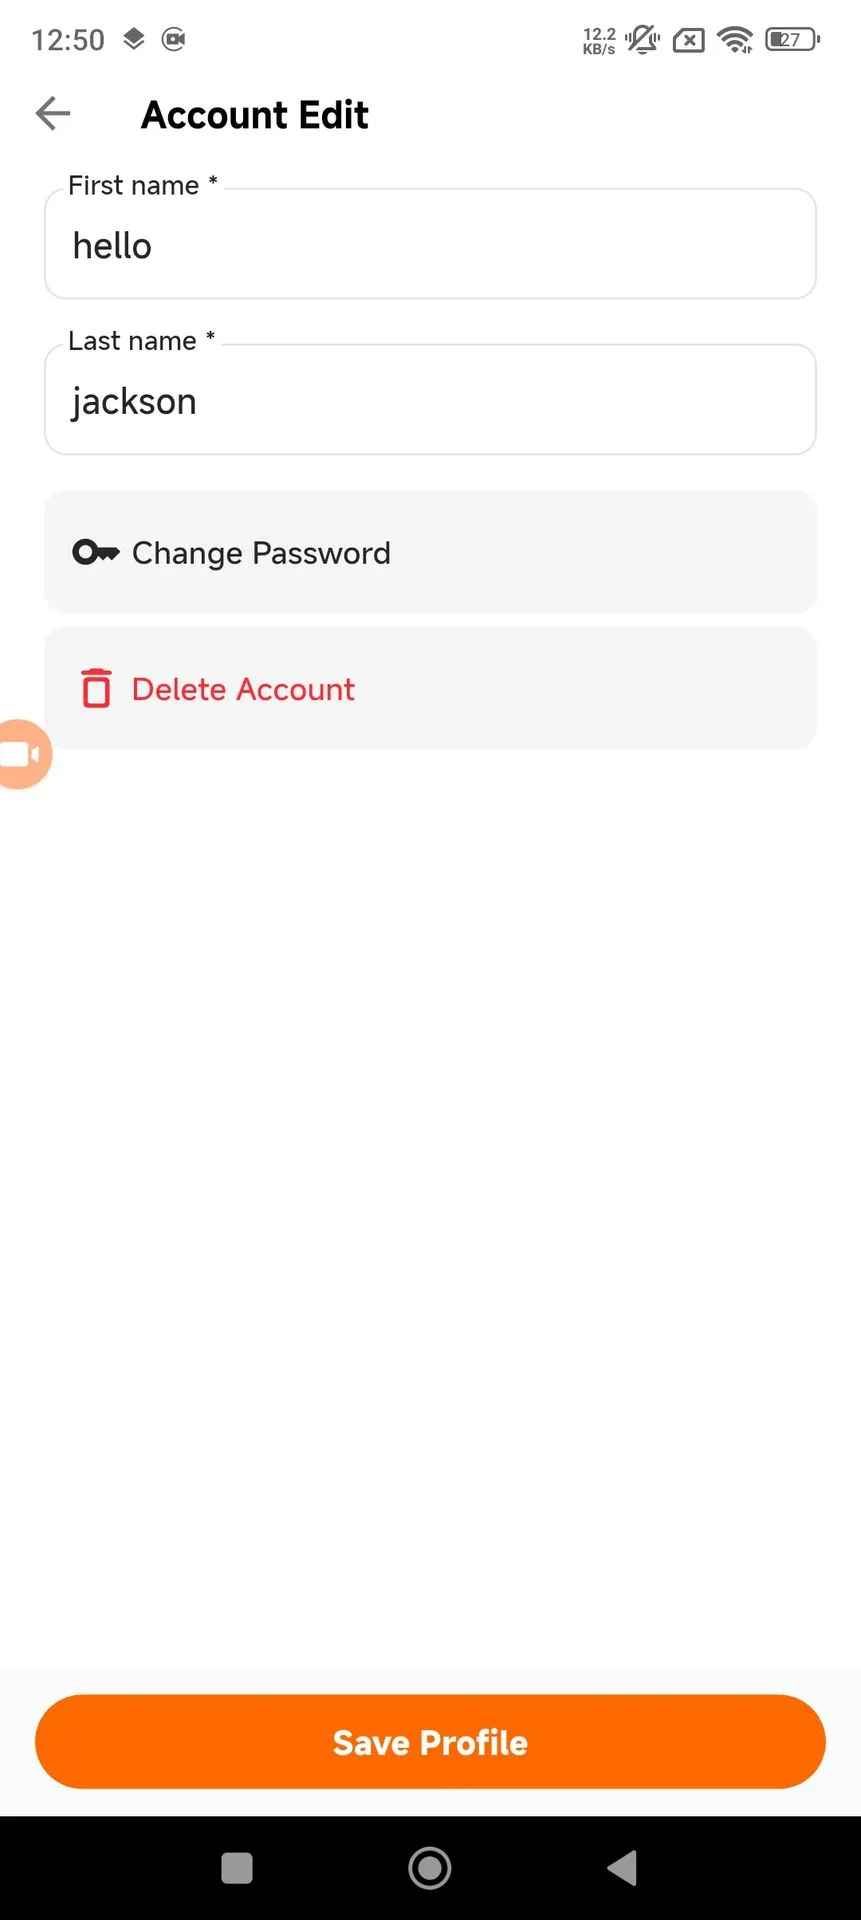
From the Account Settings page, tap Account Info to manage your account details. You can update your first name and last name, change your password, or delete your account from this section.
After making the required changes, tap Save Profile to save the updated account information.
Account Info
Allows users to manage their basic account information, including first name and last name. Users can also change their password or delete their account from this section.
10. Address Book
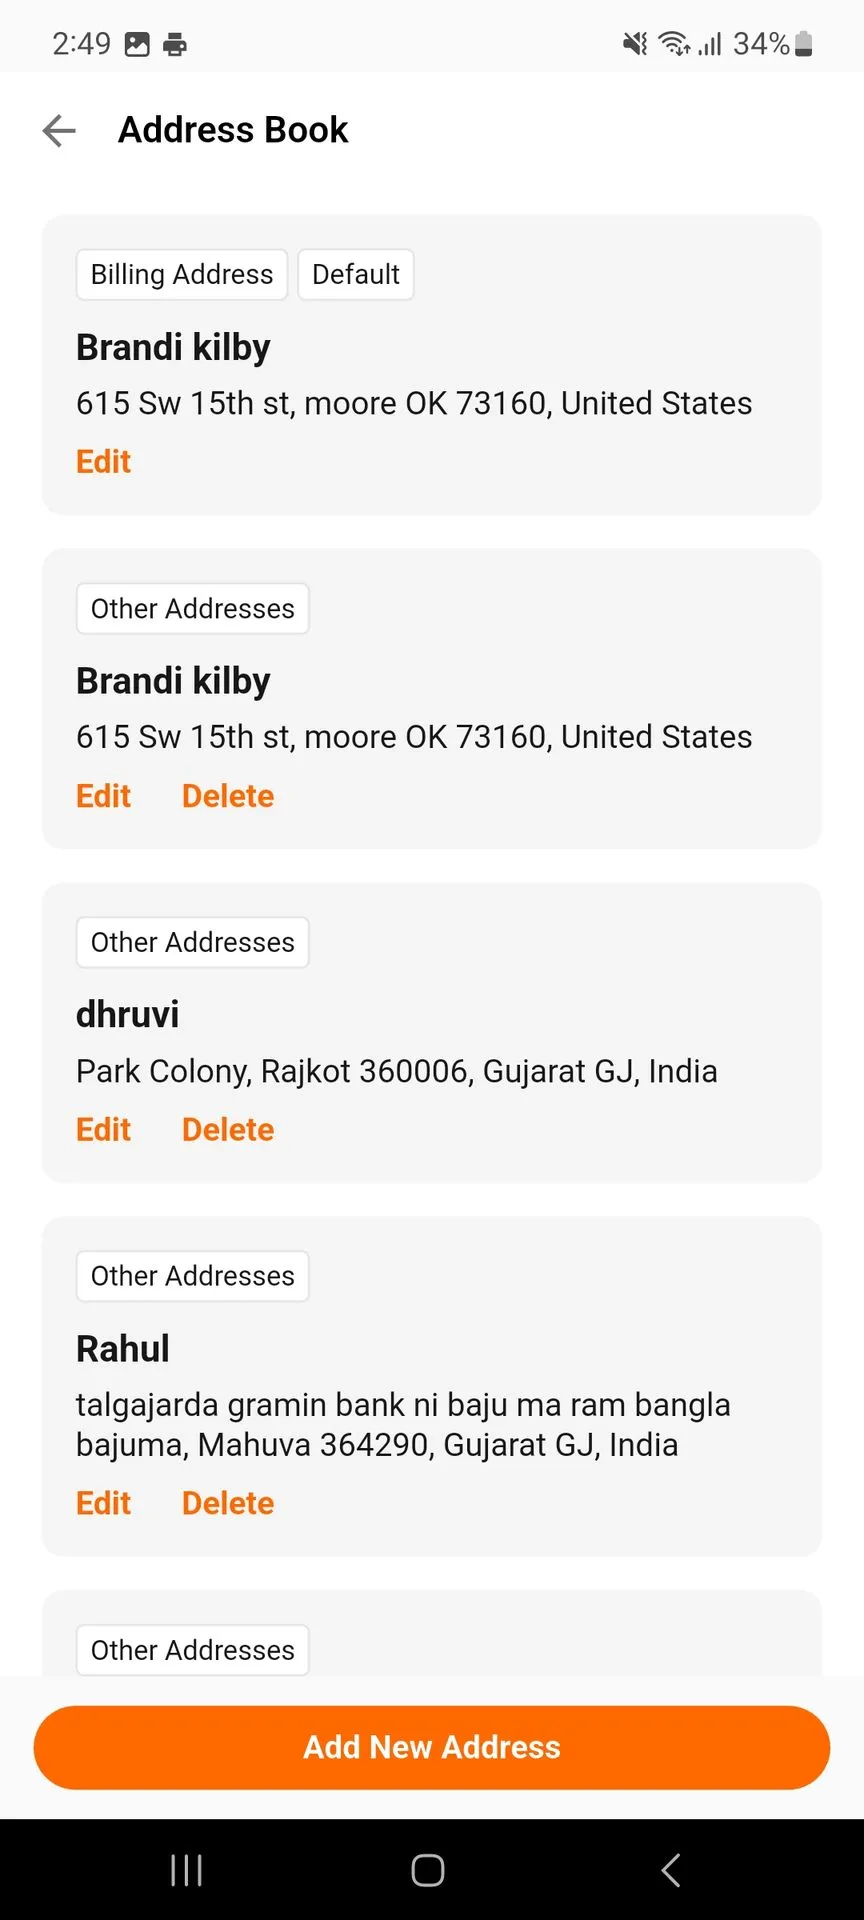
From the Account Settings page, tap Address Book to view your saved addresses. The address list shows the billing address and other saved addresses, along with options to edit or delete them.
To add another address, tap Add New Address at the bottom of the page and enter the required address details.
Address Book
Displays saved billing and other addresses associated with the customer account. Users can edit or delete existing addresses and add new addresses when required.
11. My Wishlist
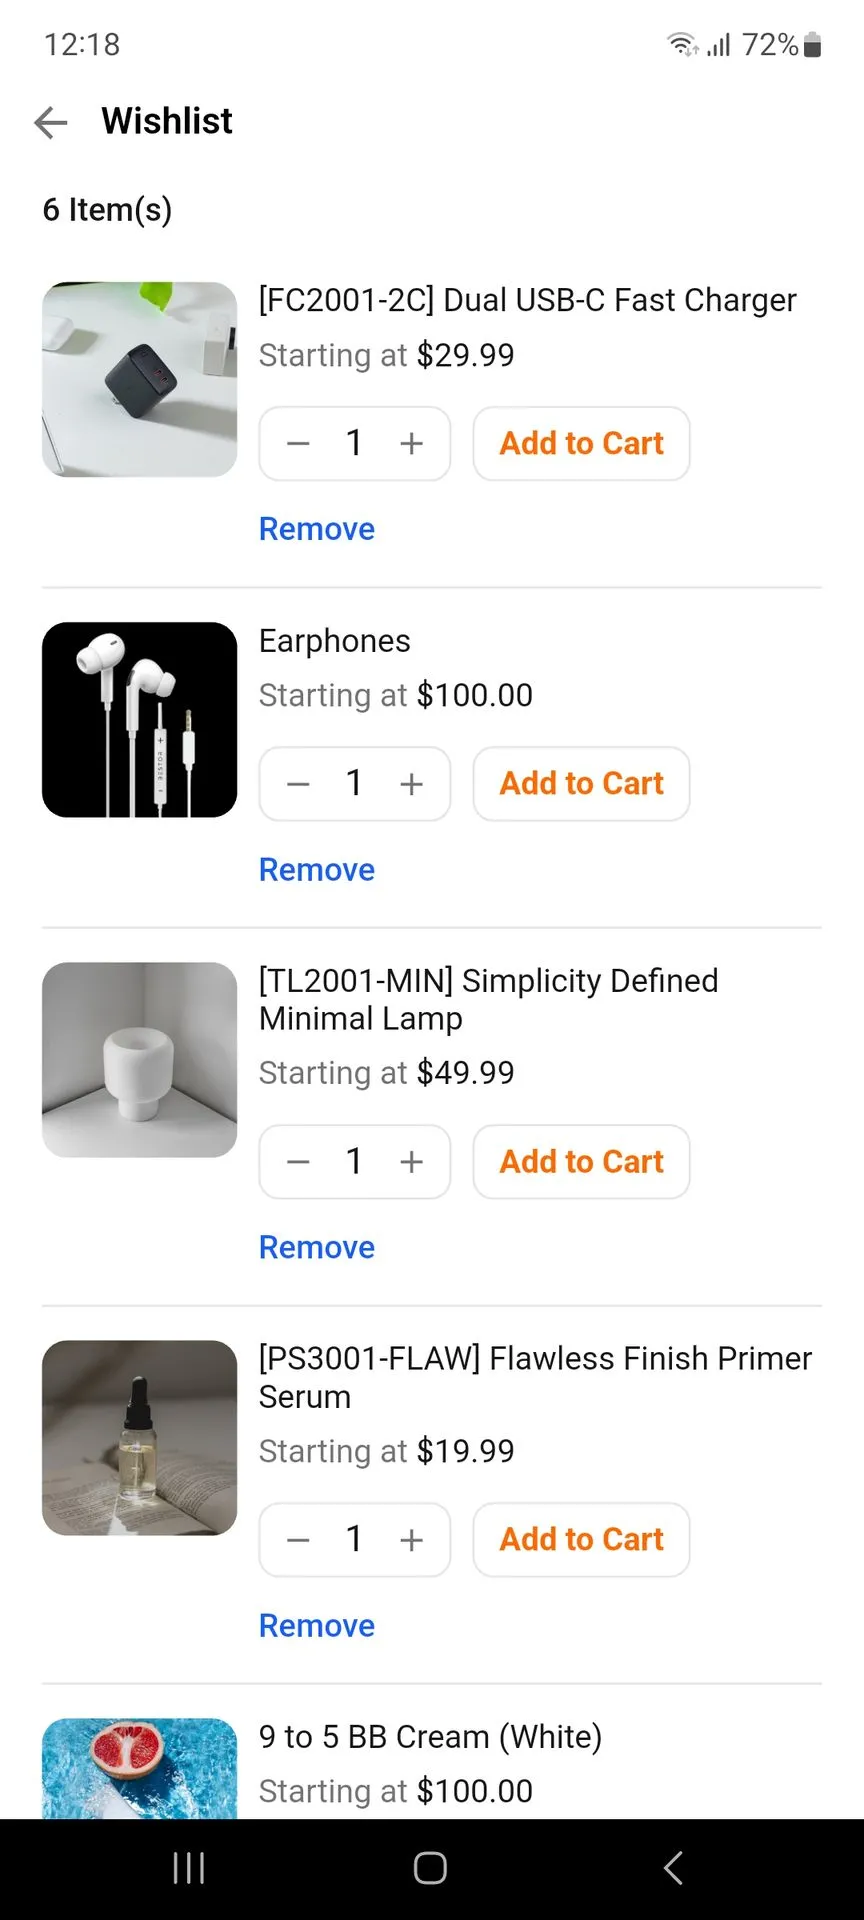
From the Account Settings page, tap My Wishlist to view the products you have saved for later. The Wishlist displays the saved products along with their name, starting price, and quantity controls.
You can tap Add to Cart to move a wishlist item to your cart, adjust its quantity using the + and − buttons, or tap Remove to delete the product from your wishlist.
My Wishlist
Shows products saved by the customer for later purchase. Users can adjust the quantity, add products directly to the cart, or remove items from the wishlist.
12. Currency
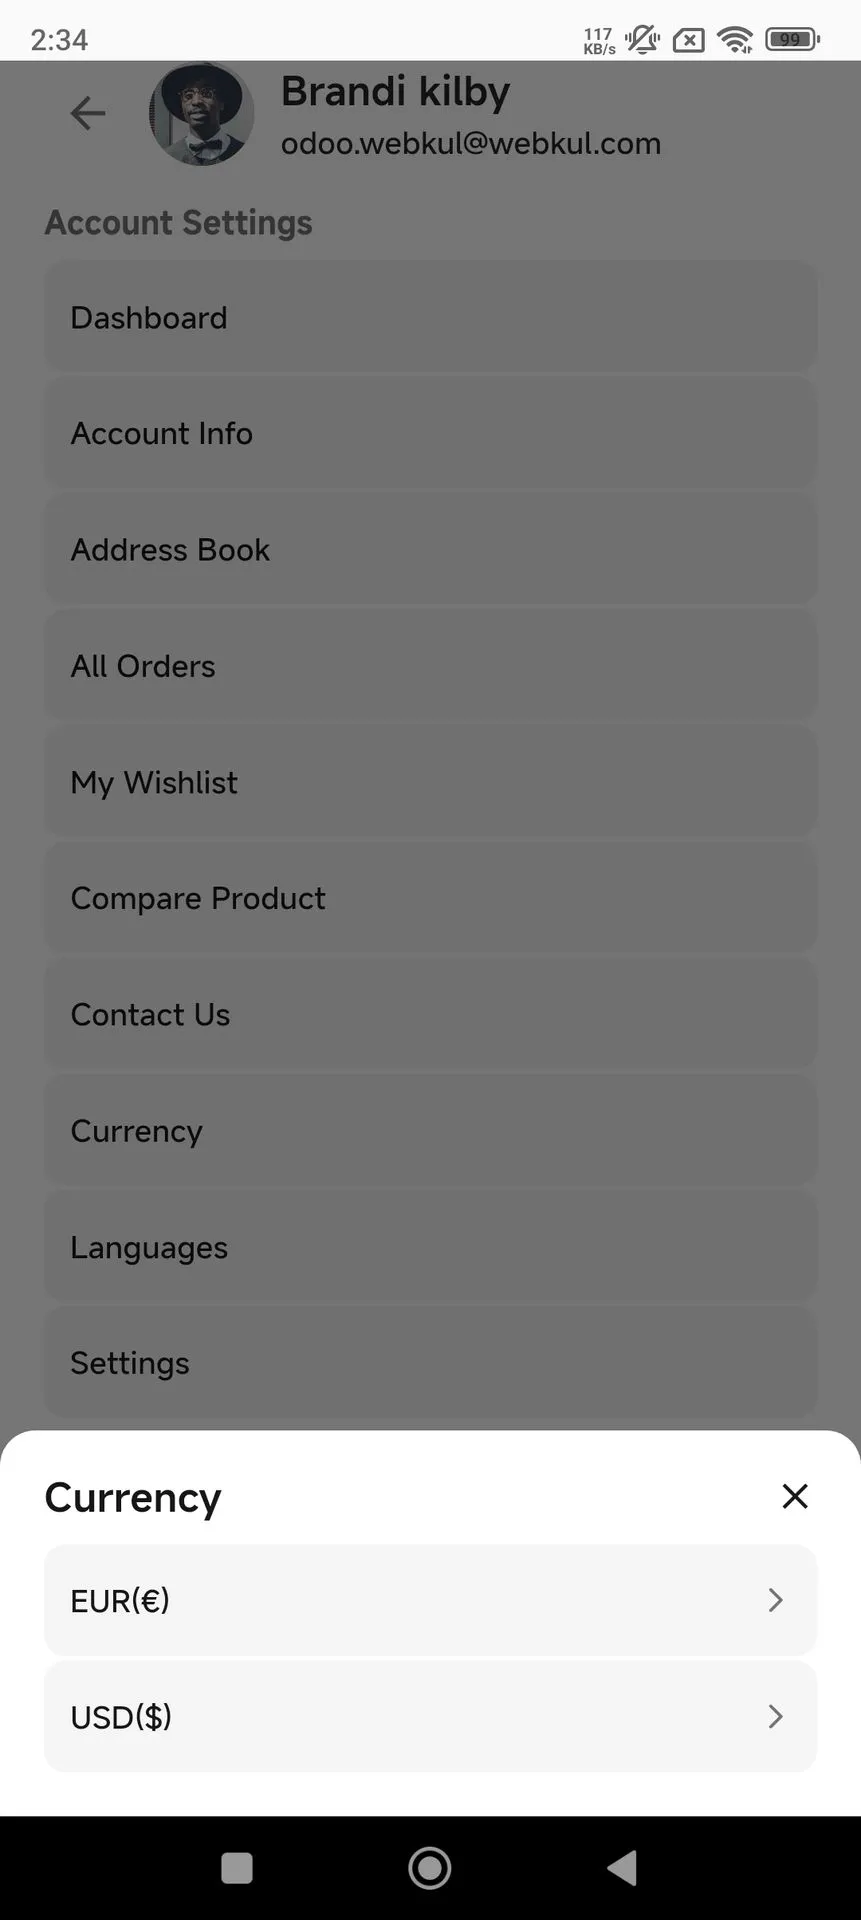
From the Account Settings page, tap Currency to view the available currency options. The app provides EUR (€) and USD ($) as the available currencies.
Select the required currency from the list to use it for viewing product prices and other monetary values in the mobile app.
Currency
Allows customers to select their preferred currency for shopping. Available currency options are displayed for quick selection.
13. Languages
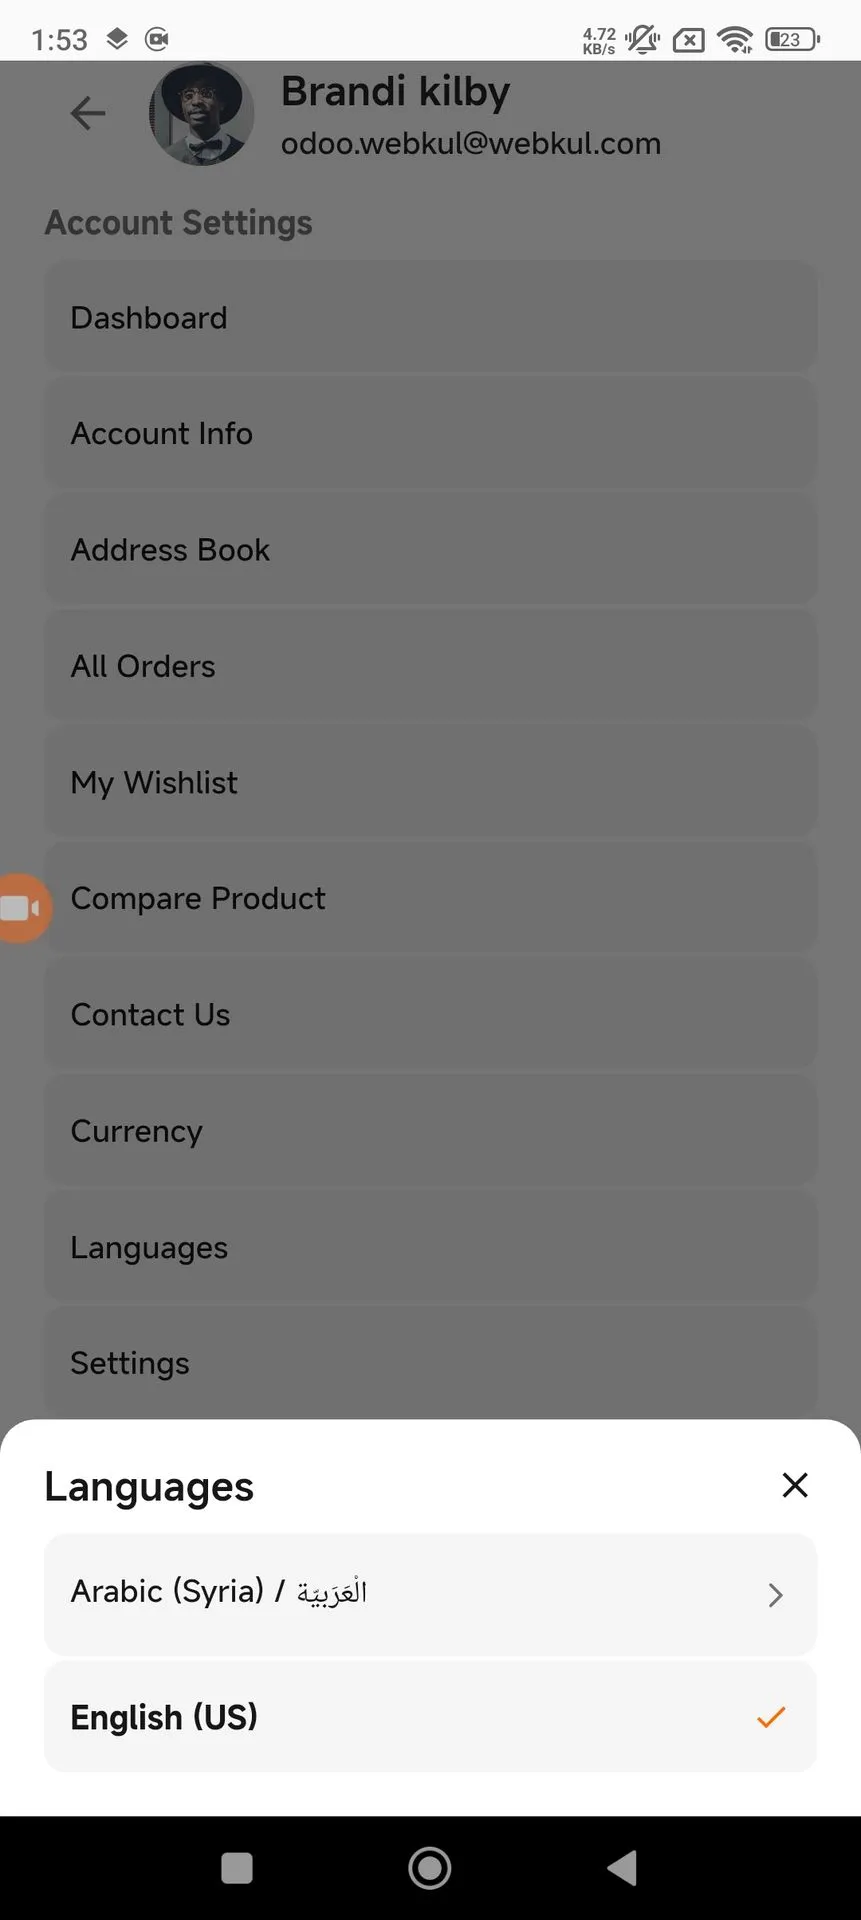
From the Account Settings page, tap Languages to open the available language options. The language selection panel displays the supported languages, such as Arabic (Syria) / العربية and English (US).
Tap the required language to set it as the preferred language for the mobile app. The currently selected language is marked with a check icon.
Languages
Allows users to select the preferred language for the mobile app. The currently selected language is indicated with a check mark.
14. Settings
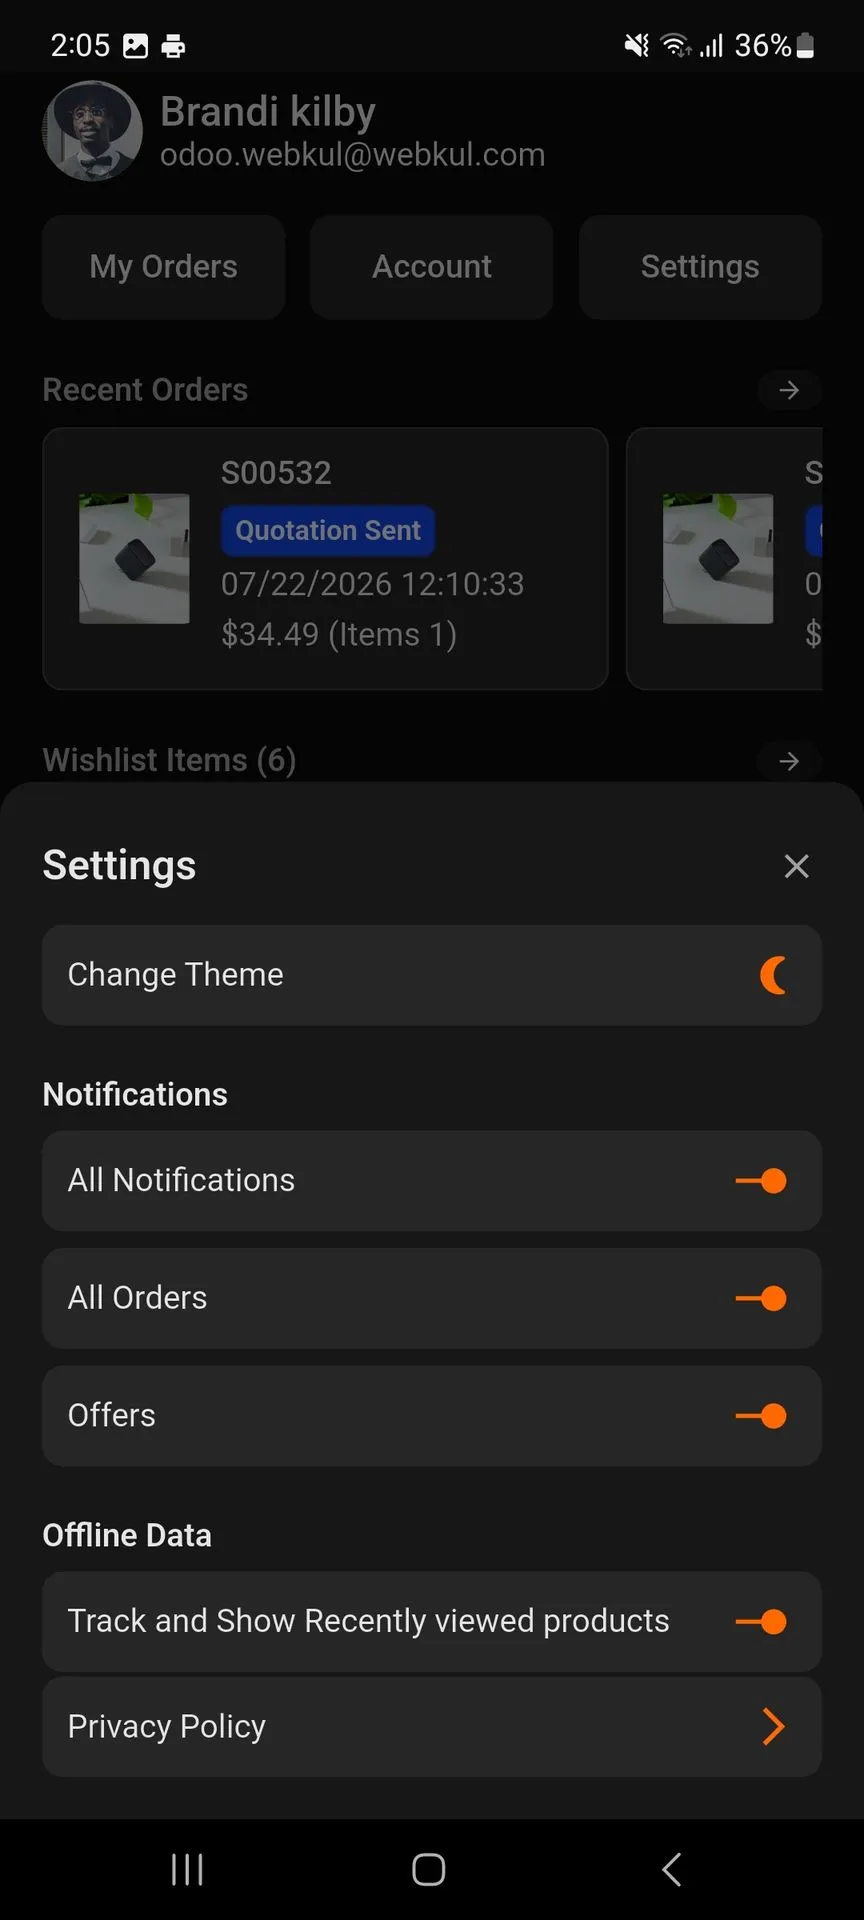
From the Account Settings page, tap Settings to open the app settings. Here, you can change the app theme and manage notification preferences for All Notifications, All Orders, and Offers.
The Offline Data section lets you enable or disable tracking and displaying recently viewed products. You can also access the Privacy Policy from this section.
Settings
Provides options to customize the app experience, including theme preferences, notification settings, recently viewed products, and access to the Privacy Policy.
15. Product Page
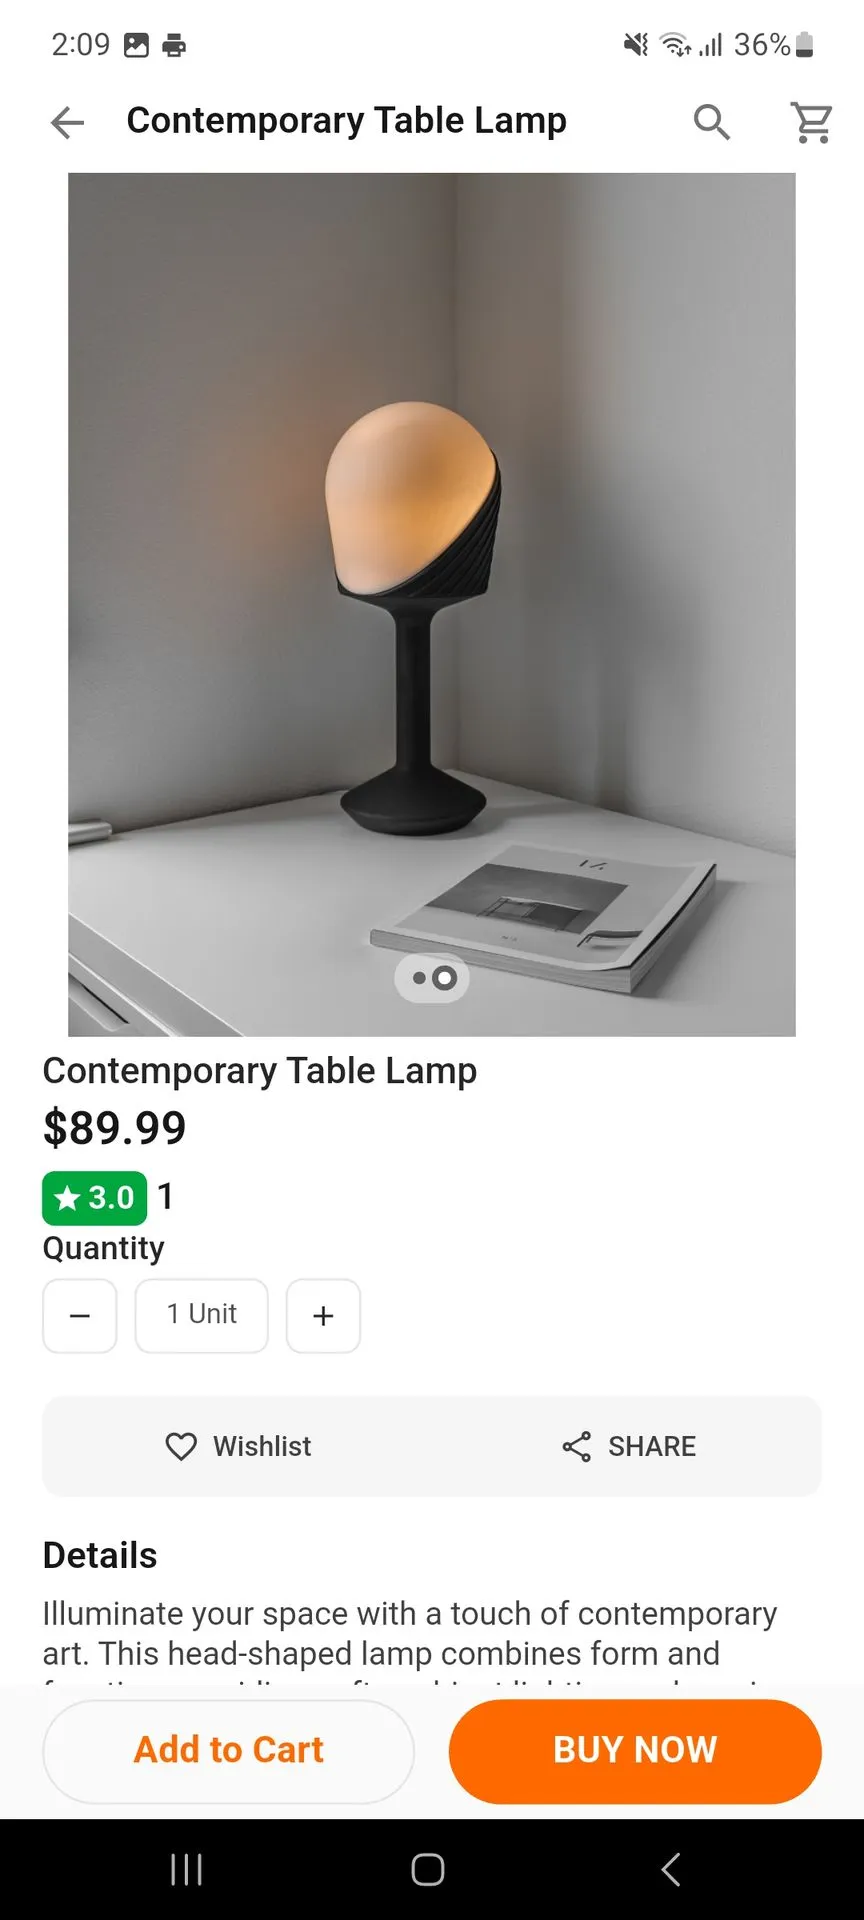
Select any product from the Home or Categories section to open its product page. Here, customers can view the product image, name, price, rating, and available quantity. They can also use the Wishlist and Share options for the product.
Customers can adjust the required quantity and review the product details before purchasing. To continue with the purchase, tap Add to Cart to add the product to the shopping cart, or select Buy Now to proceed directly to checkout.
Product Page
Displays detailed information about a selected product, including its image, price, rating, quantity, description, wishlist, and sharing options. Customers can add the product to the cart or proceed directly to purchase.
16. Reviews
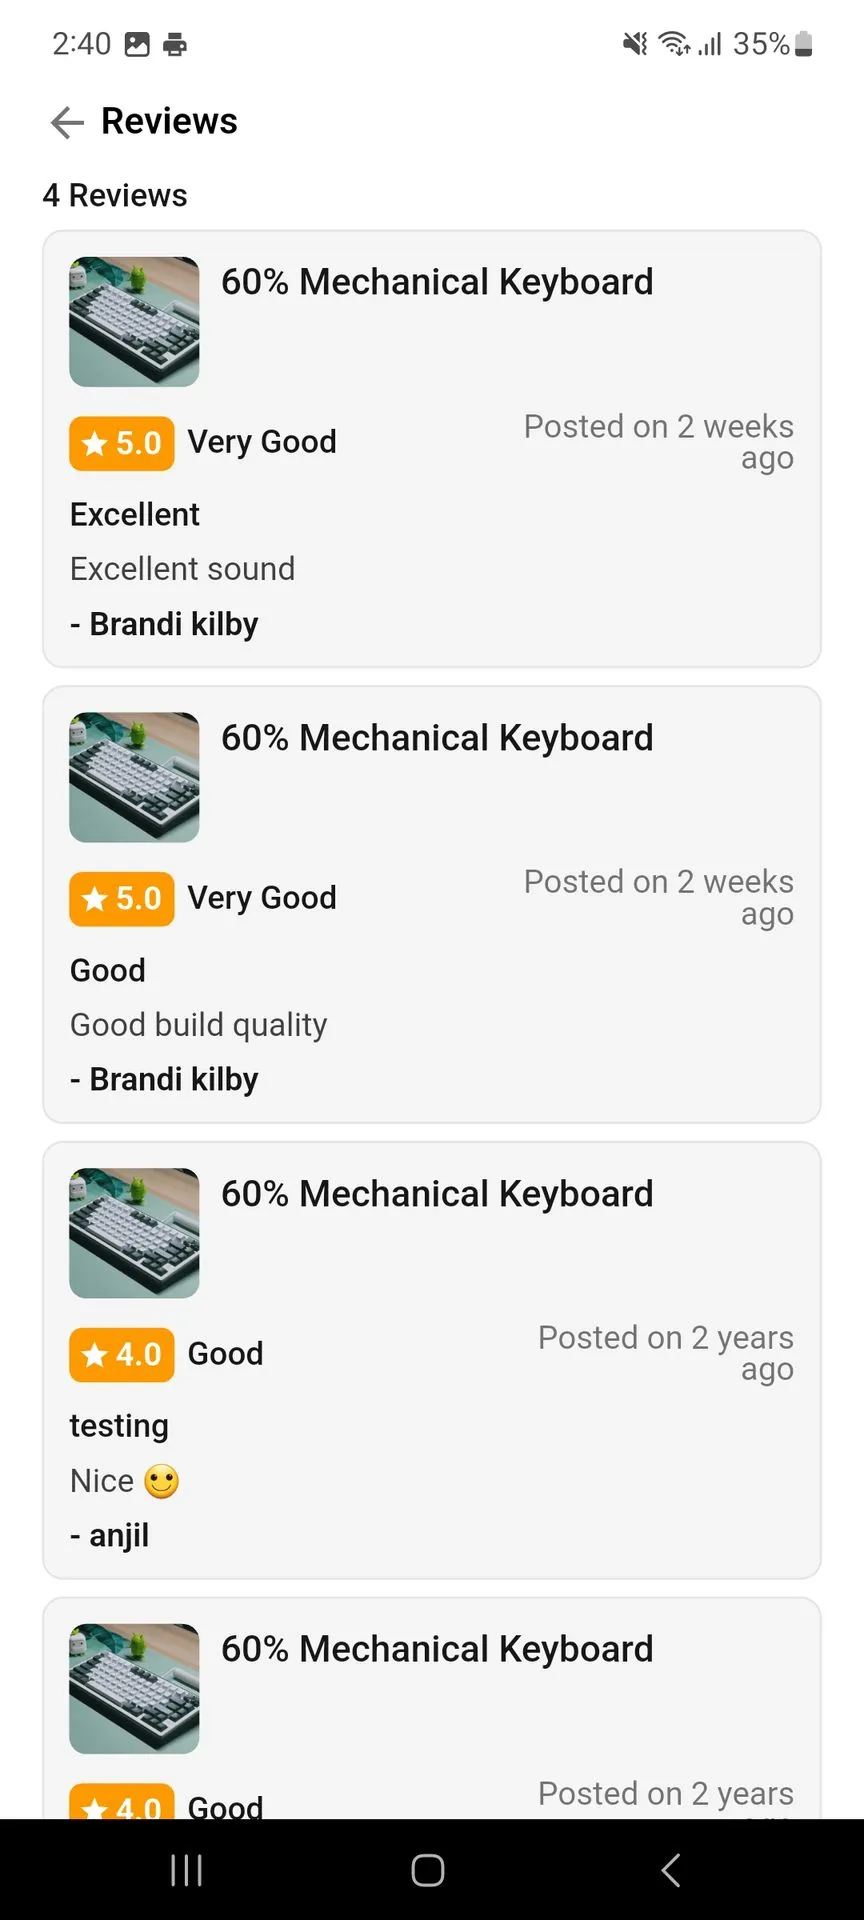
Customers can view the reviews shared by other buyers for products available in the marketplace. The Reviews page displays the product name, rating, review title, comments, reviewer name, and posting date, helping customers understand other users’ experiences.
Customers can browse multiple reviews to compare ratings and feedback before making a purchase decision.
Reviews
Displays customer reviews and ratings for the selected product. Users can view ratings, review comments, reviewer names, and the time when reviews were posted.
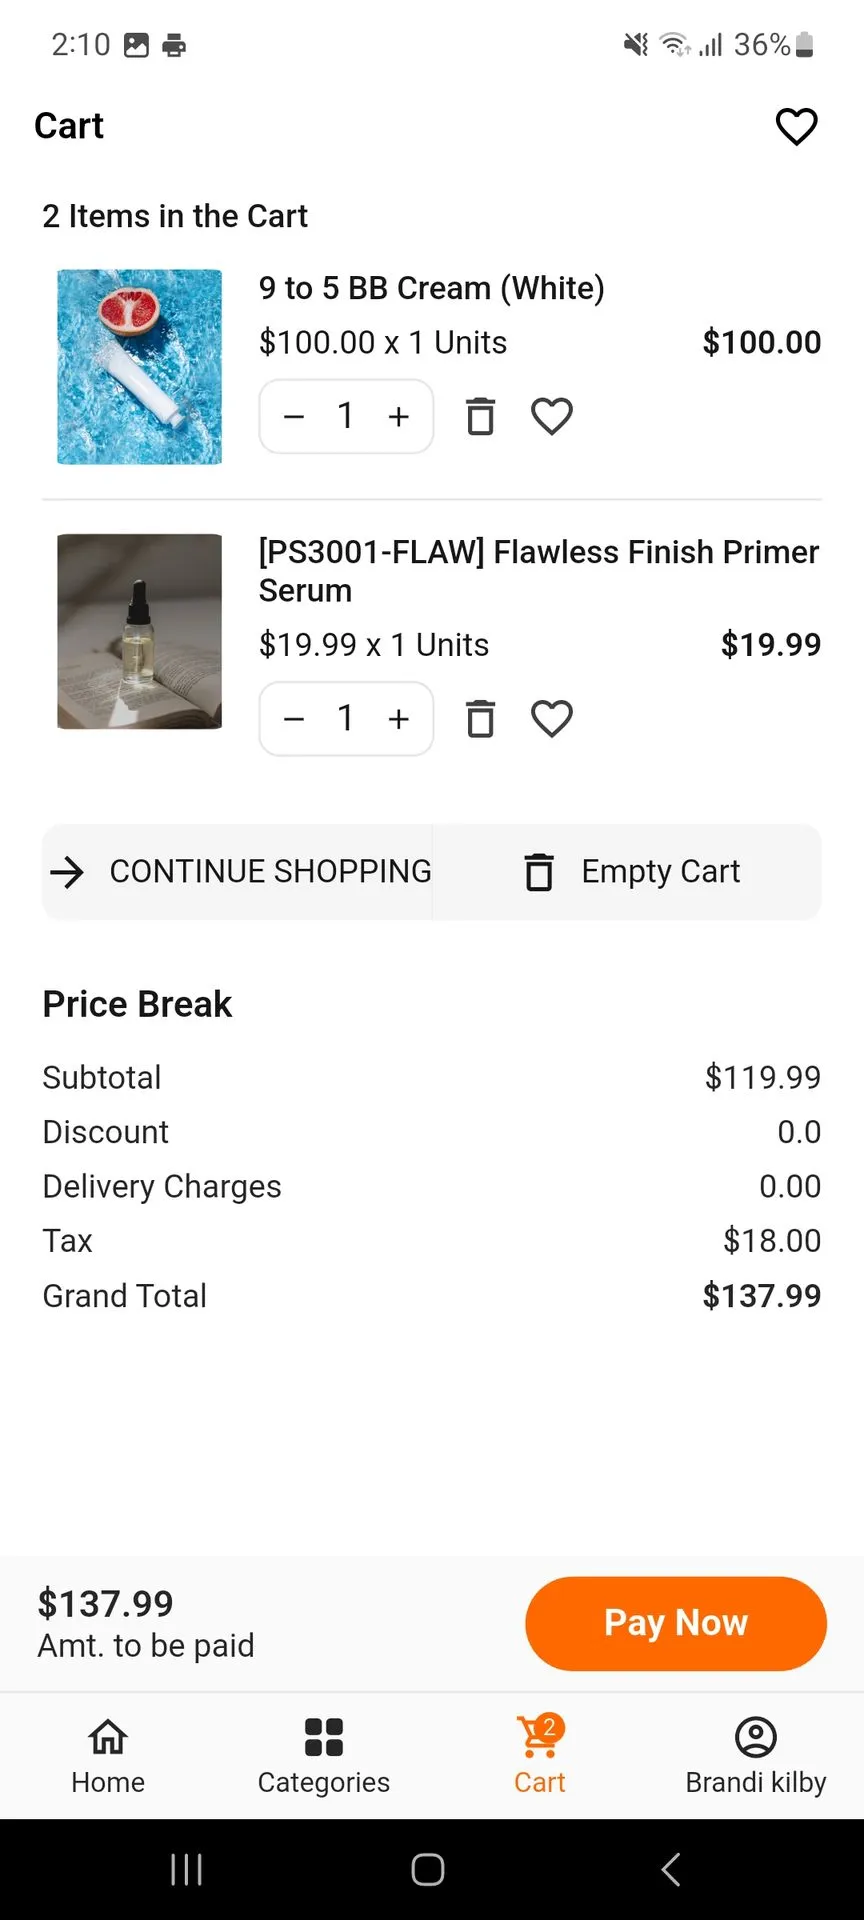
17. Shopping Cart
After adding products to the cart, customers can review all selected items from the Cart section. The cart displays the product name, price, quantity, and item total. Customers can increase or decrease the quantity, remove products, or move items to the wishlist.
The Price Break section shows the subtotal, discount, delivery charges, tax, and grand total. Customers can review the final payable amount and tap Pay Now to proceed with the checkout process.
Shopping Cart
Displays all products added to the cart along with their quantities and prices. Customers can update quantities, remove items, move products to the wishlist, and review the complete price breakdown before checkout.
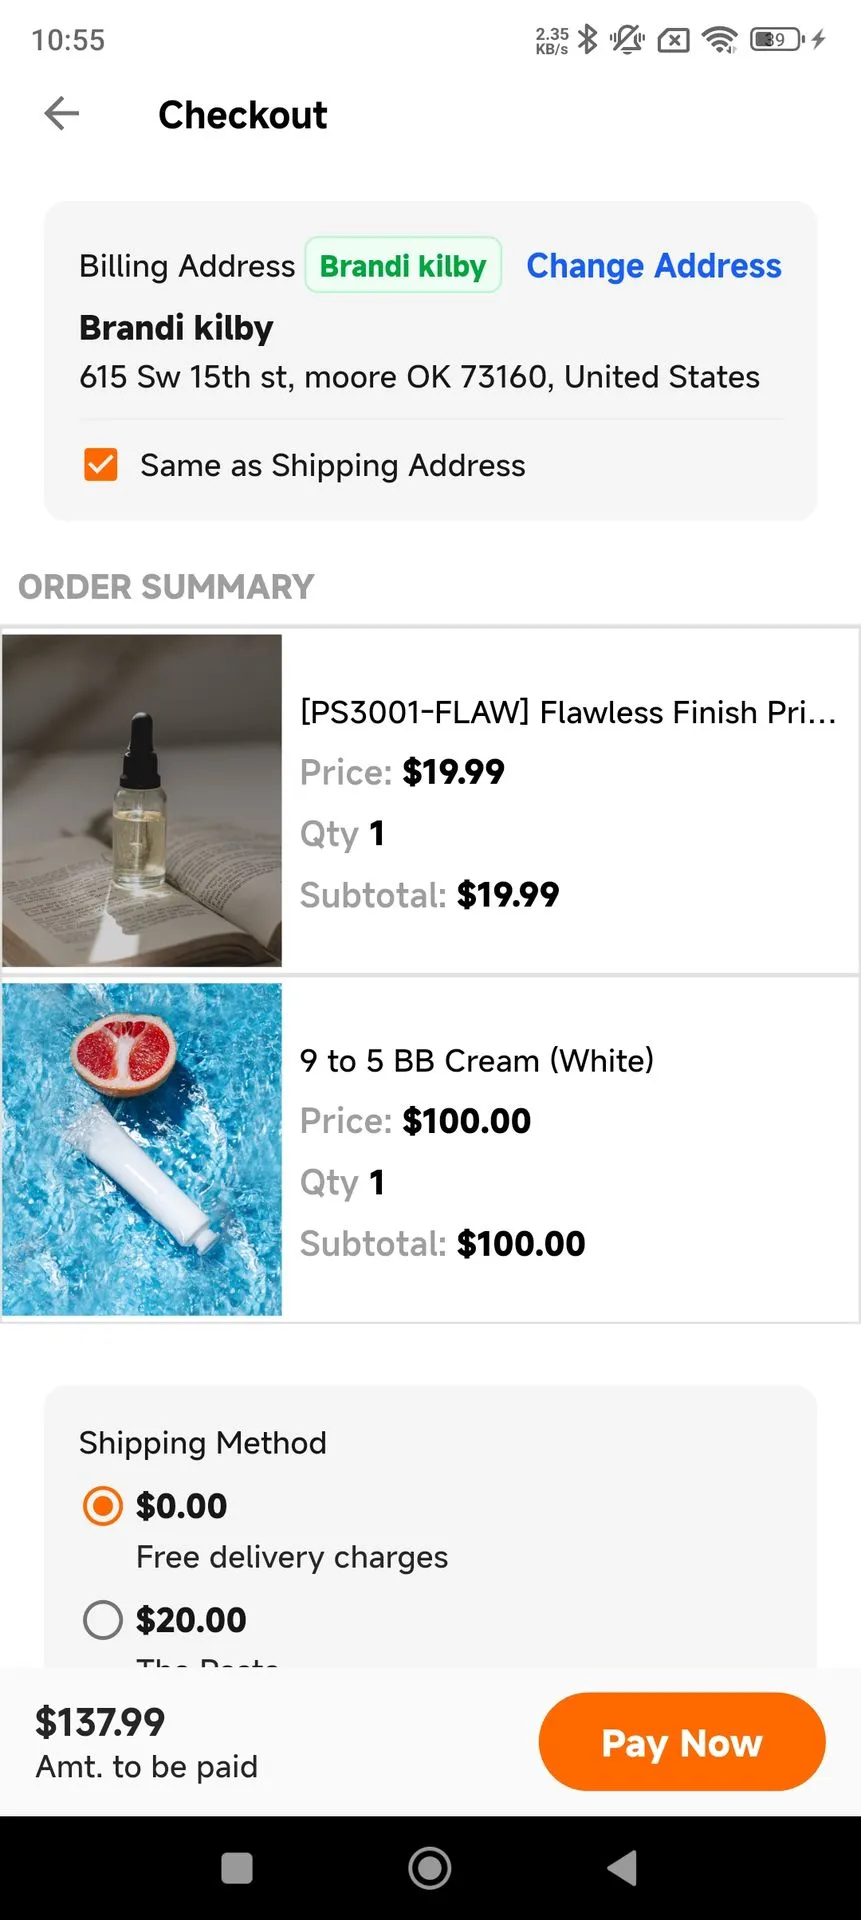
18. Checkout
After reviewing the cart, tap Pay Now to proceed to the Checkout page. Here, customers can review their Billing Address and use Change Address to select a different address. They can also choose whether the billing address should be the same as the shipping address.
The Order Summary displays the selected products, price, quantity, and subtotal. Customers can then select the available Shipping Method and review the payable amount before tapping Pay Now to continue with the payment process.
Checkout
Allows customers to review their billing and shipping address, select a shipping method, and verify their order summary. The page also displays the total amount payable before placing the order.
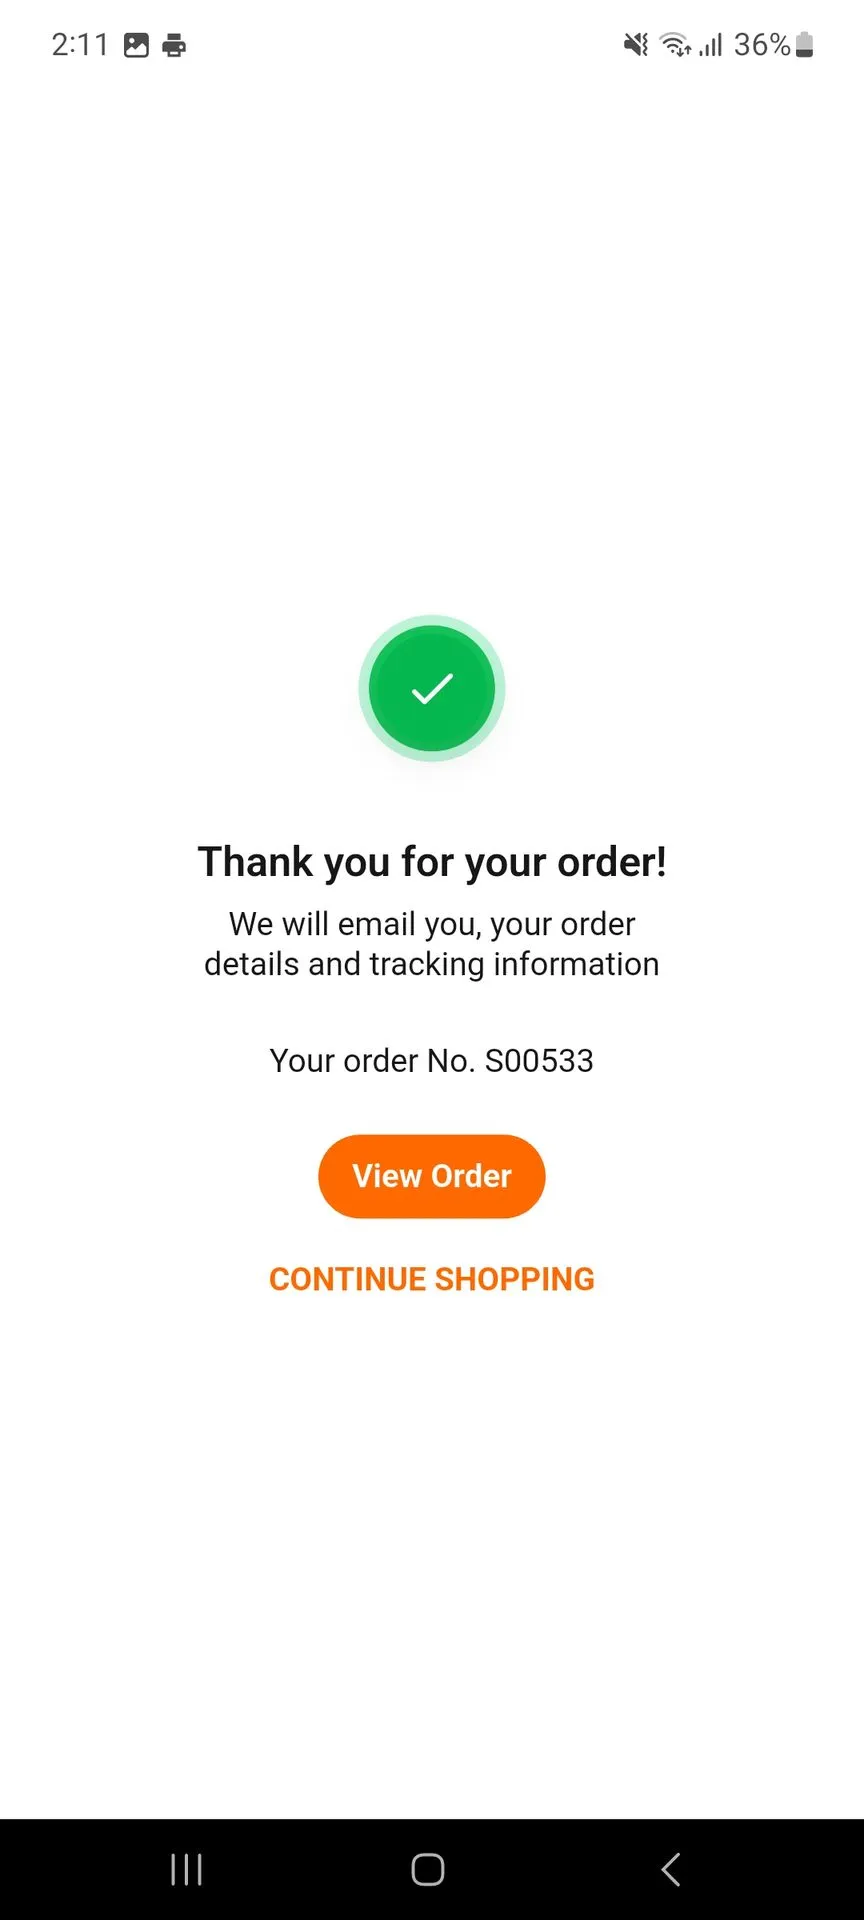
19. Order Confirmation
After completing the payment, the customer is redirected to the order confirmation page. The page confirms that the order has been successfully placed and displays the order number along with a message that the order details and tracking information will be sent by email.
Customers can tap View Order to access the order details or select Continue Shopping to return to the store and browse more products.
Order Confirmation
Confirms that the order has been successfully placed and displays the order number. Customers can view the order details or continue shopping.
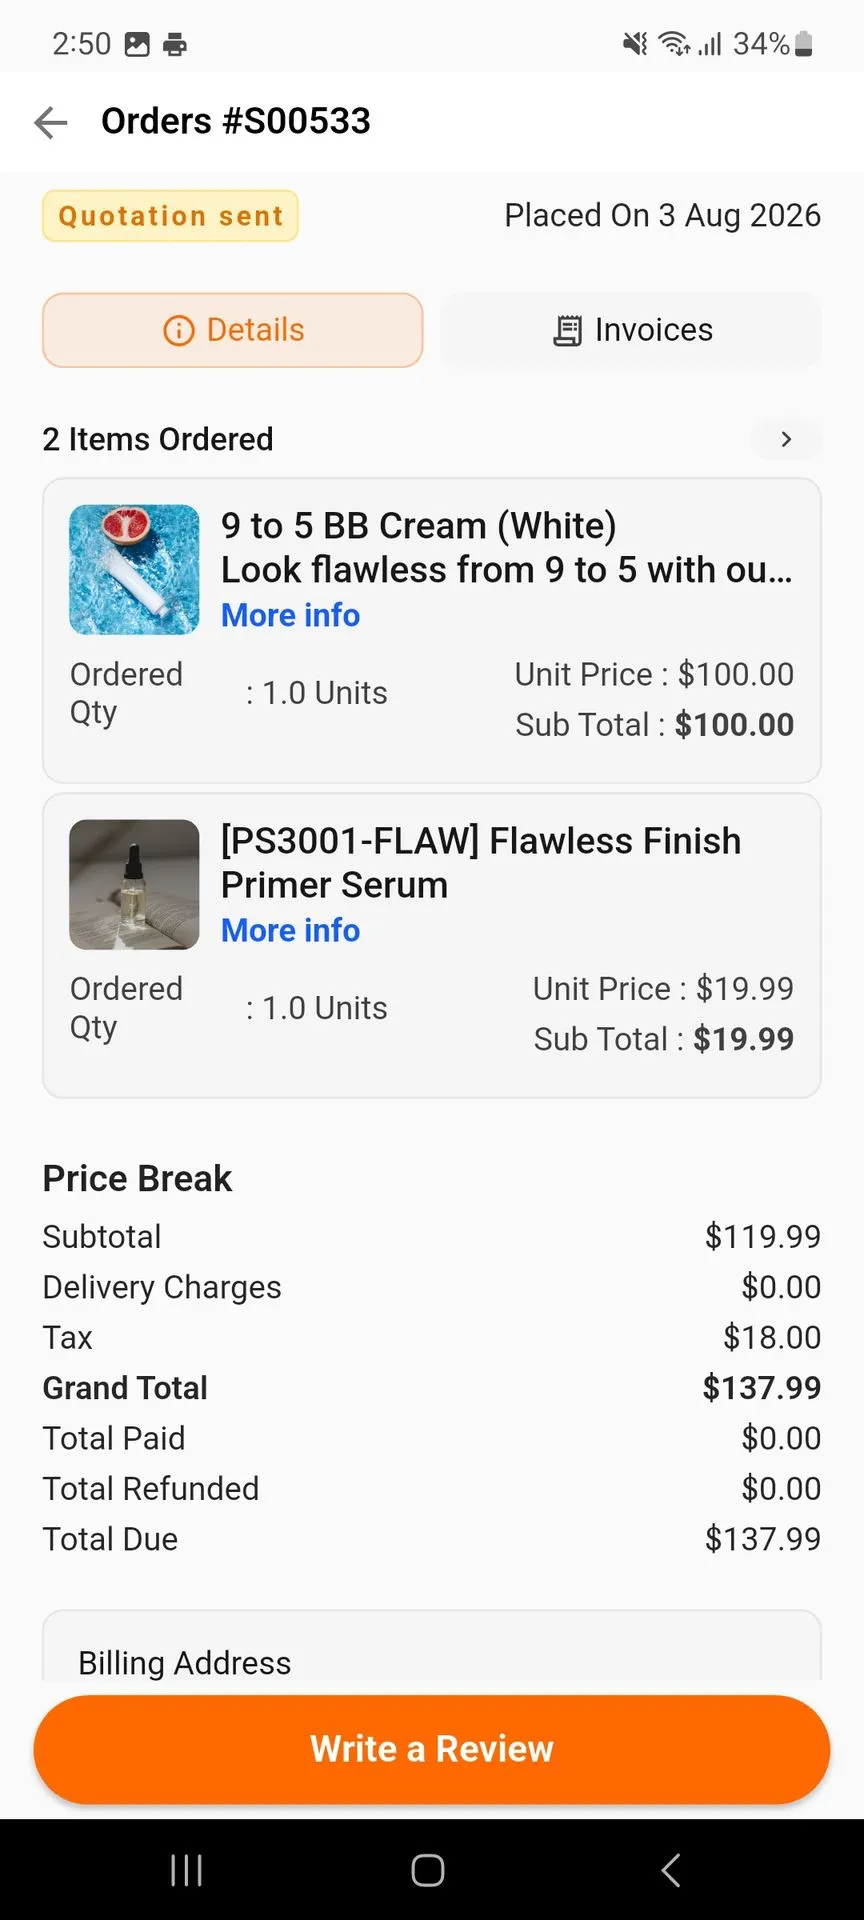
20. View Order Details
After placing the order, customers can open the order details to review the complete order information. The page displays the order status, order date, ordered products, quantities, pricing details, taxes, delivery charges, and total amount.
Customers can also view their Billing Address and access the Invoices section. The Write a Review option allows customers to share their feedback about the purchased products.
Order Details
Displays complete information about a placed order, including ordered products, quantities, prices, order status, price breakdown, payment details, and addresses. Customers can also write a review for the purchased products.
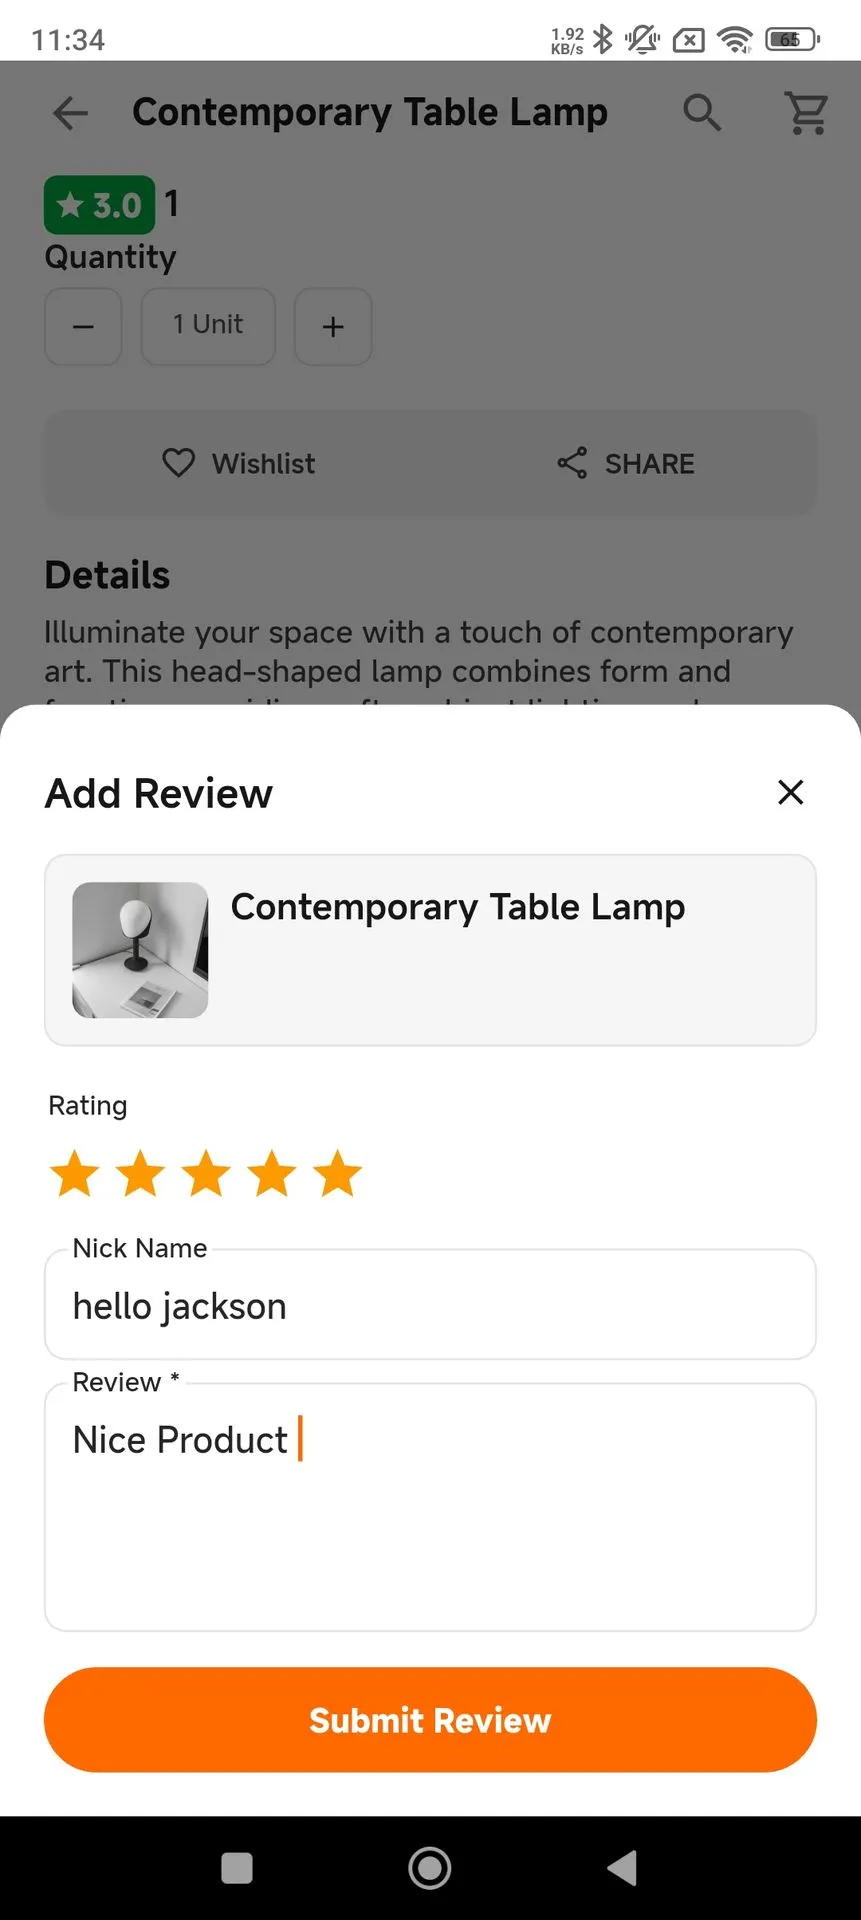
21. Add Review
Customers can submit feedback for a product by selecting the Write a Review option on the Order Details page. Select a rating using the available stars, enter a nickname, and write the review in the provided field.
Add Review
Allows customers to rate the product and share their feedback. Users can select a rating, enter a nickname and write a review before submitting it through the Submit Review button.
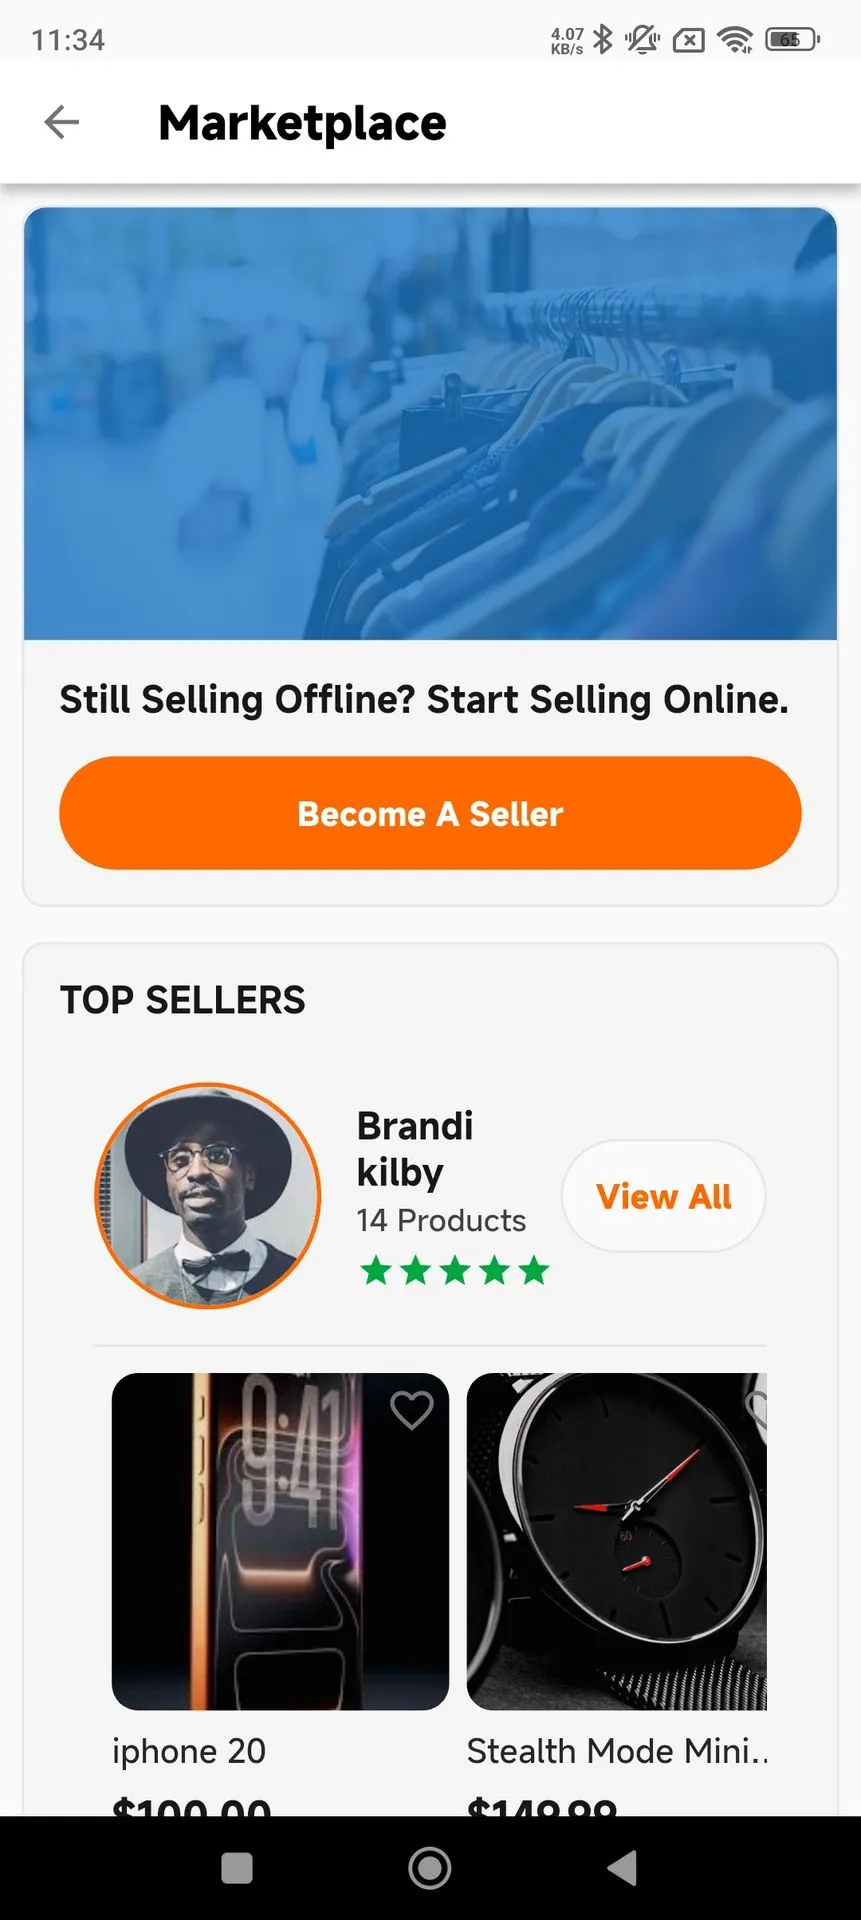
22. Become a Seller
Customers can start selling their products through the marketplace by selecting the Become A Seller option. This option allows customers to begin the seller registration process and access the marketplace as a seller.
Become a Seller
Provides customers with an option to start selling products through the marketplace. Users can select Become a Seller to access the seller registration process.
Seller’s View of the Odoo Multi Vendor Mobile App
1. Account
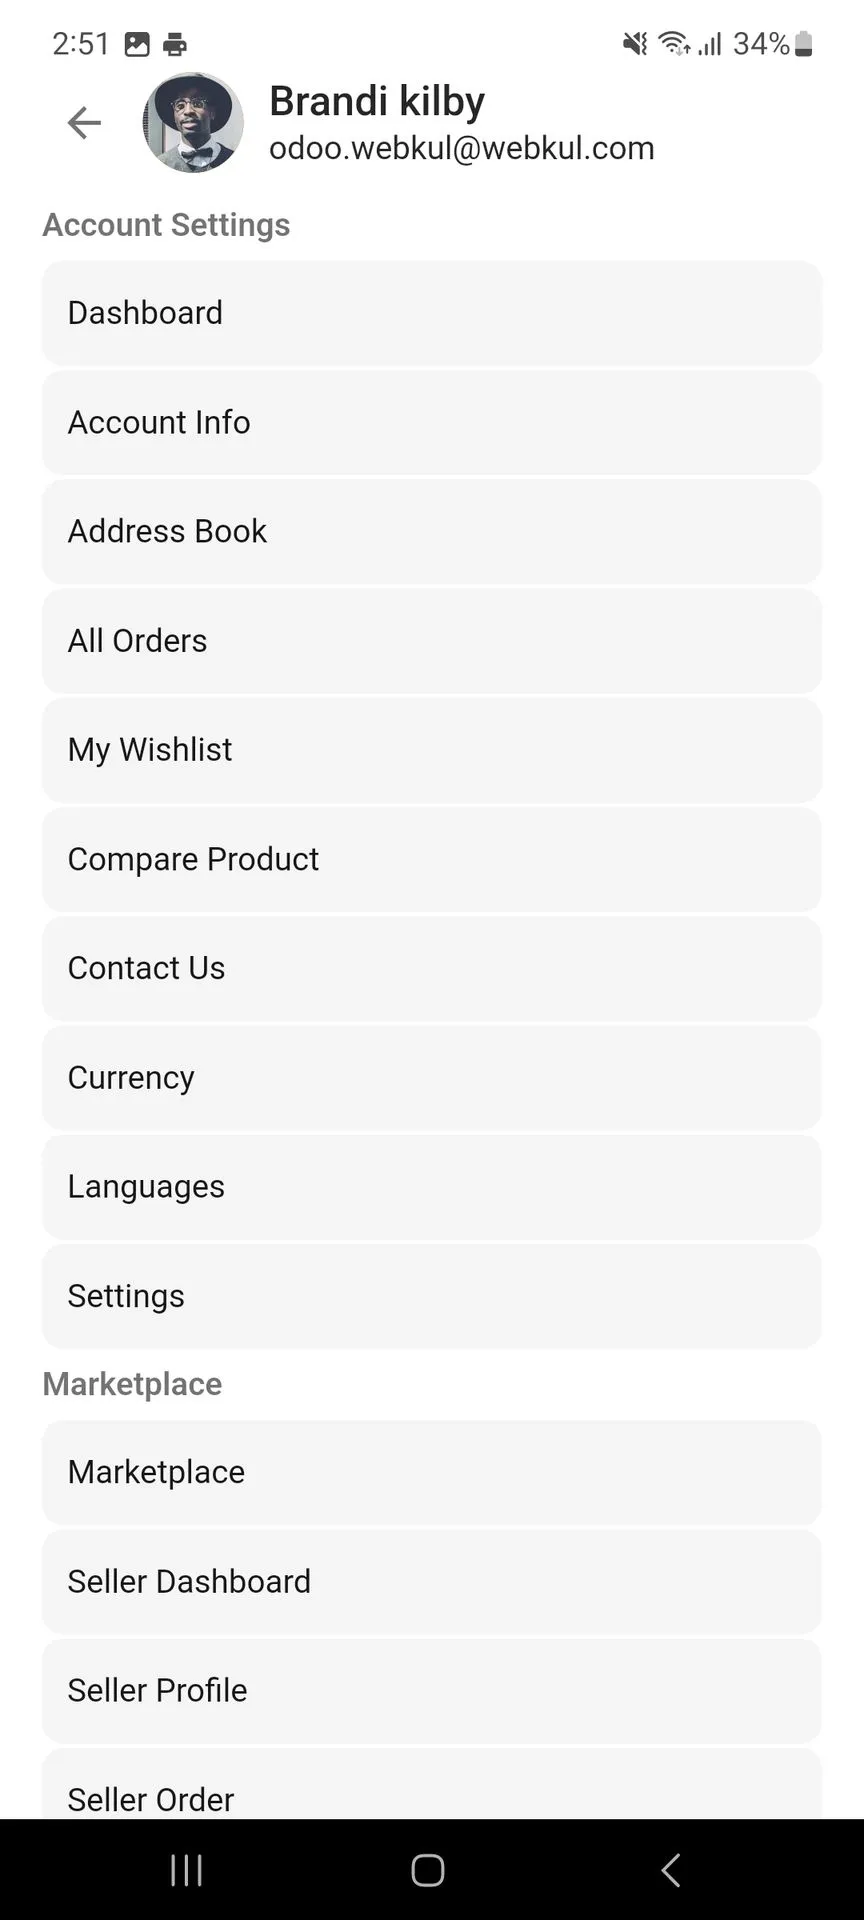
After becoming a seller, go to the Profile section and tap Account to open the Account Settings page. Here, you can access options such as Dashboard, Account Info, Address Book, All Orders, My Wishlist, Compare Product, Contact Us, Currency, Languages, and Settings.
The Marketplace section provides quick access to Marketplace, Seller Dashboard, Seller Profile, Seller Order, and Ask to Admin. These options allow sellers to access and manage their marketplace-related activities directly from the mobile app.
Account
Provides access to various account-related options along with dedicated Marketplace features for sellers. Sellers can access the Marketplace, Seller Dashboard, Seller Profile, Seller Order, and Ask to Admin options directly from the Account Settings page.
2. Marketplace
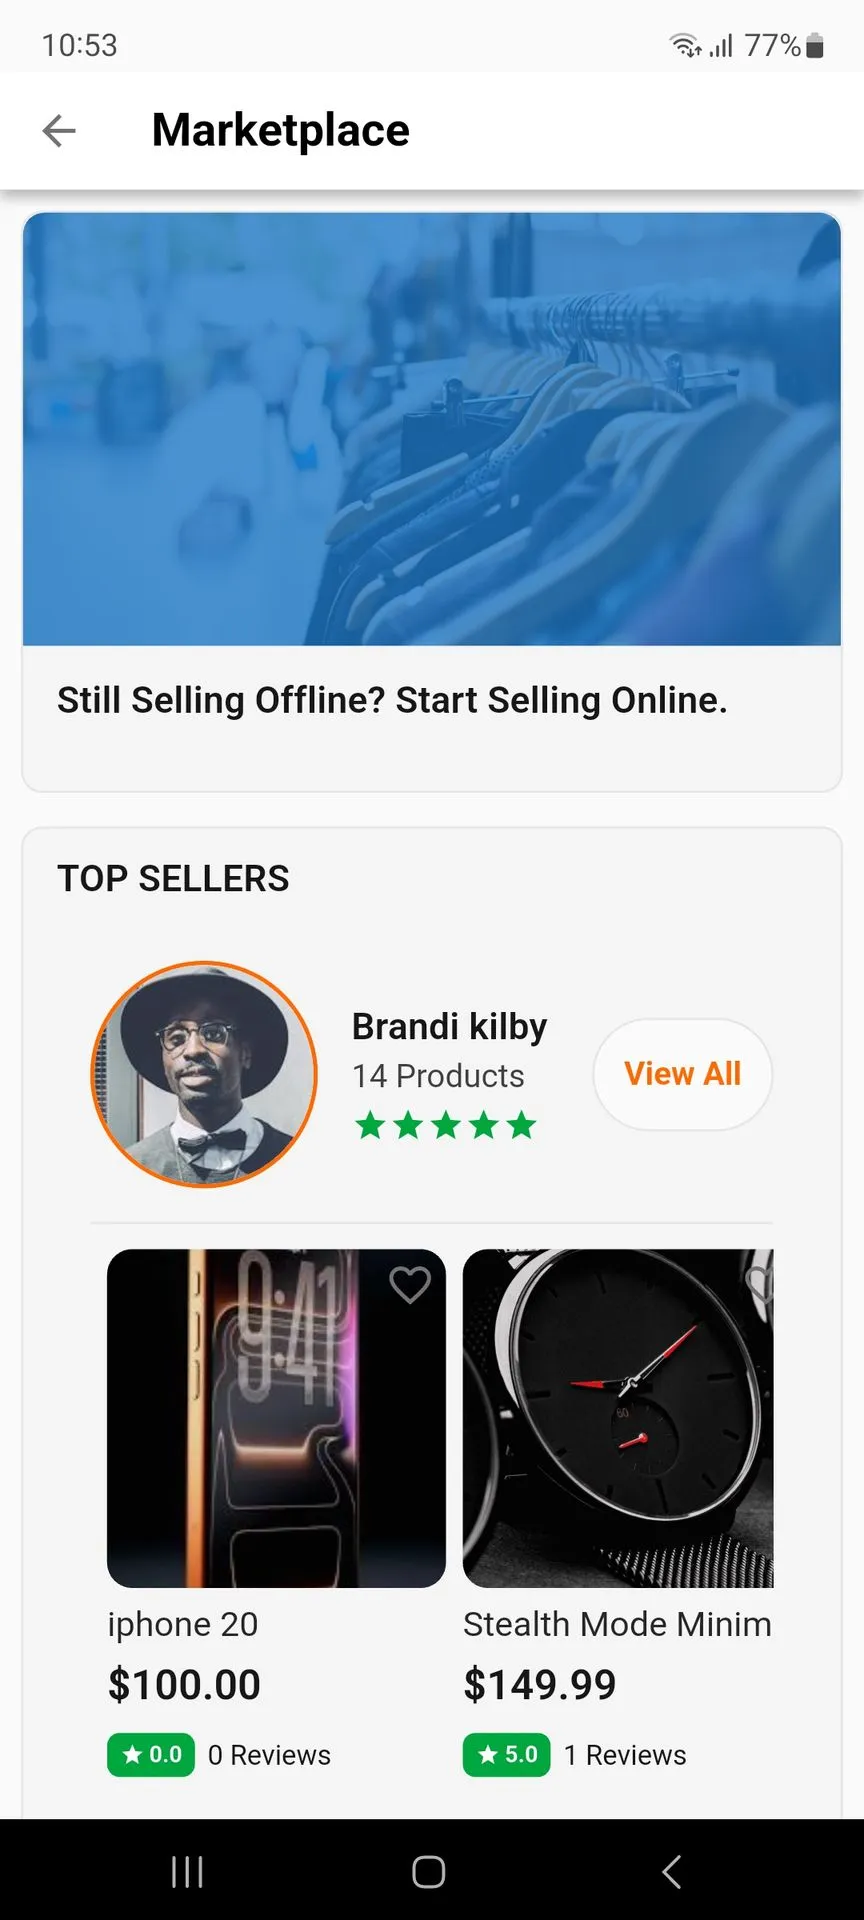
From the Account section, tap Marketplace to open the marketplace page. The page displays the marketplace banner along with the available sellers and their products.
The Top Sellers section shows seller information, including the seller name, number of products, rating, and a View All option. You can browse the products listed by the seller, view their prices and ratings, and select a product to explore its details.
Marketplace
Allows sellers to explore the marketplace, view top sellers, and browse their listed products. The page also provides a direct option to start selling online.
3. Seller Dashboard
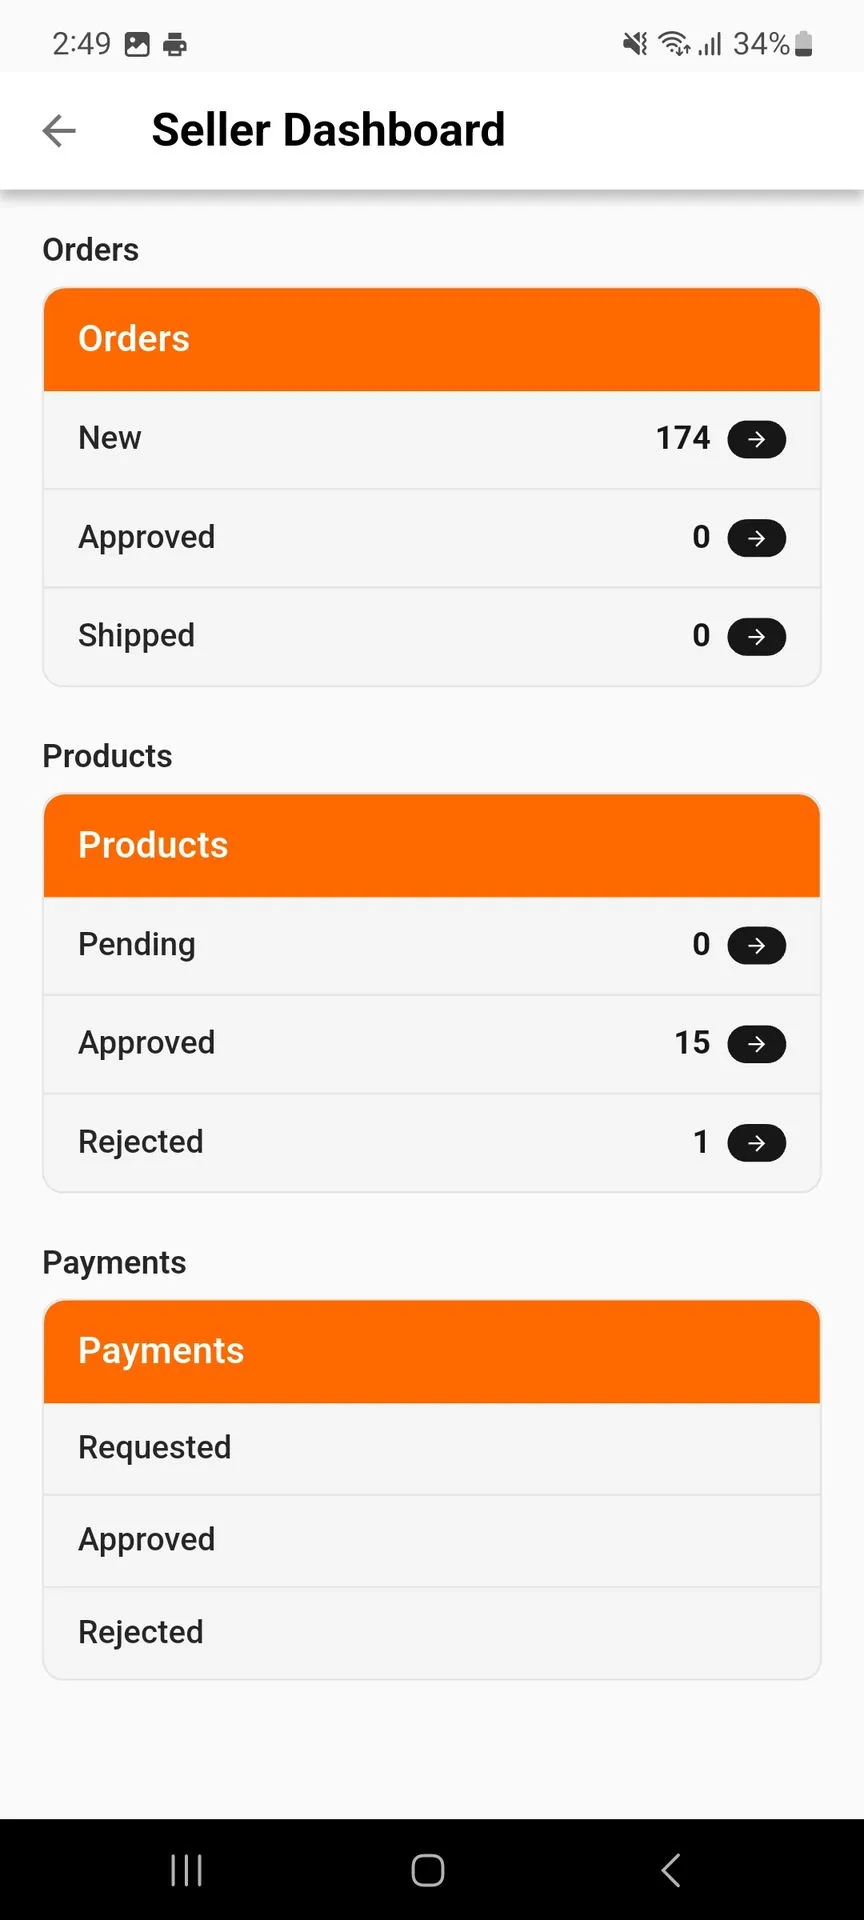
From the Account section, tap Seller Dashboard under the Marketplace section to open the seller dashboard. The dashboard provides a centralized view of your marketplace activities, including Orders, Products, and Payments.
In the Orders section, you can view New, Approved, and Shipped orders. The Products section shows Pending, Approved, and Rejected products, while the Payments section provides options for Requested, Approved, and Rejected payment requests. Tap the arrow next to an order or product status to view the related records.
Seller Dashboard
Provides an overview of seller activities, including orders, products, and payments. Sellers can quickly view counts for new, approved, shipped, pending, and rejected items.
4. Seller Profile
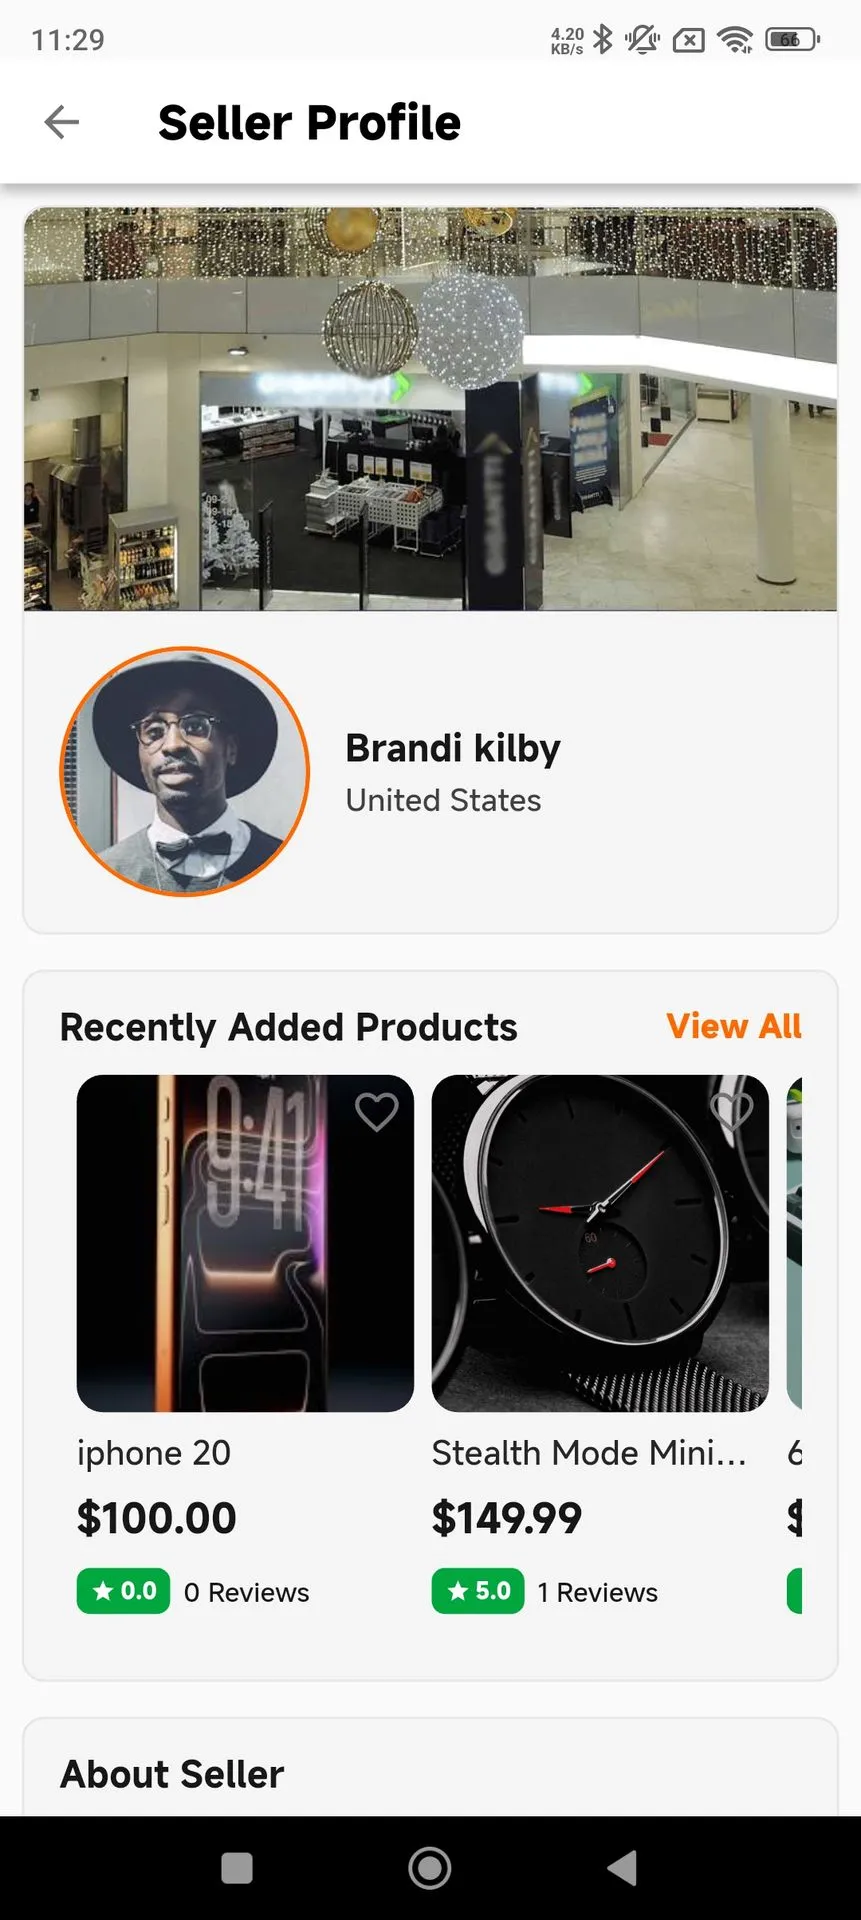
From the Account section, tap Seller Profile under the Marketplace section to open the seller profile. The profile displays the seller’s store banner, profile image, name, and country.
The profile also shows Recently Added Products, with product images, names, prices, ratings, and review counts. Tap View All to explore the seller’s available products, and scroll down to view additional seller information.
Seller Profile
Displays the seller’s profile information along with recently added products. Sellers can view their profile details and showcase the products available in their store.
5. Seller Order
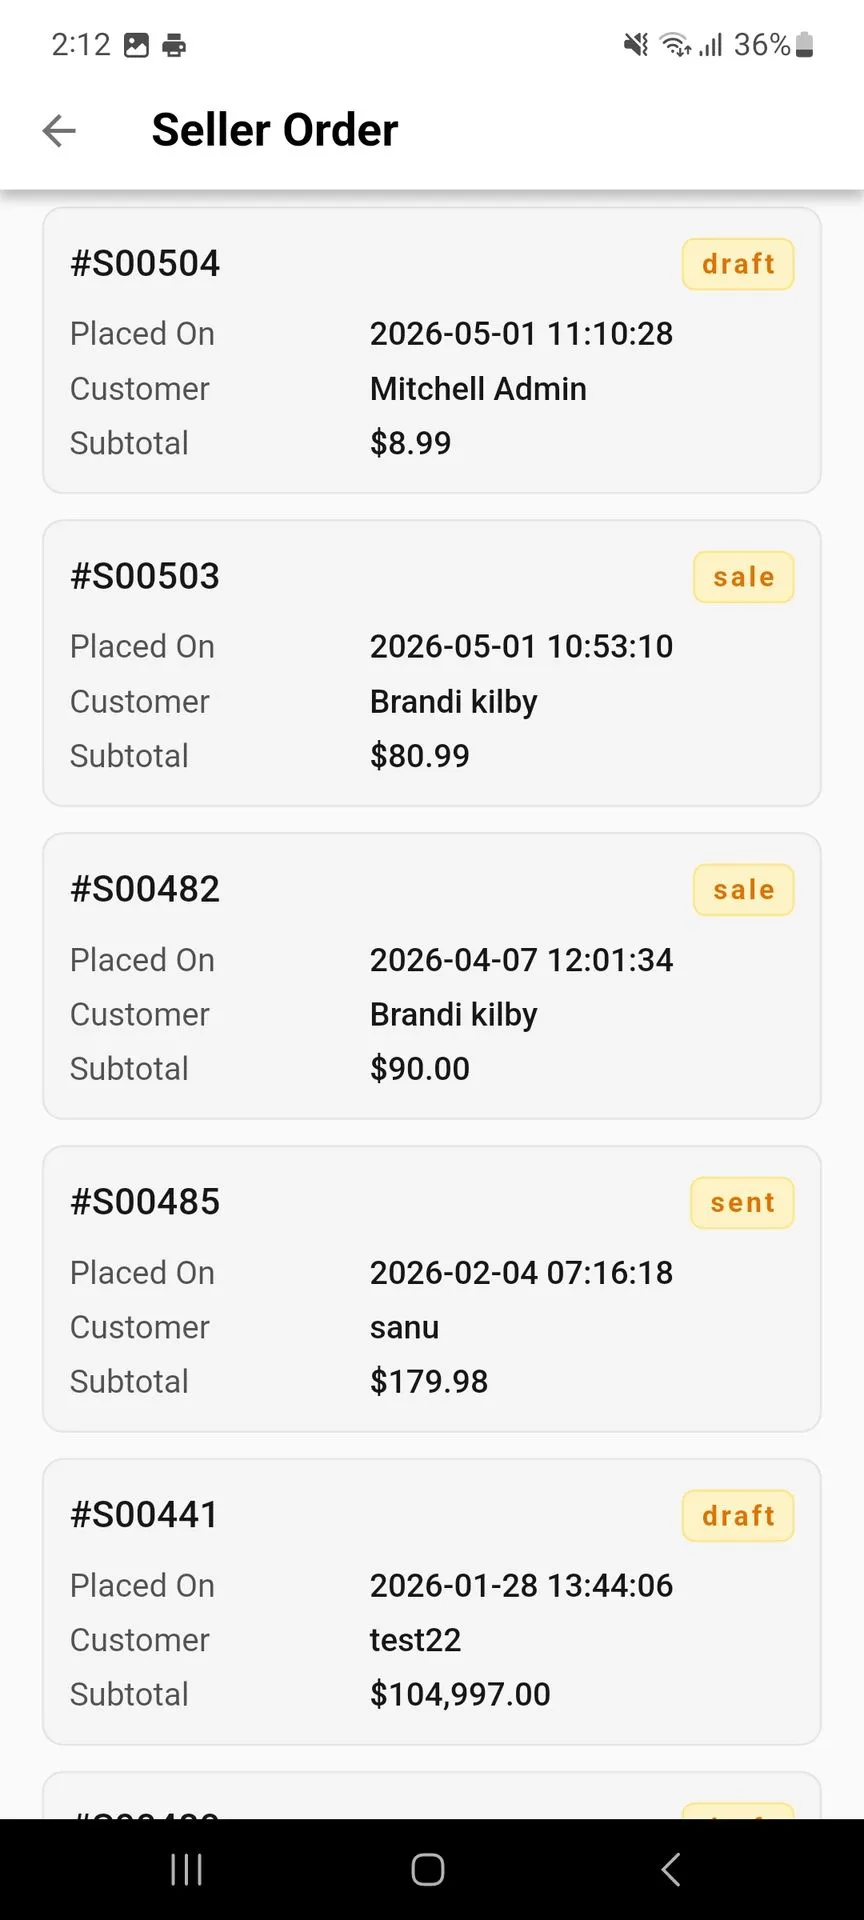
From the Account section, tap Seller Order under the Marketplace section to view the orders received by the seller. The Seller Order page displays each order with its order number, order status, placement date, customer name, and subtotal.
Sellers can review their marketplace orders and check the current status of each order, such as Draft, Sale, or Sent. This helps sellers keep track of orders received from different customers directly from the mobile app.
Seller Order
Displays the orders received by the seller with details such as order number, order date, customer, subtotal, and order status. Sellers can use this section to track their marketplace orders.
6. Ask To Admin
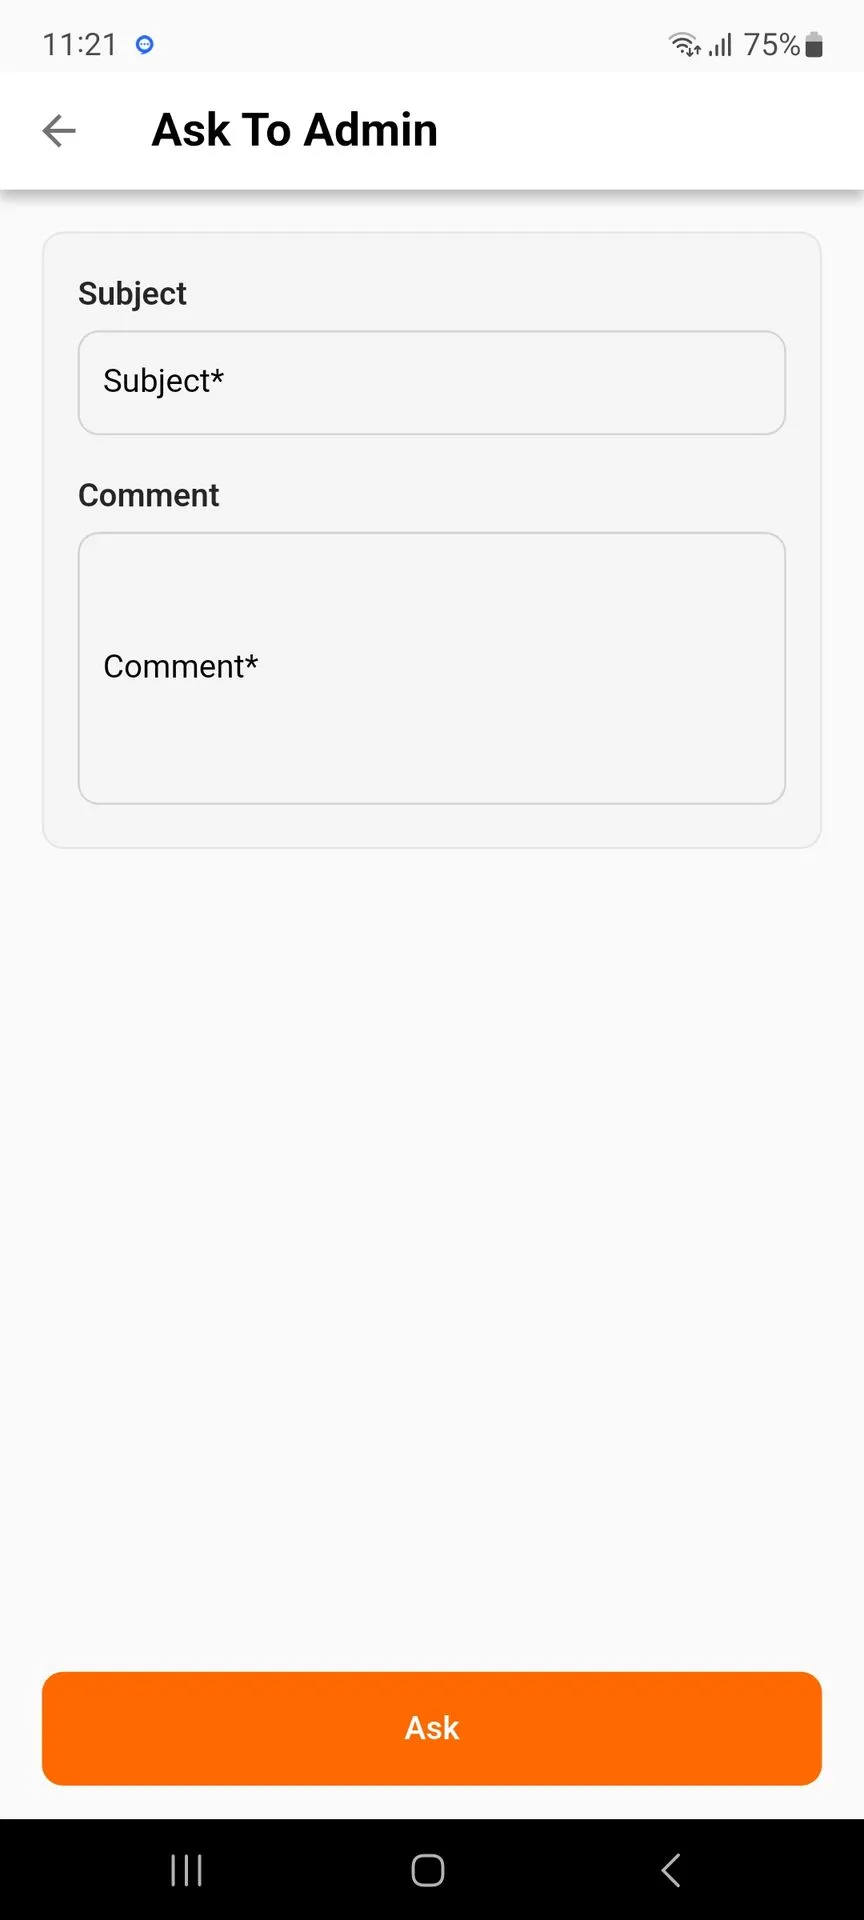
From the Account section, access Ask To Admin to contact the marketplace administrator. Enter a Subject and describe your query or concern in the Comment field.
After entering the required details, tap Ask to submit the request to the administrator.
Ask To Admin
Allows sellers to send queries or requests directly to the marketplace administrator. Sellers can enter a subject and comment and submit the request using the Ask button.
Check the User Guides of Other Odoo Mobile Apps
NEED HELP?
Hope you find guide helpful! Please feel free to share your feedback in the comments below.
If you still have any issues/queries, please create a ticket at the UV Desk.
I hope this helps. In case of any further queries, contact us at our support mail.
Thanks for paying attention!!