User Guide For Wix Product Auction App
Overview
To increase sales, you can consider having an auction in addition to simply making your things available for purchase. This application will make it easier for you to achieve that.
You may launch an online auction on your Wix store with the Wix Product Auction App. The app’s numerous capabilities make it simple to start and manage online auctions.
The Product Auction application helps users auction a product in a few easy steps.
Undoubtedly, the user-friendly UI will aid in your initial setup.
Features
For each product, an administrator can create and control auctions.
Users can apply auctions to both physical and digital products.
Admin can manually start and end the auction.
The app also allows admins to restart unsuccessful auctions.
Additionally, admins can configure email settings to send notification emails to customers.
An admin can set up auctions for several products at once.
Popcorn Bid extends the auction time whenever a bid is placed near the end of the auction.
Note – If you have any cookies enabled on your website, your customers will need to accept them first. Then auction will become visible.
Video Guide


App Subscription :
To subscribe to the app, you need to go to the Wix Dashboard, then Apps >> Manage Apps.
You will see the option to upgrade your subscription in front of the app. Click on the Upgrade button to complete the process.
Installation and Configuration
Auction Installation:-
To install the app, follow the following steps –
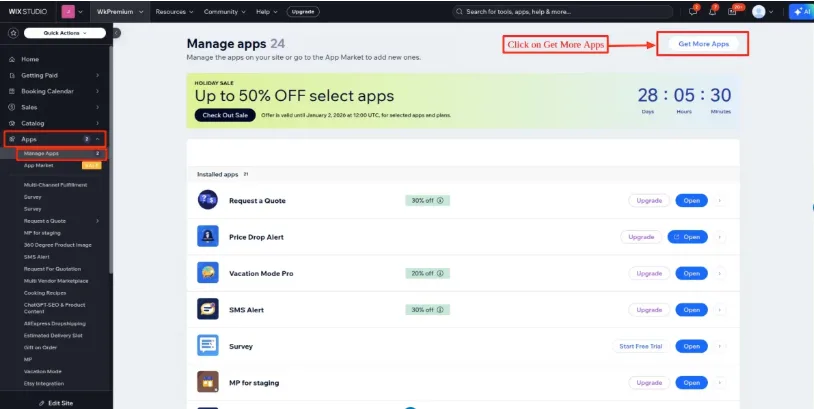
- Go to your Wix store, then click on Apps >> Manage Apps as shown.
- Now, click on Get More Apps.

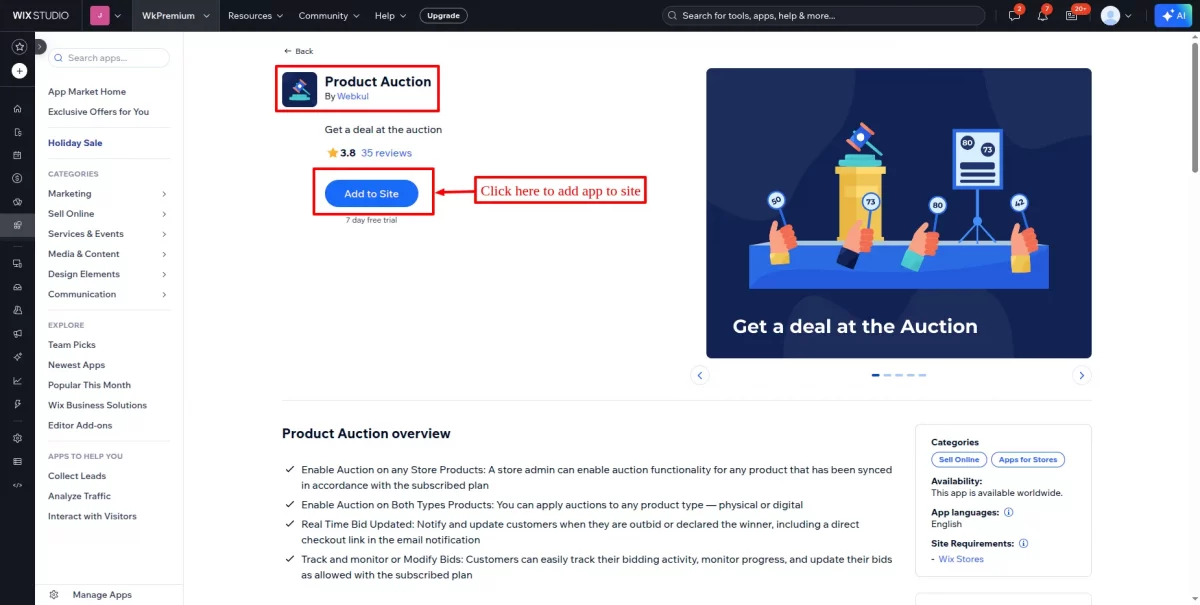
- Now, you’ll be redirected to the app market page from where you need to search for “Product Auction”.
- Click on the ” Add to site” button to add the app to your site, as shown below.

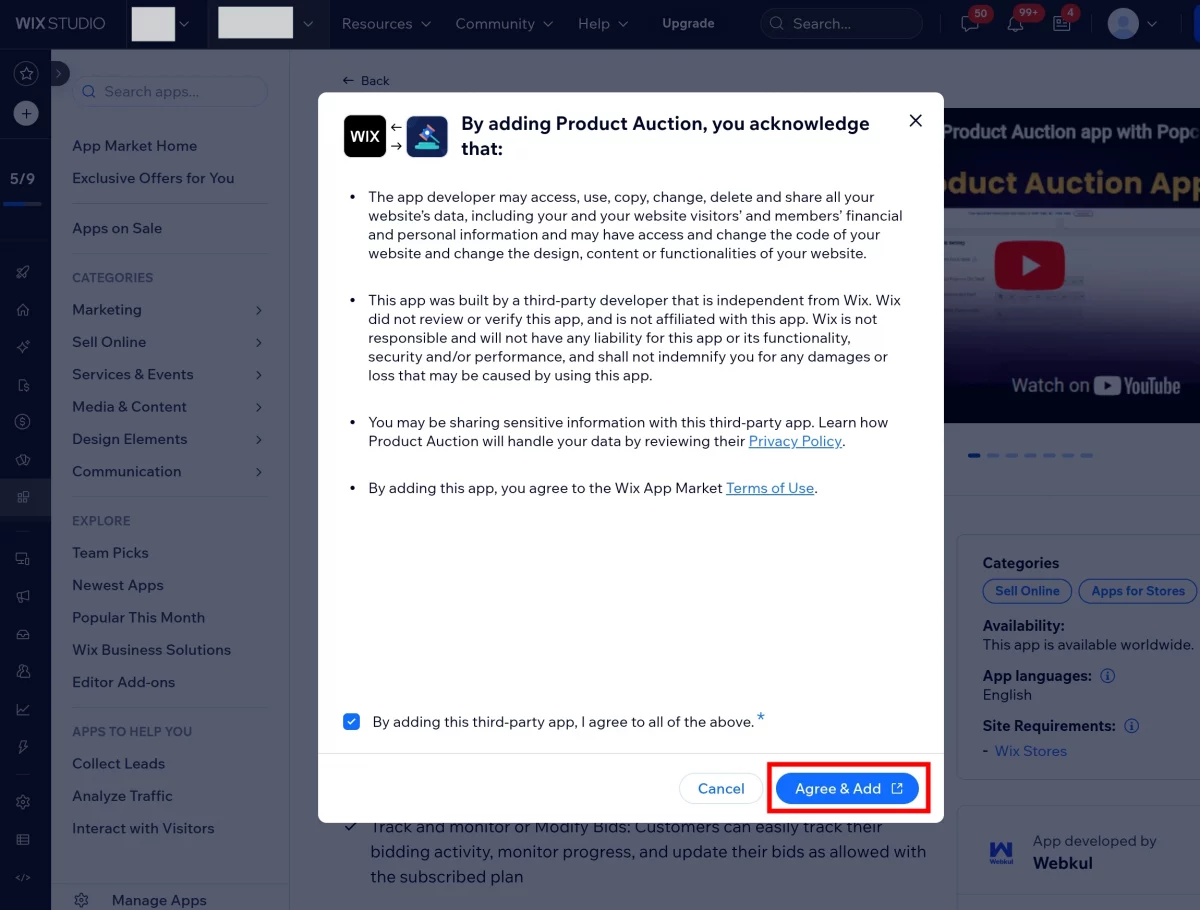
- Click on Agree & Add to move forward after reading the terms and conditions of the application.

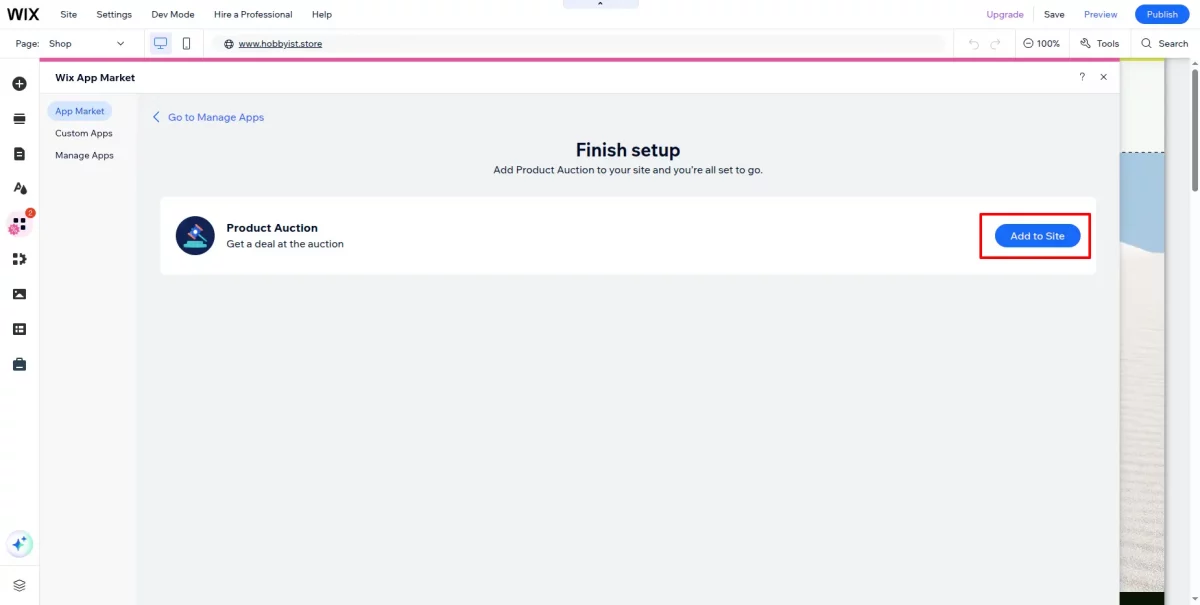
- Click on the ” Add to site” button again to add the app to your site, as shown below.
- Then, to save the changes, click on publish.
Auction Configuration
Admin needs to configure auction settings as follows:–
Email:- Admin needs to insert an email ID on which the admin wants to receive emails for the placed bids.
Email Notification for Every Bid:- By enabling this option, the Admin will be able to receive a notification for every bid.
Show Current Bid:- After enabling this option, the current bid will be visible on the product page.
Show Bid Count:- After enabling this option, the total number of bid counts will be visible on the product page.
Restrict Reserve Price:- Admin can restrict purchases if the last bid amount is lower than the reserve price.
Allow to User enter the Decimal Bid Value:- Allow the users to enter the decimal value in the bidding field.
Outbid Functionality:- Notify the previous bidder about the outbid notification.
Popcorn Bid Setting:- It automatically extends the auction time whenever a bid is placed near the end of the auction.
Bid Increment:- Activate the auction bid increment feature for all created auctions.
Amount to be paid by Auction winner:- Admin can set the amount to be paid by the auction winner here.
- Winning Bid:- In case the admin selects this option, then the auction amount is the only amount the winner has to pay.
- Percentage of Winning Bid:- If the admin puts the percentage amount, then the customer will need to pay the winning bid amount plus the percentage amount that the admin has applied.

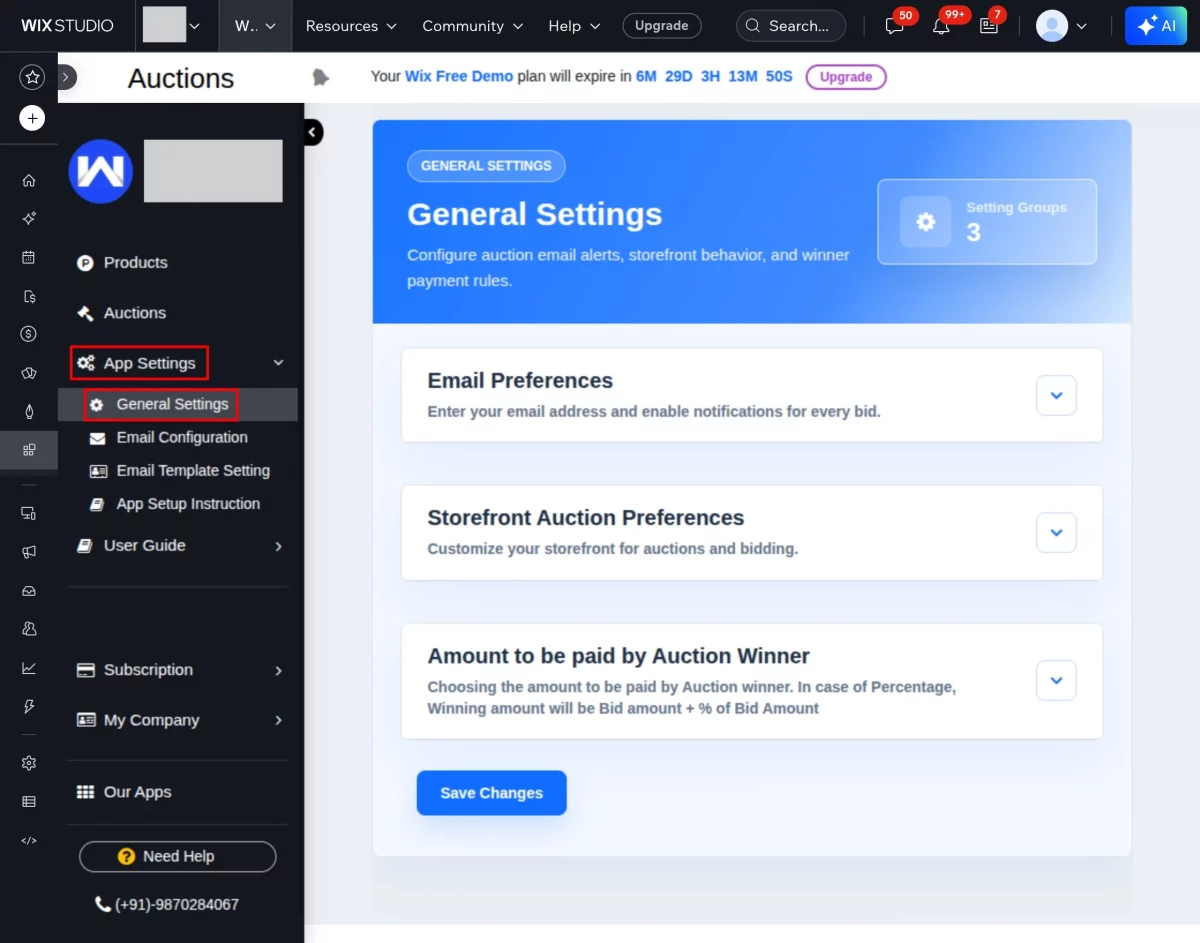
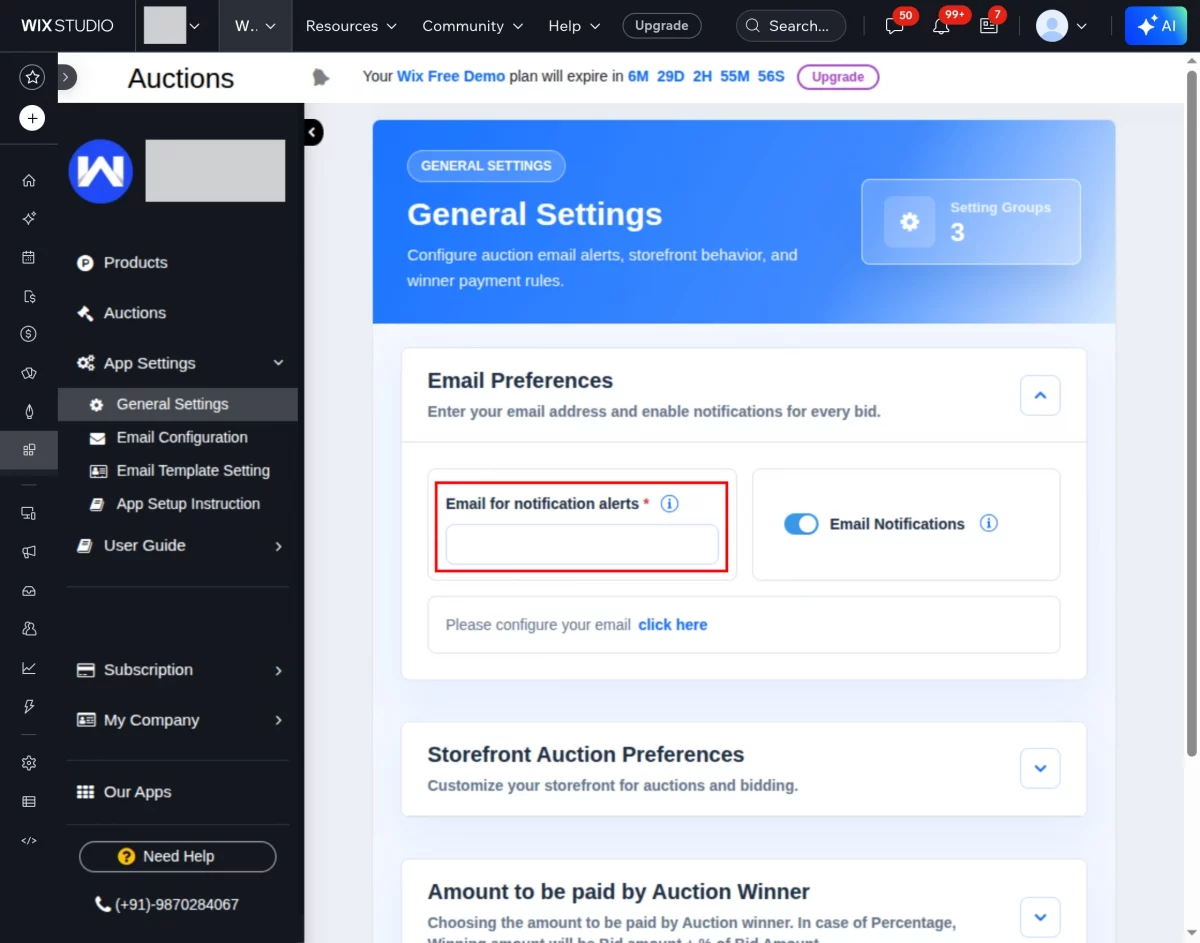

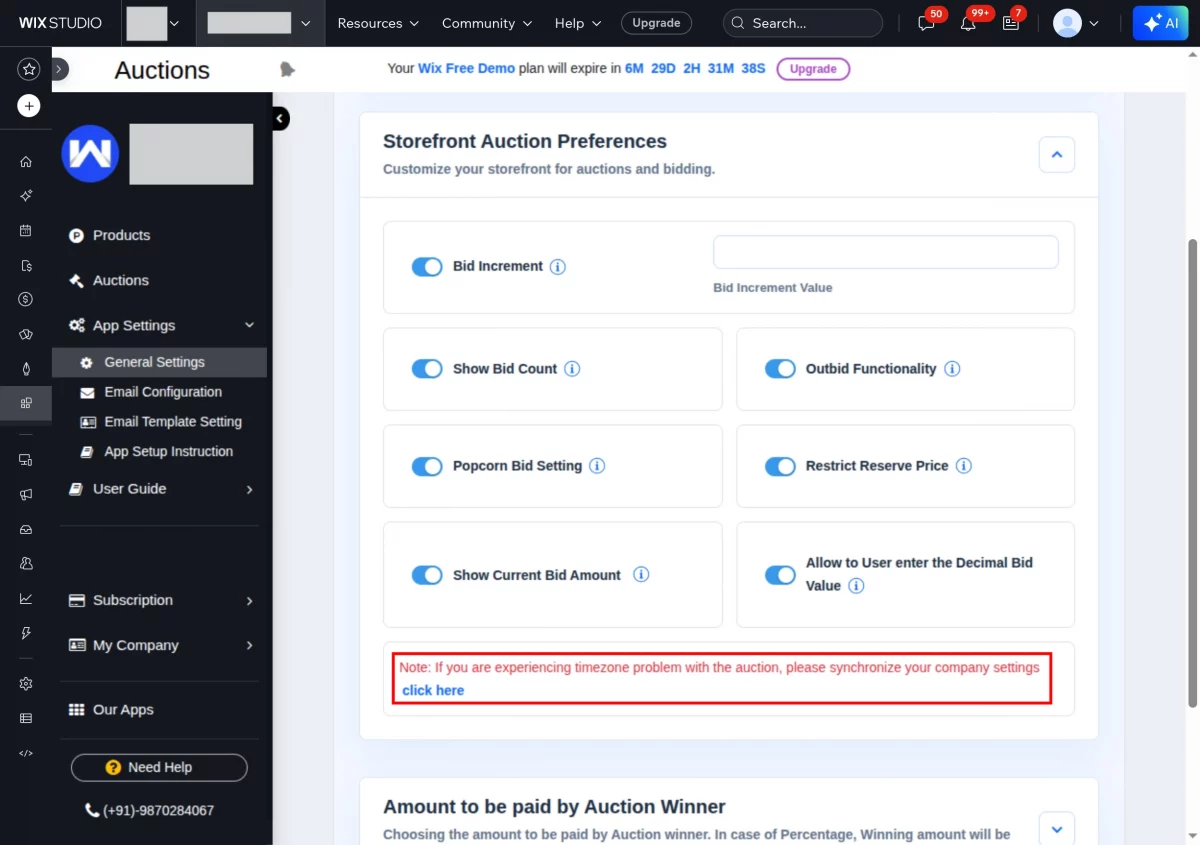
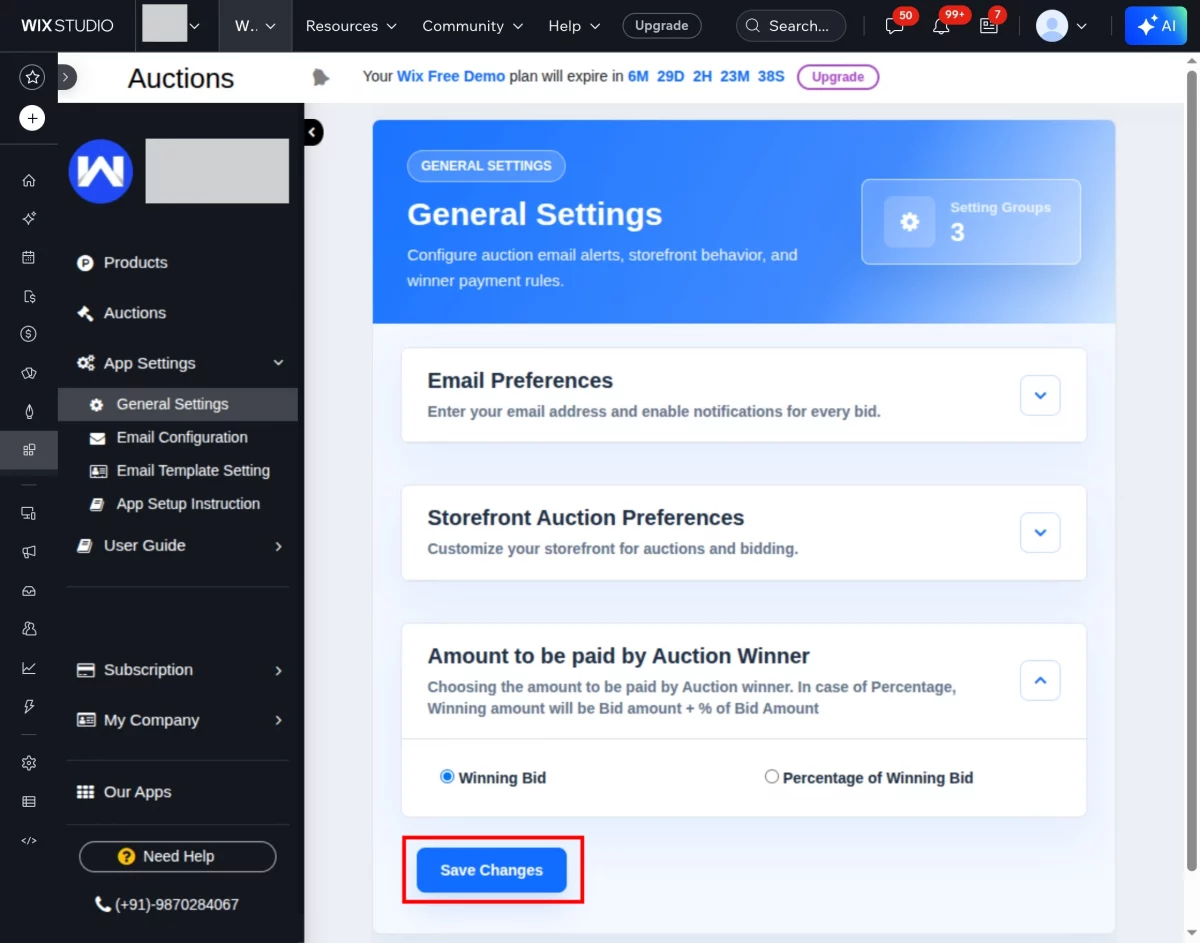
Auction General Settings
Email template Setting

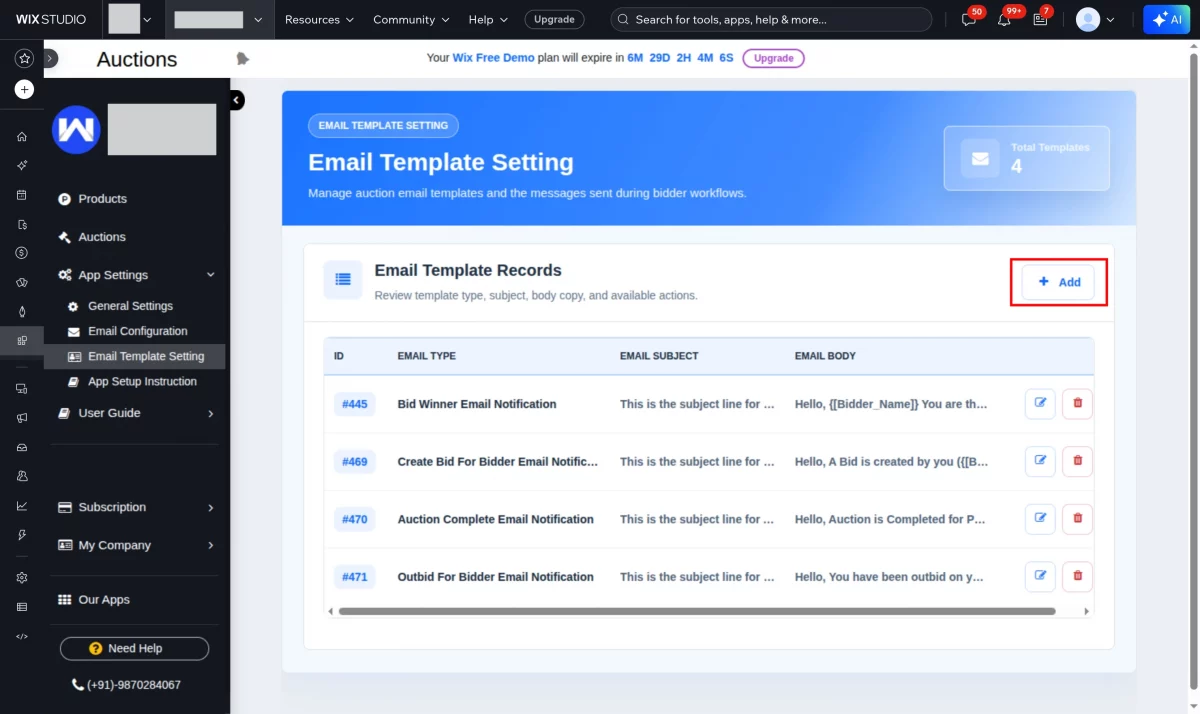

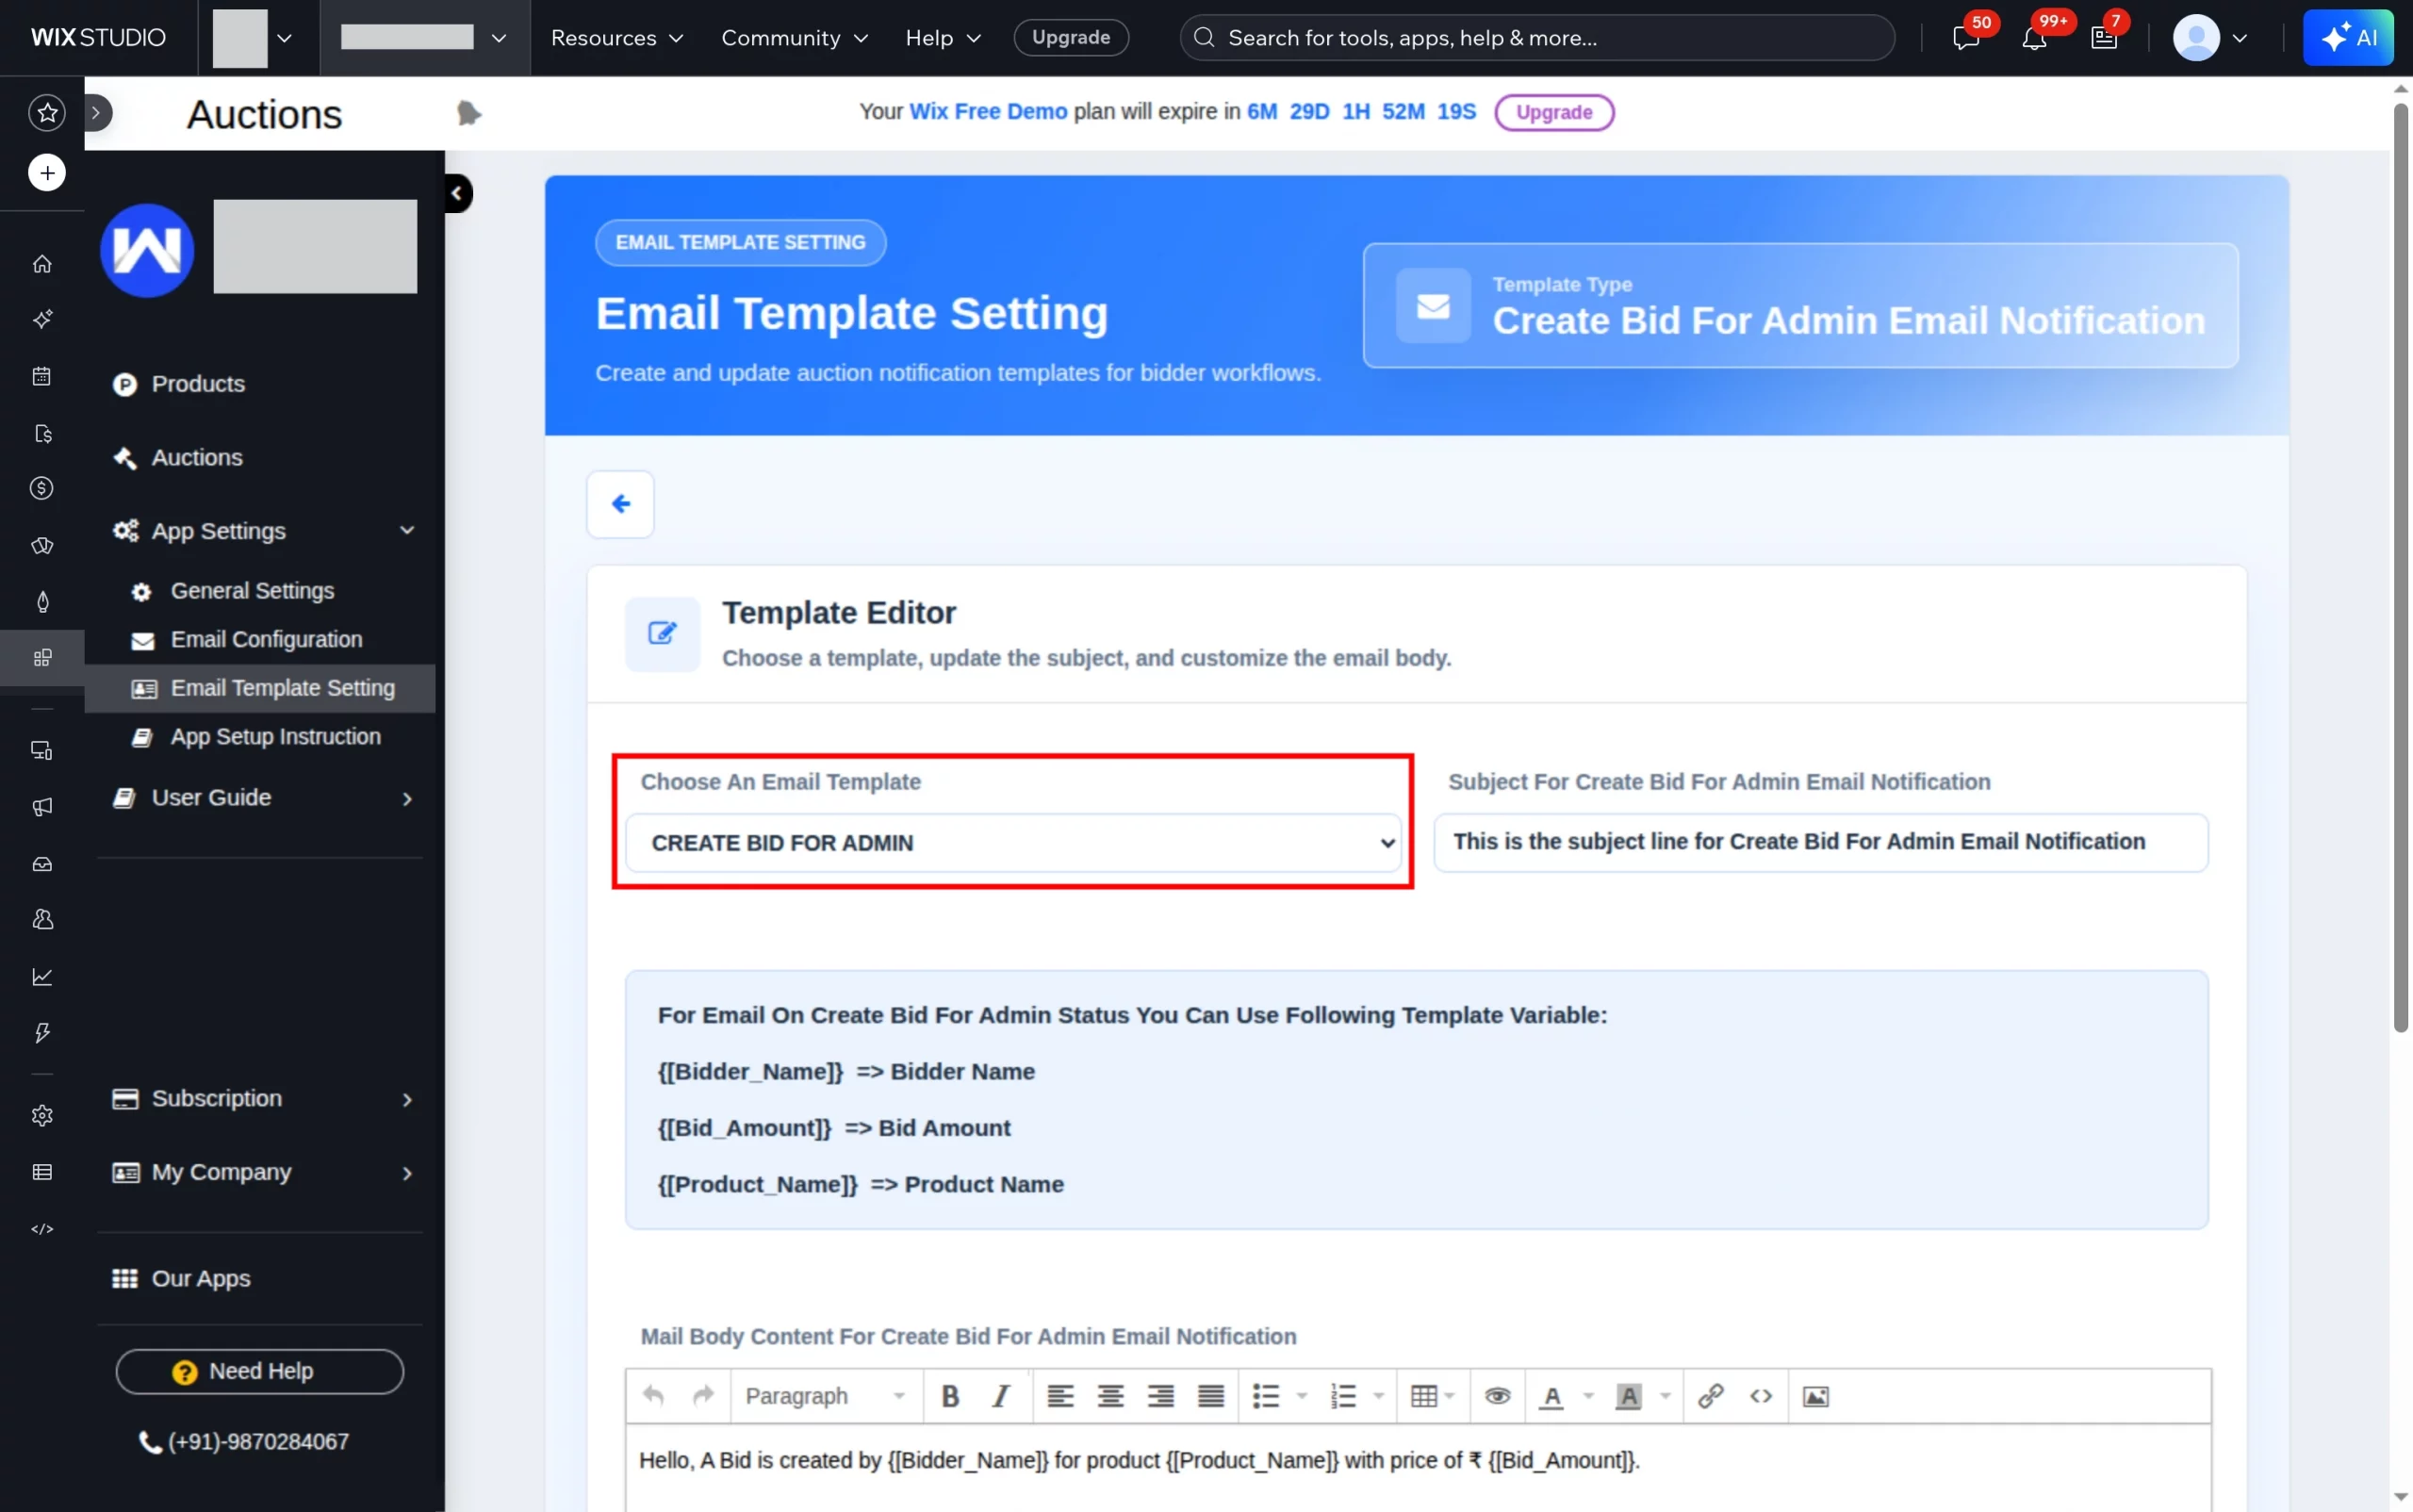
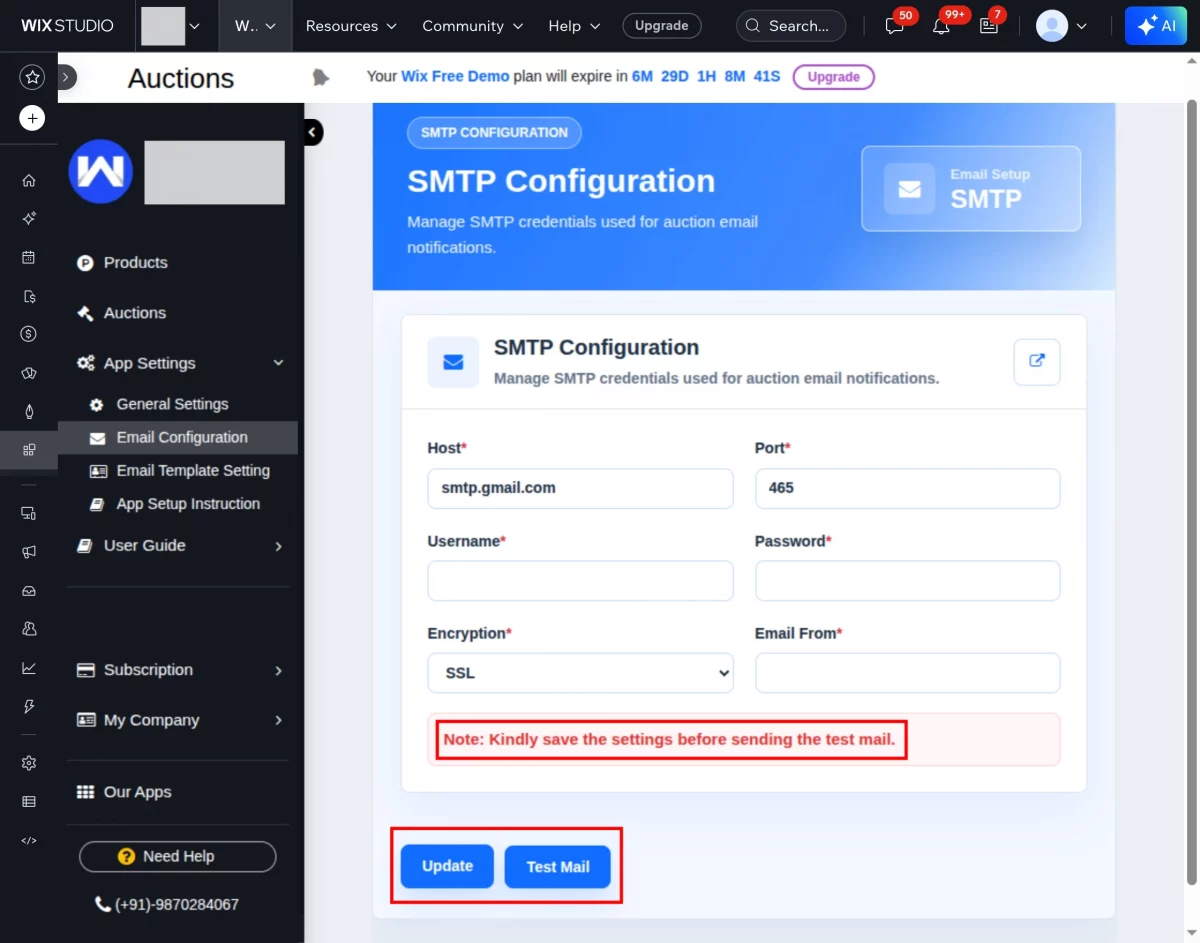
Email Configuration
To know how to configure email settings, please visit the User Guide and follow the required steps.
Note – The above settings are for Gmail; in case you are using any other email service, contact your email service provider for the following details.
Refer to the link provided for the video guide on email configuration: Video Guide
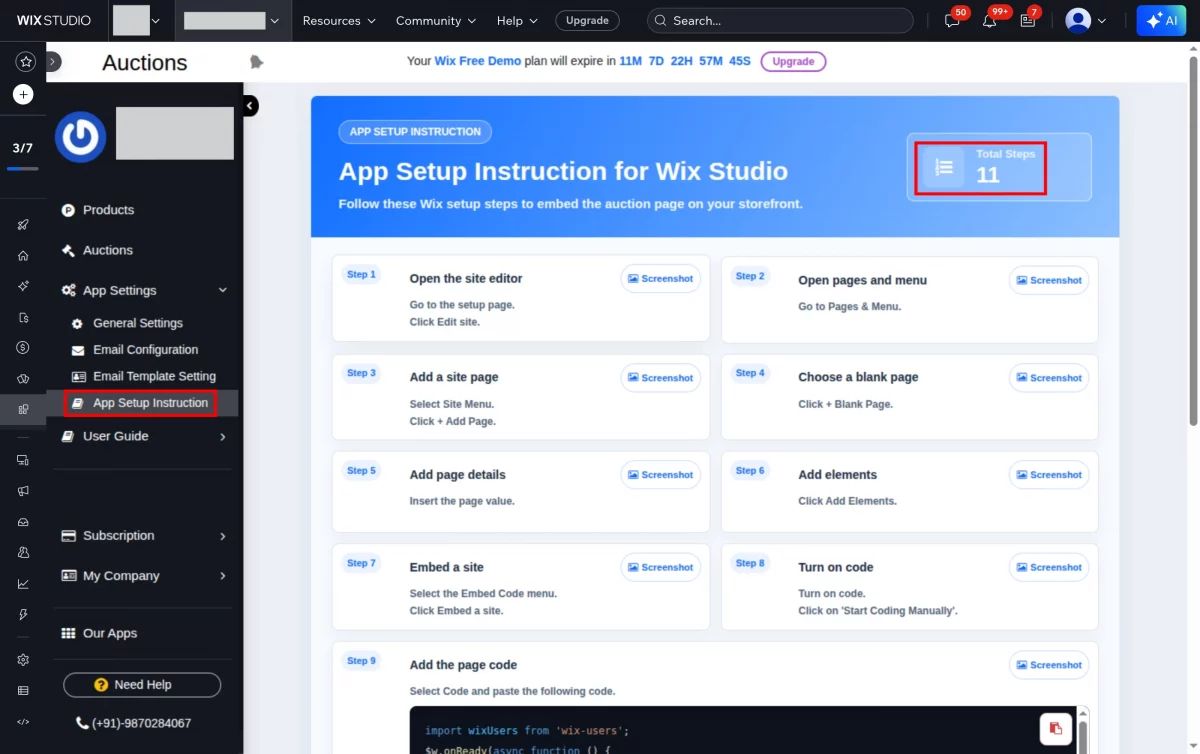
App Setup
Follow the steps mentioned to complete the app setup:
To add the Auction and My Bid page on the website frontend.

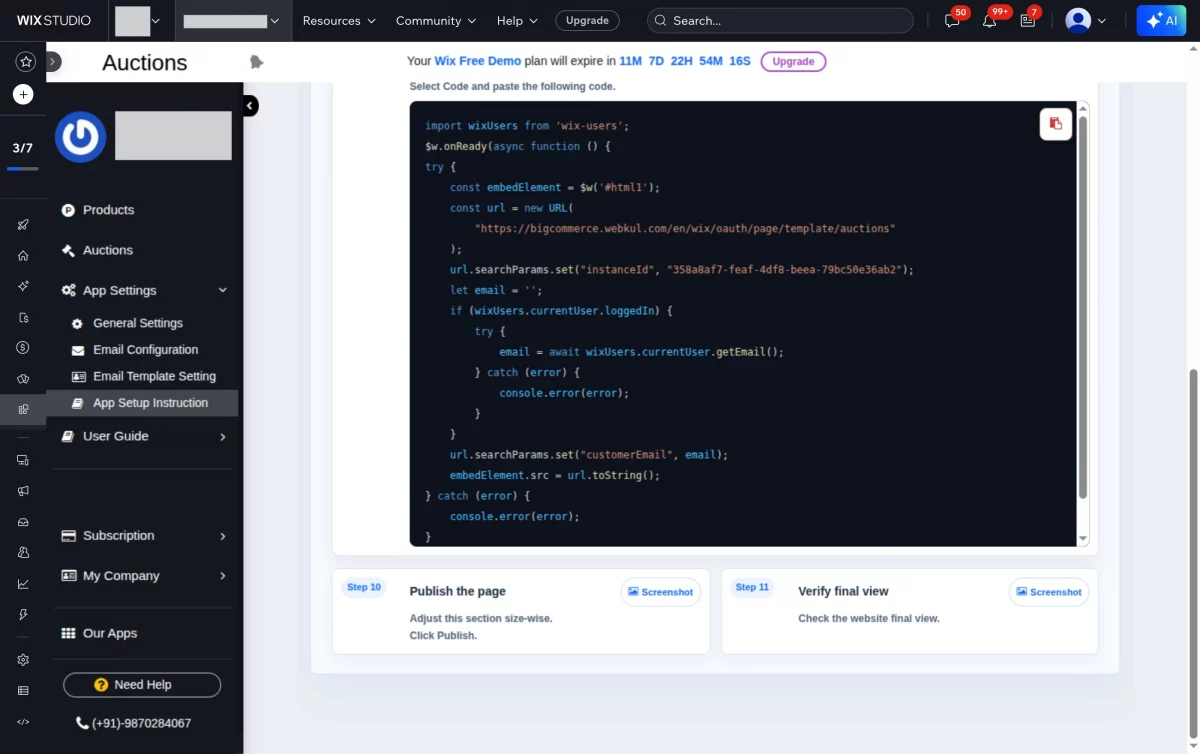
Add Auction to Products
STEP 1: After configuring the application, the Admin needs to manually sync the data by clicking on “More Actions”.


STEP 2: Click the plus icon “+ New Auction” to add the auction to the products.

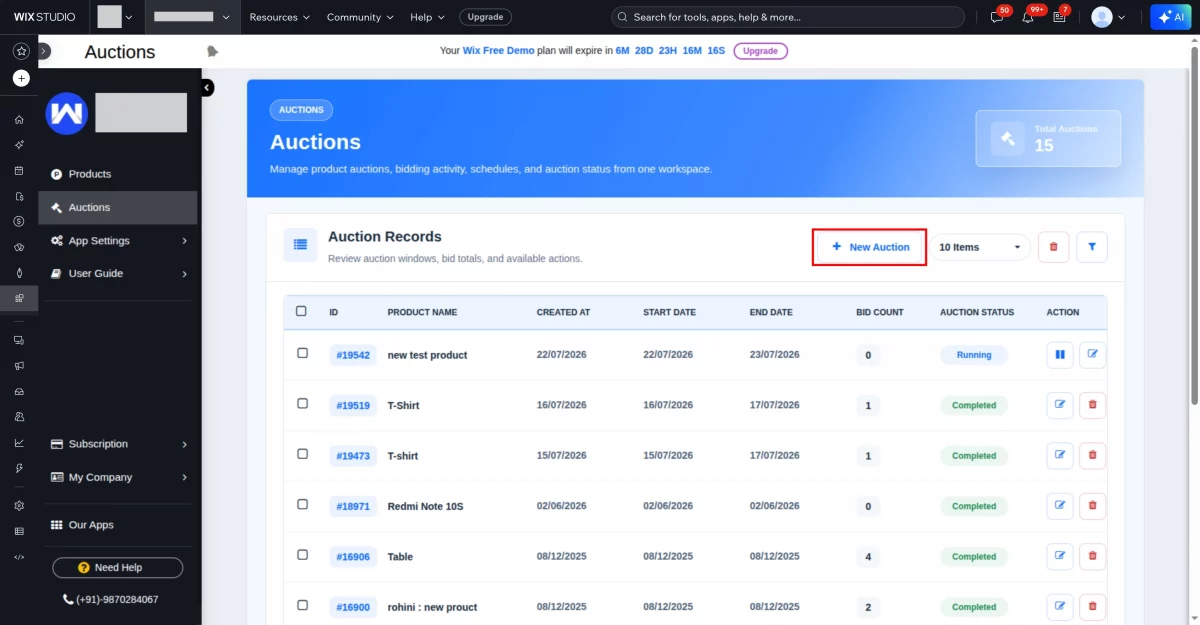
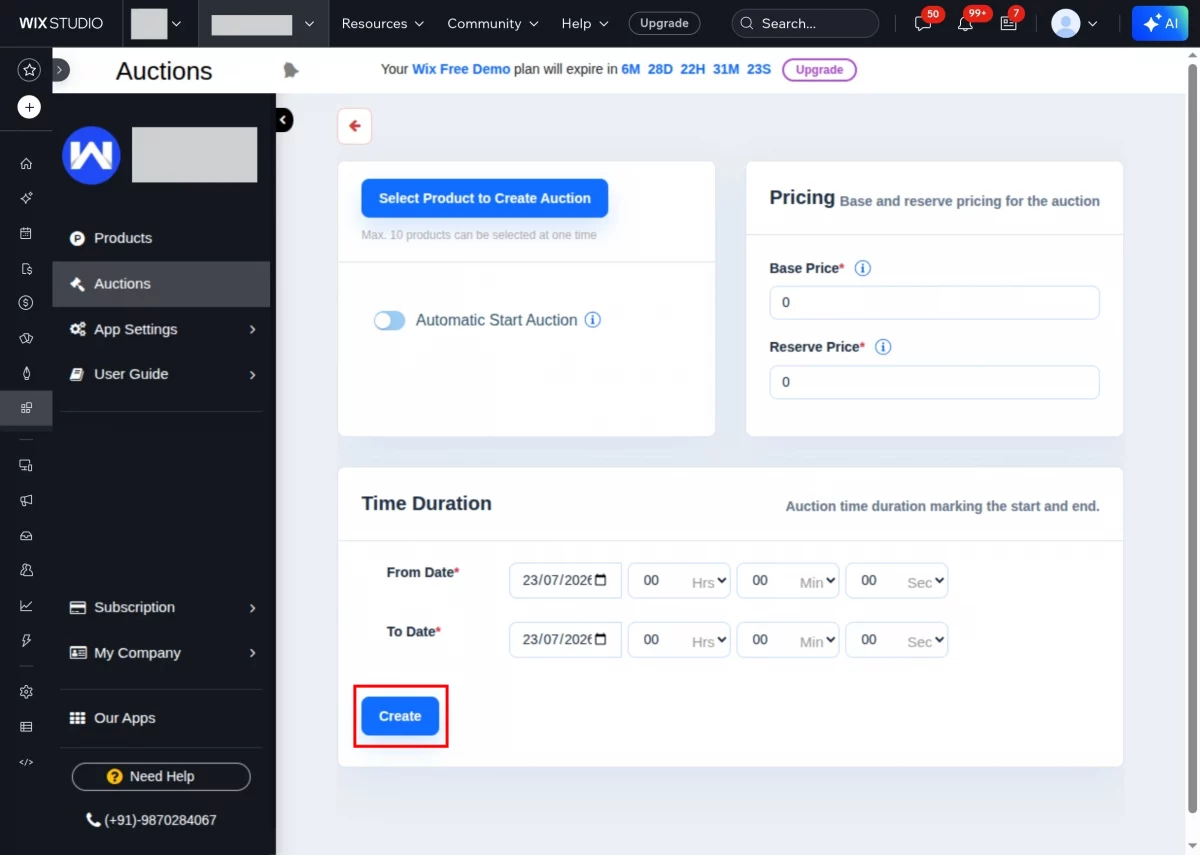
STEP 3:- After clicking on the New Auction button, it opens up the page where you have to fill in the product auction details.
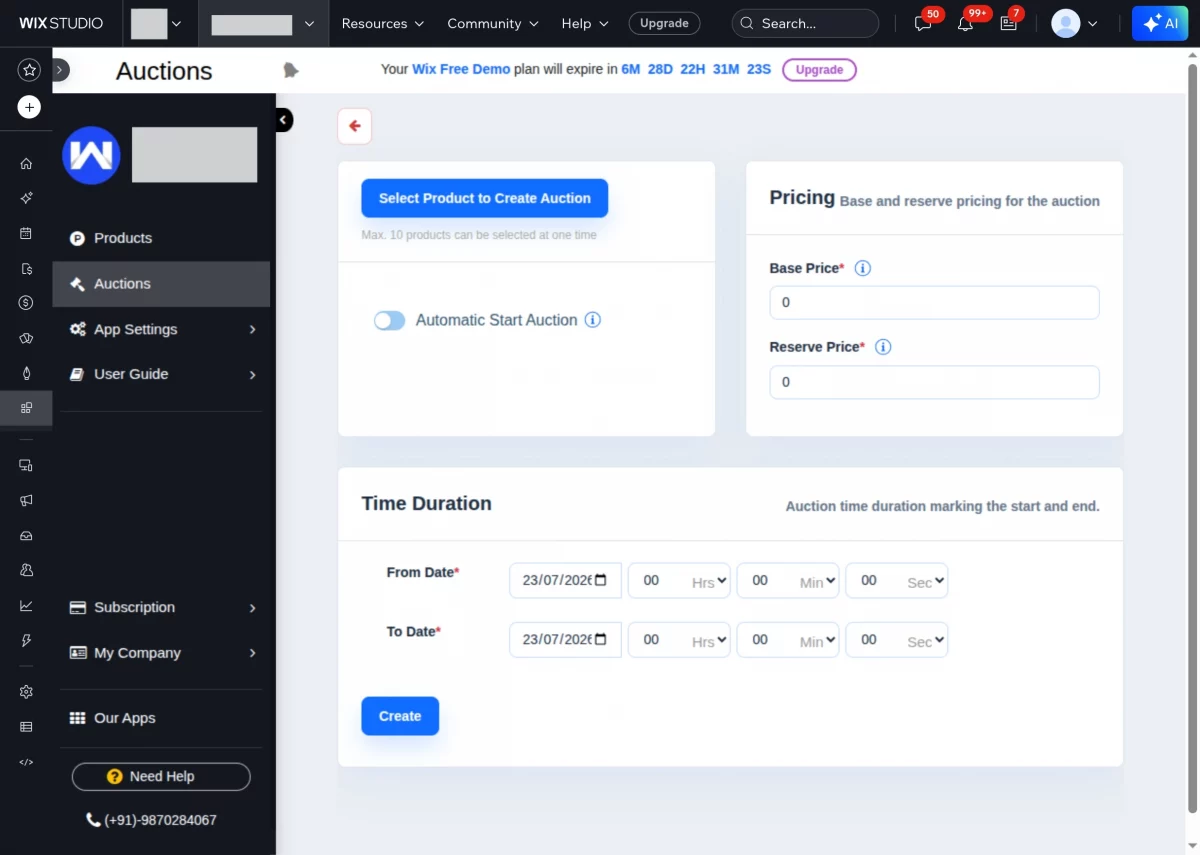
Click on Select Products on which you want to set the Auctions (You can select a maximum of 10 products at one time).
- If you want to start the auction on the product automatically, enable the “Automatic Start Auction” button.
- Now enter the following Pricing details:
- Base Price, i.e., the minimum price from which the bid will get started.
- Reserve Price, i.e., the minimum auction price below which the admin will not sell the product.

- You need to set the time duration by specifying the auction start/end date and time.
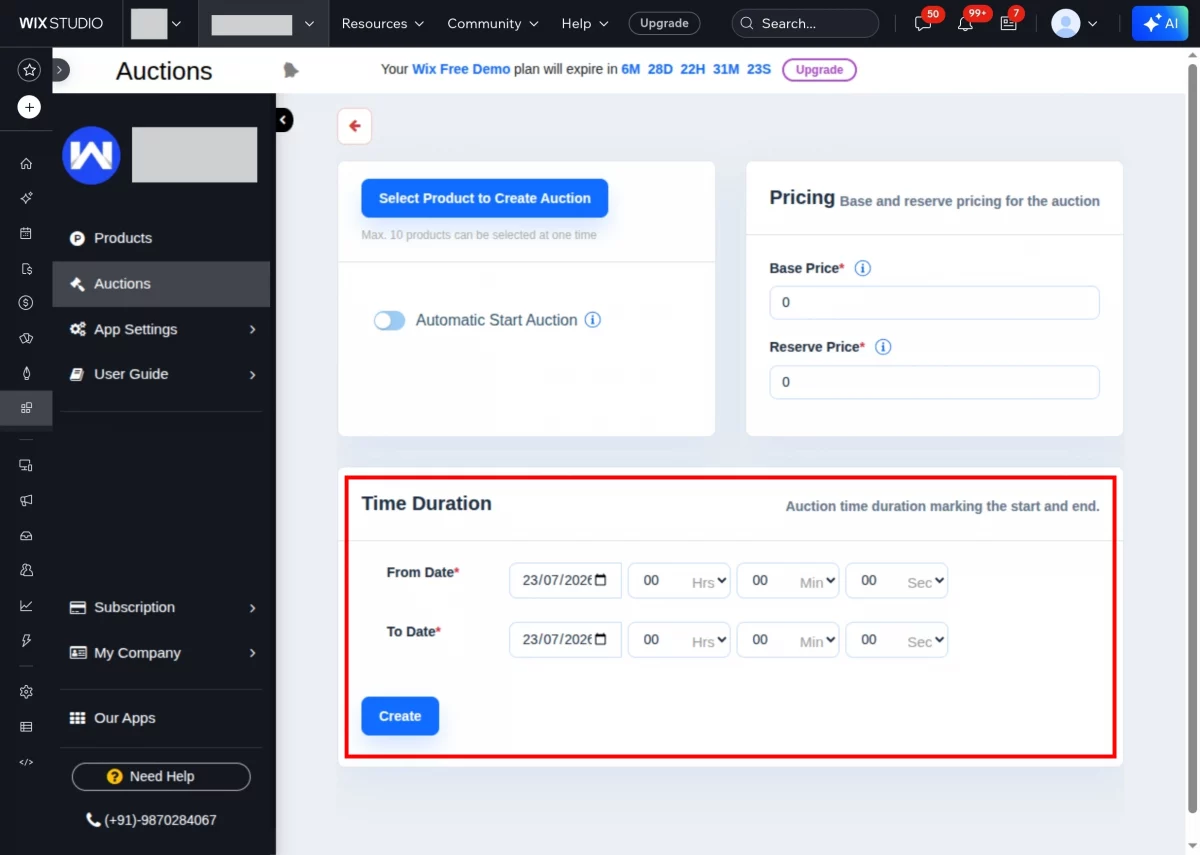
- After applying all the settings, you need to click on Create to set the auction.
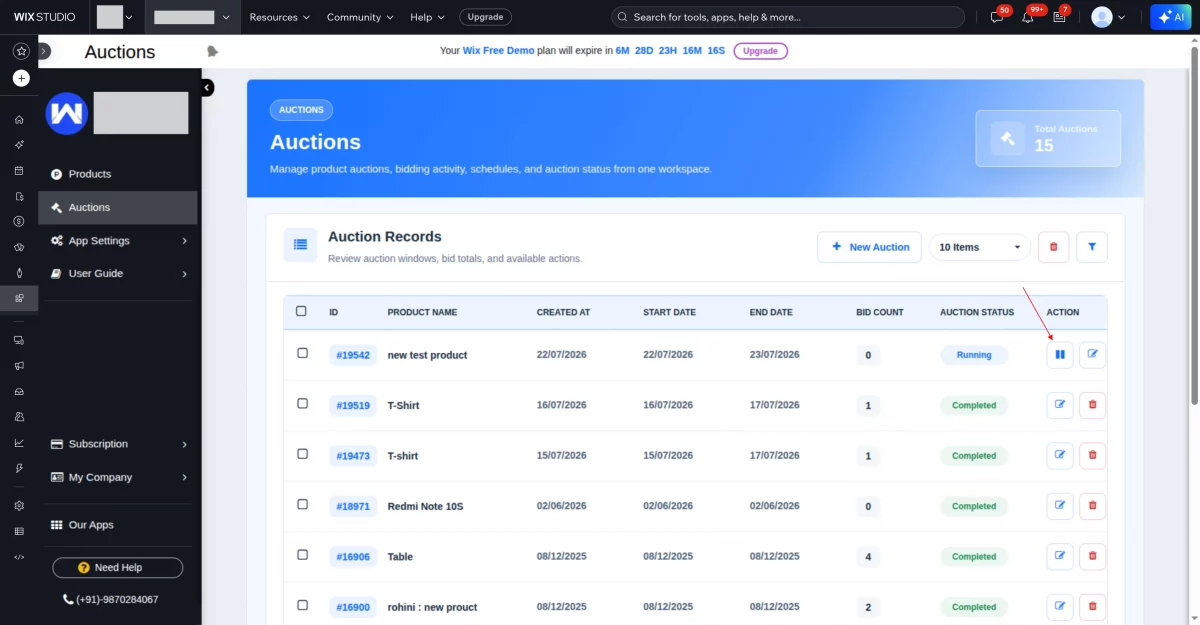
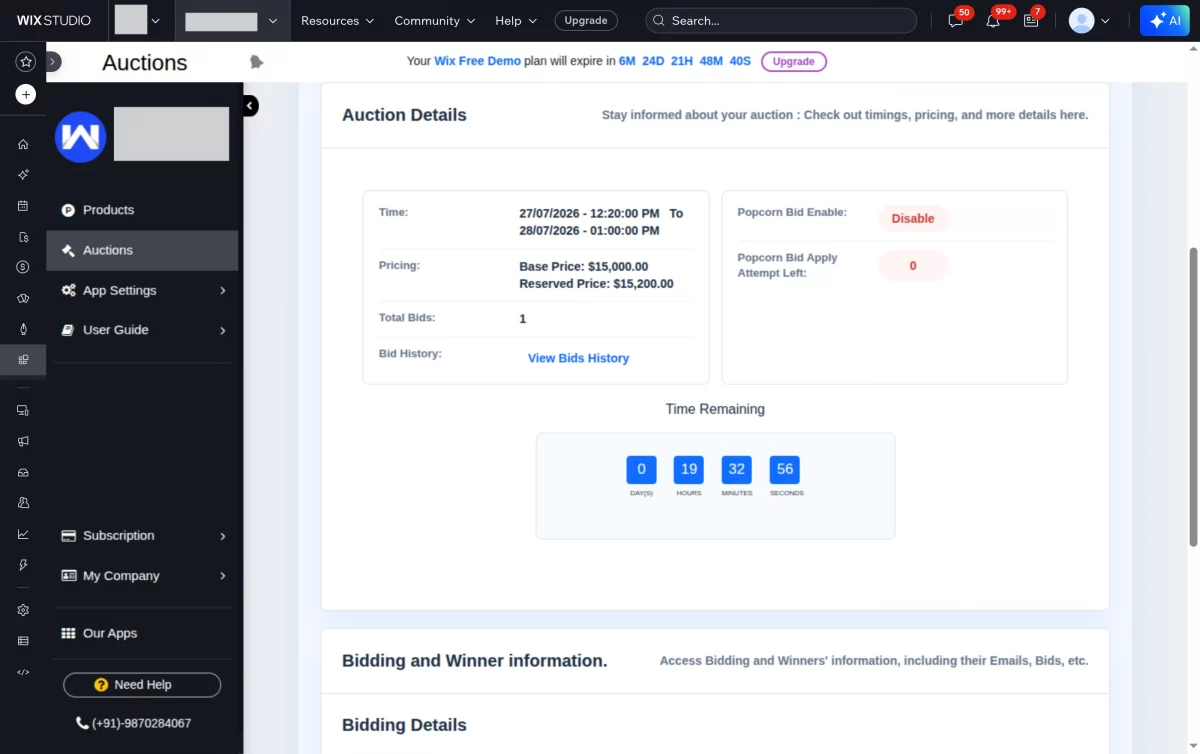
STEP 4:- When you add an auction to a product, the auction for that product starts. You can view complete auction details in the “Auctions” section of the app.
Also, you can edit the auction details as well as stop the auction on the product manually.
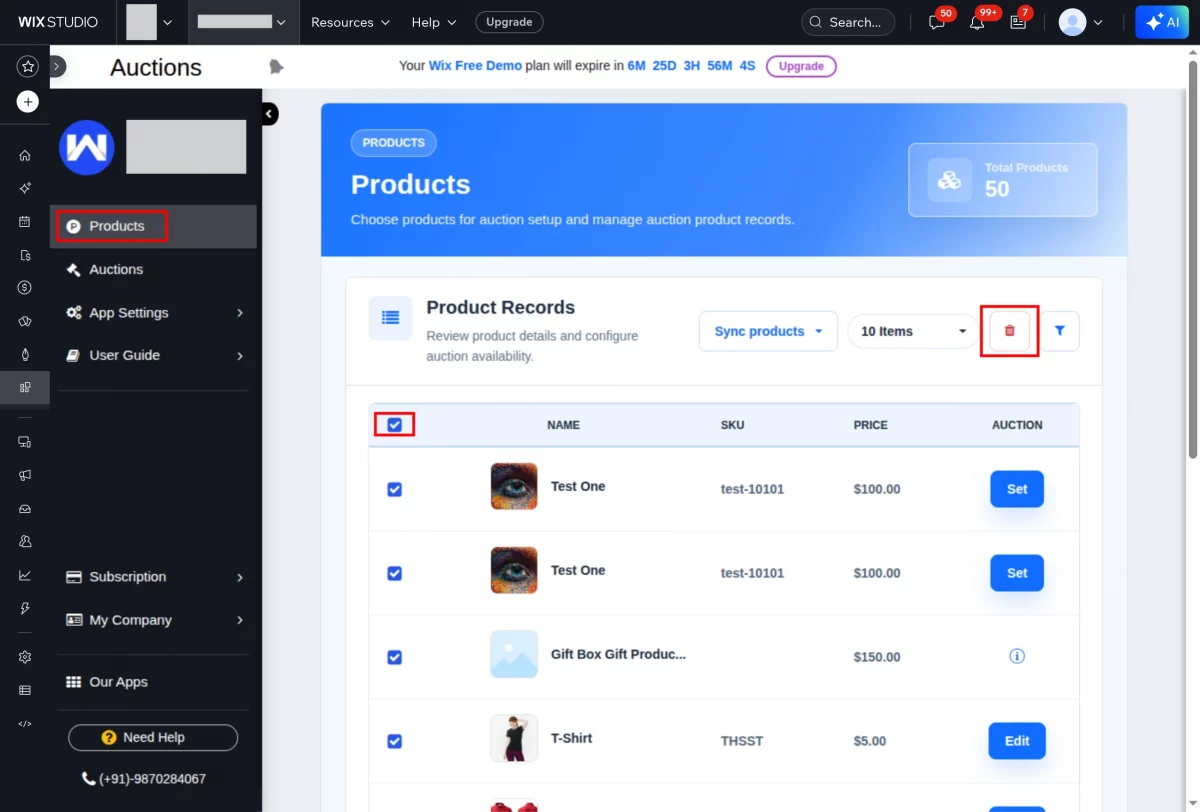
Note – You can delete those products from the auction app end on which you don’t want to apply auction via bulk/single delete option as shown below –

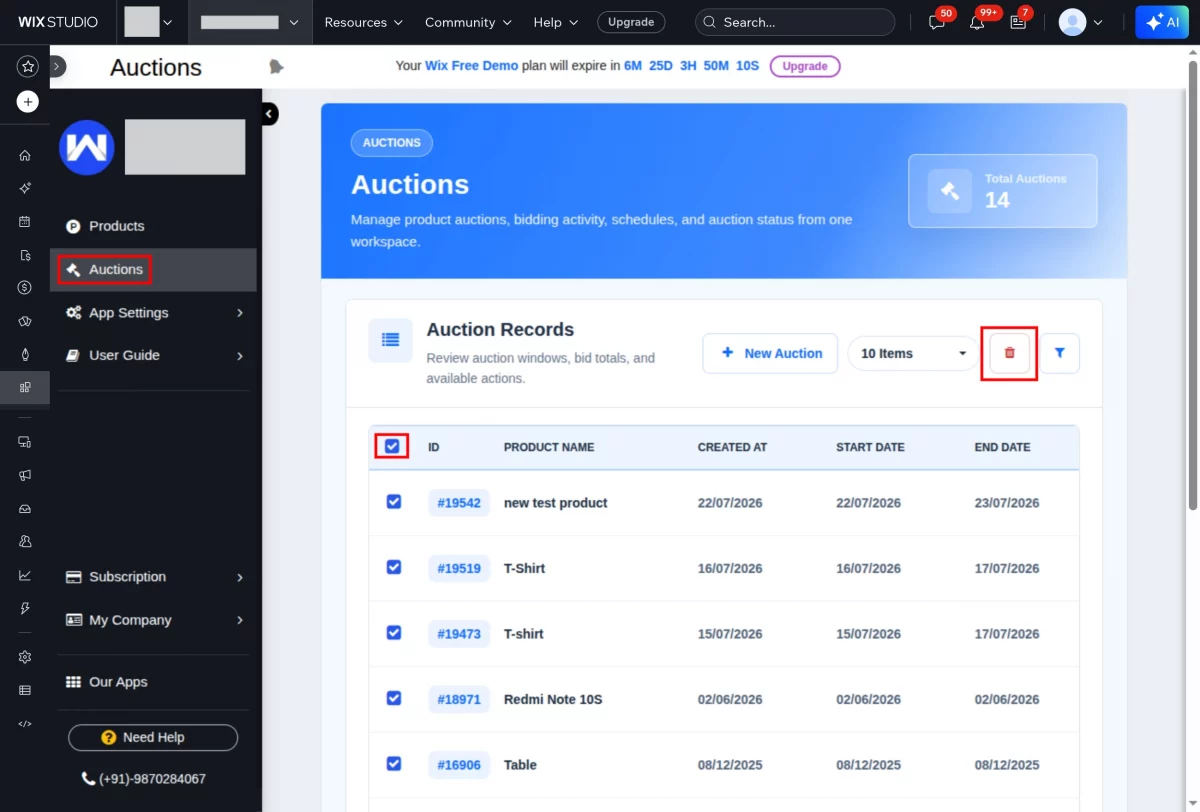
Also, you can delete those auctions that you don’t want anymore on the auction app end.
Popcorn Bidding in Auction
We have introduced a new feature in the Product Auction app called “Popcorn Bidding.”
This feature keeps auctions active and competitive by automatically extending the auction timer whenever a user places a bid near the end of the auction.
It gives more bidders a chance to respond and helps increase the final auction price.
Admin can enable the Popcorn Bid feature from the general settings of the Auction App:
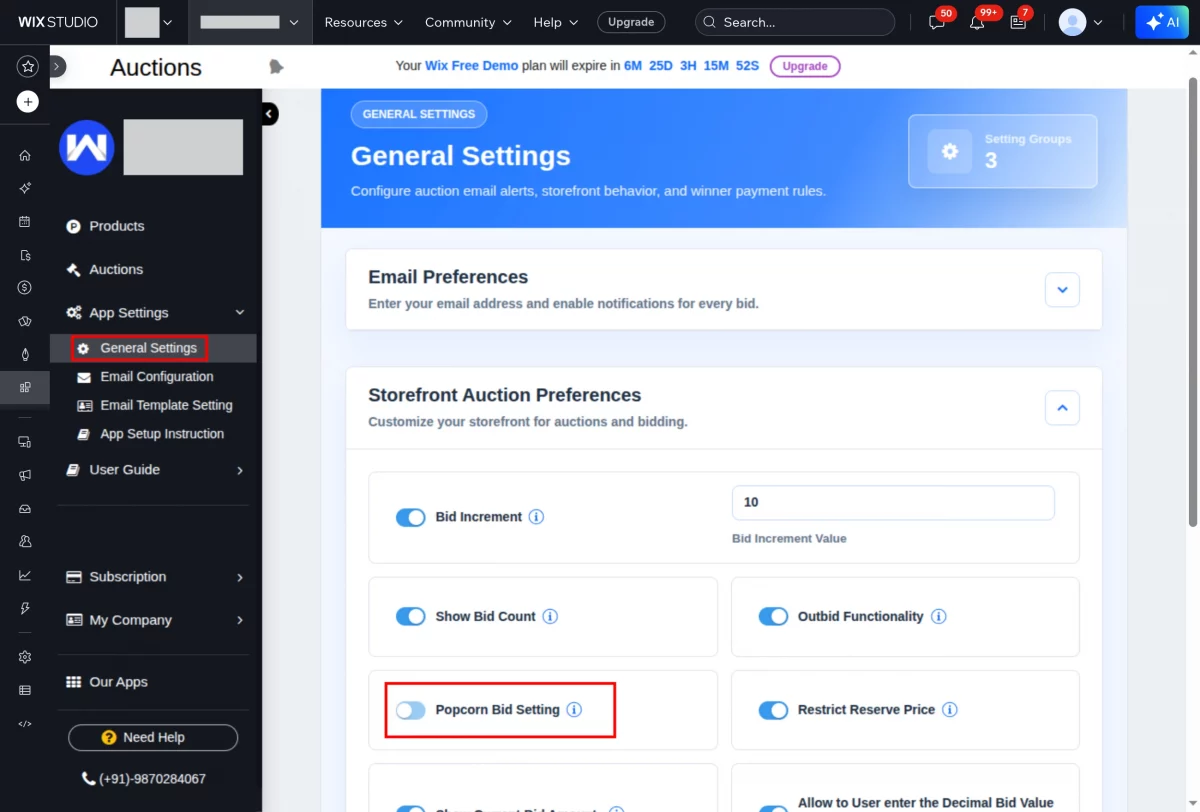
After enabling it from the general settings, it will be visible in the auction creation section:

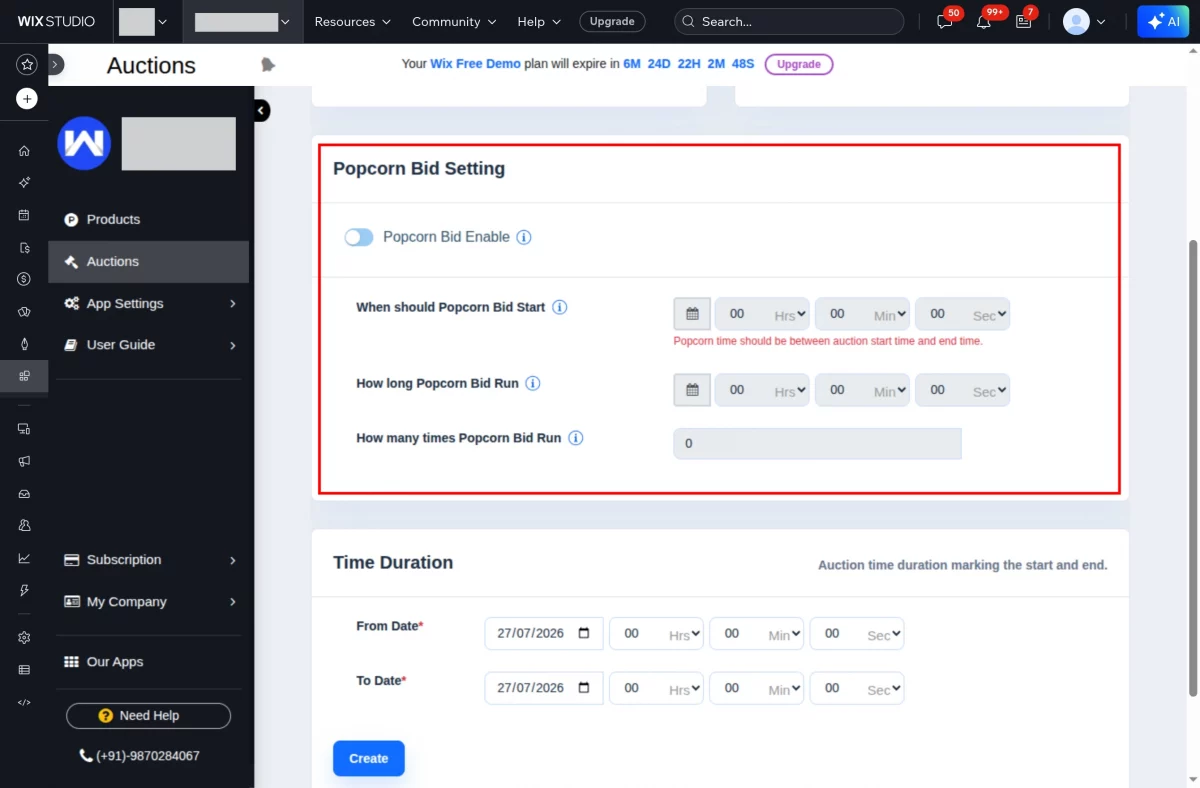
After enabling the Popcorn Bid, it can be applied to the auction product from here:
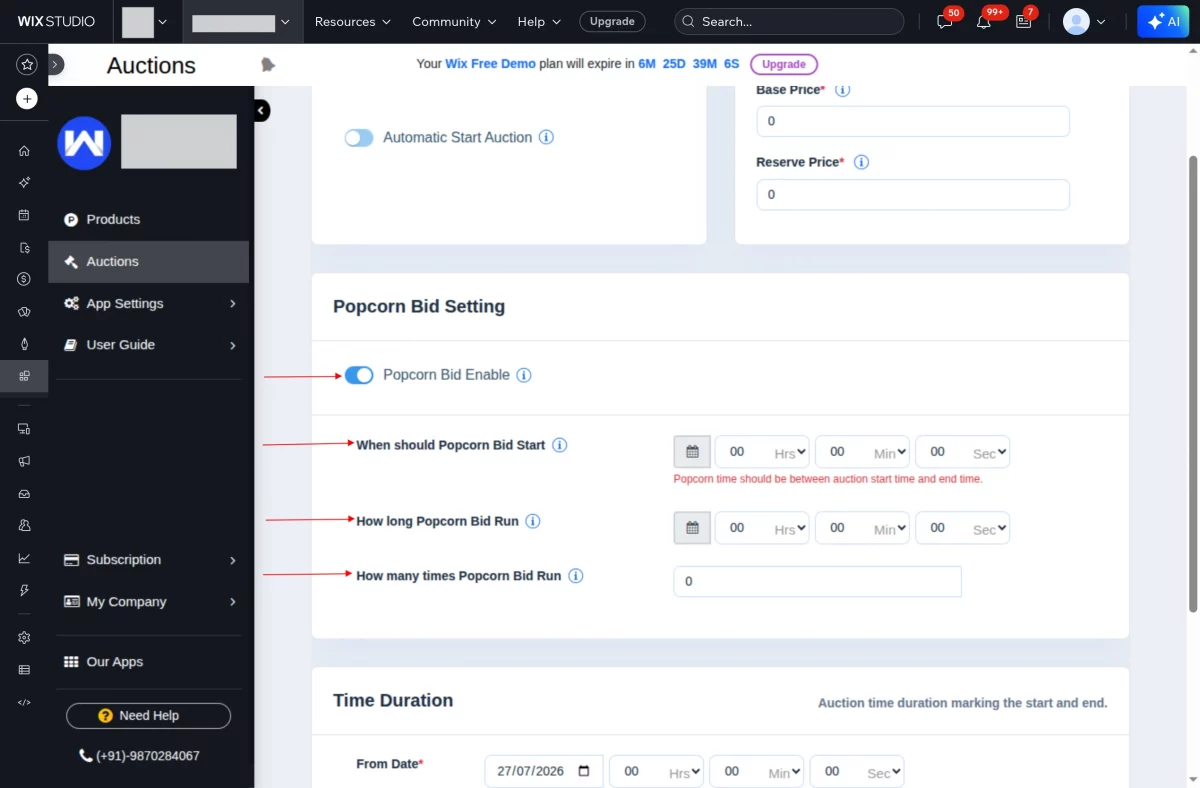
After enabling the Popcorn Bid toggle, the following can be set:
When should Popcorn Bid Start:- Set the remaining time before the auction ends at which the Popcorn Bid should become active when a user places a bid during that specific time period.
How long Popcorn Bid Run:- The admin sets the duration by how much the auction extends.
How many times Popcorn Bid Run:- Number of times the popcorn bid will become active on the product.
Add Auction Page to Homepage
When the auction app is installed on your end, it will automatically create an auction category under Store products >> Categories, as shown below :


Now you need to open that category and click on add the category to site option as shown :


When you click on the ” Add now ” option, it will redirect you to create the page.
Click on the ” create page ” option as shown below :


Click on Publish site


Auction Page on Home page :

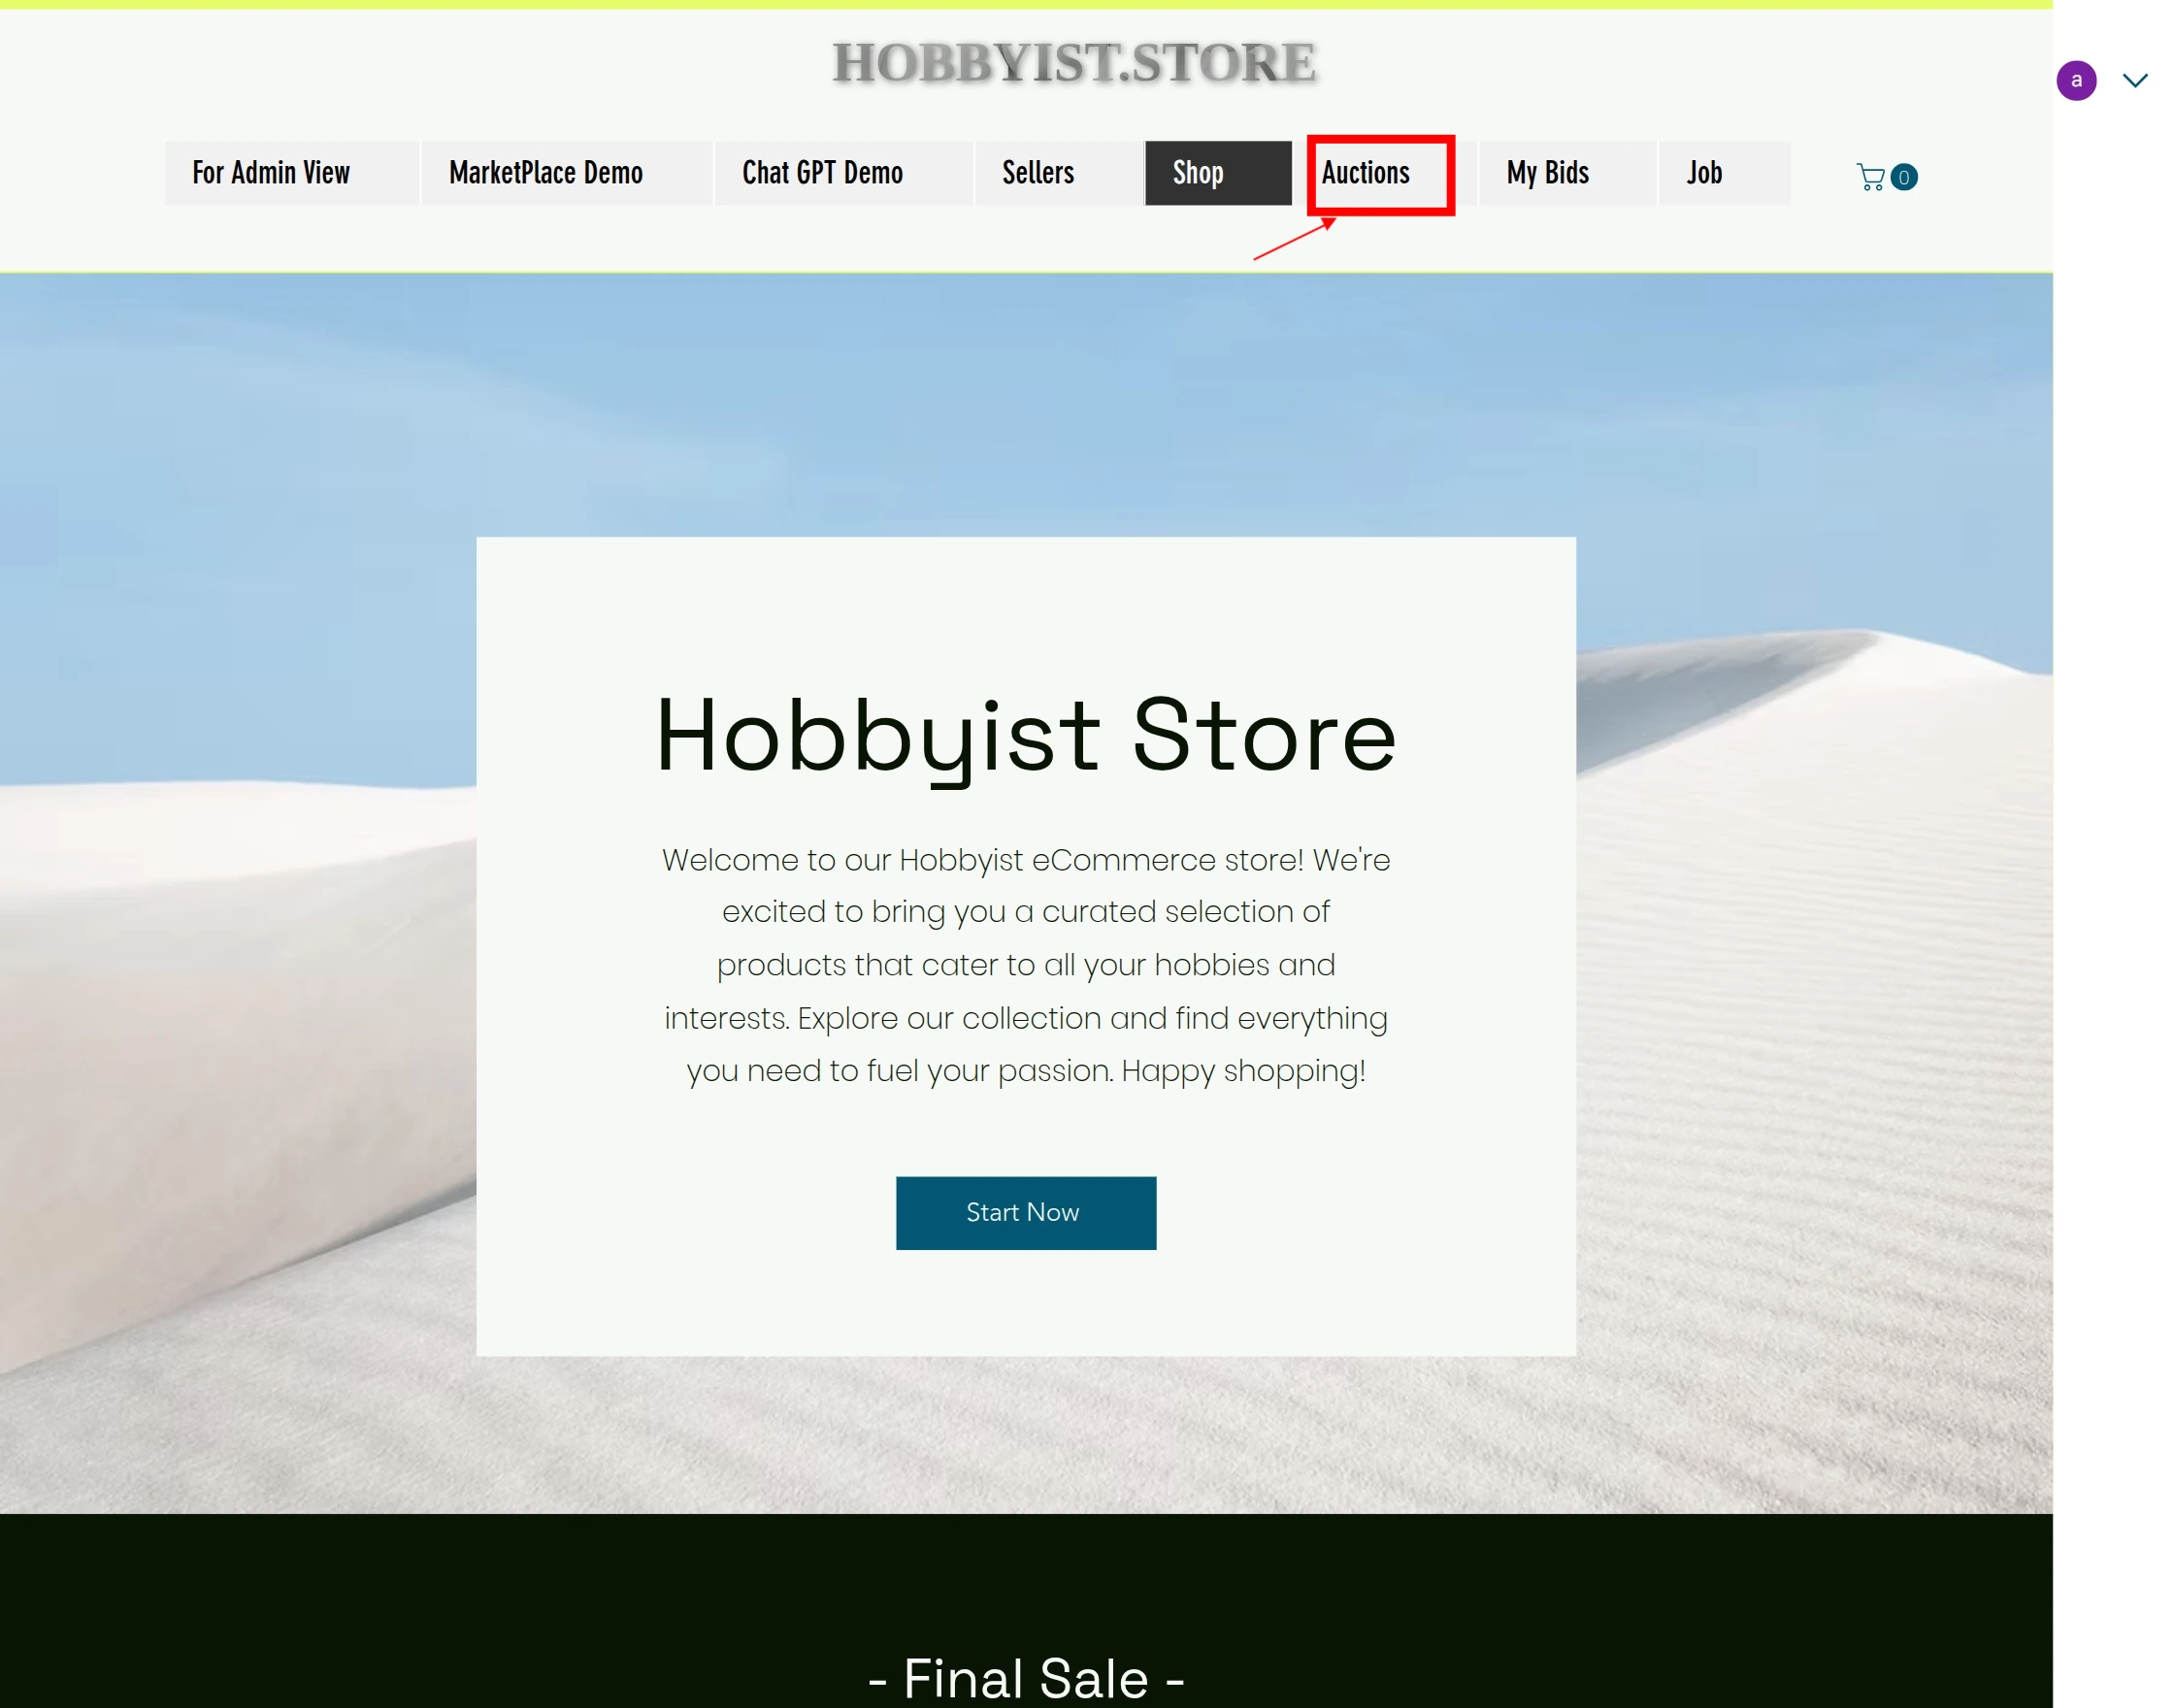
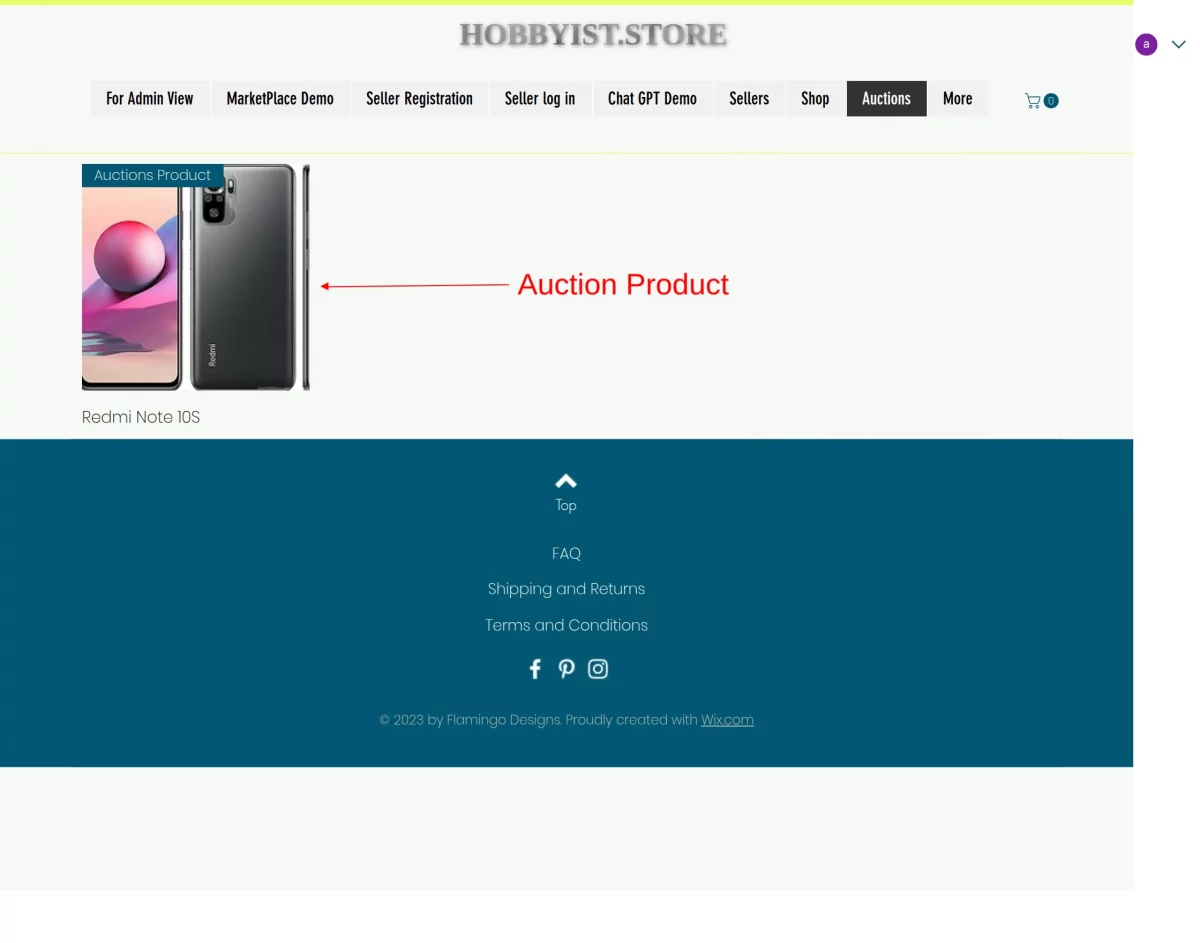
Frontend View
When you add auction products and the auction starts, your auction window for the auction products will look like this on the front end :

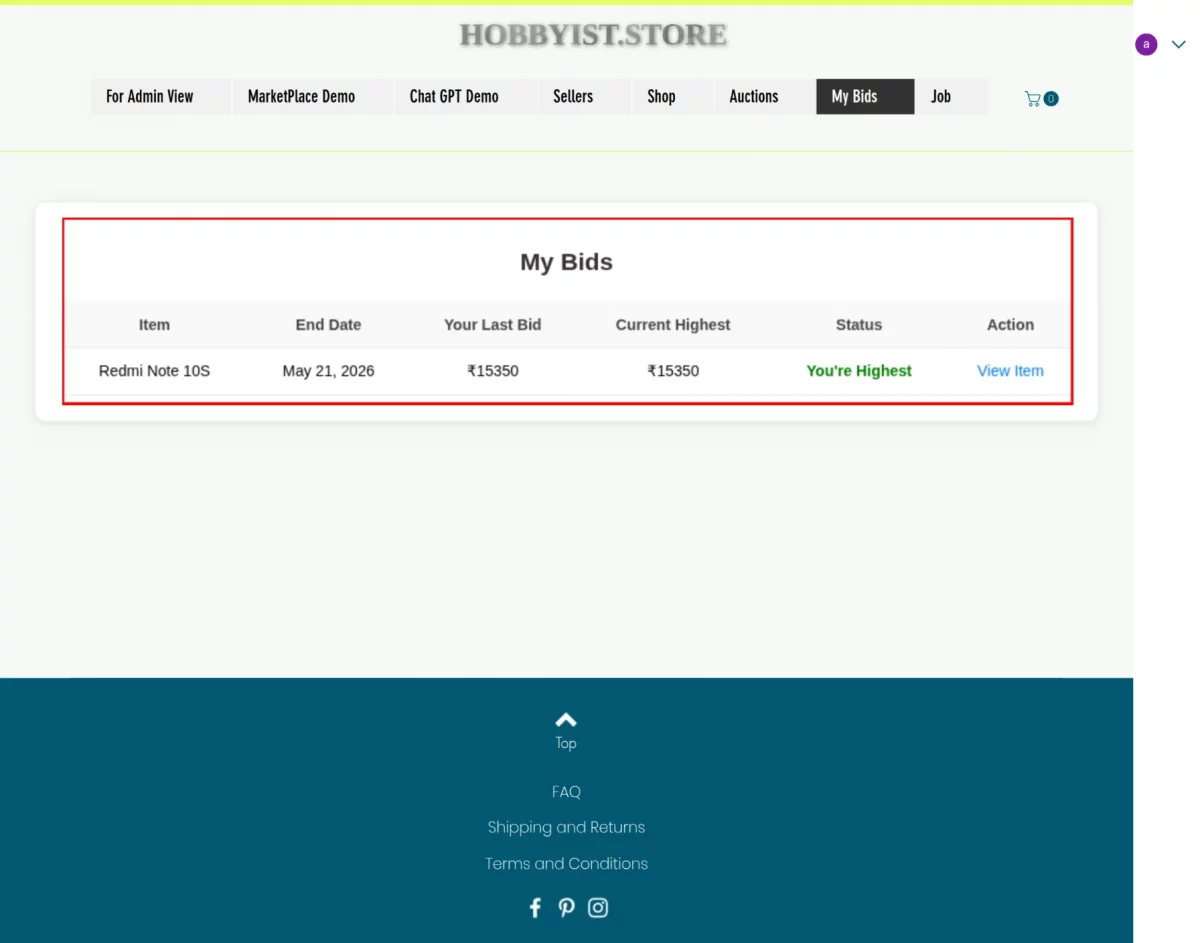
My Bids:
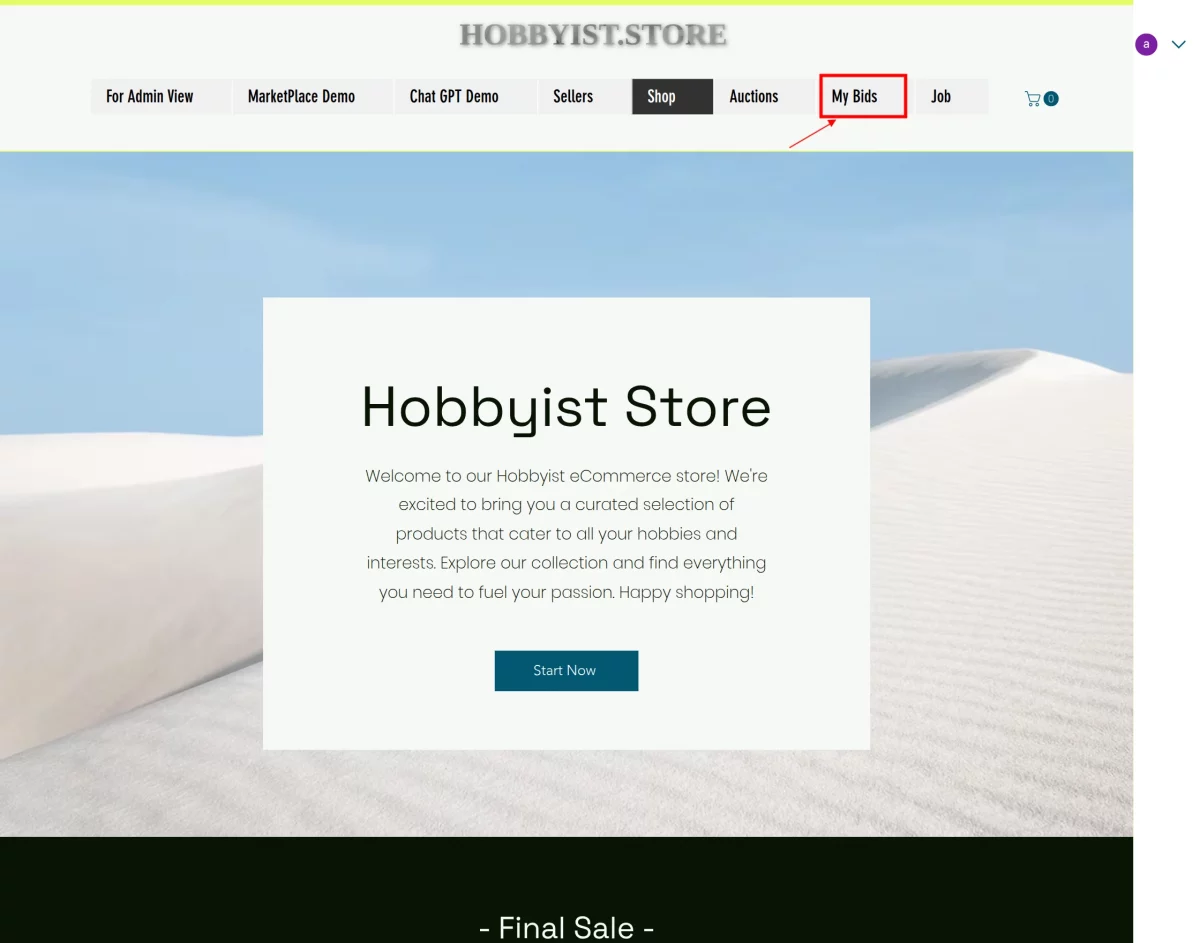
Silver plan: Under the Silver Plan, bidders can access detailed information about their bids, as illustrated in the screenshot below.
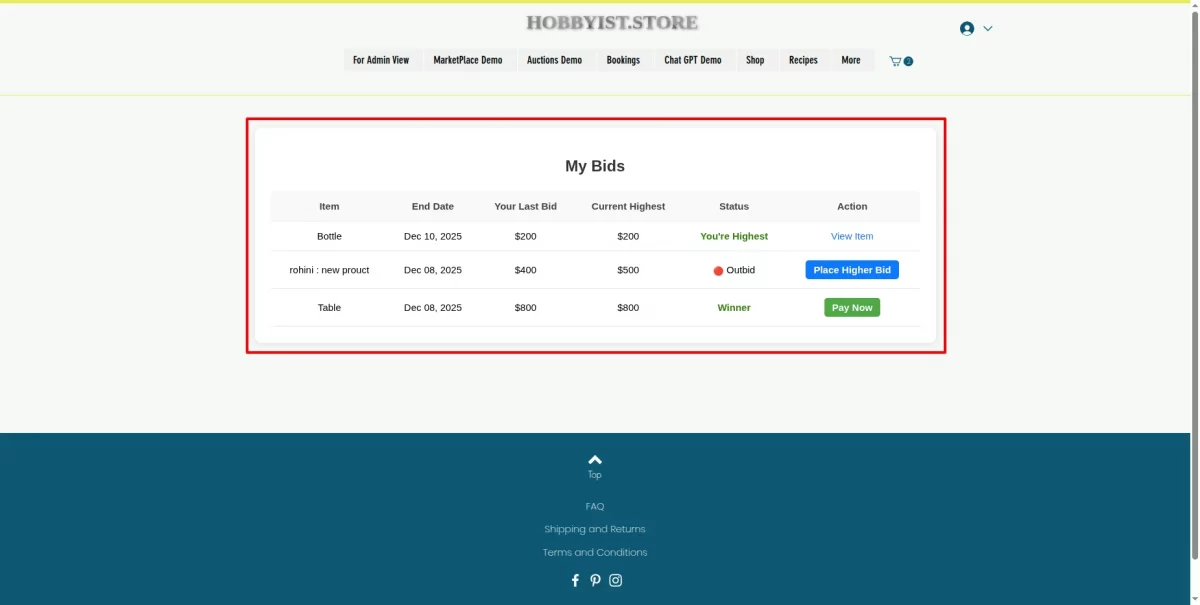
Gold plan: Under the Gold Plan, bidders can access detailed information about their bids, as shown in the screenshot below.
Declaration of Winner
After the auction ends, the admin will be able to see information about the bidding and the winner’s details, and can also notify the auction winner.
If somehow the notified winner is not purchasing the product, then the admin will be able to notify the alternative winners.
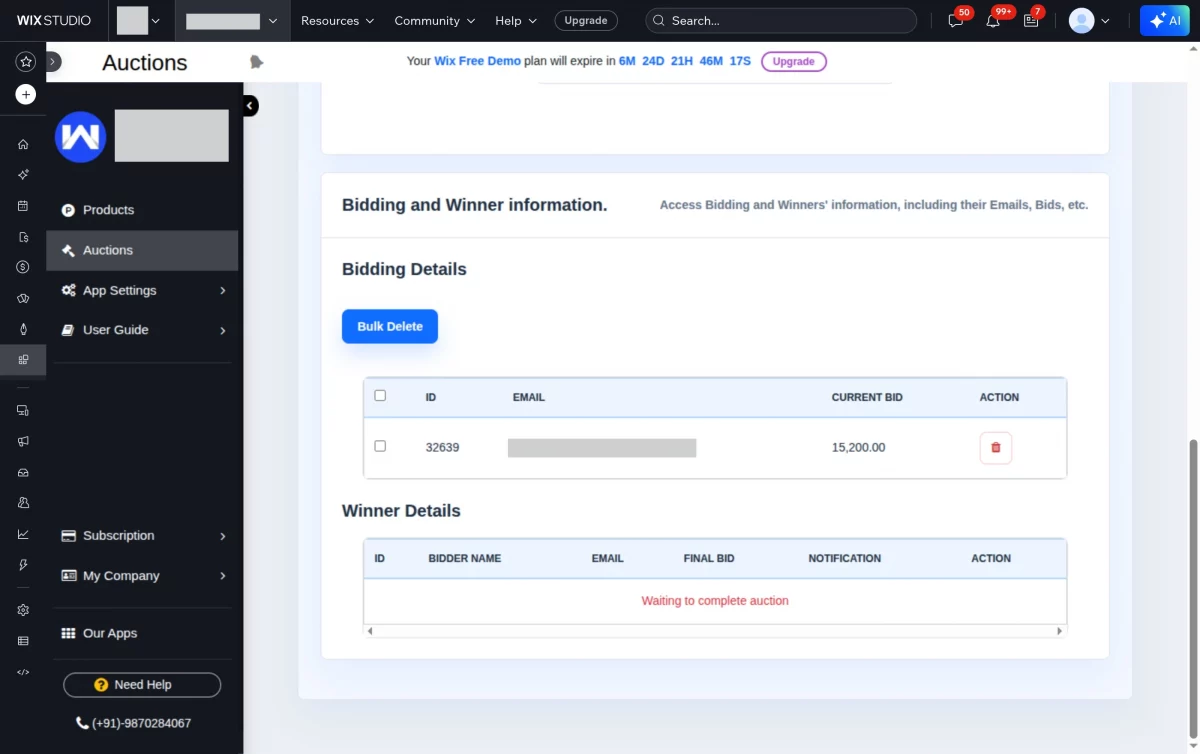
The email is sent when the admin notifies the winner. The email has the link to purchase the auction product that you have won.


Support
If you need any kind of support/assistance, then kindly raise a ticket at http://webkul.uvdesk.com/ or drop a mail at support@webkul.com