User Guide for Akeneo Custom XLSX Connector
Table of Content
Akeneo Custom XLSX Connector enables seamless export and import of product and product model data using customizable XLSX files.
It allows you to map Akeneo attributes to XLSX header columns for sharing product information with third-party platforms, suppliers, or external systems.
In addition to export, the connector supports importing simple and product model.
This ensures a smooth, two-way data exchange with accurate and structured product information management.
You can also use the Akeneo Template Connector to dynamically generate product attribute values using templates.
Check a brief overview of the plugin –
Basic Requirements:
- This module works with Akeneo 3.0.x, 3.1.x, 3.2.x 4.0.x ,5.0.x, 6.0.x and 7.0.x. Download Akeneo from here
- Node and Yarn packages need to be installed.
- This module is compatible with the Akeneo community and Enterprise(Flexibility) edition.
- If you want to use this extension on Akeneo EE Serenity mode, please contact us.
- For the Akeneo installation, your Akeneo server should meet these system requirements.
Features
- Import products and product models into Akeneo using XLSX import mapping templates.
- Export products and product models from Akeneo into XLSX files.
- Product export variations from Akeneo into Xlsx file.
- Export multiple product images from Akeneo to XLSX (as image links).
- Use a fixed value for some fields when exporting data.
- Mapping of Akeneo fields with Xlsx field code.
- Create multiple stores.
- Create dynamic custom fields for every store.
- Select types that the custom field support at the time of creating.
- Support option to the export category, attribute, and select type attribute option label.
- Export category and family with a product.
- Variant product mapping is also available.
- This module is compatible with the latest Akeneo version 7.0.x.
- Filter Data to be exported based on Category, Family, Completeness, Time conditions, Identifier (SKU), Language, and Currency.
Composer Installation
Before beginning the composer installation
1: Get the ACCESS KEYS [Create a support ticket]
2: In Akeneo composer.json, add our repository as well as the installation script.
For Akeneo 6 and 7
{
  "scripts": {
        "post-update-cmd": [
           "vendor/webkul/webkulcustomxlsxbundle/src/Webkul/WebkulCustomXlsxBundle/install/config.sh COMPOSER=true NO_DOCKER=true"
        ],
        "post-install-cmd": [
           "vendor/webkul/webkulcustomxlsxbundle/src/Webkul/WebkulCustomXlsxBundle/install/config.sh COMPOSER=true NO_DOCKER=true"
        ],
        "post-create-project-cmd": [
          "vendor/webkul/webkulcustomxlsxbundle/src/Webkul/WebkulCustomXlsxBundle/install/config.sh COMPOSER=true NO_DOCKER=true"
       ]
   },
  "repositories": [{
    "type": "composer",
    "url": "https://akeneorepo.webkul.com/"
  }]
}
For Akeneo <=5.x
{
  "scripts": {
        "post-update-cmd": [

"vendor/webkul/webkulcustomxlsxbundle/composer_install.sh"
        ],
        "post-install-cmd": [

"vendor/webkul/webkulcustomxlsxbundle/composer_install.sh"
        ],
        "post-create-project-cmd": [

"vendor/webkul/webkulcustomxlsxbundle/composer_install.sh"
       ]
   },
  "repositories": [{
    "type": "composer",
    "url": "https://akeneorepo.webkul.com/"
  }]
}
3: Use composer to install the extension.
composer require webkul/webkulcustomxlsxbundle
4: Complete the authentication form.
5: Send a Message of Success
6: Delete your browser’s cache.
Installing Module for Version 6.0.x and 7.0.x
- After unzipping the appropriate extension zip, merge the “src” folder into the akeneo project.
- From the PIM directory, run the following command over the NO-DOCKER Instance.
./src/Webkul/WebkulCustomXlsxBundle/install/config.sh COMPOSER=false NO_DOCKER=true
- Run the command below over the PIM directory’s DOCKER instance.
./src/Webkul/WebkulCustomXlsxBundle/install/config.sh COMPOSER=false NO_DOCKER=false
Installing Module for Version 4.0.x to 5.0.x
Please follow these steps for installing the Custom Xlsx Connector for the Akeneo module in your Akeneo PIM platform.
1 – Unzip the respective extension zip then merge the “src” folder into the Akeneo project root directory.


2 – Goto config/Bundles.php then add line:
Webkul\WebkulCustomXlsxBundle\WebkulCustomXlsxBundle::class => ['all' => true],
in the return array.
3 – Copy the “config” folder into the akeneo project root directory for routing.


4 – Run this command after ssh to your akeneo server by the terminal
rm -rf var/cache/ && php bin/console customxlsx:setup:install
5 – If you are using php-fpm. Then you need to restart the php-fpm services and apache web server.
For Akeneo 5
sudo service php-fpm7.4 restart
For Akeneo 4
sudo service php-fpm7.3 restart
Docker Installation Command :
For Akeneo 5
alias docker_php='docker-compose run -u www-data --rm php php';
alias docker_yarn='docker-compose run -u node --rm node yarn';
docker_php bin/console cache:clear --env=prod;
docker_php bin/console pim:installer:assets --symlink --clean --env=prod;
docker_php bin/console d:s:u --force;
docker_yarn run webpack;
docker_yarn run update-extensions;
docker_yarn run less;
For Akeneo 4
alias docker_php='docker-compose run -u www-data --rm php php';
alias docker_yarn='docker-compose run -u node --rm node yarn';
docker_php bin/console cache:clear --env=prod;
docker_php bin/console pim:installer:assets --symlink --clean --env=prod;
docker_php bin/console d:s:u --force;
docker_yarn run webpack;
docker_yarn run less;
Installing Module for Version 2.x to 3.x
Please follow these steps for installing the Custom XLSX Connector for Akeneo module in your Akeneo PIM platform.
1 – Unzip the respective extension zip then merge the “src” folder into the Akeneo project root directory.
2 – Goto app/AppKernel.php then add the line
new Webkul\WebkulCustomXlsxBundle\WebkulCustomXlsxBundle(),
3 – Goto app/config/routing.yml then add these lines at top of the file
webkul_xlsx:
    resource: "@WebkulCustomXlsxBundle/Resources/config/routing.yml"
    prefix:    /
4 -You have to navigate to Akeneo Installation Directory(Ex. cd /opt/bitnami/apps/akeneo/htdocs ). Run this command after ssh to your akeneo server by the terminal.
rm -rf var/cache/ && php bin/console customxlsx:setup:install
5 – You have to restart your web server like Apache, Nginx. Run the command for the Apache webserver.
sudo service php-fpm7.2 restart
Common Issues After Installation
It might happen that even after proper installation, upon opening your Akeneo admin dashboard, you see a loading screen. In that case, do check for the following solution:
- Webpack Installation: If you get the below error


It means that web pack is not installed in your system. Run the following command
npm install --save-prod webpack
npm install
- Module routing.yml is not configured properly. Re-check the routing.yml file as mentioned in the 3rd step of Module Installation
- Clear your browser cache.
Uninstall Module: For Akeneo 6 and 7
- From the PIM directory, run the command below over the NO-DOCKER Instance.
./src/Webkul/WebkulCustomXlsxBundle/uninstall/uninstall.sh COMPOSER=false NO_DOCKER=true
- Then run the command below over the PIM directory’s DOCKER instance.
./src/Webkul/WebkulCustomXlsxBundle/uninstall/uninstall.sh COMPOSER=false NO_DOCKER=false
Configure Akeneo Custom XLSX Mapping Template
After installing the connector in Akeneo, the Webkul Custom XLSX Connector icon will appear on the Akeneo dashboard.

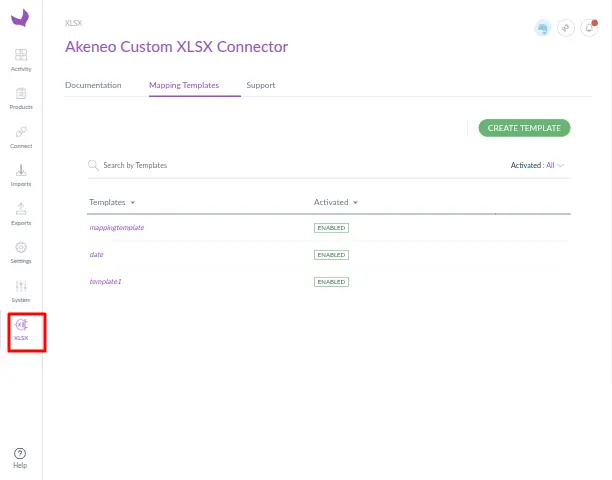
XLSX Connector Product Mapping Fields
By clicking the Connector icon, you can configure the connector and create multiple XLSX mapping templates as required.
To create a new template, click on Create Template.


After that, it will redirect you to the new page in which you have to enter the name of the template.

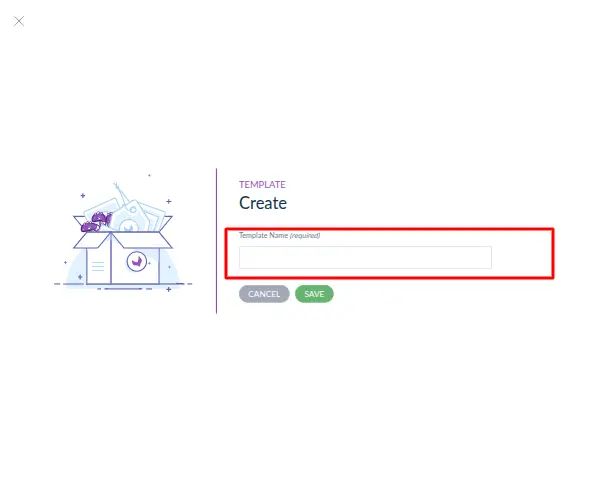
Then click on to Save button.
Now to map the attributes in that template click on the template.
Export Mapping
Once the mapping template is created, you will be redirected to the Export Mapping page. Here, you must first add the XLSX fields (XLSX column header) and then map them with Akeneo attributes.
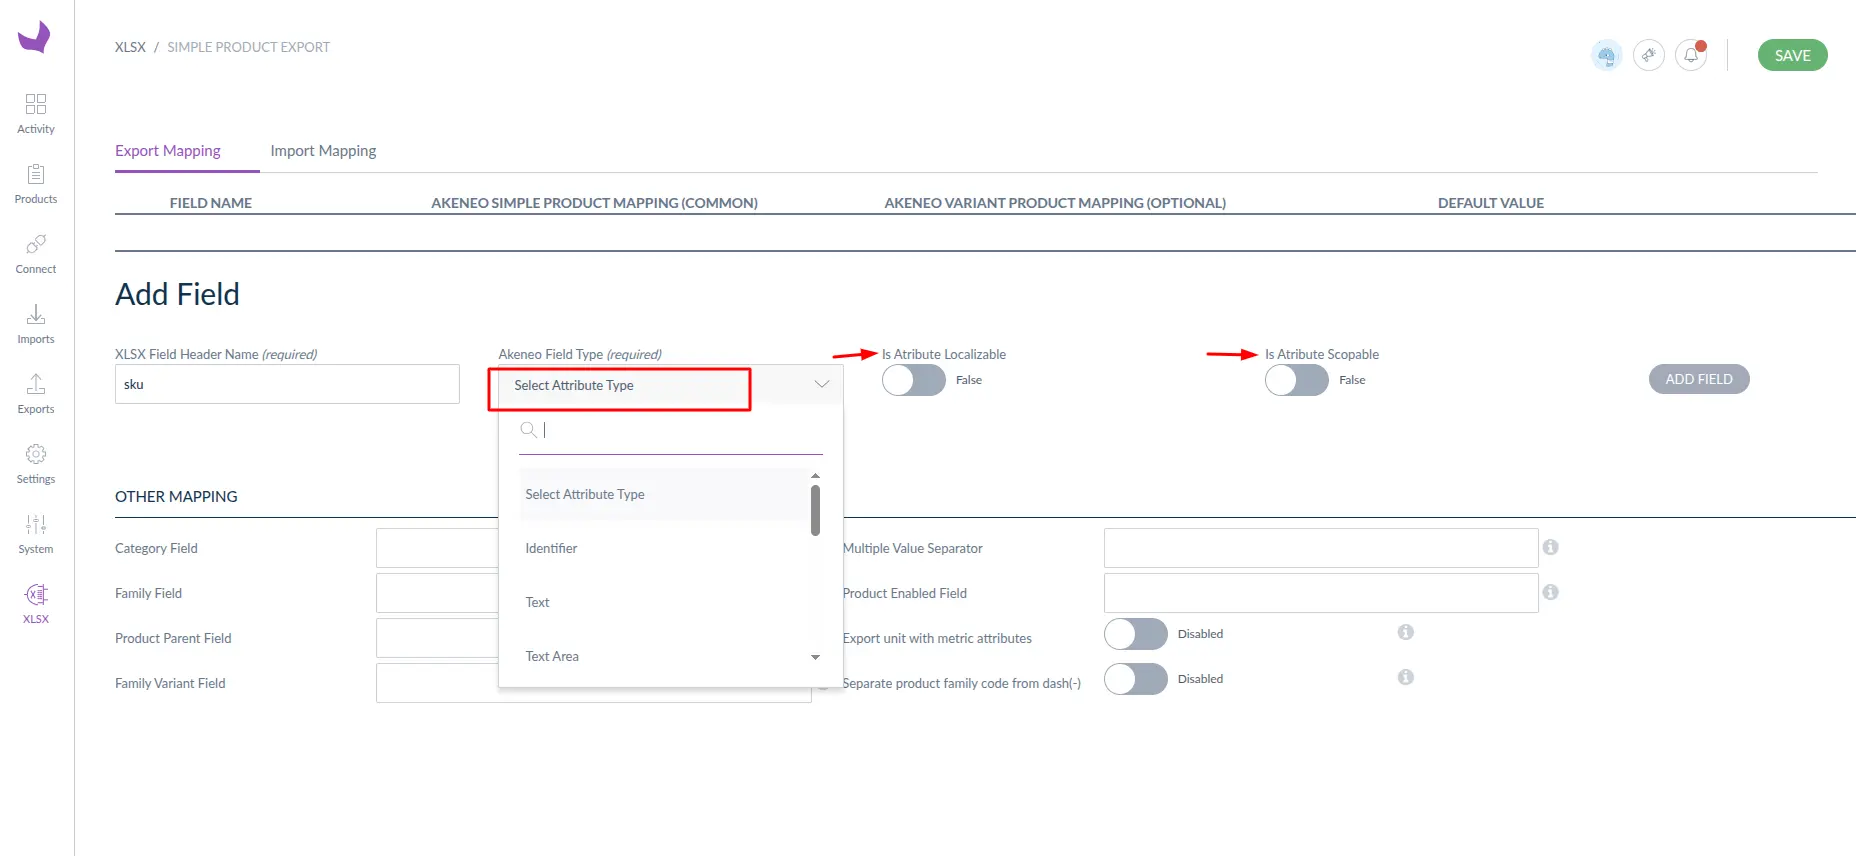
Step 1: Add XLSX Fields
To start mapping, you must add fields that will be column headers in the exported XLSX file.
- Enter the XLSX Field Header Name (this will be the column name in the XLSX file)
- Select the Akeneo Attribute Type from the dropdown.
- Enable or disable the following options based on the attribute configuration:
- Attribute Localizable – enable if the attribute is locale-based.
- Attribute Scopable – enable if the attribute is channel-based.
- Click Add Field to save the field
These settings must match the actual configuration of the Akeneo attribute.

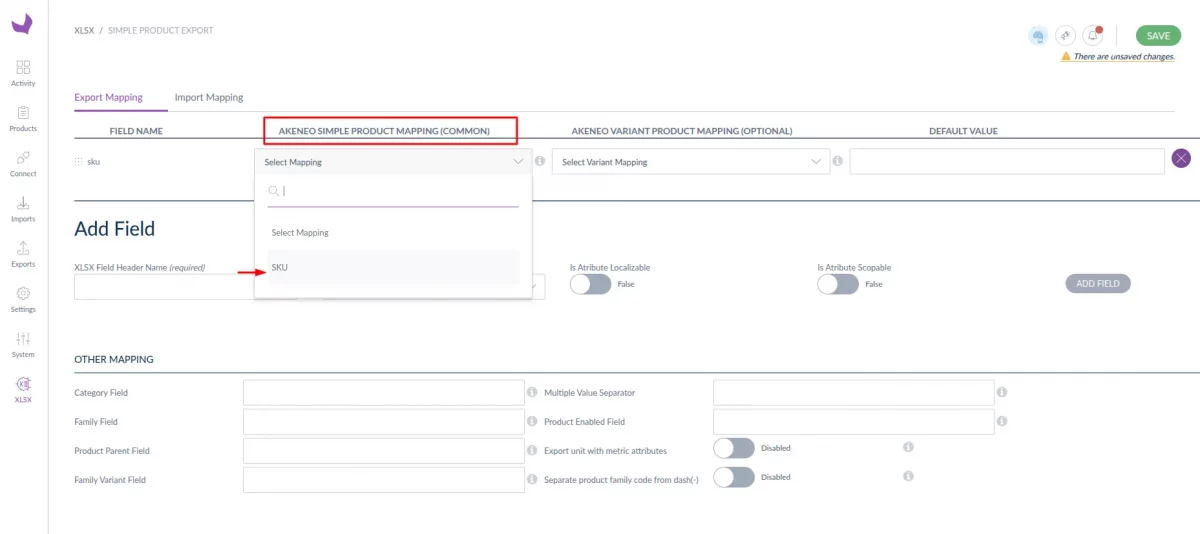
Step 2: Map Akeneo Attributes (Simple Products)
After successfully adding the fields:
- Select the corresponding Akeneo attribute for each XLSX field from the dropdown
- This mapping applies to simple product attributes.
This ensures the correct product data is exported into the XLSX file.


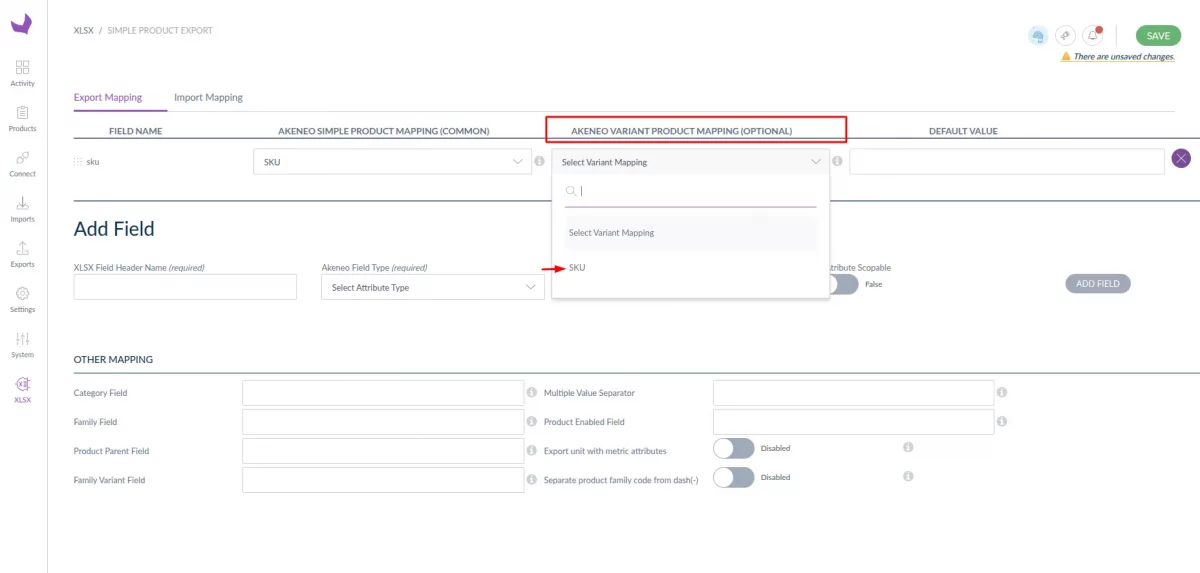
Step 3: Variant Product Mapping –
In Akeneo Variant Product Mapping. You can export the variant product information along with the parent product information.
Example: If you have a variant product with a variant like color – Red, White. Then, you can send the product information, like the price for the variant product.


Step 4: Default Value (Optional)
- You can define a default value for any mapped field.
- If an attribute value is missing on product data, the default value will be exported .

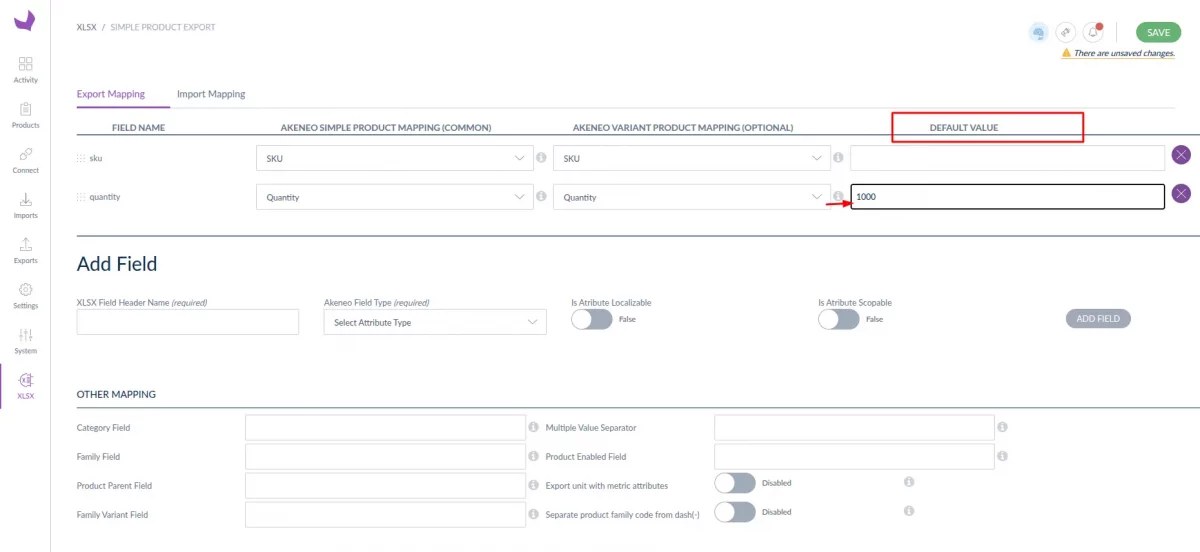
Example:
If a quantity attribute is empty, a fixed quantity value can be exported.
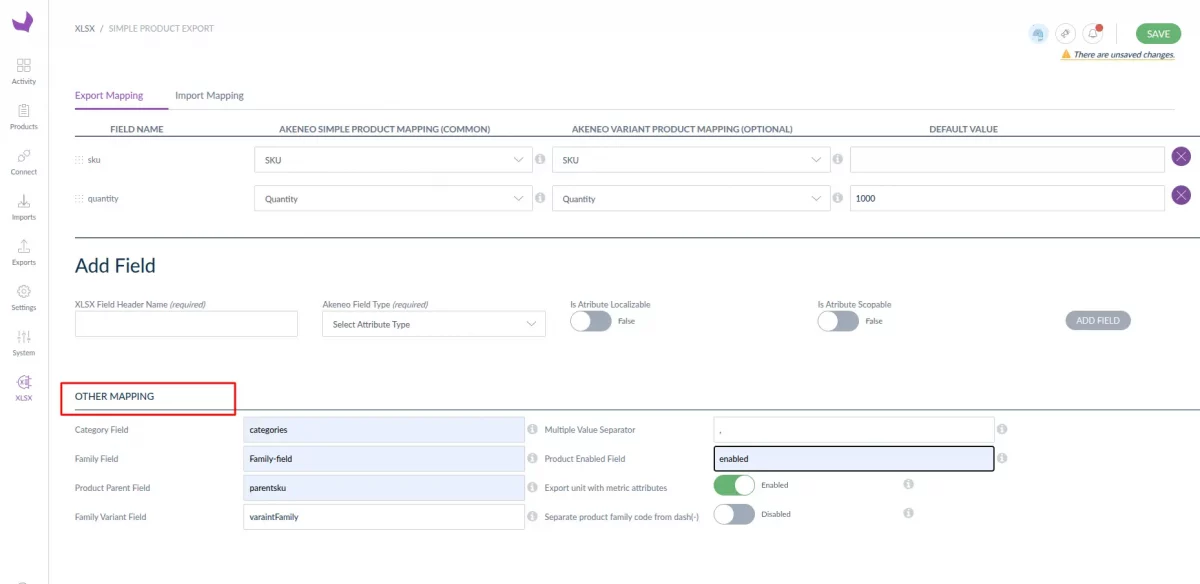
Step 5: Other Mapping
Use the Other Mapping section to configure system-level XLSX fields:
- Category Field – In this section you have to enter the category header name as entered in the XLSX file.
- Family Field – In this section you have to enter the family header name as entered in the XLSX file.
- Product Parent Field – you can save the Akeneo product parent field in this which you want to export.
- Family Variant Field – Export the family variant code
- Multiple Value Separator – Define separator for multi select attributes (e.g.
,). - Export Unit with Metric Attributes – Enable this option if you want to export metric attributes.
- Separate product family code from dash(-) – When enabled during export, the family code is split into multiple cells . for example
display_camerais exported asdisplayandcamerain two cells . When disabled, the family code is exported as-is in a single cell. - Product Enabled Field – In this section, you have to enter the status name as entered in the XLSX file.

These mapping configurations ensure that the Excel sheet is generated exactly as configured, with correct header names and data for both simple products and product models.

Note: While adding fields, ensure the header names are entered exactly as you want them to appear in the exported XLSX file. You can click the hint icon next to any field to view guidance on its usage.
Import Mapping
The Import Mapping section is used to import product data from an XLSX file into Akeneo.
Before running an import job, users must add and configure XLSX fields, then map them with the appropriate Akeneo attributes.


Step 1: Add Fields
Before importing data, you must add fields that match the header names in your XLSX file.
While adding a field:
- Enter the XLSX Field Header Name exactly as it appears in the xlsx file.
- Select the Product Field Value Type
- Select the Product Field Format
- Repeat the same steps for Variant Field
- Select the Akeneo Field Type
- Click Add Field
- Configure both Simple Product Mapping (Common) and Variant Product Mapping (Optional) if required.
The Akeneo Field Type you select controls same Akeneo attributes type are available for mapping.

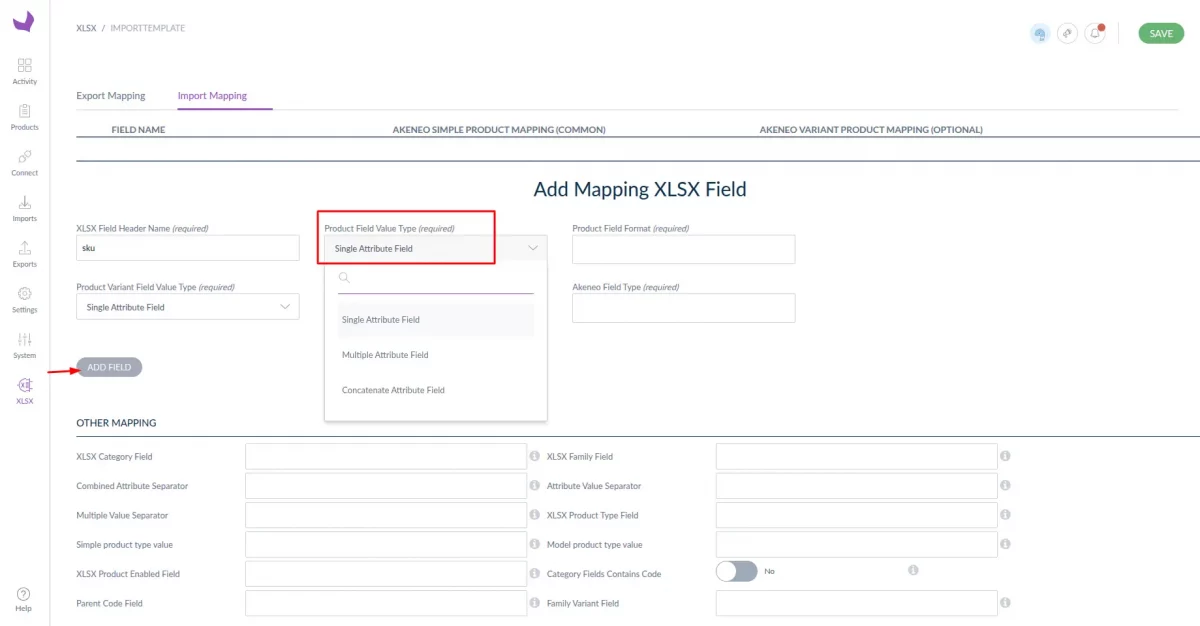
Product Field Value Types for Import
The connector supports three product field value types during import:
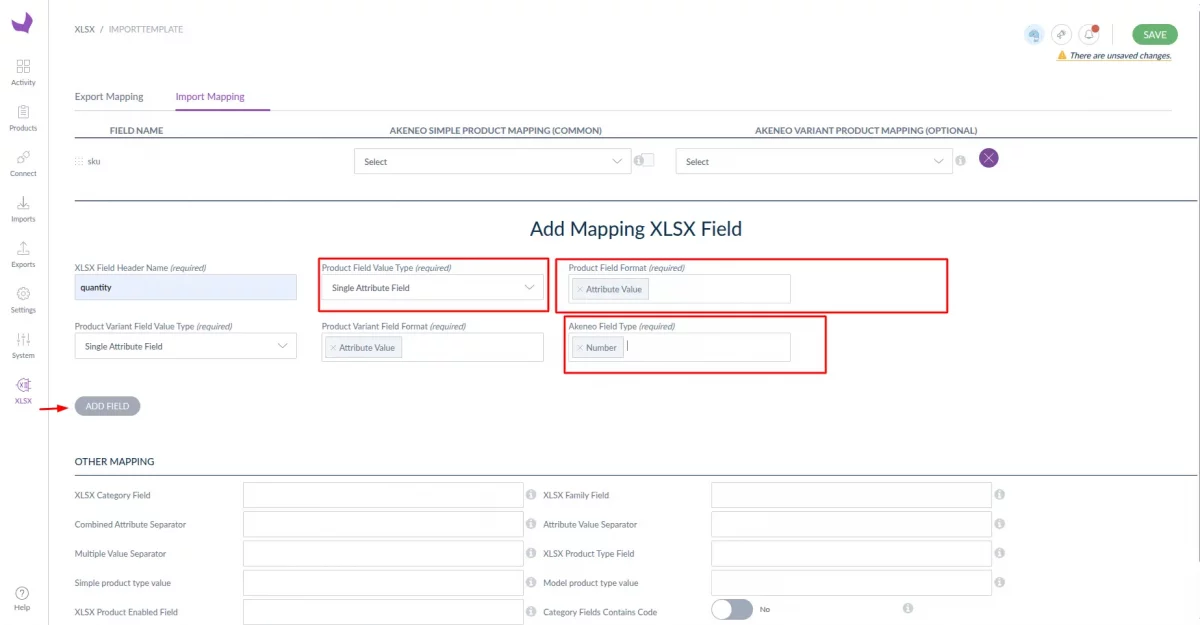
1. Single Attribute Field Type
Use this type when the XLSX column contains only a single value for one attribute.
Configuration steps:
- Select Single Attribute Field as the Product Field Value Type
- In Product Field Format, select Attribute Value
- Select the correct Akeneo Field Type (e.g. Number, Text, Date)
Example:
- XLSX Header:
quantity - Value in XLSX:
50 - Akeneo Attribute Type: Number
Repeat the same steps for Product Variant Field Value Type, if variant data is required.
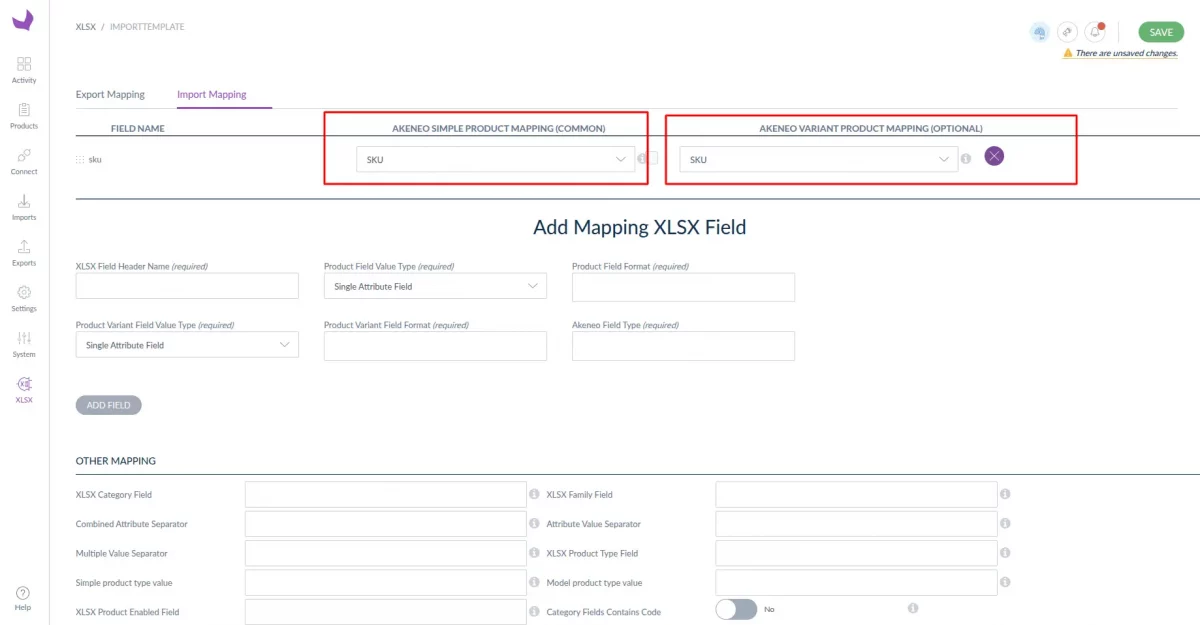
After adding the field:
- Map the corresponding Akeneo attribute under:
- Simple Product Mapping (Common)
- Variant Product Mapping (Optional)

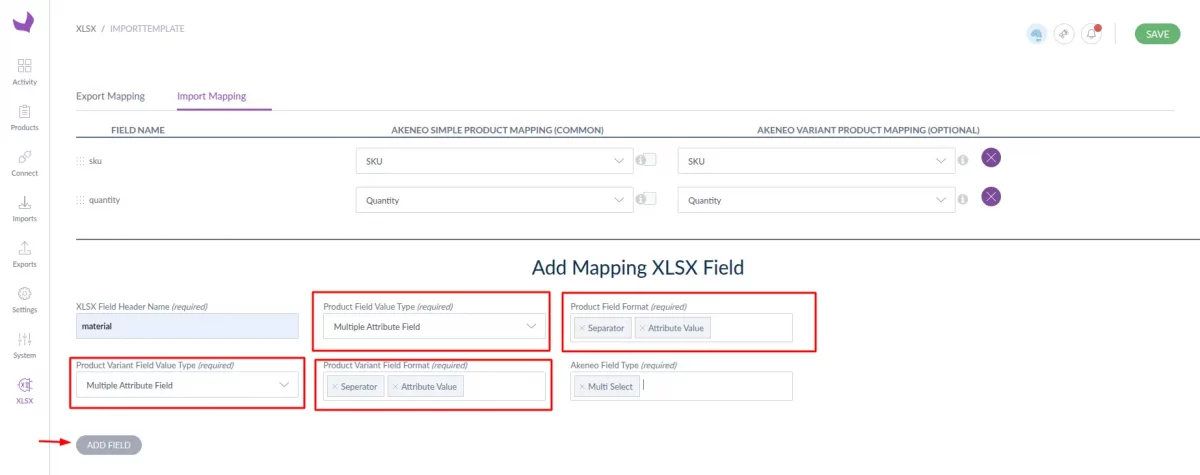
2. Multiple Attribute Field Type
Use this type for multi-select attributes that contain multiple values in one cell.
Configuration steps:
- Select Multiple Attribute Field as the Product Field Value Type
- In Product Field Format, select:
- Separator and
- Attribute Value
- In Other Mapping, set:
- Multiple Value Separator (e.g.
,)
- Multiple Value Separator (e.g.
Example:
- XLSX Header:
material - XLSX Value:
cottton,polyster,synthetic - Separator: ‘
,‘
Note: Multi-select attributes can also be imported using the Single Attribute Field Type.
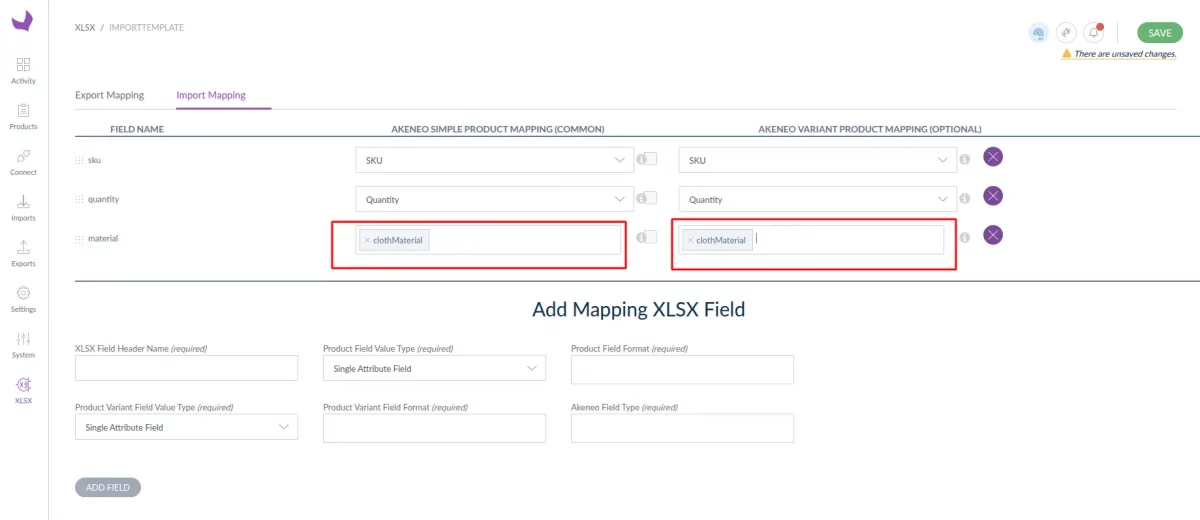
After adding the field, map the relevant Akeneo multi-select attribute for simple and variant products.


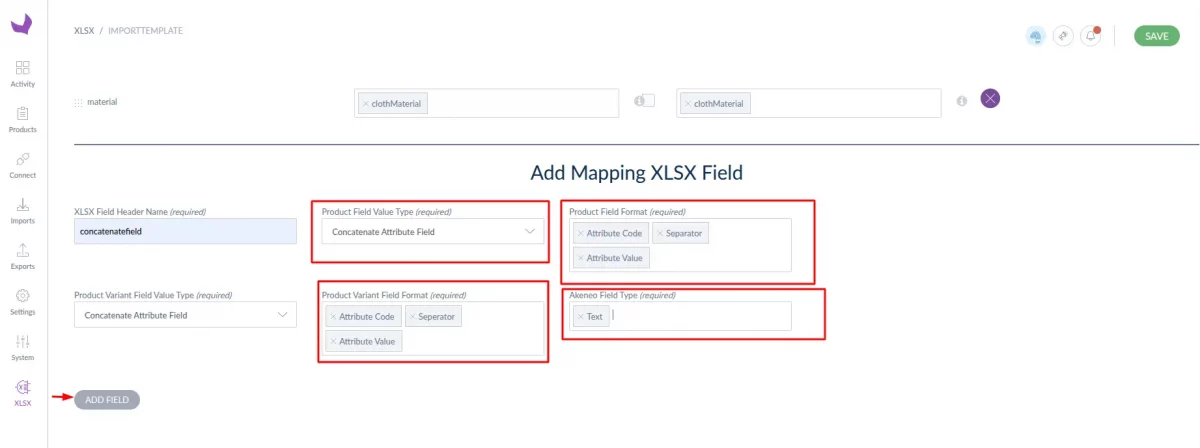
3. Concatenate Attribute Field Type
Use this type when multiple attributes are combined in a single XLSX column as key–value pairs.
XLSX Format Example:
ean:101010;camera_model_name:sonyA6700;max_image_resolution:1200
Configuration steps:
- Select Concatenate Attribute Field as the Product Field Value Type
- In Product Field Format, add:
- Attribute Code
- Separator
- Attribute Value


Other Mapping configuration
- Add value on field Combined Attribute Separator as ‘
;‘. - Add value on field Attribute Value Separator as ‘
:‘.
This tells the system how to split attribute codes and values correctly.
After adding the field:
- Map the respective Akeneo attributes for:
- Simple products
- Variant products (if applicable)
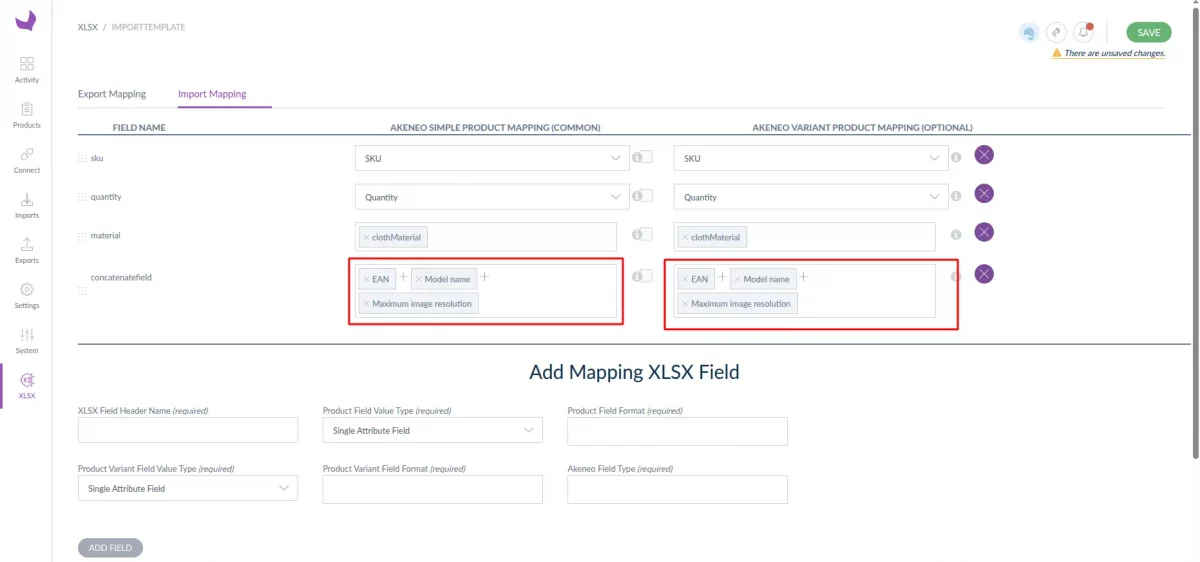
Step 2: Map Akeneo Attributes
Once fields are added:
- Map the corresponding Akeneo attributes under:
- Akeneo Simple Product Mapping (Common)
- Akeneo Variant Product Mapping (Optional)
Only attributes matching the selected Akeneo Field Type will be available for selection.
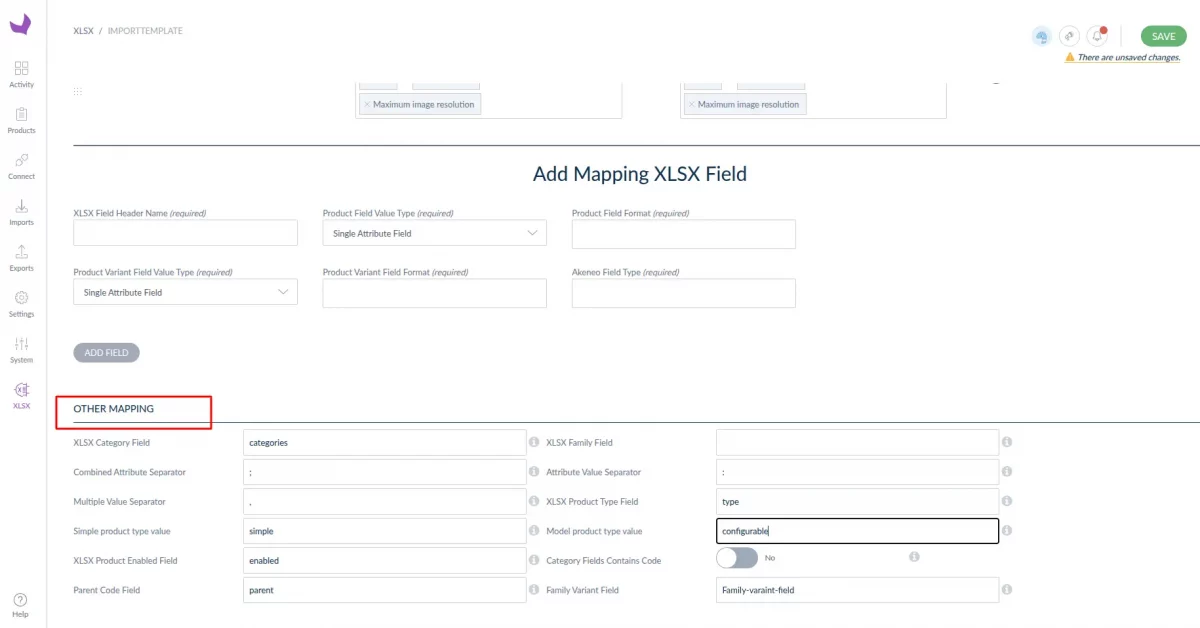
Step 3: Configure Other Mapping
In the Other Mapping section,
- XLSX Category Field: Enter the xlsx column header that contains product category.
- Combined Attribute Separator: Used to separate multiple attributes in a single cell (e.g.
ean:red;modelName:M). - Attribute Value Separator: Defines the separator between attribute code and its value (e.g.
:inean:p011). - Multiple Value Separator: Used to separate multiple values of the same attribute (e.g.
red,blue). - XLSX Family Field: Specify the column header that contains the simple product family code.
- Family Variant Field: Required for product models; enter the column header containing the family variant code.
- XLSX Product Type Field: Column that defines whether the row is a simple product or a product model.
- Simple / Model Product Type Value: Values that identify simple products and product models in the XLSX.
- XLSX Product Enabled Field: Column header used to enable or disable products (
true/false). - Parent Code Field: Required for variants; enter the column header containing the parent product code.
- Category Fields Contains Code: Enable this if category values in XLSX are category codes instead of labels.

Enter XLSX header names (for field like category, family etc.) exactly as defined in the xlsx file.Configure required separators as guided by the hint icons
Ensure all headers (category, family, parent, variant, enabled field, etc.) are correctly filled
For Concatenate field type, if no separator is configured, the Excel sheet must follow the default format: ‘
:‘ for key–value pairs and ‘;‘ to separate attribute codes.
The same behavior applies to Multiple Attribute field type—by default, ‘,‘ is used for multiple values.
Note: Parent header is required for the import of variants, while family variant header is required for the import of product models.


Create Product
For creating the product in Akeneo, you can follow our user guide. Create Product and Product Variant in Akeneo
To create a product in Akeneo, go to navigate to Products then click the Create button. Now, you need to choose the product type – Product or Product Model.
Product – Select this type for creating simple and virtual products.
Product Model – Select this type for creating a configurable product with variation


Now to enter the required SKU, choose a family, then click the Save button.
SKU– Fill in the product’s unique code.
Product Family – A family is a set of attributes that will be the same for all products belonging to a family.
The product family represents product type, imposes product information structure, and defines the list of attributes for a product that it belongs to.


Add Product Details
Now you need to provide information about the product. First, select the Channel and Locale then enter the price, name, and description.


Export Profile
Now to export your product data you need to create a export job profile then execute it.
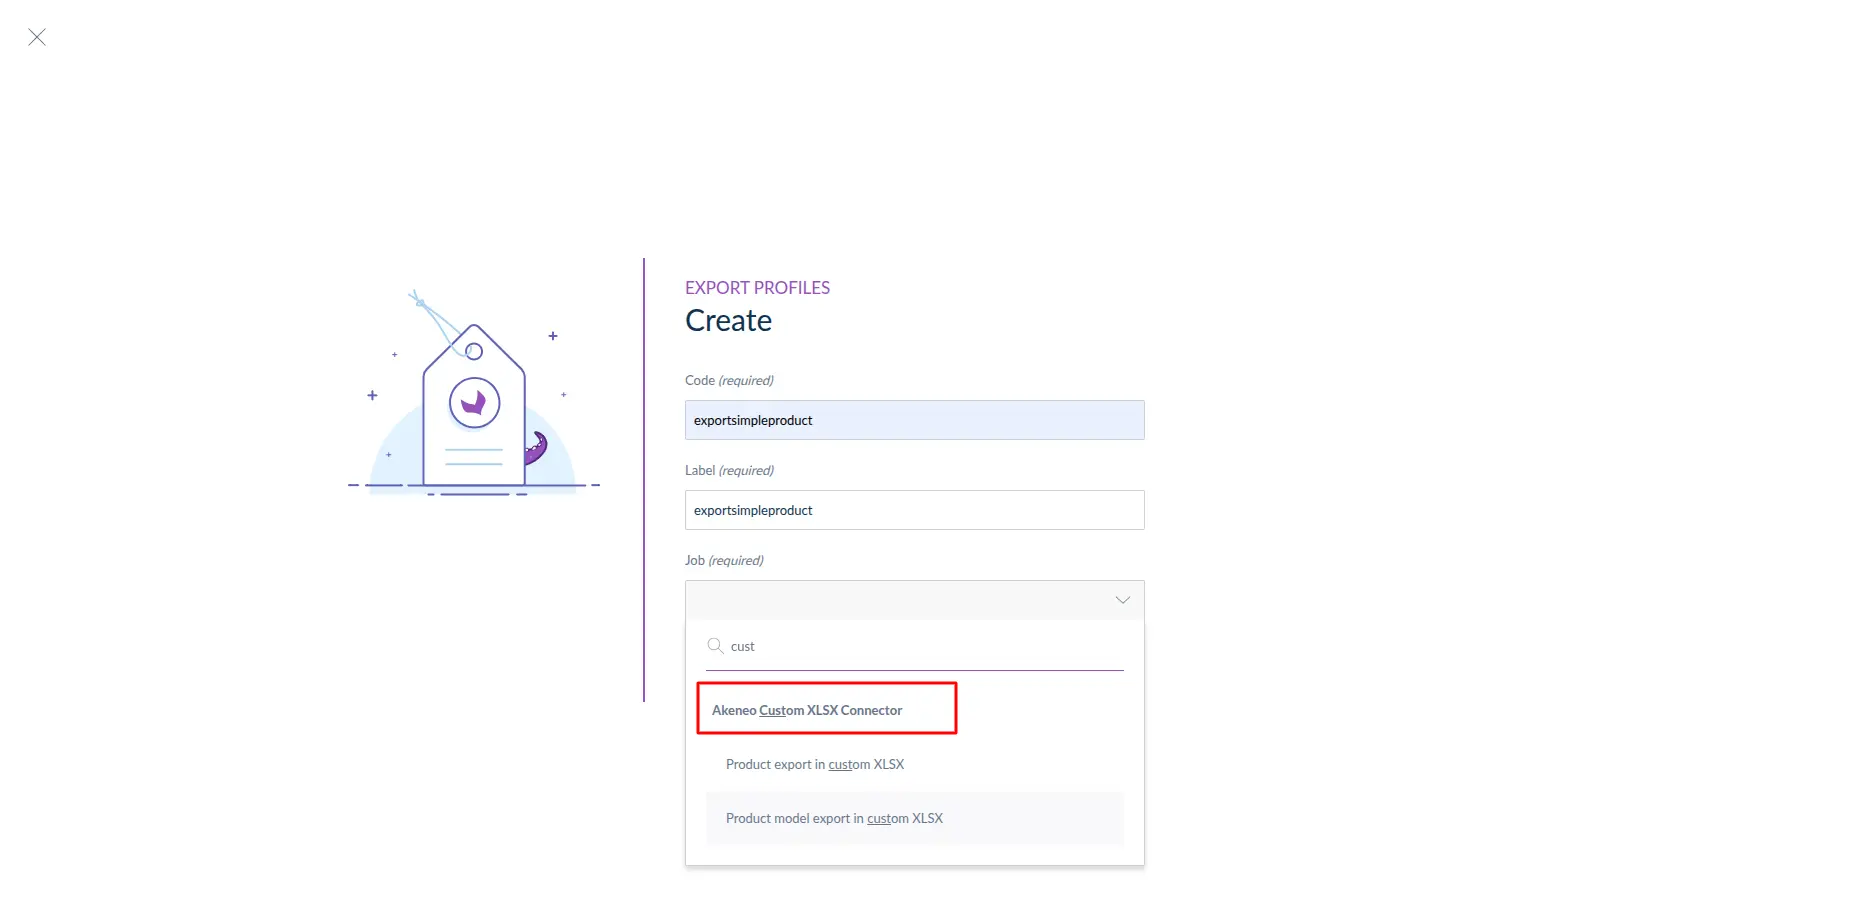
First, go to Exports>Create Export Profile after that enter a unique code, the label then select a job profile.


After that, you have to select the Job profile. for simple product export, select job type as Product export in custom XLSX.
And for Product model export, select job type as (Product model export in custom xlsx).
and finally click on the Save button.

After clicking on the save button, you can see the export profile.
Properties:
In this, you have to select the storage type and enter the file path.


Global Settings:
In this, you have to fill in the details given below in the image like decimal separator, data formate, etc.

Setup Store Template:
In this, you can select the template, and after that click the Save button and follow the next step to execute this profile.


Now go to the Content section then select the following options:
Channel – Each export job can only be linked to one channel, please select the relevant channel of products to export.
Locales – Select one or more Locales depending on your requirements.
Currency – You have to select here one currency.
Attributes – You can select which product attributes you want to export all or a few of them. Click the Edit button to select the attributes.


Edit Attributes
To make your own attribute selection, click on the left side to select a specific attribute group (or All groups to display all attributes).
The selected attributes will be displayed as columns in your export file.


Filter The Products
Now you need to decide which products to export an Xlsx file.


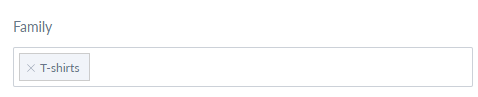
Family
After that one or more product families to export in the Xlsx file.
If you want to export products belonging to specific families, click on the drop-down list then click on the families to add in the field like clothing, shoes, t-shirts.
Status
You can also filter on the status of your products, three options available:

- All – to export all products whatever their status is
- Enabled (default option) – only to export enabled products
- Disabled – to only export enabled products
Completeness

This enables you to filter on the completeness of selected locales. Four options on completeness are proposed:
- No condition on completeness – all products will be exported whatever their completeness is.
- Complete on at least one selected locale (default option) – products must be complete on at least one locale
- Not complete on all selected locales – In these products must not be complete on all locales (if you have selected more than one locale).
- Complete on all selected locales – products must be complete on all locales (if you have selected more than one locale).
Time Condition
You can now export your product on a specific time condition.

- Updated products over the last n days (e.g. 6) – To filter the products that were updated during the last six days, enter 6 value.
- No date condition (default option) – Products are not filtered using time conditions.
- Updated products since this date – To filter the products that were updated during a specific date, select a date.
- Updated products since last export – It will export the product updated since the last export.
Category
You can configure the categories of the channel tree you want to export. For example, you want to export the clothing products to update.

By default, all categories are exported. To select a category, click n the Edit button the categories of the channel tree are displayed.


Identifier

You can make a selection of identifiers to export by adding them to the SKU field. You can copy and paste a list of identifiers, separated them by using comma, space, or line breaks.
Product Export
After creating and filtering data in the Export profile, you can see the Export Now button in Akeneo.


Now after clicking on the Export Now button, Wait for the execution process to complete and check the errors.
After the completion of the export job, click on Download Generated File .The products will appear in the Xlsx file.


Import Xlsx Product
Now to import your product data you need to create an import job profile and then execute it.
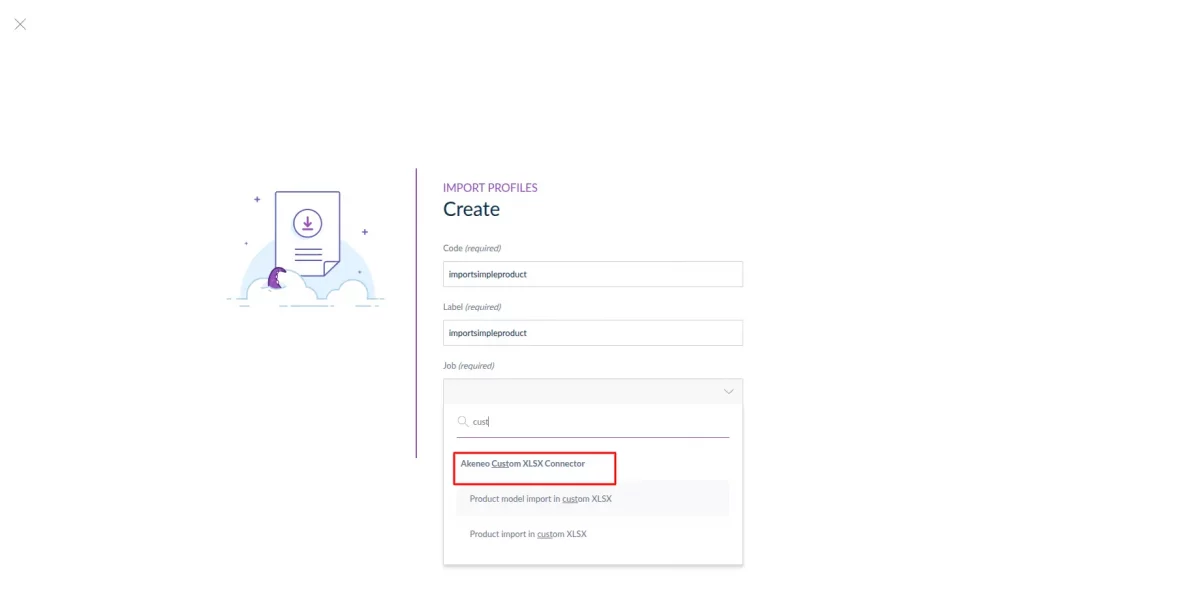
First, go to Imports>Create Import profile.


After that, enter a unique code, the label, then select the Job profile as required .
Select job type as Product import in custom XLSX (import Simple Product) and Product model import in custom XLSX(import product model).
To create an import profile, you have to click on the Save button.


After clicking on the save button, you can see the import profile.
Properties:
In this, you have to select the storage type and enter the file path.

Global Settings:
In this, you have to fill in the details given below in the image like decimal separator, and data formate.


Setup Store Template:
In this, you can select the template, and after that click the Save button and follow the next step to execute this profile.

Product Import
After creating and adding data to the Export profile, you can see the Import Now button in Akeneo.

As well as you can add upload xlsx files for import.


Now, after clicking on the Import Now button, wait for the execution process to complete and check the errors if they occur. After the completion of the import job, products will appear on the Products Page in Akeneo.
Support
That was all about the Custom Xlsx Connector for Akeneo.
Moreover, if you have any doubts or queries regarding the connector get back to us at support@webkul.com or create a ticket at our HelpDesk system.
You can also check the Akeneo Development Services and Quality Akeneo Extensions.