Guide for WordPress WooCommerce Wallet System
WordPress WooCommerce Wallet System is an awesome plugin that allows customers to make the online payment from their Wallet.
In WooCommerce Wallet plugin, the admin can manually debit or credit the amount into the customer’s wallet.
The store owner can offer your customers a new convenient way of paying for goods and services.
The wallet is an online prepaid account where one can stock money, to be used when required.
There is no chance of a decline in payment since the wallet is a prepaid account.
As it is a pre-loaded facility, customers can buy a range of products without having to enter their debit/credit card details for every online transaction.
Note:
- We provide a production version of the plugin. If you want a development version then you can get it at an additional cost. Please contact support@webkul.com for it.
Comprehend the WooCommerce Wallet Plugin workflow below –
Features
WordPress WooCommerce Wallet System Plugin behaves as an online Payment Gateway.
It behaves as an online payment gateway so a buyer can purchase products from the store by using its available amount.
The customer can easily add credit to their wallet.
The process of adding credit to their wallet system is super easy for the customers of an online store.
They simply need to enter the amount that they want to credit to their wallet system and checkout via available payment methods.
On the checkout page, a customer can choose to use wallet cash or any other payment method.
While placing an order,a buyer can choose whether he wants to use wallet cash for checkout or not.
The wallet amount can credit after the approval of an admin.
If a buyer uses a payment method like Direct Bank Transfer, or Check Payments, then the amount will credit after the approval of an admin.
Mail notification for wallet transactions.
A Customer will be notified via e-mail of all the wallet transactions.
Wallet Transaction List.
The admin can view the transactions made by the customers and also the transaction details like transaction id, reference, transaction type, amount, date etc.
Virtual Order Payment
The admin can also set the wallet configuration to accept payments for virtual order using the wallet.
New Features
- Custom Wallet Amount Management.
The admin can manually Debit or Credit the amount into the customer’s wallet.
- Cashback Rules
The admin can set the minimum cart total, maximum cart total and the cashback amount which the customer will receive if the cart total lies in the range selected by admin.
- Restrictions
Minimum Wallet Credit Amount can set by admin which means a customer has to credit at least this much amount in his/her wallet.
The admin can also set maximum wallet debit amount which means that the customer can use at most this much amount in a single transaction.
- Multiple Cashback Conditions
If the admin has selected the multiple cashback conditions then the customer will get cashback applicable to both cart and product.
If the admin does not choose multiple cashback conditions then the customer can get cashback applicable to the cart or product.
The preference of the cart or product can also be selected by admin.
- Wallet Transfer
A customer can transfer his cashback amount to any registered customer.
- Wallet Transaction List.
The admin can view the transactions made by the customers and also the transaction details like transaction id, reference, transaction type, amount, date, etc.
- Wallet Withdrawal
Users can quickly withdraw money from their wallet for hassle-free payments anytime.
The wallet withdrawal feature provides a convenient way to make payments directly from the available wallet balance.
This plugin is now compatible with WooCommerce’s latest High-Performance Order Storage (HPOS) and Cart and Checkout block.
If you require expert assistance or want to develop custom unique functionality, Hire WooCommerce Developers for your project
Installation
You will get a zip file after purchase. Upload it in the “Add New” menu option in the WordPress Admin Panel.
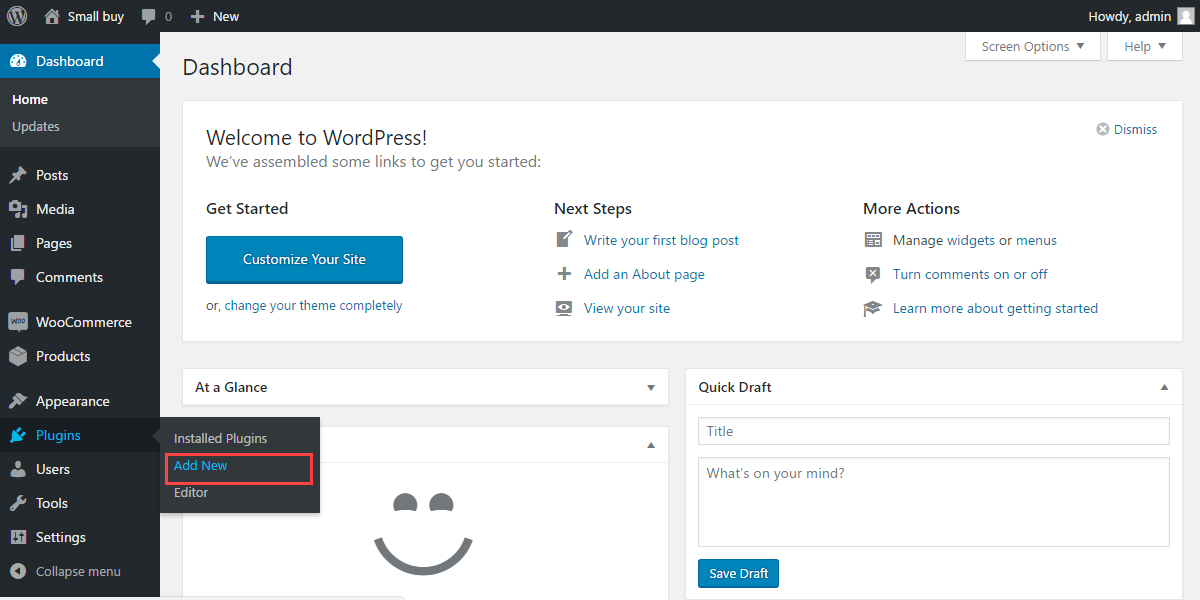
For this login to WordPress Admin Panel and Under the Dashboard hover your mouse over the “Plugins” menu option
which brings out a Sub-Menu and then selects the “Add New” option.
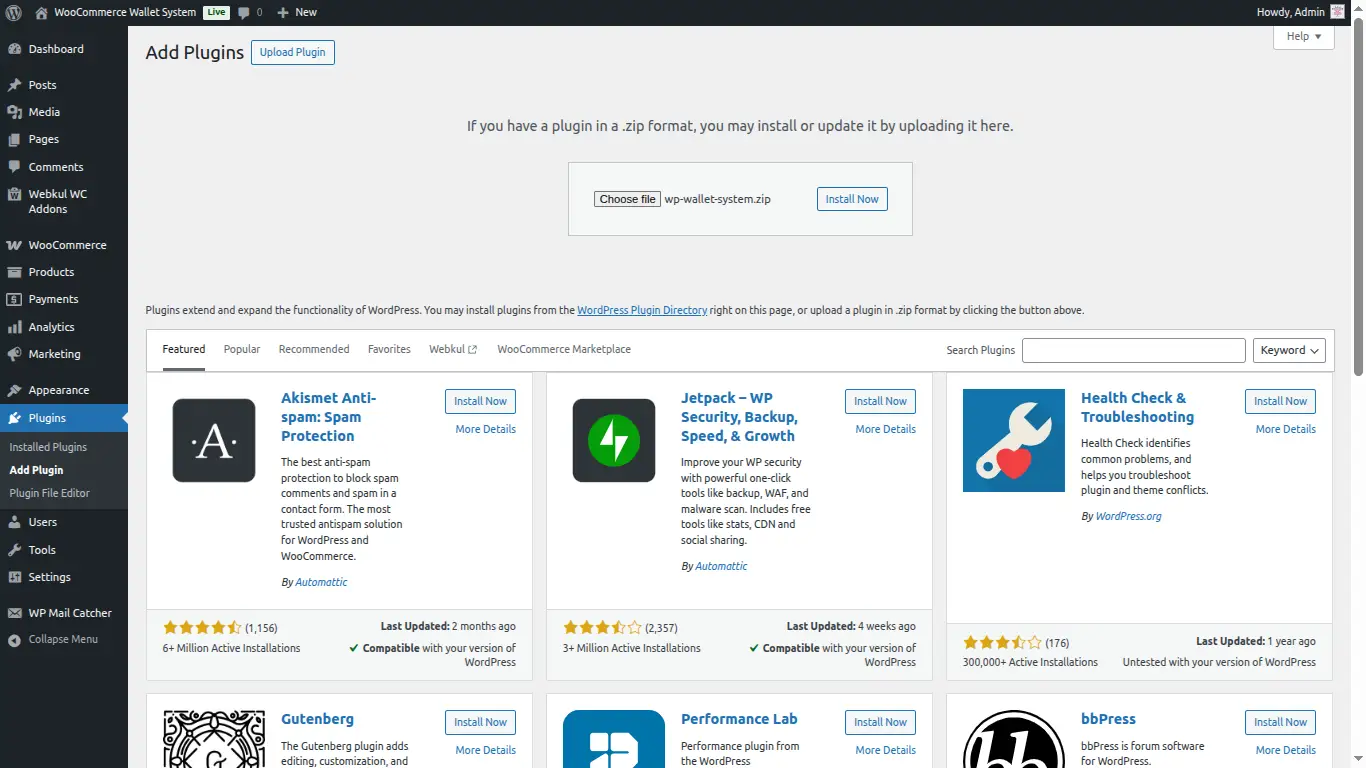
After this, you will see an option on the top of your page that is “Upload Plugin”, click the option to upload the zip file.

By clicking on the “Upload Plugin” option, below that you will see a button “Choose File” click on the button to browse for the zip file as per the snapshot below.

After browsing the file, click the “Install Now” button to install the plugin as per the snapshot.
Kindly visit the WooCommerce plugins page to explore a wide variety of solutions to add more features to your online store.

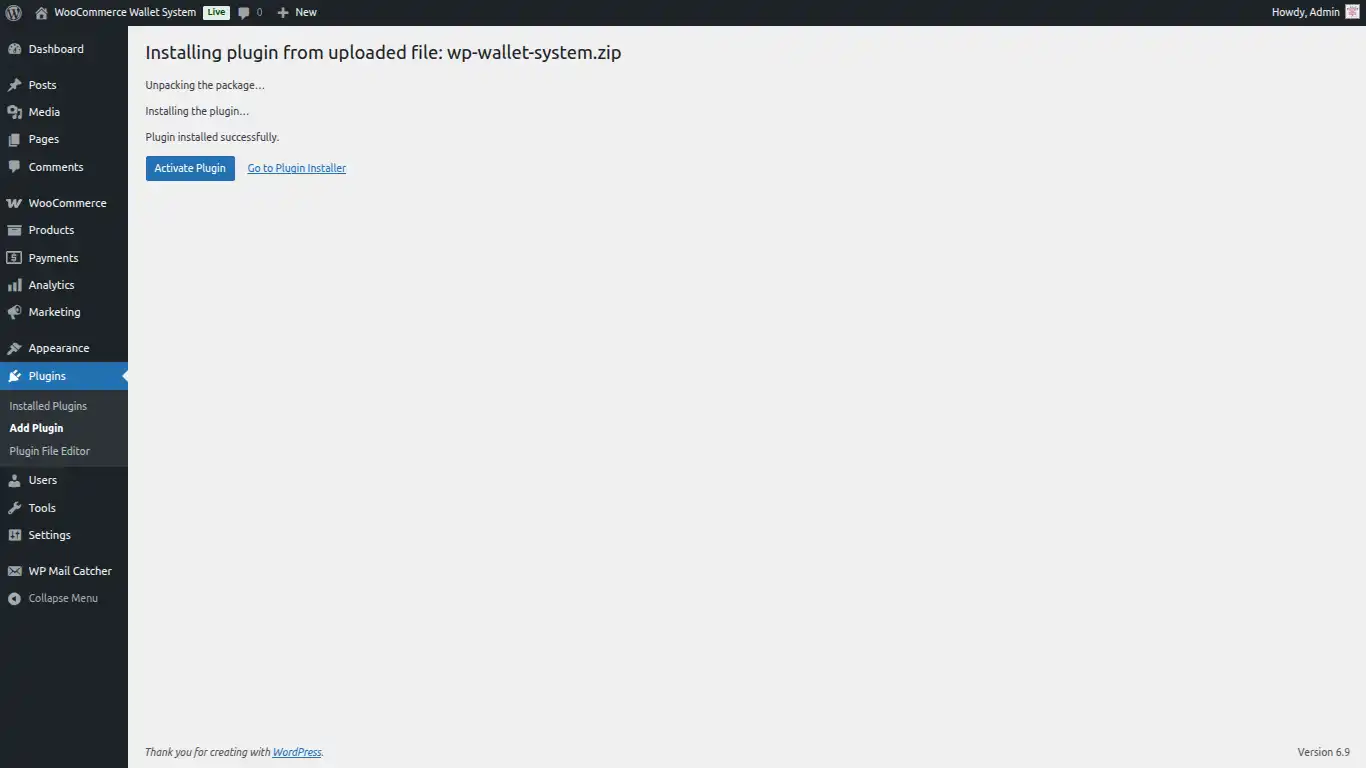
Here when the plugin is installed correctly, you can see the success message and an option to activate the plugin.
Check how to Activate WooCommerce Plugin through the purchase code and get updates on Webkul Modules directly on the Plugins page
Module Translation
To know how to translate the module, you can click here.
How to Get the Test Twilio Credentials
The admin can get the Account SID, and Auth Token by following the below-mentioned steps:
Step 1:
First, Go to the web address https://www.twilio.com/ and click on the signup button as shown below –


Step 2:
After clicking on the sign-up option, the below page will be open.
Thereafter, the admin will enter all details to get registered.


Step 3:
after clicking the start button above, you will have to verify your email address and then the phone number as shown below.


Step 4:
Further, post completing the above procedure click on the verify button
After completing the required details the admin will get the Account SID, and Auth Token as shown below.


Step 5:
At last, to get SMS OTP user must need to verify his number as below:


Module Configuration
After the successful installation of the WordPress WooCommerce Wallet System Plugin, the admin can configure this under “WooCommerce > Settings > Payments > Wallet”.
The admin can set some restrictions on wallet usage by customers.
- Enable the wallet payment gateway.
- Admin will enter the payment method title and description that the customer will see during checkout.
- Add instructions that will add to the thank you page.
- If the order is virtual then the admin can enable the accept wallet.
- Set the maximum amount that the customer can keep in the wallet.


- Admin can set minimum and maximum wallet credit amount which means that the customer can credit at least and maximum amount in his/her wallet.
- Set the maximum amount transfer from the wallet.
- Select the maximum wallet debit type i.e. fixed and percentage for wallet checkout.
- The admin can also set the maximum wallet debit amount which means that the customer can use at most this much amount in a single transaction.
- Enable apply discount option so that discount can apply on using the wallet payment option.
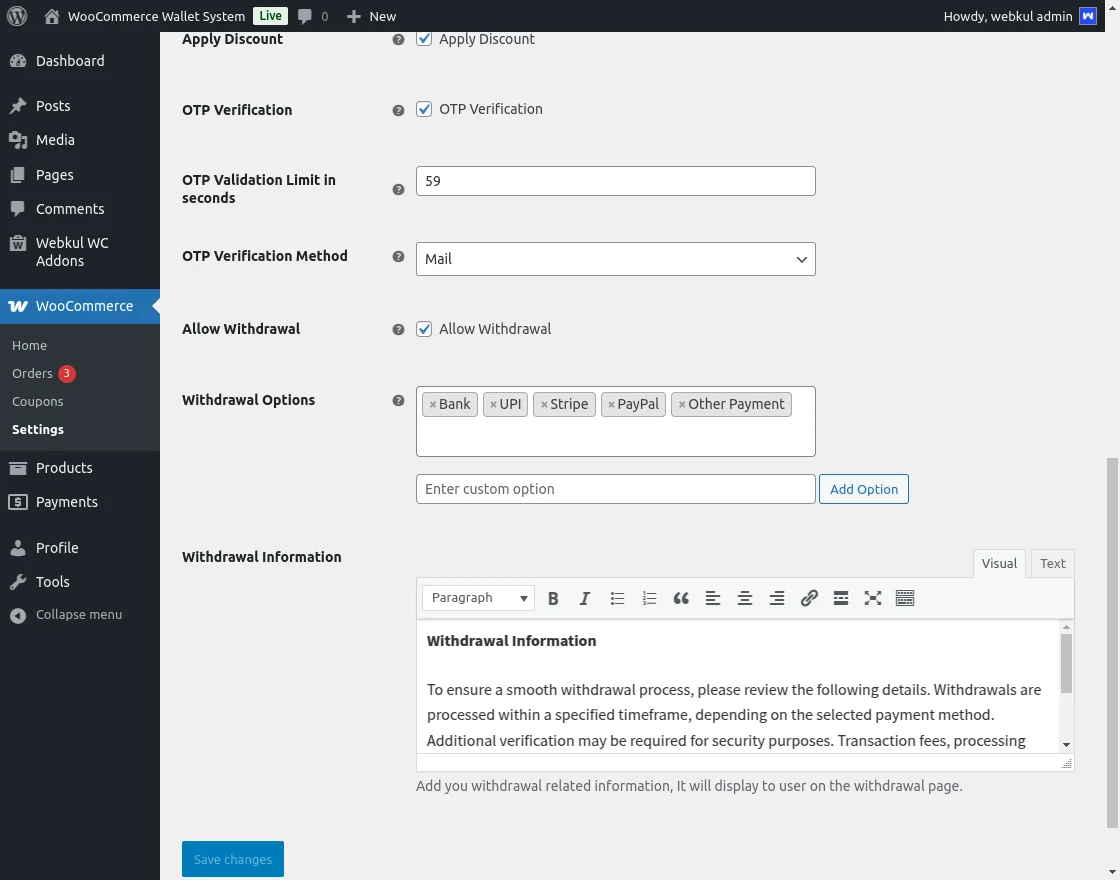
- Enable the withdrawal option first, then choose from various withdrawal methods and provide the necessary withdrawal details.
OTP Verification
- The admin can also enable or disable the OTP verification for the customers.
- The admin can also select the OTP access method via mail or SMS, the customer will receive OTP.
- OTP validation limit can also be set by admin which means that the time limit allowed to the customer for applying the OTP.
- If SMS is enabled, then enter the account SID (Service Identifier) as a unique identifier for your Twilio account.
- If SMS is enabled, enter the Twilio number provided by Twilio that you can use to send and receive SMS and phone calls through the Twilio platform
- Enter the auth Token (Authentication Token) is a secret key associated with your Twilio account for the SMS OTP access method.
This OTP verification will be valid for wallet-to-wallet transactions.
Note: If the Admin selects SMS as the Access Method, he must install the Twilio package via the composer.
The way to install Twilio via composer is:- composer requires Twilio/SDK.
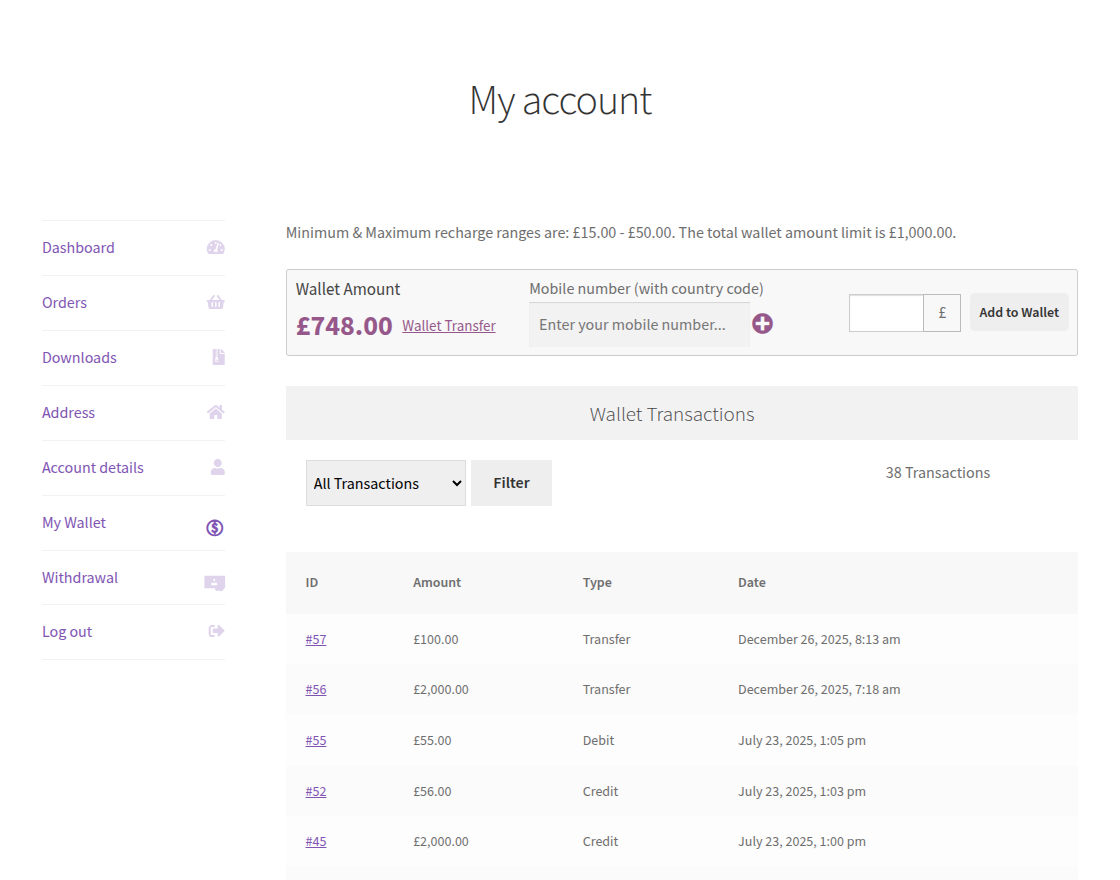
Once the admin selects the OTP verification method as SMS on the admin end, then, the customers will have to fill their Mobile numbers as per the image below,
Withdrawal Options
- Admin Can Enable Withdrawal options using allow withdrawal
- After than admin can set various withdrawal options like bank, UPI, Paypal and other payments etc.
- Admin can also customize and set withdrawal Information which is displayed at withdrawal page.
Now, Click on Save Changes to save the restrictions on your wallet.Now, it acts as a payment method. Enable this to be used at checkout time.
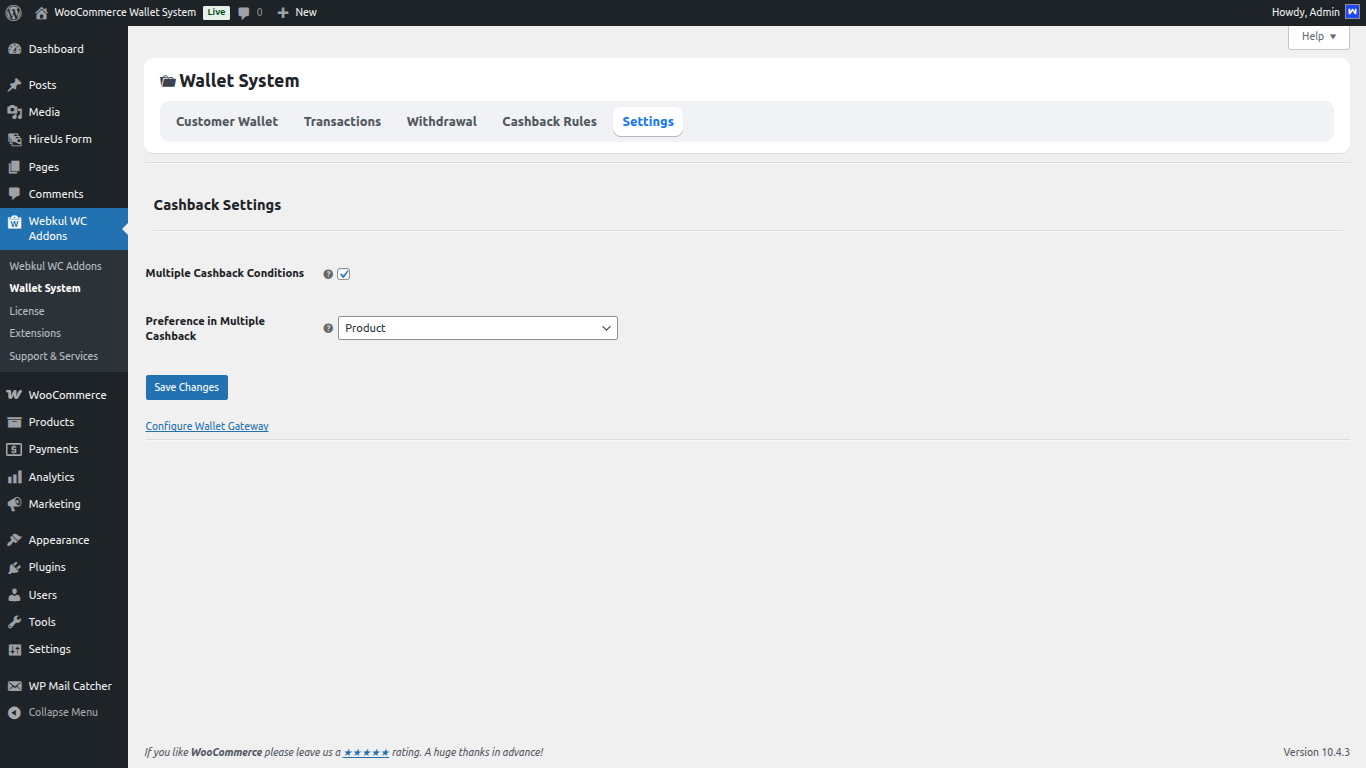
Cashback Settings
The admin can apply cashback on the cart as well as the product.
- If the admin disables multiple cashback conditions, in this case, the customer will be able to avail of cashback applied to the product or cart.
- If admin enables multiple cashback conditions then the Customer can avail of the cashback applied to both products as well as the cart.
- The admin can set a preference for the cashback to be availed by the customer. If the admin disables Multiple Cashback Conditions and the preference as Cart, then the customer will be able to avail of the cashback which is applicable to the cart and if the preference has been set as a product, then the customer can avail the cashback which has been applied to a product.
- Click on the save changes button to save the changes as shown in the above screenshots.
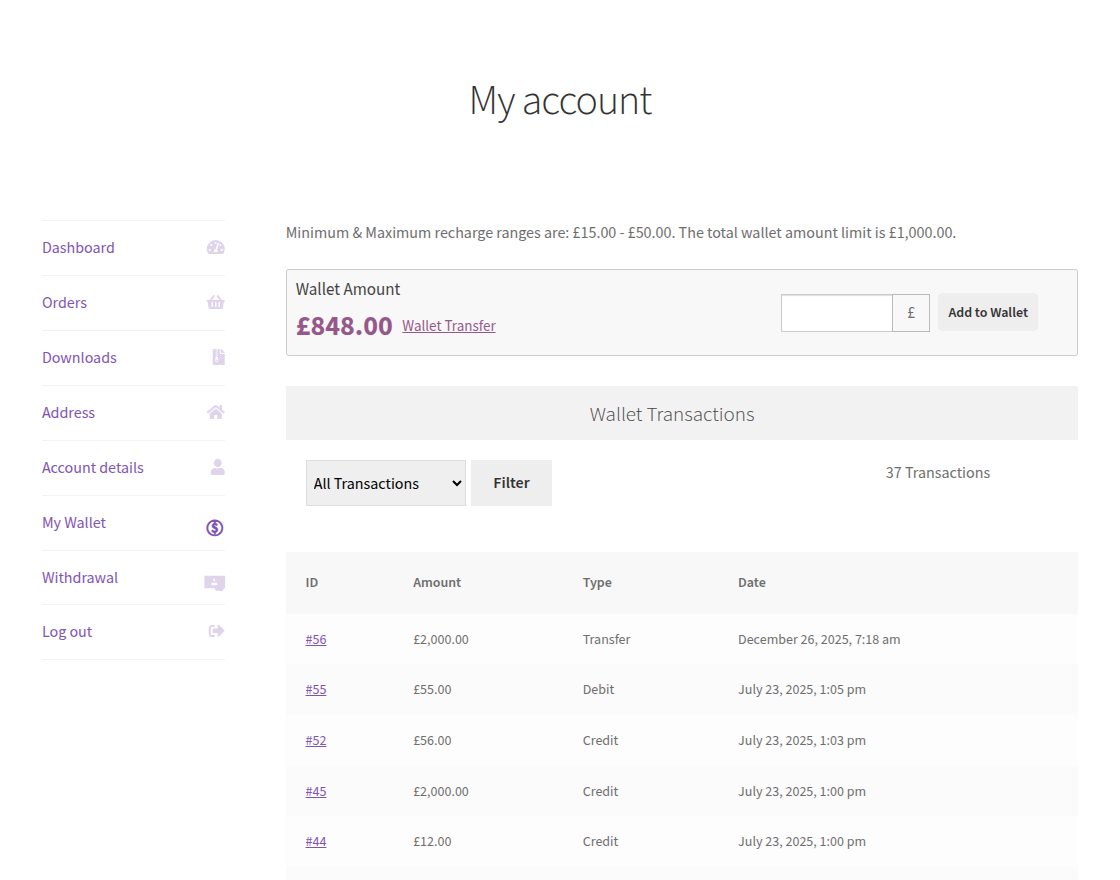
Adding Wallet amount
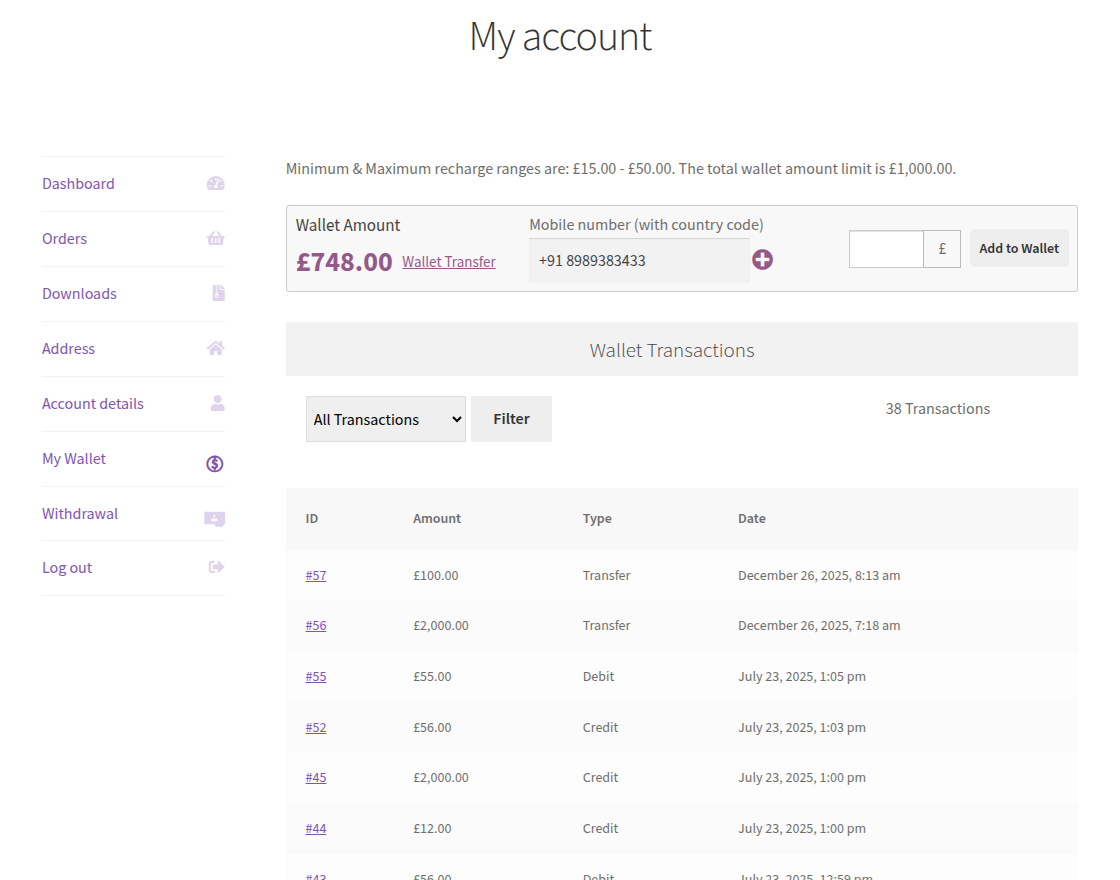
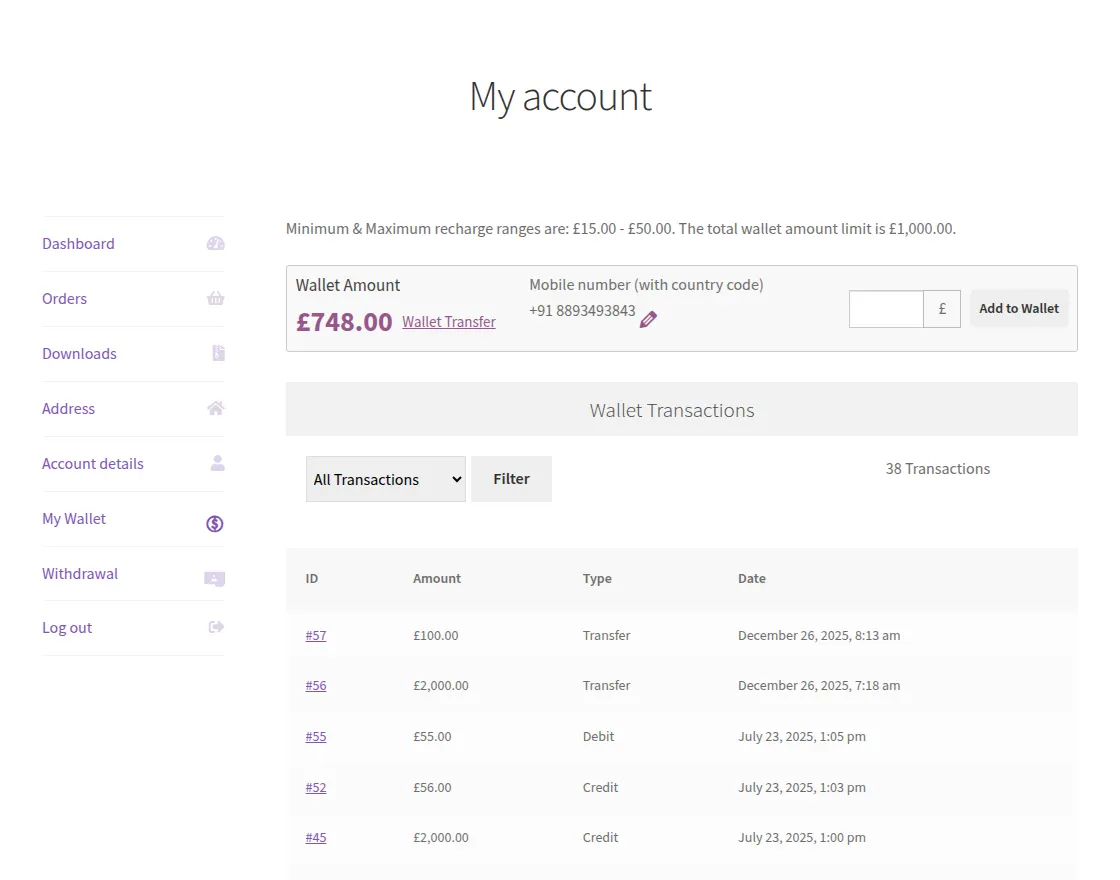
After login, the “My Wallet” tab is available on the customer’s My Account page. From here a customer can easily manage the wallet.
By clicking on “My Wallet”, the customer can see their total Wallet Balance and Wallet transaction details.
The customer can also add a credit amount into their Wallet System by entering the amount into the provided input box.
Please refer to the below image for a better understanding.
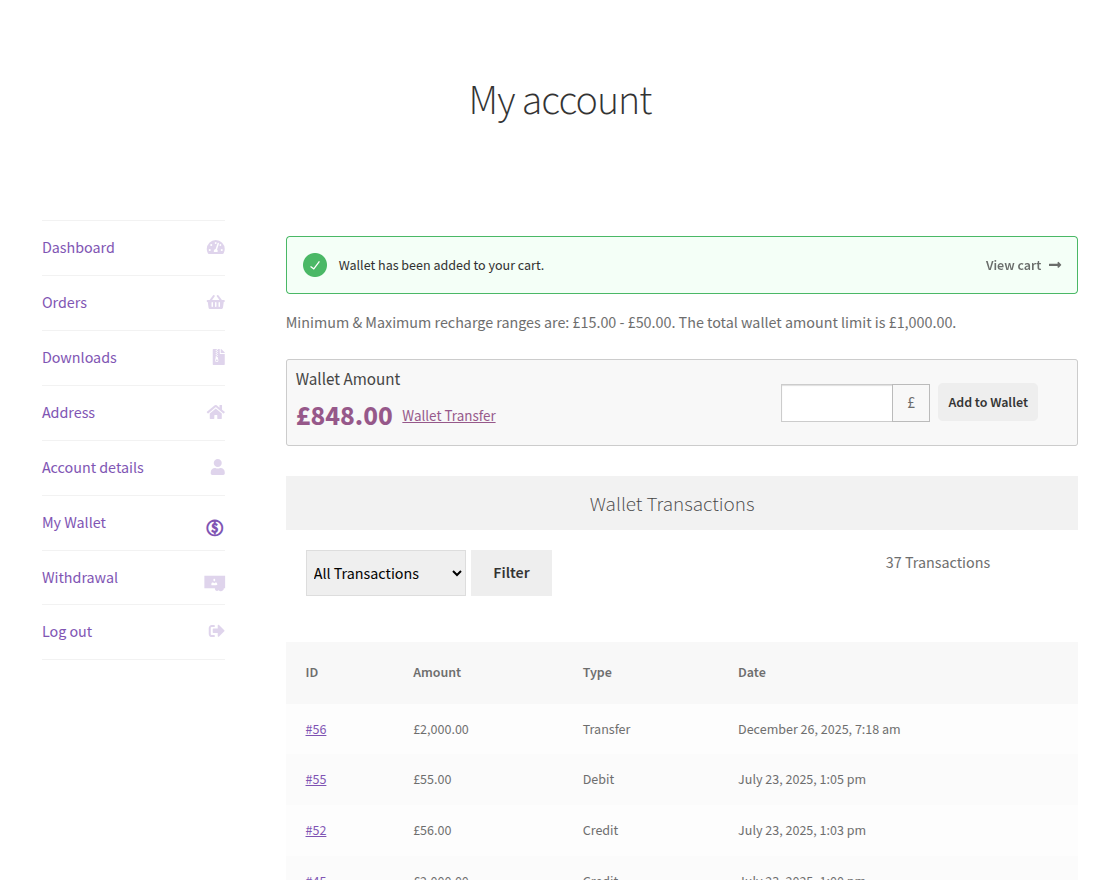
Now the customer enters the desired amount which he wants to credit in the wallet system and clicks on “Add to Wallet”
Then, it will be directed to the cart page where they can see Wallet Amount.

The customer will further click on Proceed to Checkout button.
The customer can see a summary for recharging their Wallet and pay the amount.


Customers will be notified on their registered email.


After making the payment, the customer can see the credited amount in their wallet as per the below image.
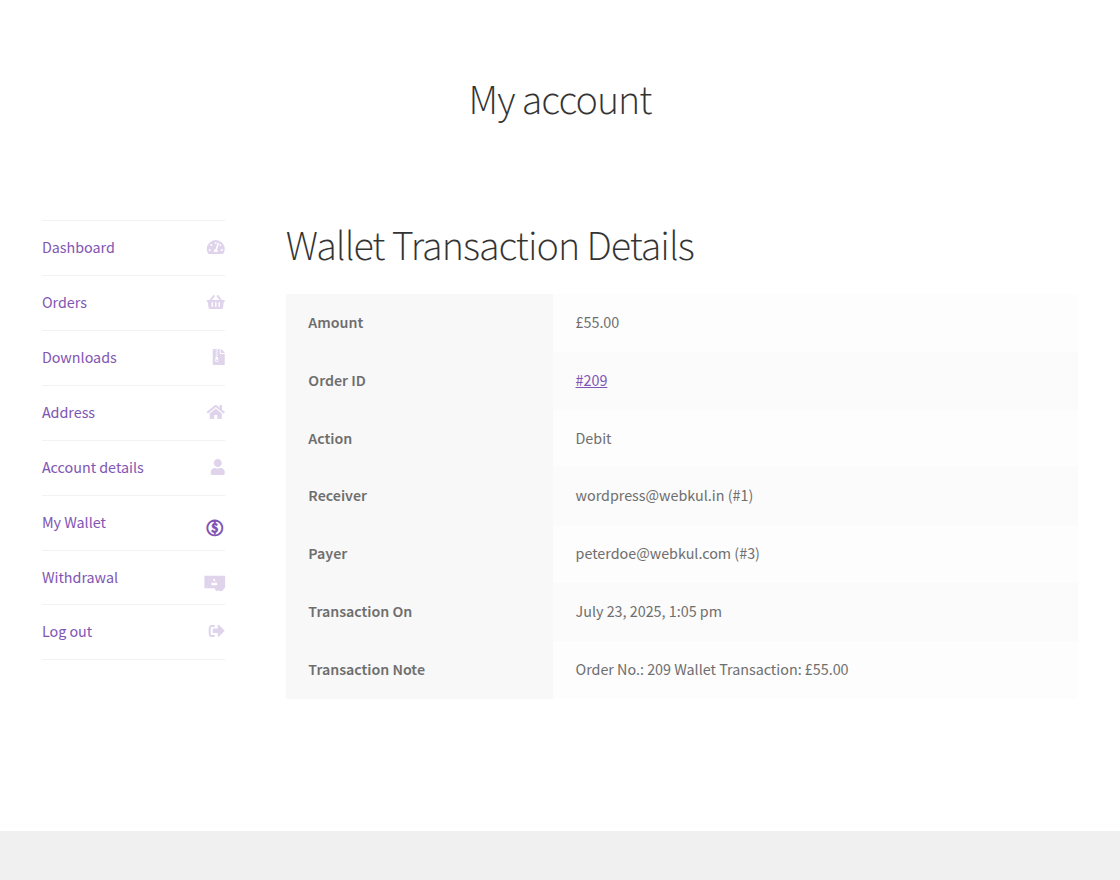
The transactions are visible to the customer under “Wallet Transactions”.
The customer can view the wallet transaction details under “Wallet Transaction” by clicking on the “ID” of the transaction made by the customer.
Using Wallet System
A customer can use the wallet amount at checkout time. Have a look at the use of wallet amount at checkout time in different situations.
1. No wallet amount available :
If there is no wallet cash available then “Pay via Wallet” or “Wallet” are not available at checkout time.
The buyer needs to pay for the order via other payment methods.


2. Wallet amount is less and is equal to or greater than the total amount :
In this situation, a “Pay via Wallet” option is available at the checkout time.
Here the buyer can choose “Pay via Wallet” to pay via wallet and the rest of the amount via other payment methods or he can pay the total amount via other payment methods.


The amount will be deducted as per the below screenshot if a customer chooses “Pay via Wallet”.


The customer can see the order details after placing an order successfully.
Once the order gets processed, the amount will be deducted from the wallet.
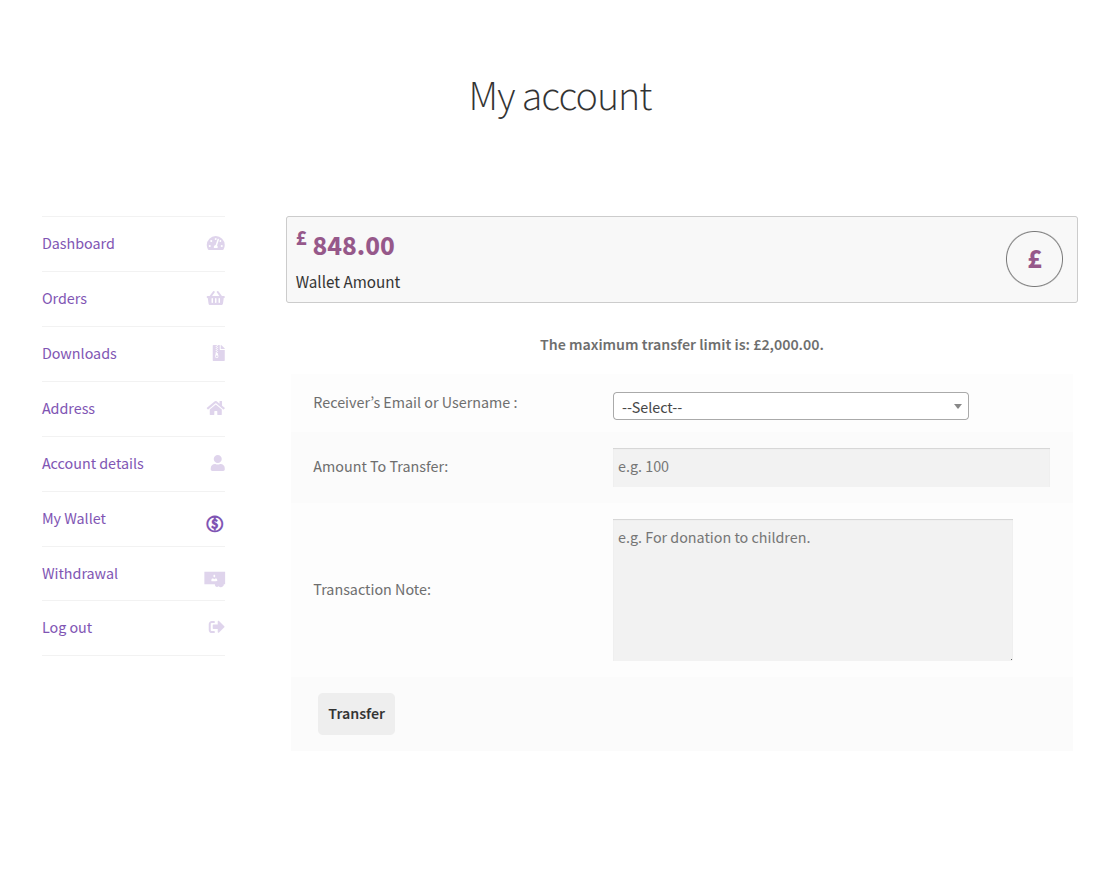
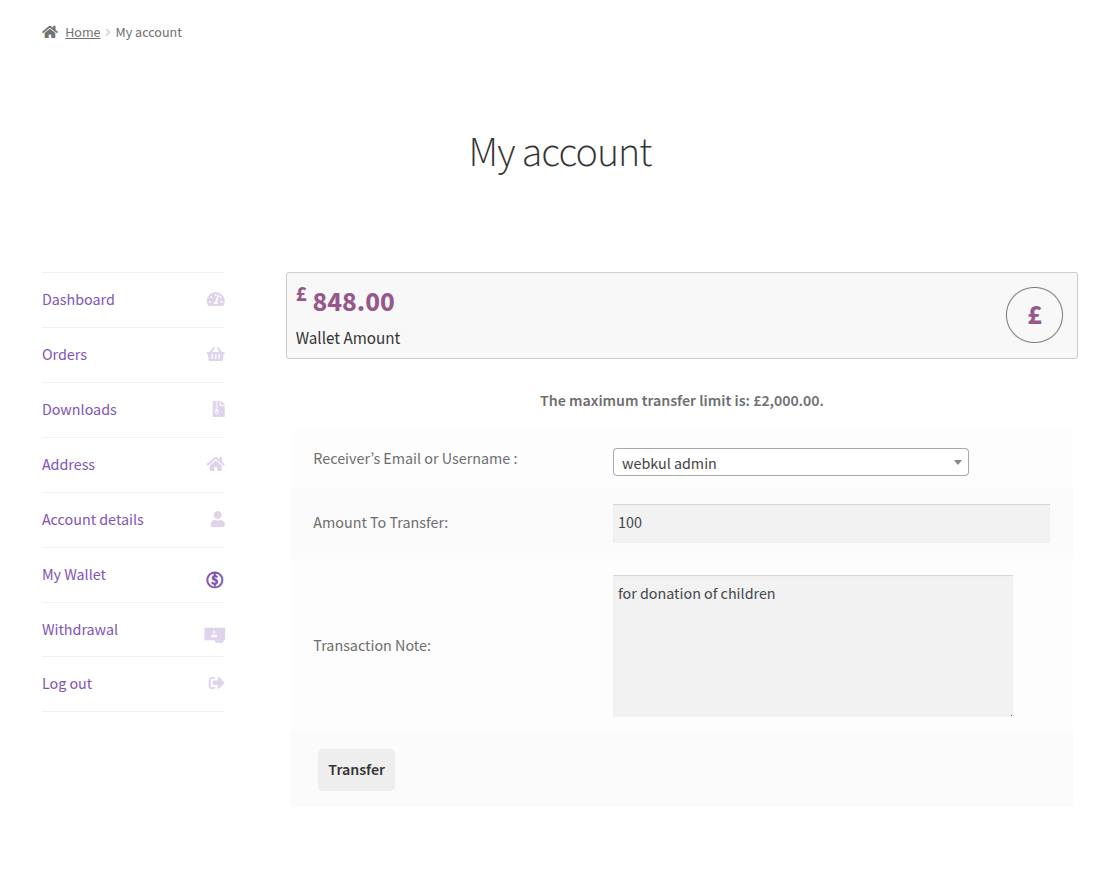
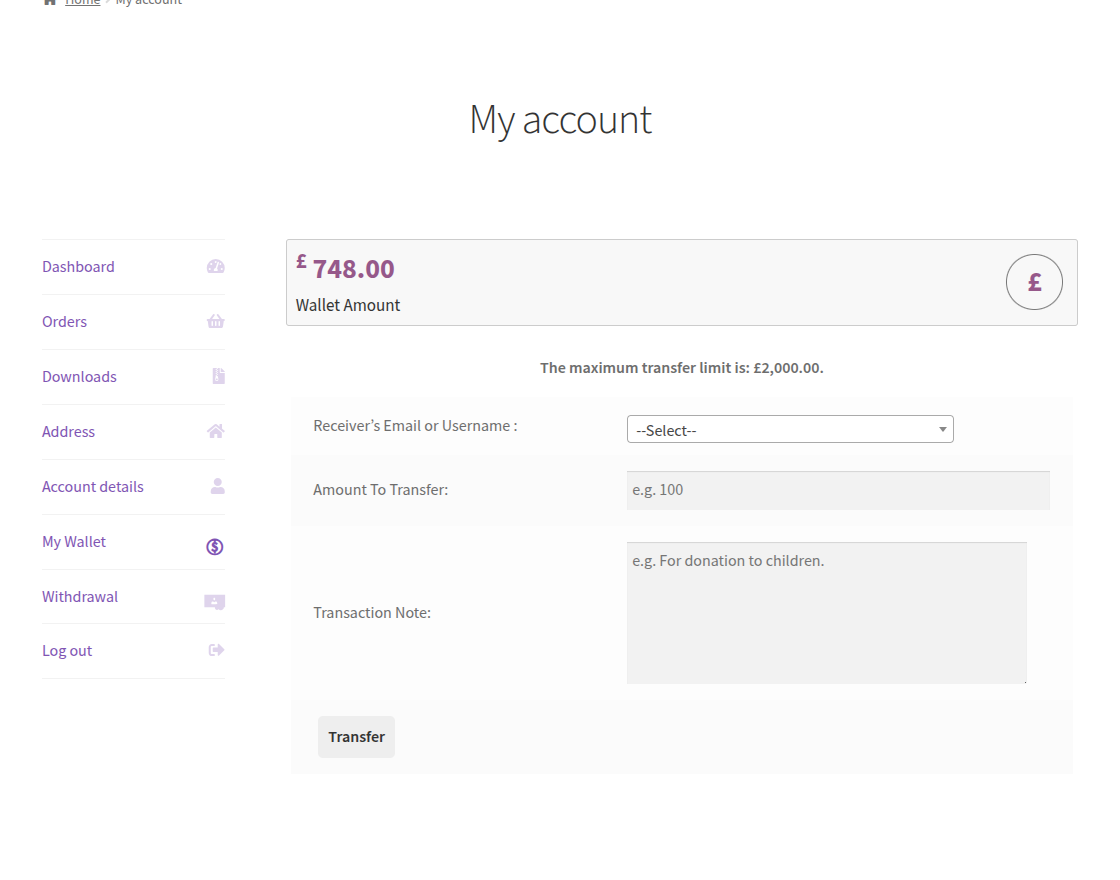
Wallet Transfer to a Customer using mail
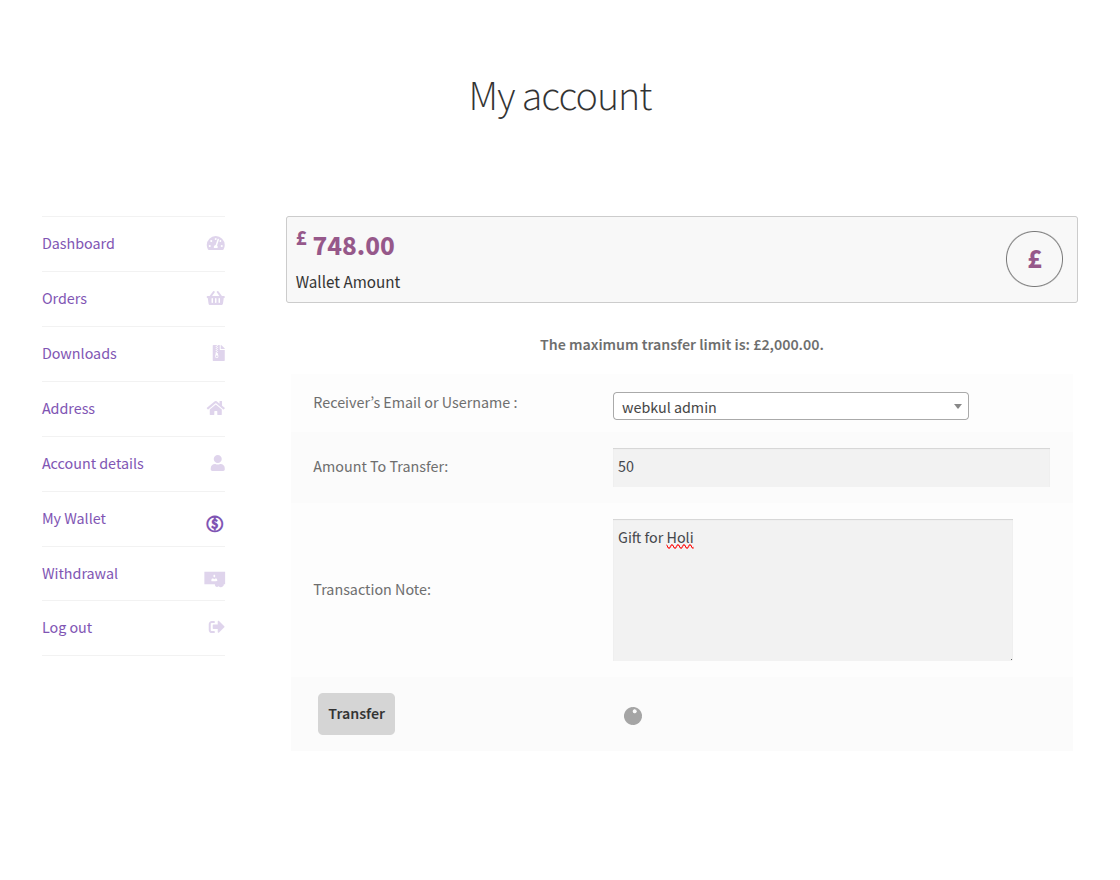
The customer can transfer his wallet amount to any other registered customer by clicking on the Wallet Transfer option in the My Wallet Tab.
After clicking on the Wallet Transfer option, the customer has to enter the registered customer email and the amount he wants to transfer, the transaction note, and then click on Transfer.
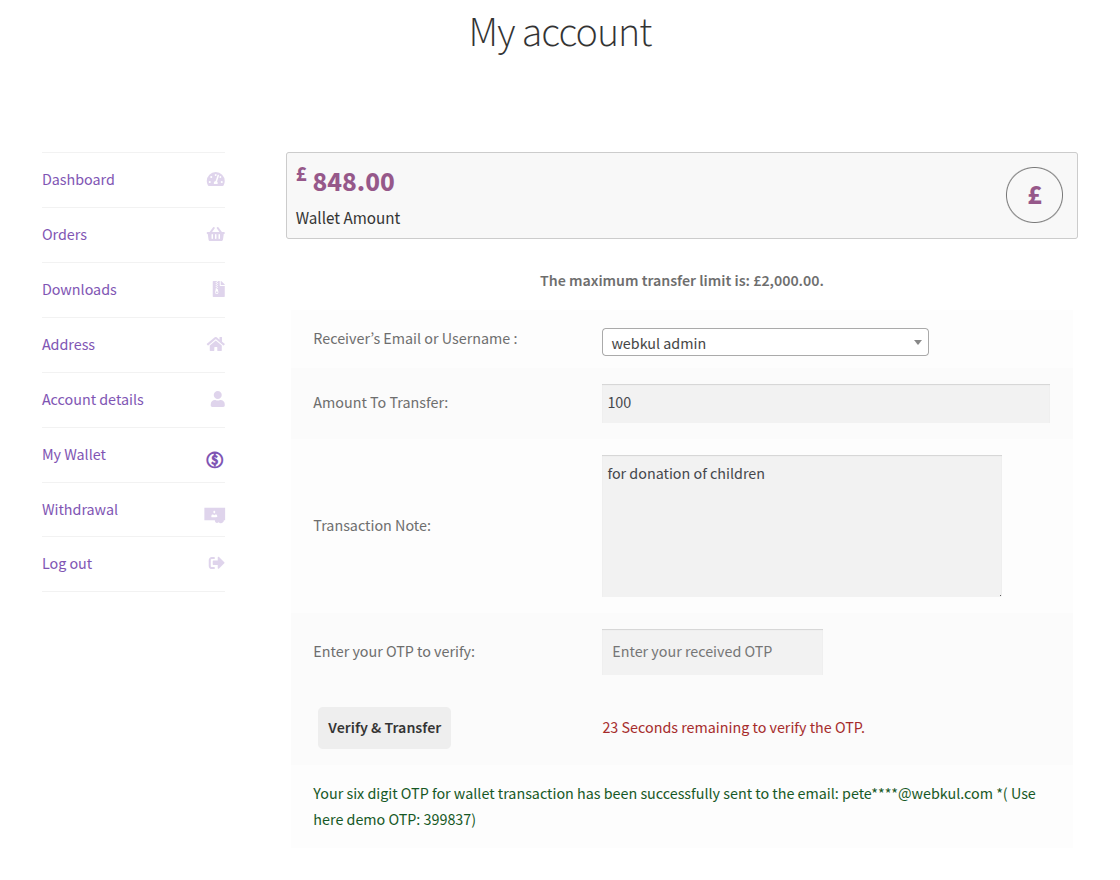
Once the customer clicks on the Transfer option he will receive an OTP, and the OTP will be expired within the time limit set by the admin.
You can resend the OTP after the expiration of the time limit as shown in the below image.
Enter the OTP. Clicking on the Verify and Transfer option, the Amount Transferred Successfully message will be displayed.


Wallet Transfer to a Customer using SMS
The customer can transfer his wallet amount to any other registered customer by clicking on the Wallet Transfer option under the My Wallet side panel option.
After clicking on the Wallet Transfer option, a customer has to enter the registered customer email and the amount he wants to transfer, the transaction note, and then click on Transfer.
Once the customer clicks on the Transfer option he will receive an OTP, and the OTP will be expired within the time limit set by the admin.
You can resend the OTP after the expiration of the time limit as shown in the below image.
Enter the OTP. Clicking on the Verify and Transfer option.
Wallet Withdraw
The Wallet system offers a withdrawal feature, enabling users to withdraw money from their wallet for direct payments.
Additionally, the refund feature allows refunds to be processed via the wallet, regardless of the original payment method.
Follow the steps below to withdraw money to your wallet and make payments using your wallet balance.
Log in to your account on the website. Navigate to My Wallet .
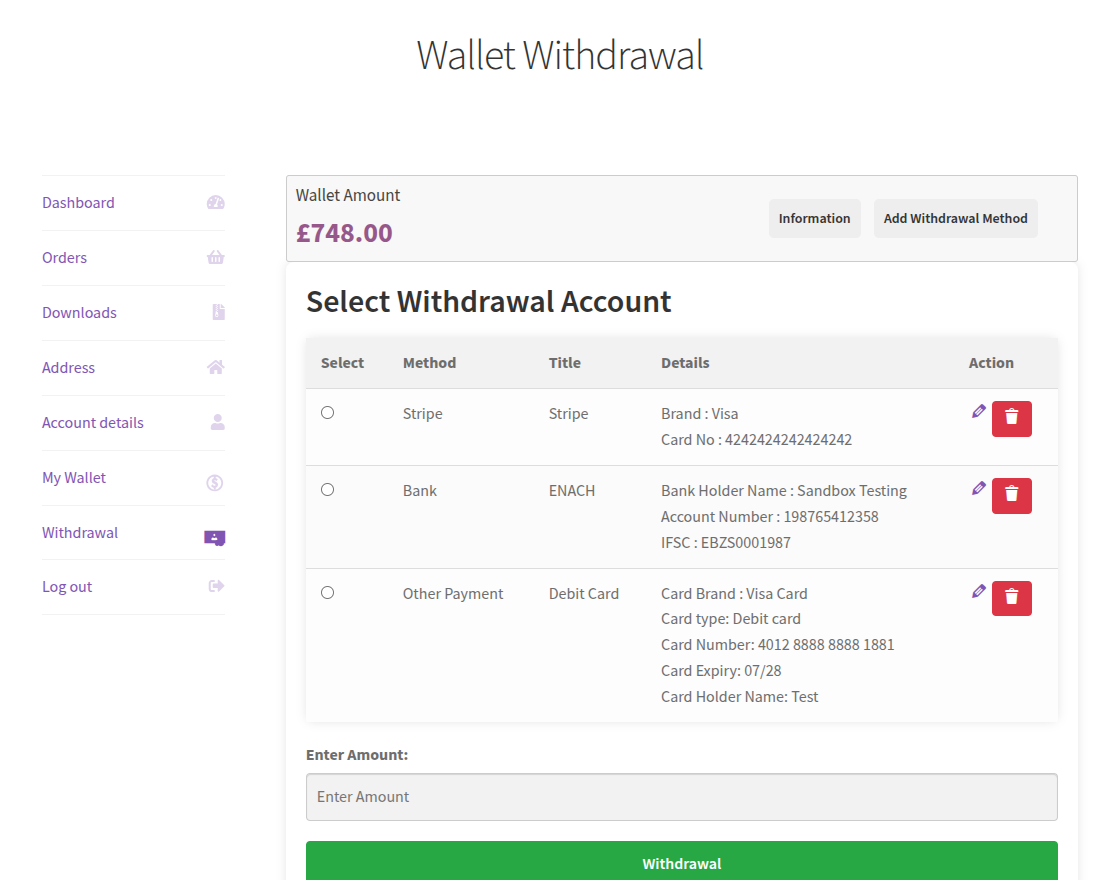
Click on add your withdrawal details and select the payment options,enter title and add your details.

Click on enter amount and Enter the specific amount you want to add to your wallet.
After adding the amount click on withdrawal after than there is a pop which shows withdrawal request was submitted successfully as shown below.


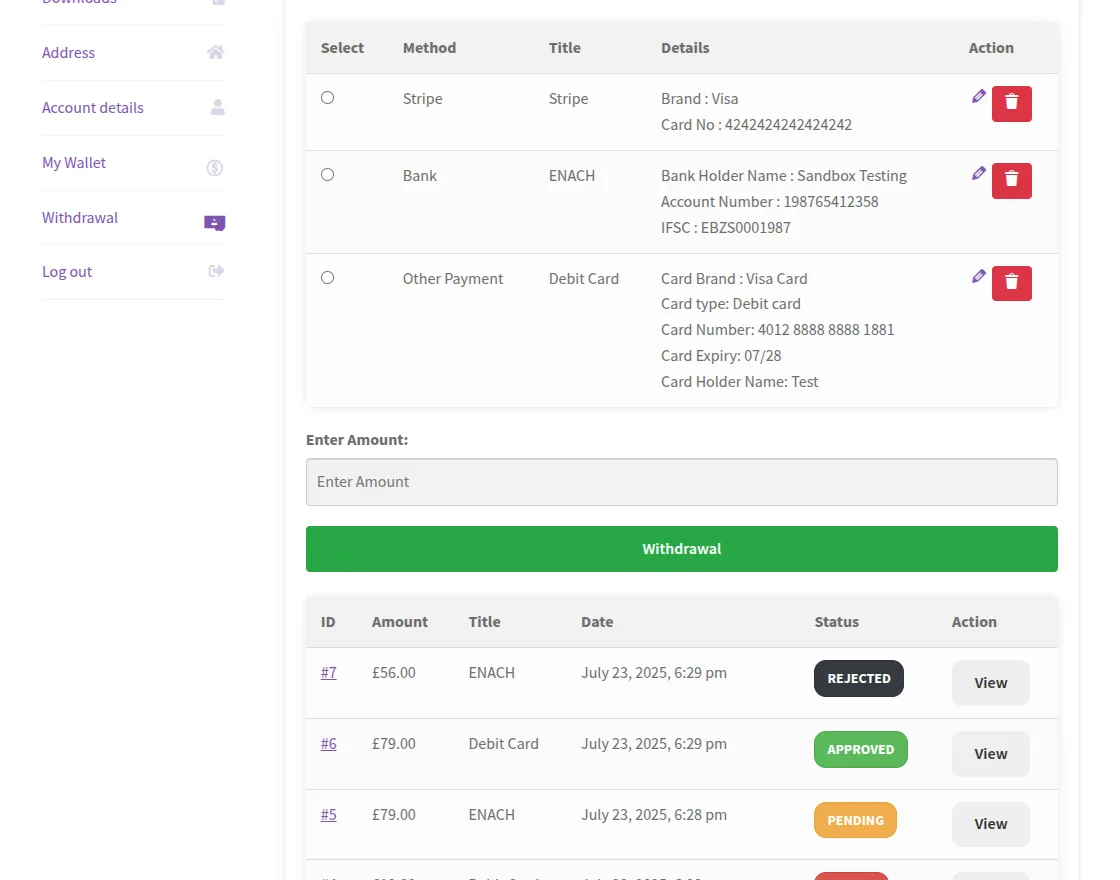
After the withdrawal request is submitted successfully you can check the status of the withdrawal as shown below.
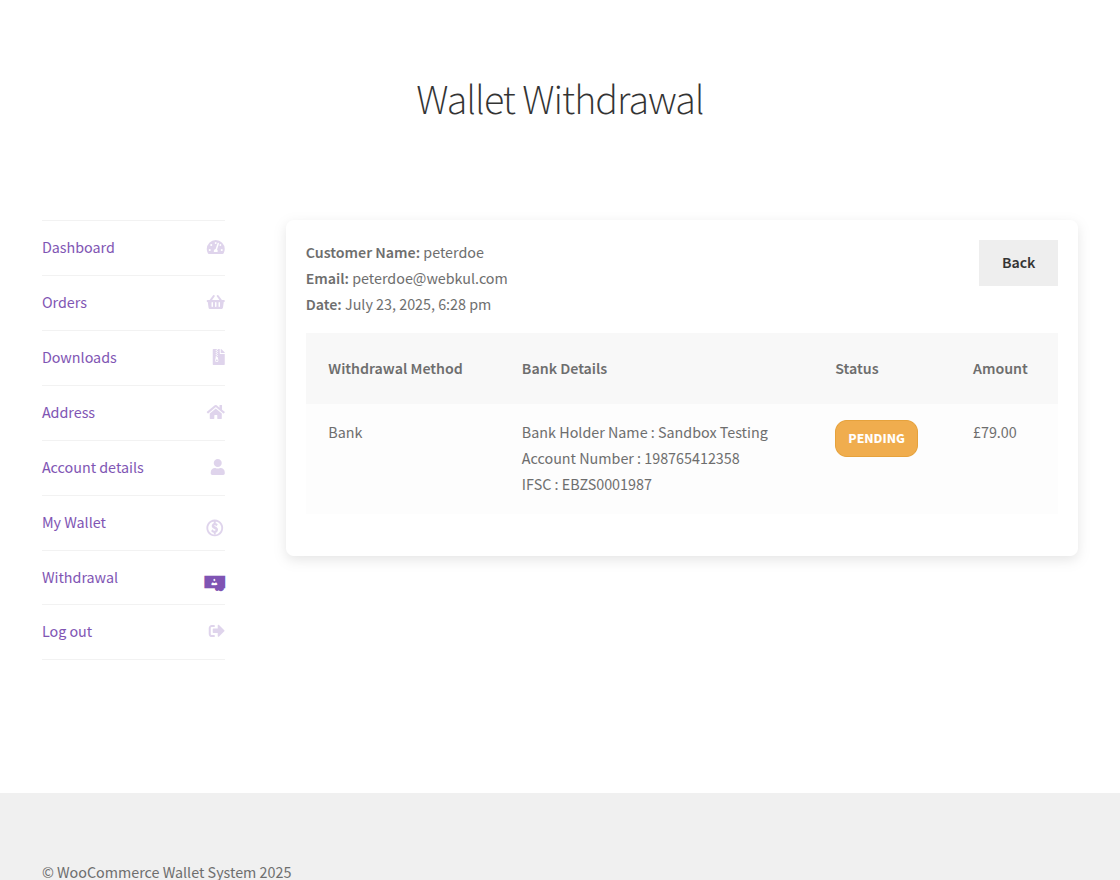
Now, After clicking on the view button you can see details of applied wallet withdrawal.
Admin Management
Admin can manage the wallet system and orders under “Customer Wallet”. Here the admin can see the wallet balances of customers.
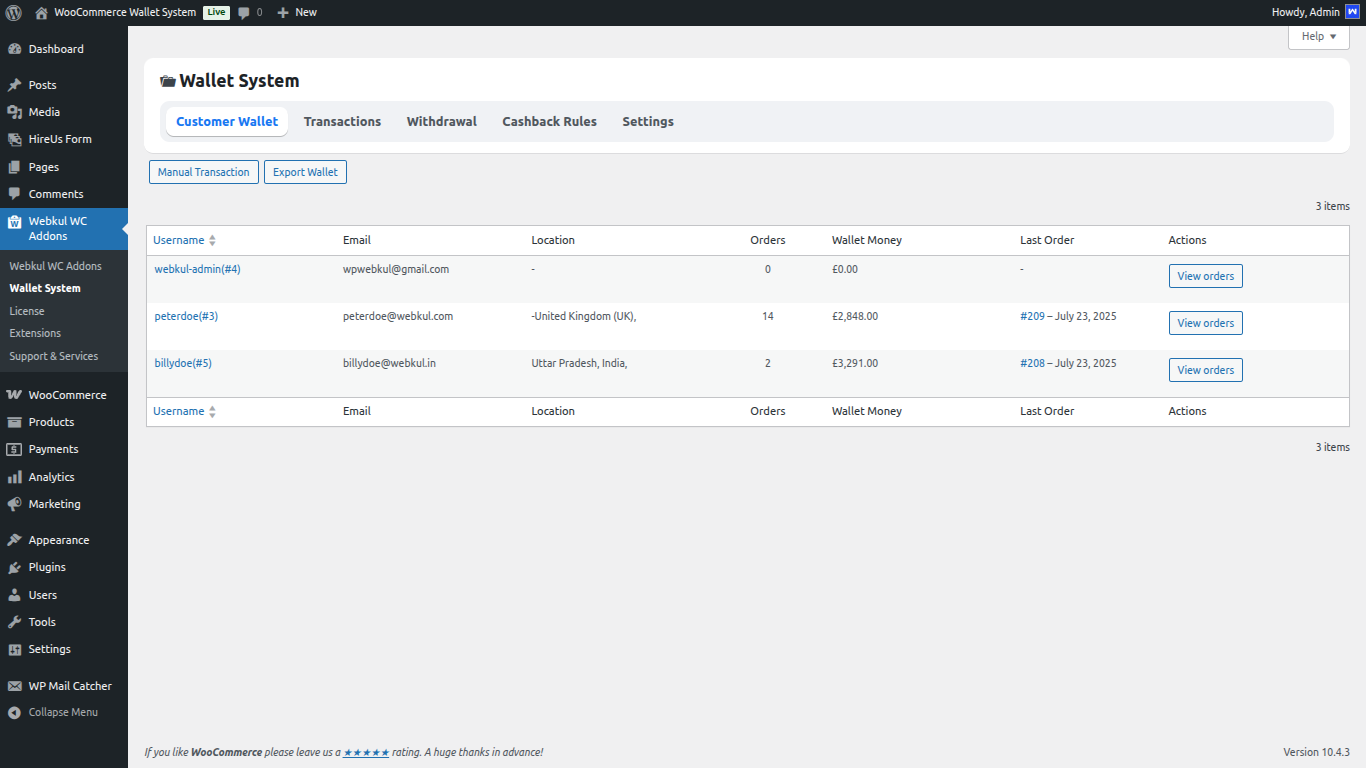
After approval of the order by admin from WooCommerce Orders, the amount will be deducted from the wallet cash.
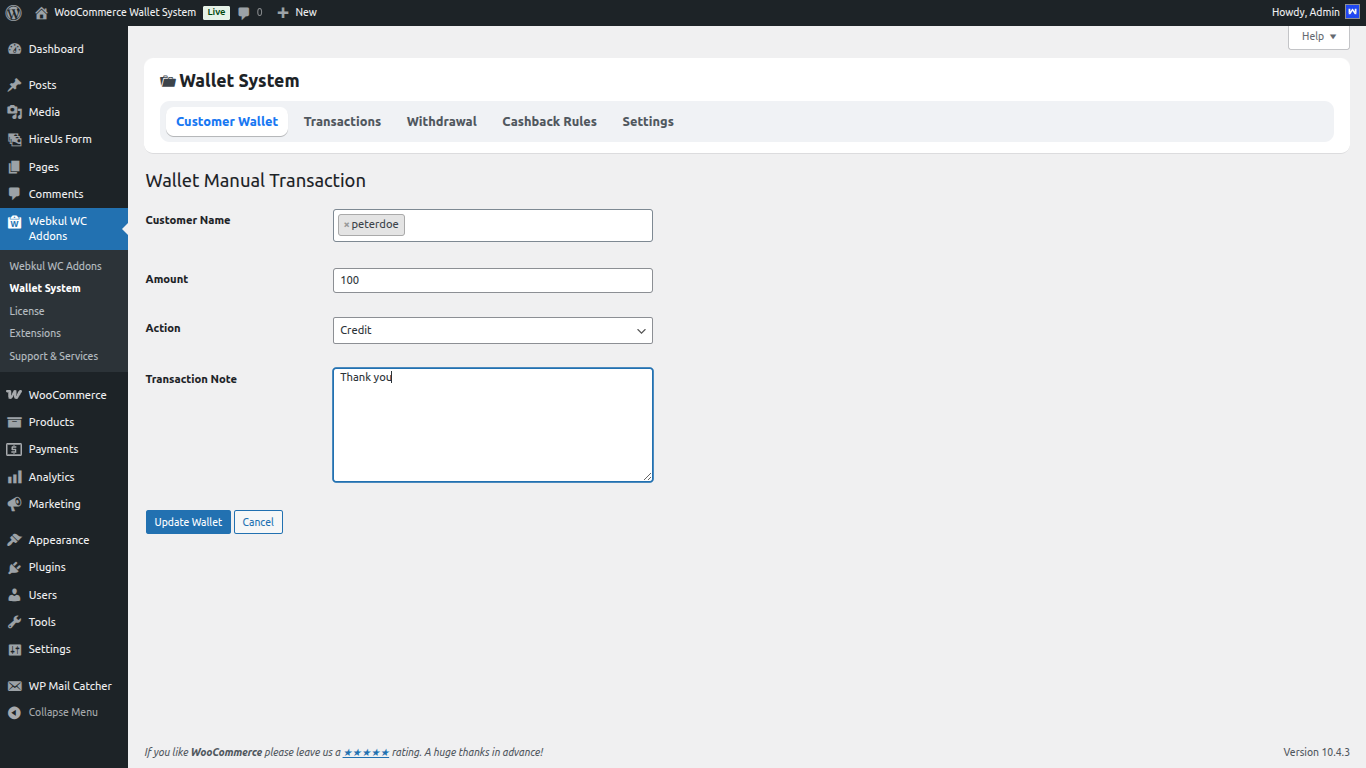
Manual Wallet Transaction
Under “Customer Wallet > Manual Wallet Transaction” the admin can debit or credit wallet amount manually as well.
Here, select the customer from the drop-down and enter the amount.
After that select the action as per the requirement whether “Debit” or “Credit“. And finally, update the wallet.
Customers receive the email for the new transaction on your Wallet WooCommerce Wallet System on their registered email as shown in the below snapshots.


Export Wallet Details
Under the Export Wallet Details section, the admin will be able to download the customer wallet details in the form of a CSV file:
The CSV file will be similar to the following image:


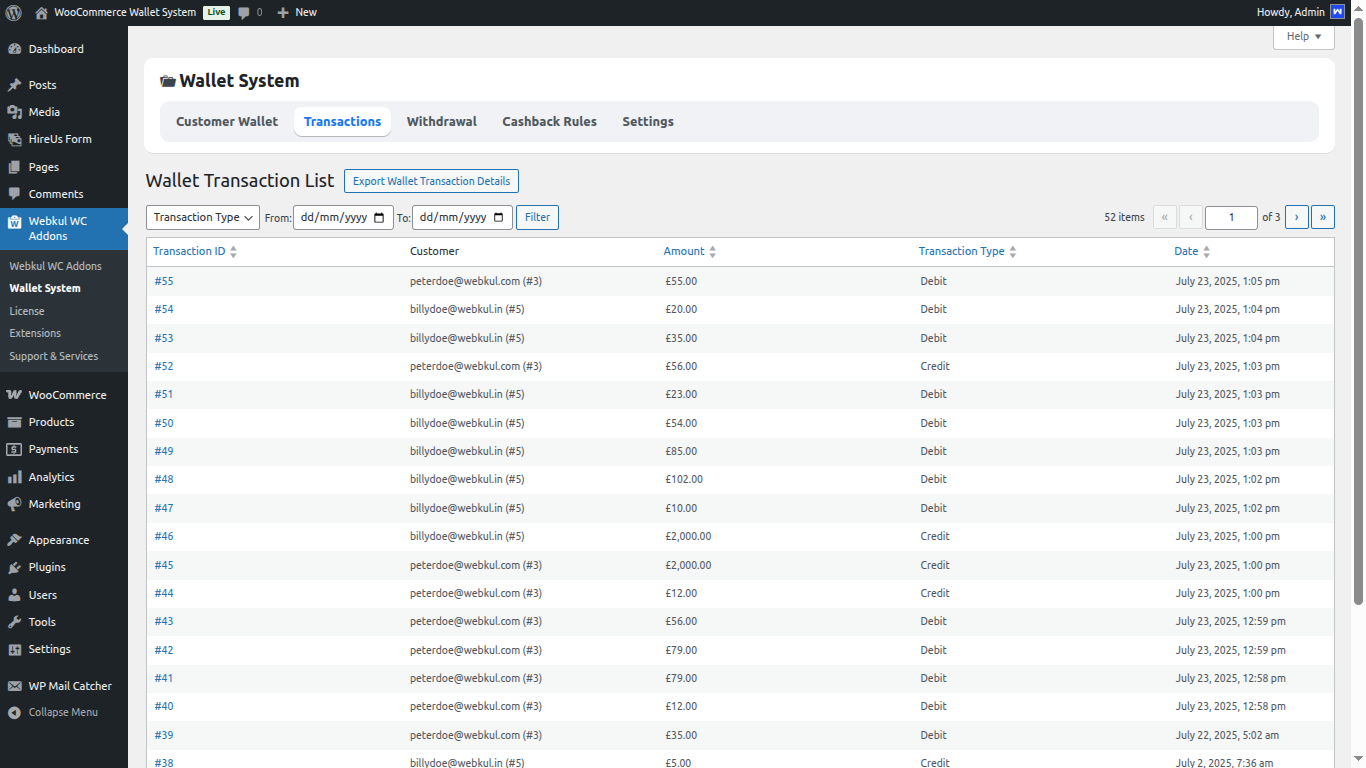
Transactions
The admin can also check the transactions by navigating to the Transactions tab as shown in the image below:
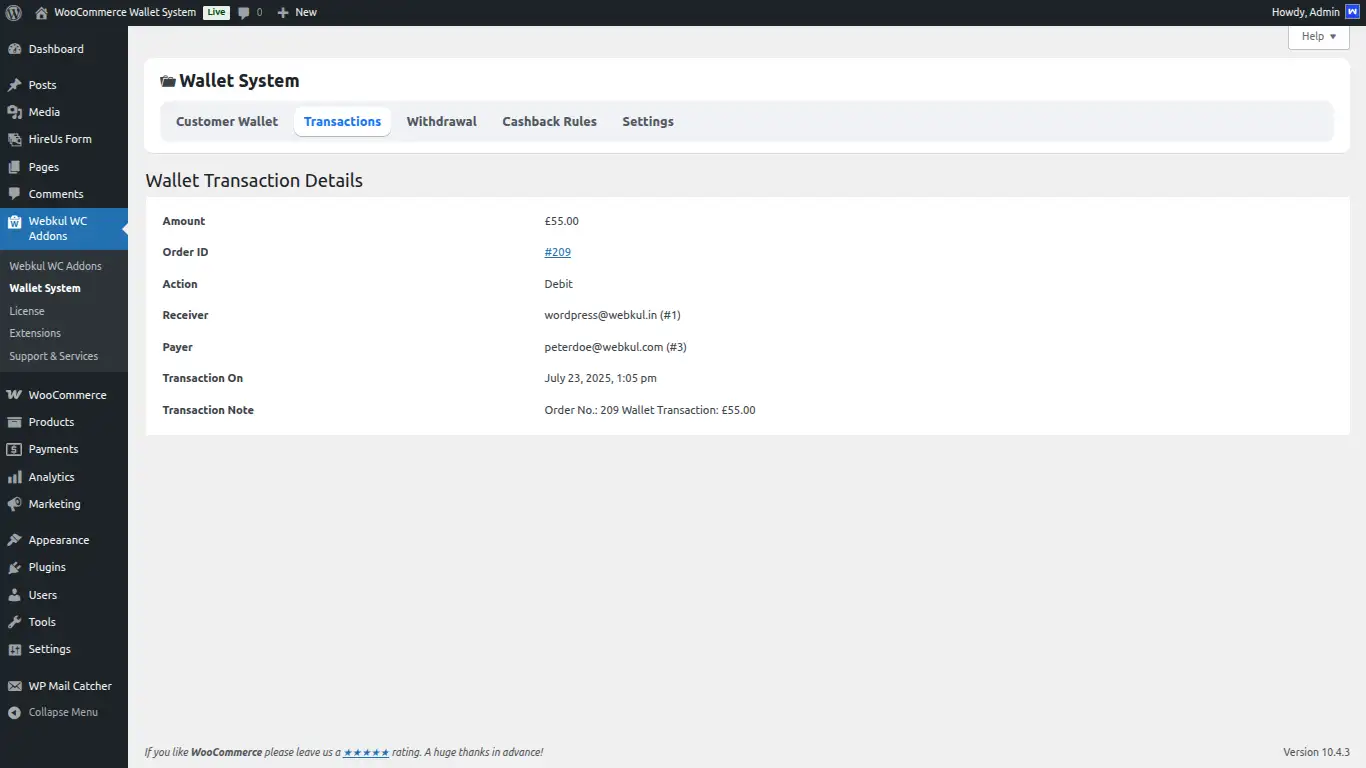
By clicking on the particular transaction ID, the details of the transactions will be visible to the admin:
Under the Export Wallet Transaction Details the admin can download all the transaction details in the form of a CSV file.
The CSV file will look just like the image shown below:


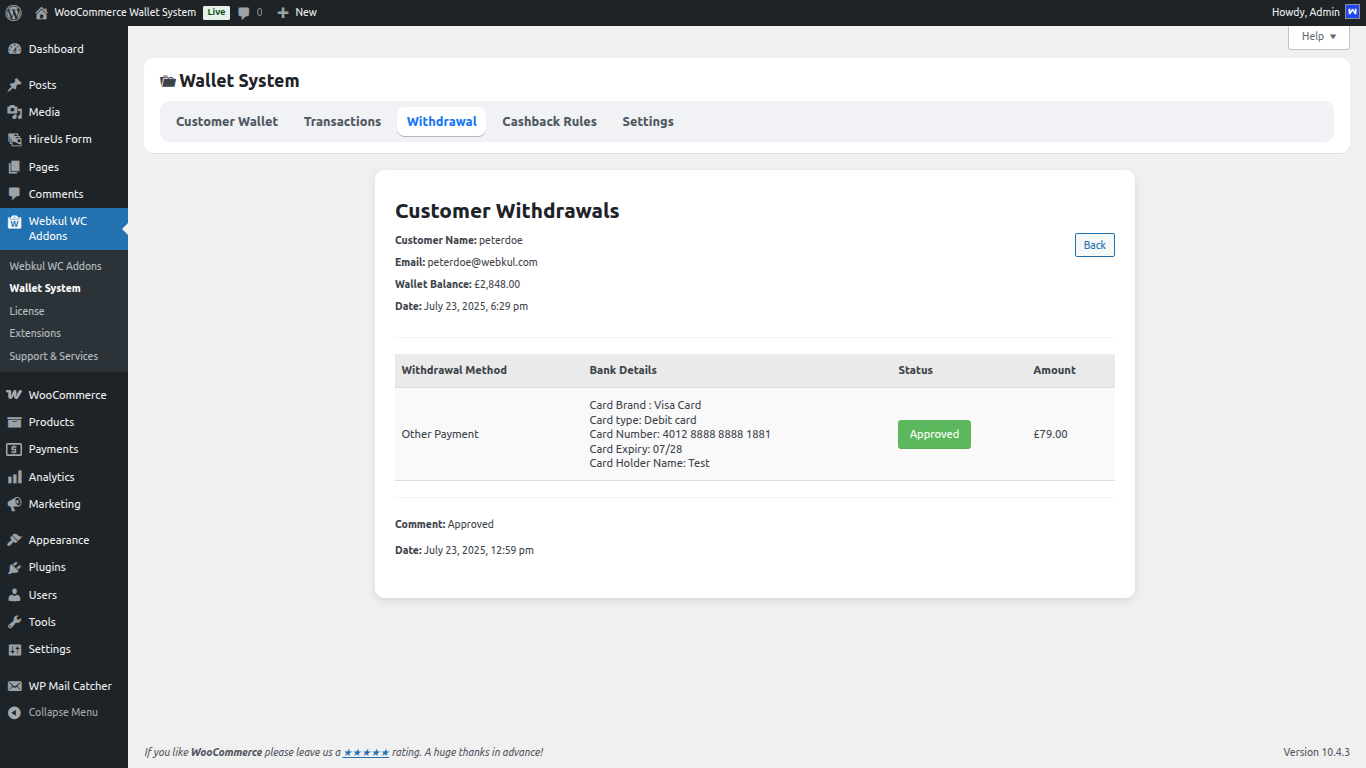
Withdrawal
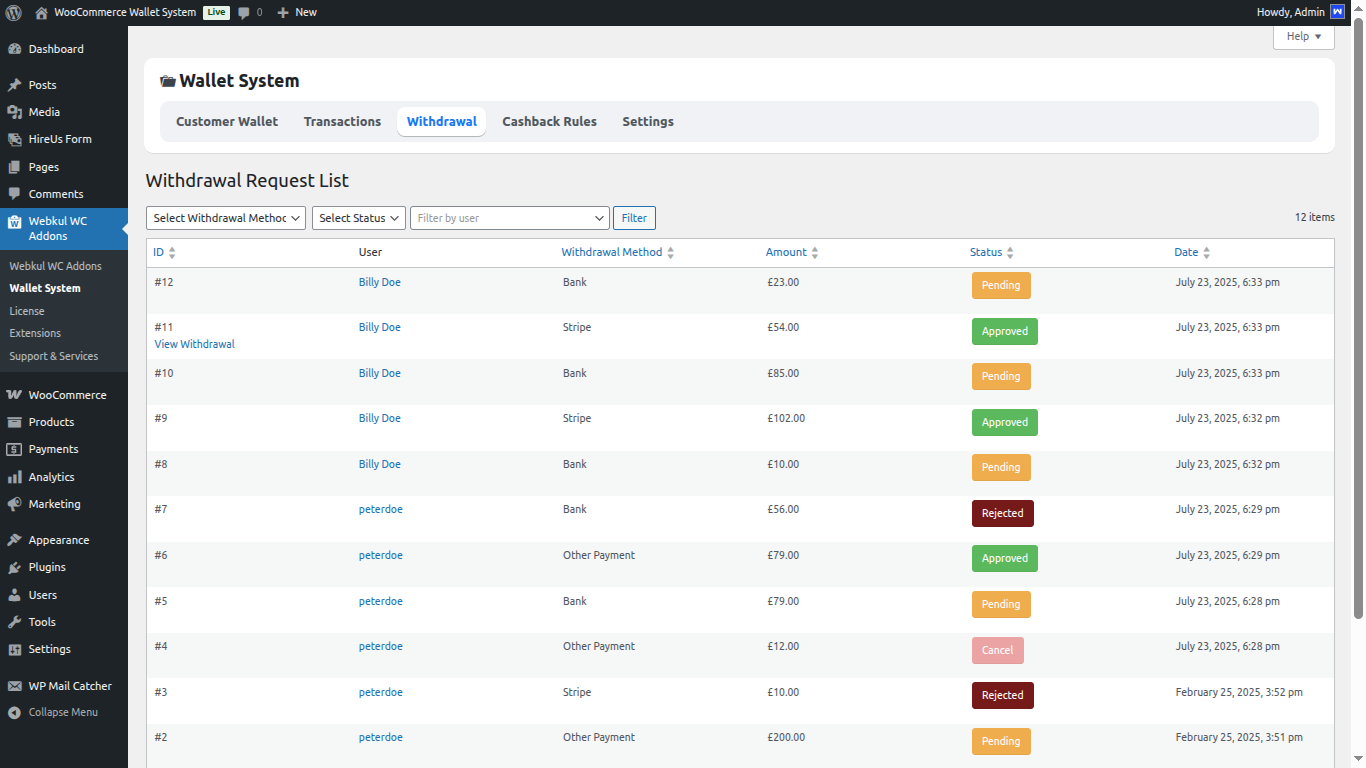
The Withdrawal system helps admin to check the status of the wallet whether the payment is rejected , pending or approved.
Admin can navigate through Customer wallet system > Withdrawal and check the status of payment.
As in the below image you can see three payment which consist of rejected, pending and approved payment orders.
Once you have reached the withdrawal request list you can click on any of the request.Here are the details of payment orders when it is rejected as shown below.
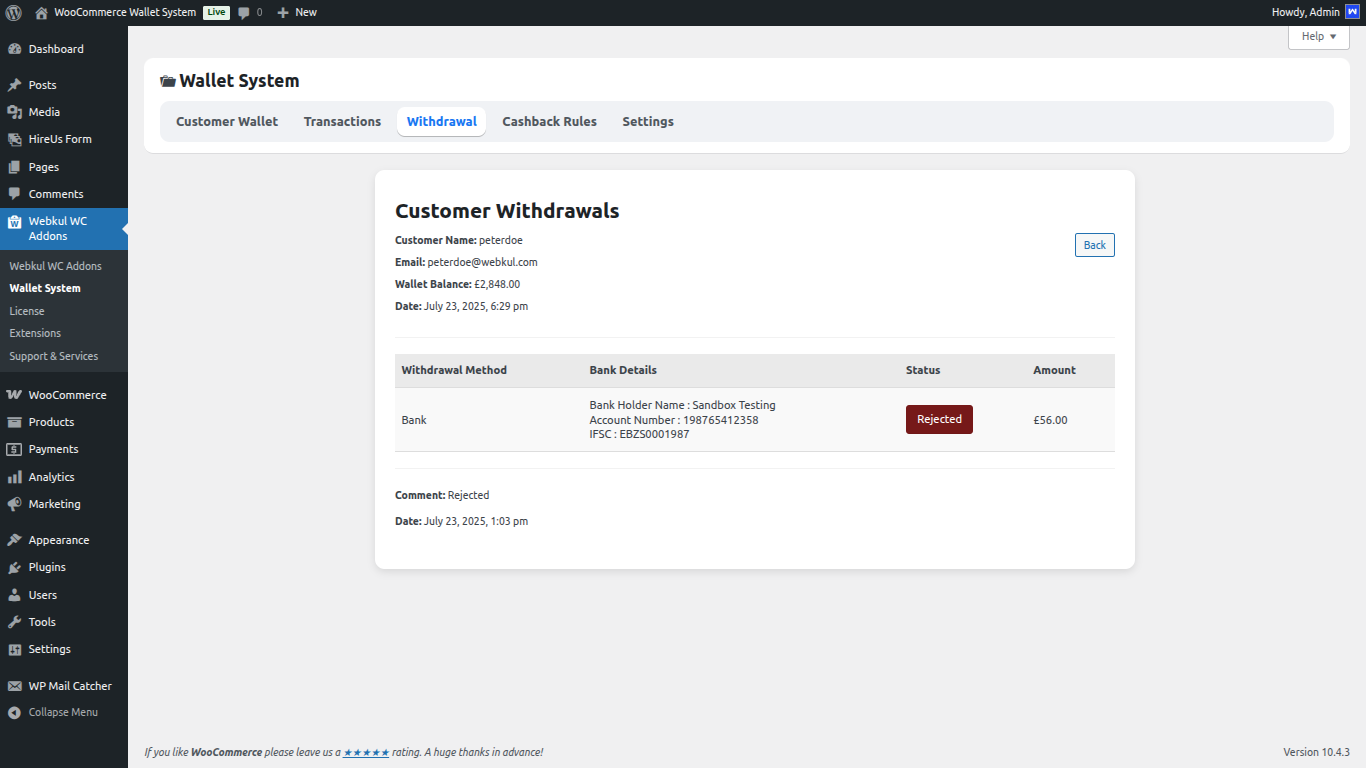
You can find the withdrawal method type bank details as shown in image. When orders payment are in pending or not confirmed then status of the orders changes to pending as shown below.
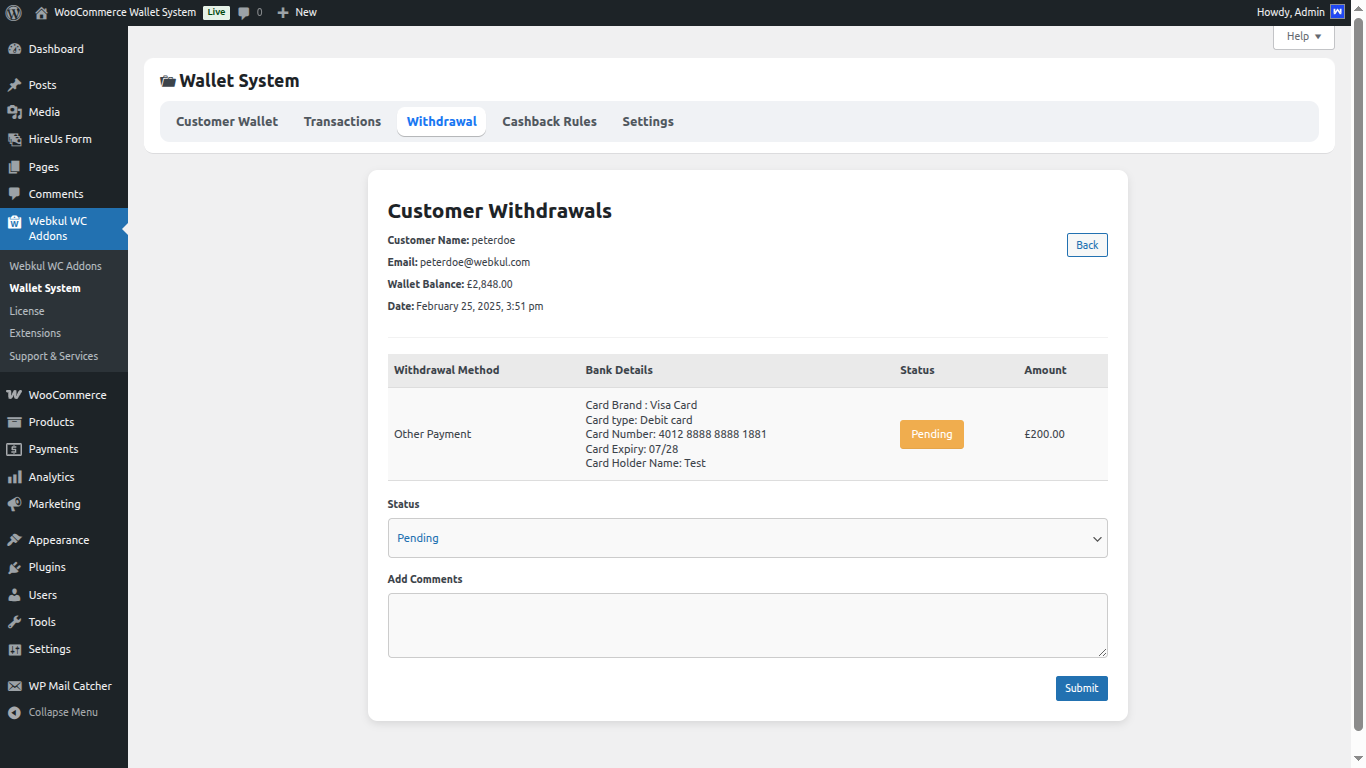
In the customer withdrawals you can find the details like customer name, email, wallet balance and date.
When the payment are confirmed then the status of the orders are changed to approved as shown below.
Cashback Rules
The admin can set cashback rules for the customers as per their requirements by navigating through Customer Wallet >Cashback Rules.
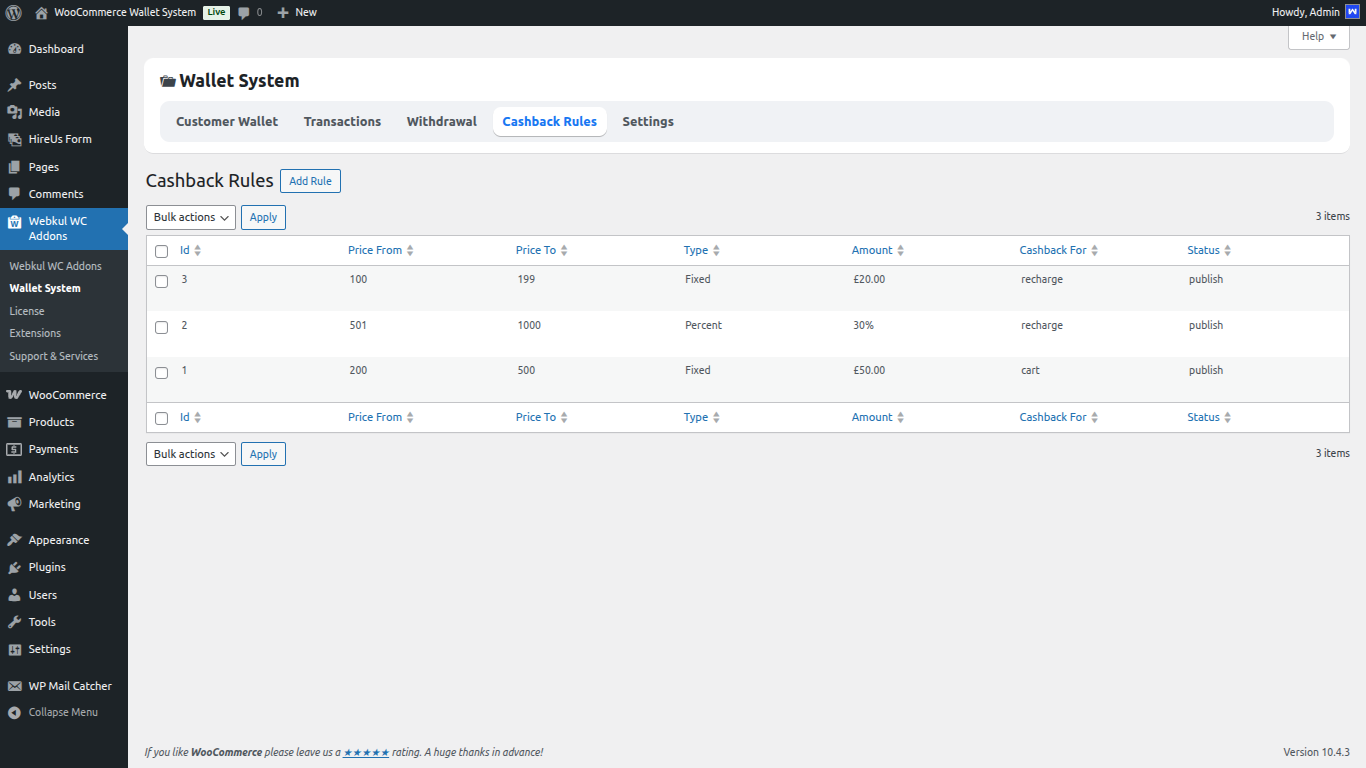
Under the Cashback Rules section, the admin can add cashback rules to the customer’s wallet as shown in the below image.
Click on the save button to add the cashback rule.
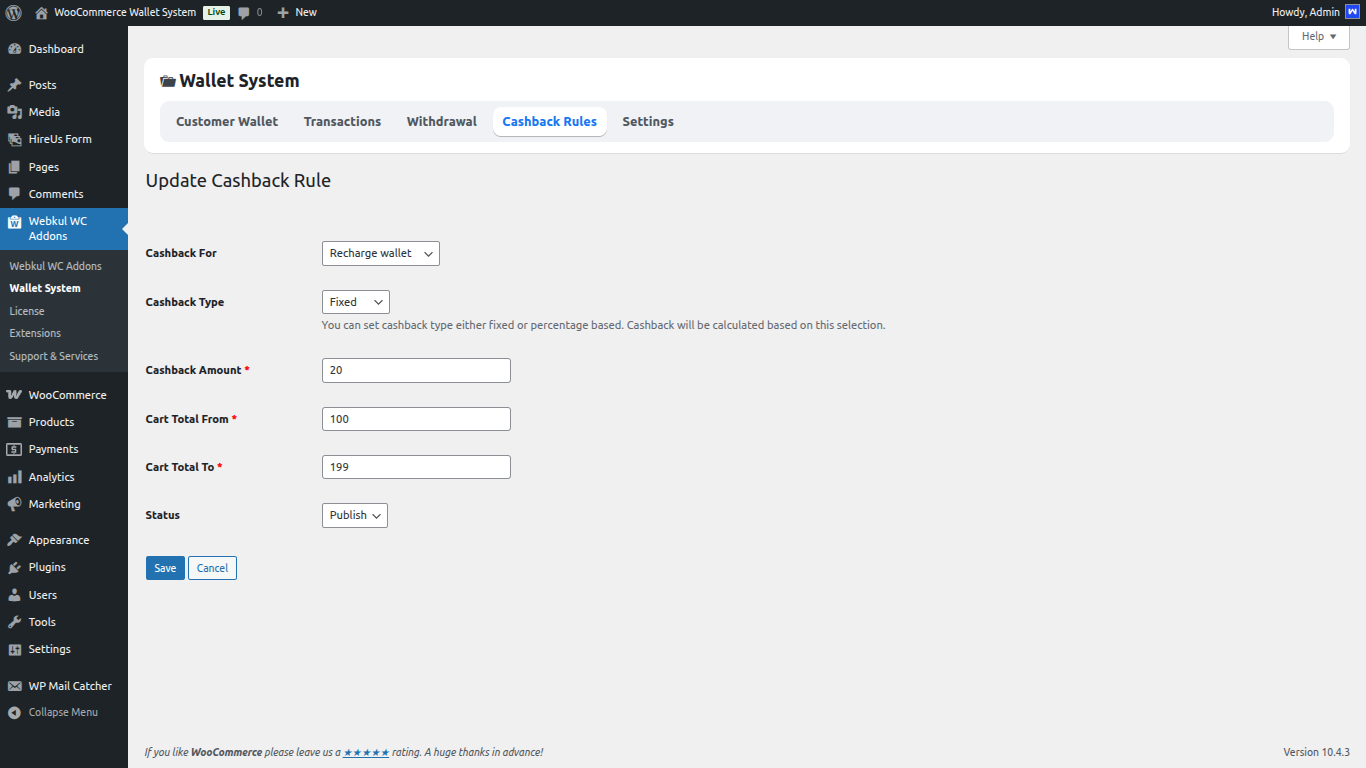
admin can select the cashback for – recharge wallet or cashback
then set the cashback type as fixed or percentage. Also, the admin can set minimum and maximum cart amounts for the customers to avail of cashback.
The admin can also set the cashback amount.
The admin can also apply cashback for a particular product.
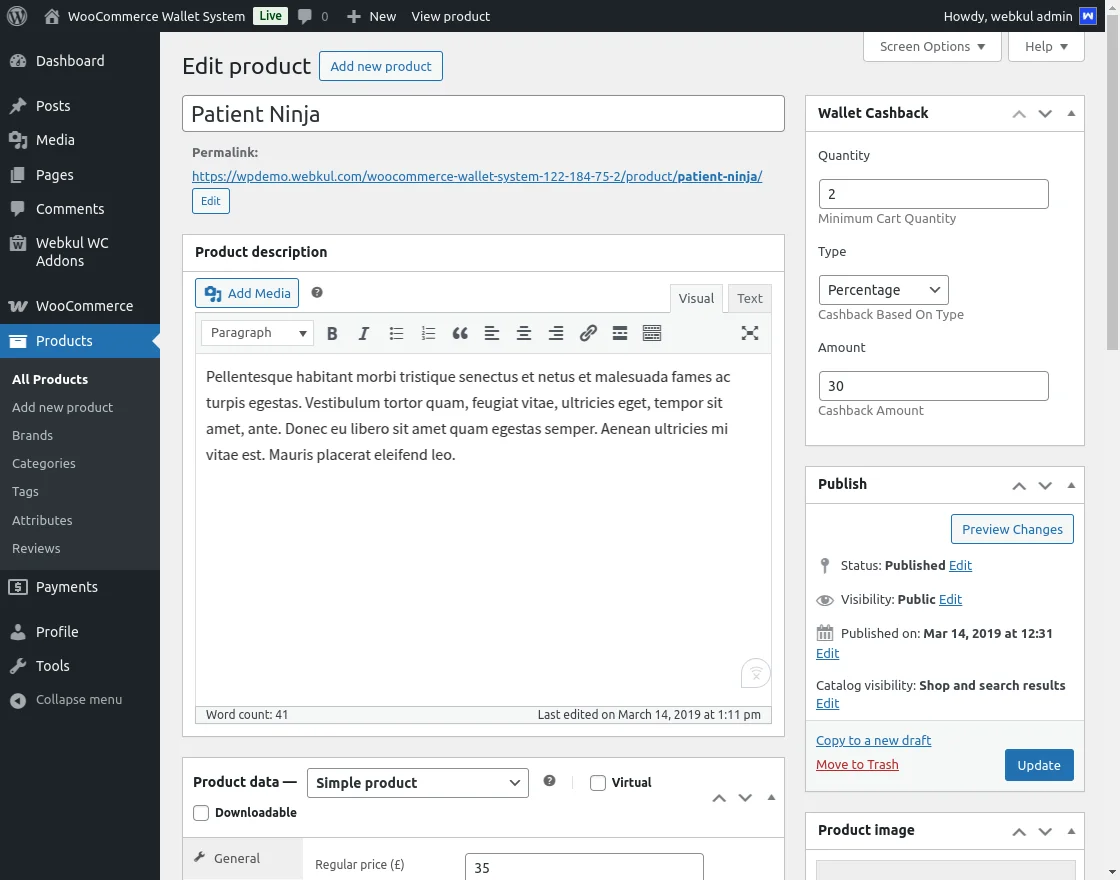
If the customer purchases the product and the product range lies between the amount set by the admin.
Then customers can avail of the cashback and get email notifications on the registered email.


Refund Via Wallet
The admin can also set the refund amount for the orders and the payment can make through the wallet.
For this admin has to navigate through WooCommerce->Orders and then click on the view option.


On clicking the Refund option, the admin can enter the Refund amount and click on Refund via Wallet.


Support
For any technical assistance kindly raise a ticket or reach us by email at support@webkul.com
Looking to implement a wallet system in your WooCommerce store? Check out our WooCommerce Payment Method Development services to explore how we can help.