Magento 2 Wallet System
Table of Content
Introduction
Magento 2 Wallet Extension is an awesome module that allows the customers to make the online payment from their Wallet System.
The customers can select the Wallet System payment method at the time of the checkout process.
Now the buyers can easily add credit amounts, transfer money, view transaction details in Wallet System.
Moreover, the admin can set the minimum and maximum limits for adding money to the wallet. The admin can also do a refund to its customer using the wallet money.
Watch the these videos to understand the module workflow: –
Admin Configuration
Customer End
Admin Adding Amount into the Wallet
Wallet to Wallet Transfer
Please Note:
- At the time of adding balance to the wallet, no other product should be added in the shopping cart.
- If the wallet balance is insufficient, customers can complete the remaining payment using another supported payment method.
- For partial online 3rd party payment method support, contact sales.
- This module works with Multiple Address Checkout.
- This module supports multi-store and multi-currency features.
- The currency which admin has assign to the respective store, user can add the amount in that same currency to the wallet and proceed for check out.
- Whenever a user looks in a default store view, he will see the currency in which the admin has assigned it.
Advanced Features
- Email notification is sent to the customer for each transaction.
- The wallet amount will get credited after the generation of the invoice.
- The cashback amount gets deducted from the Customer’s Wallet after the admin creates the credit memo for the refund.
- The codes are open source, so it can be customized as per the requirement.
Admin Centric Features
- Merchant can view the bank account details during the bank transfer approval.
- The owner will receive a notification to approve the payee and to approve the amount transfer to the account.
- Also, the admin can restrict the approval required for payees.
- The store Owner can restrict the customer to use discount codes when adding the amount in his wallet.
- Admin can export wallet system details in CSV and XML format.
- The admin can bulk adjust the wallet amount for customers using a CSV file.
- The owner can also do a refund with the help of the Wallet System for Adobe Commerce, and can review customer-submitted refund-to-wallet requests separately.
- Admin can add the amount to the Customer’s Wallet or deduct the amount from the Customer’s Wallet.
- The owner can create multiple Credit Rules for the cashback, including category-based rules and an order value threshold.
- Also, the admin can view the customer details who are using Wallet System for making the online payment, from a dedicated Analytics Dashboard.
- Merchant can set the limit (maximum and minimum) for the Wallet Amount, as well as how much wallet balance can be used per order.
- Admin can enter the prefix for various wallet transactions.
- The store owner & the customers can view detailed transaction information.
- Merchant can approve or disapprove of the bank transfer status.
- The owner can transfer money from one wallet to another customer’s wallet.
- Owner can review and approve or reject customer KYC document submissions, and choose which wallet features stay locked until verified.
- Merchant can approve or disapprove customer withdrawal requests to Stripe or PayPal, with an optional withdrawal fee.
- Admin can configure Buy Now Pay Later, including the debt limit, minimum order total, repayment window, and interest rate.
- The owner can set up the Refer & Earn program, including reward amounts and multi-level commission percentages.
- Merchant can configure preset recharge amounts, a checkout discount for wallet payments, and daily login or top-up bonuses.
- Admin can set a low balance email alert threshold, and enable a transfer fee or Twilio SMS OTP for wallet transfers.
- This extension is compatible with GraphQL.
- The extension is compatible with the Hyva Theme.
Customer-Centric Features
- The buyer can easily add credit amount into their wallet system, including a quick top-up using preset amounts.
- Also, the shopper can add a payee within his account to transfer the amount to the payee’s wallet.
- The customer can add multiple bank account details.
- Moreover, the shopper can request to transfer their amount in his bank account, or withdraw it directly to a connected Stripe or PayPal account.
- On the checkout page, the customer can see used wallet amount and remaining wallet amount, and pay the balance with Buy Now Pay Later if the wallet falls short.
- The cashback amount gets deducted from the Customer’s Wallet after the admin creates the credit memo for the refund.
- Moreover, the buyer can get Cash Back amount into their Wallet.
- Shoppers can receive monthly statements regarding wallet transactions via email, along with a low balance alert when their wallet drops below a set threshold.
- The customer can verify their identity through KYC document upload to unlock selected wallet features.
- Buyers can request a refund straight to their wallet from My Account.
- Shoppers can send and receive money instantly using a personal QR code.
- Customers can earn wallet rewards by referring friends through the Refer & Earn program, including multi-level rewards where enabled.
- The buyer can earn small wallet credits through daily login rewards and top-up deposit bonuses.
Wallet System Installation
Customers will get a zip folder and they have to extract the contents of this zip folder on their system. The extracted folder has an src folder, inside the src folder you have the app folder.
Now, You need to transfer this app folder into the Adobe Commerce Cloud root directory on the server as shown below.


After the successful installation, you have to run these commands in the Adobe Commerce root directory.
php bin/magento setup:upgrade
php bin/magento setup:di:compile
php bin/magento setup:static-content:deploy
php bin/magento indexer:reindex
php bin/magento cache:flush
php bin/magento queue:consumers:start bulkadjust.amount &
php bin/magento queue:consumers:start bulkadjust.amount.csv &
Configuration For Multilingual Support
For the multilingual support, the admin will navigate through Store->Configuration->General ->Locale Options furthermore select the locale as German
(the language into which the admin wants to translate his store content).


Wallet System – Module Translation
If the user wants to translate their module from English to German,
they need to follow the path app/code/Webkul/Walletsystem/i18n in their unzipped Adobe Commerce Walletsystem folder and will get a CSV file with name “en_US.csv”.
Now, they will rename that CSV as “de_DE.csv” and translate all right side content after the comma in the German language.
After editing the CSV, save it and then upload it to the path app/code/Webkul/Walletsystem/i18n where they have installed Adobe Commerce Cloud on the server.
Now, the module will get translated into the German Language. It supports both RTL and LTR languages.


The user can edit the CSV like the image below.
Adminend Workflow
Post successfully installing the Wallet System module, please go to the backend admin panel to do the module configuration. First, the admin needs to do the configuration in the Payment Method.
Payment Methods Configuration
Now, Follow the path: Stores > Configuration > Sales > Payment Methods > Webkul Wallet System.
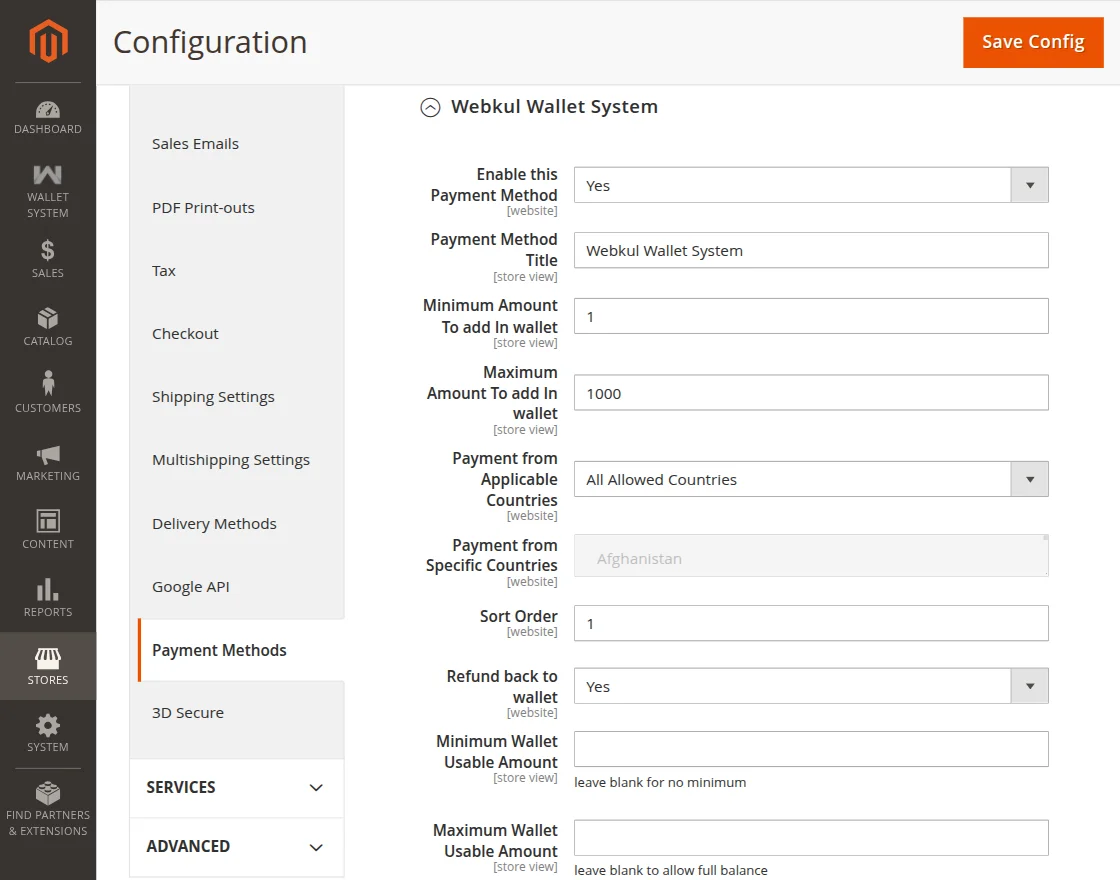
- Enable this Payment Method – Select Yes to enable Wallet as a payment method.
- Payment Method Title – Enter the title displayed for the wallet payment method at checkout.
- Minimum Amount to Add in Wallet – Set the minimum amount customers can add to their wallet.
- Maximum Amount to Add in Wallet – Set the maximum amount customers can add to their wallet.
- Payment from Applicable Countries – Choose whether the wallet payment method is available for all or specific countries.
- Payment from Specific Countries – Select the countries where the wallet payment method will be available.
- Sort Order – Set the display order of the wallet payment method at checkout.
- Refund Back to Wallet – Select Yes to automatically refund eligible credit memos to the customer’s wallet.
- Minimum Wallet Usable Amount – Set the minimum wallet amount required to use the wallet at checkout. Leave blank for no limit.
- Maximum Wallet Usable Amount – Set the maximum wallet amount that can be used per order. Leave blank to allow the full balance.
Wallet System Configuration
For Wallet System Configuration, the admin can follow the path Stores > Configuration >Wallet System. Here, the admin can configure the following:-
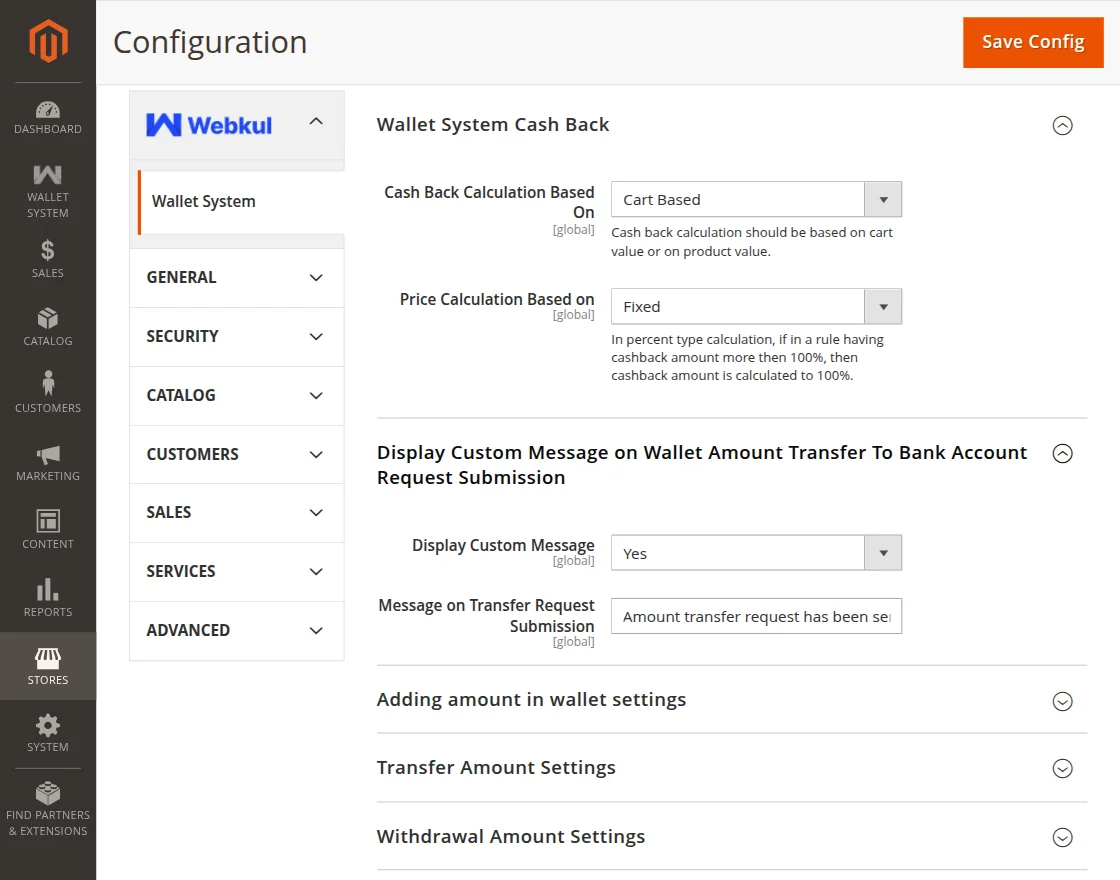
Wallet System Cash
- Cash Back Calculation Based On – Choose how cashback should be calculated: Product, Cart, or Category.
- Price Calculation Based On – Select whether cashback should be calculated as a Fixed amount or a Percentage.
Display Custom Message On Wallet Amount Transfer to Bank Account Request Submission
- Display Custom Message – Select Yes to display a custom message after a transfer request.
- Message on Transfer Request Submission – Enter the message displayed to the customer after submitting a wallet transfer request.
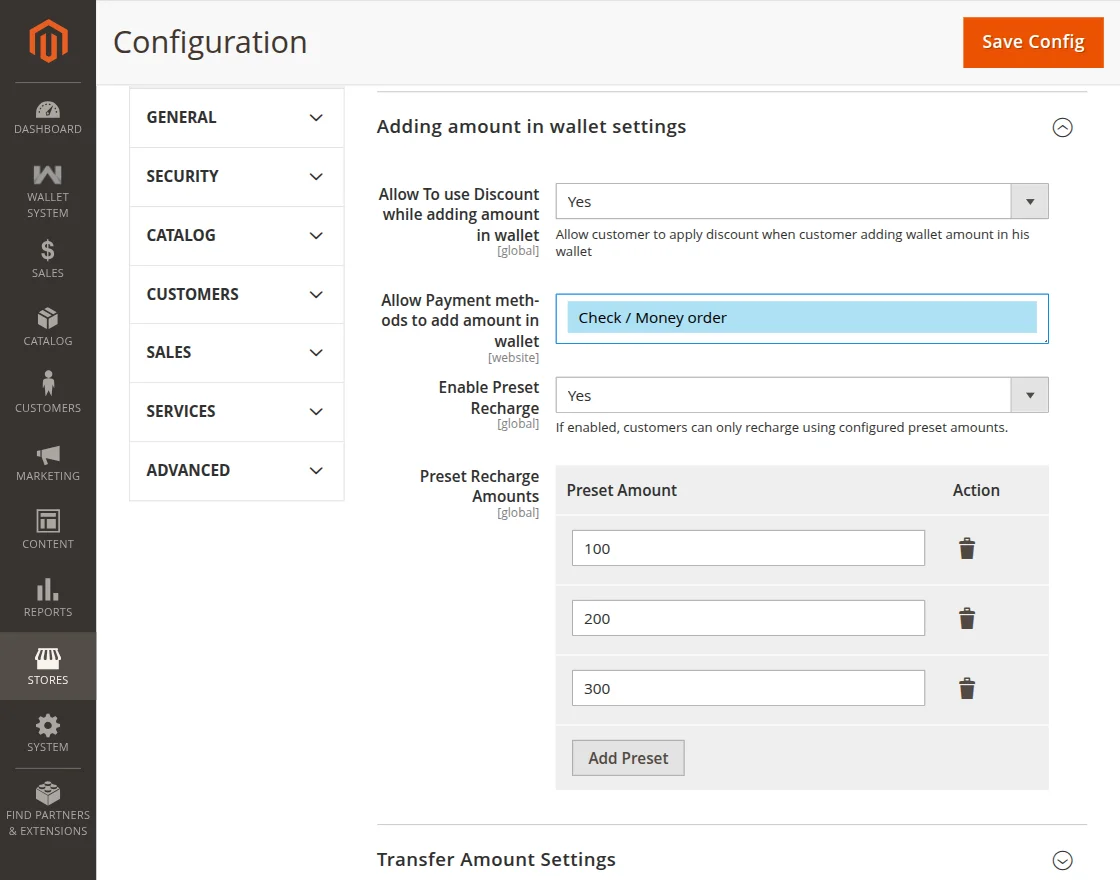
Adding Amount In Wallet
- Allow Using Discount while Adding the Amount to the Wallet – Enable or disable the use of discount codes when adding funds to the wallet
- Allow Payment Methods to Add the Amount in Wallet – Select the payment methods customers can use to add funds to their wallet.
- Enable Preset Recharge – Choose whether customers can recharge using preset amounts.
- Preset Recharge Amounts – Specify the predefined recharge amounts available to customers.
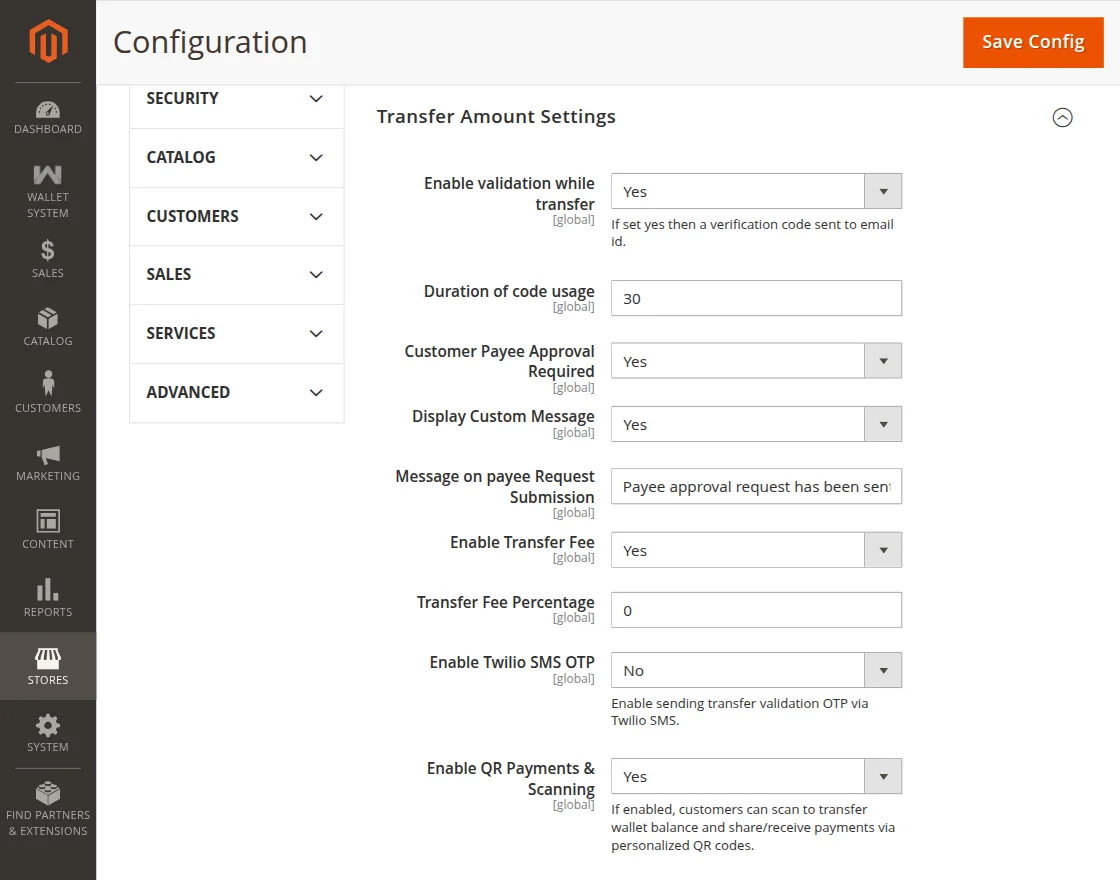
Transfer Amount Settings
- Enable Validation While Transfer – Select Yes to send a verification code via email before completing a wallet transfer.
- Duration of Code Usage – Set the verification code validity period in seconds.
- Customer Payee Approval Required – Select Yes to require admin approval before a payee can be added.
- Display Custom Message – Select Yes to display a custom message on the storefront.
- Message on Payee Request Submission – Enter the message displayed after a payee request is submitted.
- Enable Transfer Fee – Select Yes to charge a transfer fee on wallet transfers.
- Transfer Fee Percentage – Enter the transfer fee percentage (0–100).
- Enable Twilio SMS OTP – Select Yes to send the transfer verification code via Twilio SMS.
- Enable QR Payments & Scanning – Select Yes to allow customers to send and receive wallet payments using QR codes.
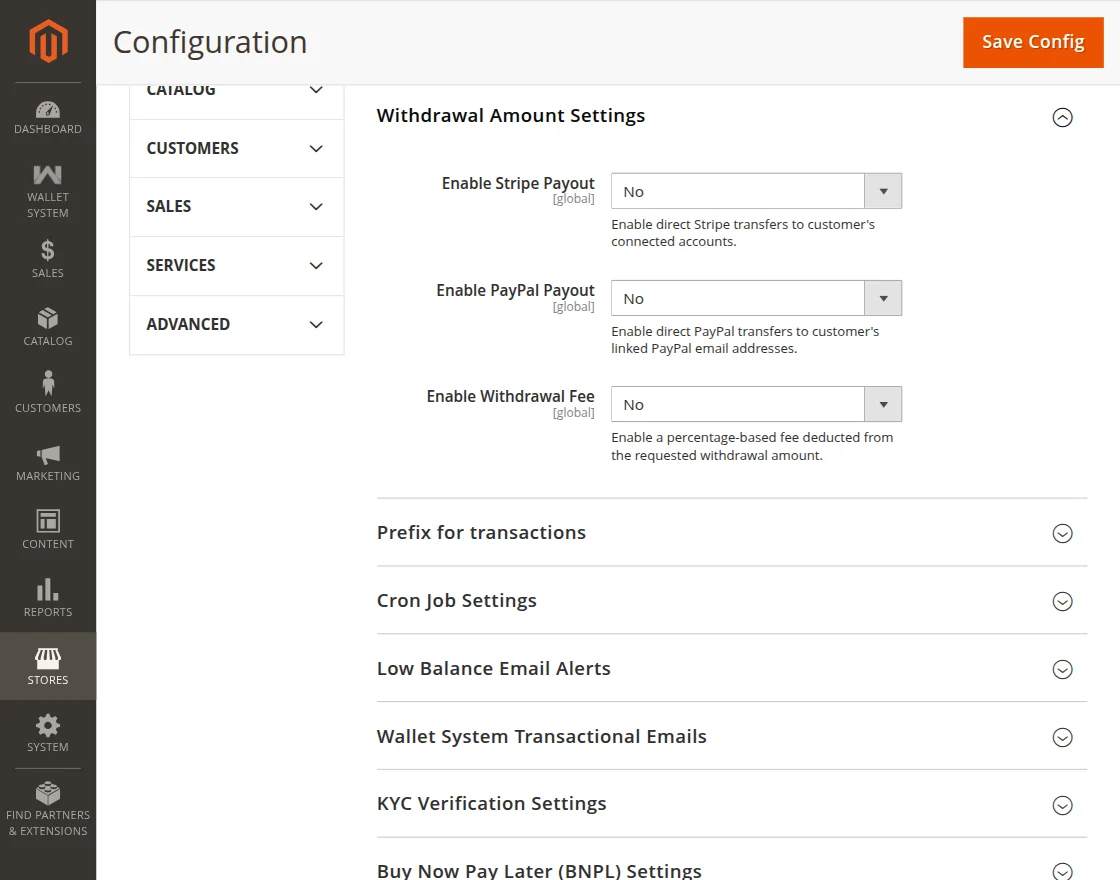
Withdrawal Amount Settings
- Enable Stripe Payout – Select Yes to allow customers to withdraw wallet funds to their connected Stripe account.
- Enable PayPal Payout – Select Yes to allow customers to withdraw wallet funds to their linked PayPal account.
- Enable Withdrawal Fee – Select Yes to charge a percentage-based fee on wallet withdrawals.
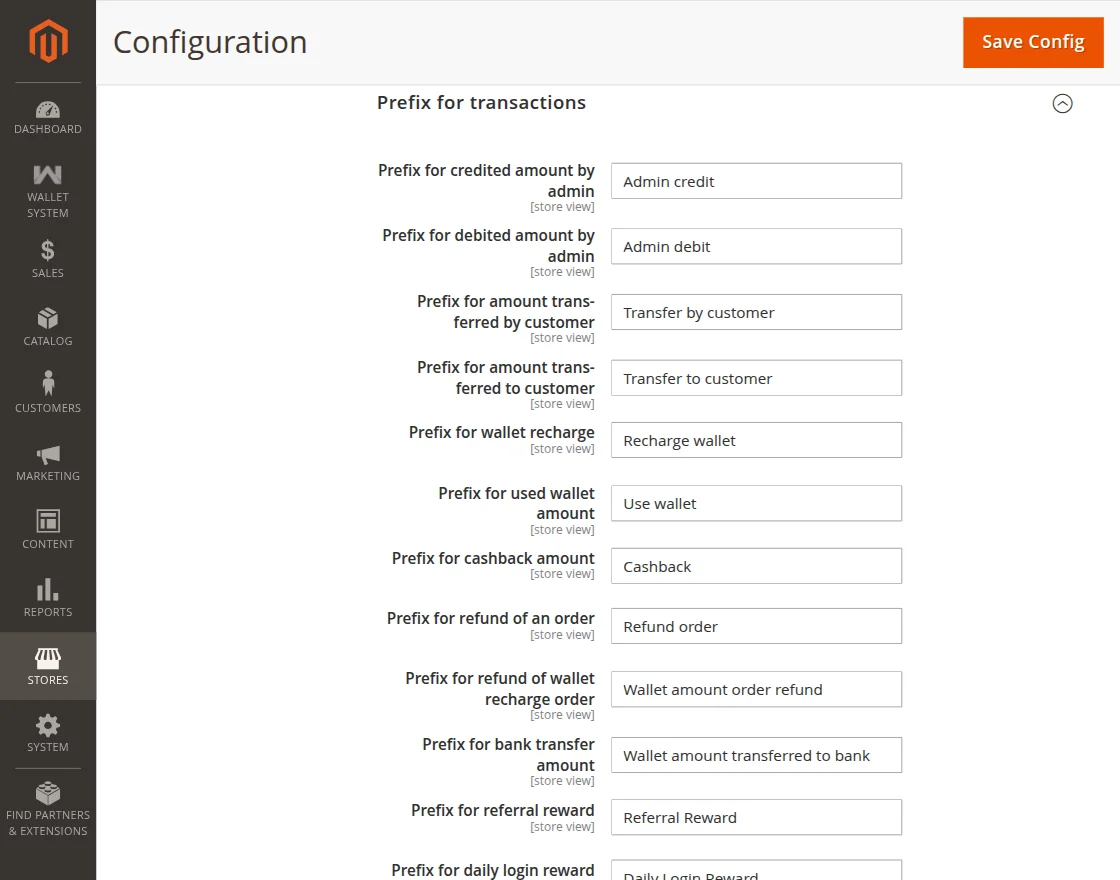
Prefix for Transactions –
The admin needs to add the prefix for the following transactions of the Wallet –
- The credited amount by admin.
- The debited amount by admin.
- The amount transferred by the customer.
- Amount transferred to the customer.
- Wallet recharge.
- Used wallet amount.
- Cashback amount.
- Refund of an order.
- Bank transfer amount.
- Referral reward.
- Daily login reward.
- Top-up deposit bonus.
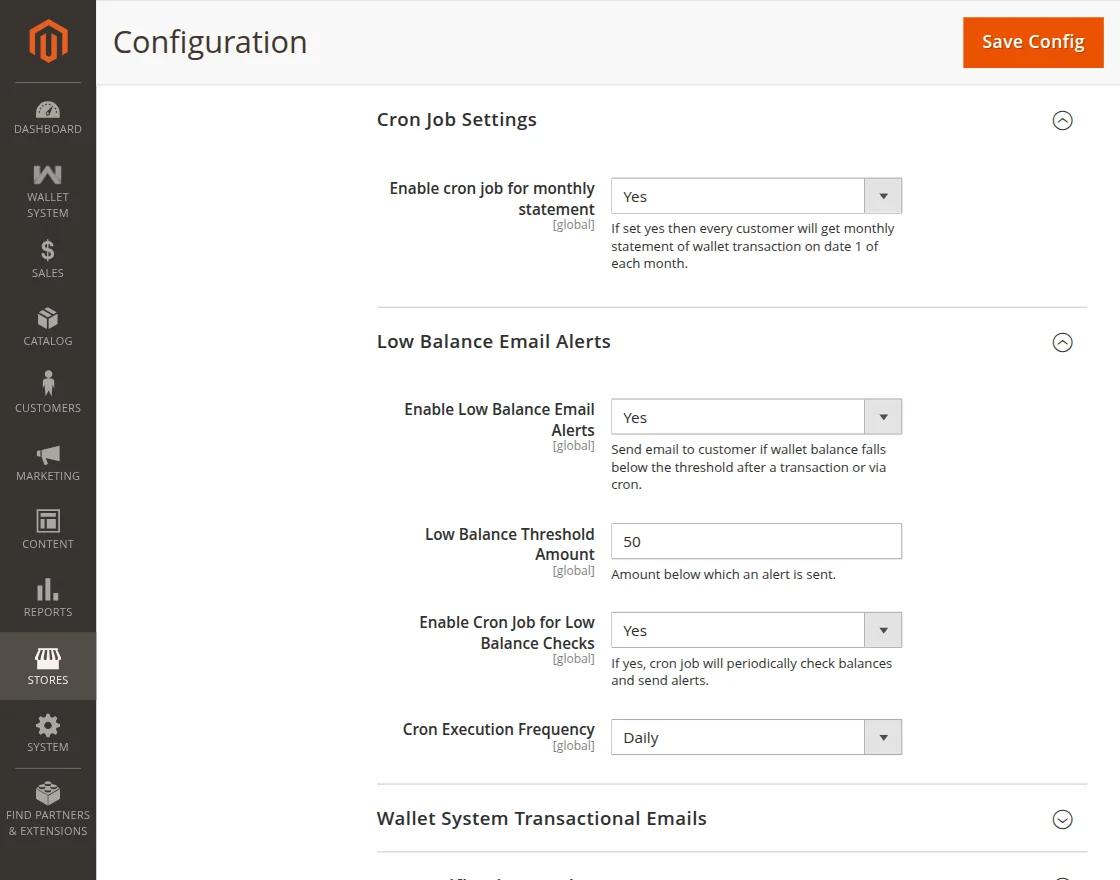
Cron Job Settings
- Enable Cron Job for Monthly Statement – Select Yes to send monthly wallet statements to customers via email.
Low Balance Email Alerts
- Enable Low Balance Email Alerts – Select Yes to notify customers when their wallet balance falls below the threshold.
- Low Balance Threshold Amount – Enter the wallet balance that triggers the low balance alert.
- Enable Cron Job for Low Balance Checks – Select Yes to periodically check wallet balances and send alerts.
- Cron Execution Frequency – Choose how often the cron job runs: Daily, Weekly, or Monthly.
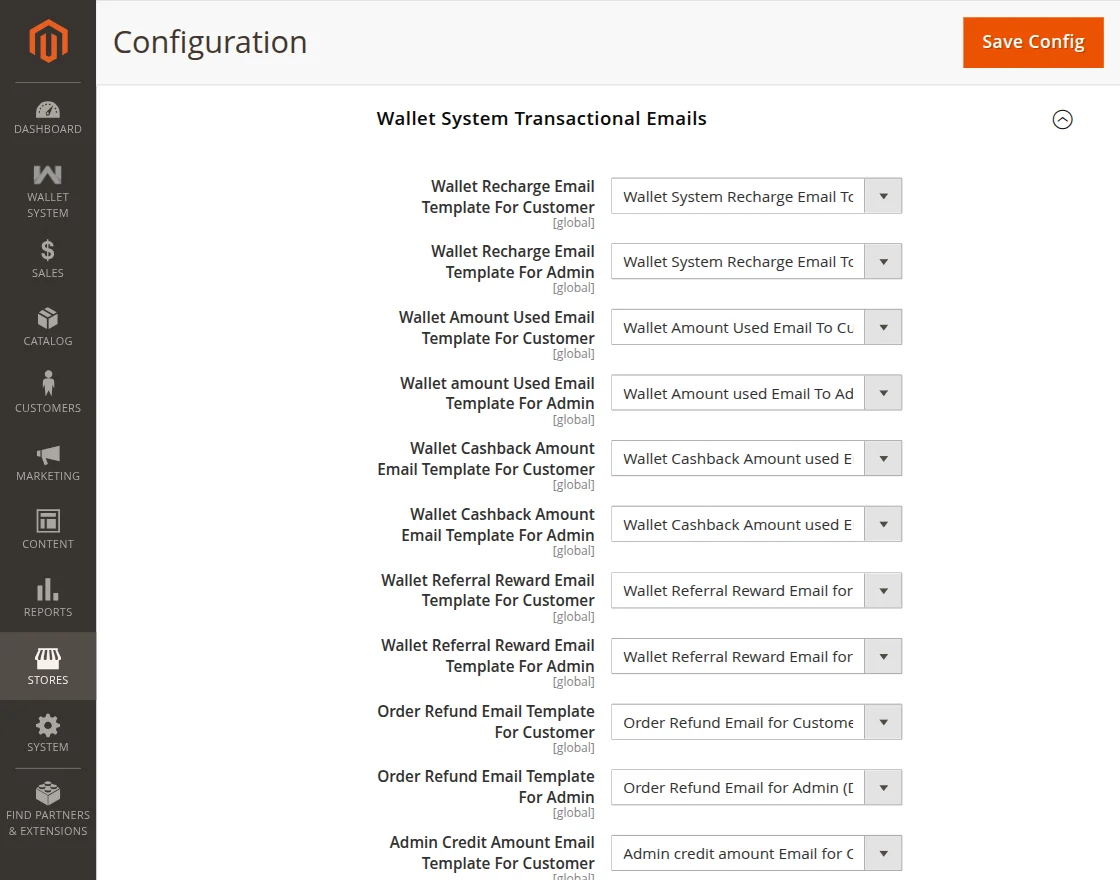
Wallet System Transaction Emails
- In this section, the admin can select the email templates used to send wallet transaction notifications for different events.
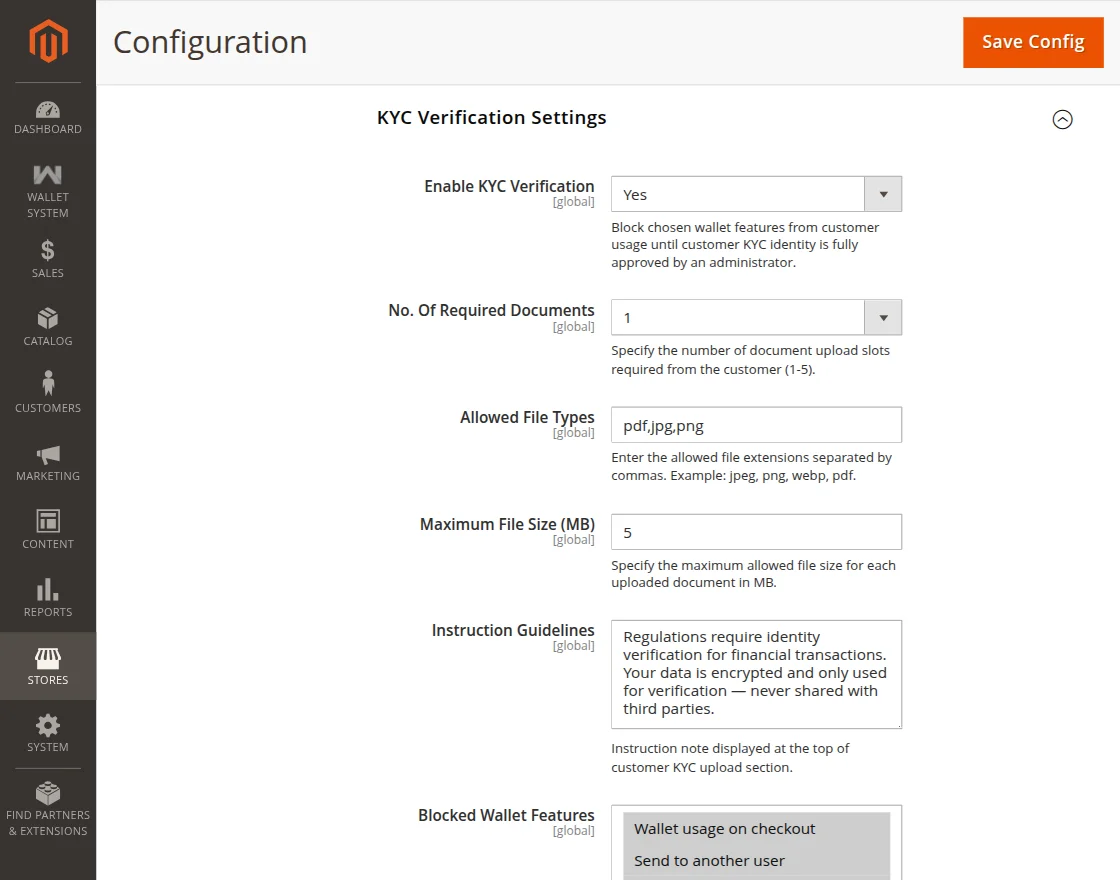
KYC Verification Settings
- Enable KYC Verification – Select Yes to require customers to complete KYC verification before accessing selected wallet features.
- No. of Required Documents – Enter the number of documents customers must upload for KYC.
- Allowed File Types – Specify the permitted file formats for document uploads.
- Maximum File Size (MB) – Set the maximum file size allowed for each uploaded document.
- Instruction Guidelines – Enter the instructions displayed on the KYC upload page.
- Blocked Wallet Features – Select the wallet features that remain unavailable until KYC verification is approved.
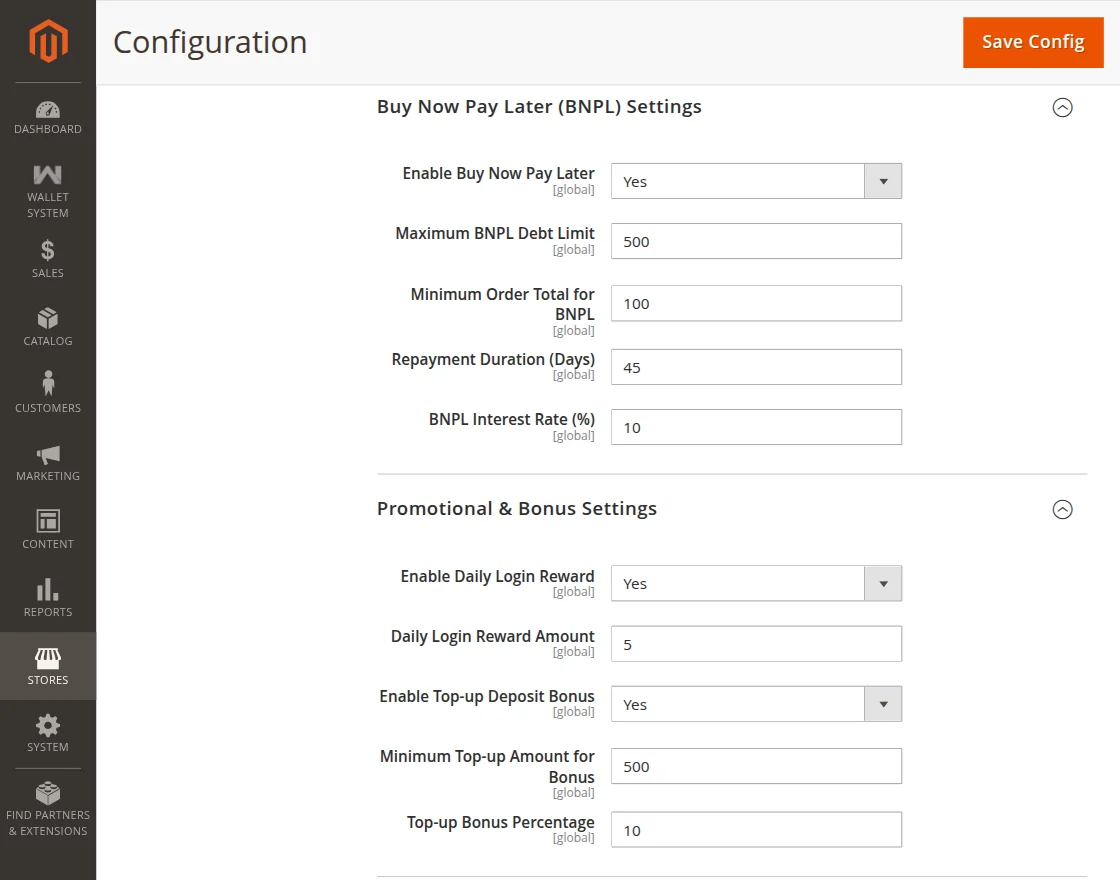
Buy Now Pay Later (BNPL) Settings
- Enable Buy Now Pay Later – Select Yes to enable the BNPL payment option.
- Maximum BNPL Debt Limit – Set the maximum outstanding BNPL amount allowed per customer.
- Minimum Order Total for BNPL – Enter the minimum order total required to use BNPL.
- Repayment Duration (Days) – Set the number of days customers have to repay their BNPL balance.
- BNPL Interest Rate (%) – Enter the interest rate applied to the BNPL amount.
Promotional & Bonus Settings
- Enable Daily Login Reward – Select Yes to reward customers for their first login of the day.
- Daily Login Reward Amount – Enter the reward amount credited for each daily login.
- Enable Top-up Deposit Bonus – Select Yes to reward customers with a bonus on wallet recharges.
- Minimum Top-up Amount for Bonus – Enter the minimum recharge amount required to qualify for the bonus.
- Top-up Bonus Percentage – Enter the bonus percentage applied to eligible wallet recharges.
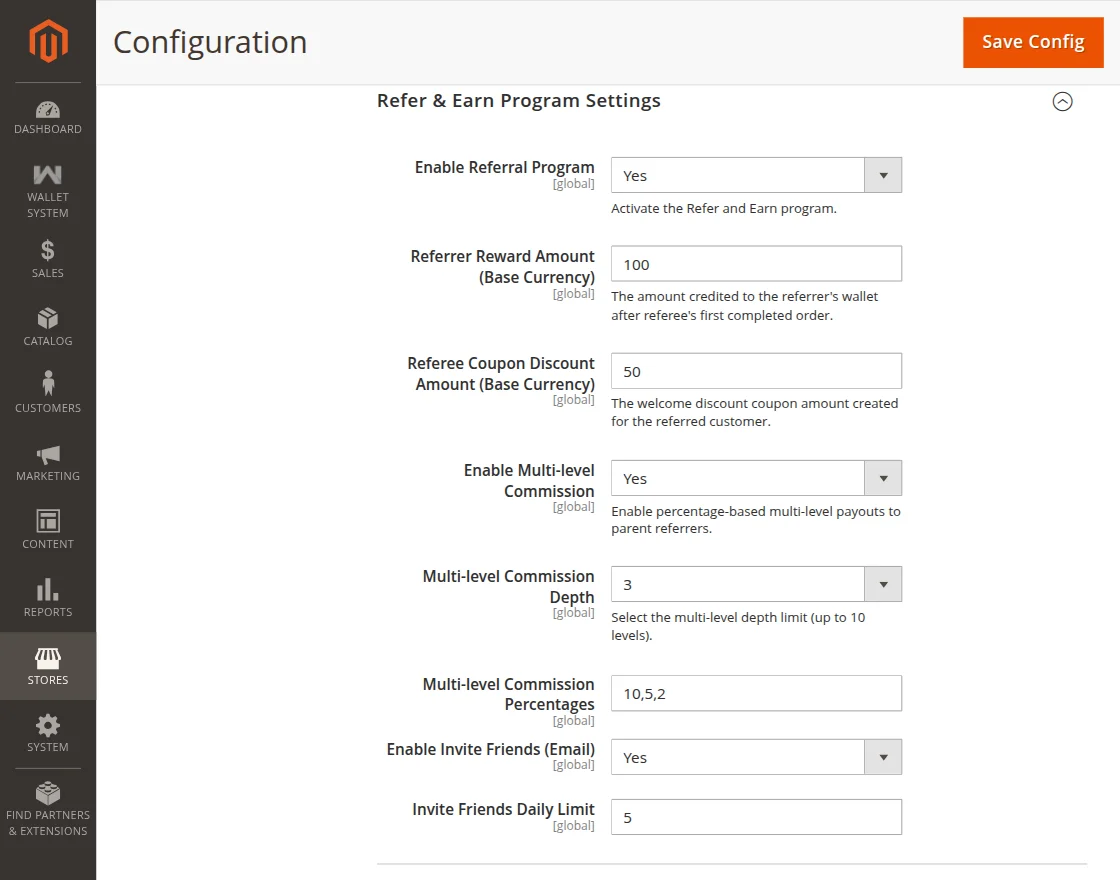
Refer & Earn Program Settings
- Enable Referral Program – Select Yes to enable the Refer & Earn program.
- Referrer Reward Amount (Base Currency) – Enter the reward amount credited to the referrer’s wallet after the referee’s first completed order.
- Referee Coupon Discount Amount (Base Currency) – Enter the discount amount for the coupon issued to the referred customer.
- Enable Multi-level Commission – Select Yes to enable multi-level referral commissions.
- Multi-level Commission Depth – Set the maximum number of referral levels eligible for commission.
- Multi-level Commission Percentages – Enter the commission percentage for each referral level, separated by commas.
- Enable Invite Friends (Email) – Select Yes to allow customers to invite friends via email.
- Invite Friends Daily Limit – Set the maximum number of email invitations a customer can send per day.
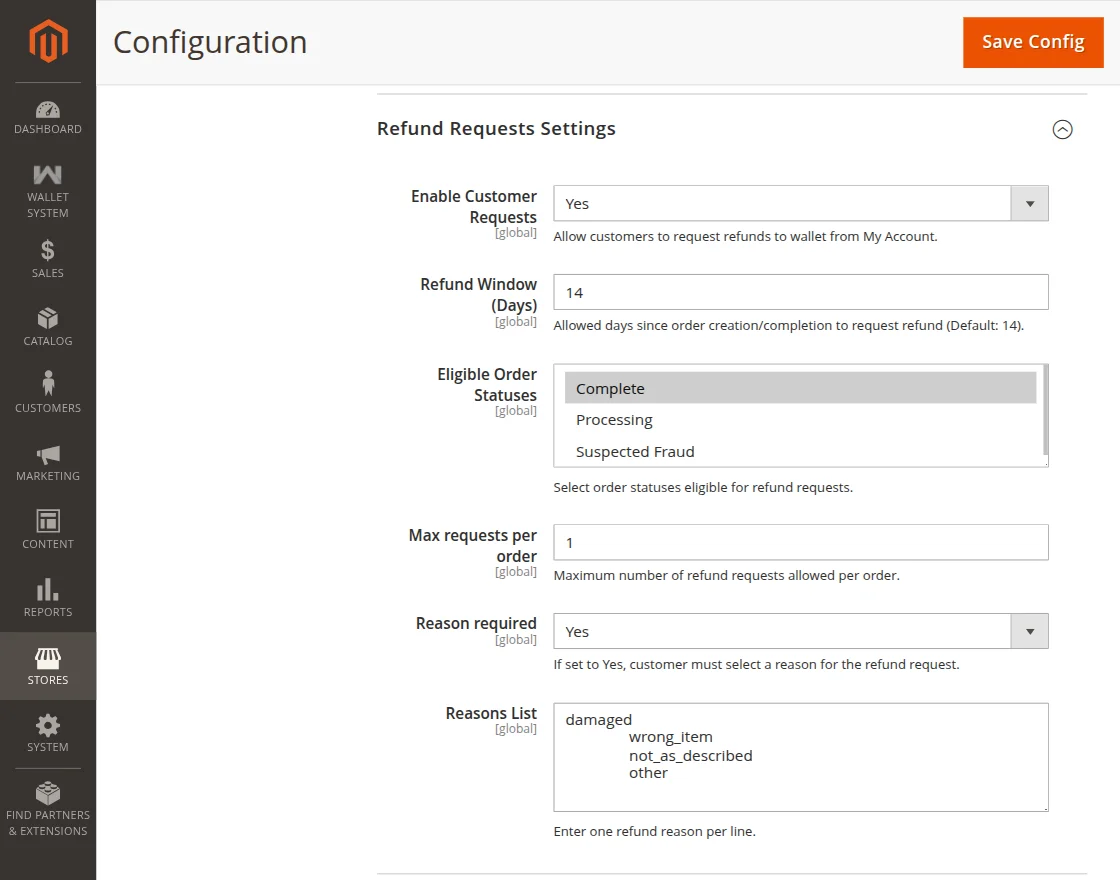
Refund Requests Settings
- Enable Customer Requests – Select Yes to allow customers to submit wallet refund requests.
- Refund Window (Days) – Set the number of days customers have to request a refund.
- Eligible Order Statuses – Select the order statuses eligible for refund requests.
- Max Requests Per Order – Set the maximum number of refund requests allowed per order.
- Reason Required – Select Yes to require customers to provide a refund reason.
- Reasons List – Enter the available refund reasons, one per line.
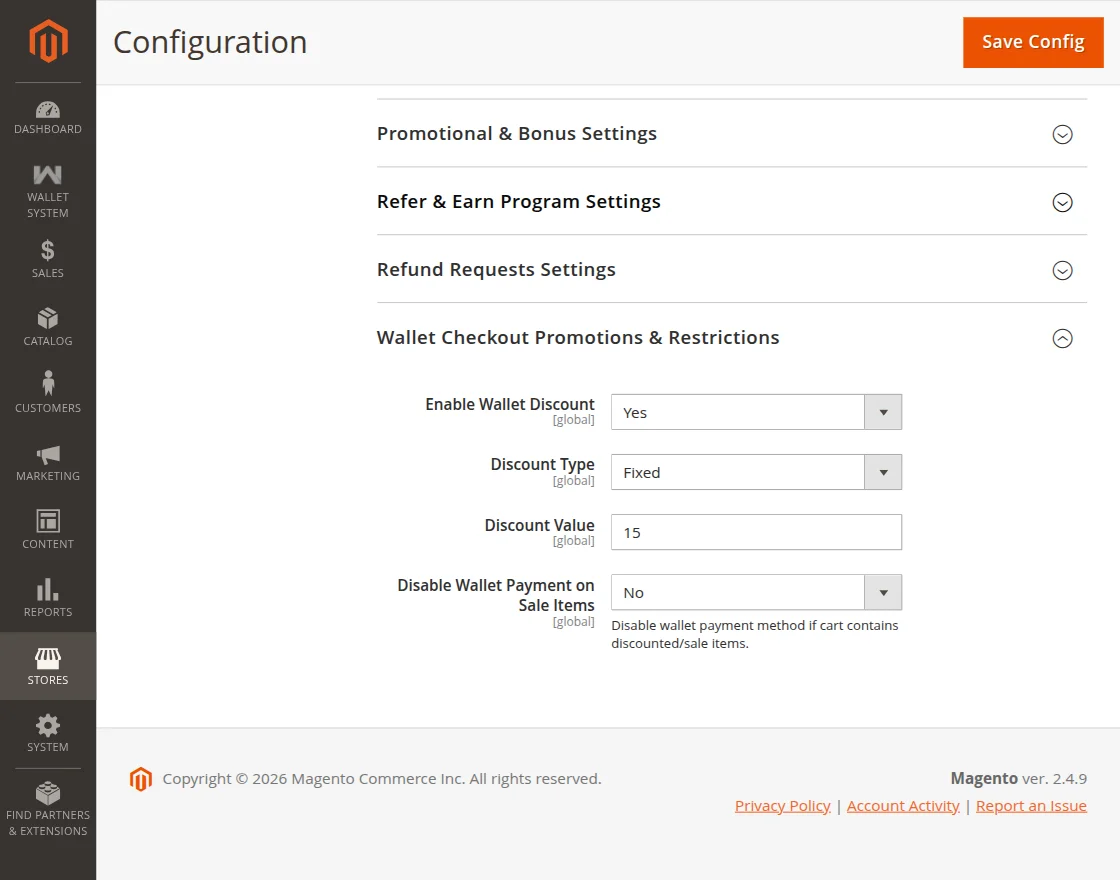
Wallet Checkout Promotions & Restrictions
- Enable Wallet Discount – Select Yes to offer a discount when customers pay using their wallet.
- Discount Type – Choose whether the discount is a Fixed amount or a Percentage.
- Discount Value – Enter the discount amount or percentage to apply.
- Disable Wallet Payment on Sale Items – Select Yes to prevent wallet payments for carts containing discounted or sale items.
Admin Management – Wallet System
To manage wallet system, navigate to Wallet System from the admin sidebar menu.
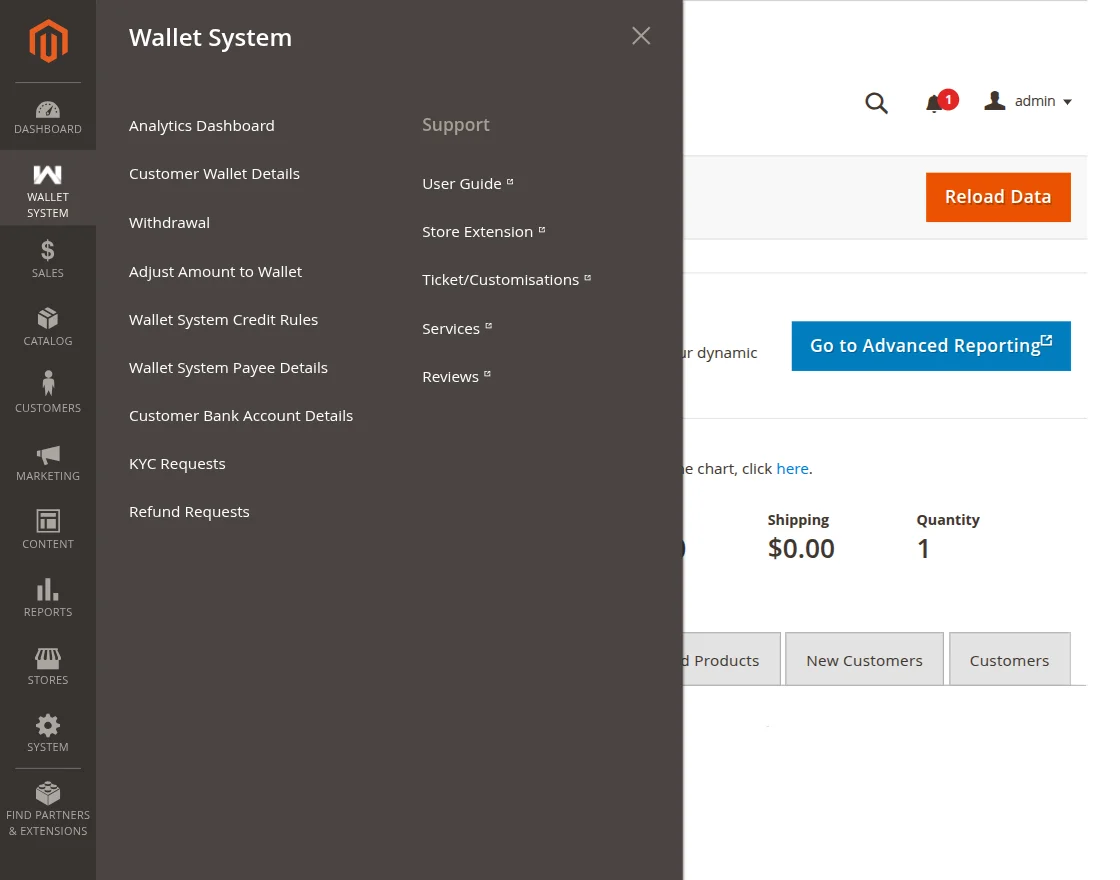
The Wallet System includes the following sections:
- Analytics Dashboard
- Customer Wallet Details
- Withdrawal
- Adjust Amount to Wallet
- Wallet System Credit Rules
- Wallet System Payee Details
- Customer Bank Account Details
- KYC Requests
- Refund Requests
Analytics Dashboard
The Analytics Dashboard offers a centralized view of wallet performance, customer activity, cashback, referrals, and BNPL status.
The Analytics Dashboard includes the following dashboard segments and visualizations:
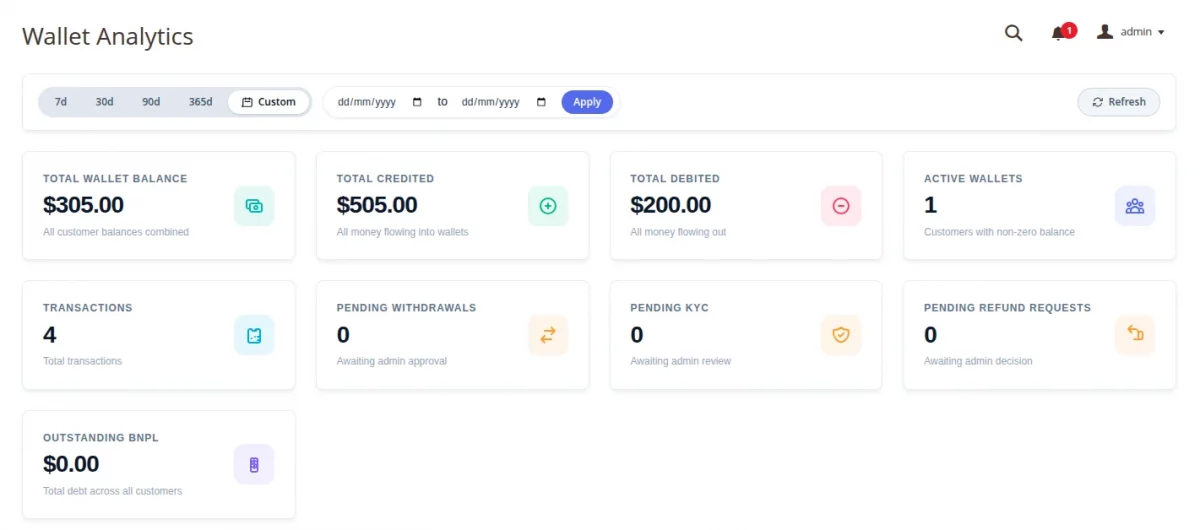
1. Date Filters & KPI Cards
Allows the admin to adjust date ranges and view core health metrics at a glance.

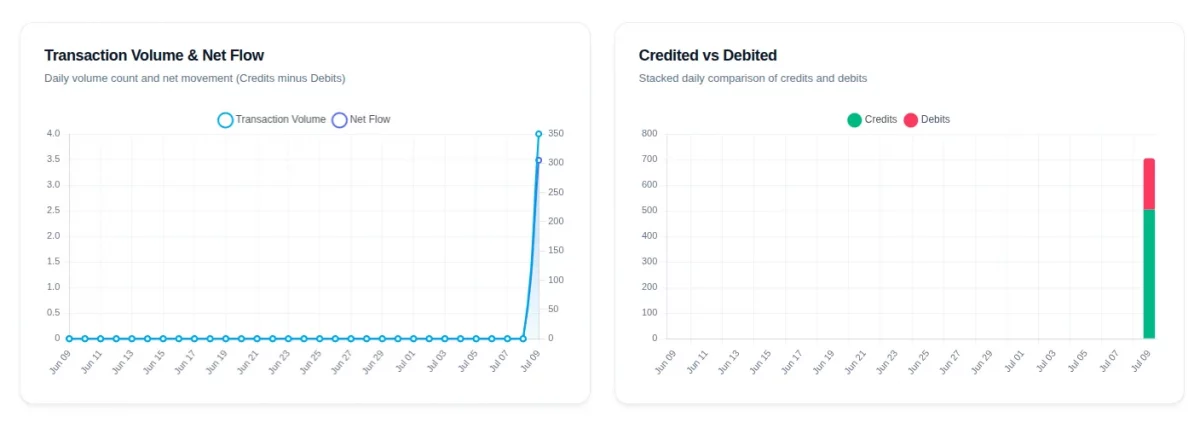
2. Analytical Charts (Volume, Credited, Debited, Net Flow)
Interactive charts showing day-by-day wallet transaction trends:
- Transaction Volume & Net Flow: Tracks total transactions counted and net currency added/removed over time.
- Credited vs Debited: Visualizes daily breakdown comparing funds credited (added) against debited (spent).

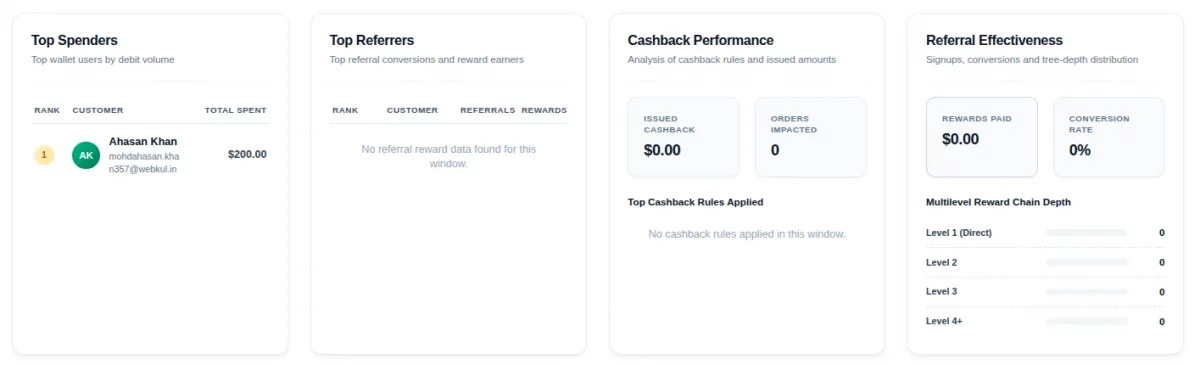
3. Campaign Effectiveness & Customer Standings
Displays flat tables and data matrices analyzing customer activity and promotional returns:
- Top Spenders: A listing of the top 5 customers with the highest amount of wallet debit actions.
- Top Referrers: A listing of the top 5 customers who earned the most referral bonus rewards by sharing referral links.
- Cashback Performance: Highlights effectiveness stats including total cashback issued, order counts, and top-performing credit rules.
- Referral Effectiveness: Displays conversion funnel metrics (invites sent, signups, completed purchases) and distribution depth chains.

Customer Wallet Details
The Customer Wallet Details section allows administrators to view and manage wallet information for all customers.
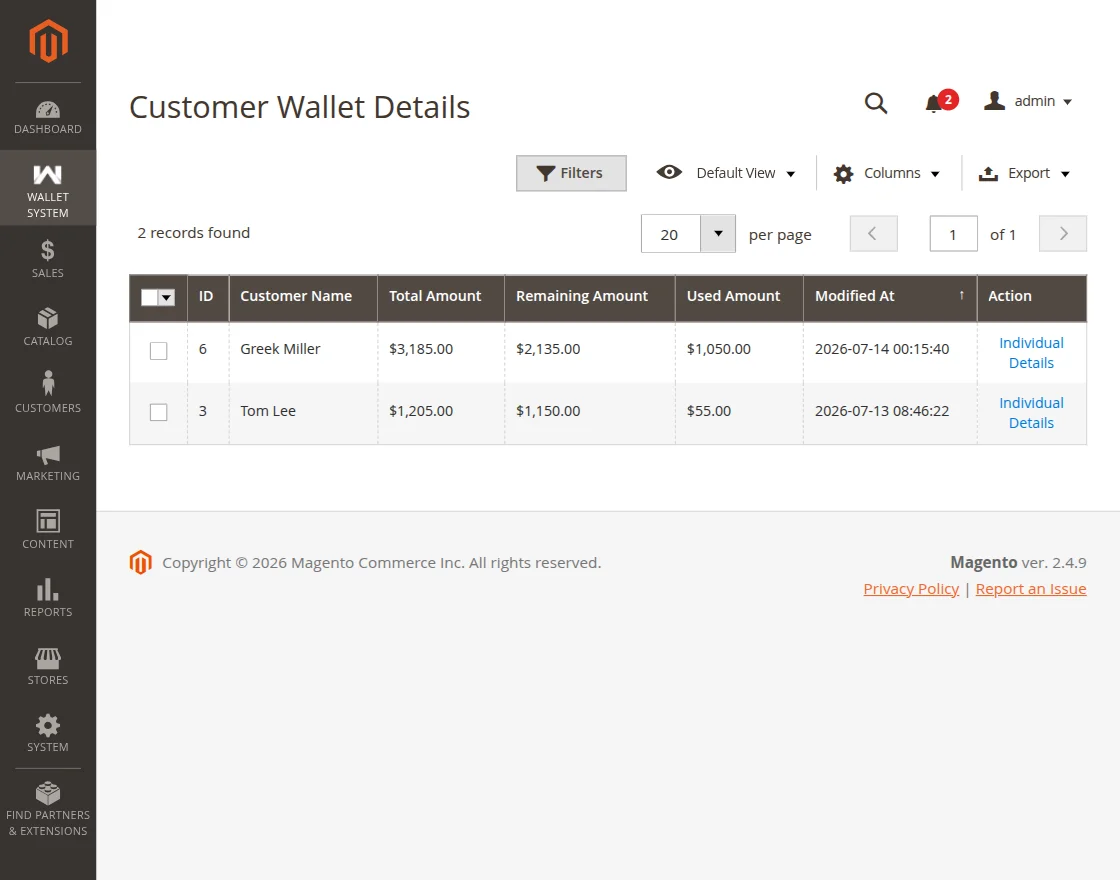
The customer wallet grid displays the following information:
- ID: Unique identifier of the wallet record.
- Customer Name: Name of the customer.
- Total Amount: Total funds available in the customer’s wallet.
- Remaining Amount: Current wallet balance available for use.
- Used Amount: Amount already spent from the wallet.
- Modified At: Date and time of the last wallet update.
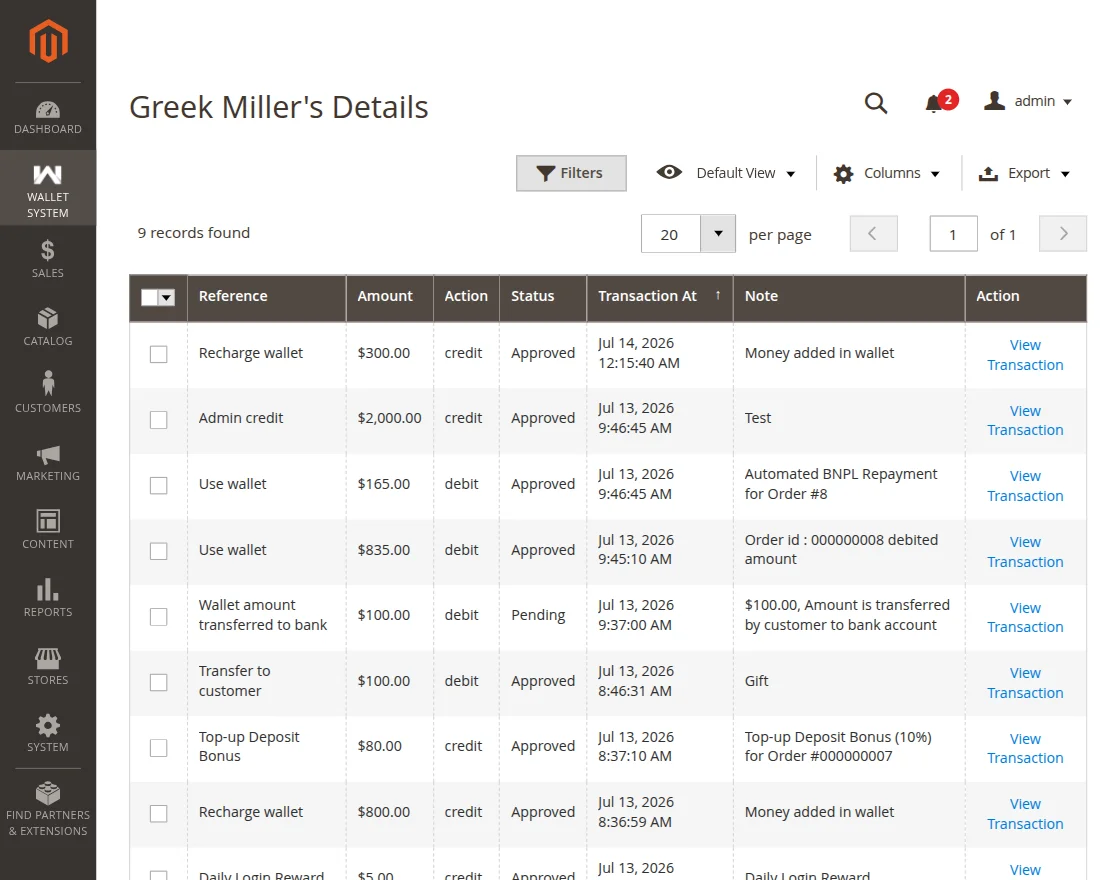
Note: Selecting Individual Details opens the complete wallet transaction history for the selected customer, including wallet credits, debits, and other wallet-related activities.
Withdrawal
The withdrawal section allows administrators to view, manage, approve, or reject customer withdrawal requests.
To access this section, navigate to Wallet System → Withdrawal.
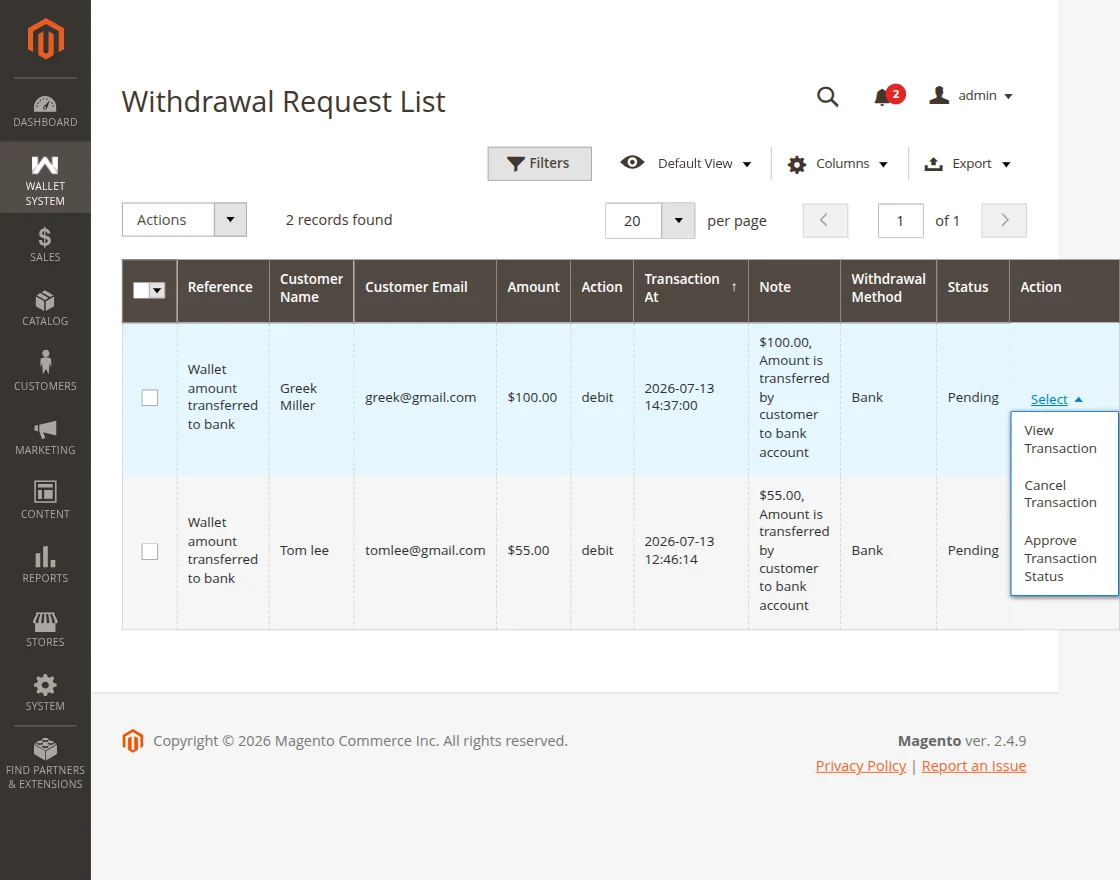
The withdrawal grid displays the following details:
- Reference – Description of the withdrawal transaction.
- Customer Name – Name of the customer requesting the withdrawal.
- Customer Email – Customer’s email address.
- Amount – Withdrawal amount requested.
- Action – Transaction type (Credit/Debit).
- Transaction At – Date and time the withdrawal request was submitted.
- Note – Additional information related to the withdrawal request.
- Withdrawal Method – Method selected for the withdrawal (such as Bank, PayPal, or Stripe).
- Status – Current status of the withdrawal request.
- Action – Manage the request using the available options.
From the Action dropdown, the admin can:
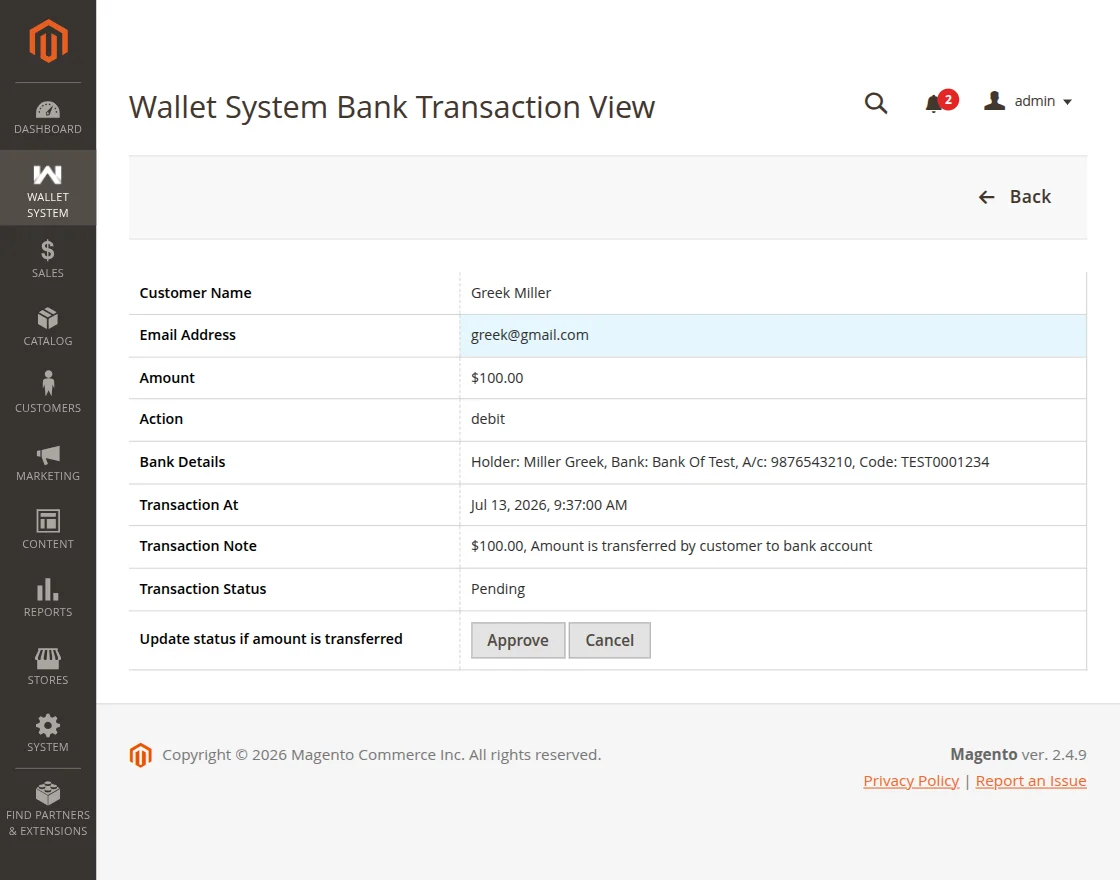
1: View Transaction – To view the complete details of a withdrawal request, click View Transaction from the Action dropdown. From this page, the admin can also Approve or Cancel the withdrawal request.
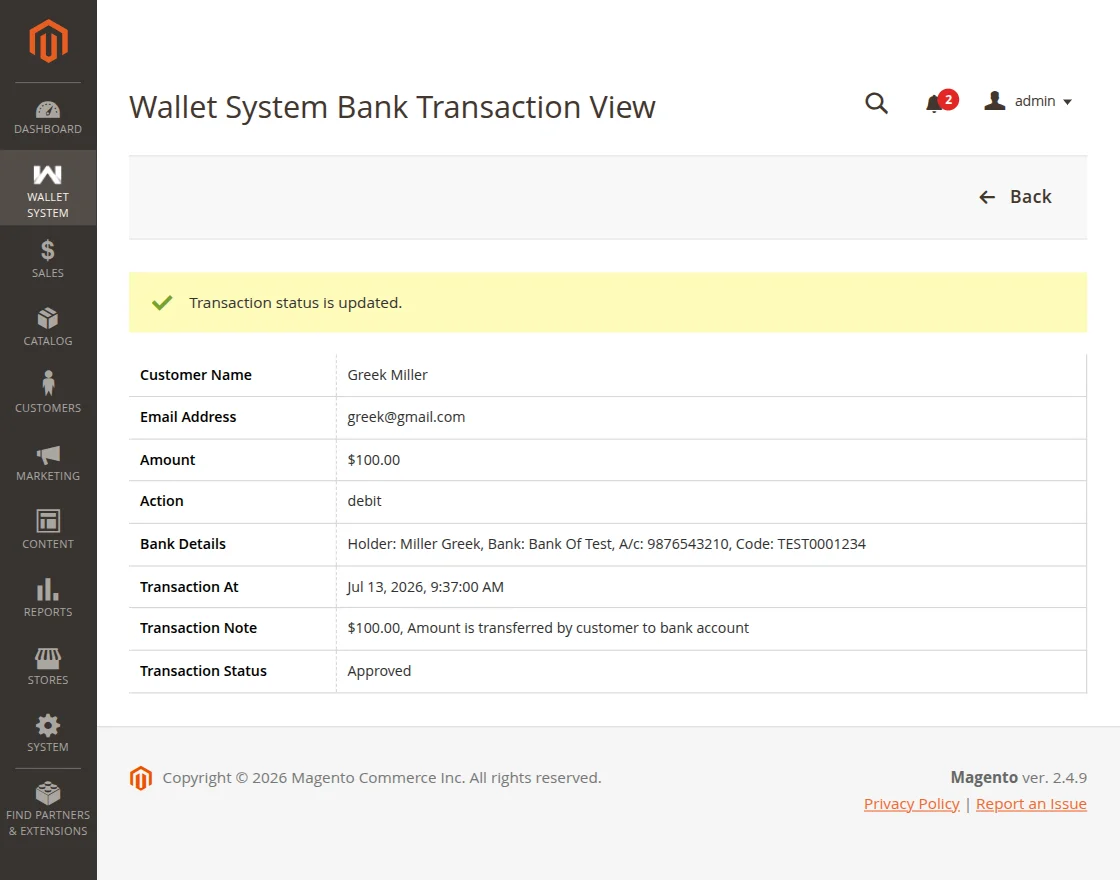
2: Approve Transaction Status – To approve the withdrawal request, click Approve Transaction Status from the Action dropdown.
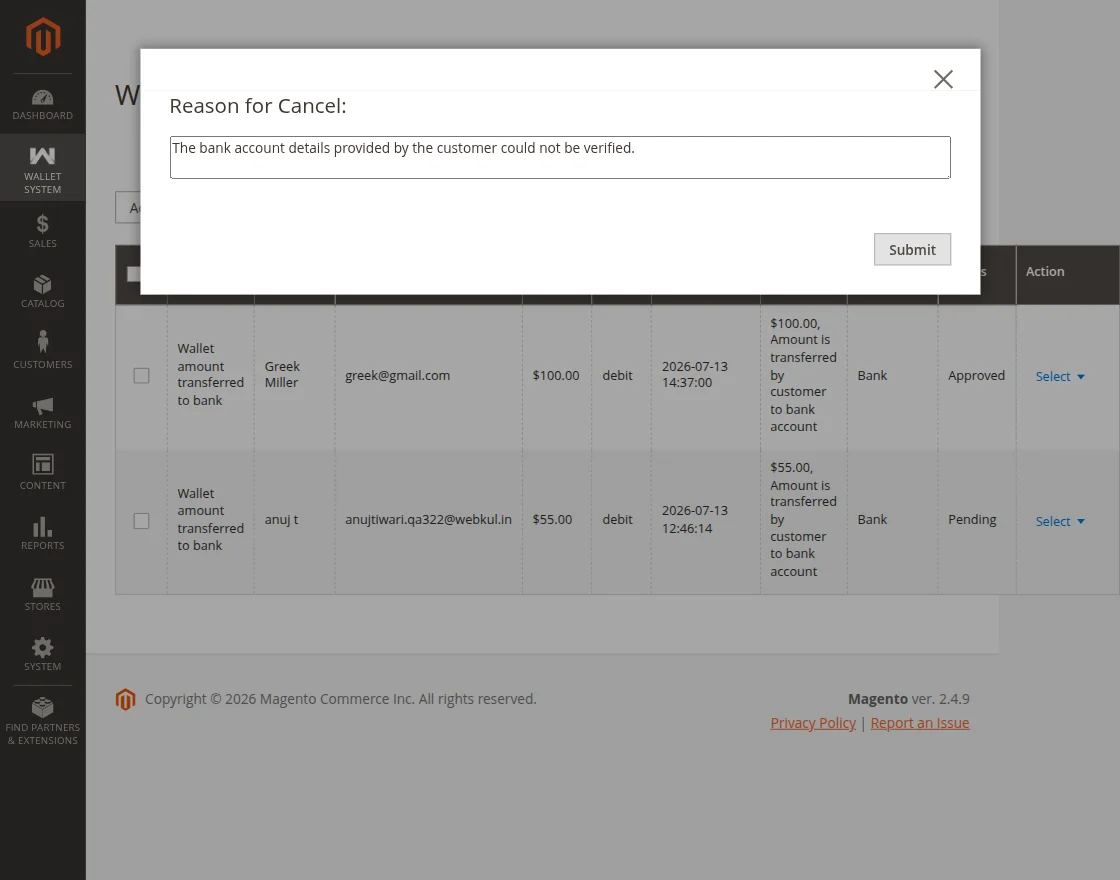
3: Cancel Transaction – To cancel a withdrawal request, select Cancel Transaction from the Action dropdown.
Enter the Reason for Cancellation and submit the request. The provided reason is recorded and the withdrawal status is updated to Cancelled.
Adjust Amount to Wallet
The Adjust Amount to Wallet section allows admin to manually credit or debit wallet balances for one or more customers.
To access this section, navigate to Wallet System → Adjust Amount to Wallet.

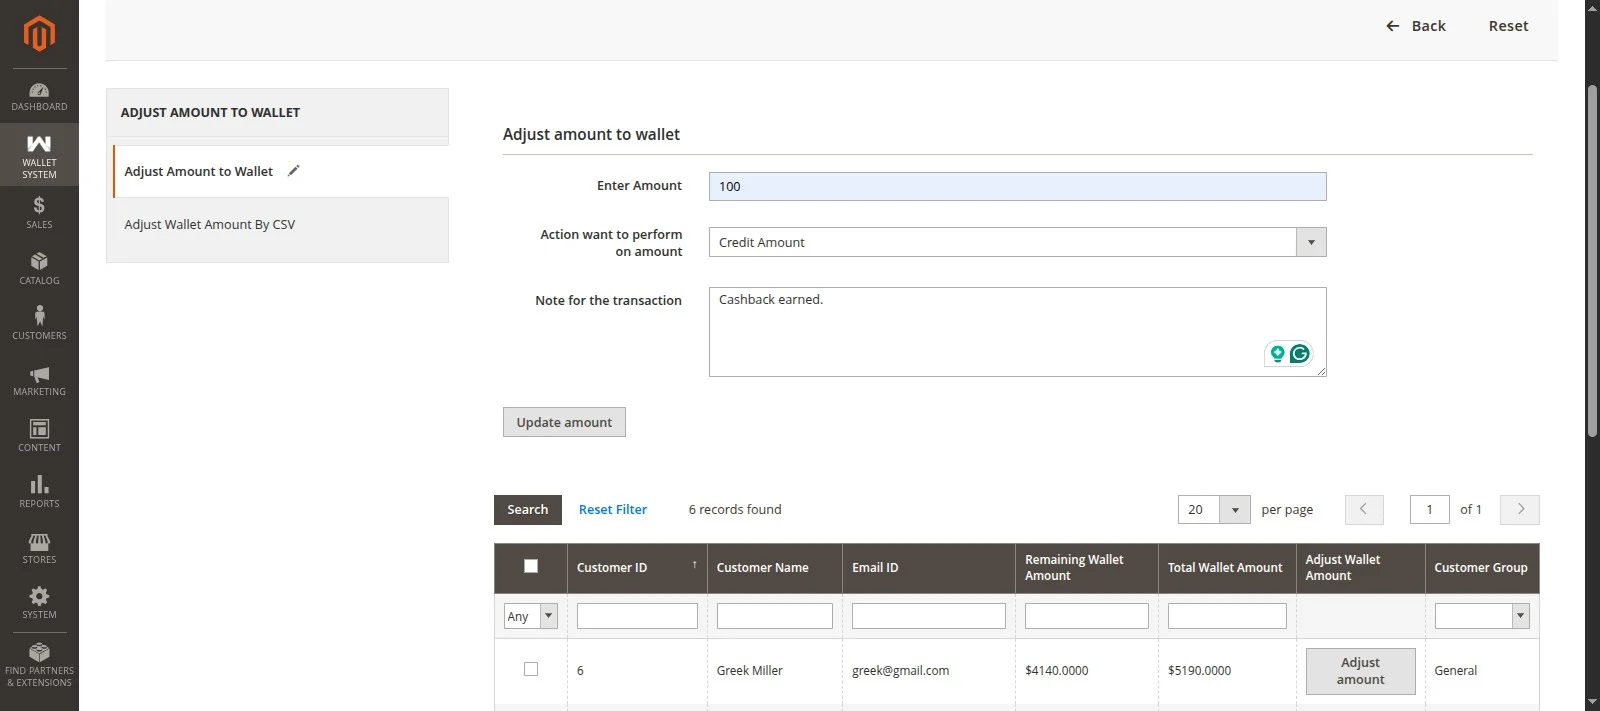
The admin can configure the following details:
- Enter Amount – Specify the amount to be credited or debited from the selected customers’ wallets.
- Action – Choose whether to Credit Amount or Debit Amount.
- Note for the Transaction – Enter a note describing the reason for the wallet adjustment.
Note: Before clicking Update Amount, the admin must select one or more customers from the customer grid.
After entering the required details, click Update Amount to apply the wallet adjustment to the selected customers.
Adjust Wallet Amount by CSV
The Adjust Wallet Amount by CSV section allows administrators to update wallet balances for multiple customers in a single operation using a CSV file.
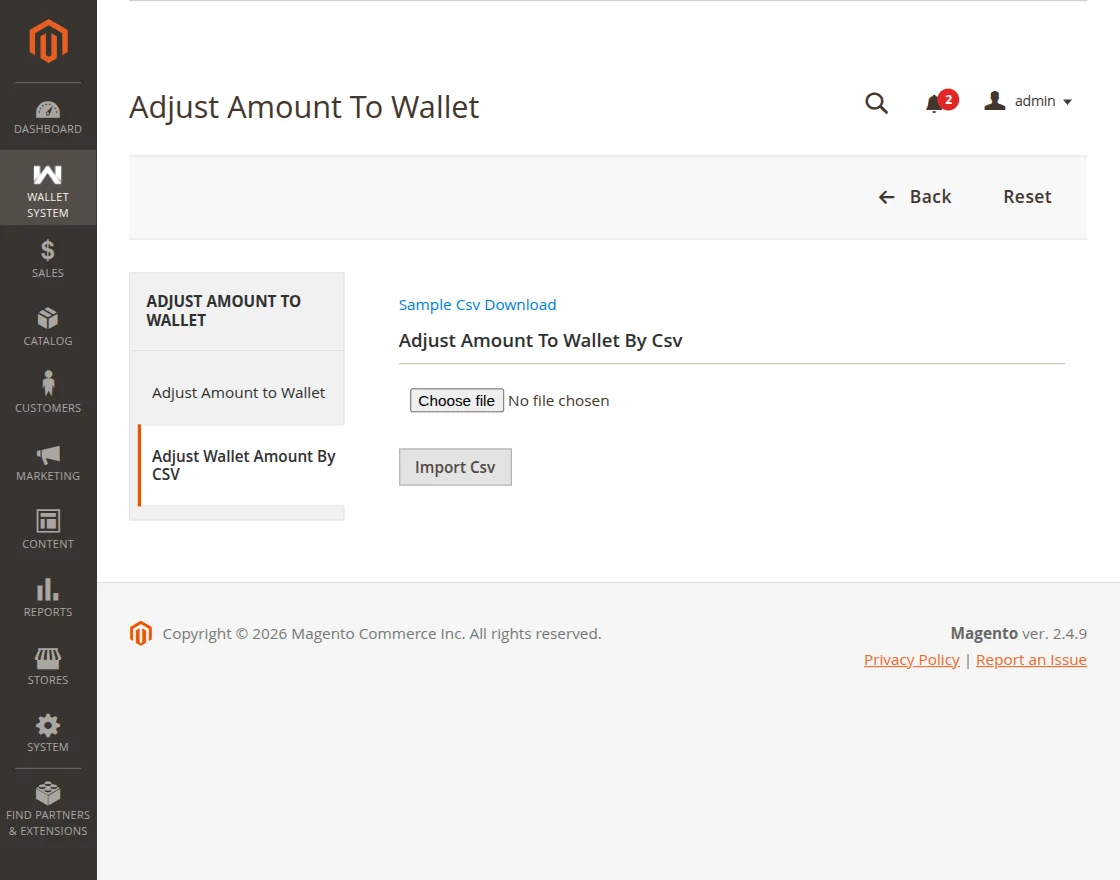
To perform a bulk wallet update:
- Navigate to Wallet System → Adjust Amount to Wallet → Adjust Wallet Amount by CSV.
- Download the sample CSV file and populate it with the required customer and wallet adjustment details.
- Upload the completed CSV file.
- Choose whether to Credit or Debit the wallet amount, if applicable.
- Click Import csv to process the file and update the selected customer wallets in bulk.
Wallet System Credit Rules
The Wallet System Credit Rules section allows admin to create and manage cashback rules for wallet transactions.
To access this section, navigate to Wallet System → Wallet System Credit Rules.
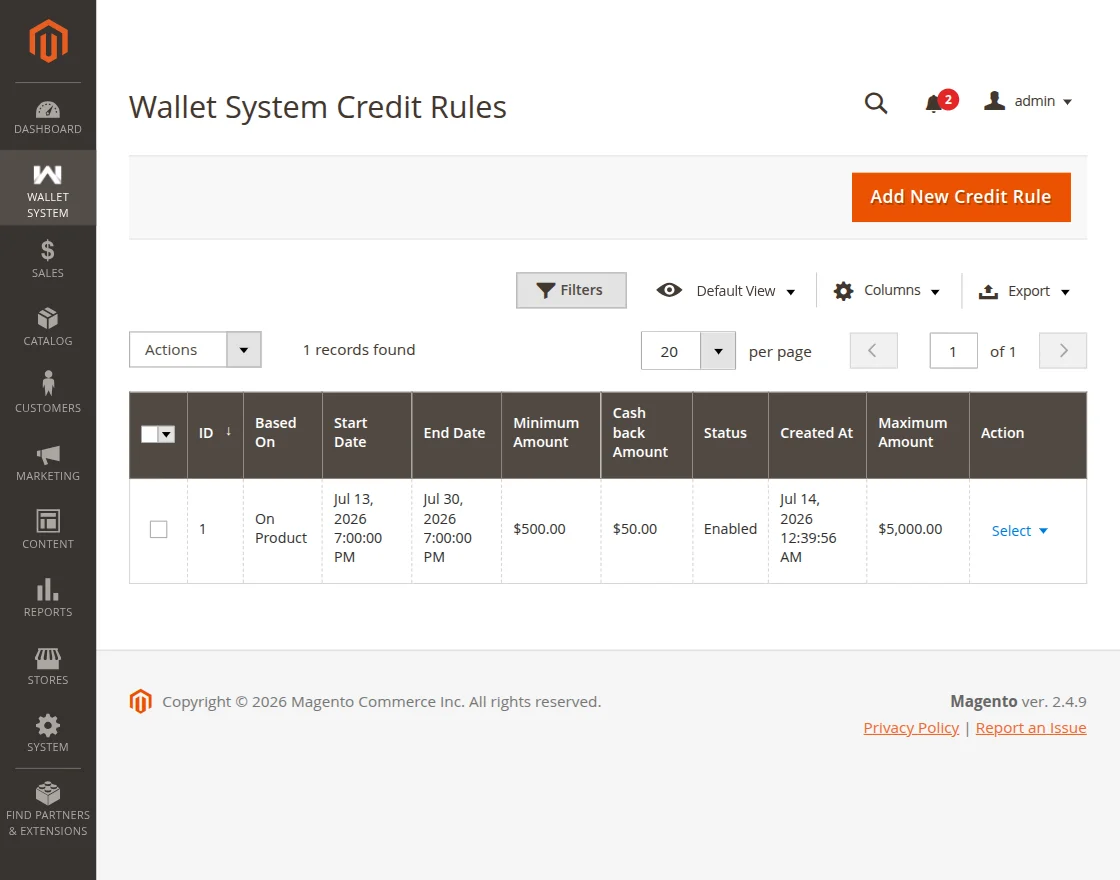
The credit rule grid displays the following details:
- ID – Unique identifier of the credit rule.
- Based On – The basis for cashback calculation (Product, Cart, or Category).
- Start Date – Date from which the rule becomes active.
- End Date – Date until which the rule remains active.
- Minimum Amount – Minimum cart or product amount required to qualify for cashback.
- Cashback Amount – Cashback value awarded under the rule.
- Status – Current status of the rule.
- Created At – Date and time the rule was created.
- Maximum Amount – Maximum cart or product amount eligible for the cashback rule.
- Action – Manage the credit rule.
Add Credit Rule
To create a new cashback rule, click Add New Credit Rule.
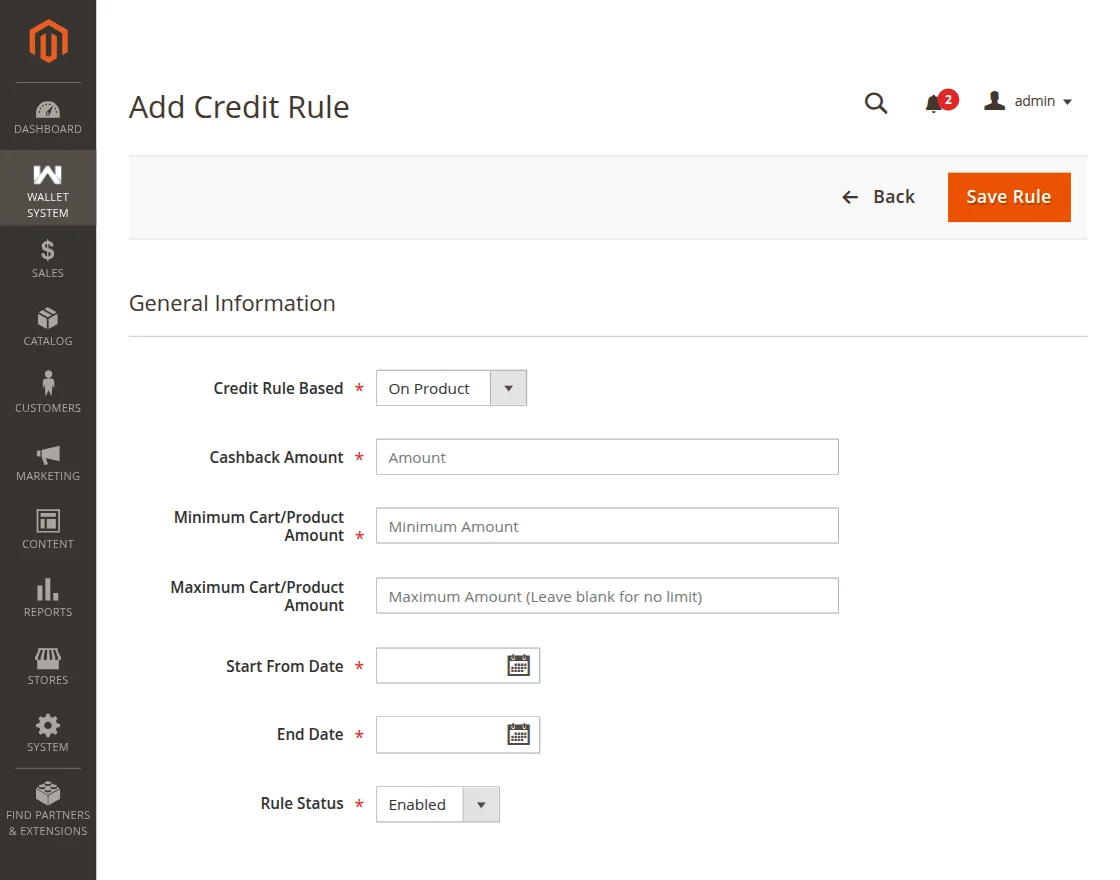
While creating a credit rule, configure the following fields:
- Credit Rule Based – Select whether the cashback rule applies to Product, Cart, or Category.
- Cashback Amount – Enter the cashback amount to be credited when the rule conditions are met.
- Minimum Cart/Product Amount – Enter the minimum cart or product amount required to qualify for cashback.
- Maximum Cart/Product Amount – Enter the maximum eligible cart or product amount. Leave this field blank to apply no upper limit.
- Start From Date – Select the date from which the credit rule becomes active.
- End Date – Select the date until which the credit rule remains active.
- Rule Status – Enable or disable the credit rule.
After configuring the required details, click Save Rule to create the cashback rule.
Wallet System Payee Details
The Wallet System Payee Details section allows administrators to view and manage the payees added by customers for wallet transfers.
To access this section, navigate to Wallet System → Wallet System Payee Details.
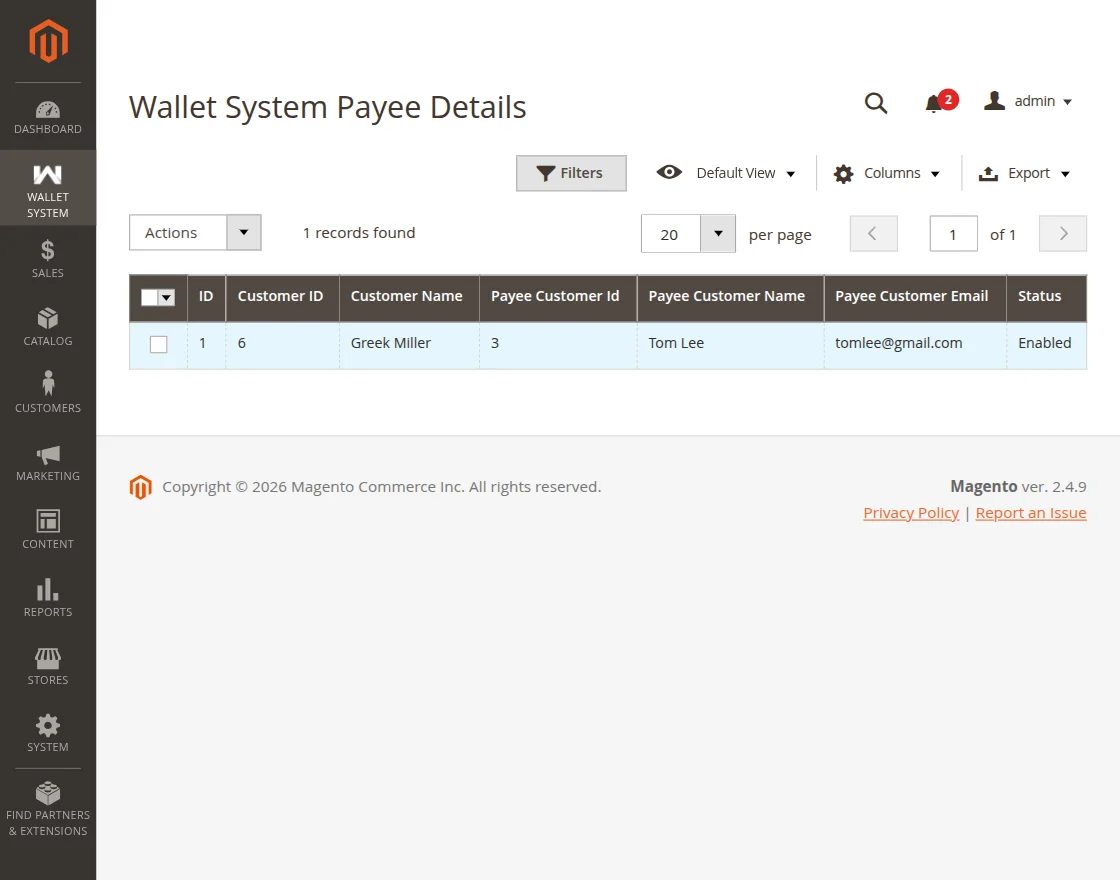
The payee grid displays the following details:
- ID – Unique identifier of the payee record.
- Customer ID – ID of the customer who added the payee.
- Customer Name – Name of the customer.
- Payee Customer ID – ID of the registered payee.
- Payee Customer Name – Name of the payee.
- Payee Customer Email – Email address of the payee.
- Status – Current status of the payee.
The admin can select one or more payee records and perform the following actions:
- Delete – Remove the selected payee record(s).
- Update Payee Status – Change the status of the selected payee(s) to Enabled or Disabled.
Customer Bank Account Details
The Customer Bank Account Details section allows administrators to view and manage the bank account details added by customers for wallet withdrawals.
To access this section, navigate to Wallet System → Customer Bank Account Details.
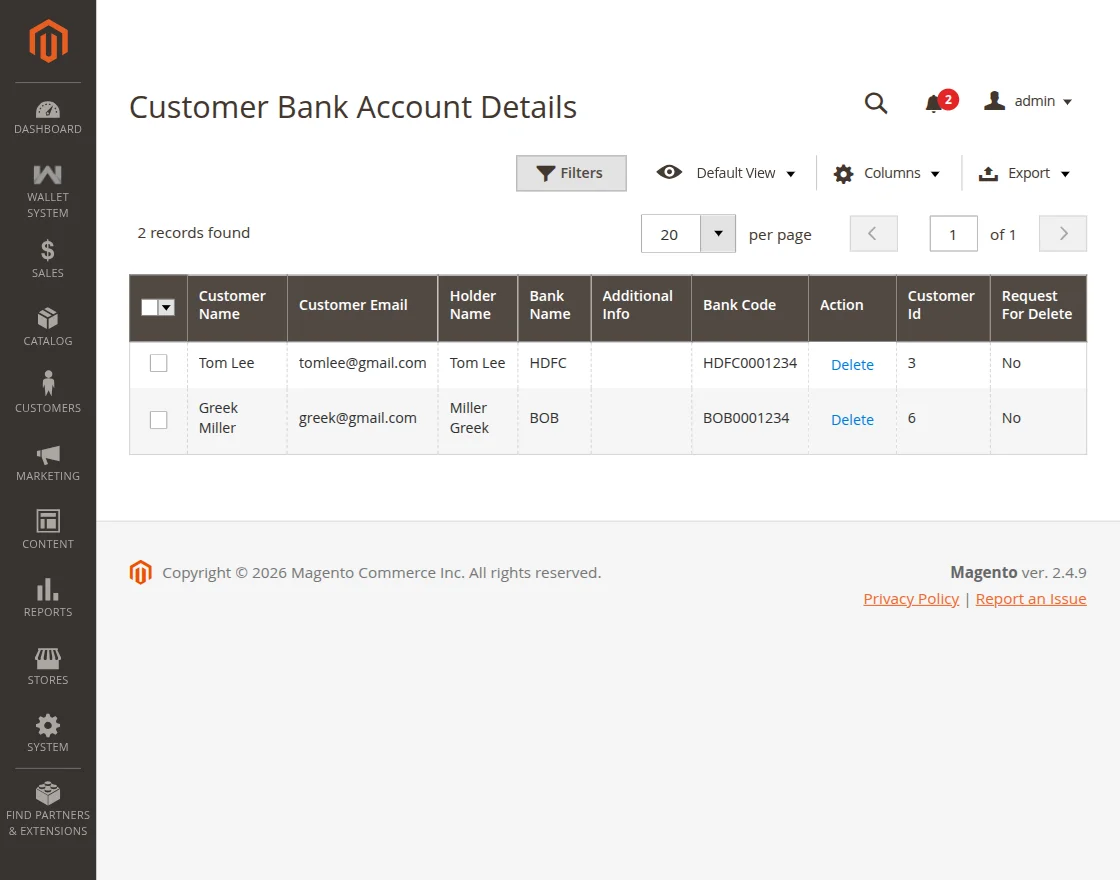
The bank account grid displays the following details:
- Customer Name – Name of the customer.
- Customer Email – Customer’s email address.
- Holder Name – Name of the bank account holder.
- Bank Name – Name of the bank.
- Additional Info – Additional information provided for the bank account, if any.
- Bank Code – Bank routing or IFSC code.
- Action – Delete the customer’s bank account details.
- Customer ID – Unique identifier of the customer.
- Request for Delete – Indicates whether the customer has requested deletion of the bank account details.
The admin can delete a customer’s bank account details by clicking Delete under the Action column.
KYC Requests
The KYC Requests section allows administrators to review and manage customer KYC verification requests.
To access this section, navigate to Wallet System → KYC Requests.
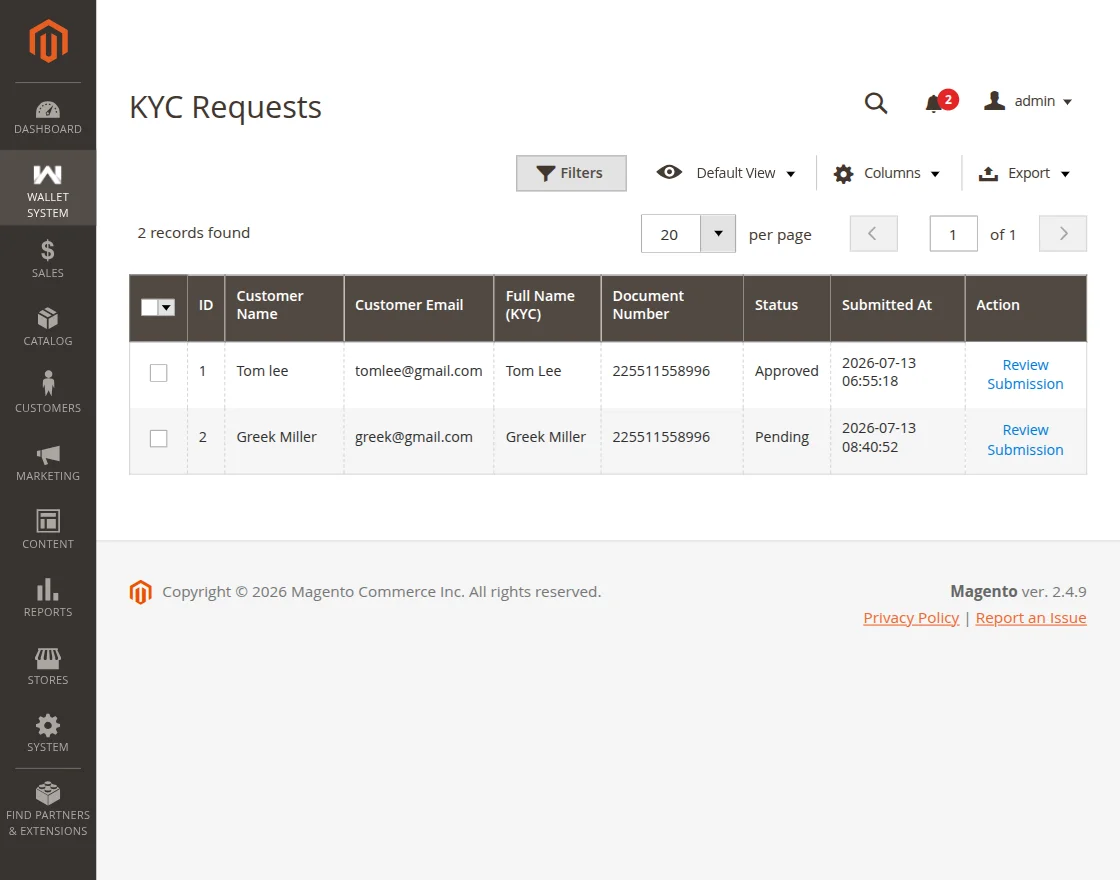
The KYC request grid displays the following details:
- ID – Unique identifier of the KYC request.
- Customer Name – Name of the customer.
- Customer Email – Customer’s email address.
- Full Name (KYC) – Name provided by the customer during KYC submission.
- Document Number – Identification document number submitted for verification.
- Status – Current status of the KYC request.
- Submitted At – Date and time the KYC request was submitted.
- Action – Review the submitted KYC documents.
Review KYC Submission
To review a KYC request, click Review Submission under the Action column.

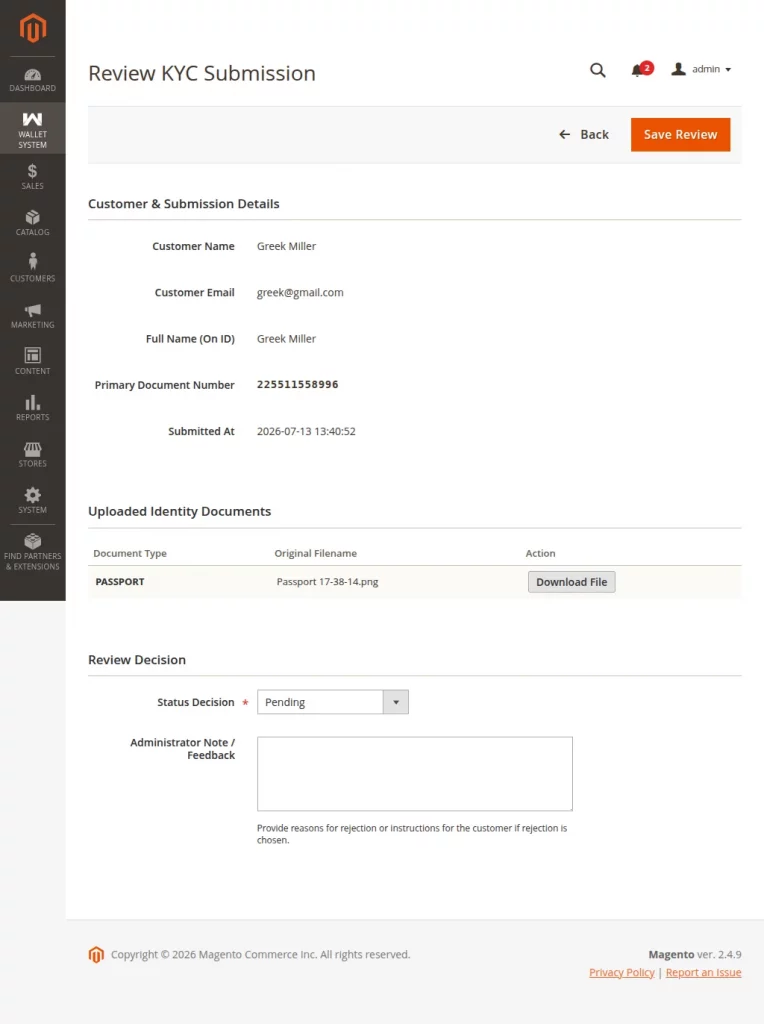
The review page displays the customer’s KYC details, including:
- Customer Name
- Customer Email
- Full Name (On ID)
- Primary Document Number
- Submitted At
- Uploaded Identity Documents – View the uploaded document details and click Download File to review the submitted document.
After reviewing the documents, the admin can:
- Status Decision – Select Approved, Rejected, or Pending.
- Administrator Note / Feedback – Enter comments or the reason for rejection, if applicable.
Once the review is complete, click Save Review to update the KYC request status.
Wallet Refund Requests
The Wallet Refund Requests section allows administrators to review and process customer requests for refunds to their wallet.
To access this section, navigate to Wallet System → Wallet Refund Requests.
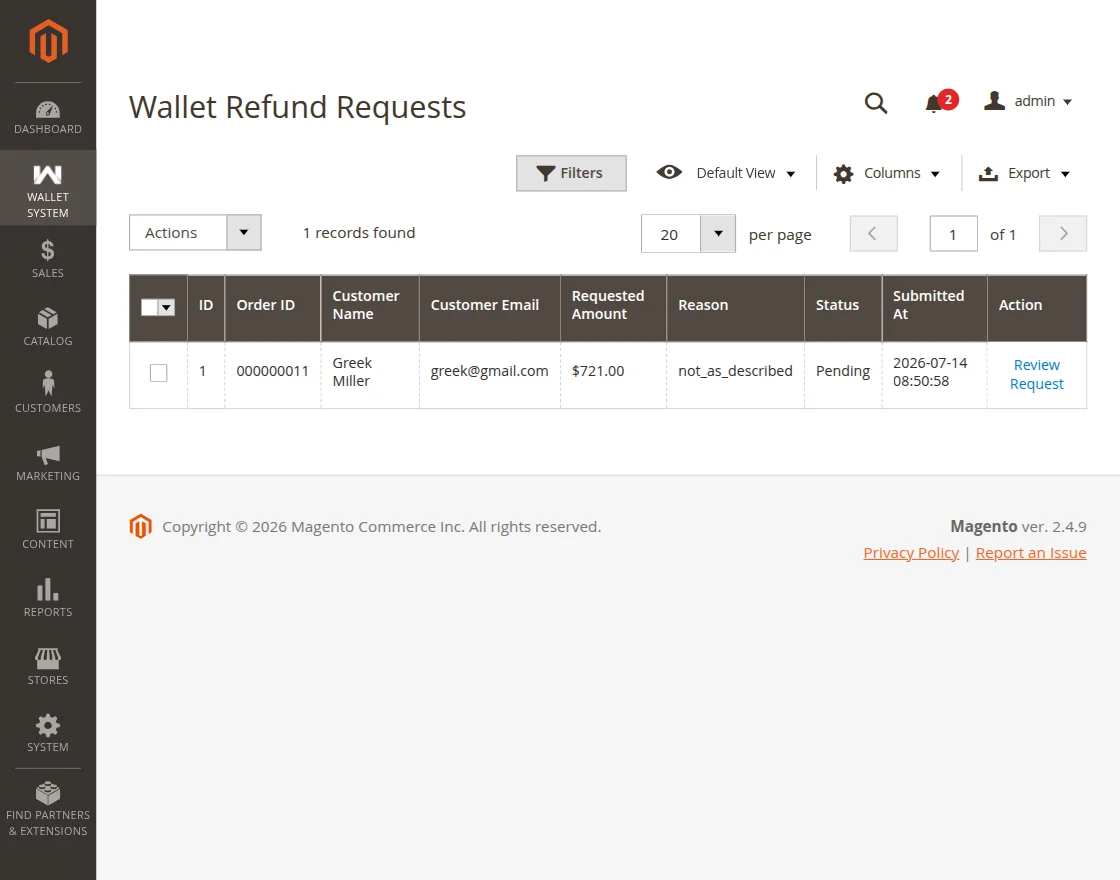
The refund request grid displays the following details:
- ID – Unique identifier of the refund request.
- Order ID – Order associated with the refund request.
- Customer Name – Name of the customer.
- Customer Email – Customer’s email address.
- Requested Amount – Amount requested for refund.
- Reason – Reason provided by the customer for the refund request.
- Status – Current status of the refund request.
- Submitted At – Date and time the refund request was submitted.
- Action – Review the refund request.
Review Refund Request
To review a refund request, click Review Request under the Action column.
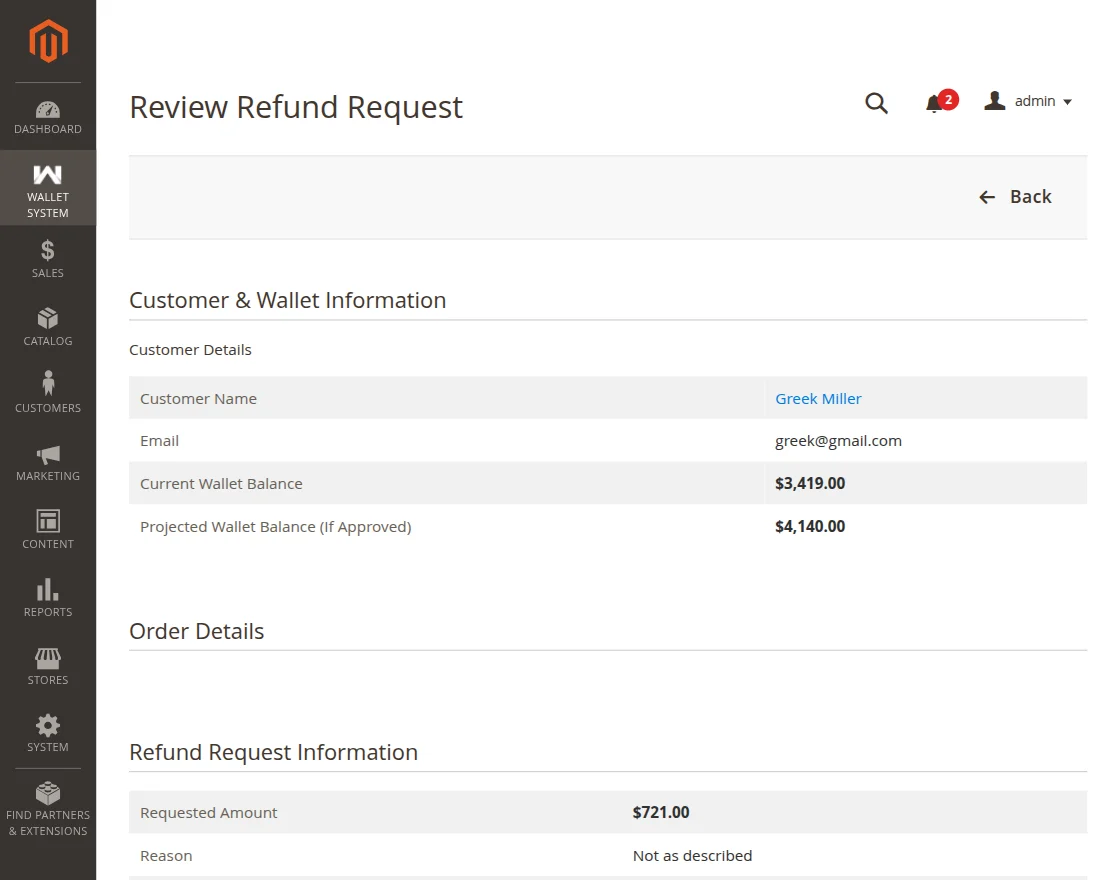
The review page provides complete details of the refund request, including:
- Customer Details – Customer name, email address, current wallet balance, and projected wallet balance after the refund.
- Order Details – Order number, order date, order status, grand total, refunded amount, and payment method.
- Items Ordered – Lists the ordered products along with their SKU, item status, price, quantity, and subtotal.
- Refund Request Information – Displays the requested refund amount, refund reason, customer note, and current request status.
To process the request:
- Action – Select the appropriate action, such as Approve, Reject, or Keep Pending.
- Admin Note – Enter any comments or the reason for the selected action.
After reviewing the request, click Submit Decision to update the refund request status.
Storefront Workflow
After configuring the Wallet System from the Magento Admin, customers can access and use wallet features from their My Account section and during the checkout process.
To access the Wallet System, navigate to: My Account → My Wallet
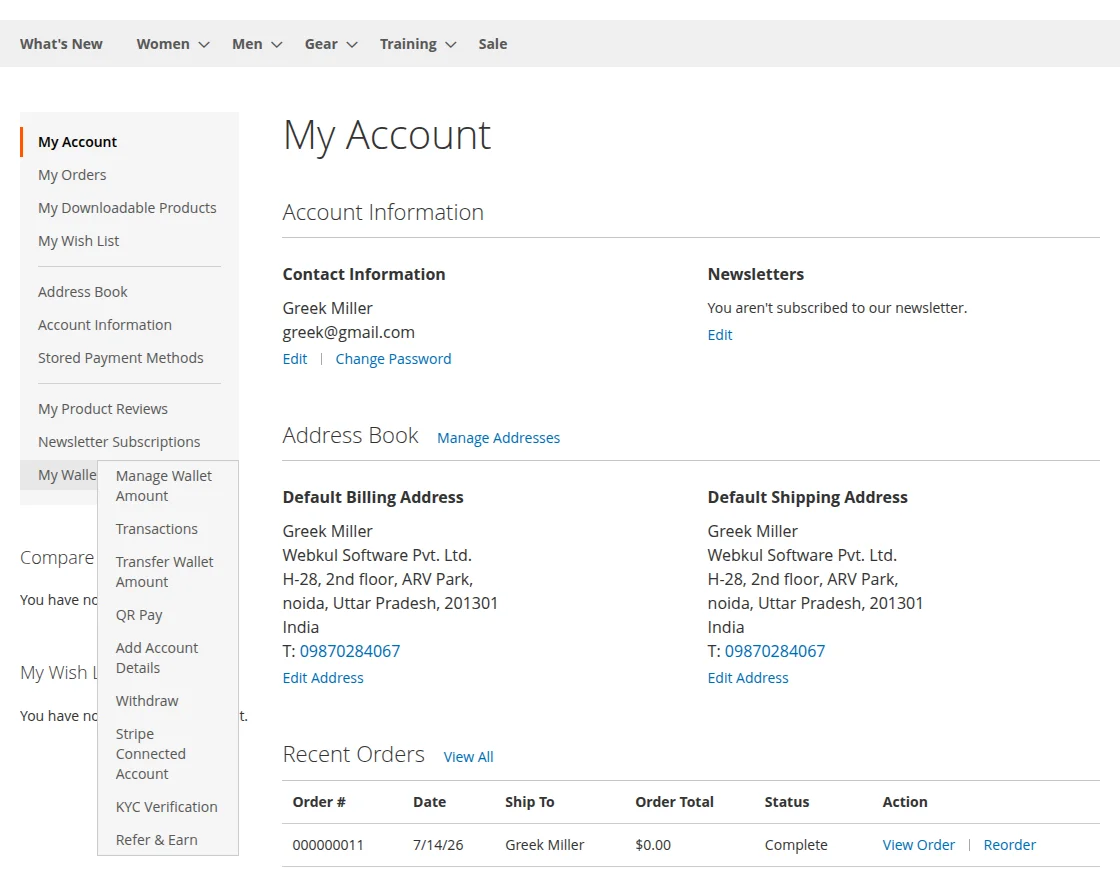
The My Wallet menu includes the following sections:
- Manage Wallet Amount
- Transactions
- Transfer Wallet Amount
- QR Pay
- Add Account Details
- Withdraw
- KYC Verification
- Refer & Earn
Manage Wallet Amount
The My Wallet page provides customers with a centralized dashboard to manage their wallet balance, rewards, and wallet-related activities.
To access this page, navigate to My Account → My Wallet → Manage Wallet Amount.
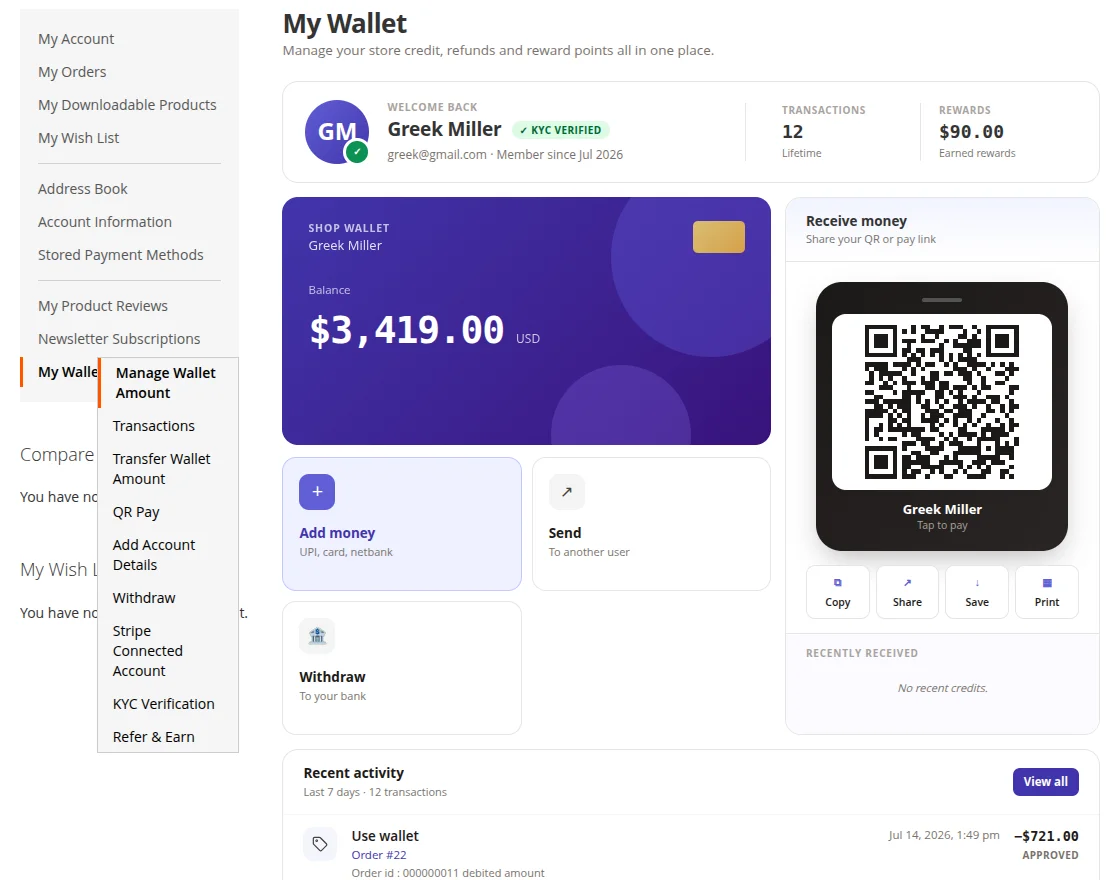
The My Wallet dashboard displays the following information:
- Customer Information – Displays the customer’s name, email address, membership details, and KYC verification status.
- Transactions – Shows the total number of wallet transactions.
- Lifetime Rewards – Displays the total rewards earned by the customer.
- Wallet Balance – Shows the current wallet balance available for spending.
- Add Money – Allows customers to add funds to their wallet using the available payment methods.
- Send – Enables customers to transfer wallet funds to another registered customer.
- Withdraw – Allows customers to submit a withdrawal request to transfer wallet funds to their registered payout account.
- Recent Activity – Displays the most recent wallet transactions, including rewards, credits, debits, transfers, and other wallet activities. Customers can click View All to view the complete transaction history.
Add Money To Wallet:
The Add Money to Wallet feature allows customers to recharge their wallet using the available payment methods.
To add money to the wallet, click Add Money.
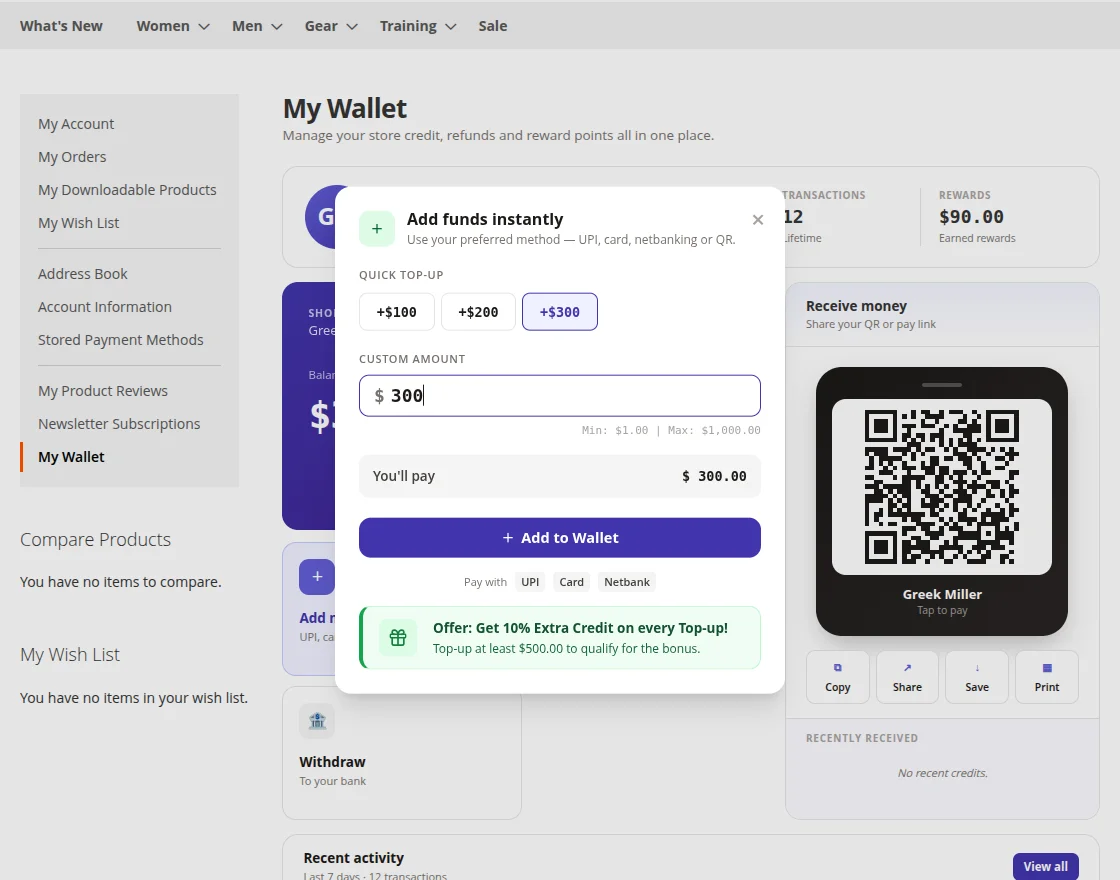
The Add Money popup includes the following options:
- Quick Top-up – Select a predefined recharge amount.
- Custom Amount – Enter a custom recharge amount within the configured limits.
- You’ll Pay – Displays the total amount to be charged.
- Offer – Displays any applicable wallet recharge bonus or promotional offer.
After clicking Add to Wallet, the selected wallet amount is added to the shopping cart.
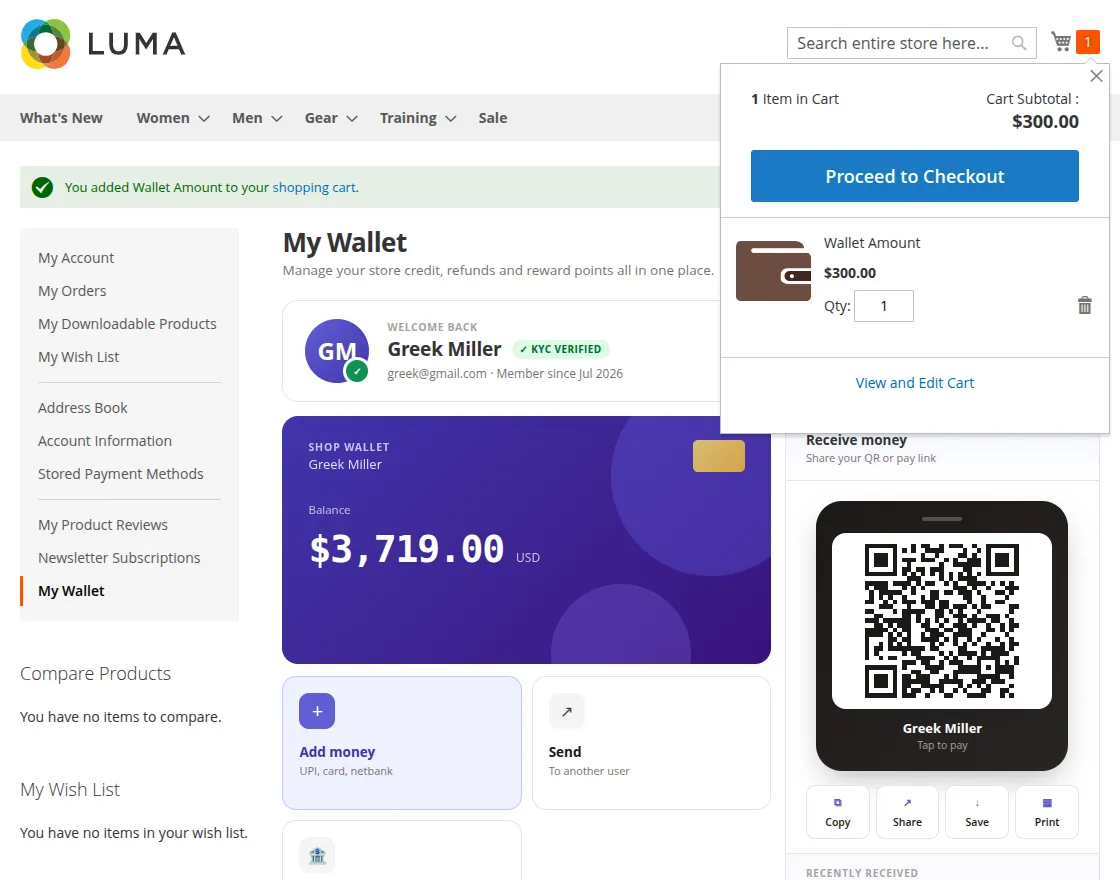
The customer can review the cart and click Proceed to Checkout to continue with the purchase.
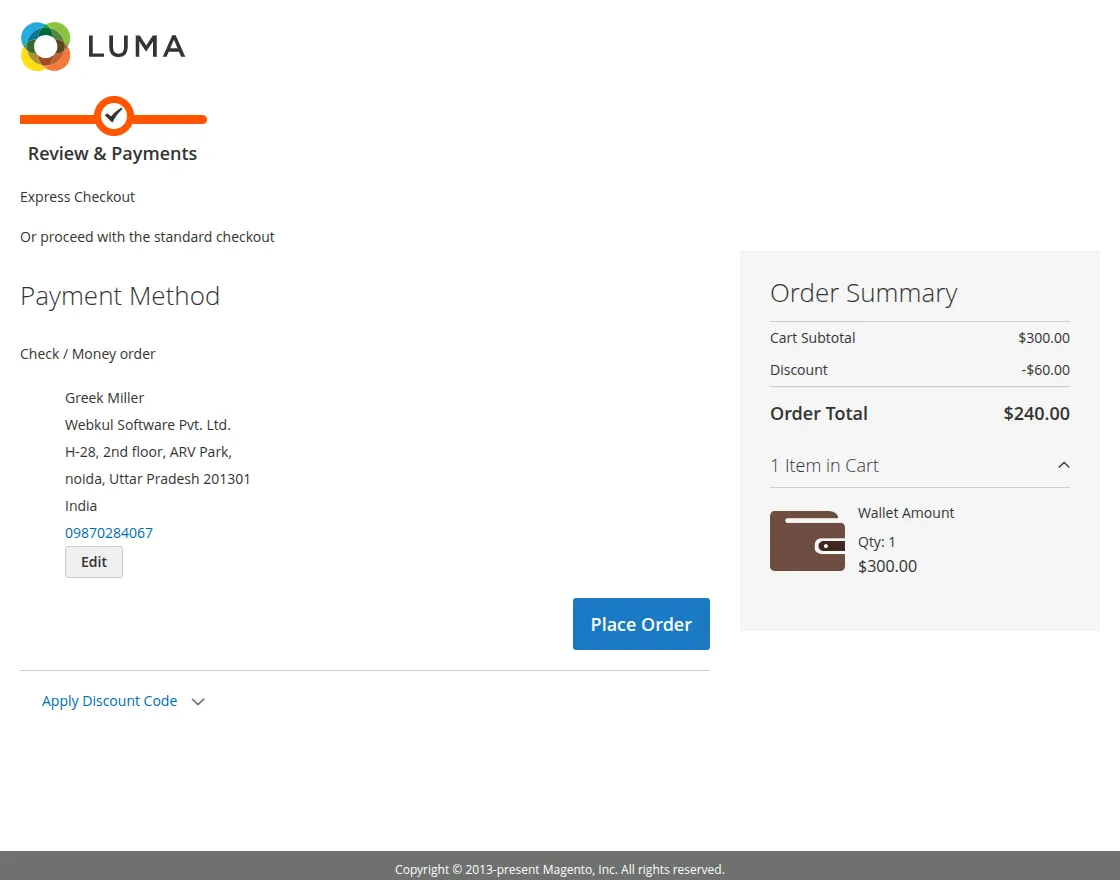
On the checkout page, the customer completes the payment using the selected payment method and clicks Place Order.
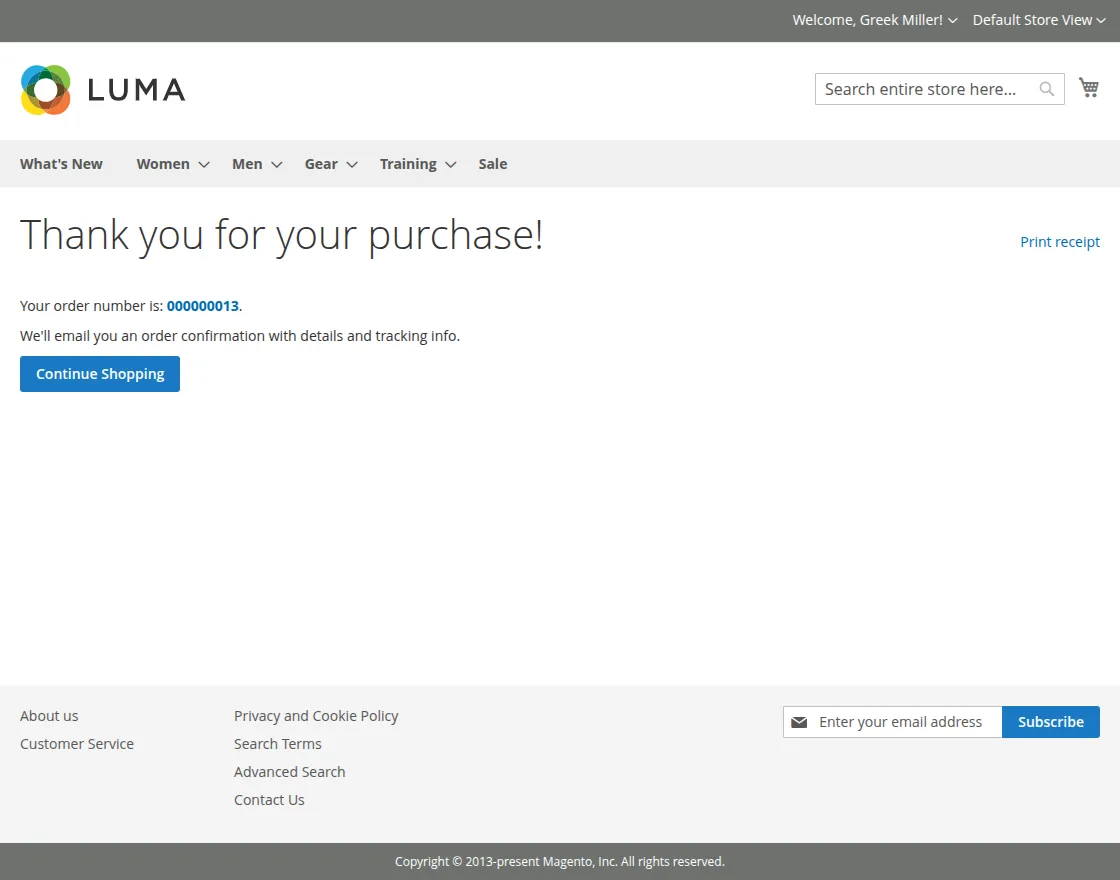
After the order is placed, the wallet recharge request is created.
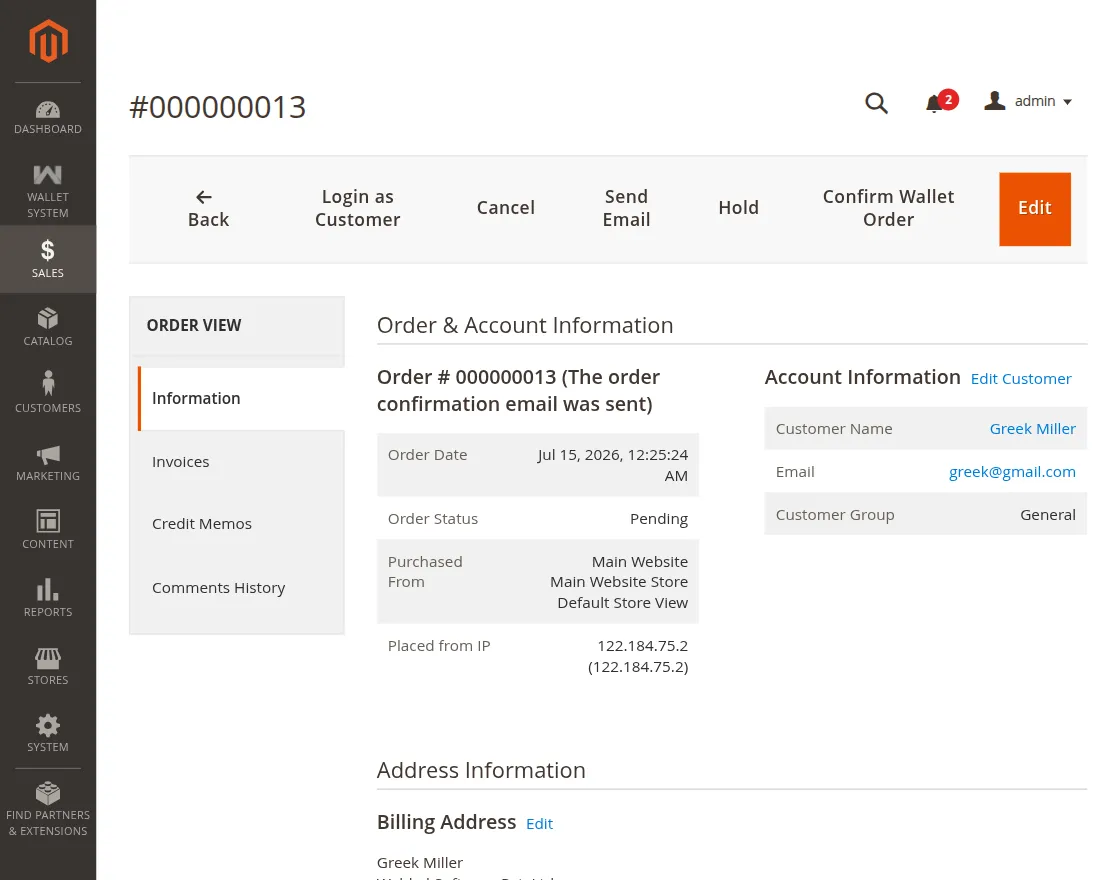
The admin can confirm the wallet recharge by opening the order in the Admin Panel and clicking Confirm Wallet Order.
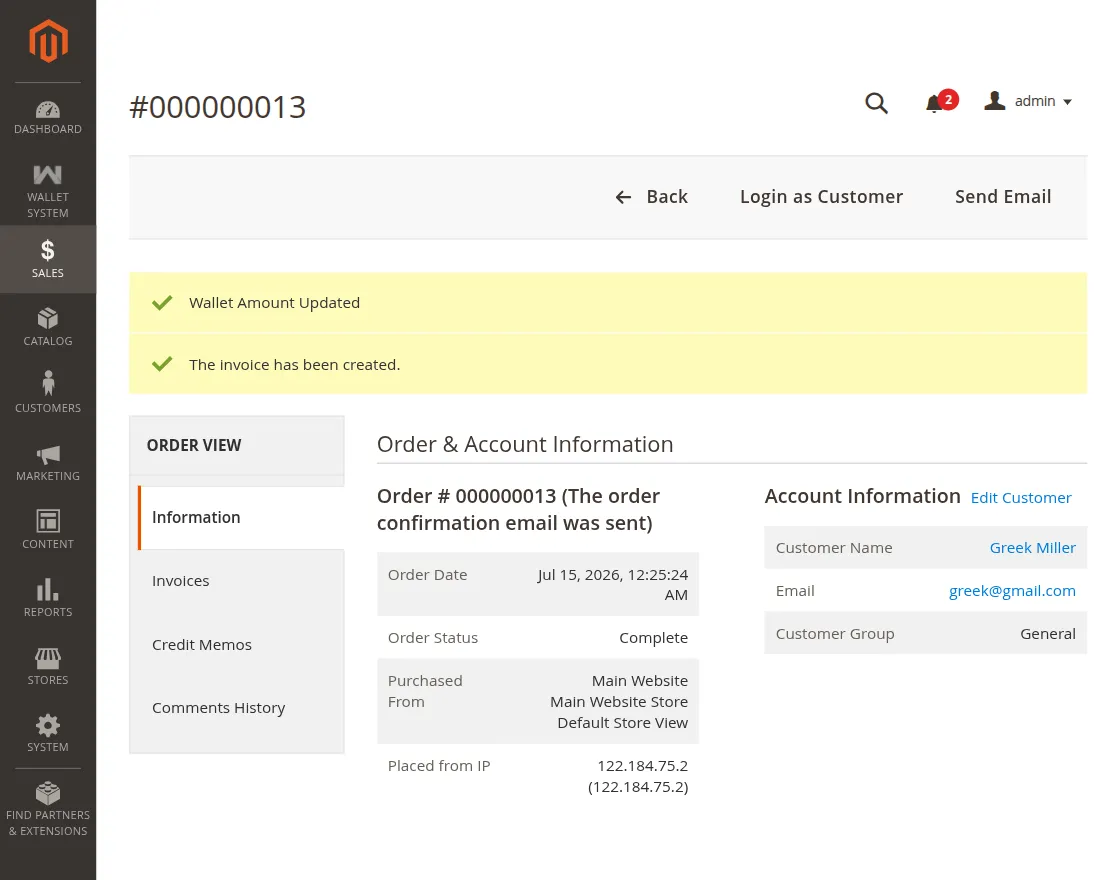
Once confirmed, the order status is updated, an invoice is generated, and the recharge amount is credited to the customer’s wallet.
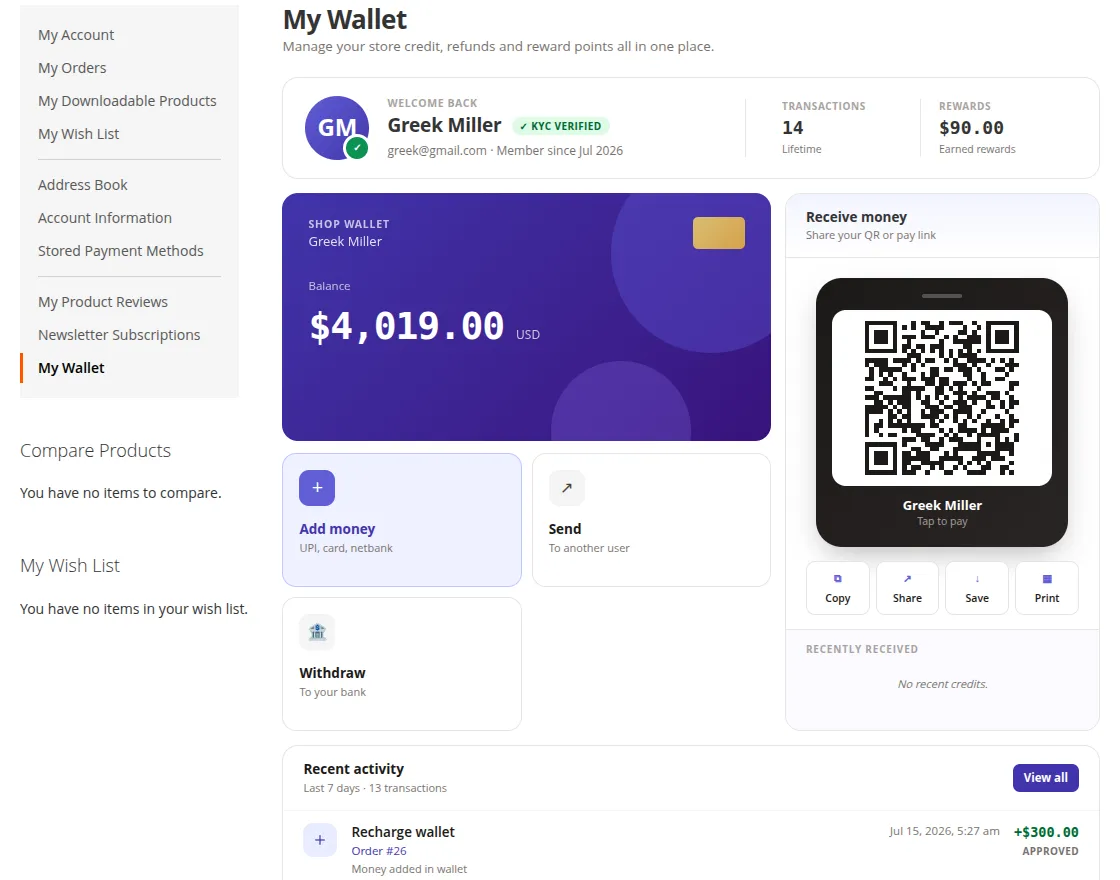
The customer can then view the updated wallet balance and the recharge transaction in the My Wallet dashboard under Recent Activity.
Transactions
The Transactions section provides a complete history of all wallet activities, allowing customers to track every credit and debit made to their wallet.
Customers can view a transaction summary showing the Total Credit, Total Debit, Net Flow, and the Total Number of Transactions.
They can also download their wallet statement by clicking on Download statement button for record-keeping.
Customers can filter the transaction history by Transaction Type (All, Credit, Debit, Refund, Transfer, Cashback, or Withdraw) and by selecting a From and To date range.
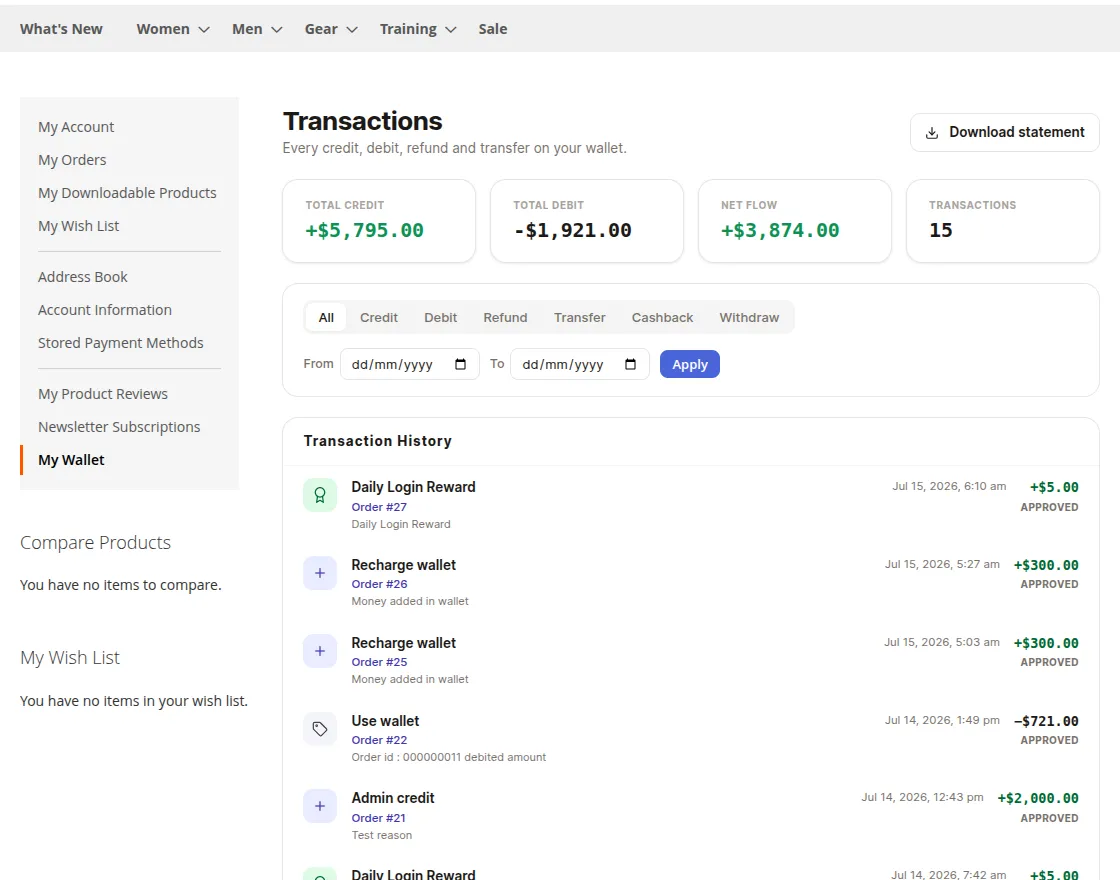
The transaction history displays the following details for each wallet transaction:
- Transaction Type – Type of wallet activity, such as Recharge, Cashback, Transfer, Refund, or Withdrawal.
- Reference – Associated order number or transaction reference.
- Description – Additional information related to the transaction.
- Transaction Date – Date and time when the transaction was processed.
- Amount – Amount credited to or debited from the wallet.
- Status – Current transaction status, such as Approved or Pending.
The transaction list supports pagination, allowing customers to browse all wallet transactions conveniently.
Transaction Details
To view complete information about a wallet transaction, the customer can click any transaction from the Transaction History list.
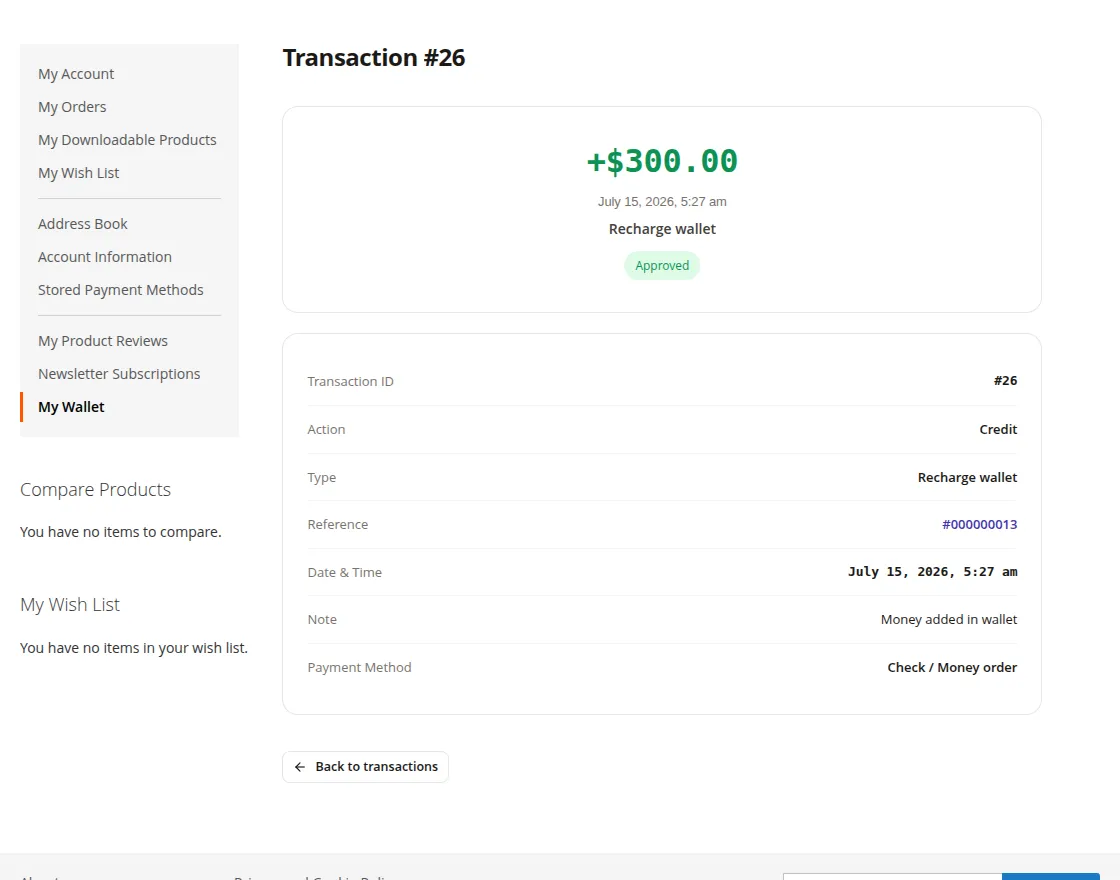
The Transaction Details page displays the following information:
- Transaction ID – Unique identifier of the wallet transaction.
- Action – Transaction type, such as Credit or Debit.
- Type – Category of the transaction, such as Recharge Wallet, Cashback, Refund, Transfer, or Withdrawal.
- Reference – Associated order or transaction reference number.
- Date & Time – Date and time when the transaction was processed.
- Note – Additional information or remarks related to the transaction.
- Payment Method – Payment method used for the transaction, if applicable.
Customers can click Back to Transactions to return to the complete transaction history.
Transfer Wallet Amount
The Transfer Wallet Amount feature allows customers to instantly transfer wallet funds to another registered customer.
To transfer wallet funds, navigate to My Account → My Wallet → Transfer Wallet Amount.
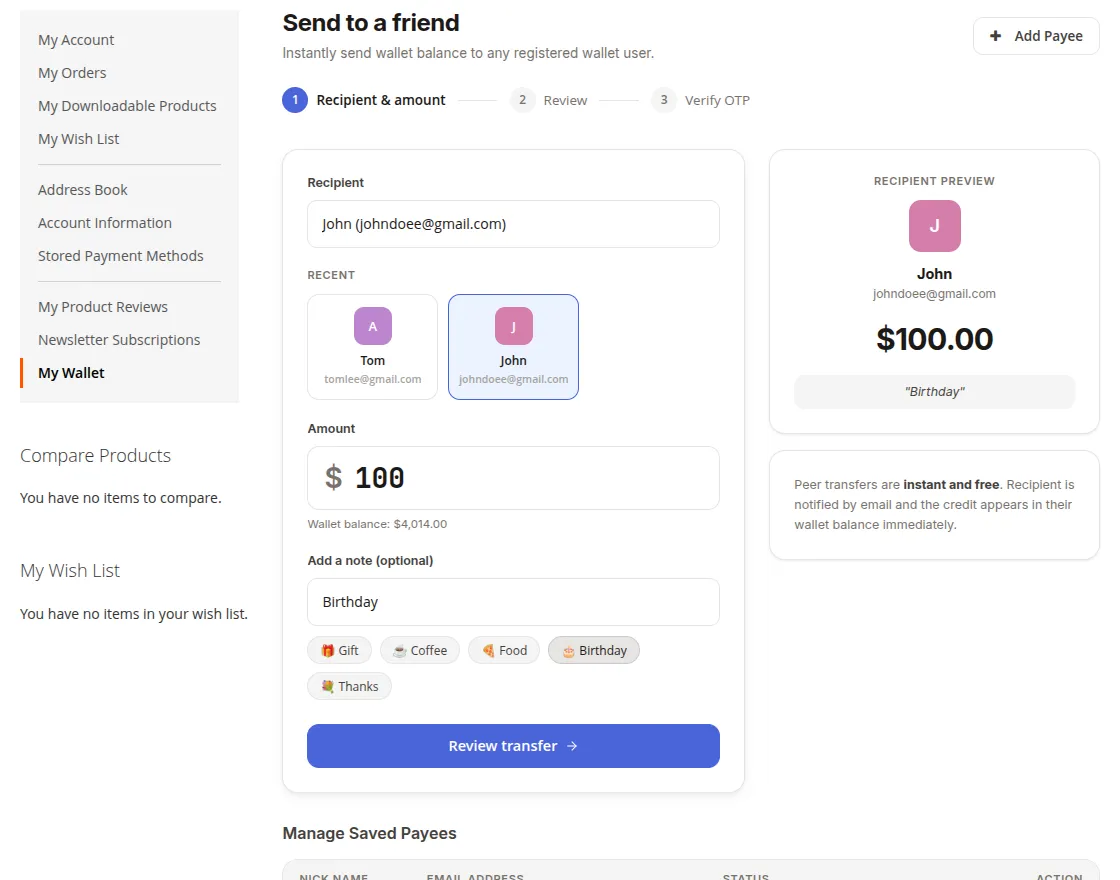
Select a recipient from the saved payee list or recently used recipients and enter the transfer amount. Optionally, add a note describing the purpose of the transfer.
Click Review Transfer to review the transfer details and verify the transfer using the OTP (if enabled by the administrator).
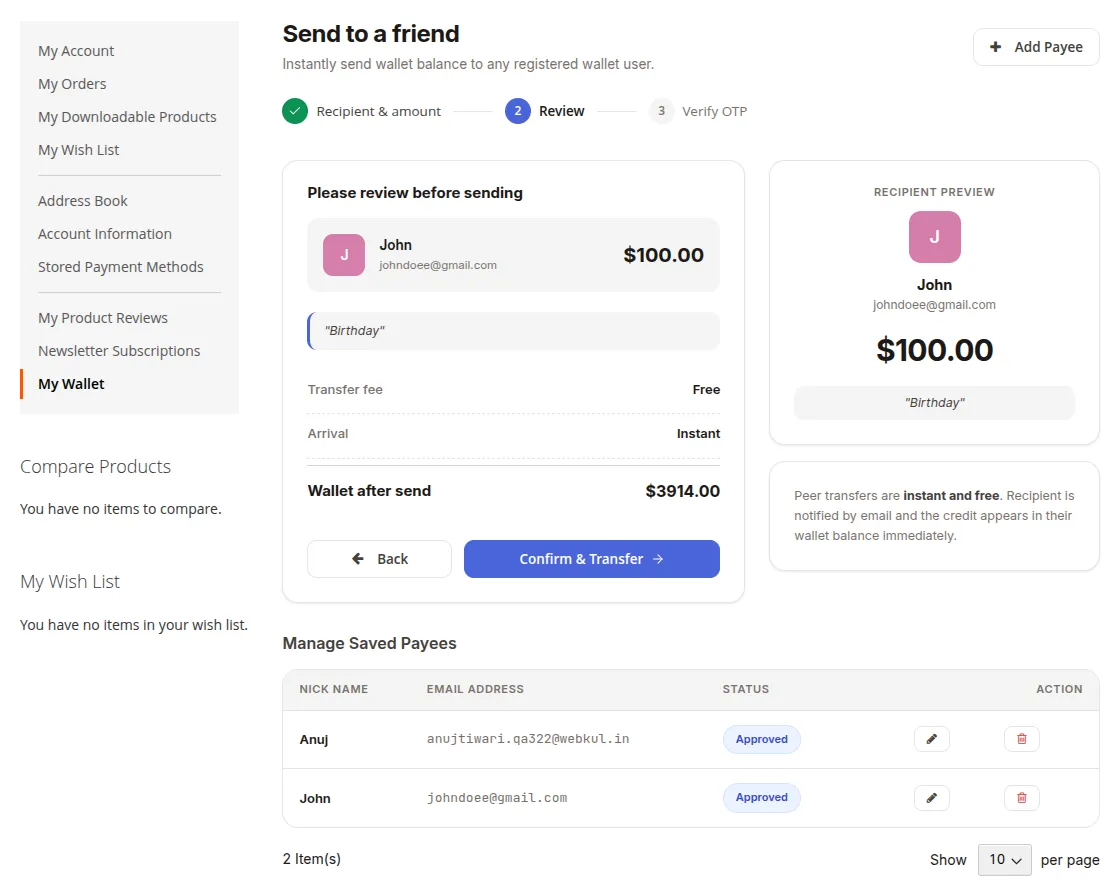
Then, click Confirm & Transfer to complete the wallet transfer.
Once the transfer is completed successfully, the transferred amount is deducted from the sender’s wallet and credited instantly to the recipient’s wallet.
Add a New Payee
If the intended recipient is not available in the payee list, the customer must first add them as a payee.
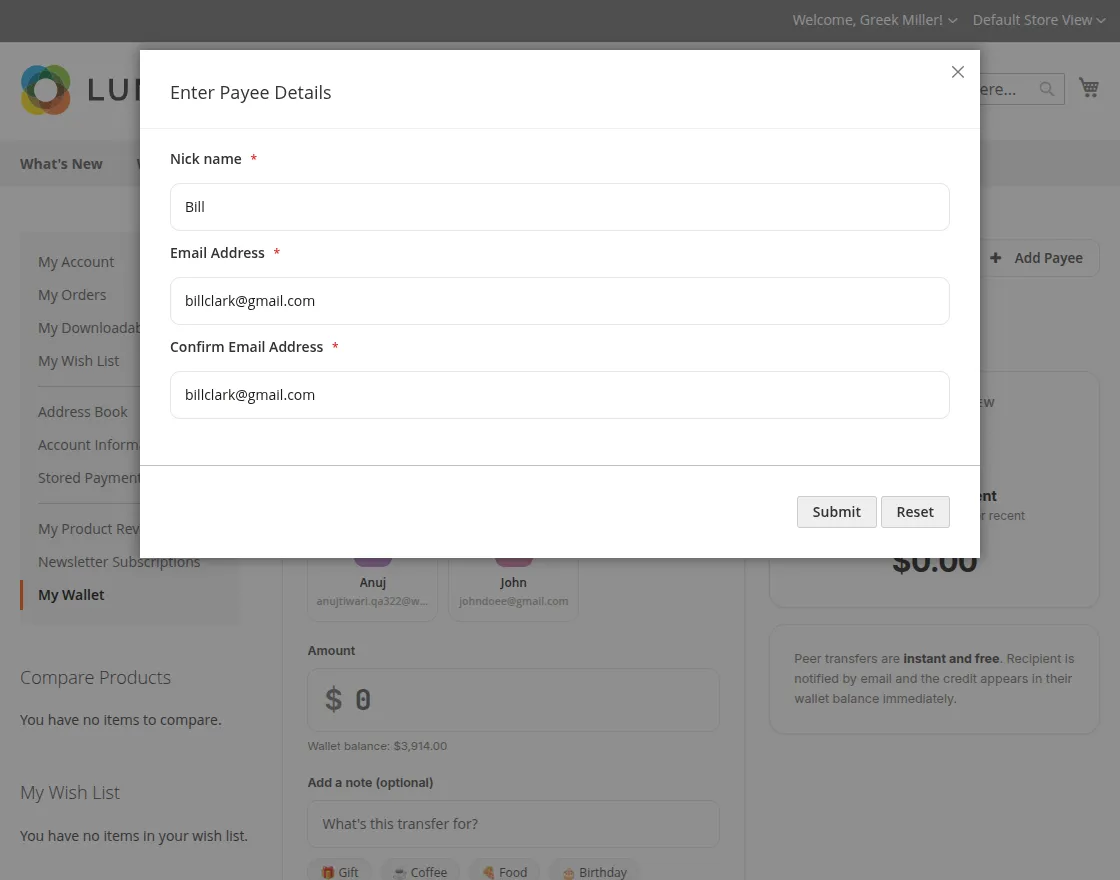
To add a new payee:
- Click Add Payee.
- Provide a nickname for easy identification.
- Enter the recipient’s registered email address.
- Click on Submit button.
- If payee approval is enabled, the request is sent to the administrator for review. Otherwise, the payee is added immediately.
Once approved, the payee appears in the recipient list and can be selected for wallet transfers.
QR Pay
The QR Pay feature allows customers to send and receive wallet payments using a personal QR code. To access QR Pay, navigate to My Account → My Wallet → QR Pay.
The QR Pay section includes the following tabs:
My QR Code
The My QR Code tab allows customers to receive wallet payments from other registered users.
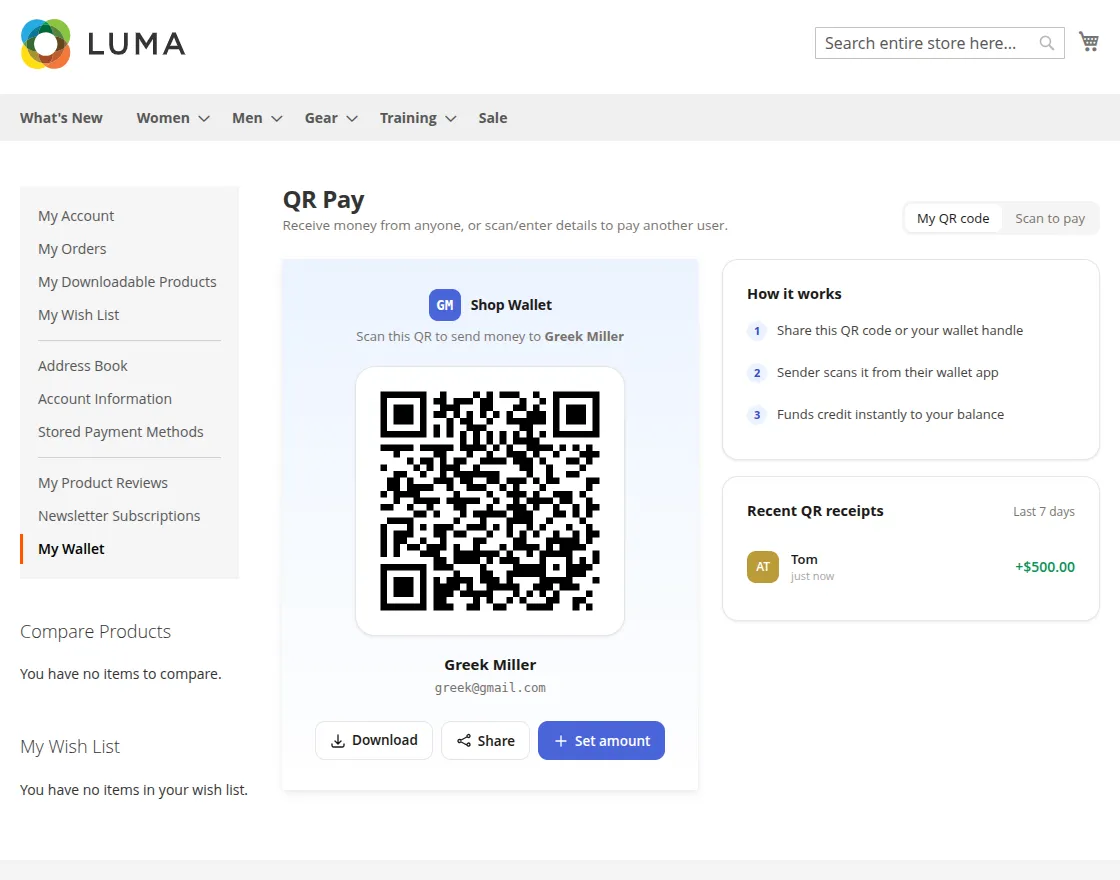
Customers can:
- View their personal wallet QR code.
- Download or share the QR code.
- Set a payment amount before sharing the QR code.
- View recent QR payment receipts.
To receive a payment:
- Share the QR code or wallet handle with the sender.
- The sender scans the QR code using the Scan to Pay option.
- Once the payment is confirmed, the amount is credited instantly to the customer’s wallet.
Scan to Pay
The Scan to Pay tab allows customers to make wallet payments by scanning another customer’s QR code.
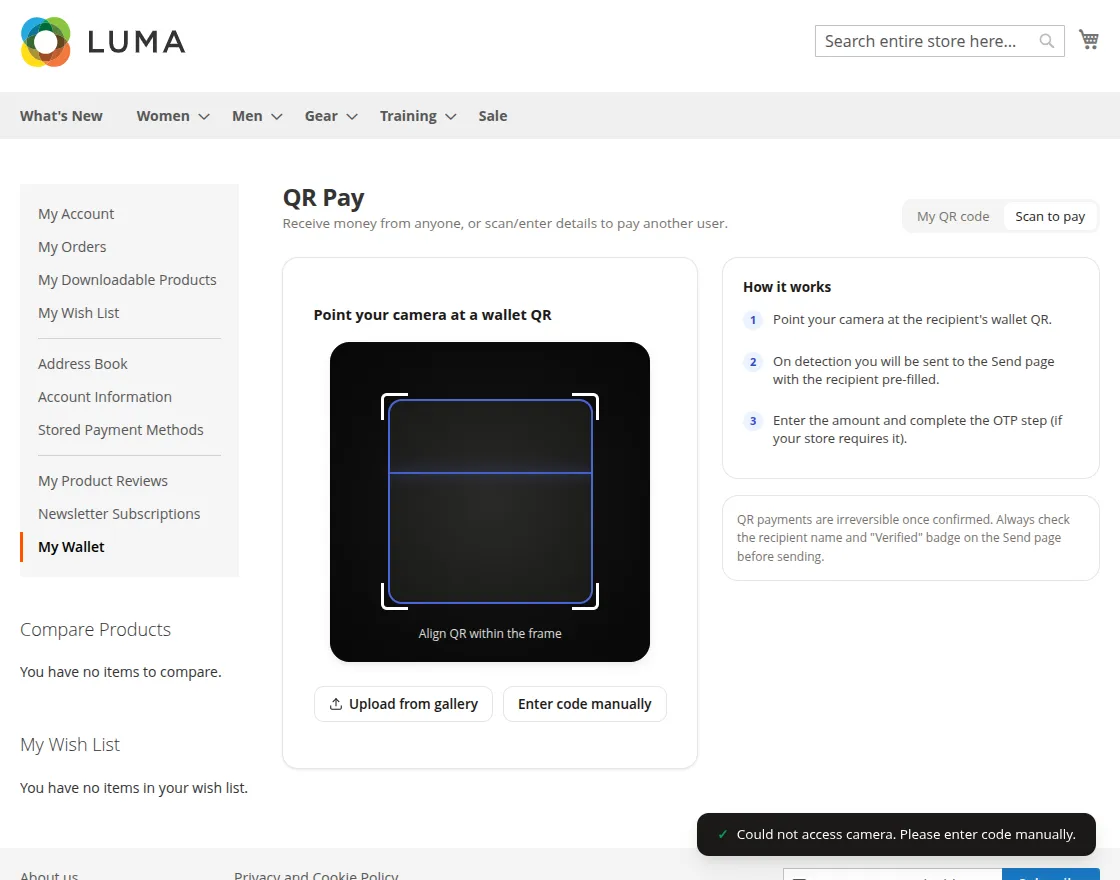
To send a payment:
- Open the Scan to Pay tab.
- Scan the recipient’s wallet QR code using the device camera, upload a QR code image from the gallery, or enter the wallet code manually.
- After the QR code is detected, the recipient details are populated automatically.
- Enter the amount to transfer and review the payment details.
- Complete OTP verification, if enabled by the administrator.
- Confirm the payment to transfer the wallet amount to the recipient.
Note: QR payments are irreversible once confirmed. Customers should verify the recipient’s details before confirming the transaction.
Add Account Details
The Bank Details section allows customers to add and manage their bank account information for wallet withdrawals.
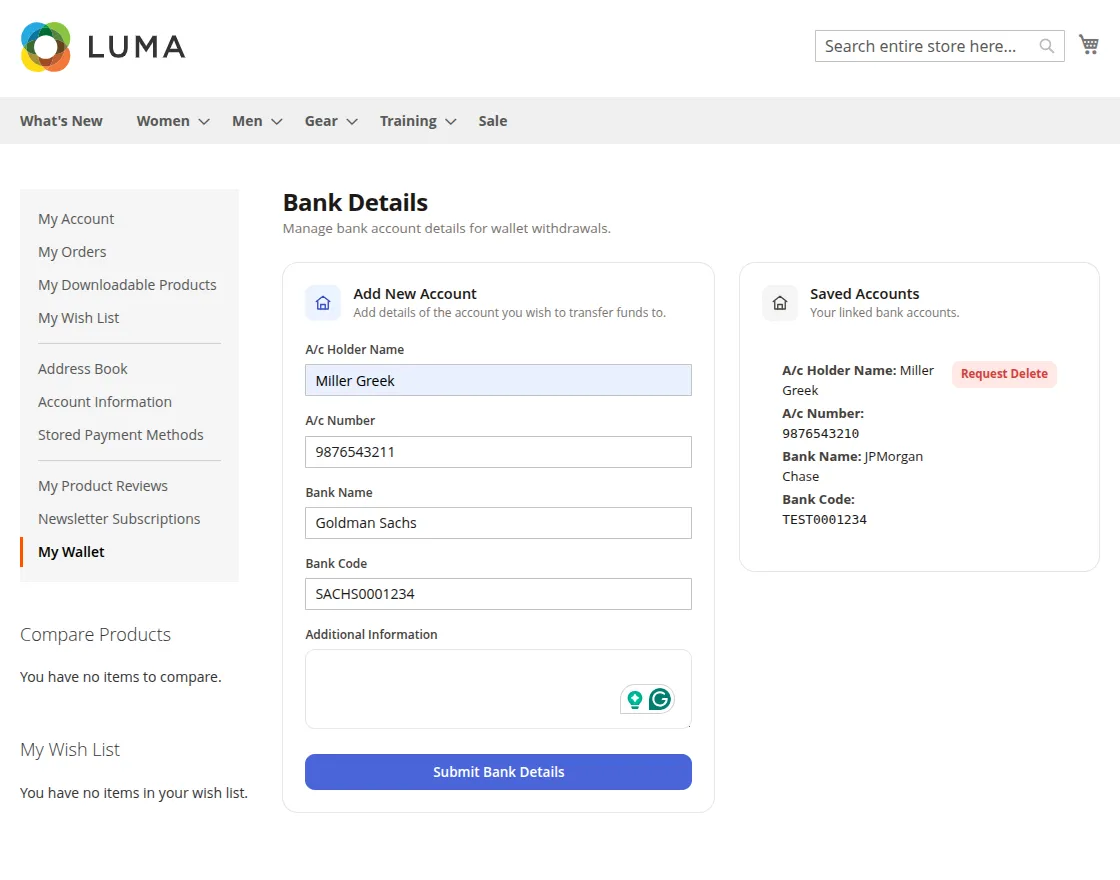
To add a bank account, navigate to My Account → My Wallet → Add Accounts Details.
- Click Add New Account.
- Enter the following details:
- A/c Holder Name – Name of the bank account holder.
- A/c Number – Bank account number.
- Bank Name – Name of the bank.
- Bank Code – Bank routing or IFSC code.
- Additional Information – Enter any additional details, if required.
- Click Submit Bank Details to save the account information.
Once the bank account is added successfully, it becomes available for wallet withdrawal requests.
Withdraw
The Withdraw section allows customers to transfer wallet funds to their linked bank account or other supported payout accounts.
To submit a withdrawal request, navigate to My Account → My Wallet → Withdraw, enter the amount to withdraw, select the desired payout account.
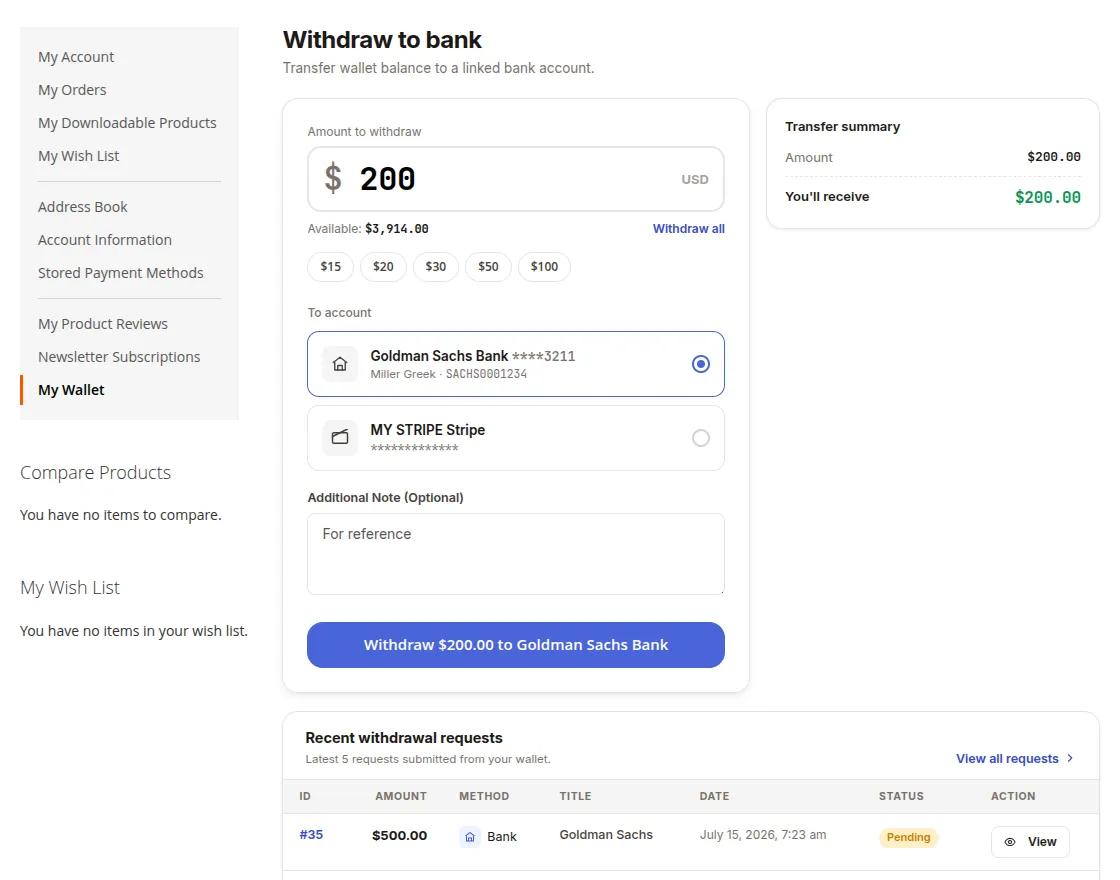
The Transfer Summary displays the withdrawal amount and the amount to be received. After reviewing the details, click Withdraw to submit the withdrawal request.
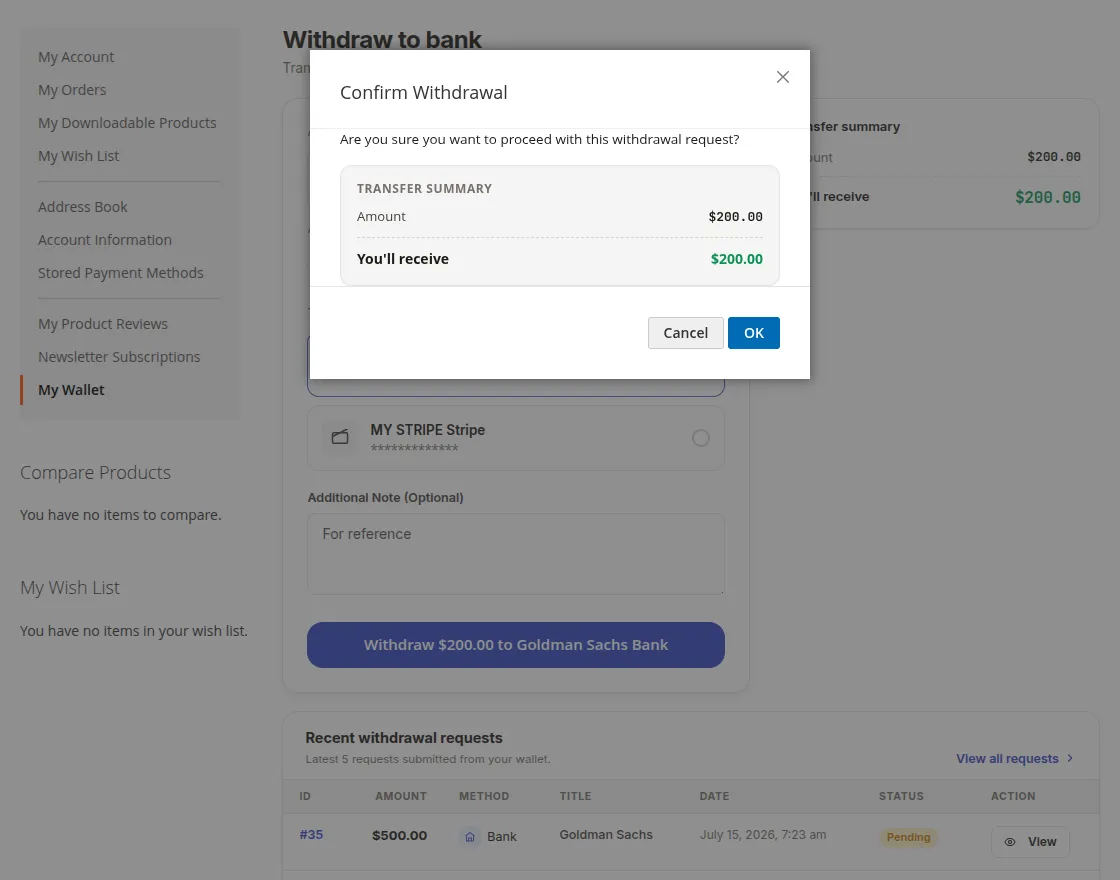
After clicking Withdraw, a Confirm Withdrawal popup appears displaying the transfer summary. Review the details and click OK to confirm the withdrawal request.
Once confirmed, the withdrawal request is submitted for administrator approval.
After the administrator approves the request, the withdrawal amount is transferred to the selected payout account, and the request status is updated accordingly.
KYC Verification
The KYC Verification section enables customers to verify their identity before accessing wallet features that require identity validation.
Depending on the store configuration, KYC verification may be mandatory for actions such as wallet withdrawals, wallet-to-wallet transfers, QR payments, and refund requests.
Customers need to submit their personal information along with a valid identity document for administrator review.To submit a KYC verification request:
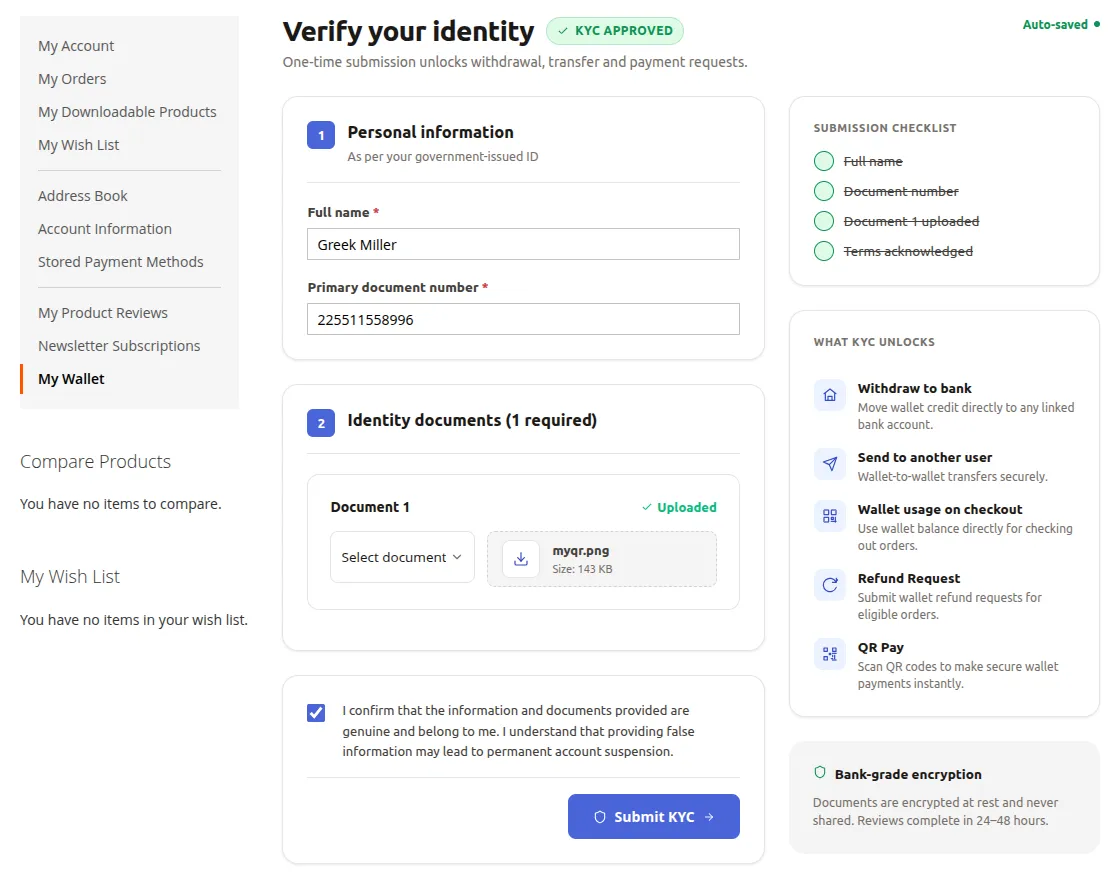
To submit a KYC verification request, navigate to My Account → My Wallet → KYC Verification.
- Enter your Full Name exactly as it appears on your government-issued identity document.
- Enter the Primary Document Number associated with your selected identity document.
- Select the Document Type (such as Passport, Driving License, National ID, etc.).
- Upload a clear copy of the required identity document in the supported format (PDF, JPG, or PNG).
- Read and accept the declaration confirming that the submitted information is accurate and belongs to you.
- Click Submit KYC to send the verification request.
After submission, the request is forwarded to the admin for review. The administrator can approve or reject the request.
Once the KYC request is approved, the customer gains access to wallet features.
Refer & Earn
The Refer & Earn section allows customers to invite friends to the store and earn wallet credits when their referrals complete their first purchase.
Customers can share their unique referral link or referral code through various channels and track the status of their invitations from a single page.
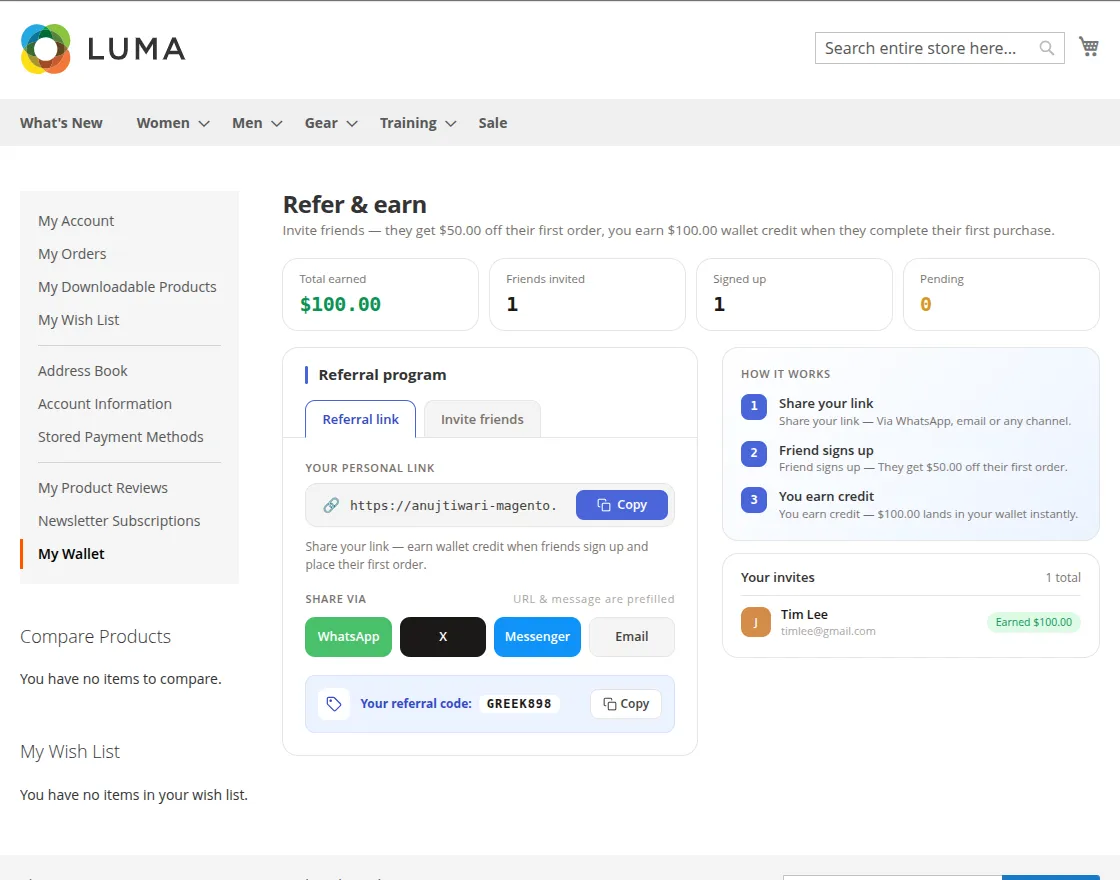
To invite friends and earn wallet credits, navigate to My Account → My Wallet → Refer & Earn.
- Copy your Referral Link or Referral Code using the Copy button.
- Share your referral link directly through WhatsApp, X (Twitter), Messenger, Email, or any other preferred communication channel.
- Ask your friend to register using your referral link or referral code.
- Once the referred customer signs up, they become eligible for the configured first-order benefit (if enabled by the administrator).
- Once the referred customer places their first order and the order status changes to Complete, the configured referral reward is automatically credited to your wallet.
Monitor the status of your referrals and earned rewards in the Your Invites section, where you can view pending invitations and successful referrals.
Using Wallet System at Checkout
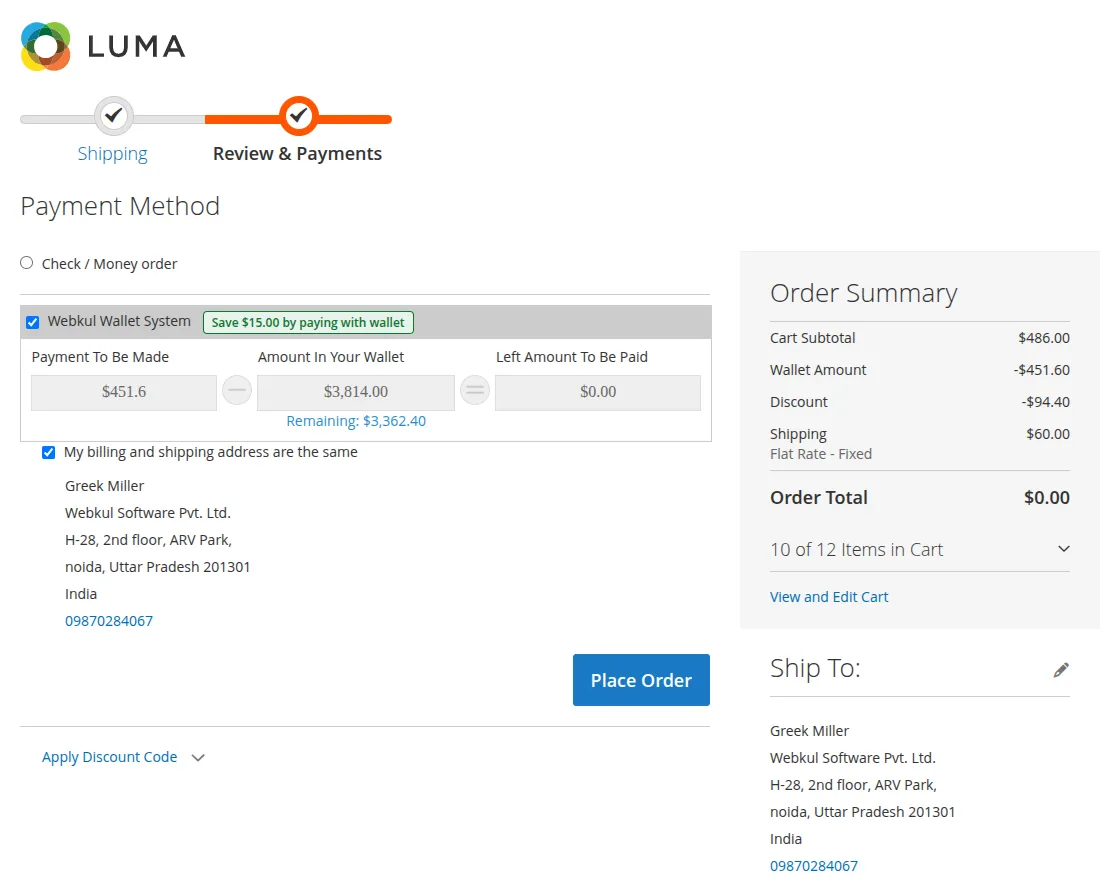
At the time of making a payment, a customer can use Wallet System to make the order payment.
The total payable amount will deduct from the Wallet Amount balance and the customer can also see the remaining Wallet amount after making the payment.
If the admin has enabled the Buy Now Pay Later (BNPL) feature, customers can also choose to complete the purchase using their wallet even when the available balance is insufficient.
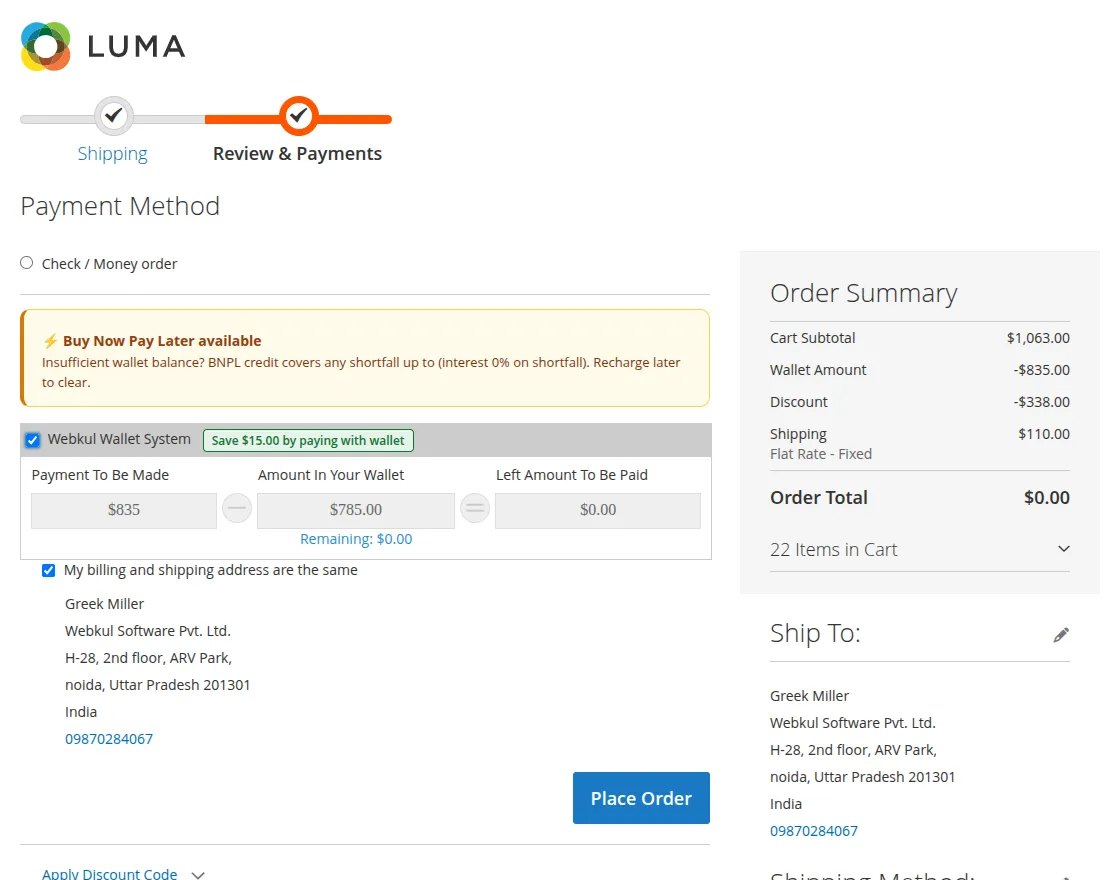
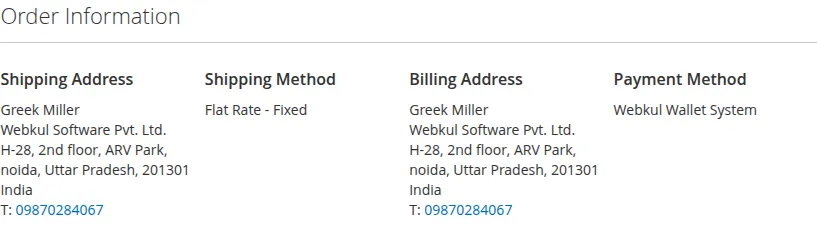
The partial payment methods information will be visible on the order view page also.


That’s all for the Wallet System for Magento 2. However, if you still have questions regarding the Magento 2 extensions please create a support ticket by clicking Webkul Support System.