Gift On Order App for Shopify
Table of Content
Who doesn’t likes gifts!! Everyone loves to receive it as it adds the pinch of excitement in the whole situation.
Ever imagine giving free gifts to your buyers as it could be a sales booster and a motivation for them to buy from your eCommerce store.
Yes, you got it right. Using the Shopify Gift on Order app, you can assign free gifts to orders which exceed a set amount and much more.
Let’s understand it all in detail.
Features
- Admin can create various gift products.
- Admin will set the value of the order, exceeding which the gift will get assigned.
- The gift product will be automatically added to the cart of the buyer.
- The buyer can also choose from the range of free gifts available.
- All the rules for a gift related to order value will be decided by the Admin or the store owner.
- An app amazingly design to promote and enhance sales.
- User-friendly interface.
- cross-browser compatible.
Installation
Use the following link to install the app: https://apps.shopify.com/gift-on-order
Workflow
Once you make the payment for the plan, you will have Gift On Order in the apps section of your Shopify store.


Clicking on which you will be redirected to the home page of the app.


Firstly, you’ll have the top five recently added gift rules & gift products. At the bottom of the page, you’ll have three navigation menu, i.e., User Guide, App features & Take a tour.
On the same page, you’ll have an option to create a ticket in case of query & schedule booking.
CONFIGURATION
General Configuration
In the general configuration section of the app, you will just have to set the email id and domain name, enable the ‘Display other gift section on cart page‘
If you want to display other gift rules which exceed the current cart amount on the cart page and enable ‘Display welcome popup‘.
Priority on Gift Products: Choose if you want to offer gift products to the customer in case the cart value satisfies or the product rule satisfies.
Note: Please don’t enable the option to display welcome popup until and unless you’ve added gift rules and gift products to your store.
Note: Now Gift on Order app is compatible with the Drawer cart also.
Admin can now able to provide more than one gift product in a single cart.


Label Configuration
The admin can use this section to change the frontend labels.


Welcome Popup
This section lets the Admin display a welcome popup which will notify the users that they can win free gifts on their purchase. Admin can customize the welcome note as per his likings.
To configure this, all he needs to do is upload a welcome image, enter the welcome title, enter a description and mention the popup button text.


Frontend View of the welcome popup:


Gift Products
This section will show the list of gift products added by you. You can enable/disable and can even delete them from here.
The products can be searched using the filter option on the basis of product ID, name and price.


How to add gift products?
Click on the ‘Add Gift Product’ button:


Select the product from the popup:


Gift Rules
This section displays the list of rules already created. You can enable/disable, delete and view the existing rule and can even create new rules as well.


Adding New Rule
Clicking on the Add button you will be redirected to the section where you can create rules. Let’s see the two different kinds of rules that can be added:
CART RULE
You can set a minimum cart amount after which your customers will be eligible to have a free gift.
Enter the Gift RULE INFORMATION
- Gift Rule Status: Make the gift rule active by enabling this option.
- Gift Rule Name: Enter the gift rule name.
- Description: Enter the gift rule description.
- Select Gift Product
- Default Gift


Enter the GLOBAL CRITERIA
- ‘Gift rule on the basis of‘: This will show either cart or product as per your configuration.
- Min Cart Amount: Set up the minimum order value to be eligible for the free gift.
- Select the date range for which the rule will be valid.
CUSTOMER COMMUNICATION
- Enter Gift Rule Heading
Enter the gift rule heading to be displayed for each gift product on the cart page & the gift rule condition page.
Example (Product based rule):- Buy Product A & Get a FREE Gift
Example (Cart based rule):- Purchase above $1000 & Earn a FREE Gift
- Enter Gift Rule Sub Heading
Enter the gift rule sub-heading to be displayed for each gift product on the cart page & the gift rule conditions.
Example (Product based rule):- Get a FREE gift product on the purchase of Product A!
Example (Cart based rule):- Add products (worth $1000 USD) to cart & earn a FREE gift product!


PRODUCT RULE
Set a rule according to which, if a buyer purchases product X, he will get a product Y free.
Enter the Gift RULE INFORMATION
- Gift Rule Status: Make the gift rule active by enabling this option.
- Gift Rule Name: Enter the gift rule name.
- Description: Enter the gift rule description.
- Select Gift Product
- Default Gift
Enter the GLOBAL CRITERIA
- ‘Gift rule on the basis of‘: This will show either cart or product as per your configuration.
- SELECT PRODUCT: Select the product on which this rule applies.
- Select the date range for which the rule will be valid.


CUSTOMER COMMUNICATION
- Enter Gift Rule Heading
Enter the gift rule heading to be displayed for each gift product on the cart page & the gift rule condition page.
Example (Product based rule):- Buy Product A & Get a FREE Gift
Example (Cart based rule):- Purchase above $1000 & Earn a FREE Gift
- Enter Gift Rule Sub Heading
Enter the gift rule sub-heading to be displayed for each gift product on the cart page & the gift rule conditions.
Example (Product based rule):- Get a FREE gift product on the purchase of Product A!
Example (Cart based rule):- Add products (worth $1000 USD) to cart & earn a FREE gift product!
Gift Rule Page
Now, the admin can create a header navigation menu on his storefront to display all the gift rules he has added.
Customers can also redirect to see all the gift products associated with that particular gift rule by clicking on the view all gifts menu. Refer to the image given below.


How to add this navigation menu?
- Go to the Online Store section from Shopify backend
- Click on Navigation
- Click on the Main menu


- Type your page title (ex. Gift Rules)


- Click on the link text field
- Select Pages


- Select Gift Rules from the listing
- Click on Add.
How to Offer Complimentary Gift Products at Checkout Based on the Selected Payment Method
Offering complimentary gifts is an effective way to improve the customer shopping experience,
encourage purchases, and reward customers for choosing specific payment methods.
With the Gift On Order app, Shopify merchants can offer complimentary gift products on the
checkout page based on the payment method selected by the customer.
This allows merchants to create targeted gift offers and give customers an additional incentive to complete their purchases.
For example, you can offer a free gift to customers who select a particular payment method at
checkout. Customers can then choose from the available gift products and proceed with their
purchases.
Important: This feature is available only to merchants on the Shopify Plus plan. Gift products are
displayed on the checkout page through a Checkout UI Extension.
Here, we will explain how to configure gift rules, add gift products, enable the checkout
extension, and allow customers to select complimentary gifts.
Step 1: Configure the Gift Rule to Apply at Checkout
Before creating a gift rule, you need to configure the gift rule application method.
Follow these steps:
- Open the Gift On Order app in your Shopify admin.
- Navigate to Configuration > General Configuration.
- Locate the Rule Applied setting.
- Select Checkout.

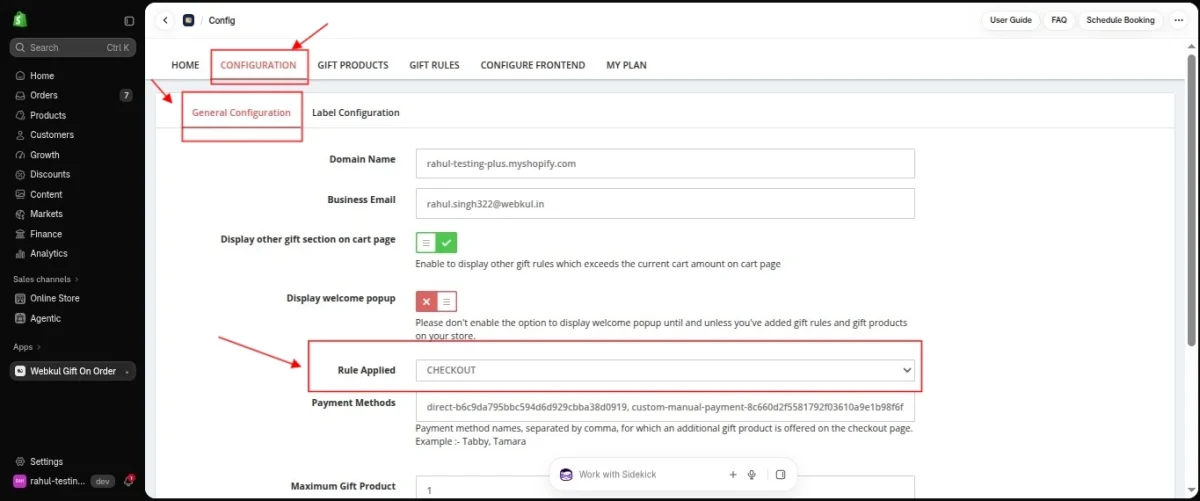
When you select Checkout, a confirmation popup will appear asking you to switch the gift rule
application method to checkout.
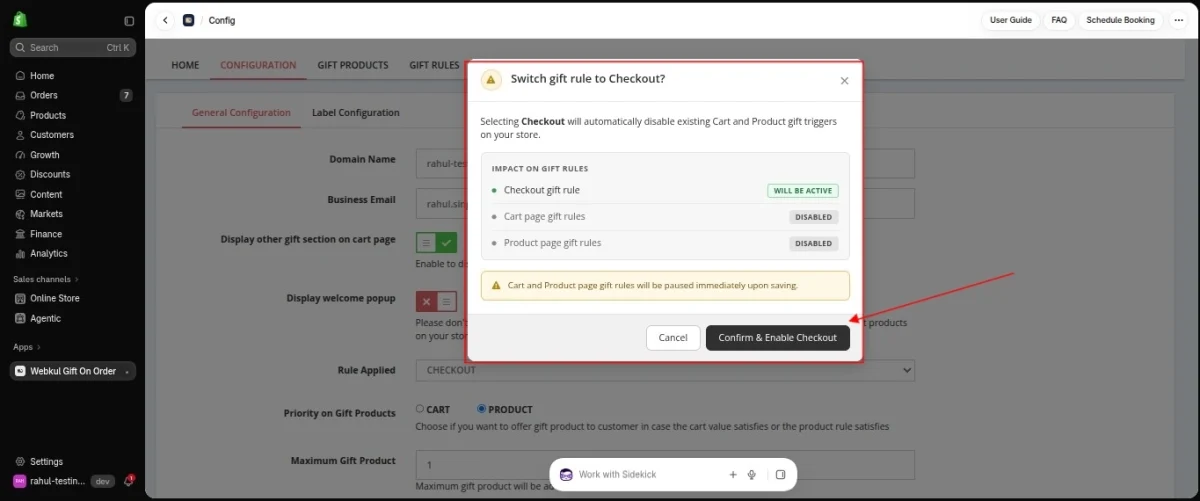
- Click Confirm & Enable Checkout to activate the checkout-based gift rule functionality.
Once enabled, you can configure gift offers that customers can access directly from the checkout
page.
Step 2: Configure the Payment Methods and Gift Selection Limit
After enabling the checkout-based gift rule functionality, configure the payment methods for which
you want to offer complimentary gifts.
In the configuration settings, you can specify the following:
Payment Methods: Enter the names of the payment methods for which you want to display
complimentary gift products. You can add multiple payment methods by separating their names
with commas.
For example, if you want to offer gifts to customers who select specific payment methods, enter the
applicable payment method names in this field.
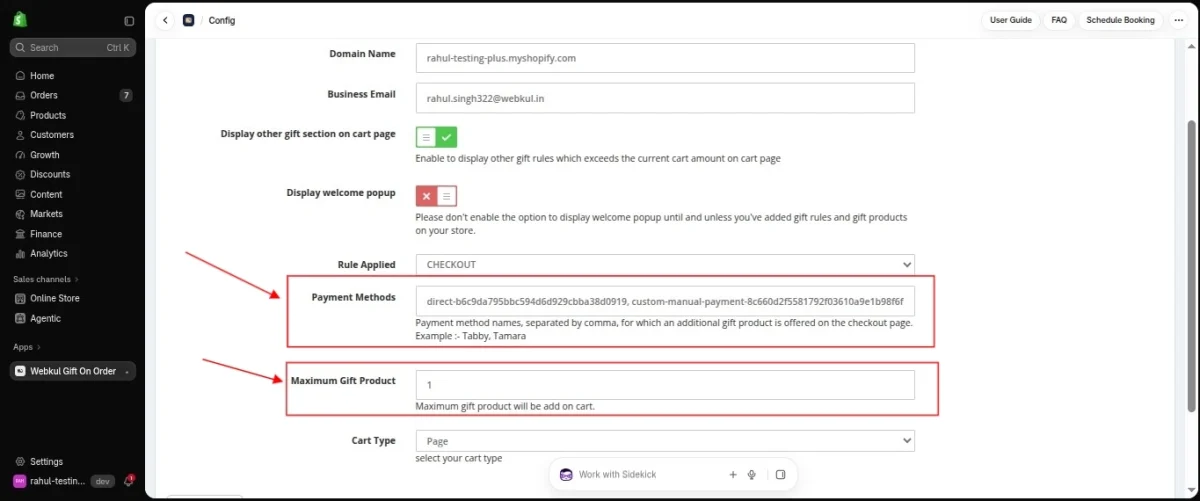
Maximum Number of Gifts: Specify the maximum number of complimentary gift products a
customer can select.
Once you have entered the required information, click Save to apply the configuration.
Note: Customers will be able to access the configured gift offer when they select a payment method
that matches your settings and the applicable gift rule conditions are satisfied.
Step 3: Add a Gift Product
After configuring the checkout gift settings, you need to add the products you want to offer as
complimentary gifts.
Follow these steps:
- Navigate to the gift product section in the Gift On Order app.
- Click the option to add a gift product.
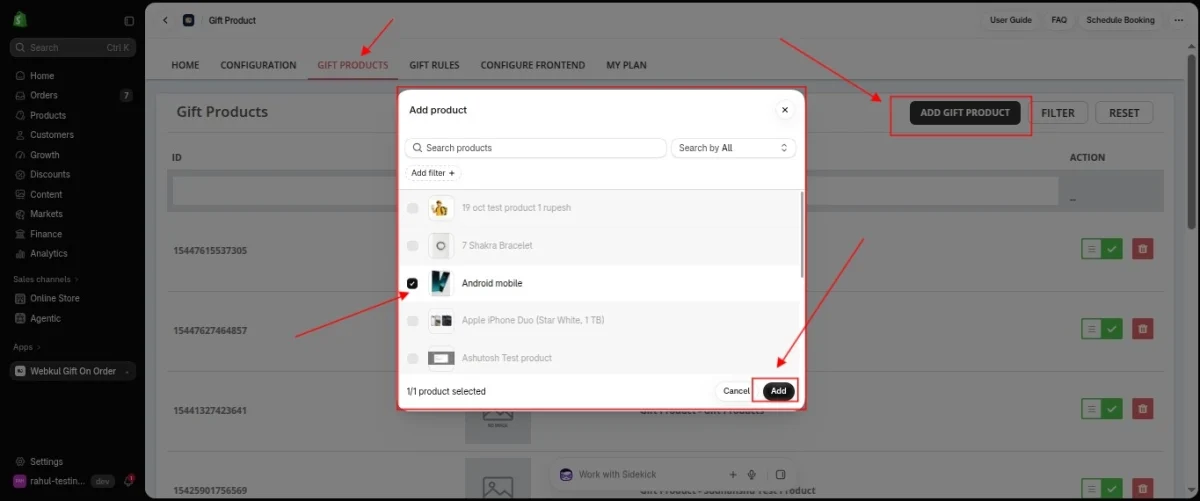
Select the product you want to offer as a gift.
When you add a gift product, a popup will appear asking how you want to offer the product to
customers.
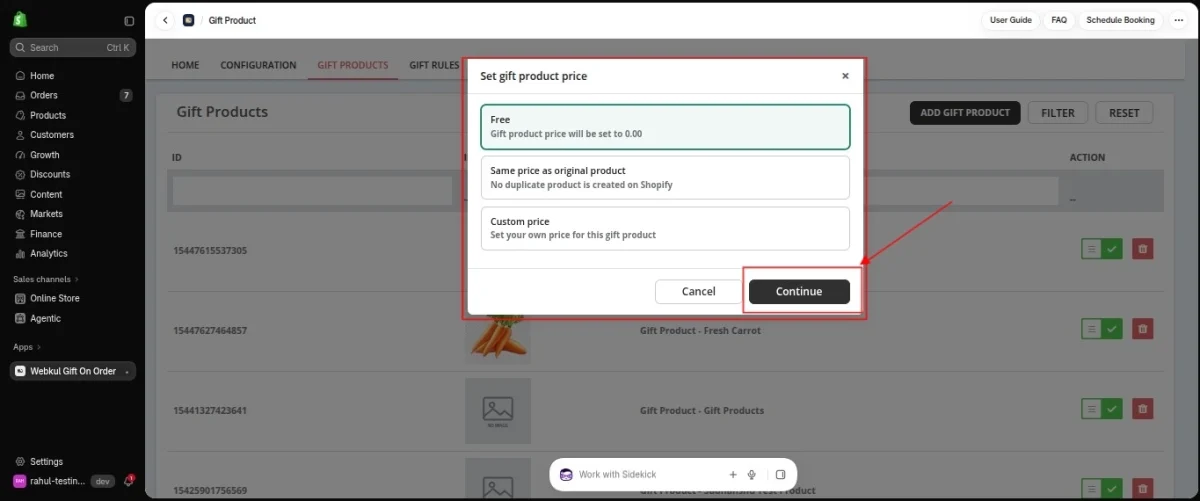
You can choose from the following pricing options:
Free: Offer the gift product to customers at no additional cost.
Same as Original Price: Offer the gift product at its original product price.
Custom Price: Set a specific price for the gift product.
Select the pricing option that suits your requirements and click Continue to Add Product to
complete the process.
Repeat these steps for any additional products you want to make available as gifts.
Step 4: Create a Gift Rule
After adding your gift products, you need to create a gift rule that determines when the
complimentary gift offer should be available to customers.
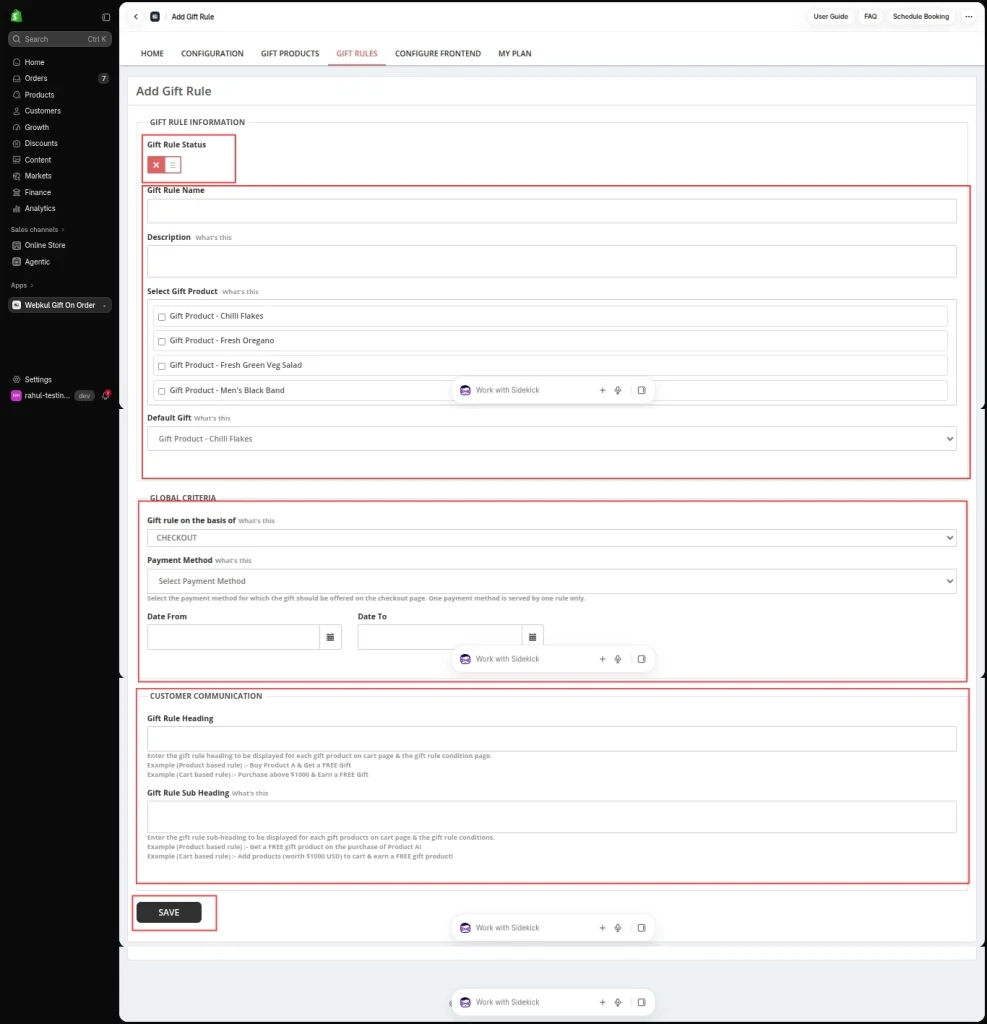
Navigate to the Gift Rule section in the app and create a new rule.
Configure the following fields according to your requirements.
A. Gift Rule Information
Gift Rule Status: Enable or disable the gift rule depending on whether you want the offer to be
active.
Gift Rule Name: Enter a name to identify the gift rule in your admin panel.
Description: Add a description explaining the purpose or conditions of the gift rule.
Select Gift Product: Choose the gift product you want to associate with the rule.
Gift Product: Specify the gift product associated with the rule.
Default Gift: Configure the default gift option as required.
B. Global Criteria
This section allows you to define the conditions under which the gift rule will apply.
Gift Rule on the Basis of: Select the condition type for the rule. The available options include:
- Cart
- Product
- Checkout
For this feature, select Checkout to configure a gift offer that applies at checkout.
Min Cart Amount: Specify the minimum cart value required for the rule to apply, if applicable.
Date From: Set the date on which the gift offer should begin.
Date To: Set the date on which the gift offer should end.
These settings help you control the eligibility criteria and availability period for your gift offer.
C. Customer Communication
Configure the messages that customers will see when the gift offer is displayed.
Gift Rule Heading: Enter the heading you want to display for the gift product on the cart page and
gift rule condition page.
Gift Rule Sub Heading: Enter a supporting message explaining the gift offer and its conditions.
Once you have configured all the required fields, click Save to create the gift rule.

Step 5: Configure the Checkout UI Extension
After creating the gift rule, you need to add the Checkout UI Extension to your Shopify checkout
page so customers can view and select their complimentary gifts.
Prerequisite: This feature is available only to Shopify Plus merchants.
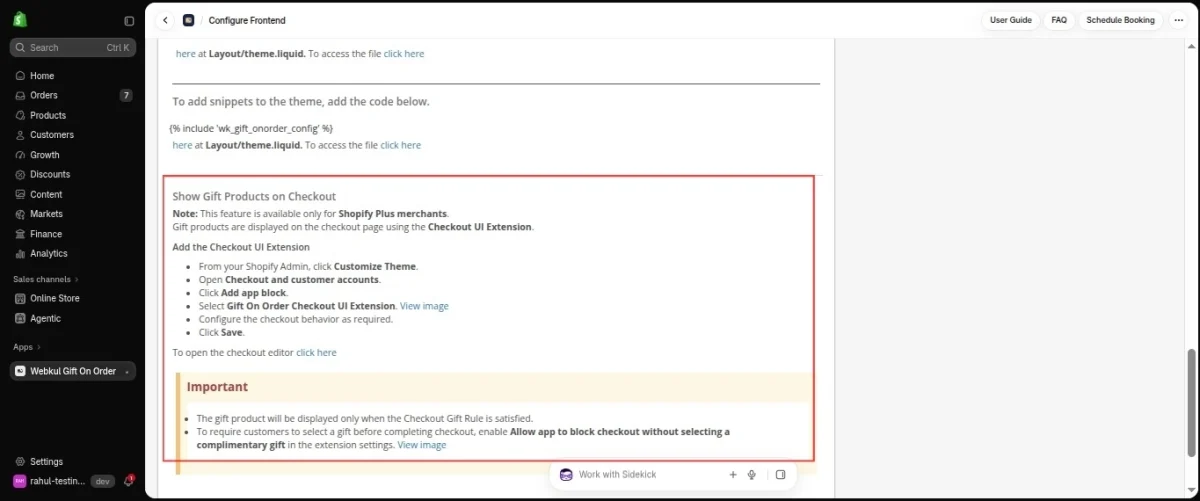
Follow these steps to enable the extension:
- Open your Shopify admin.
- Navigate to Customize Theme.
- Open Checkout and customer accounts.
- Enter the checkout editor.
- Click Add app block.
- Select Gift On Order Checkout UI Extension.
- Configure the checkout behavior according to your requirements.
- Click Save to apply the changes.
You can also open the checkout editor directly using the following link:
Open the Shopify Checkout Editor
After adding the extension, make sure it is enabled and positioned appropriately within your
checkout layout.
Optional: Require Customers to Select a Gift
If you want customers to select a complimentary gift before completing their checkout, enable the
following option in the extension settings:
Allow app to block checkout without selecting a complimentary gift
When this setting is enabled, the extension can block checkout completion until the customer
selects a gift, provided the gift rule applies.
Enable this option only if selecting a gift is mandatory for your offer.
Step 6: How Customers Select Complimentary Gifts at Checkout
Once the gift rules and checkout extension are configured, customers can select eligible
complimentary gifts during checkout.
- Here is how the process works:
- Step 1: The customer adds products to the cart and proceeds to checkout.
- Step 2: The customer reaches the checkout page and selects a payment method.
- Step 3: If the selected payment method matches the payment methods configured by the admin, and the applicable checkout gift rule conditions are satisfied, the complimentary gift option becomes available.
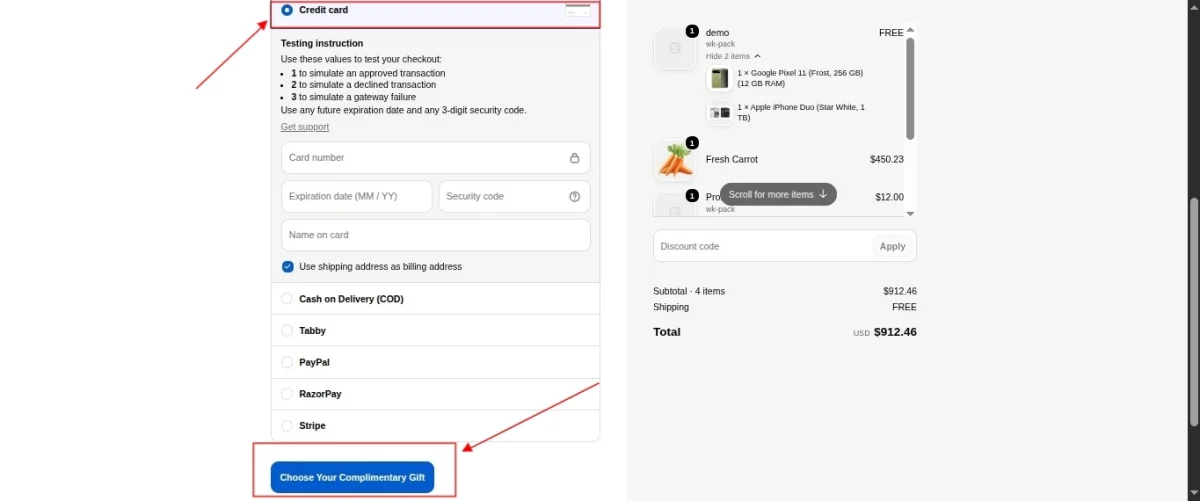
- Step 4: The customer views the available gift products and selects a gift, subject to the configured gift selection limit.
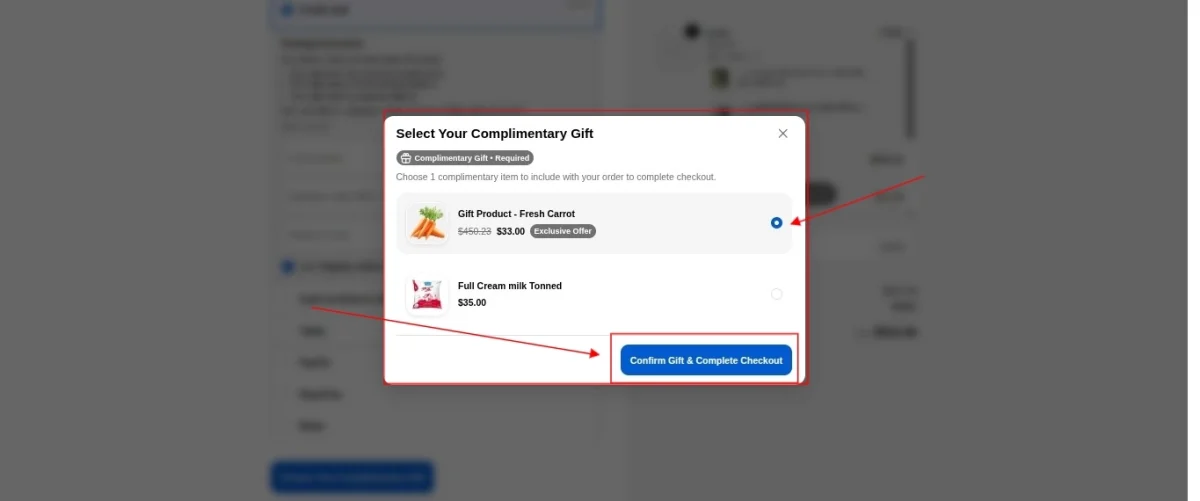
- Step 5: The selected gift is added according to the configured gift pricing option.
- Step 6: The customer proceeds to complete the purchase.
- This process allows merchants to provide payment-method-based gift offers while allowing eligible
- customers to choose their preferred complimentary gift.
Benefits of Offering Payment-Method-Based Complimentary Gifts
Configuring complimentary gifts based on the selected payment method offers several advantages.
- Encourage Preferred Payment Methods
Merchants can use gift offers to encourage customers to choose specific payment methods
supported by their store. - Improve the Customer Experience
Customers receive an additional benefit during checkout, making the shopping experience more
engaging. - Customize Promotional Campaigns
Merchants can configure gift products, selection limits, eligibility criteria, and offer periods
according to their promotional requirements. - Provide Greater Flexibility
By configuring multiple eligible payment methods and gift products, merchants can create gift
offers suited to different business objectives.
Conclusion
The Gift On Order app allows Shopify Plus merchants to offer complimentary gift products on the
checkout page based on the payment method selected by the customer.
Enable checkout gift rules, set payment methods and gift limits, add gift products, and configure the rule and Checkout UI Extension.
Once everything is set up correctly, eligible customers can select their complimentary gifts directly
during checkout and proceed with their purchases.
This feature provides merchants with another way to create targeted promotional offers and enhance the overall checkout experience.
Configure Frontend
The Admin needs to do some code-pasting regarding the app. In the Configure Frontend section, he will get all the codes and instructions for the same.
To show the gift info popup on any page of your store, add the below-given code to Layout/theme.liquid template file
<div id="wk_order_gift" data-total-price="{{ cart.total_price }}"></div>
Show & add gift products to cart, add the below-given code to Templates/cart.liquid
<div id="wk_order_gift" data-total-price="{{ cart.total_price }}"></div>
To hide the gift products from the product page, add the below-given code to the first line of Sections/product-template.liquid
{% unless product.tags contains "gift_product" %}
also, at the last line of Sections/product-template.liquid
{% endunless %}
To hide the gift product from the product grid page, you need to add the below-given code at the first line of Sections/product-grid-item.liquid.
{% unless product.tags contains "gift_product" %}
also, at the last line of Sections/product-grid-item.liquid.
{% endunless %}
NOTE
Make sure to hide the gift product quantity on the cart page.
To remove the quantity field from the cart page for gift product, you need to add the code to Templates/cart.liquid file
{% if item.product.tags contains "gift_product" %} <a href="#wk_choose_gifts">View all gifts</a> {% else %} {% endif %}


If you are using Online store 2.0 (Example- Dawn), you need to follow the steps to add the codes.
To show the gift Info popup, add the codes to layout/theme.liquid file:-
{% include 'wk_gift_order_popup' %}
For showing and add gift product on cart, add the codes to sections/main-cart-footer.liquid file:-
<div id="wk_order_gift" data-total-price="{{ cart.total_price }}"></div>
To hide the gift product from the product page, add the codes at the first line of sections/main-product.liquid file:-
{% unless product.tags contains "gift_product" %}
Also, add the code at the last line of sections/main-product.liquid file:-
{% endunless %}
To hide the gift product from the product grid page, add the codes at the first line of snippets/product-card.liquid file:-
{% unless product_card_product.tags contains "gift_product" %}
also, add the codes to at the last line of snippets/product-card.liquid file:-
{% endunless %}
Now, to remove update quantity field from cart page for gift product, add the codes to at sections/main-cart-items.liquid file inside below code:-
{% if item.product.tags contains "gift_product" %} <a href="#wk_choose_gifts">View all gifts</a> {% else %} {% endif %}
Connect in case of any assistance.
My Plan
Explore the Gift On Order plans that we have for you from this section:


Clicking on ‘View All Plans’, you’ll have this:


Basic: Your monthly basic plan for $9.00 is activated.
Premium: Choose the premium plan if you want to get charged yearly at a cost of $99.00/Yearly.
Shopify Gift on Order Front-end
On the front end, as per your rule, the minimum order value will be crossed then the default gift item will get automatically assigned to the cart when a buyer will add the products to the cart.
The customer can, however, change the free gift if you have given the options of other gifts as well.


Also on the cart page just below the checkout button, the information about the next offer of minimum purchase and free gift on that.


Admin can also display the additional amount needed to make your current order eligible for a free gift product:


Shopify Gift On Order Demo
Moreover, check out the link given below to have a demo of the app:
https://gift-on-order.myshopify.com/pages/demo
Support
Further, in case of any query, feel free to raise a ticket at http://webkul.uvdesk.com/ or drop an email at support@webkul.com.