Guide of Sell as Brand for Magento 2 Extension
Magento 2 Shop by Brand: A brand name plays an essential role in distinguishing a company and its products from competitors in the market.
And obviously, the customers will prefer branded products over non-branded ones.
It is now the prime responsibility of the business owners to combine the sell-as-brand feature with their online store because nowadays customers are so brand-centric.
And, Magento 2 Shop by Brand extension allows admin to create brands, brand-specific pages, choose layouts, and upload cover images and logos for each brand.
As in real-life scenarios, a first impression is most important. The brand name too leaves a positive or negative impression on the customer’s mind.
For more details about the workflow please watch our tutorial video.
Features
- The admin can create brands.
- The admin can manage the brands.
- All brands appear on the brand’s category page.
- The admin can manage the layered navigation of the particular brand.
- The admin can choose the layout of the brand in the front end.
- The admin can create individual pages for each brand.
- The admin can set the cover image of the brand.
- The admin can set the Logo Image of the brand.
- This extension is compatible with the Hyva Theme.
Installation
At first, Extract the downloaded zip folder. Inside the extracted folder, navigate to the src folder where you will find the app folder.
Now transfer the app folder into the Magento 2 root directory on the server as shown below.


After successfully installing, run the below commands in the Magento 2 root directory.
php bin/magento setup:upgrade
php bin/magento setup:di:compile
php bin/magento setup:static-content:deploy
php bin/magento indexer:reindex
php bin/magento cache:flush
Language Translation
In order to translate the module language, navigate through src/app/code/Webkul/SellAsBrand and edit the en_US.csv file.
Thereafter, rename the CSV as “en_SA.csv” and translate all right side content after the comma in the Arabic language. After editing the CSV, save it.


Now upload this to the path src/app/code/Webkul/SellAsBrand where the Magento 2 is installed on the server.
Furthermore, the module translates into the Arabic Language. It supports both RTL and LTR languages.
Module Configuration: Sell As Brand for Magento 2 (Adobe Commerce)
After installing the Sell As Brand for Magento 2 Extension, the admin configures this by navigating through Stores→Configuration→Webkul→Sell As Brand.

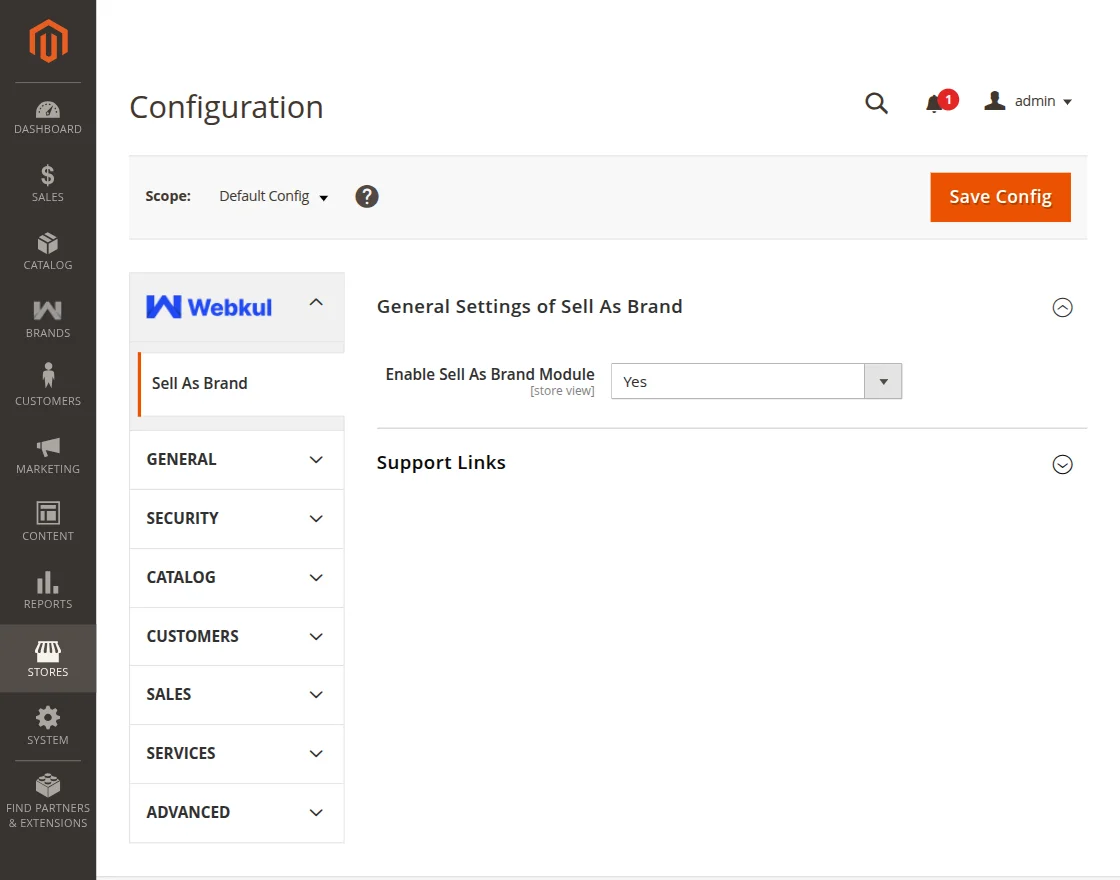
General Settings of Sell As Brand:
The admin configures the General setting.
- Enable Sell As Brand Module: Admin can enable or disable the module.
Admin Workflow
To create and manage brands, navigate to BRANDS from the admin sidebar menu.
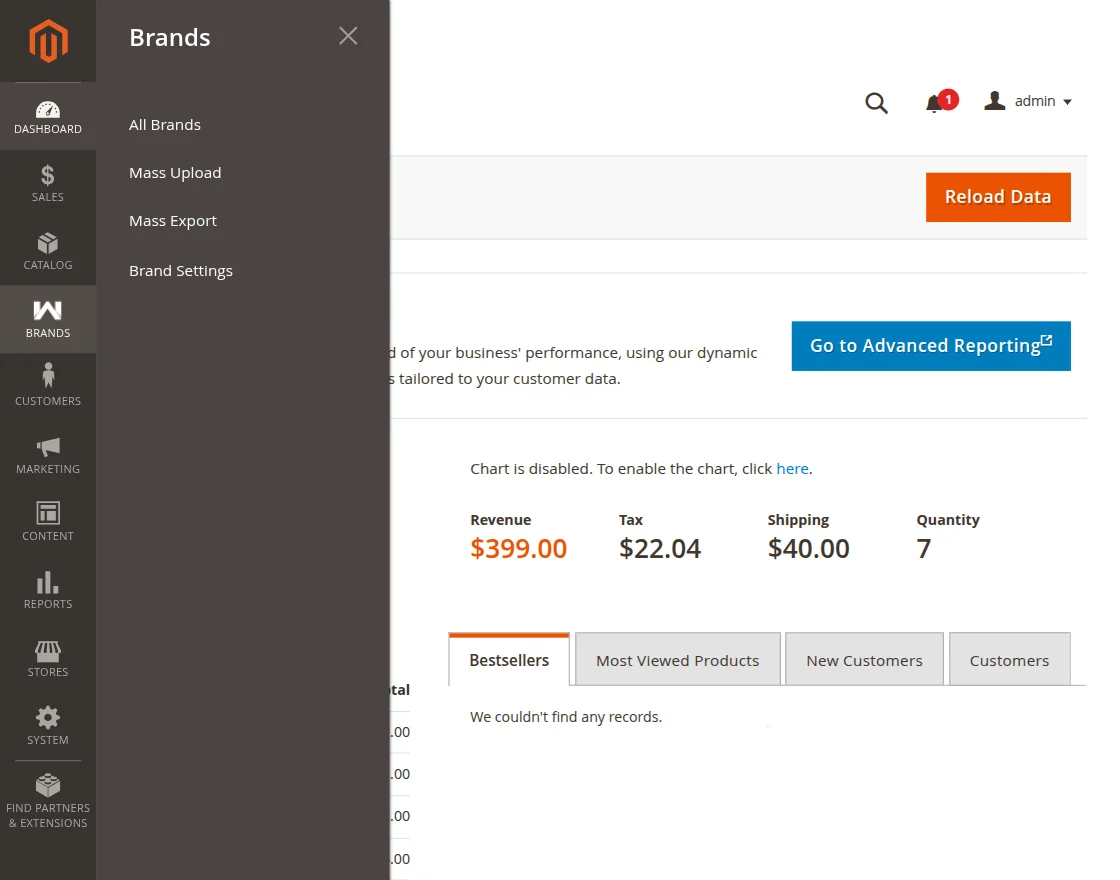
This has four sections:
- All Brands: View and manage all the registered brands in the store.
- Mass Upload: Upload multiple brand in bulk at once.
- Mass Export: Export multiple brand details in bulk.
- Brand Settings: Configure and manage the general settings for the brands.
All Brands
To View and manage the brands, navigate to Brands → All Brands.
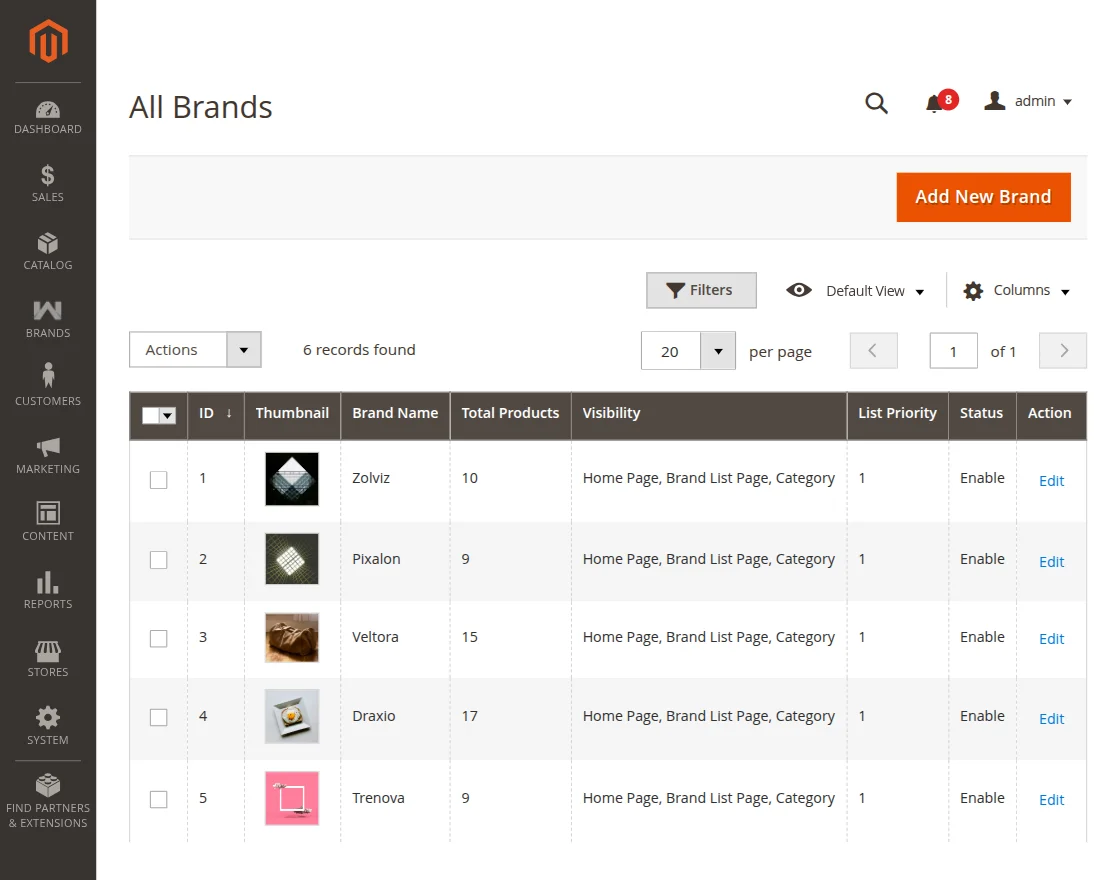
Here the admin can view all the brands with their details like Brand ID, Thumbnail, Brand Name, Total Products, Visibility, List Priority, and Status.
And admin can also make changes in the brand from the Edit link if required.
Now for adding a new brand the admin clicks on Add New Brand. Upon clicking this it will be visible like this.
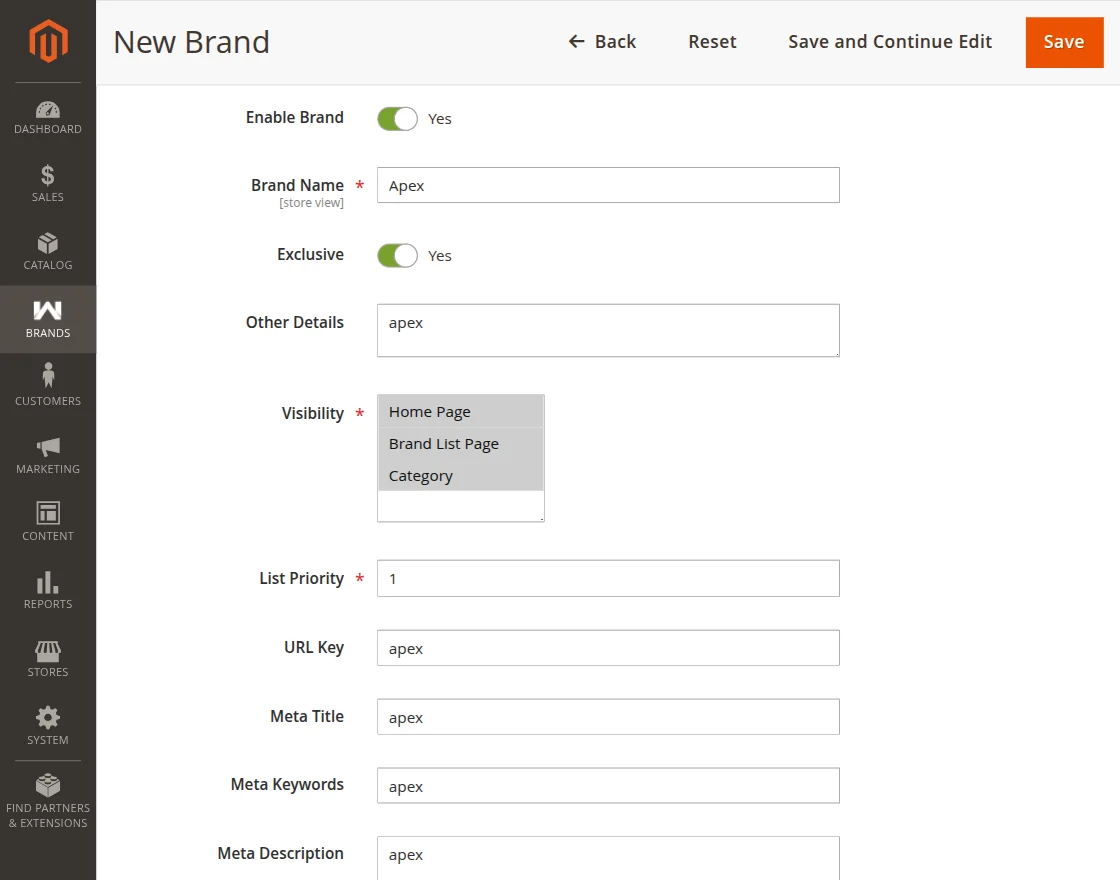
Here The admin fills the form with the following details-
- Enable Brand- Admin can enable or disable this brand.
- Brand Name – Here admin provides the brand name.
- Exclusive – If admin wants to list the brand as exclusive then, admin enables this.
- Other Details – Here admin can provide more details about the brand.
- Visibility – Here admin chooses where to display the brand.
- List Priority – Set the display priority order of the brand.
- URL Key – Enter URL key for the brand.
- Meta Title – Enter the meta title to be displayed on the browser tab for the brand page.
- Meta Keywords – Provide relevant keywords to help with brand searchability.
- Meta Description – Write a brief summary of the brand for search engine display.
Furthermore, there are more details required which are displayed in the below images.
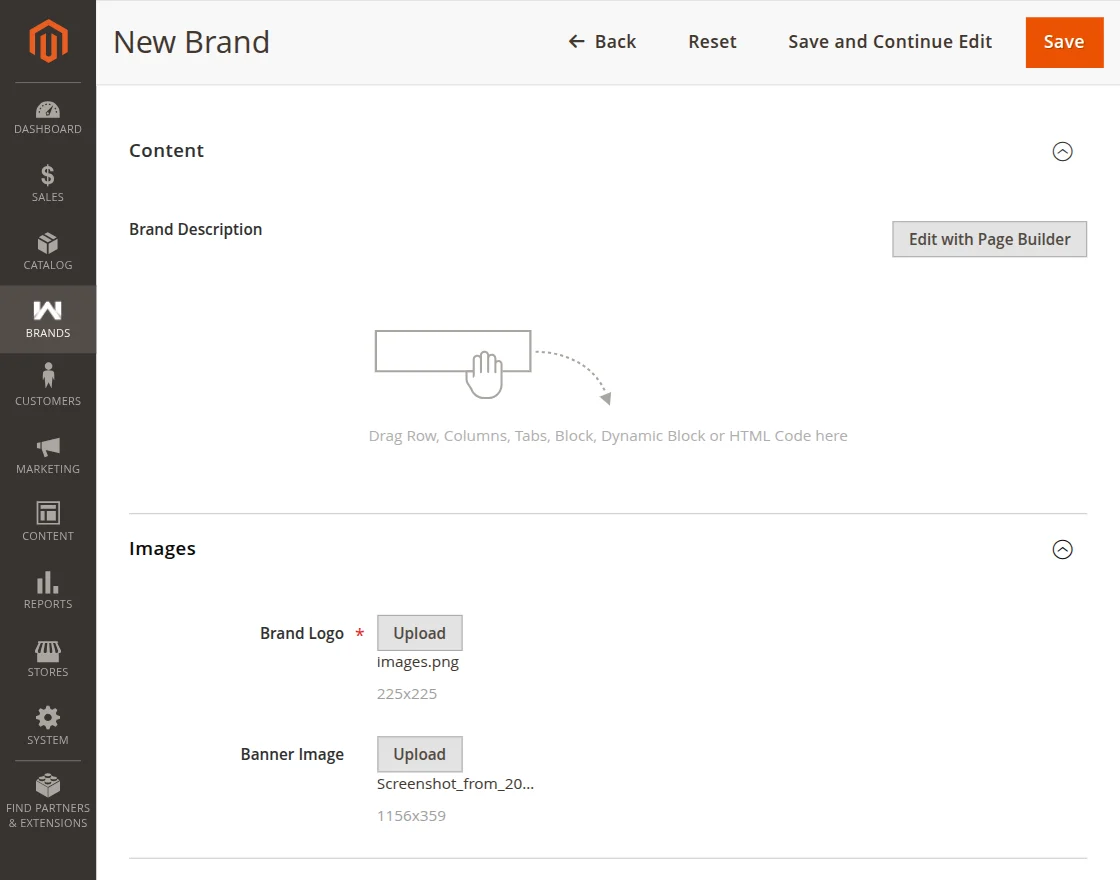
- Contents – Add detailed content or description for the brand page.
- Images – Upload the brand’s Logo and Banner Image.
Once all the required details are filled in, the admin saves the brand to make it live.
Mass Upload
To import multiple brands at once, navigate to Brands → Mass Upload.
Here admin fills the form with the following details:
- Upload CSV/XLS/XML – Upload the file containing the brand details.
- Upload Images Zip File – Upload a ZIP file containing all the brand logo and cover images.
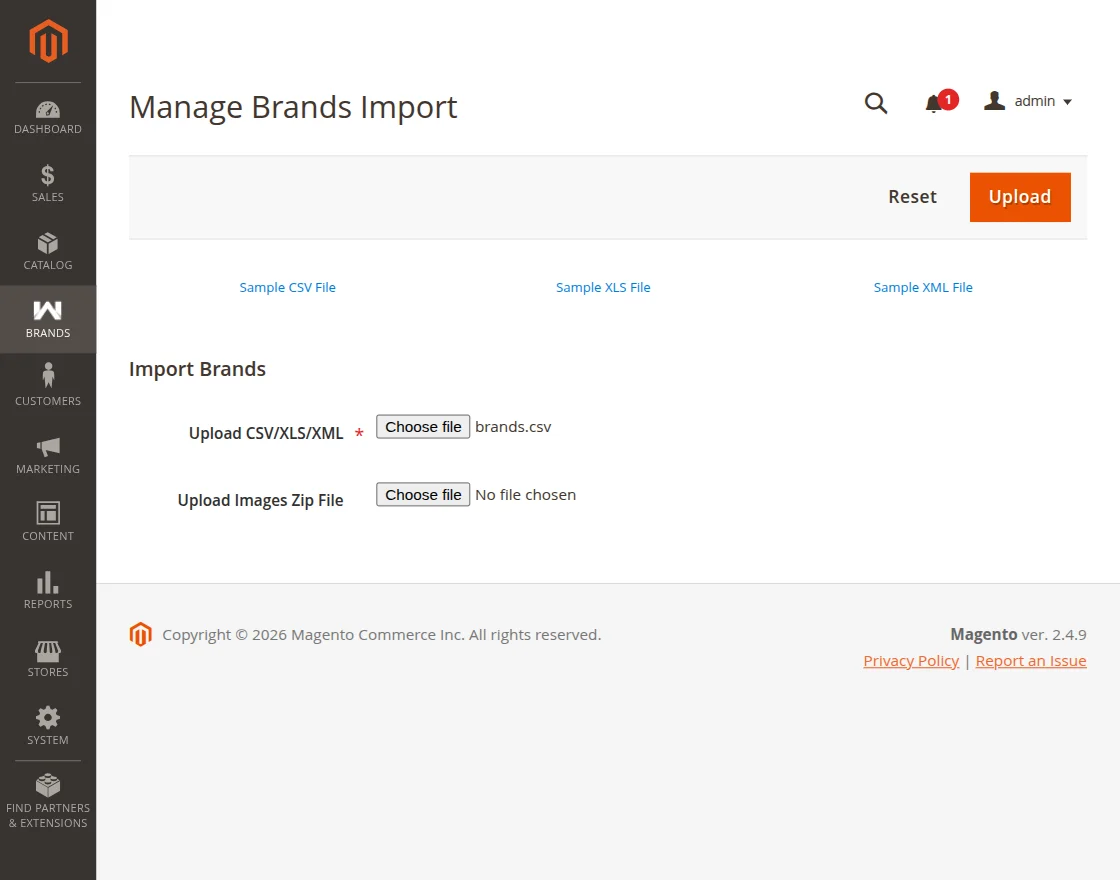
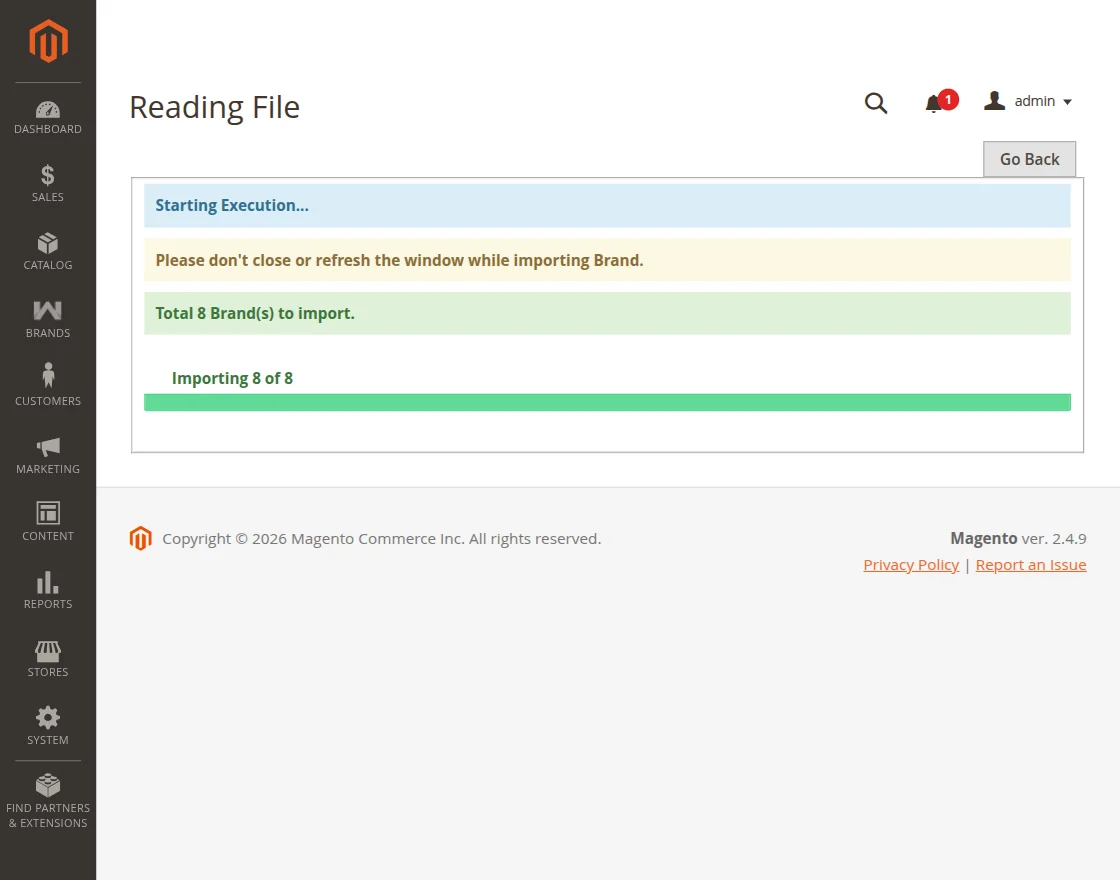
Once all the required details are filled in, the admin can click Upload to begin the import process and add multiple brands to the store at once.
Mass Export
To export all the brands at once, navigate to Brands → Mass Export.

Here the admin can export all the existing brand details in bulk.
Upon clicking Export Brands, the system automatically generates and downloads a CSV file.
Brand Settings
To configure the brand settings, navigate to Brands → Brand Settings.
Here the admin can configure the brand settings for the front end. The admin fills in the following details:
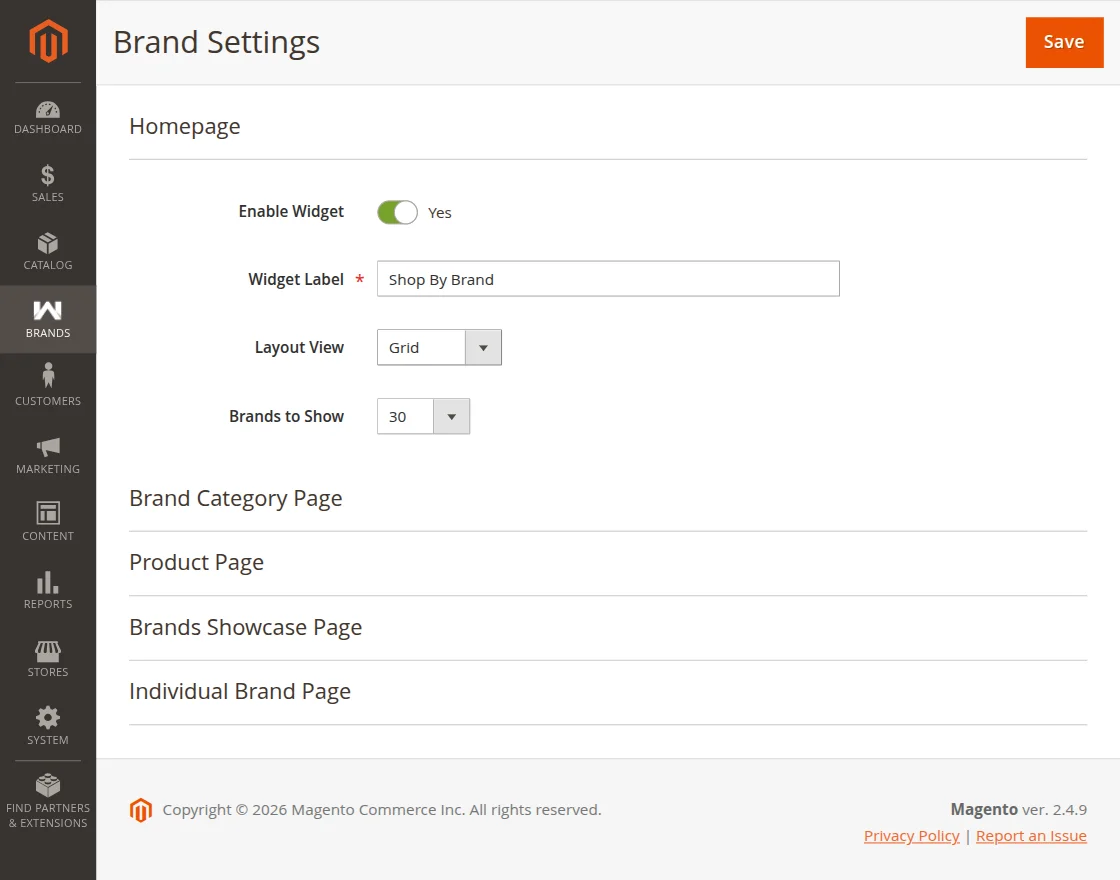
HomePage
The admin can configure how the brands will be displayed on the homepage of the front end by filling in the following details:
- Enable Widget – Enable or disable the brand widget on the front end.
- Widget Label – Set the label name for the brand widget.
- Layout View – Choose how the brands will be displayed on the front end. The admin has two options: Grid or Carousel.
- Brands to Show – Set the number of brands to be visible on the homepage.
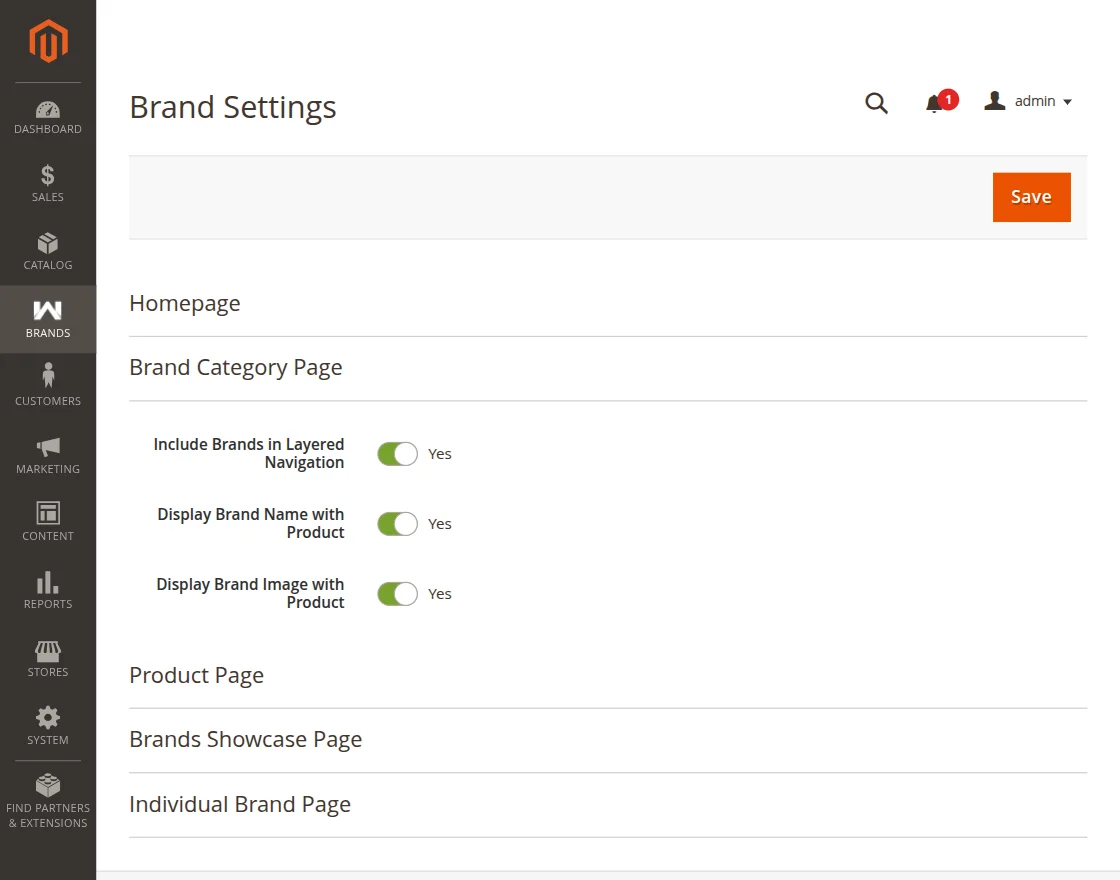
Brand Category Page
The admin can configure how the brands will be displayed in the category section of the front end by filling in the following details:
- Include Brands in Layered Navigation – Set whether to show the brands in the filter section on the front end.
- Display Brand Name with Product – Set whether to display the brand name along with the product.
- Display Brand Image with Product – Set whether to display the brand image along with the product.
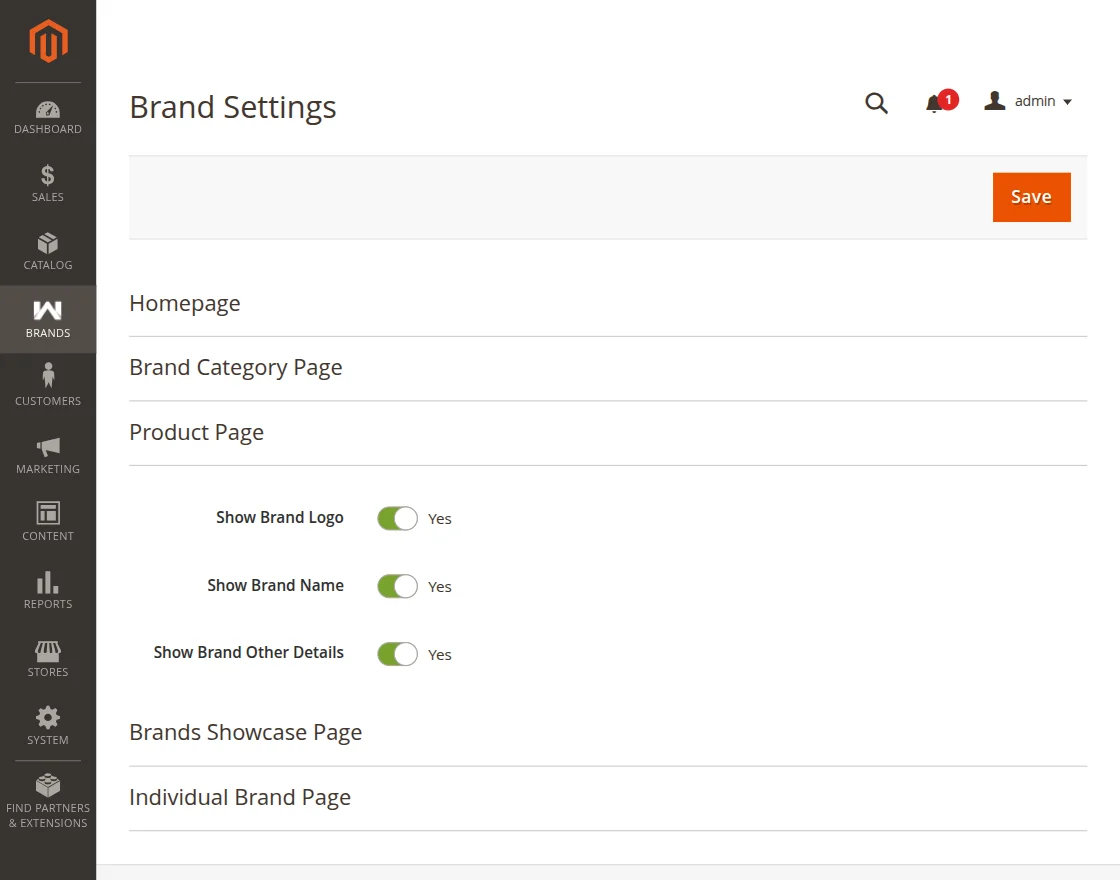
Product Page
The admin can configure how the brand details will be displayed on the product page by filling in the following details:
- Show Brand Logo – Set whether to show the brand logo on the product page.
- Show Brand Name – Set whether the brand name should be visible on the product page.
- Show Brand Other Details – Set whether the additional brand details should be visible on the product page.
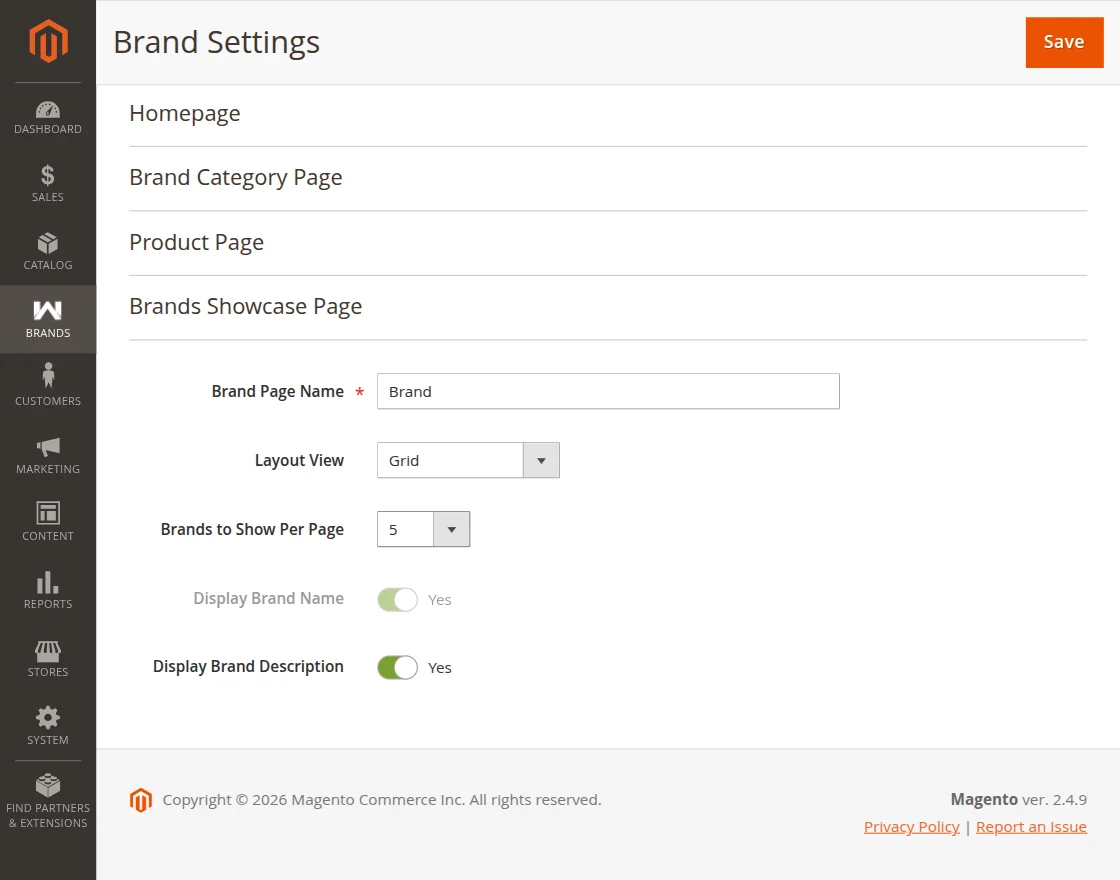
Brands Showcase Page
The admin can configure how the brands will be displayed on the brand showcase page by filling in the following details:
- Brand Page Name – Set the name for the brand showcase page.
- Layout View – Choose how the brands will be displayed. The admin has two options: Grid or Grid with Images.
- Brands to Show per Page – Set the number of brands to be visible per page.
- Display Brand Name – Set whether the brand name should be displayed on the brand showcase page.
- Display Brand Description – Set whether the brand description should be displayed on the brand showcase page.
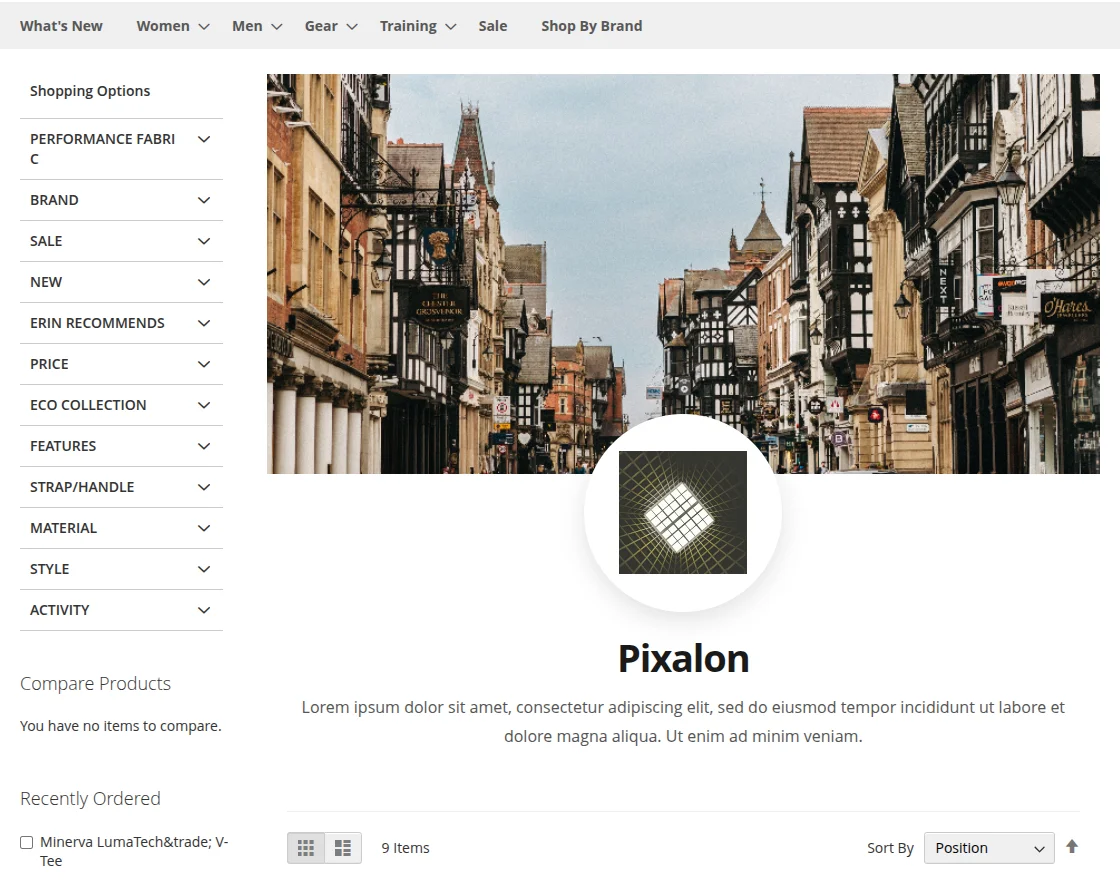
Individual Brand Page
The admin can configure how the brand details will be displayed on the individual brand page by filling in the following details:
- Enable to Appear in Search Engine Pages – Set whether the brand should appear in search engine results.
- Show Brand Cover Images – Set whether the brand cover image should be displayed on the individual brand page.
- Show Brand Description – Set whether the brand description should be visible on the individual brand page.
- Show Brand Other Details – Set whether the additional brand details should be visible on the individual brand page.

Finally, everything is configured from the admin end. Now all the changes reflect on the front end.
Customer View
The Customers can visit the Shop by Brand page under the homepage where all the available brands are listed. Here customers can see:
- All Brands – View all the available brands in the store.
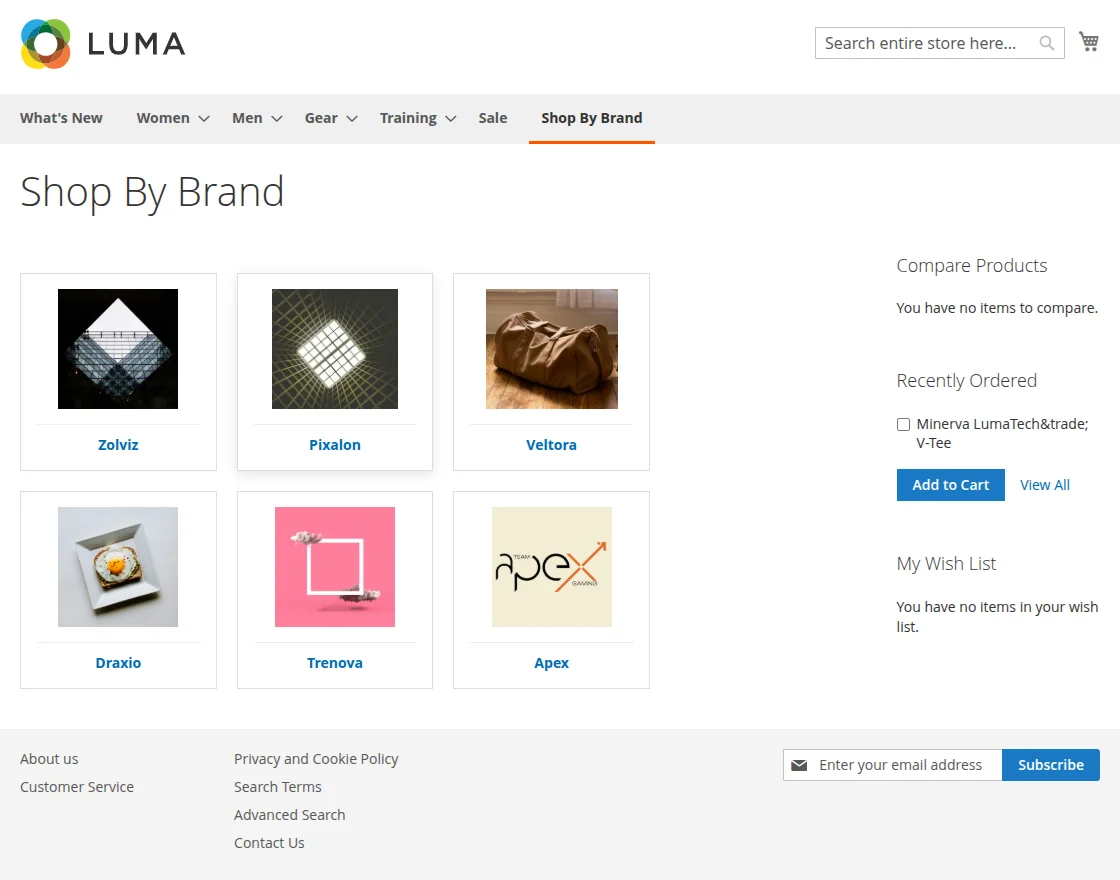
Customers can click on any brand to visit its individual brand page. Here customers can:
- Add products to the cart and proceed to purchase directly from the brand page.
- View all the products listed under the specific brand.
- Browse and choose products easily from the brand page.
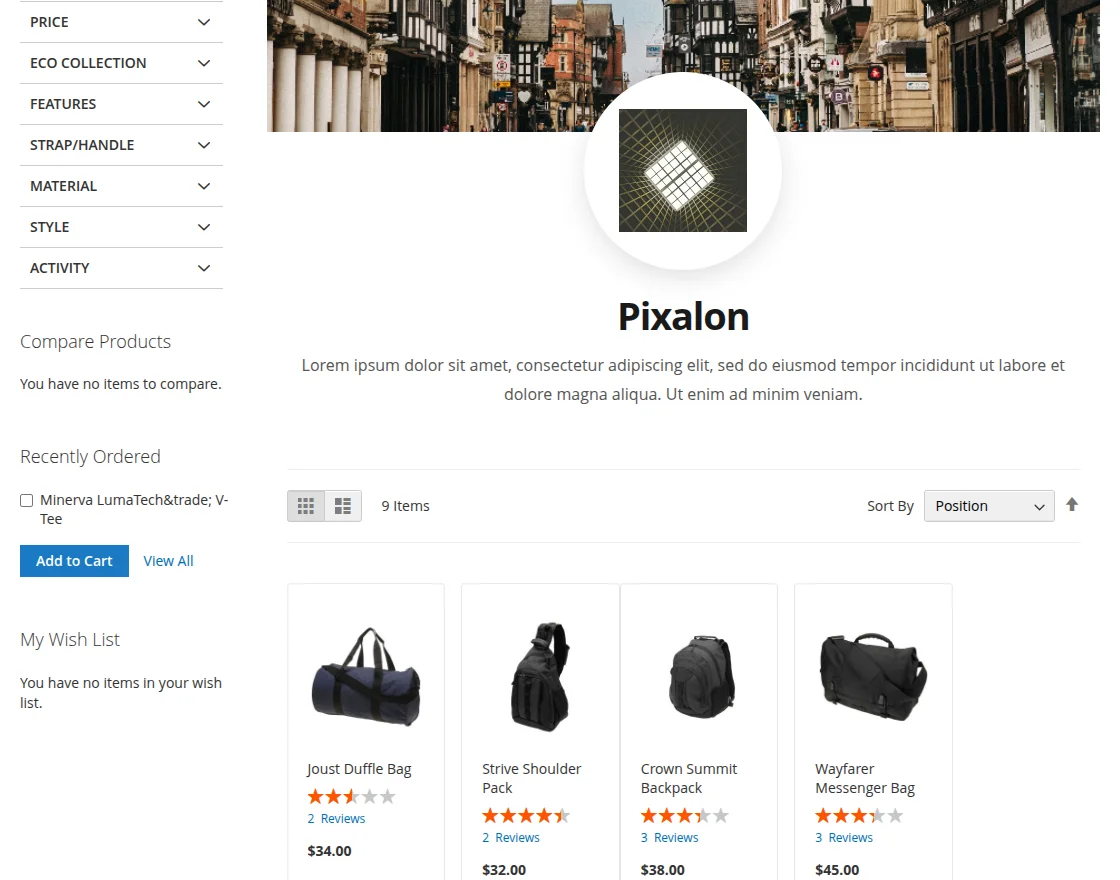
Here customers can purchase products directly through the brand page.
That’s all for the Sell as Brand for Magento 2 (Adobe Commerce) extension. If you face any issues, feel free to add a ticket at webkul.uvdesk.com
Explore the Adobe Commerce Cloud development services by Webkul. You may also browse other quality Magento 2 extensions.