Laravel eCommerce Pre Order
Table of Content
Laravel eCommerce Pre Order module lets your Bagisto store accept orders for products that are out of stock or not launched yet.
Customers reserve the item by paying the full price or only a percentage of it. Once the stock arrives, they settle the rest and the order moves forward.
Note – Laravel eCommerce Pre Order module is now supported with Bagisto version 2.4.11.
Features of Laravel eCommerce Pre Order
- Buyers can pre-order any product that is out of stock.
- Works with both simple and configurable products.
- Choose between complete payment and partial payment upfront.
- Set a custom message that appears on every pre-order product page.
- Show an expected availability date so shoppers know when the item ships.
- Limit how many units one customer may reserve, per product or store wide.
- Close pre-orders automatically once the cut-off date you choose passes.
- A clear notice appears on the cart and the checkout page as well.
- Customers receive a confirmation email the moment they place a pre-order.
- An in-stock email goes out automatically, or you send it yourself from the admin panel.
- A scheduled reminder chases the unpaid balance, and unpaid reservations can expire on their own.
- The Preorder button also appears on category listings, search results and the wishlist.
- Admin sees a dedicated Preorders grid plus a summary panel on the order page.
- The store charges shipping only once, even though the payment splits across two orders.
- Guest users can pre-order too, using a secure link that arrives by email.
- Multi-Lingual support with all 22 locales including RTL.
- The code is fully open & you can customize it according to your need.
Installation of Laravel eCommerce Pre Order
After purchasing the extension the customers will get a zip folder.
Unzip the respective extension zip and then merge “packages” and “public” folder into project root directory.
Next, run the commands below from the Bagisto root directory to complete the setup.
- Goto composer.json file inside the Bagisto root directory now add the following line under ‘psr-4’
"Webkul\\PreOrder\\": "packages/Webkul/PreOrder/src"
- Regenerate the autoloader so that the new package is discovered
composer dump-autoload
- Goto bootstrap/providers.php file now add the following line under ‘providers’
use Webkul\PreOrder\Providers\PreOrderServiceProvider;

inside return [...]; keep,

PreOrderServiceProvider::class,
- Finally run the installer, which handles the migrations, the pre-order product attributes and the assets
php artisan pre-order:install
Once the commands finish, enable the module from Configuration > Preorder > Settings > General.
Afterwards the Preorder entry appears in the left-hand admin menu, as the screenshots below show.
Laravel eCommerce Pre Order Configuration
General Settings
Every pre-order rule lives under Configuration > Preorder > Settings > General. Eight fields control the whole workflow.

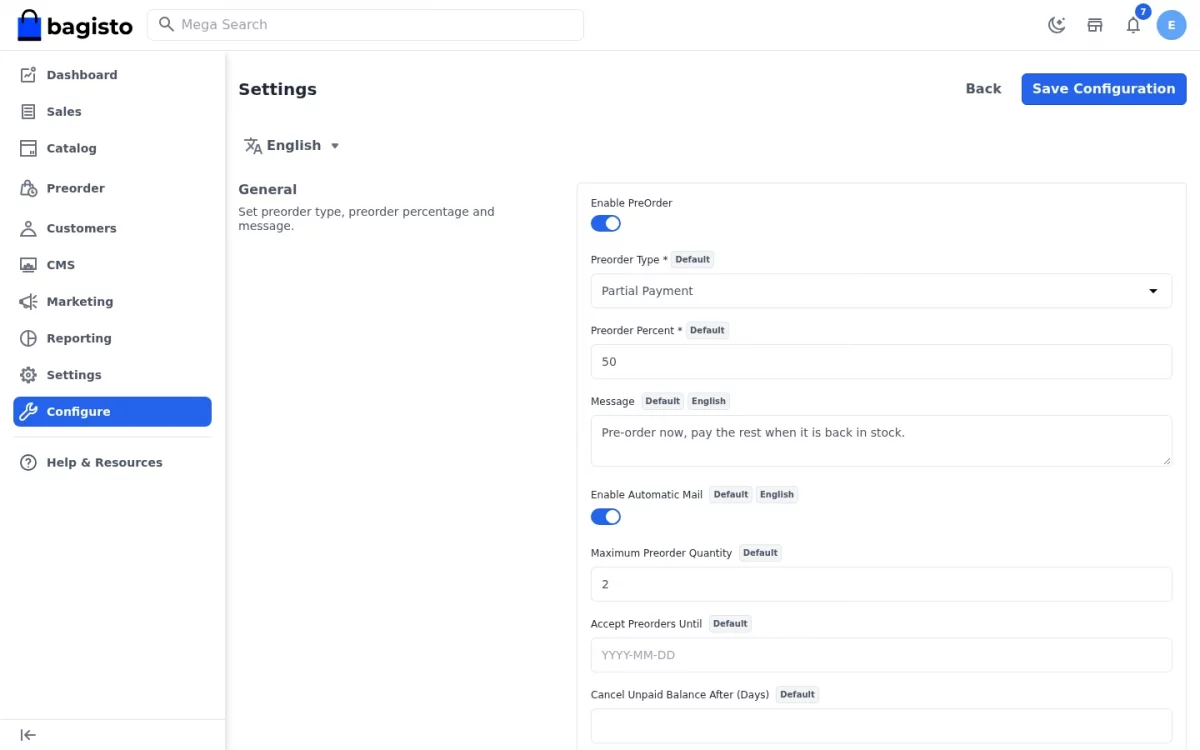
Enable PreOrder
This toggle switches the feature on for the whole store. Moreover, turning it off also hides the Preorder admin menu entry.
Preorder Type
Choose Partial Payment or Complete Payment. Partial collects a percentage now, whereas complete collects the full price upfront.
Preorder Percent
This field appears only for partial payments. For example, a value of 50 asks the shopper for half the price today.
Message
Write a short line that appears on the product page, the cart and the checkout. Additionally, the message is translatable per locale.
Enable Automatic Mail
With this on, customers are told the moment their reserved product is back in stock. Otherwise you send that email yourself from the grid.
Maximum Preorder Quantity
This caps how many units one customer may reserve. However, a per-product limit always wins over this store-wide value.
Accept Preorders Until
Enter a cut-off date in YYYY-MM-DD format. After that day the Preorder button disappears and normal stock rules apply again.
Cancel Unpaid Balance After (Days)
The module cancels reservations whose balance stays unpaid for this many days. Consequently, stale reservations never pile up.
Step-by-Step: Configure Pre-Order
- Log in to the admin panel and open Configuration from the left menu.
- Select Preorder > Settings > General.
- Turn Enable PreOrder on.
- Pick a Preorder Type, then enter the Preorder Percent if you chose partial payment.
- Write the Message shoppers should see, and enable automatic mail if you want restock emails sent for you.
- Optionally set Maximum Preorder Quantity, Accept Preorders Until and Cancel Unpaid Balance After (Days).
- Click Save Configuration.
Pre Order – Product Management
The module adds three fields to every simple and configurable product. You will find them in the General section of the product edit page.
Allow Preorder marks the product as reservable. Preorder Qty caps the units one customer may take, while Product Availability holds the expected arrival date.
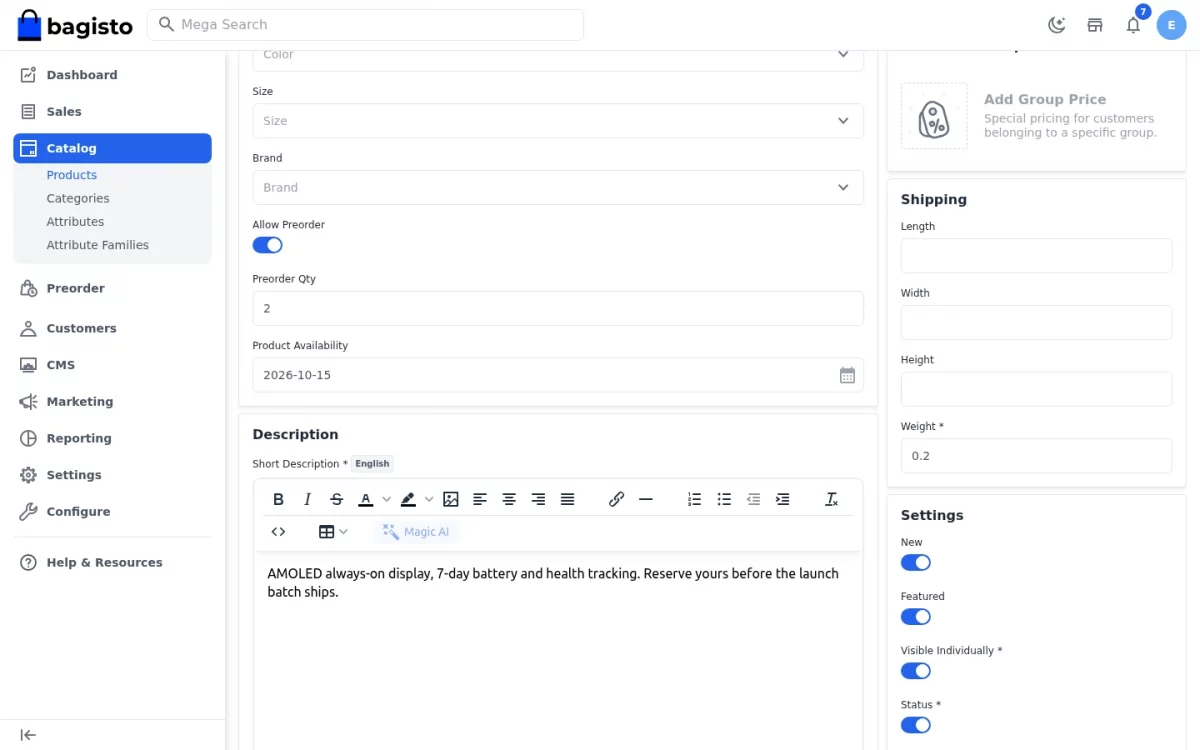
Notably, these fields only show up when pre-ordering is on and the product type supports it. Therefore bundles and downloadables stay uncluttered.
Step-by-Step: Make a Product Pre-Orderable
- Open Catalog > Products and edit the product you want to offer.
- Scroll to the General section.
- Switch Allow Preorder on.
- Enter a Preorder Qty if this product needs its own per-customer limit.
- Pick the expected Product Availability date.
- Set the inventory quantity to zero, because only out-of-stock products can be reserved.
- Click Save Product.
Pre Order – Product Page
On the storefront the usual Add To Cart button becomes Preorder. Alongside it, a card explains the deal in plain words.
The card shows the percentage due today, your custom message and the expected availability date.
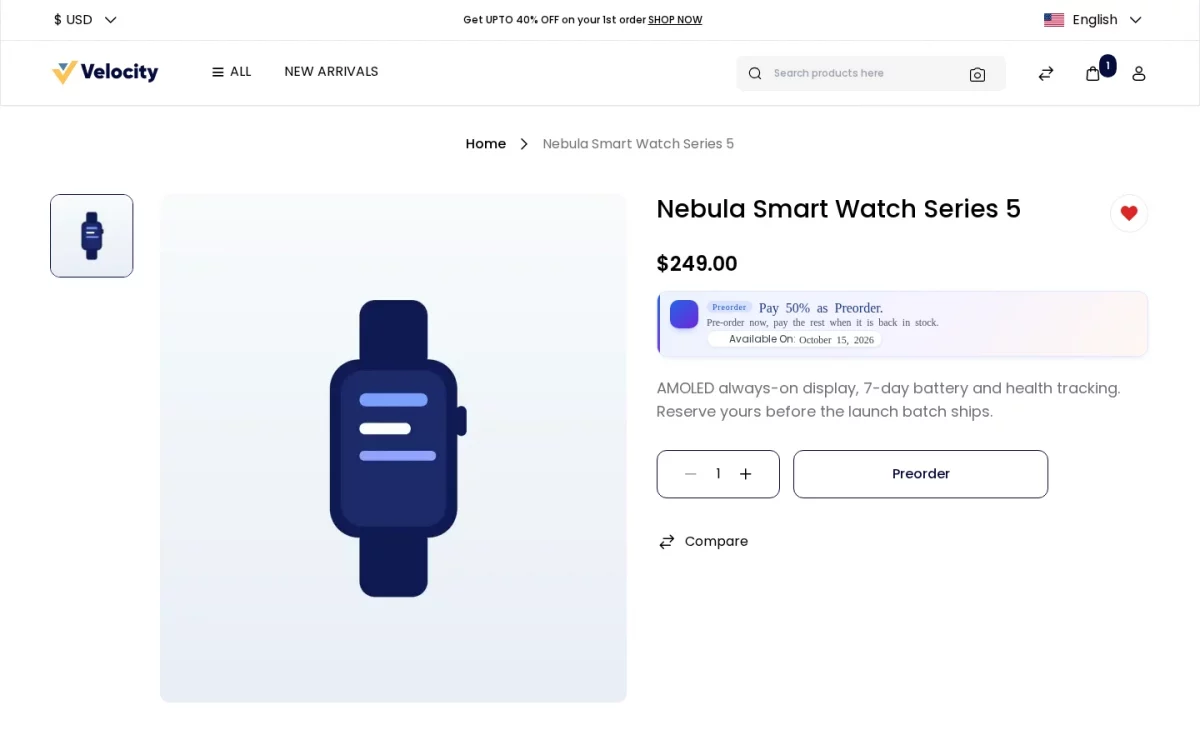
In this example the tablet costs $600 and the store collects 50% upfront. As a result the shopper pays $300 now and $300 on restock.
Step-by-Step: Place a Pre-Order from the Product Page
- Open the out-of-stock product on the storefront.
- Read the pre-order card to check the amount due and the availability date.
- Choose the quantity you want to reserve.
- Click Preorder to add the item to your cart.
Pre-Order For Configurable Product
Configurable products work the same way once every variant is out of stock. First the shopper picks the options, then the Preorder button becomes active.
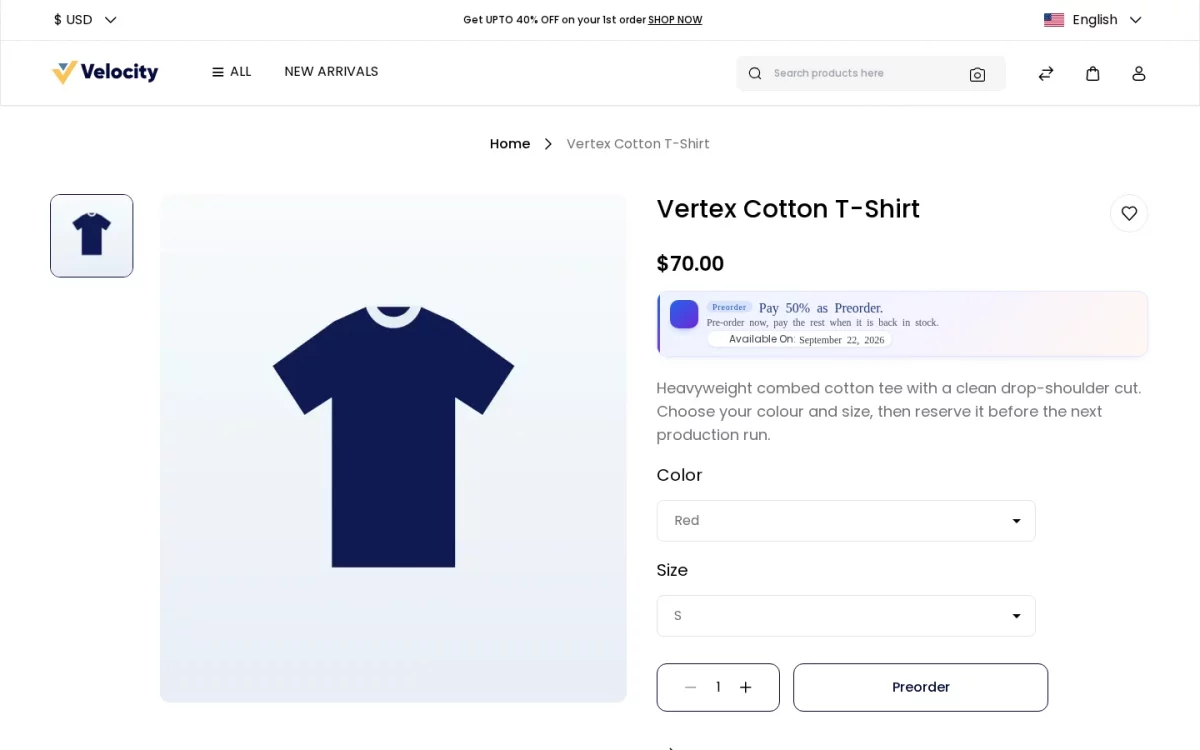
The pre-order card sits above the options, so the shopper reads the terms before choosing anything.
Preorder Button on Listing and Wishlist
Shoppers do not have to open a product page to reserve an item. Instead the Preorder button appears right on the category and search listings.
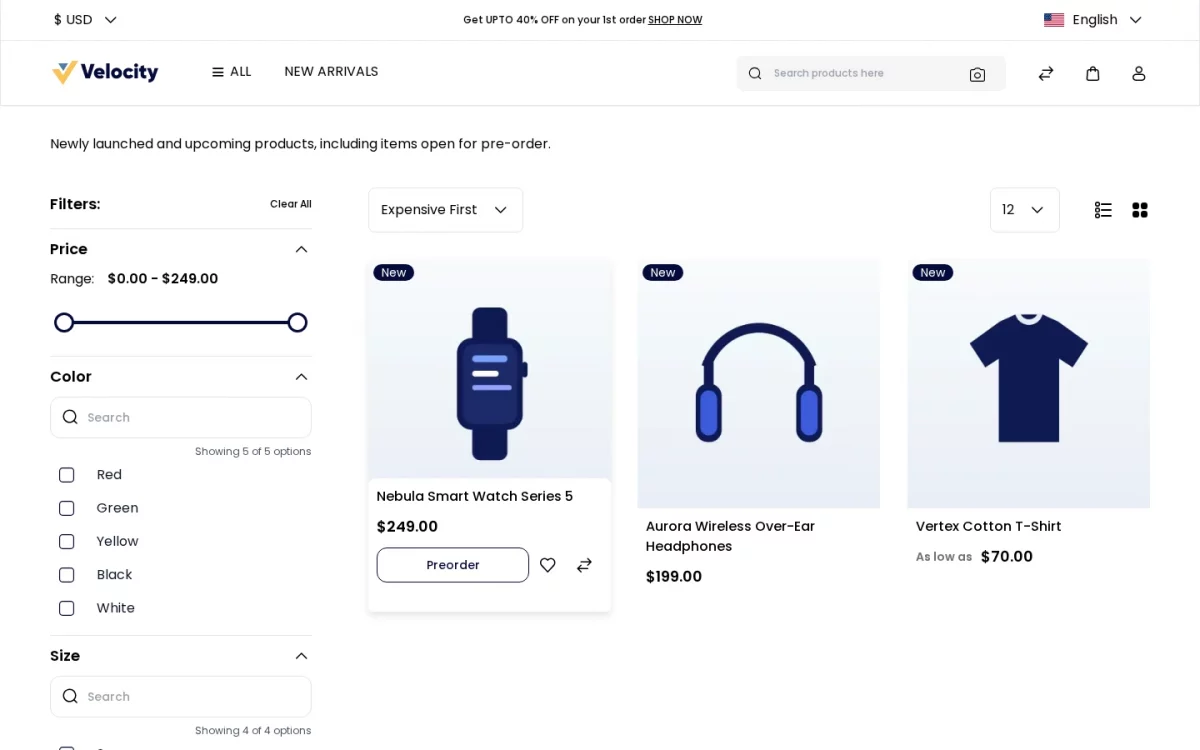
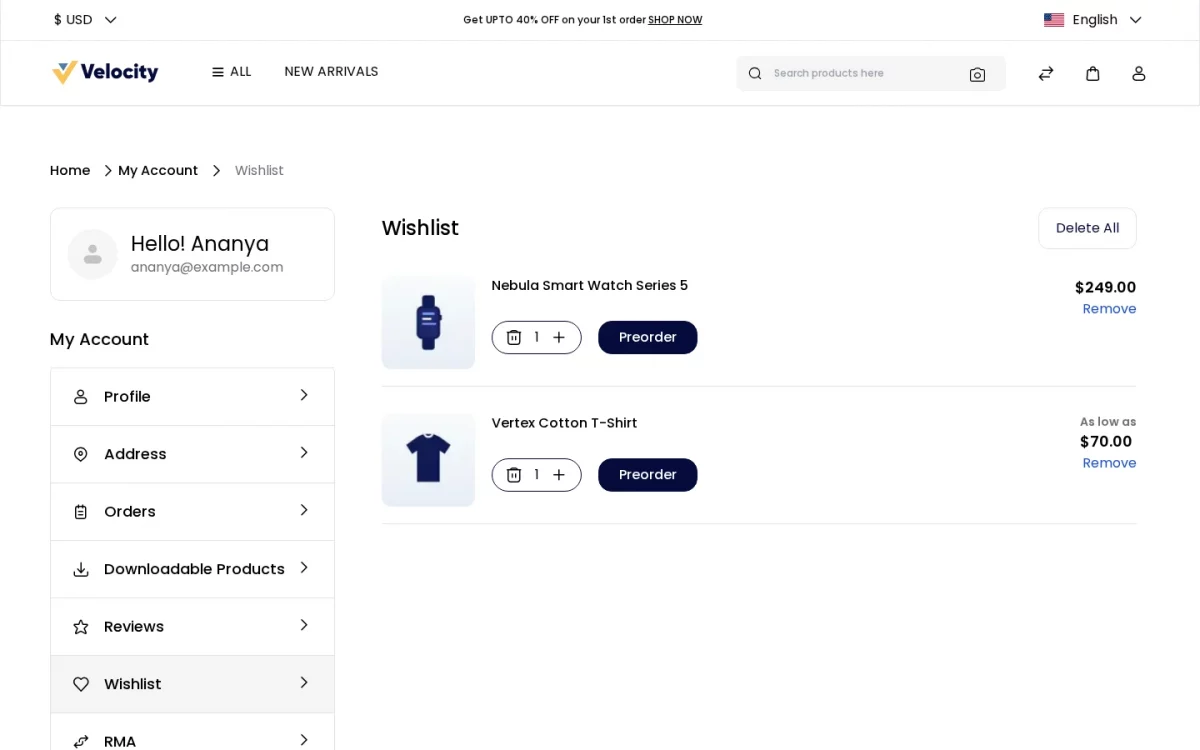
Similarly, the wishlist replaces its Move To Cart button with Preorder for any reservable product.
Customer Placing Pre-Order
How much the shopper pays depends entirely on the Preorder Type you selected. Two cases are possible.
Case 1 – Complete Payment
The customer pays the entire price straight away. Consequently there is no balance left and nothing to chase later.
Case 2 – Partial Payment
The customer pays only the configured percentage. Meanwhile the rest stays pending until the product is back in stock.
Shopping Cart
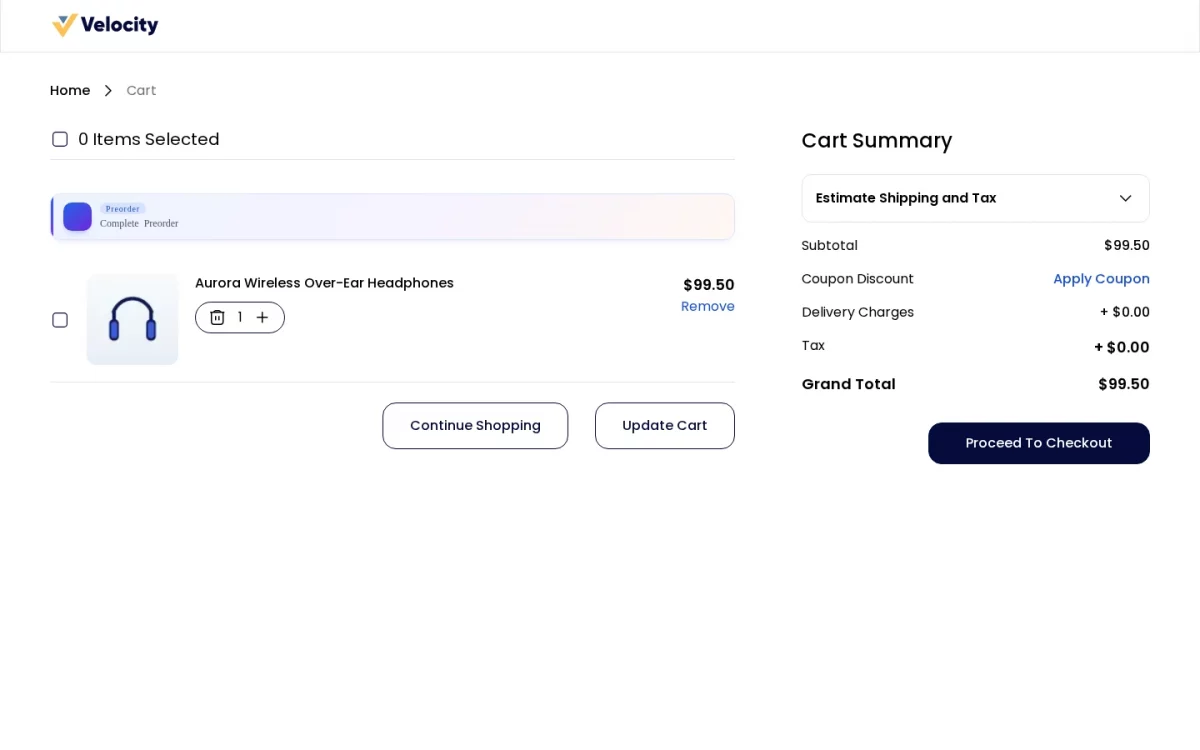
A pre-order notice sits at the top of the cart, so the terms never come as a surprise.
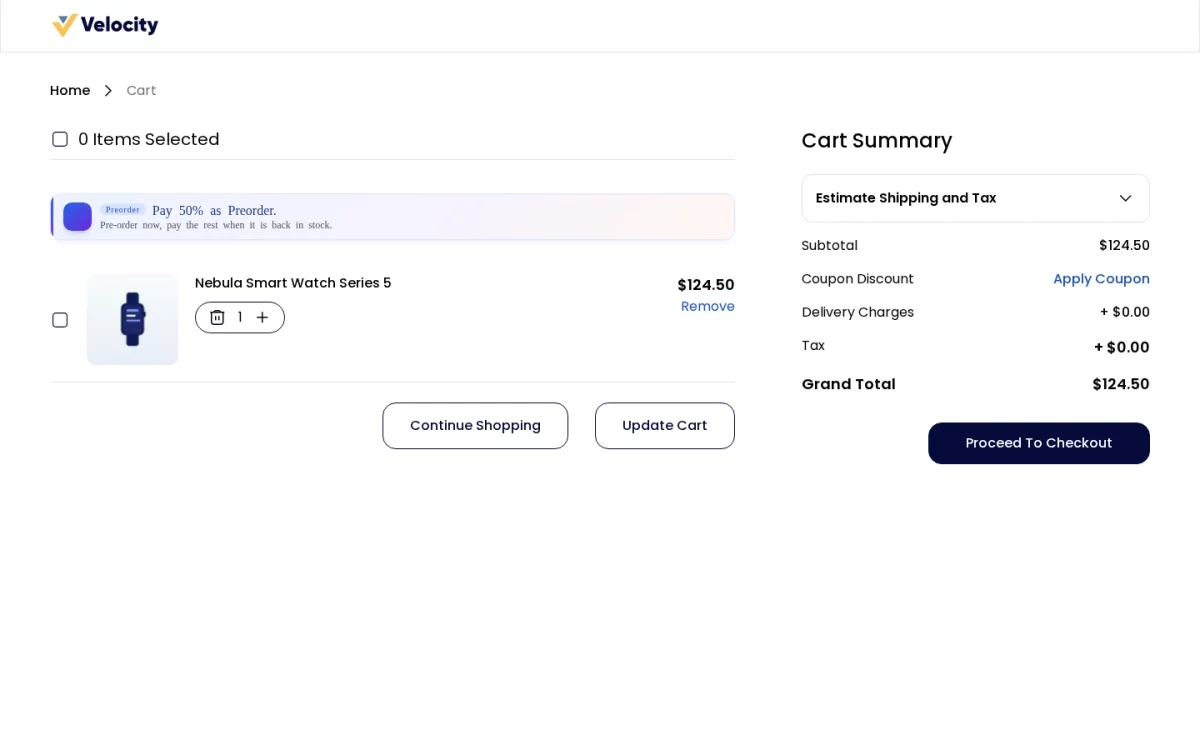
Notice the $600 tablet showing at $300, which matches the 50% you set in the configuration.
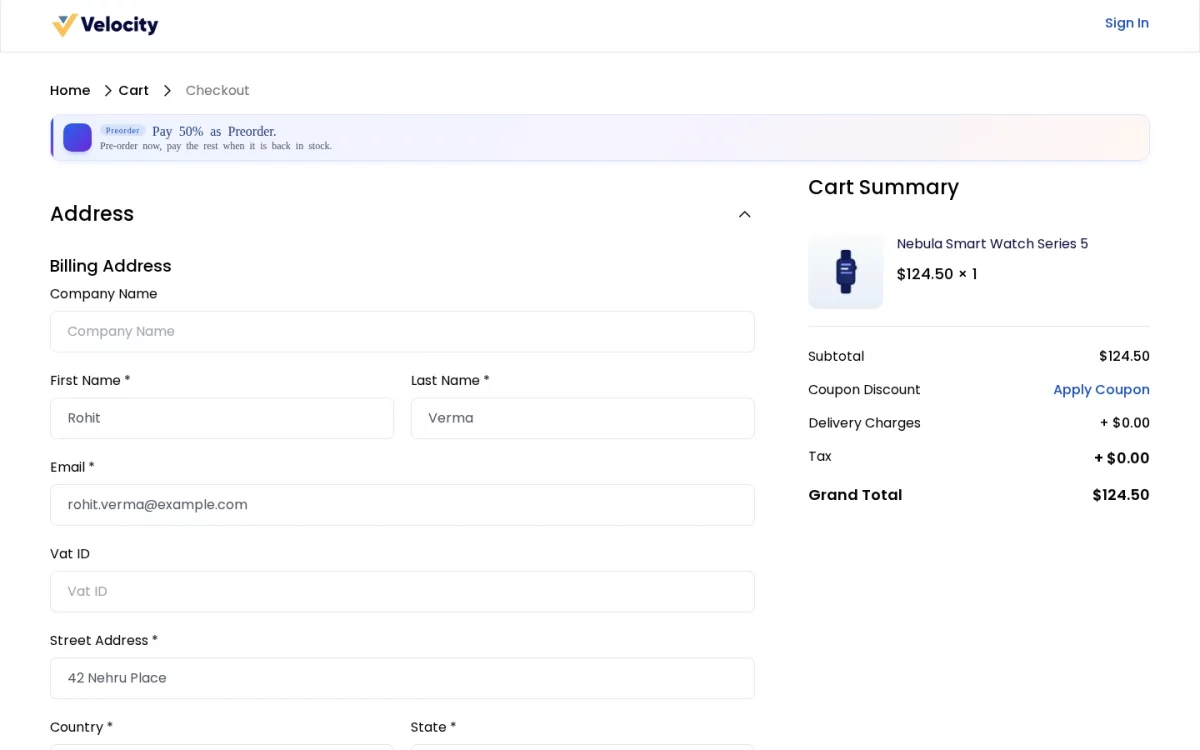
Checkout Notice
The same notice follows the shopper to the checkout page. Therefore the pre-order terms stay visible right up to the moment of payment.
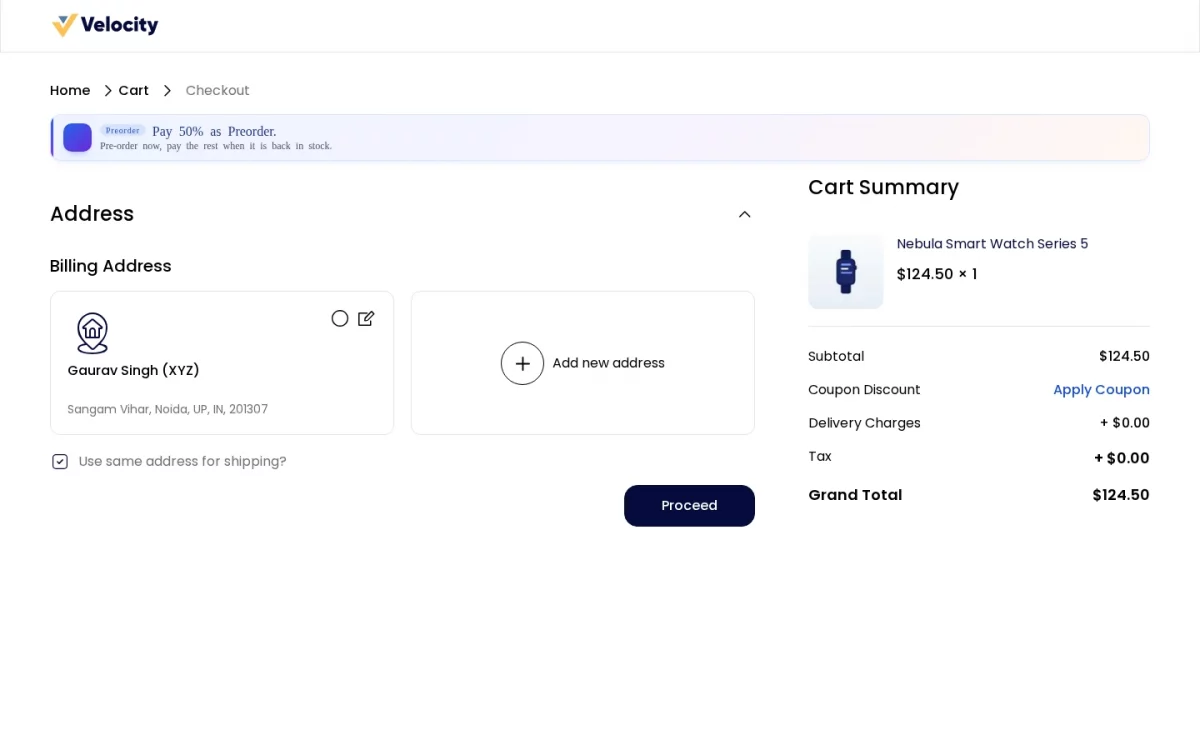
Pre-Order Shipping Price
The store charges shipping once only. For that reason the balance payment later goes through with free shipping.
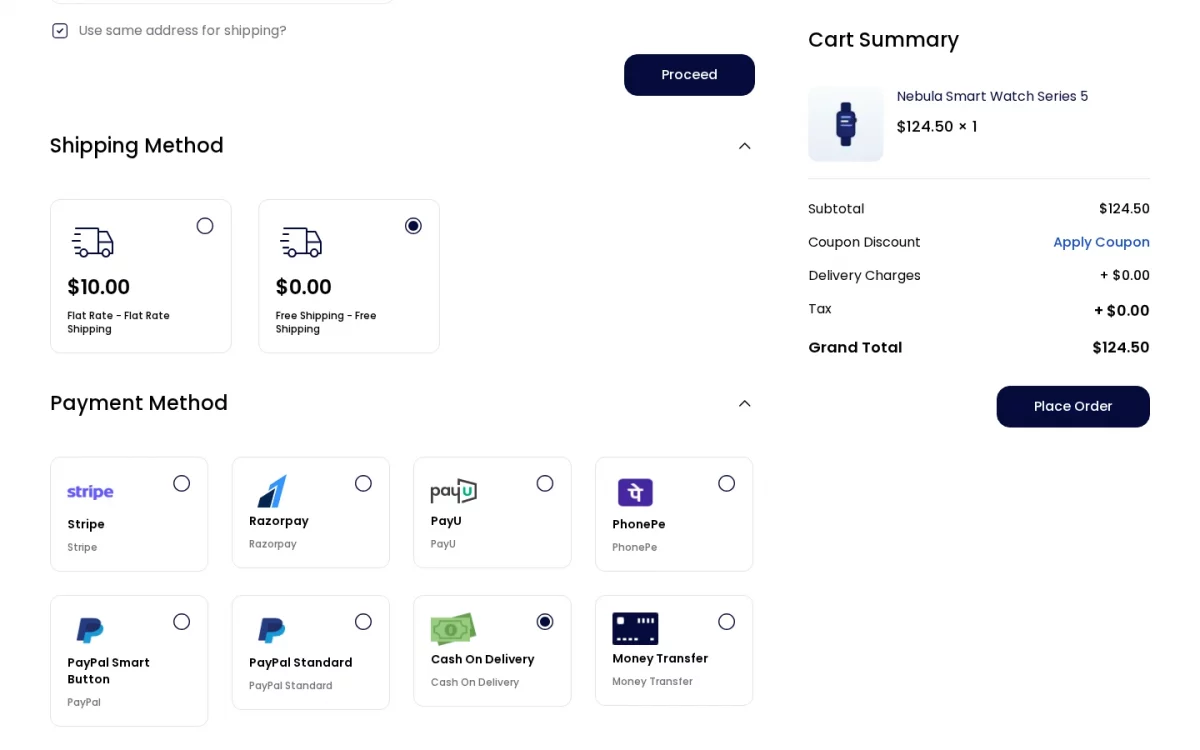
Finally the customer selects a payment method and places the order as usual.
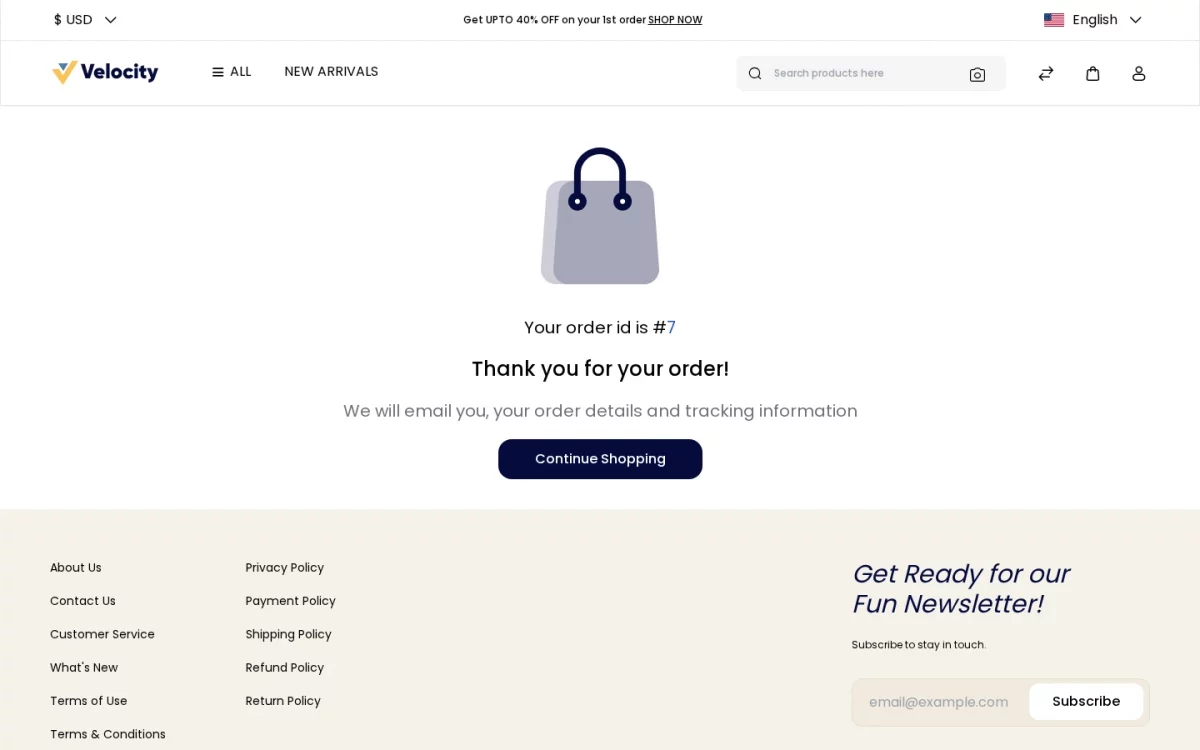
Step-by-Step: Complete the Pre-Order Checkout
- Open the cart and review the pre-order notice.
- Click Proceed To Checkout.
- Fill in the billing and shipping address, then save it.
- Select a shipping method followed by a payment method.
- Click Place Order to confirm the reservation.
Pre Order – Admin Management
Every reservation lands in Preorder on the admin sidebar. The grid lists the product, the customer, both amounts and the current status.
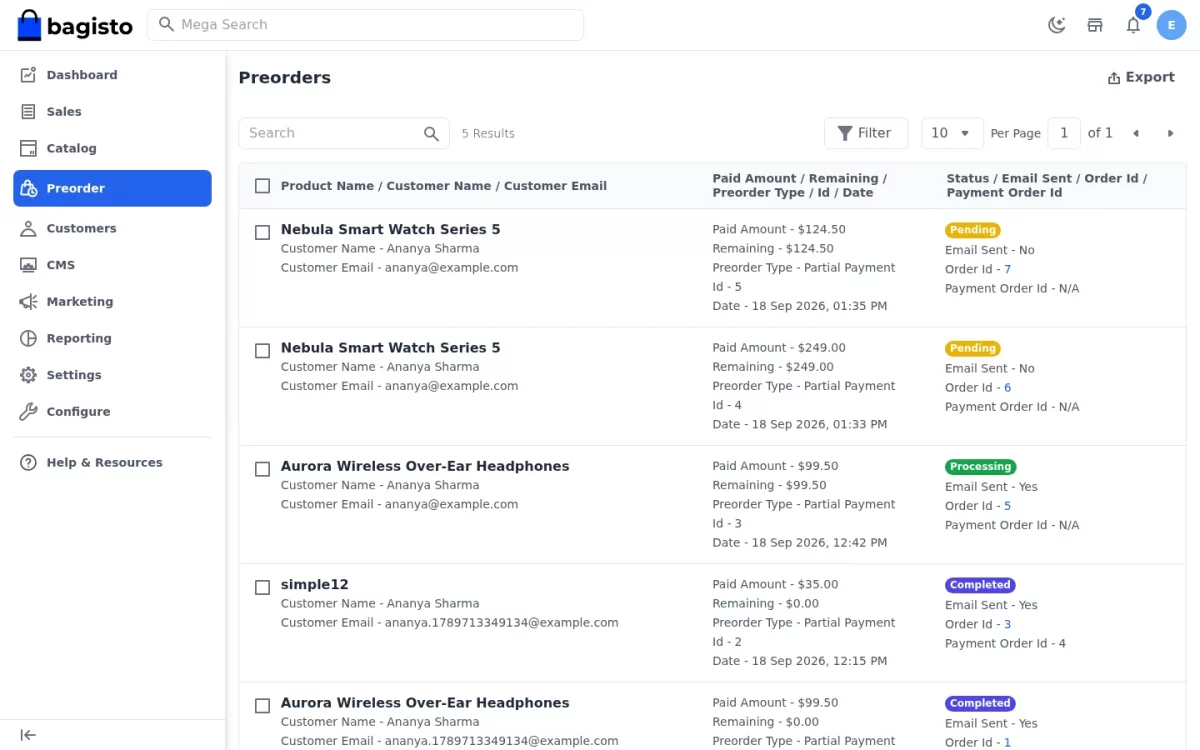
A reservation moves through pending, processing and then completed. It may also end up canceled.
In addition you can search, filter by status or date and export the whole grid.
Notify Customers Manually
Select one or more rows, open Select Action and choose Notify Customer. The in-stock email then goes out immediately.
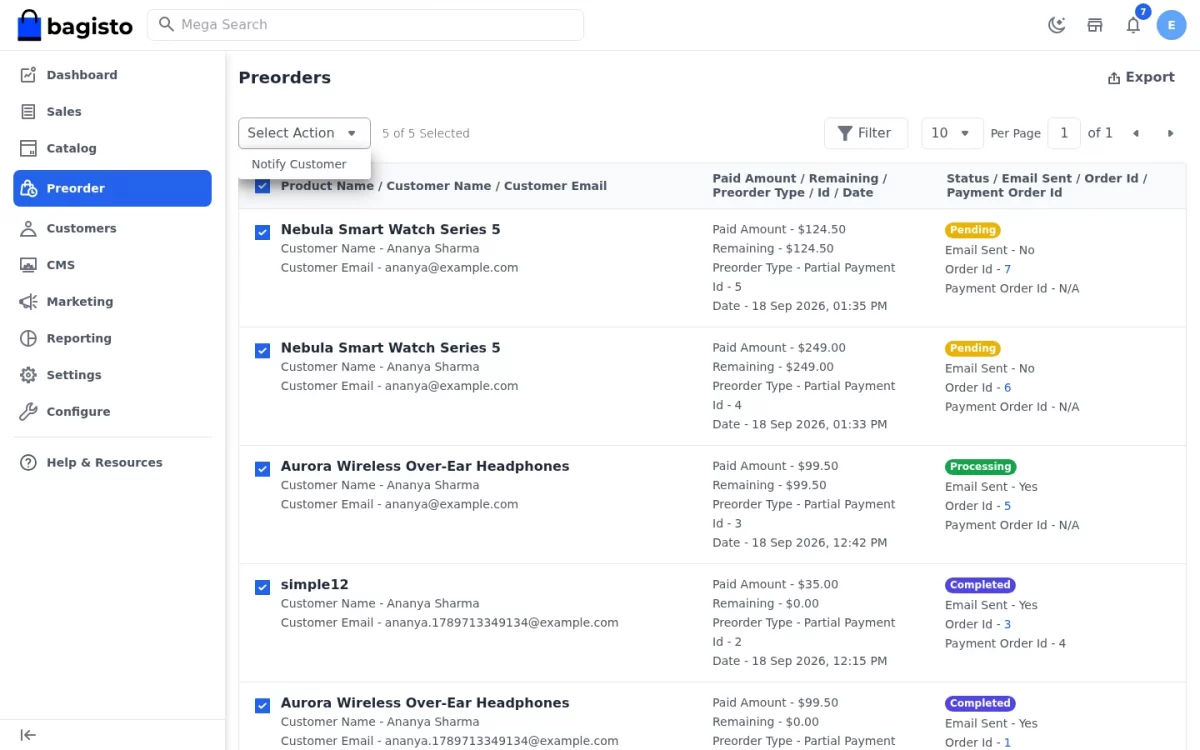
This is handy when automatic mail is off, or when a customer asks you to resend the link.
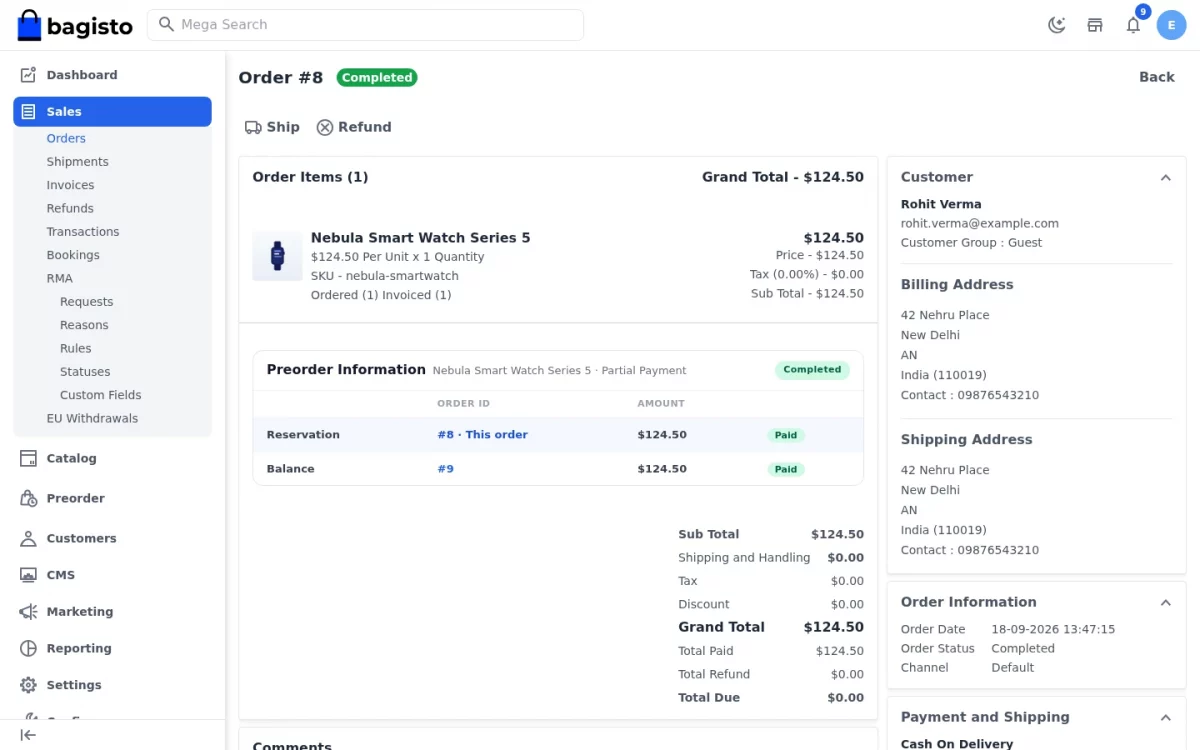
Preorder Information on the Order Page
Open any order that holds a reservation and a Preorder Information panel appears below the items.
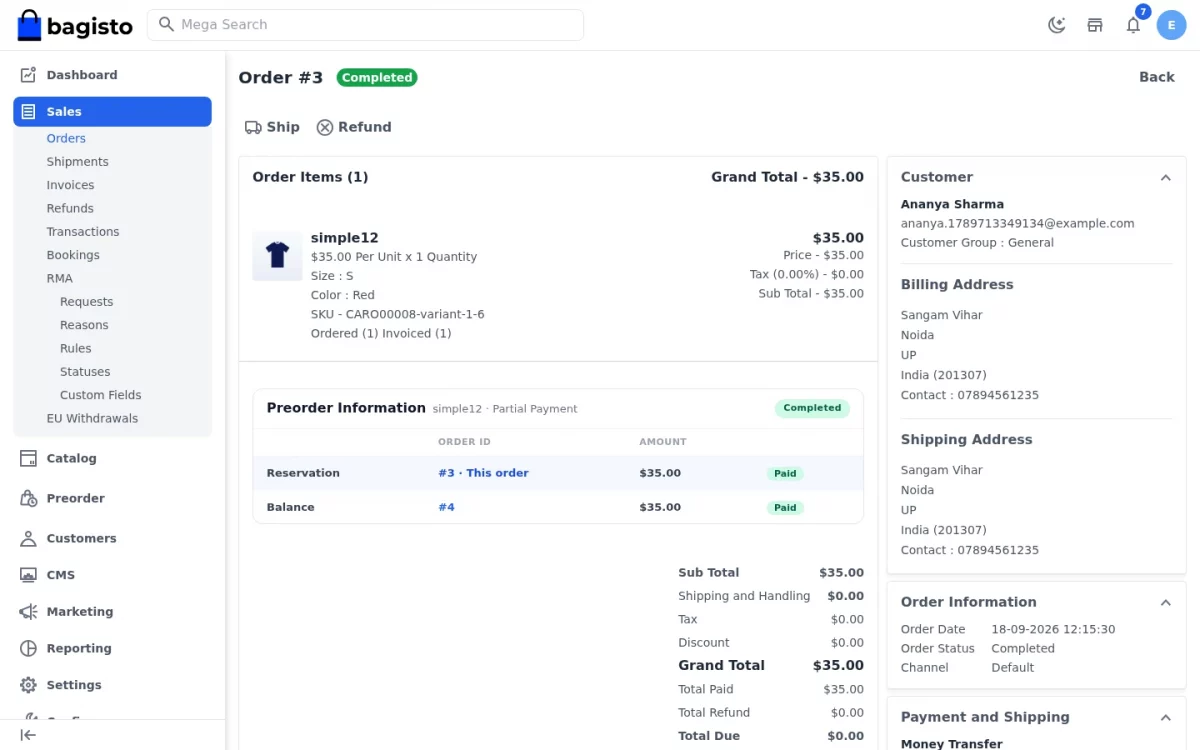
A pre-order is paid across two orders, therefore the panel states both of them in one small table.
Reservation names the order that took the deposit, while Balance names the order that settles it.
Moreover every row carries its order number, its amount and whether that part is already paid.
The row you are reading is tinted and marked This order. As a result the merchant reaches either order from either side.
Until the customer pays, the Balance row simply reads Not raised yet.
Furthermore the panel hides the Ship action while money is owed. Shipping waits for the balance, never the other way round.
Step-by-Step: Notify a Customer that Stock Arrived
- Open Preorder from the admin sidebar.
- Tick the rows whose product is back in stock.
- Open the Select Action dropdown.
- Choose Notify Customer and confirm.
Registered Customer – Completing Pre-Order
Customers follow their reservations from My Account > Orders, exactly where their normal orders live.
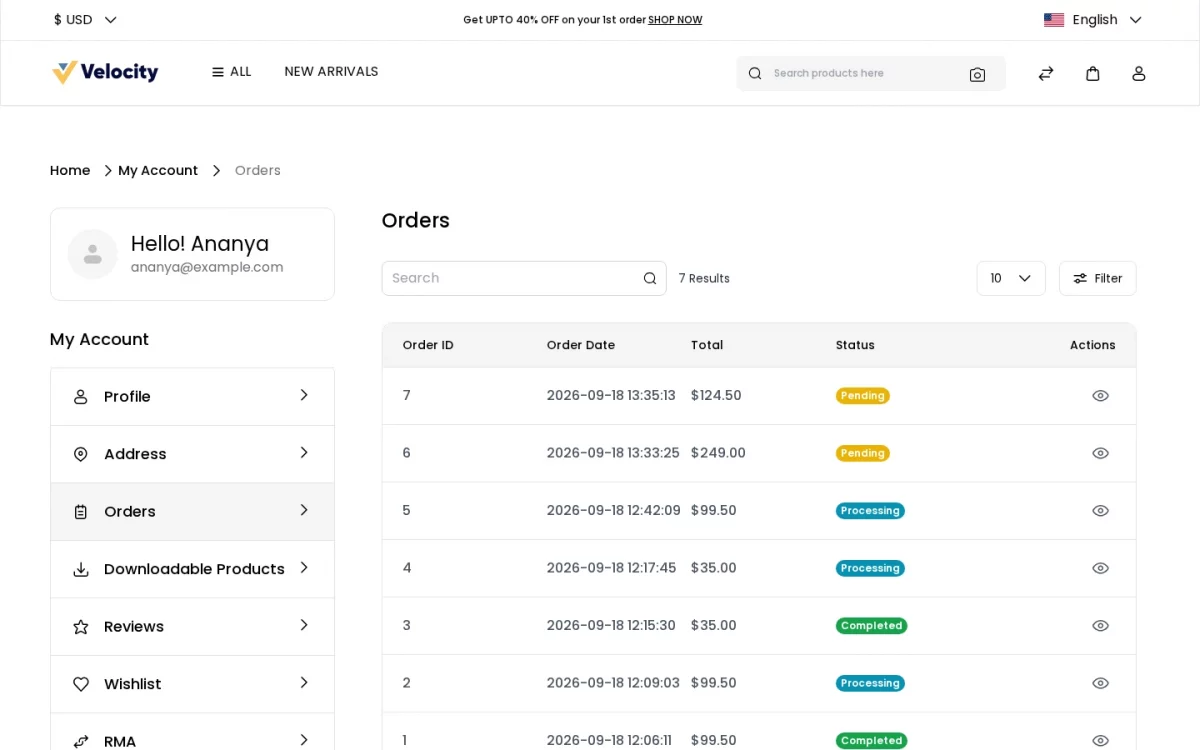
Order Details
A notice at the top of the order detail page states that the order contains preorder items.
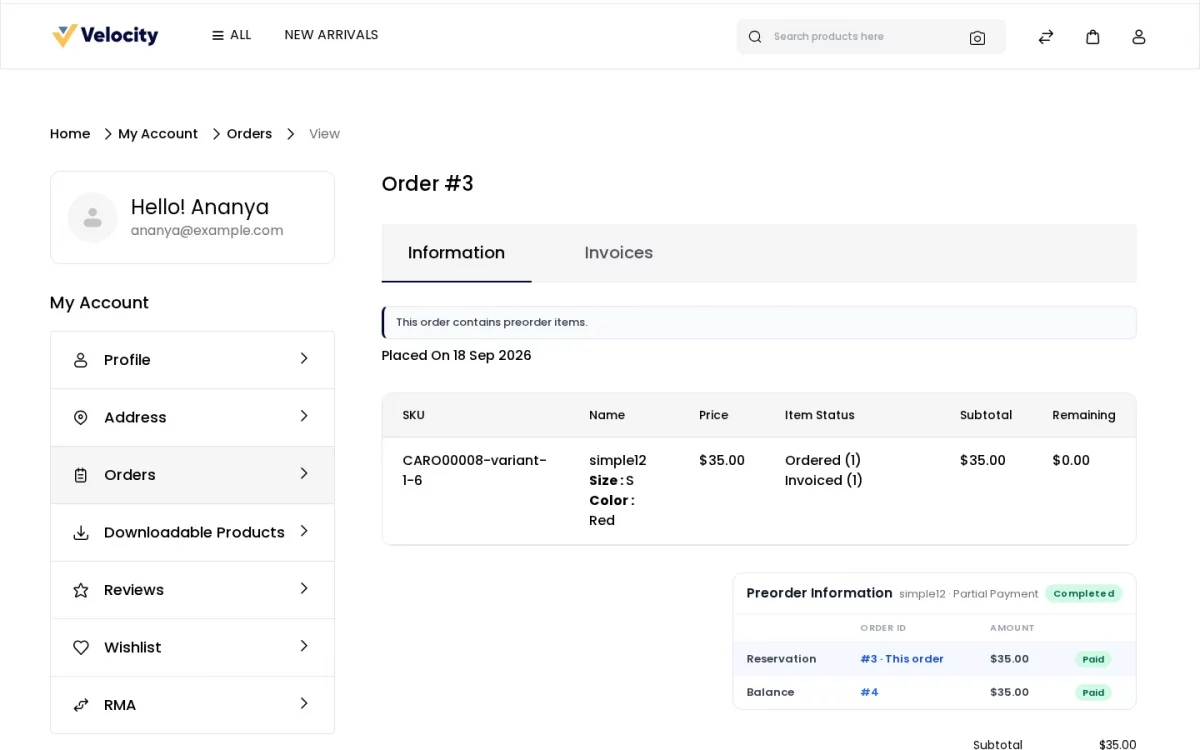
Additionally the item table gains a Remaining column, which shows up only on orders that really hold a reservation.
Below the items the customer reads the same two-row panel the merchant sees.
Consequently the deposit order and the balance order link to each other, and either one opens from here.
On a phone each row restacks into a labelled card, so nothing has to scroll sideways.
Product In-Stock Email Notification
As soon as the product returns to stock, the customer receives an email with a link to settle the balance.
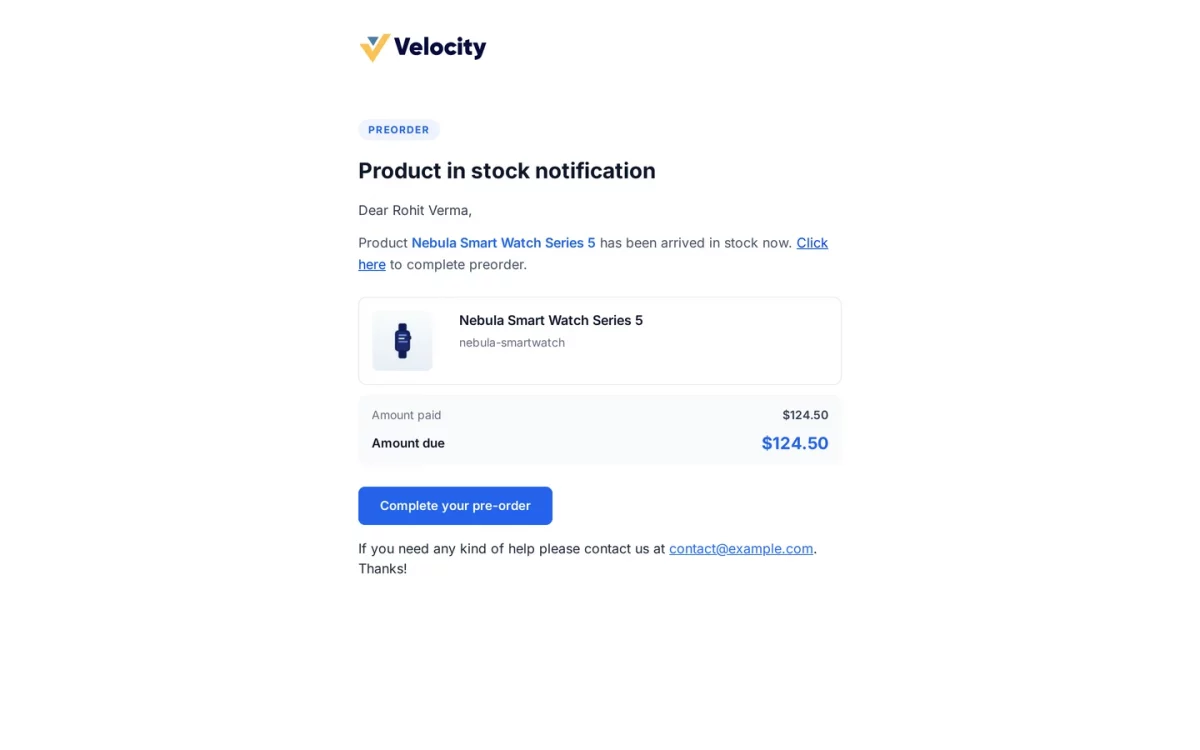
Pay Remaining Amount
Once the stock arrives and the merchant invoices the deposit, a Complete Preorder button appears beside the item.
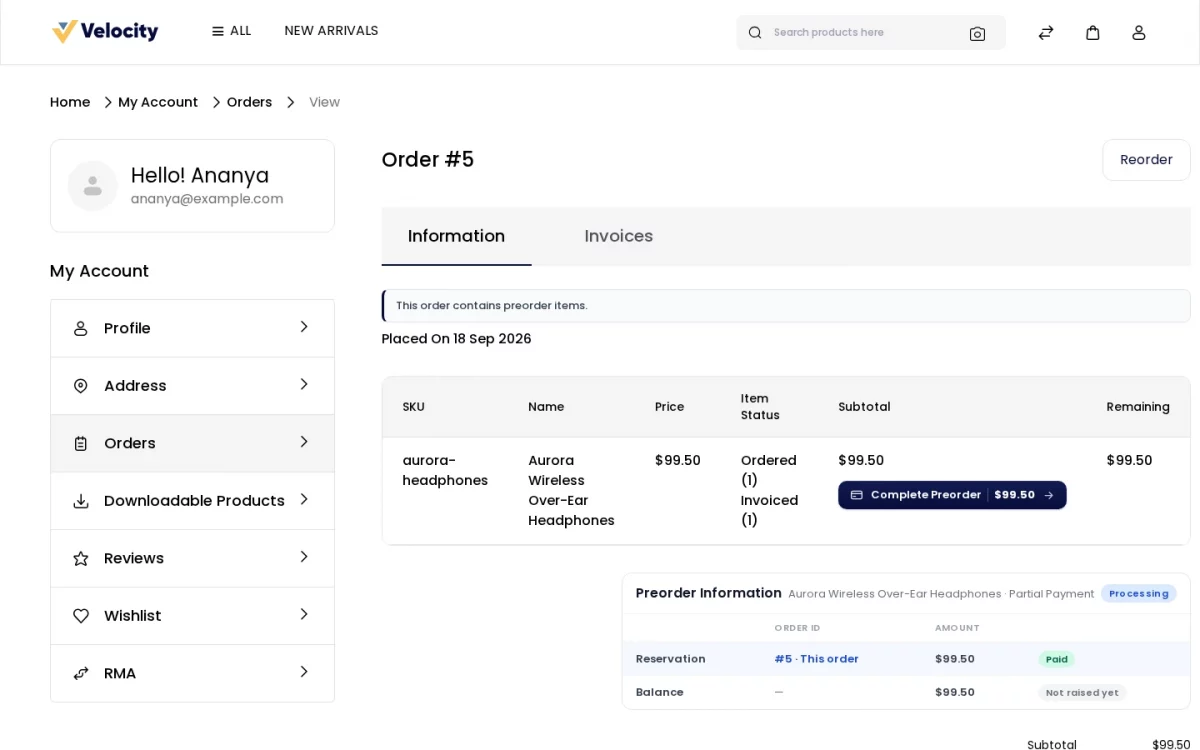
Notably the button carries the outstanding amount, so the customer knows the cost before pressing it.
While the item is still out of stock, an Available soon note takes its place instead.
Clicking it adds the outstanding amount to the cart and sends the customer straight to checkout.
Remaining Amount Paid
After the customer pays the balance, the module marks the reservation completed. At that point the merchant can invoice and ship the order.
Step-by-Step: Settle the Remaining Amount
- Open the in-stock email, or sign in and go to My Account > Orders.
- Open the order that holds the reservation.
- Click Complete Preorder next to the item.
- Check the outstanding amount shown at the checkout.
- Select a payment method and place the second order.
Automatic Reminders and Cancellation
Two scheduled commands ship with the module, so unpaid balances do not need manual chasing.
Payment Reminder Email
Each morning the module emails every customer who still owes a balance. Moreover it reminds each customer once only, never daily.
php artisan pre-order:send-reminders
Cancelling Unpaid Pre-Orders
The command cancels reservations older than the number of days you configured. Thus the grid keeps showing live reservations only.
php artisan pre-order:cancel-unpaid
Both commands run on the Laravel scheduler, so a single cron entry on the server is enough.
* * * * * cd /path-to-bagisto && php artisan schedule:run >> /dev/null 2>&1
Guest Users – Pre Order Management
Guests can reserve products as well. However, because they have no account page, the module uses secure email links instead.
Guest User – Order Placed
The guest completes the checkout in the usual way and pays the pre-order amount.
Email notification for Guest Users
A confirmation email reaches the guest the moment the order is placed, stating what was paid and what is still due.
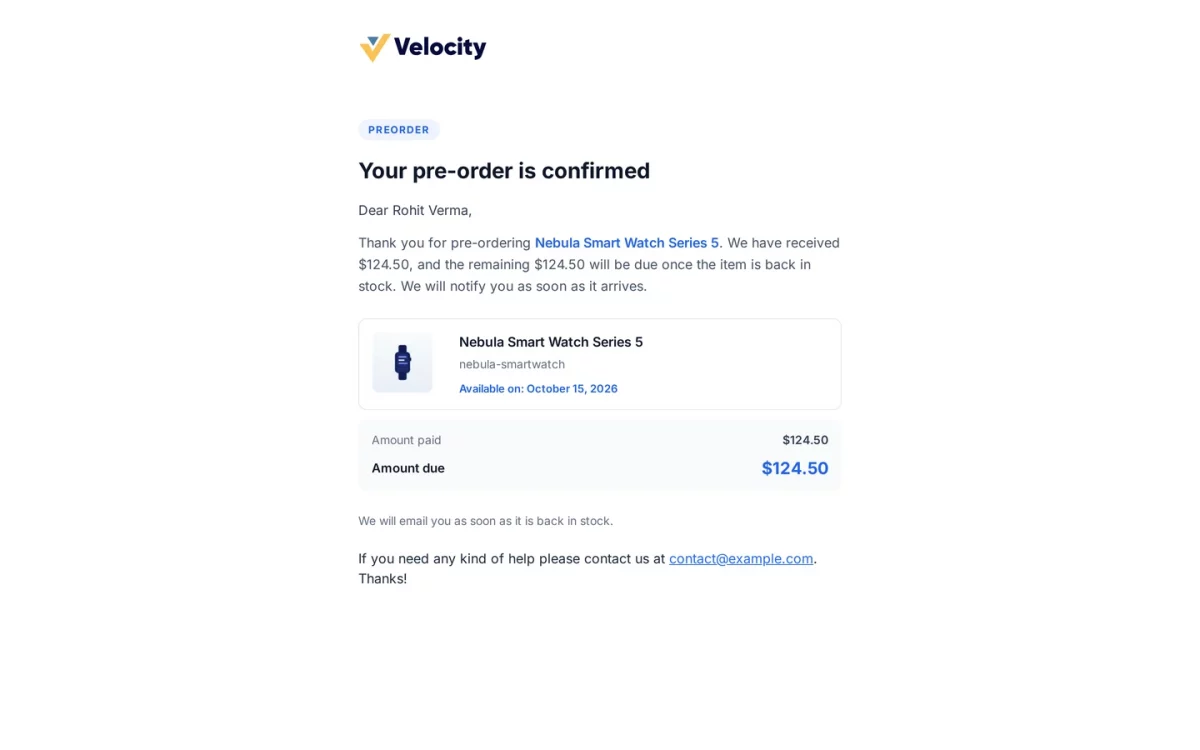
Later, when the product returns to stock, the same in-stock email arrives with a one-time link to settle the balance.
Completing Pre-Order for Guest User
That link adds the remaining amount to the cart and opens the checkout directly.
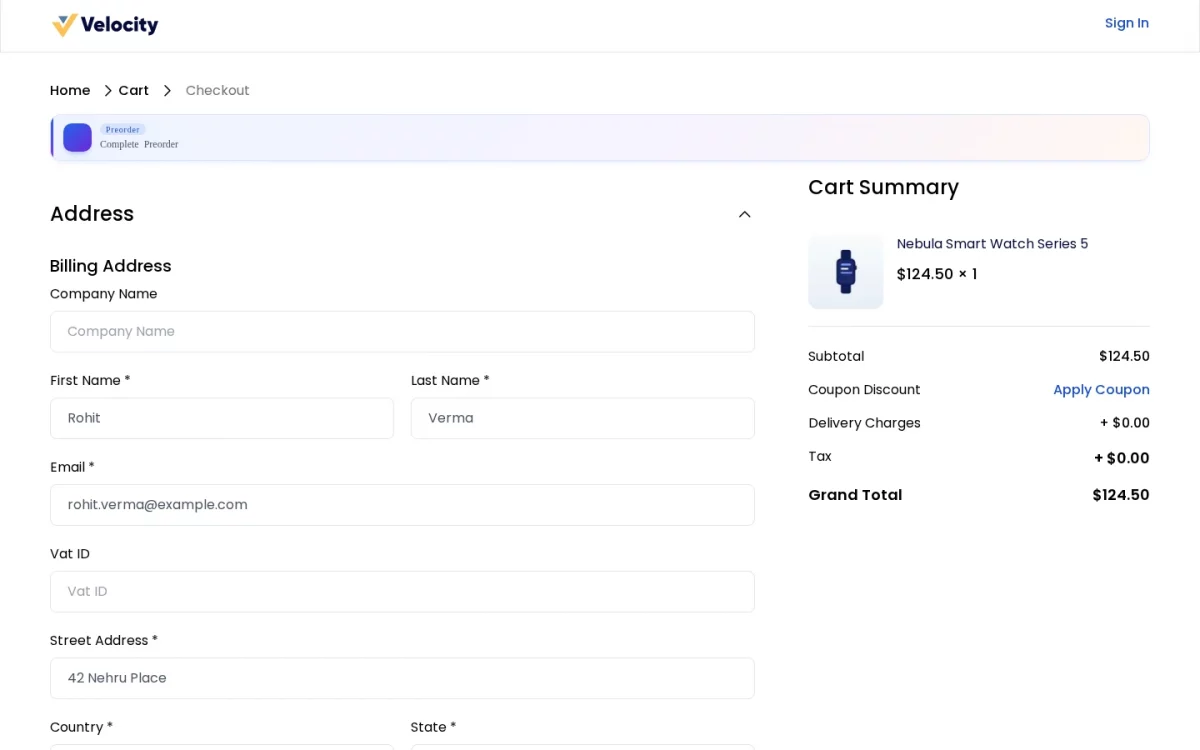
Afterwards the guest fills in the order information, picks a payment method and places the order.
That is everything the Bagisto Pre Order module offers on version 2.4.11. Consequently your store can sell upcoming stock long before it reaches the warehouse.
Still facing an issue? Feel free to add a ticket and let us know your views to make the module better https://bagisto.uvdesk.com/en/
You can also browse the official documentation at https://devdocs.bagisto.com/ for more on extending Bagisto.