Laravel eCommerce Point of Sale
Live Demo
Laravel eCommerce Point of Sale extension offers extensive features for admins, enabling easy creation of multi-stores.
It also allows seamless tracking of daily sales and efficient customer management.
The physical stores will have a POS front-end for which the admin can assign a POS agent who can easily manage the daily sales with their respective customers.
The Bagisto POS system can work in both online and offline mode in case of poor connectivity.
This guide documents the Laravel eCommerce Point of Sale extension for Bagisto v2.4.11.
Compatibility
- Compatibility: Bagisto v2.4.11
- Bagisto API: Bagisto Headless eCommerce is needed, because the POS terminal communicates with the store entirely over the Bagisto API.
Which printer and scanner support Bagisto POS?
The Bagisto Point of Sale system supports the Epson TM-T82 Thermal POS Receipt Printer.
The paper width and the roll diameter are 79.5 ± 0.5 (W) × dia. 83.0; 57.5 ± 0.5 (W) × dia. 83.0.
Most barcode scanners work with the Bagisto POS system, such as the Retsol LS450.
Check a brief overview of the POS terminal workflow
7gjobytCnsg
Check a brief overview of the POS backend settings –
ynAxK7tlmLs
Features Of Laravel eCommerce Point of Sale
- Creation of several outlets from the back-end.
- Sales agents can manage discounts from the front-end.
- Sales agents can handle customers both online and offline.
- Front-end cart hold features.
- Ability to create several carts from the front-end.
- Barcode generation and printing available at the back-end.
- Separate product inventory management by assigning inventory sources to each outlet.
- Support for cash, card and split payments at the front-end.
- Real-time sync of customers and orders in offline mode.
- Capability to place orders with custom products.
- Support for various product types: Simple, Configurable, Downloadable, Virtual, Bundle, Grouped and Booking.
- Customizable POS sales invoices.
- POS sales reporting with extensive filtering options at the admin end.
- Barcode prefix option added into module settings.
- Reorder / Repeat Order – Quickly recreate a previous order by fetching items into the current cart.
- Return Product – Process a return for a previous order directly at the POS terminal.
- Cash drawer management with reports that agents can print and reprint.
Installation of Laravel eCommerce Point of Sale
The customer will get a zip folder.
Prerequisite: Install Bagisto API on your Bagisto v2.4.11 store before installing the POS extension.
Therefore, the POS terminal uses the Bagisto API, so you cannot use the till endpoints without it.
Follow these steps to install the Bagisto POS Extension:
1. Unzip and Merge Files
Extract the extension zip file and merge the packages folder into your project’s root directory.
2. Update composer.json
Add the following entry under the psr-4 section in composer.json:
"Webkul\\Pos\\": "packages/Webkul/Pos/src"
3. Update bootstrap/providers.php
Bagisto v2.4.11 runs on Laravel 12, where you register service providers in bootstrap/providers.php instead of config/app.php. Add the following lines to that file:
use Webkul\Pos\Providers\PosServiceProvider;
PosServiceProvider::class,
4. Run Commands
From the project root, run the following commands in your terminal:
composer dump-autoload
php artisan pos:install
The pos:install command runs the POS migrations, seeds the default settings, publishes the POS assets, provisions the storefront key used by the terminal, and clears the application caches.
Accessing the POS Front-end
The POS terminal comes pre-built, and php artisan pos:install publishes it. Therefore, you do not need a separate front-end build or preview server.
Once the commands above have completed, open the terminal at:
https://example.com/pos
Replace example.com with your own store domain. The extension registers the POS terminal as a route in your Bagisto application, so it uses the same domain as your store.
You can also open the terminal from the POS Front button on the Agents and Outlets pages in the admin panel.
POS stays switched off until you enable it
The installation leaves the extension switched off. Until you turn on Status under Configure >> Point Of Sale >> Settings >> General, the Point Of Sale (POS) menu is hidden in the admin panel and the terminal page returns 404 Not Found.
Note: The terminal keeps selling while the connection is down, as long as the terminal page stays open. Do not reload the page while you are offline, because it cannot be loaded again until the connection returns.
After updating the extension, hard-refresh the terminal so the browser loads the new version instead of the cached one.
Once the extension is installed and its Status is turned on, you will see the Point Of Sale (POS) menu on the left-hand side of the admin panel. It contains Agents (with Agents and Outlets), Barcode Products, Orders, Requests, Banks, Sales Report and Receipts.


Laravel eCommerce Point of Sale Configuration
From the admin dashboard, go to Configure >> Point Of Sale >> Settings. The page has four groups: General, Barcode, Products and POS API.
General Settings
The fields below depicting [Default] refer to the setting of the default channel and English locale.
Let’s go through the Configuration Settings one by one:
Status
Turns the whole extension on or off. While it is off, the admin menu is hidden and agents cannot open the terminal.
Pos Logo
Upload the logo that the POS login panel will show.
Heading On Login
Enter the POS heading which will be visible on the POS login panel.
Sub-Heading On Login
Enter the sub-heading which will be visible on the POS login panel.
Footer Content
Enter the footer content that the POS login panel will show.
Footer Note
Enter the footer note.

Barcode
Print Product Name
The admin can turn on this option to print the product name along with the product barcode.
Width
Here the admin can add the width of the barcode.
Height
Here the admin can add the height of the barcode.
Generate Barcode With
The admin can generate the barcode with the Product Id or with the Product Sku (stock keeping unit) from the drop-down.
Prefix
The admin can also add a barcode prefix if needed. Leave it blank if you do not want to add a prefix.
Hide Barcode
The admin can turn on or turn off this option as per their need.

Products
Allow SKU for Custom Product
Once the admin turn ons this option, the POS agent can add a custom product SKU at the front end while adding the product to the customer’s cart.

POS API
Bagisto v2.4.11 serves the POS terminal over the Bagisto API, and this section holds the settings for that till API.
Agent Token Lifetime (Days)
How many days an agent stays signed in when they tick Remember Password at login. Leave it empty to use the default of 30 days. An agent who does not tick Remember Password stays signed in for one day.
Storefront Key
The storefront key the POS terminal presents when it calls the Bagisto API.
This key is set automatically when you run php artisan pos:install, so in most installations it does not need to be changed by hand.
Manage Agent
Go to Point Of Sale (POS) >> Agents >> Agents to manage the people who sign in to the terminal.
- Agents: Here you can see the list of agents that the admin created.

Create Agent
The admin can add agents by clicking on the “Create Agent” button, which opens the Add Agent screen.
Here, the admin needs to add the below details:
Username
The admin can add the username of the agent. This is the username the agent signs in to the POS terminal with.
First Name
Here the admin can add the first name of the agent.
Last Name
The admin needs to add the last name of the agent.
The admin can add the email ID of the agent.
Upload Agent Image
Add an image to represent the agent.
Password and Confirm Password
The admin can set the password for the agent and confirm it.

Outlet
Select the outlet from the drop-down.
Status
The admin can activate or deactivate the agent from the toggle button. A deactivated agent cannot sign in to the terminal.
Lastly, hit the Save Agent button to save the agent settings correctly.
Manage Outlet
Go to Point Of Sale (POS) >> Agents >> Outlets to see the list of POS outlets.

First, the admin can add an outlet by clicking on the “Create Outlet” button, which opens the Add Outlet screen.
Here, the admin needs to add some details –
Outlet Name
The admin needs to add the name of the outlet in the field.
Enter the email address of the outlet.
Phone and Customer Care Number
Enter the outlet’s phone number and the customer care number to print on the receipt.
GST Number
Enter the tax registration number of the outlet, if applicable.
Website
Enter the website address associated with the outlet.
Status
The admin can activate or deactivate the outlet status.
Outlet Address
Enter the outlet address in this section.
Country
The admin can select the country of the outlet.
State
The admin needs to select the state of the outlet.
City
Select the city of the outlet.
Postcode
Enter the postcode of the outlet.
Inventory Source
The admin has to choose the inventory source for each outlet from the drop-down. The POS uses this source to count the outlet’s stock.
Low Stock Quantity
Set the threshold below which a product is treated as low stock for this outlet. Products under this threshold appear in the agent’s Low Stock Products list at the terminal. Agents can also change this value from the terminal, as described under POS Panel-Product Management.
Receipt
The admin selects the receipt template for this outlet from the Select Receipt drop-down. The list contains the receipts created under the Receipts section described later in this article.
Finally, hit the Save Outlet button to save the outlet settings correctly.
After creating the outlet, click the Assign Product action on its row, shown in the image below, to choose which products the outlet sells.

Manage Products
The Manage Outlet Products page lists your catalog with each product’s quantity at the outlet. Select the products, choose Update Assign from the mass actions, then pick Assign or Unassign. The terminal shows only assigned products, after the agent syncs.

Outlet Stock Rules
**Note:
Each outlet uses its own Inventory Source, and the POS counts its stock at that source.
Therefore, an outlet can hold a different quantity of the same product from another outlet or from an unassigned warehouse.
In addition, Bagisto shares the stock instead of copying it: a POS sale reduces the quantity at the outlet’s inventory source.
Also, a change made elsewhere in Bagisto for that source appears at the till after the agent syncs.
For example, for a configurable product, the POS uses the quantity of the chosen variant at the outlet’s inventory source, not the parent product.
A configurable parent carries no stock of its own.
Barcode Product List
Here the admin can view all the products associated with their outlet accordingly.
They can generate product barcodes so the POS agent can add products to the cart during checkout.

Generate Barcode
Go to Point Of Sale (POS) >> Barcode Products. To generate the barcode for one product, click Generate Barcode on its row. To generate several at once, select the products and choose Generate Barcode from the mass actions.

After that, print a product’s barcode in the quantity you need by clicking Print Barcode on its row.
Here the admin will first select the products for which they want to set the barcode quantity.
Then they choose Print Barcode from the mass actions.

On the Print Barcode page, enter the Qty of labels for each product and click Print.

Orders
Go to Point Of Sale (POS) >> Orders to see every order placed at a terminal, with its Order ID, customer, status, grand total and date.

Click View on a row to open the order in the store’s order page. POS orders show an extra Order Note panel with the note the agent added at the terminal.


Requests
Go to Point Of Sale (POS) >> Requests to see the low stock requests that agents send from the terminal.

Click View on a request to open it. The page shows User Information — the agent, the outlet and its inventory source — and Request Information — the product, the Requested Qty and the agent’s comment.
Set the Status to Complete or Decline and click Save. You can also change several requests at once with the Update Status mass action on the list.
Completing a request adds stock
When you set a request to Complete, the requested quantity is added to the product’s stock at the outlet’s inventory source. The agent sees the request as Received at the terminal.

Banks
Go to Point Of Sale (POS) >> Banks to add the banks that agents choose from when a customer pays by card.
The admin can also see the Bank List in this section.

Once the admin clicks on the “Create Bank” button, they will find the snapshot below, in which they will add the details about their bank details.
General
Name: The admin needs to add the bank name.
Address: Enter the bank address.
Email: Enter the email ID.
Phone: The admin can add the phone number.
Pos Agent & Bank Status
Assign Pos Agent: Here the admin can assign the bank to the POS agent.
Bank Status: Select the bank status, Active/Inactive.

Now at the POS outlet, once the customer pays the bill, the POS agent can select the preferred bank from the Select Bank drop-down shown below.

Sales Report
Go to Point Of Sale (POS) >> Sales Report to see the orders placed at your terminals. Orders placed on the storefront are not included.
Each row shows the Order ID, Outlet Name, Payment Method, Bank Name, Order Note, Status, Grand Total and Order Date. You can filter by any of these columns, for example by bank or payment method, and click View to open the order.

Receipts
Go to Point Of Sale (POS) >> Receipts to add, edit, preview and delete the receipt templates that outlets print.

Add Receipt
The admin can add a new receipt by clicking on “Create Receipt”, which opens the Create New Receipt screen. The screen has four groups: General, Logo, Header and Footer.
- Receipt Title: The admin can add the title of the receipt.
- Status: The admin can turn on or turn off the receipt status.
- Display Outlet Name: By enabling this, the admin can show the outlet name.
- Display Outlet Address: By enabling this, the admin can show the outlet address on the receipt.
- Display Date: By enabling this option, the admin can show the date on the receipt.
- Display Order ID: The admin can show the order ID on the receipt by enabling this.
- Order ID Label: The admin can add the order ID label.
- Display Customer Name: By enabling this, the admin can show the customer name on the receipt.
- Display Customer Email: By enabling this, the admin can show the customer’s email address on the receipt.
- Display Customer Number: By enabling this, the admin can show the customer’s phone number on the receipt.
- Mask Customer Details: Partially hides the customer’s details on the printed receipt, so a receipt left at the counter does not expose them.
Totals and Payment Settings
- Display Sub Total: The admin can show the subtotal on the receipt by enabling this.
- Sub Total Label: The admin can add the sub-total label.
- Display Tax: By enabling this, the admin can show tax on the receipt.
- Tax Label: The admin can add the tax label.
- Display Credit Amount: By enabling this, the admin can show the credit amount on the receipt.
- Credit Amount Label: The admin adds the credit amount label.
- Display Change Amount: The admin can show the change amount by enabling this.
- Change Amount Label: The admin can add the change amount label.
- Display Cashier Name: By enabling this, the admin can show the cashier’s name on the receipt.
- Cashier Name Label: The admin can add the cashier name label.
- Grand Total Label: The admin can add the grand total label.
- Display Discount Amount: By enabling this, the admin can show the discount amount on the receipt.
- Discount Amount Label: The admin can add the discount label.
- Show Order Barcode: Prints the order’s barcode on the receipt, so the order can be scanned back at the counter for a reorder or a return.
- Show Print Confirmation: The terminal asks the agent to confirm before it sends the receipt to the printer.
Logo and Print Settings
- Display Logo: By enabling this, the admin can show the logo on the receipt.
- Upload Logo / Logo Alt / Logo Width (in px) / Logo Height (in px): The admin can upload the logo, set its alternative text, and set its width and height in pixels.
- Header Content / Footer Content: The admin can add the header or footer content on the receipt.
Receipt Settings


Laravel eCommerce Point of Sale Front-end
The agent signs in to the terminal with the User Name and Password the admin created. Ticking Remember Password keeps the agent signed in for the number of days set in Agent Token Lifetime (Days); otherwise the sign-in lasts one day.

After signing in to the POS system, the POS agents will be redirected to the POS panel as shown in the image below.


Once you have made any changes at the admin end, make sure you sync the POS front end to reflect the changes.
The terminal keeps its catalog locally for offline sales, so newly assigned products and changed fields reach an agent only after a sync.
You can do this by hitting the sync button, which you can see at the top right-hand side of the snapshot below, or from Settings >> Sync.

Reorder / Repeat Order Feature
The Reorder feature allows POS agents to quickly recreate a previous order for a returning customer.
Instead of searching the catalog and adding each product manually, the agent can fetch all items from an existing order and load them directly into the current active cart.
How to Process a Reorder
You start a reorder from the order history:
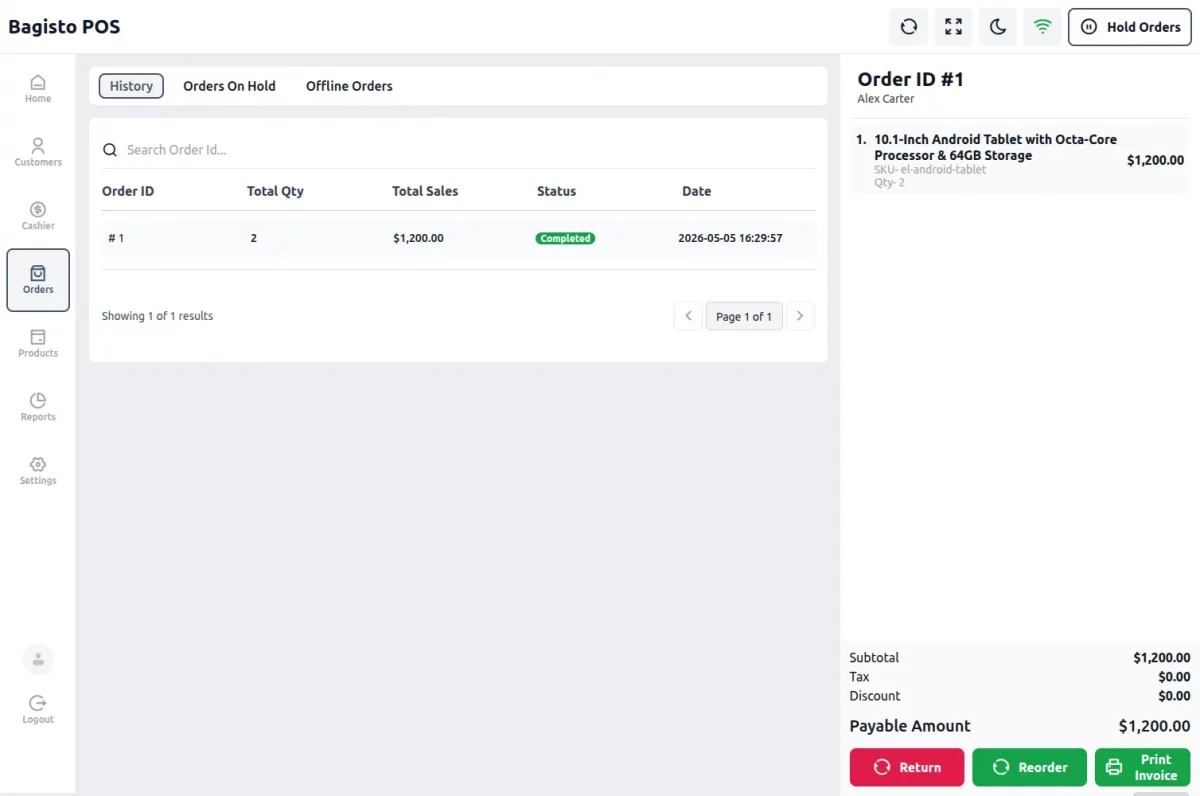
- Go to Orders >> History.
- Find the previous order by searching for its Order ID or the customer name, and select it.
- Click Reorder in the order details. Offline orders that have not synced yet have the same button under Orders >> Offline Orders.
- Select a customer first if none is chosen — the terminal will prompt with “Please select a customer first.”
- [System Check] If your current active cart already has items, the terminal moves that cart to Hold Orders so the reorder starts from a clean basket, and confirms with “Current cart has been moved to hold orders.”
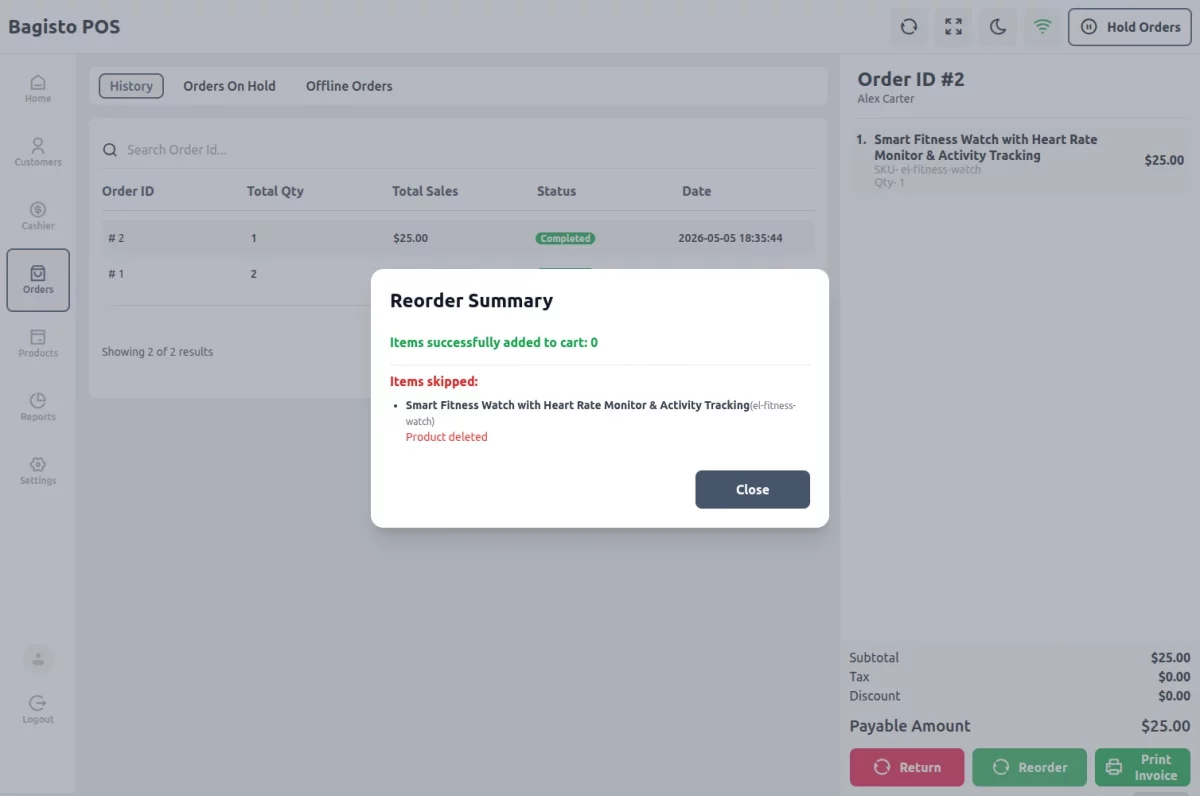
- The terminal shows a Reorder Summary. It lists the items added to the cart, the items changed because of stock limits, and the items skipped.

Smarter Cart Recalculations
Bagisto POS handles the heavy lifting when bringing past items into today’s checkout cart:
- Price & Tax Recalculation: All prices and taxes are updated to their current values, so a repeat order is charged at today’s price rather than the price on the original order.
- Smart Variations: For products with several sizes or colors, the system fetches the exact variant bought previously and checks that variant’s own stock at the outlet.
- Partial Reorder Support: If the POS cannot supply an item from the old order, it reports the item in the Reorder Summary. It then loads what is available, so you do not lose the sale. The POS reports an item as skipped when the product was deleted, disabled, or out of stock. It reports an item as modified when only part of the requested quantity is available.
Return Product
Handling returns manually by issuing a refund and creating a completely new order is time-consuming.
The Return Product feature introduces a dedicated workflow right at the POS terminal, allowing agents to process a return in a single, unified transaction.
How to Process a Return
When a customer brings an order back, follow this flow:
- Go to Orders >> History and select the customer’s original order.
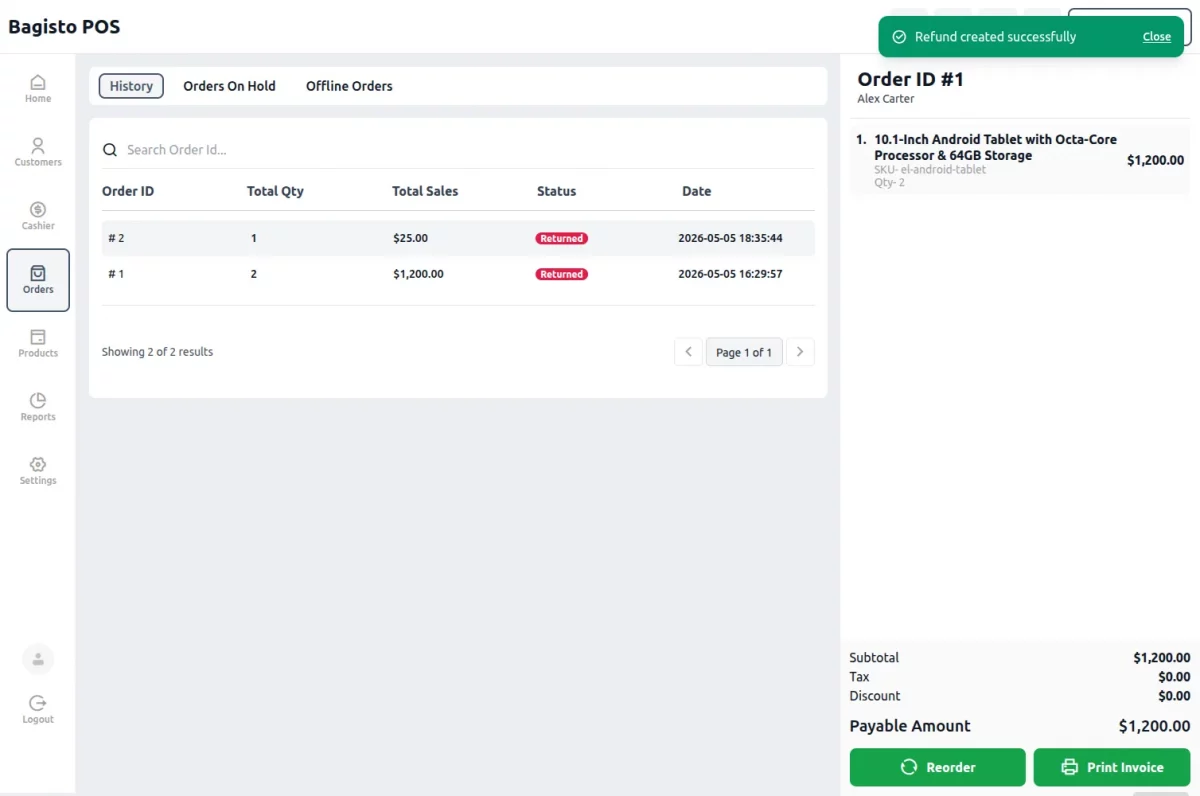
- Click Return. The button appears only while the terminal is online and the order still has items that have not been returned.
- After the terminal processes the return, it marks the order as Returned in the order history.
A return covers the whole order
Return refunds every item on the order that has not been returned yet, in one step. You cannot pick individual items or quantities, and a return cannot be undone.
An offline order that has not synced yet can be returned from Orders >> Offline Orders instead.
POS Cash Drawer Amount
After signing in, the agent is prompted to open the cash drawer. The Cash Drawer pop-up asks for the Opening Drawer Amount and optional Remarks; clicking Open Drawer starts the session.
The POS agent has to add the opening drawer amount, for example $200 as shown in the image, which is the needed amount set for that specific day.

After login, the POS agent sees all products that the admin assigned to that outlet.
The agent will also see the Cart section where the POS agent will manage the customer’s orders.

Moreover, the POS agent can add products to the cart by scanning their barcodes. The barcode button in the header (or Ctrl + B) opens Enter Barcode, where a scanned or typed barcode adds the product.

POS agents can also look for the products available in their respective categories as shown in the image below.

The image below shows all categories listed in the POS.

Configurable Products at the Till
When the POS agent opens a configurable product, the terminal shows each configurable attribute — for example Waist Size or Color and Size — with the options that can actually be sold.
Then, once the agent selects a complete combination, the terminal finds the exact child variant and shows its Selected Variant Price.
The agent can then set the quantity and click Add to Cart.
The terminal checks the quantity against the stock that the chosen variant has at the outlet’s inventory source.
The same variant decides the price, the available quantity and the line that reaches the cart.
POS – Custom Product
The POS agent can also add a product to the cart which is not available in their POS catalog but is available in the physical outlet.
The POS agent clicks the add product button in the header, shown in the image below, or presses Ctrl + Alt + N.

The Add New Product pop-up asks for the Name, Price, Weight and Quantity, and the SKU when Allow SKU for Custom Product is turned on in the configuration. Click Proceed to add the product to the cart.

After that, the POS agent can proceed with the order as normal.
POS – Cashier Management
Under the Cashier section, the POS agent manages the functionalities given below –
- Cash Drawer
- Today’s Sale
- Sale History
- Drawer Reports
After the agent opens the Cash Drawer tab, they can see the Drawer Amount Summary. It lists the Opening Drawer Amount, Cash Payment Sale, Other Payment Sale, and Expected Drawer Amount.
The agent counts the cash in the drawer, adds it, and may add Remarks describing the counter closure. The terminal then shows the Difference between the expected amount and the counted amount.
Clicking Close Drawer closes the counter for that session, and Print Drawer Report prints the drawer slip.

Drawer Reports
Under Cashier > Drawer Reports, the agent can review every drawer session that has been opened and closed.
Each row carries the Report ID, the Type (Open or Close), the Starting Cash, the Expected Cash, the Actual Cash, the Variance Cash and the Print Time.
The agent can filter reports by Date Range. They can also print any slip again with the Reprint action.
The printed drawer slip shows the POS agent, the opening and closing times, and the opening amount.
It also shows the payment summary, total sales, expected amount, actual closing amount and difference.
Today’s Sale
Under Cashier, another option, Today’s Sale, is available. It shows the Opening Drawer Amount, the Cash Payment Sale and the Other Payment Sale.
The Order ID, Time, Order Total and Payment Mode details are visible to the POS agent under the Today’s Sale option.
The agent can filter the list by Cash Payment, Card Payment, or Split Payment.

Sale History
Under Cashier >> Sale History, the agent sees their takings day by day: the Date, Total Sale, Cash Payments, Other Payments and the Drawer Note. Use Filters to narrow the list by Date Range or by amount.
Individual orders, with the Reorder and Return actions, are under Orders >> History.

POS – Order Management
The POS agent can manage sales activity such as adding products to the cart and adding customer details.
They can also put the cart on hold to process it later and take payment for the order from their panel.

After adding the products to the cart, the POS agent will now add customer details by clicking on the default customer option and then following the steps as shown in the image below.

Note: The POS agent can search customers by their name or email as well. Customers created while the terminal is offline are listed under Offline Customers until they are synced.
After the agent clicks Add New Customer, the terminal shows the form below.

Fill in the First Name, Last Name, Email, Phone Number, Address, Country, State, City and Pin code, then click Add Customer. The email and phone number must not already belong to another customer.
Product Checkout
Once the customer is chosen, the POS agent clicks Proceed in the cart (or presses Ctrl + Enter) to open the Payment screen and choose Cash, Card or Split.
If the customer has chosen the cash method, the customer will provide an amount to pay for the order and the POS agent will return the remaining money as change, as shown in the screenshot below.

In the example above, the Payment Method is Cash and the Total Order Amount is $10.55. The customer pays $10.55, so the balance amount is $0.00.
Finally, click Confirm Payment. When the outlet’s receipt has Show Print Confirmation turned on, the terminal then asks “Do you want to print the receipt of last order?” before printing.

Under Orders >> History, agents can select any order and click Print Invoice to print it again.

Customers can also pay by card. With Card, the agent enters the Card Details and selects the Bank the payment goes through; the whole order total is taken by card.
POS Panel- Apply Discount
The POS agent can give a discount on any line in the cart.
Open the cart line, enter a percentage in its Discount field and apply it, as shown below. The largest discount allowed is 99.99%.

The line then shows the percentage applied, for example “10% discount applied”, and the cart total includes the discount.
POS Panel- Hold Order
The POS agent can put a cart on hold to process it later by simply clicking on the Hold Order option as shown below.
Clicking on the Hold Order option will show a pop-up where the POS agent can specify a note for putting the cart on hold. The terminal confirms with “Order has been hold successfully.”
After holding the cart, the POS agent can check the held orders from the Hold Orders button in the header (or Ctrl + H), or under Orders >> Orders On Hold.

The above image shows the cart details of the order that has been put on hold. The note added by the POS agent is also shown under the Note section.
Here the POS agent can:-
- Click the “Resume” button to bring the held order back into the cart and process it further. If a cart is already in progress, the terminal asks the agent to process the current cart first.
- Click the “Remove” button to remove the held order.
Split Payment
The customer can also split the order payment between cash and card at checkout, as shown in the image below.
With Split, the agent enters the cash Received; the Remaining amount is taken by card, for which the agent enters the Card Details and selects the Bank.

POS Panel – Offline Orders
The sales orders taken in offline mode appear under Orders >> Offline Orders.
Meanwhile, while the connection is down, the terminal warns the agent that it is offline and that only limited features work.

Once the POS system is connected to the internet again, the POS agent can sync offline sales with the online store.
They can use the Sync Order action for a single order or Sync All Orders to push every pending order at once.
After syncing, the offline orders appear with the other orders under Orders >> History.

Under Orders >> History, the POS agent can –
- View the complete list of the orders placed.
- View the details of any order from the sales order list.
- Search for an order by its Order ID or the customer name.
- Print the invoice of the order.
- Start a Reorder or a Return for the order.
POS Panel-Product Management
The POS agent can manage their outlet products under the Products section.
Here POS agents can –
- Review the products that fall below the outlet’s low stock threshold under the Low Stock Products section as shown in the image below.

- Build a Purchase Request by adding low stock products to it, and then send the request by clicking on the Send Request button as shown in the image above.
After the agent clicks Send Request, the terminal shows the Send Quantity Request pop-up.
The POS agent can mention the Requested Quantity and a Comment, then add the product to the request.

- The POS agent can also check the sent requests for low stock products under the Requested Products section, along with the request status — Pending, Received or Declined — by navigating to Products >> Requested Products as shown in the image below.

Under Products >> Settings, the agent can set the Minimum Qty below which products count as low stock and click Save.
Minimum Qty changes the whole outlet
Minimum Qty is the outlet’s Low Stock Quantity. Saving it at one terminal changes the threshold for every agent at that outlet, and replaces the value set in the admin panel.
POS Panel- Reports
Under Reports, the agent sees a chart of their sales for the current Day, Week or Month.
POS Panel- Settings
The POS agent can also go to Settings to edit their account and terminal settings. It has four tabs: Profile, Sync, Shortcuts and Regional.
Under the Profile settings, the POS agent will –
- First Name – add the first name of the POS agent.
- Last Name – add the last name of the POS agent.
- Email – add the email address.
- Old Password – add the current password of the POS account.
- New Password – add the new password for the POS account.
- Confirm Password – re-add the new password of the POS account to confirm it.
And lastly, hit the Update Profile button to save the settings correctly.

Under the Regional settings, the POS agent can configure the terminal as shown below.
- Select the Locale for the terminal from the drop-down.
- Select the Currency for the terminal from the drop-down, then click Save.

POS Panel- Sync
Under Settings >> Sync, the POS agent chooses which Entities to sync with the server.
They can select Customers, Orders and Products using Select All or Deselect All, then click Sync Now.
The screen reports the number of records fetched for each entity and its state as the sync proceeds.
Because the sync replaces the terminal’s local catalog, changes made at the admin end reach the agent only after this step.
POS Panel- Keyboard Shortcuts
The Shortcuts section under Settings lists the keyboard shortcuts available at the terminal.
The shortcuts are:
- Ctrl + B — Open Barcode Mode
- Ctrl + Alt + N — Open Product Create Modal
- F11 — Toggle Fullscreen
- Ctrl + D — Toggle Dark Mode
- Ctrl + H — Hold Orders
- Alt + 1 to Alt + 7 — Go to Home, Customers, Cashier, Orders, Products, Reports and Settings
- Ctrl + Shift + C — Create New Customer
- Ctrl + E — Edit Current Customer
- Del — Delete Current Customer
- Ctrl + Shift + U — Change Current Customer
- Ctrl + Alt + Shift + N — Add Note
- Ctrl + Backspace — Remove Note
- Ctrl + Enter — Proceed to Checkout
- Ctrl + Shift + H — Hold Order
That’s all for the Laravel eCommerce Point of Sale extension for Bagisto v2.4.11. If you still have any issues, feel free to raise a ticket.
Also, let us know your views on making the module Laravel eCommerce Point of Sale better https://bagisto.uvdesk.com/en/