How to Create Class Data Object in Pimcore?
Want to model product data in Pimcore? You define a class, then create data objects from it — visually, inside the React-based Pimcore Studio UI.
This guide shows the exact clicks. You will define a class, add fields, and publish your first Pimcore Data Object, with no PHP required.
What is a Pimcore Data Object (and a class)?
A Class Setting in Pimcore is the blueprint. It defines the fields your records will hold, such as name, SKU, price, and image.
A Pimcore Data Object is one record built from that blueprint. Think of the class as the mold and the object as a single casting.
Classes and data objects are how Pimcore models structured product and master data. This is the heart of Pimcore as a PIM.
You need no OOP knowledge. Pimcore turns the whole thing into a point-and-click job inside Studio.
Behind the scenes, Pimcore stores each Pimcore Data Object in MySQL. The visual editor writes that schema for you.
Prerequisites
Get these ready before you start:
- A running install of the latest Pimcore (Platform 2026.1 or newer).
- Access to Pimcore Studio, the modern React-based admin UI.
- A user account with permission to edit classes and data objects.
One important note. The legacy ExtJS “classic” admin panel no longer ships in Pimcore 2026.1.
So the old route “Settings > Data Objects > Classes” is dead. Everything now lives in Studio, and this post follows that path.
On Pimcore versions before Studio became the default, screens differ. This guide targets 2026.1, where Studio is the only admin UI.
Step 1: Open the class editor in Pimcore Studio
Sign in to Pimcore Studio first. Then use the left navigation to reach the class list.
Follow this path exactly:
- Open Data Management in the left navigation.
- Expand Data Model Definitions.
- Click Classes.


We will use the plain Classes editor here. That is where every Pimcore Data Object structure begins.
Step 2: Create the class definition
On the Classes page, click the add action to start a new class. Pimcore then opens a dialog titled Create New Class Definition.
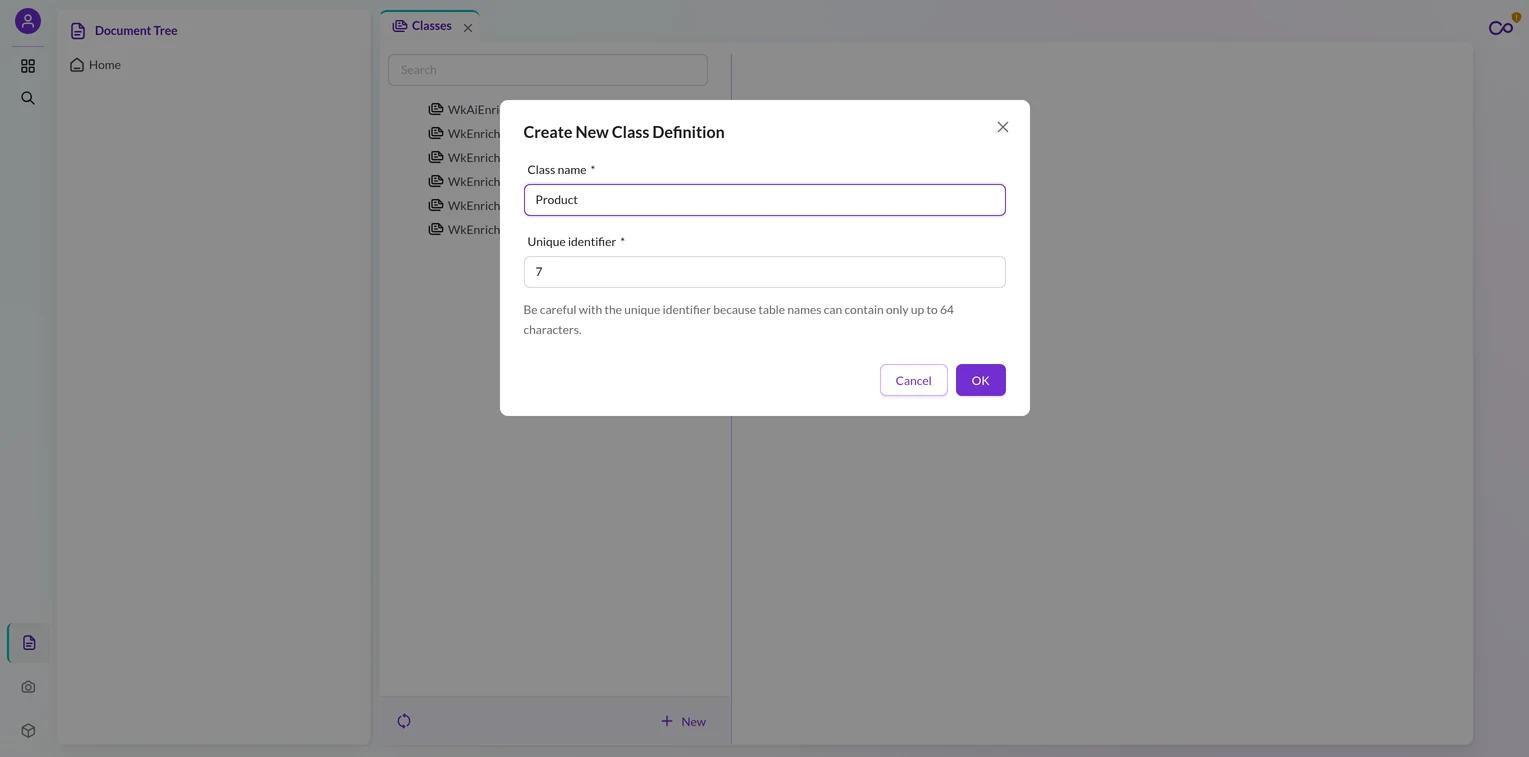
The dialog gives you two inputs:
- Class name — the human-readable name, for example
Product. - Unique identifier — the internal key Pimcore uses for tables and code.
Respect the class-name rule. Studio states it plainly: “The class name must start with a letter and can contain only letters, numbers, and underscores.”
Mind the unique identifier too. Studio warns: “Be careful with the unique identifier because table names can contain only up to 64 characters.”
That 64-character limit is a real database constraint. Keep the identifier short so your table names never exceed it.
For our worked example, name the class Product. Confirm the dialog to open the full class editor.
Step 3: Add fields with Layout + Data Components
When the editor opens, you land on the General tab. Review it first, then switch to the field builder to shape your object.
General settings for the class
The General tab shapes how the class behaves overall. A first-timer only needs a handful of these fields.
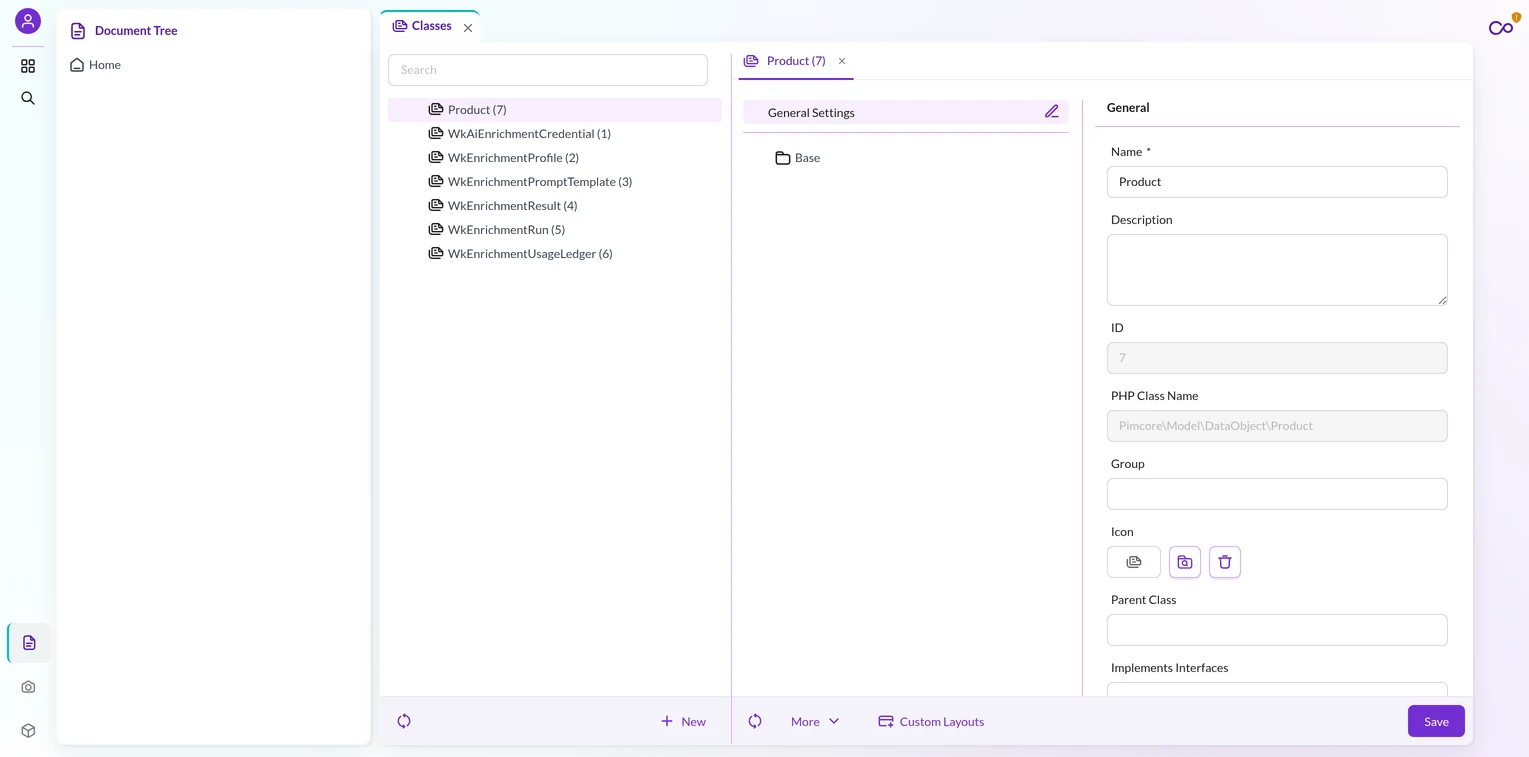
Worth a look are PHP Class Name, Group, and Icon. Toggle Allow Inheritance, Allow Variants, and Show Variants only when your model needs them.
The tab also lists advanced settings. Description, ID, Parent Class, Implements Interfaces, Use Traits, and the generator references are safe to ignore for now.
For a simple Product class, leave every General field at its default. You can revisit this tab any time.
Add Layout Component
The class editor is where you build the field tree. Pimcore gives you two add-actions, and both matter.
Click Add Layout Component to organize how fields appear in the object editor. This group controls tabs, panels, and fieldsets, not stored data.
The Layout Component group offers Panel, Tab Panel, Region, Accordion, Fieldset, and Localized Fields. Reach for a Fieldset to group related inputs visually.
Add Data Component
Click Add Data Component to add the actual data fields. This is where each Pimcore Data Object gets its real values.
Pimcore groups the Data Component types into ten families: Text, Numeric, Date, Select, Media, Relation, Geographic, CRM, Structured, and Other.
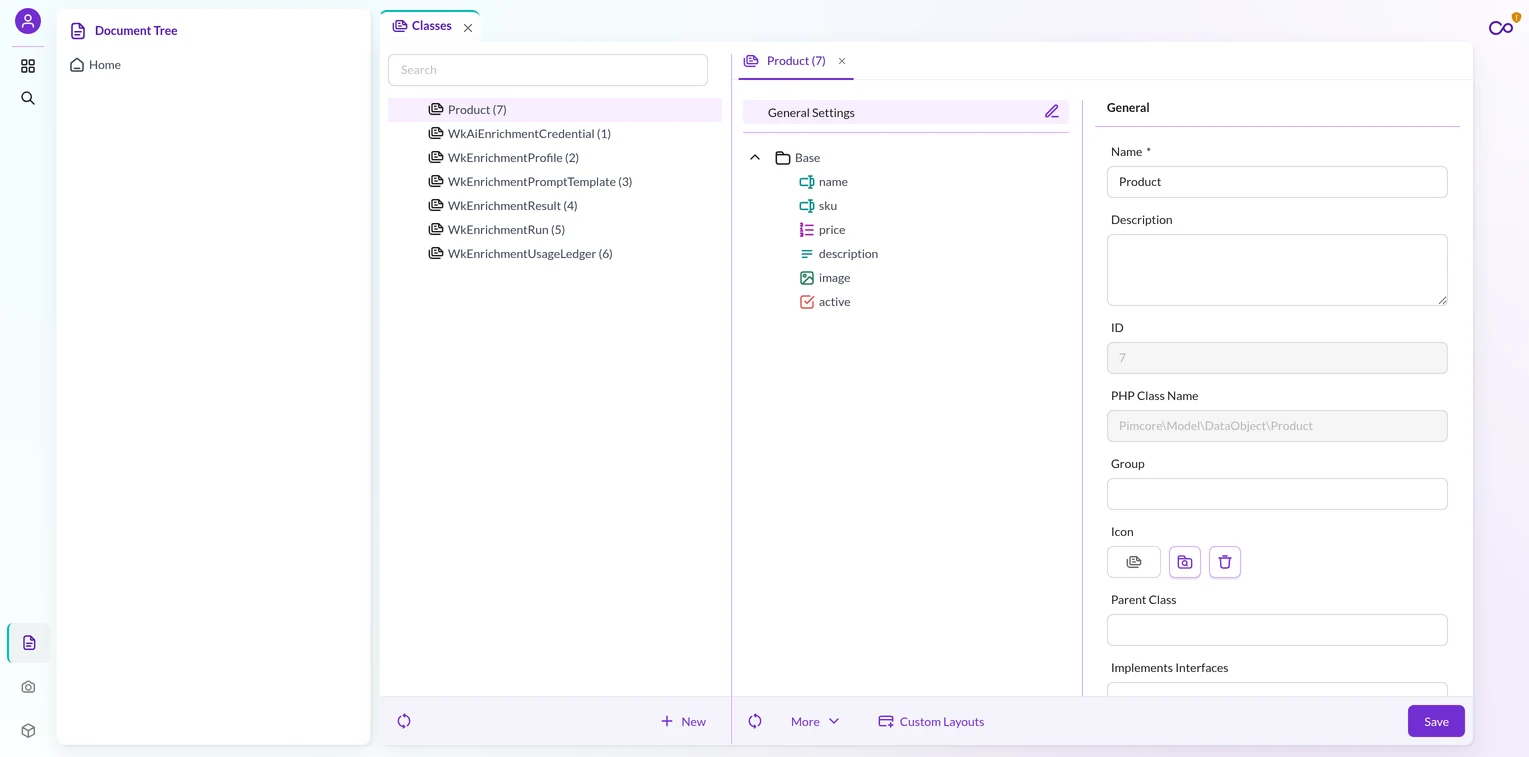
Try the first field now. Click Add Data Component, open the Text group, choose Input, then set the field name to name.
Repeat that pattern for each remaining field. Build the Product class with these data fields:
- name — Input (under Text).
- sku — Input (under Text).
- price — Number (under Numeric).
- description — Textarea (under Text).
- image — Image (under Media).
- active — Checkbox.
Each field name follows the same rule as the class name. Start with a letter, then use letters, numbers, or underscores only.
You should now see six data fields sitting in the tree. That is your full Product structure, ready to save.
Relations deserve a mention. Under the Relation group, Many-to-One and Many-to-Many object relations link one Pimcore Data Object to another.
Structured items live under the Structured group. These include Field Collections, Object Bricks, Localized Fields, and Classification Store.
You might expect these two add-actions to need separate deep-dives. In Studio they are just the two buttons above, so you have both covered here.
Step 4: Save (Pimcore builds the schema for you)
Use the Save action in the class editor once the field tree looks right. This single action does two big things automatically.
First, Pimcore generates the underlying database schema. It creates the per-class MySQL tables that will hold every Pimcore Data Object.
Second, Pimcore writes the PHP model class. It generates Pimcore\Model\DataObject\Product so your code can use the type immediately.
No coding is required for either step. The visual editor writes both the schema and the model for you.
Step 5: Create a Pimcore Data Object
Now build an instance of the class. Open the Data Objects area of Studio to reach the Data Object Tree.
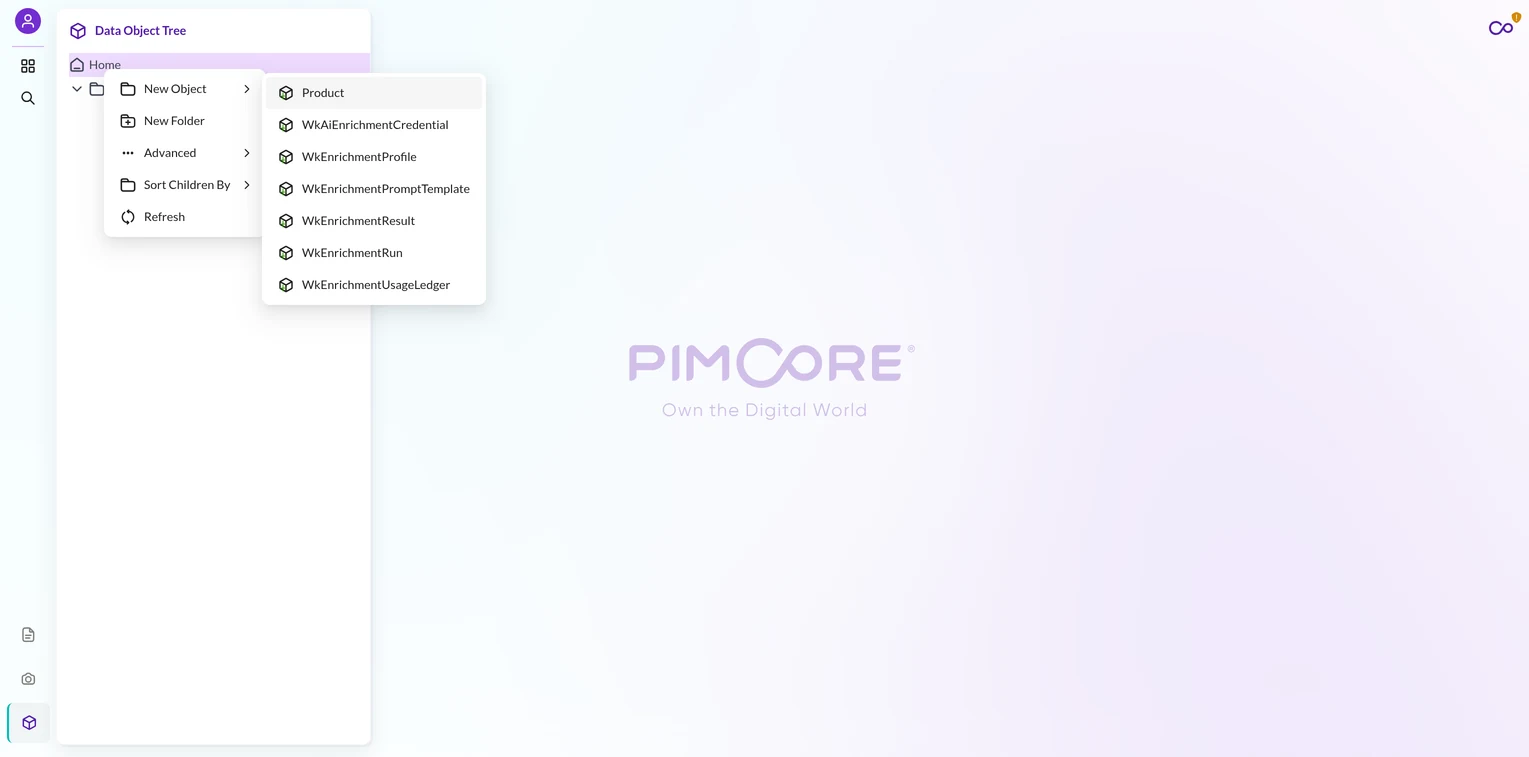
Create the object in three steps:
- Right-click a folder in the tree.
- Choose New Object from the context menu.
- Pick your class via “Add new Object of type Product”.
Pimcore opens the object in the object editor. It shows exactly the fields your class defined, and nothing else.
Fill in the fields for a real product. Enter the name, sku, price, description, upload an image, and tick active.
Every value you type lands in one Pimcore Data Object. The editor mirrors your class layout one-to-one.
Step 6: Publish
A new object starts as a draft. It stays unpublished until you act on it.
The object editor gives you two actions here: Publish and Unpublish. Click Publish to make the record live.
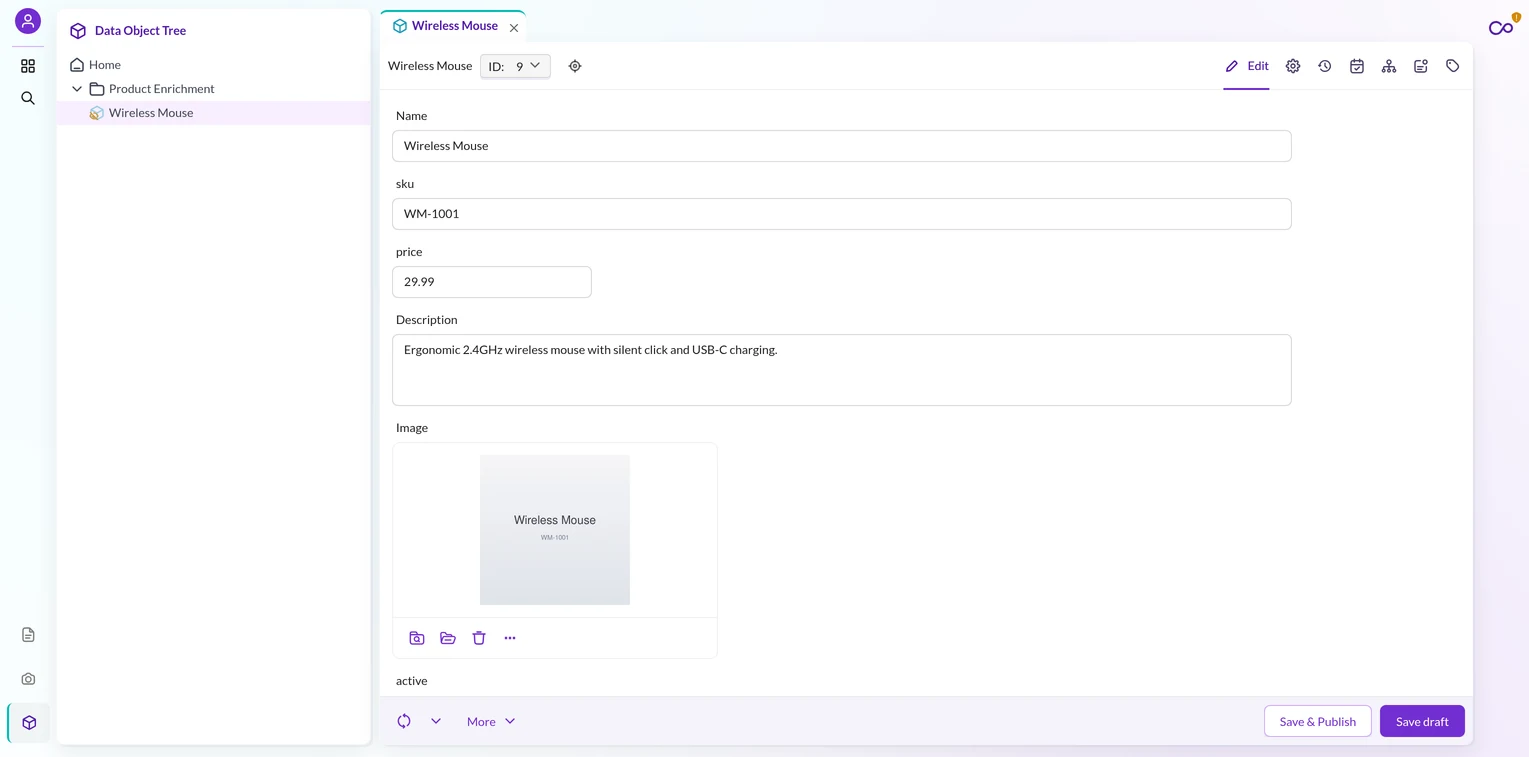
An unpublished object still exists in the tree. Pimcore does not serve it to Data Hub, APIs, or the frontend until you publish it.
Your first Pimcore Data Object is now live. Downstream systems and APIs can read it from this point on.
Need to pull it back? Use Unpublish to return the object to a draft state without deleting it.
What Pimcore built under the hood
Saving the class created several MySQL tables. You rarely touch them, but the map helps when you debug.
Pimcore uses four table types per class:
object_<id>— the base row for each object.object_store_<id>— the stored field values.object_query_<id>— values optimized for grid and listing queries.object_relations_<id>— the relation links between objects.
One modern detail matters. Pimcore 12 and later dropped the old o_ column prefix, so you never see o_id or o_key now.
On the PHP side, Pimcore\Model\DataObject\Product is a fully typed model. Your services and controllers load, edit, and save each Pimcore Data Object through it.
Prefer code? Define a Pimcore Data Object class in PHP
Studio is the fastest route, but Pimcore also supports code-first workflows. Developers can define a class in PHP.
Call DataObject\ClassDefinition::create([...]) to define the class. Then run two console commands to sync everything:
bin/console pimcore:build:classes
bin/console pimcore:deployment:classes-rebuild --force
The first command regenerates the PHP model classes. The second syncs the database columns to match the definition.
You can also ship a class as JSON. Use Data Model Definitions > Bulk Import to load one, and Bulk Export to dump it.
Heed one gotcha with Bulk Import. It reassigns class IDs on import, so never hardcode a numeric class ID.
Resolve classes by name instead. That keeps every Pimcore Data Object mapping stable across environments.
Where Pimcore Data Objects go next
A class is only the start. Each Pimcore Data Object becomes a feed for the systems around your business.
Data objects push into ERP, CRM, and eCommerce storefronts. Connectors carry that structured data to each destination.
Pimcore Data Hub exposes the same objects over GraphQL. Your storefront or app can query them directly, field by field.
Conclusion
You now know the full path in the latest Pimcore. You opened Studio, defined a class, added fields, and published a Pimcore Data Object.
The takeaway is simple. Pimcore Studio turns data modeling into clicks, and it builds the schema and PHP model for you.
Ready to connect your catalog to a storefront or ERP? Talk to the Webkul Pimcore team about a connector that moves every Pimcore Data Object where it needs to go.