Guide for WooCommerce AI Chatbot
Table of Content
Woocommerce AI Chatbot, powered by the unification of OpenAI SDK Compatible LLMs, integrates seamlessly into your Woocommerce Store, providing exceptional customer support and assistance through text and voice conversations.
Woocommerce AI chatbot becomes an integral part of your store’s front end, offering a user-friendly and interactive interface for customers to engage with AI and complete their shopping journey from a single chat window.
Customers can explore your product offerings, ask product-related queries, check shipping details, verify discount coupon availability, and interact with the chatbot using the voice feature.
Additionally, the chatbot can assist customers in managing their cart, adding or removing products, viewing cart summaries, applying coupons, retrieving shipping methods, and proceeding through checkout directly within the conversation.
Backed by the Unification of OPEN AI SDK Compatible LLMs, the Woocommerce AI Chatbot supports OpenAI-compatible APIs, allowing integration with different compatible AI models while also supporting ONNX models for local embedding generation.
Utilizing advanced RAG techniques, the chatbot analyzes customer inputs and their sentiments then delivers comprehensive answers using AI Agents.
The chatbot now goes beyond answering questions. It provides a complete conversational e-commerce experience where customers can discover products, add products to the cart, manage their cart, apply discounts, check shipping options, proceed to checkout, and make secure Stripe payments without leaving the chat interface.
It also supports applying coupons, retrieving shipping methods, and completing orders using supported WooCommerce payment gateways.
Elevate your customers’ shopping experience with the Woocommerce AI Chatbot powered by large language model.
If you also want to provide the customers on your WooCommerce store to search products using images and phrases, then you can check WooCommerce AI Image & Semantic Search.
We provide a production version of the plugin. If you want a development version then you can get it at an additional cost. Please contact support@webkul.com for it.
Check the below – mentioned video for an overview of the workflow of the plugin:
Features
- Upload WooCommerce product data to the Vector database to train the chatbot.
- Show the AI chatbot on multiple WooCommerce storefront pages.
- Conversational AI and Natural Language Processing (NLP).
- Customers can chat with the AI chatbot using the voice feature for a more interactive experience.
- Supports ONNX models for local embedding generation.
- OpenAI’s latest GPT models and Gemini Flash provide more contextually relevant responses.
- Customers can add products to their cart directly through the chatbot conversation.
- Stripe payment integration enables secure payments directly within the chatbot.
- Provides a complete e-commerce shopping experience within a single chat, from product discovery to cart management, checkout, and payment.
- OpenAI’s latest GPT models and Gemini Flash provide more contextually relevant responses.
- The plugin now supports all the latest OpenAI SDK-compatible LLM Models but outperforms on ChatGPT, GEMINI, and Cerebras models.
- Customize the WooCommerce chatbot appearance with your brand.
- Admin can create AI-generated content for the posts, pages, and products from the backend.
- Admin can view chat history between the Chatbot and the users and guest users by enabling guest history on or off.
- Product long descriptions will be created by the admin while adding new products.
- Admin can see a live dashboard that delivers real-time insights into its performance and the most-asked product.
- This module is compatible with WooCommerce’s new High-Performance Order Storage (HPOS) feature.
- It offers three types of embedding models: OpenAI, GEMINI, and ONNX embedding models (e5-small) for local embedding generation.
- It also supports two types of vector databases, Pinecone for hosted and chromadb for local vector DB.
- Embedded the Ternlight model for the AI chatbot.
- Now the chatbot can respond about shipping details, check available discount coupons, apply coupons during checkout, and guide customers through the purchase process.
- Customers can add products to cart, remove items, and view cart summaries directly through the chatbot conversation.
- The chatbot supports AI-assisted checkout flow within the chat interface.
- Customers can apply and view available discount coupons during the checkout conversation.
- The chatbot can fetch shipping methods and shipping charges dynamically.
- Stripe payment integration through MCP allows secure checkout directly from the chatbot.
- Supports default WooCommerce payment gateways for chatbot-based checkout.
- AI can place WooCommerce orders programmatically with billing and shipping details mapping.
- Chatbot verifies Stripe checkout payments and handles success responses automatically.
Installation
The user will get a zip file, which he has to upload to the “Add New” menu option in the WordPress admin panel.
For this login to the WordPress Admin Panel and under the Dashboard, hover your mouse over the “Plugins” menu option. This brings out a Sub-Menu and then selects the “Add New” option.


After that, you will see an option on the top of your page that is “Upload Plugin”, click the option to upload the zip file.


Then click on the “Upload Plugin” option, below that you will see a button “Choose File” Click on the button to browse for the zip file as per the snapshot below.


After browsing the file, click the “Install Now” button to install the plugin as per the snapshot.


Now, when the plugin is installed correctly, you will see the success message. Additionally, an option to activate the plugin.
Click on “Activate Plugin” to activate the installed plugin.


Module translation
To learn how to translate the module, you can click here.
NOTE: To generate JSON from your translations, save your translation file in the default WordPress languages directory.
Then run the following command in the same directory: Note `xx_YY` refers to the locale (eg. `en_US`)
“`wp i18n make-json ai-chatbot-for-woocommerce-xx_YY.po –no-purge
Flush Rewrite Rules
The admin has to flush the permalink by navigating to Settings > Permalinks so that the links to the chatbot store work correctly.


Vector DBs
Pincone Settings
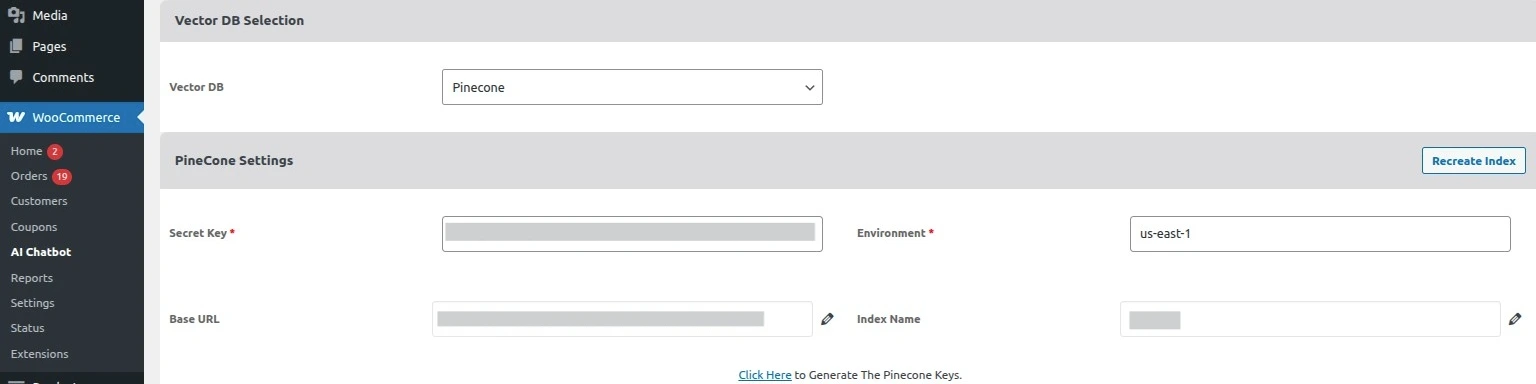
To configure the PineCone, the admin will navigate through WooCommerce > Chatbot > Settings > Vector DB Selection> PineCone Settings. Below are the steps to generate the PineCone keys.

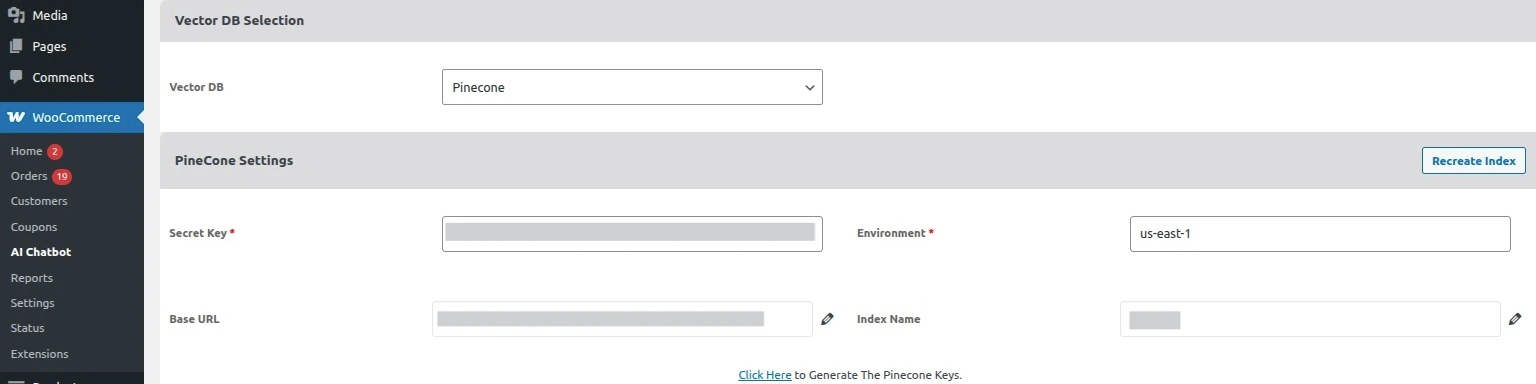
To create an account, the admin can continue with their Google, GitHub, and Microsoft account. Otherwise, enter your email to create an account on Pinecone.


After creating an account on Pinecone, to create a new API key click on API Keys > Create API key as shown in the below screenshots.


Enter the key name and click on the create key to create the new API key.


Copy and enter the environment and value key at the admin end. Please refer to the below image for a better understanding.


Chroma DB Settings:
To configure the Chroma DB, the admin will navigate through WooCommerce > AIChatBot > Settings > Vector DB Selection> Chroma DB. Click on the Click Here to know how to setup chroma db locally.


OpenAI API Compatible
The WooCommerce AI Chatbot supports OpenAI API-compatible models, allowing store owners to connect and use different AI models that follow the OpenAI-compatible API structure.
This provides greater flexibility in choosing an AI model according to the store’s requirements. Instead of being limited to a specific AI provider, the admin can configure a compatible API endpoint, model, and required credentials to use the supported model with the chatbot.
Some examples of AI models and providers that can be used through an OpenAI-compatible API include:
- OpenAI – Use OpenAI models through the standard OpenAI API structure.
- Claude – Connect supported Claude models through an OpenAI-compatible API structure.
- Gemini – Use supported Google Gemini models through a compatible API interface.
- DeepSeek – Connect compatible DeepSeek models through an OpenAI-compatible endpoint.
- Mistral AI – Use compatible Mistral models with the supported API structure.
- Groq – Connect supported Groq-hosted models using the OpenAI-compatible API format.
- Together AI – Use supported models available through Together AI’s compatible API.
- OpenRouter – Connect and use different supported models available through an OpenAI-compatible interface.
This compatibility makes the chatbot more adaptable and allows store owners to select an AI model based on factors such as performance, cost, availability, and specific business requirements.
OpenAI API-Compatible Structure
The chatbot supports the following OpenAI-compatible API structure for configuring and connecting compatible AI models.
TOON Structure
The chatbot supports the TOON structure to optimize the data sent to the AI model and consume fewer tokens.
By using the TOON structure, the required information can be represented in a more compact format compared to a conventional data structure. This helps reduce unnecessary token usage, making AI requests more efficient and potentially reducing API costs.
The TOON structure is particularly useful when sending product information, chatbot context, or other structured data to the AI model, as it helps minimize the number of tokens required while retaining the necessary information.
Embedding Models Settings
Gemini Model Settings
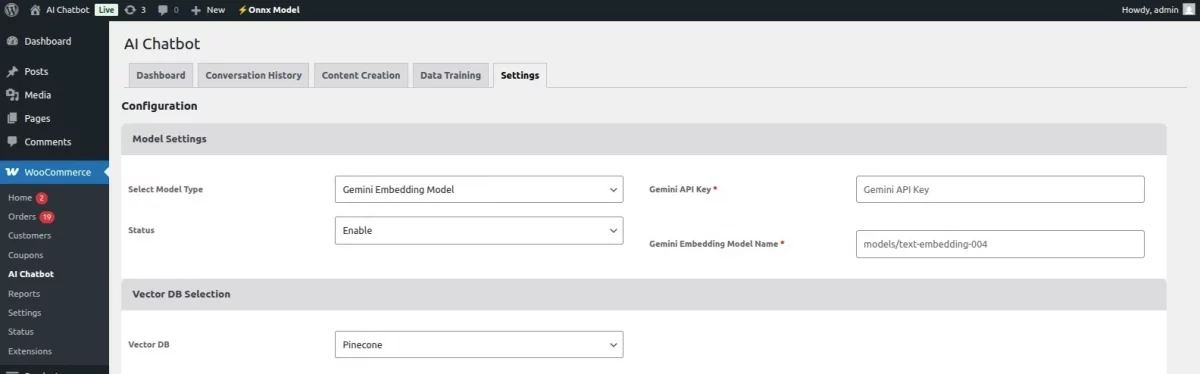
To configure the Gemini Embedding model , the admin will navigate through WooCommerce > AIChat Bot > Settings > Model Settings > Select Model Type > Gemini Model >.
Click on the Click Here to know how to generate the Gemini API keys.

Open AI Model Settings
The WooCommerce AI Chatbot supports OpenAI-compatible APIs, giving store owners greater flexibility when selecting the AI model for their chatbot.
With this support, compatible AI models can be integrated through the OpenAI-compatible API structure, allowing the chatbot to work with different supported models instead of being restricted to a single AI model provider.
This makes the chatbot more flexible and adaptable to different AI model requirements.
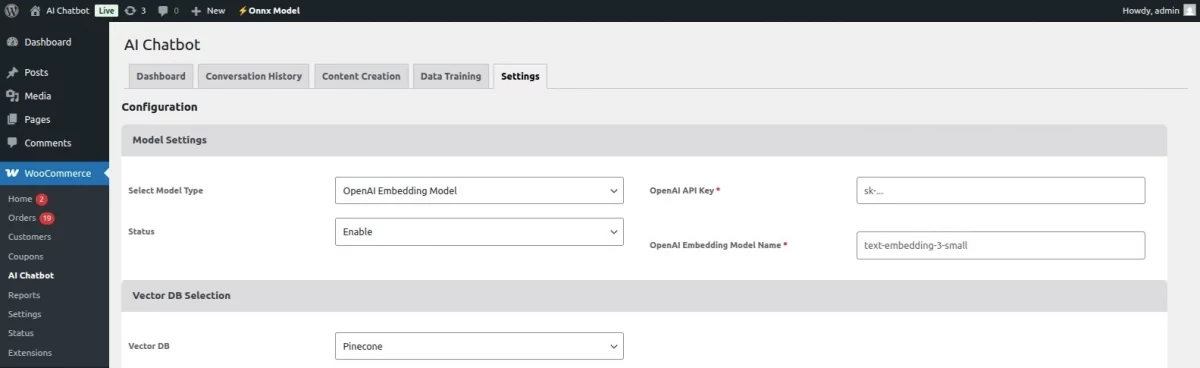
To configure the Open AI Settings, the admin will navigate through WooCommerce > AIChat Bot > Settings > Model Settings > Select Model Type >OPEN AI. Below are the steps to create OpenAI keys.
To create an account click on the get started button, or to be login into your account click on the log in button.


Click on the API option to integrate OpenAI models into your AIchat Bot.


Click into your account. Now, click on view API keys as shown in the below screenshot.


To create a new Open AI secret key, navigate through view API keys > user > API keys > create new secret key.


Enter the name of the secret key or you can skip the key name. Click on Create Secret Key to generate to new secret key.


Copy the Secret key and enter it at the admin backend. Please refer to the below screenshots for a better understanding.


Onnx Model Settings
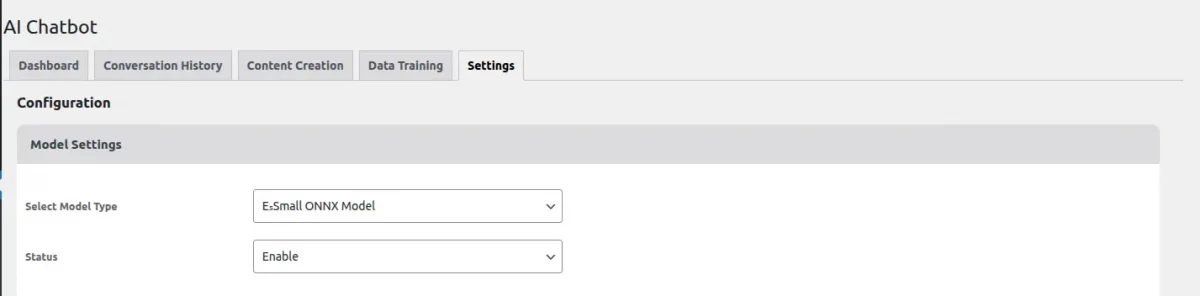
The WooCommerce AI Chatbot supports ONNX embedding models for local embedding generation. The admin can select the ONNX model from the chatbot’s model settings and enable it according to their requirements.
When the ONNX model is enabled for the first time, the system automatically downloads the required model. Once downloaded, the model can be enabled whenever required without downloading it again.
This provides an additional option for generating embeddings locally alongside the available OpenAI and Gemini embedding models.
To configure the Onnx Embedding model, the admin will navigate through WooCommerce > AI Chatbot > Settings > Model Settings > Select Model Type > Onnx Model >.
Then, select Enable from the Status dropdown and save the settings. If the model has not been downloaded yet, the system will start downloading it automatically.
This download happens only once after the plugin is activated.
In the future, whenever you want to use the ONNX model, simply set the Status to Enable, and it will start working without downloading again.

Chat Box Settings
To configure the chat Box, the admin needs to navigate through the WooCommerce > AIChat Bot > Settings > chat box settings.
- The admin can allow voice assistant or animation in the chatbot.
- Set the primary and secondary colors of the chatbot box.
- Set the chatbot name.
- You can also enable or disable the guest history.
- Upload the chatbot avatar, background image, and AI logo as per choice.
- Allow the background image for the admin conversation history.
- Admin can set the right or left position of the chatbot on the store.


Voice-Powered AI Conversations
The WooCommerce AI Chatbot allows customers to interact with the chatbot using the voice feature. Customers can ask questions about products, get information, and communicate with the AI chatbot without manually typing their queries.
This provides a more natural and convenient way for customers to interact with the store and makes the shopping experience more engaging.
Data Training
The framework allows the admin to upload their Woocommerce product data into the Selected Vector database and then train your AI Chatbot.
Also, whenever the admin updates the product, the data also gets updated through selected Models.


Admin navigates through dashboard > products > add new product can also generate product long descriptions with AI Chatbot while adding new products to the store.


- Admin has to enter the name of the product.
- Click on the long description with the AI chatbot under the product description to generate the description of the product.
- After the product description is generated by an AI chatbot, the admin can edit the generated description.
AI ChatBot Dashboard
Admin can access the real-time dashboard. Where the admin can view user and AI weekly and monthly messages over chatbot in line/bar/area/scatter format.
Admin can see the daily users over the chatbot and most asked products as shown in the below screenshots.

Conversation History
The admin can access the chat history between customers and AI to gain insights into what customers are searching for after landing on the storefront.
- The admin must enter at least three characters of the user’s name to retrieve the chat history.
- The admin can also select the date from which they want to view the conversation.
- They can download the chat history if required.
- All the guest user history you can find using the guest username
- Additionally, the admin can block a user by clicking the block option, as shown in the screenshots below.

If you want to facilitate your customer to ask order-related queries to the admin, then you can make use WooCommerce Order History Communication.
Content Creation
The module helps to generate accurate responses based on the provided WooCommerce data.
Admin can creative and high-quality content generation. Configured model will generate human-like text, answer questions, and translate languages.


Admin can also generate custom content for a number of topics. Admin has to enter the topic name and can use this module for topic suggestions.
Similarly, use this module to generate sections, content excerpts, and meta descriptions for posts, pages, and products.

After creating the content, admin can the view and edit the generated post in post > all post.

AI-Powered Add to Cart
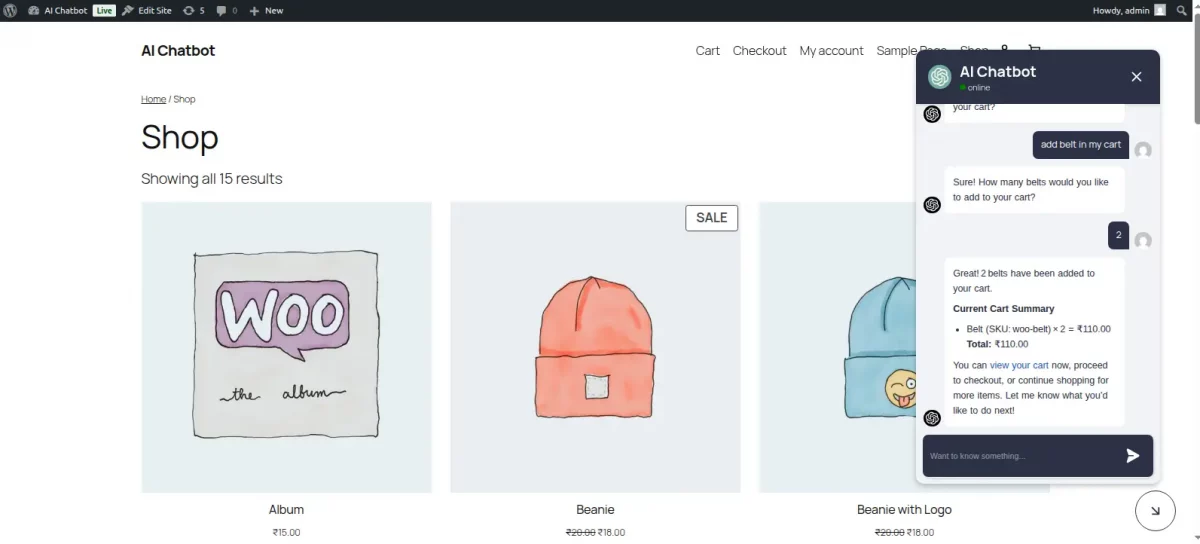
The WooCommerce AI Chatbot allows customers to add products to their cart directly through the conversation.


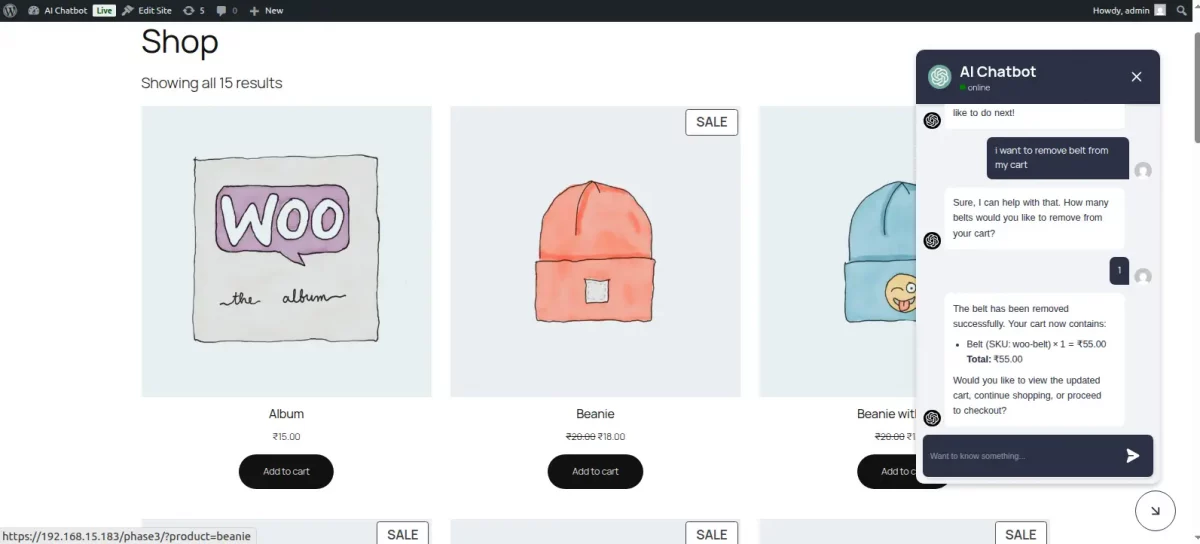
Customers can simply communicate their shopping requirements through the chatbot, and the chatbot can assist them in adding the required products to their WooCommerce cart. Customers can also manage their cart by removing products and viewing the cart summary.
This eliminates the need to manually navigate through multiple product and cart pages during the shopping process.
Complete E-Commerce Experience in a Single Chat
The WooCommerce AI Chatbot provides customers with a complete e-commerce shopping experience through a single chat interface.
Customers can discover products, ask product-related questions, get product information, add products to their cart, remove items, view cart summaries, apply discount coupons, check available shipping methods and charges, proceed through checkout, and complete their payment.
Instead of switching between different pages of the store for every step, customers can perform the major stages of their shopping journey directly through the chatbot conversation.
This creates a seamless conversational shopping experience from product discovery to order completion, making the chatbot an interactive shopping assistant for the WooCommerce store.
Storefront View
The customer can explore products, ask product-specific queries, and receive detailed information directly through the chatbot using text or voice.
In addition, customers can add products to their cart, remove items, view cart summaries, apply discount coupons, check shipping options, proceed through checkout, and complete secure Stripe payments from within the chat interface.
WooCommerce AI Chatbot provides real-time answers to customer’s product queries and displays the answers in the chat window as shown in the below screenshots.

Voice Assistant
The customer can use the voice assistant to ask questions about the product.
AI-Powered Product Queries
The AI Chatbot understands and responds to customer inquiries as shown in the below screenshots.

Add Products to Cart
Allow customers to add products to their cart directly through the chatbot interface.

Remove Products from Cart
Enable customers to remove products from their cart within the chatbot conversation.
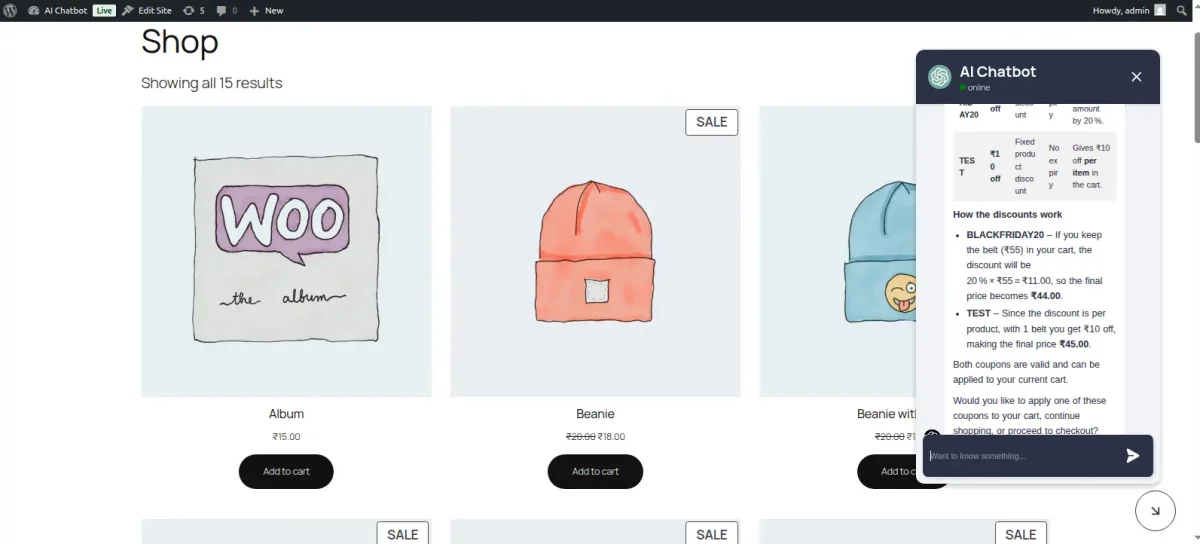
Discount Coupons
Allow customers to apply and check discount coupons directly in the chat.
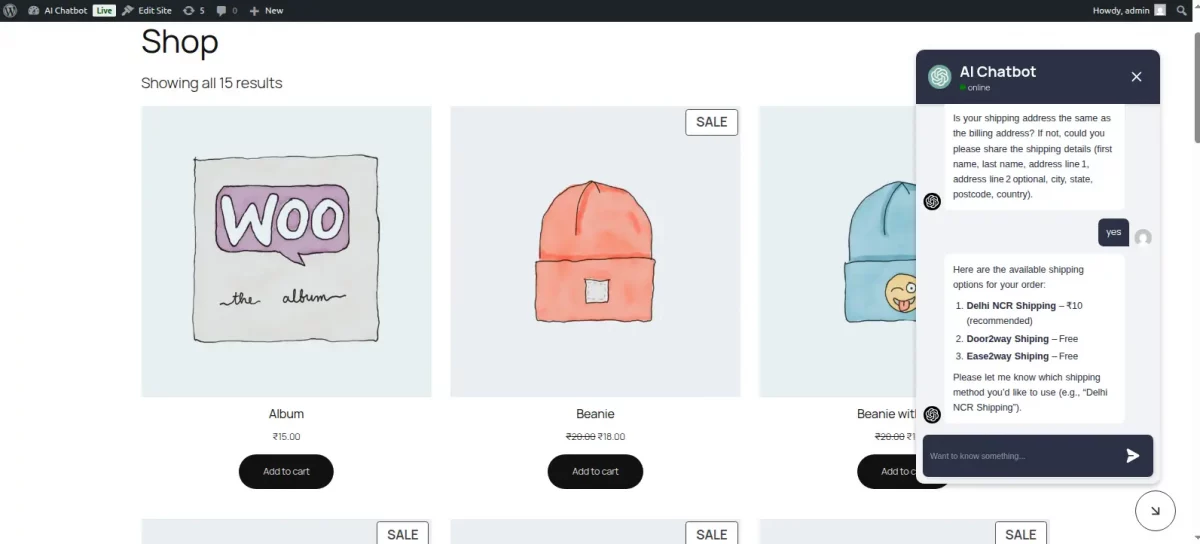
Shipping Options
Display available shipping options and charges during the chatbot checkout process.
Stripe Payment
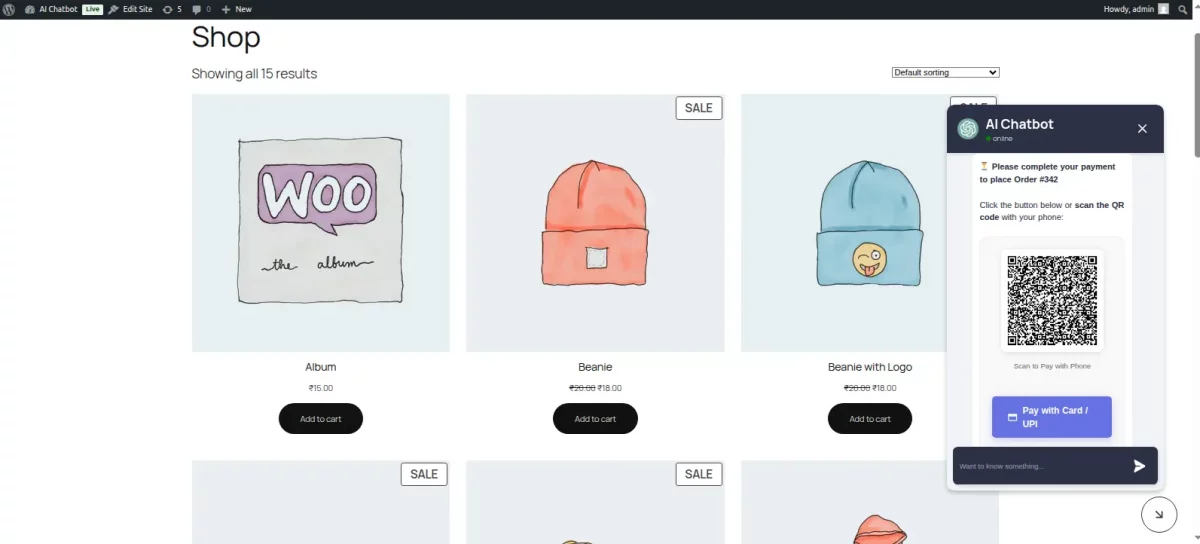
Support secure Stripe payment checkout directly from the chatbot interface.
Stripe Payment Integration
The WooCommerce AI Chatbot supports Stripe payment integration through MCP, allowing customers to complete their payment as part of the conversational checkout experience.
The chatbot can assist customers throughout the checkout process and handle the Stripe payment flow. After the payment is completed, the chatbot can verify the Stripe checkout payment and handle the successful payment response automatically.
This provides customers with a convenient and secure way to complete their purchase directly through the chatbot.
This creates a seamless conversational shopping experience where customers can discover products and complete their purchases without leaving the chat window.
If you also want to support your customer over WhatsApp, then you can make use of the WooCommerce WhatsApp Chat Plugin.
Support
Thus, that’s all for the WooCommerce AI Chatbot module. If you still have any issues, feel free to add a ticket and let us know your views on our Webkul Support System.