User Guide for Odoo OneDrive Backup
Table of Content
Introduction
Odoo OneDrive Backup feature allows customers to create personalized backups for their Odoo data on OneDrive.
Odoo OneDrive Backup provides a secure solution to protect your Odoo database using cloud storage. It automates backup processes, minimizing, risk of data loss or downtime.
Also, to set up, the module links Odoo to OneDrive in just a few steps, ensuring dependable data protection and fast recovery.
Prerequisites for Using Odoo OneDrive Backup
Odoo OneDrive Backup works in conjunction with Odoo Database Backup.
You must install the above-mentioned module to use Odoo OneDrive Backup.
Features
- Automatic secure Odoo database backups directly to OneDrive.
- Set scheduling backups at custom intervals to match your business needs.
- Supports storing multiple databases, ensuring complete data protection.
- Retains only a defined number of backup files and deletes older ones.
- Odoo OneDrive Backup lets you manage backups in your OneDrive Folder.
- Enable quick download and instant restoration for disaster recovery.
- Simplify OneDrive integration with an easy access key and folder setup.
Installation
- Once you purchase the App from Webkul store, you will receive a link to download module’s zip file.
- Extract the file on your system after download finishes. As a result, you will be able to see a folder named- ‘wk_onedrive_backup’
- Copy and paste this folder inside your Odoo Add-Ons path.
- Modify BACKUP_SCRIPT_PATH in <path_to>/wk_onedrive_backup/models/lib/onedrive_saas_client_backup.py to use the backup_script path from the wk_backup_restore module, which is <path_to>/wk_backup_restore/models/lib/.
- Now, open App and click on the Settings menu. Here, click on Activate Developer Mode.
- Then, open Apps menu and click on ‘Update Modules List.’
- In the search bar, remove all the filters and search ‘wk_onedrive_backup’
- You will be able to see the module in the search results. Click on ‘Install’ to install it.
Workflow
1. Generating Redirect URL at Odoo End:
Open OneDrive Configuration under Backup Operation and enter your OneDrive Client ID and Secret Key, then generate the redirect URL.
You can find Client ID in the Microsoft Graph App’s Overview section and obtain the Secret Key during the app configuration.
Use the generated redirect URL when setting up authentication for Azure App.
2. Microsoft Graph App Configuration:
Before connecting Odoo with OneDrive for backups, you must first configure the Microsoft Graph App.
Start by searching for “App registrations” in search bar.
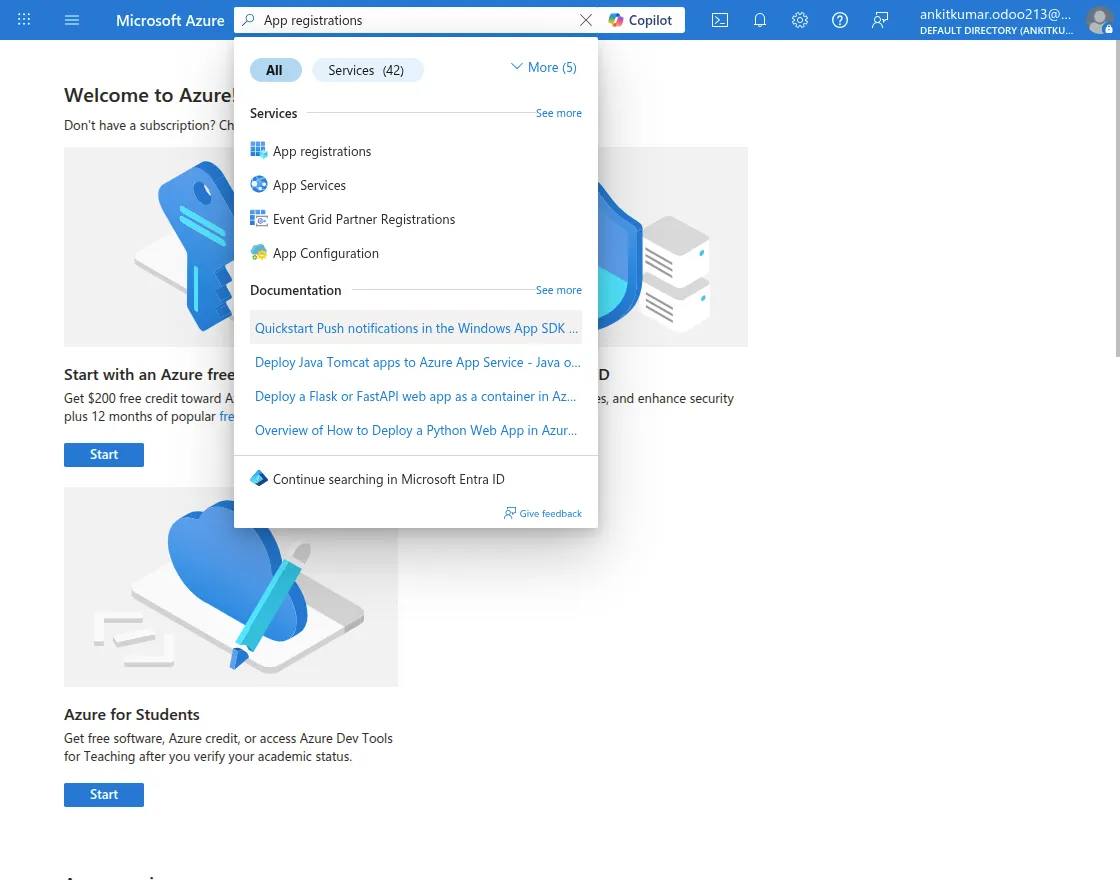
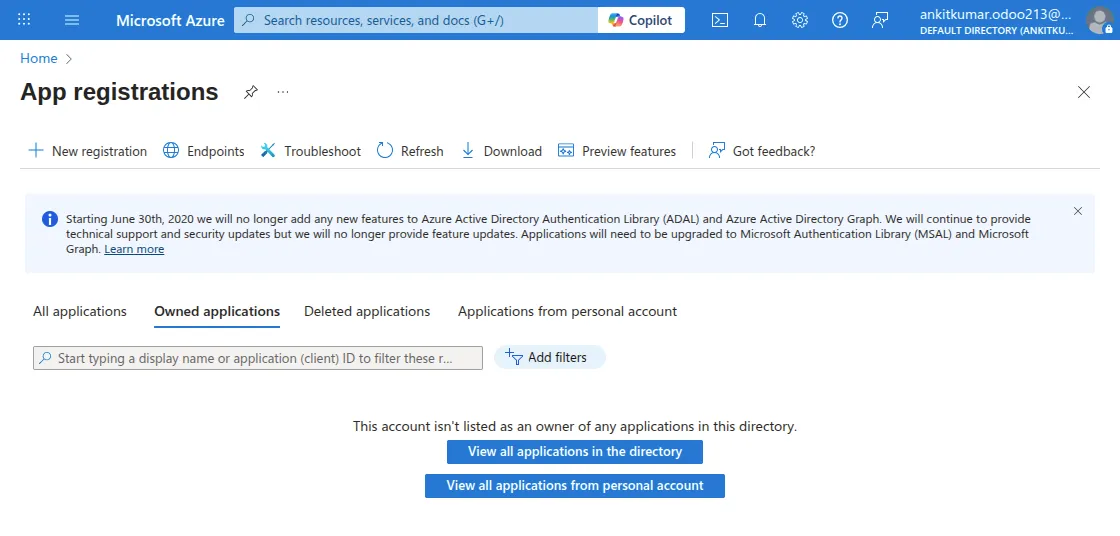
Once ‘App Registrations’ is found, open it. Click on ‘New Registration’ button.
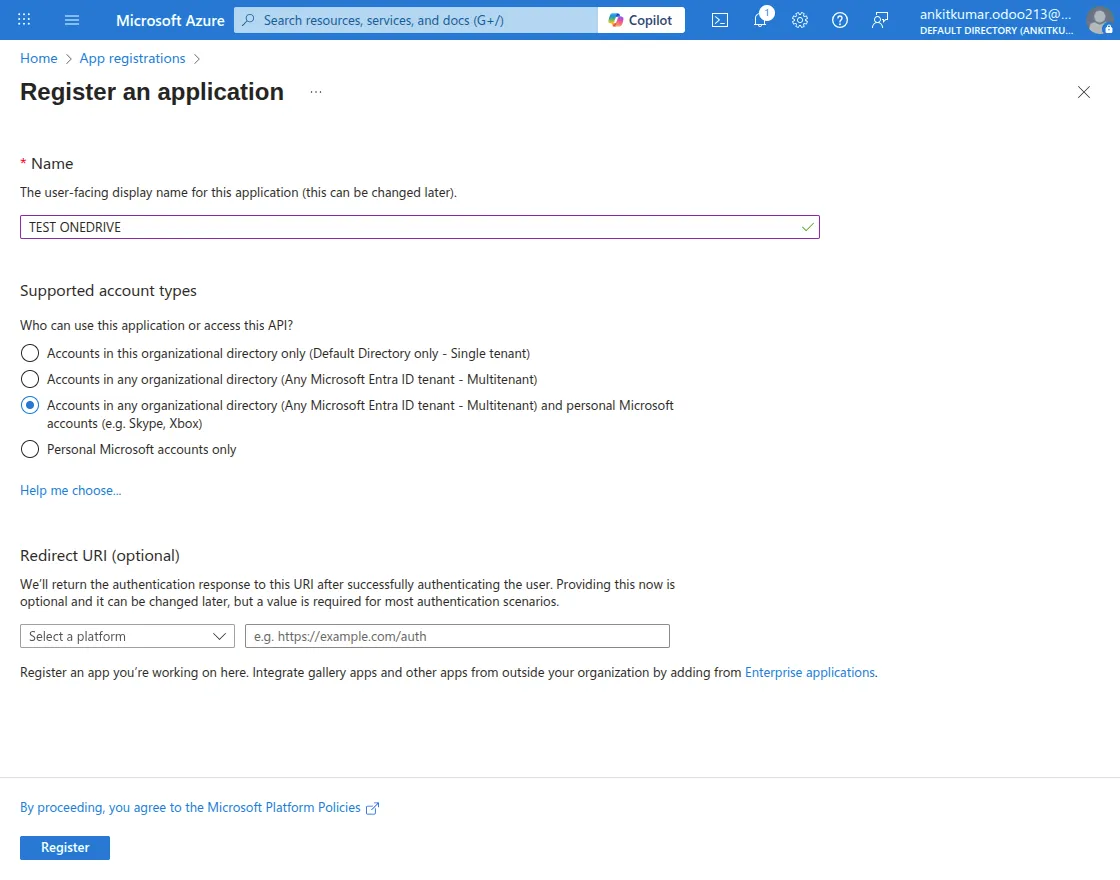
Now, fill in all required details in app creation form, and click on ‘Register’ button.
Note: Select ‘Supported Account Types’ as ‘Accounts in any organizational directory (Any Microsoft Entra ID tenant – Multitenant) and personal Microsoft accounts (e.g., Skype, Xbox)’.
Now, open “Certificates and secrets” tab from the manage section.
Add your client’s ‘Secret Key’ under the ‘Certificates and Secret’ section. Add description and expiration period for your secret key and click on ‘Add’ button.

This secret value will be visible to you in the list.
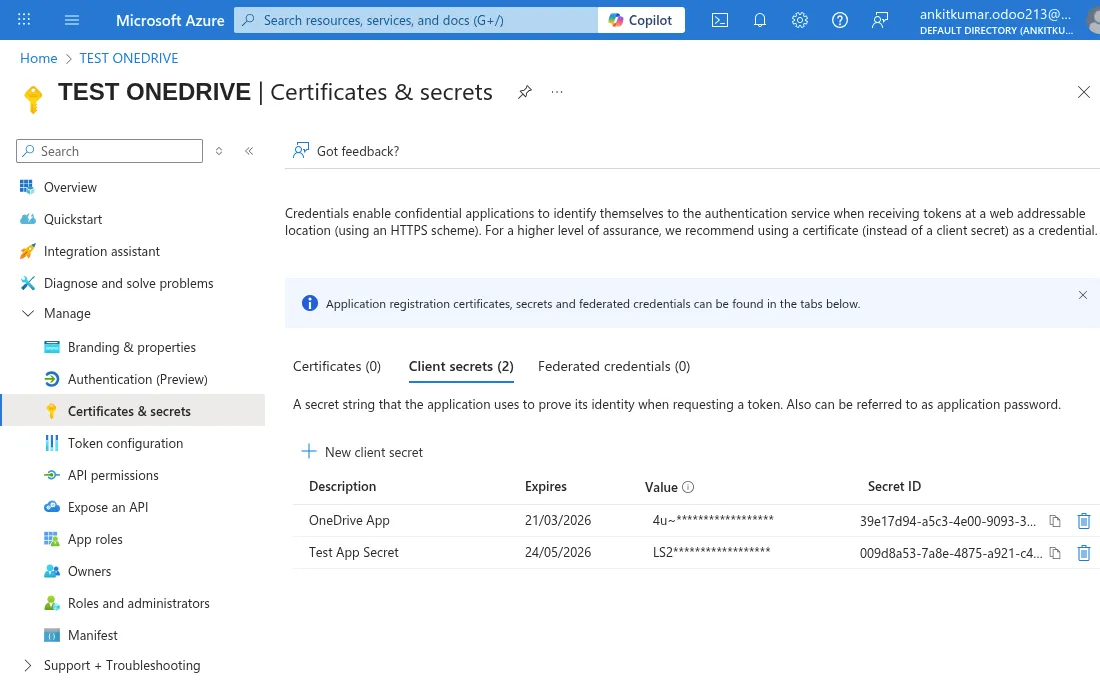
Note: Kindly copy this secret value and store it in a safe place to use it later in your Odoo Apps, as it will be read-only after creation.
You can use this App ID (Client_ID) and Secret Value(App_Secret) in your Odoo apps while configuring OneDrive Storage.
Similarly, you need to open “Test OnDrive” from the App Registration section from slideshow bar, under dropdown “Manage” menu.
Here, you will see the Authentication field. That’s what you need to open.
Add this redirect URI configured during Odoo OneDrive Backup app under ‘Authentication’ tab. Click on ‘Add a Platform’ button and choose ‘Web’.
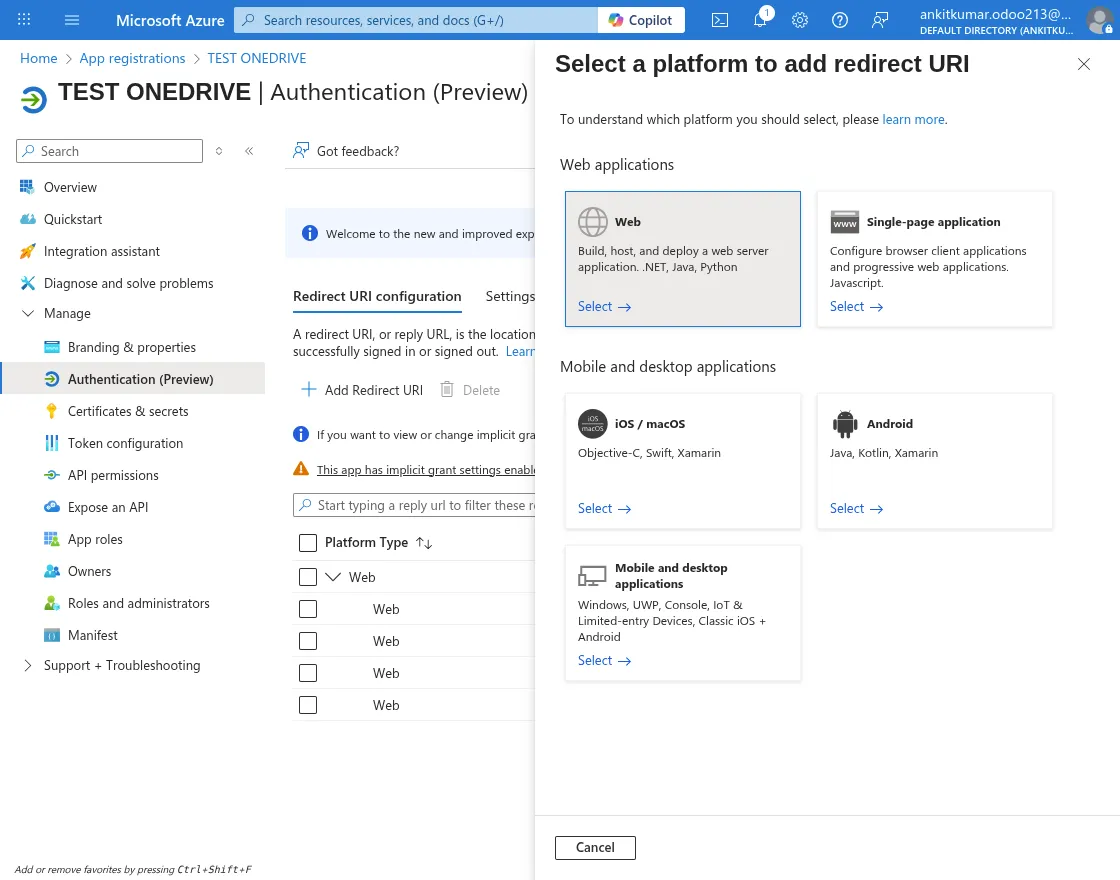
Enter the appropriate ‘Redirect URL’ configured during OneDrive Storage configuration in Odoo OneDrive Backup module and click on ‘Configure’ button.
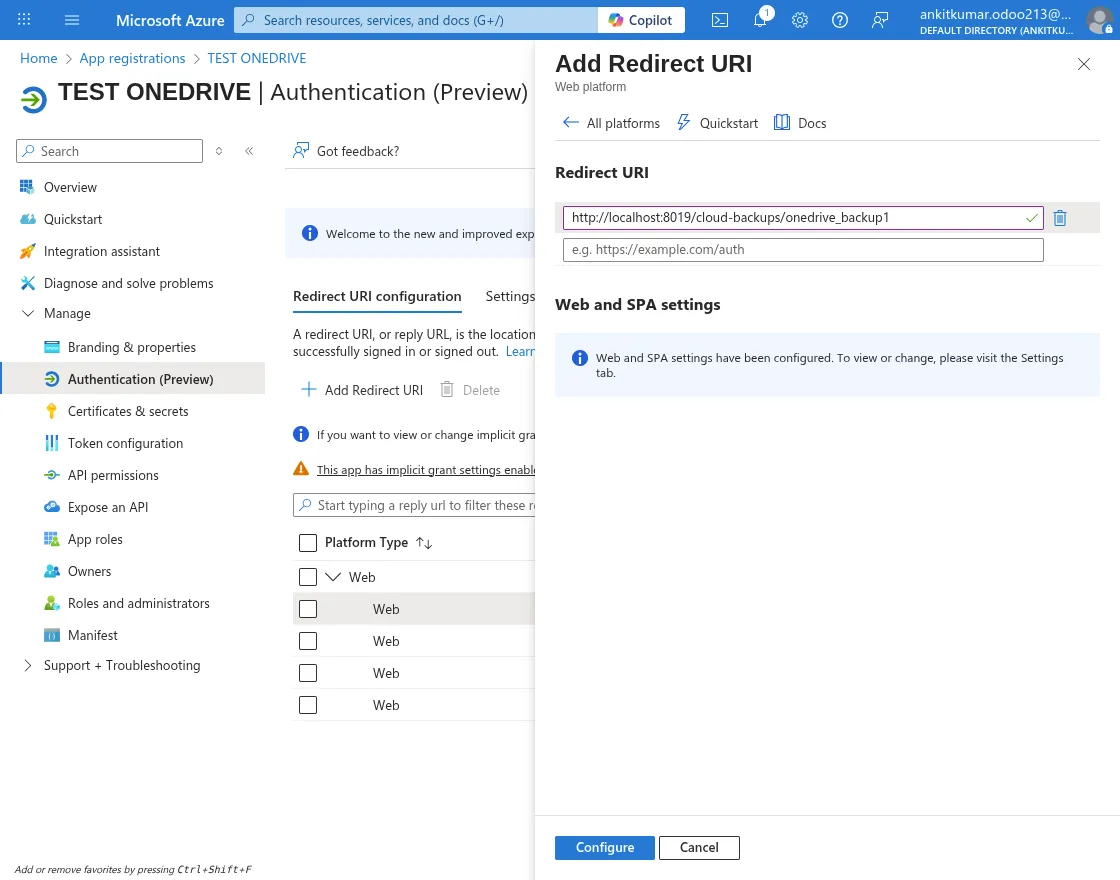
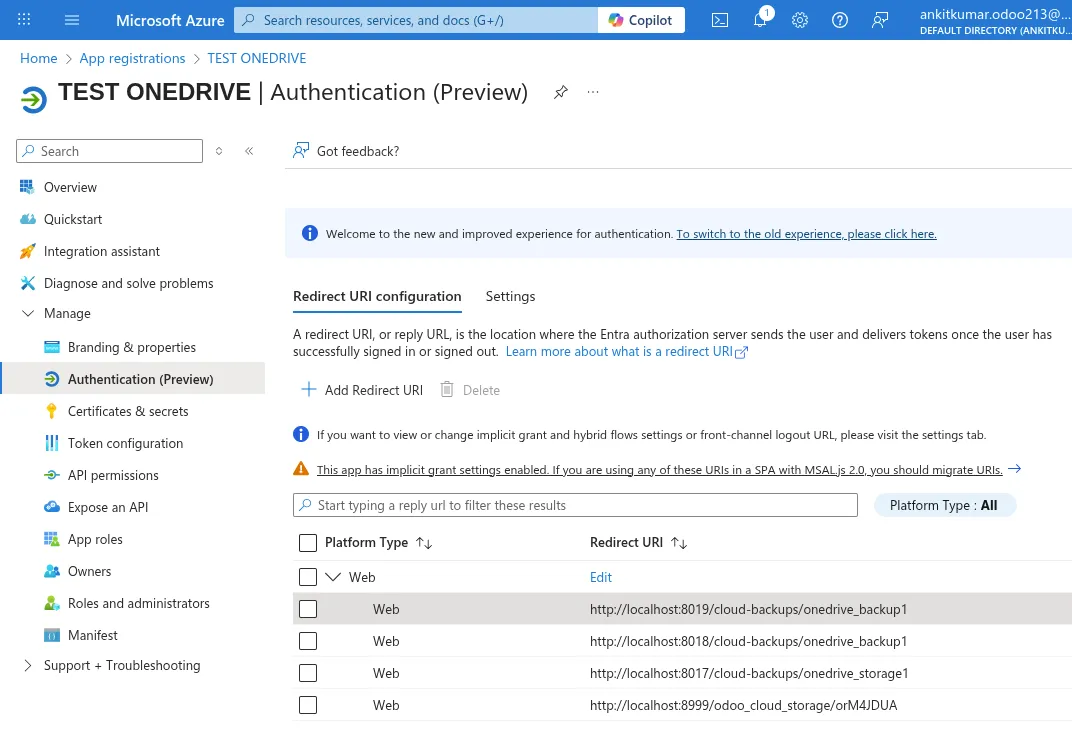
This Redirect URL will be seen in the list.
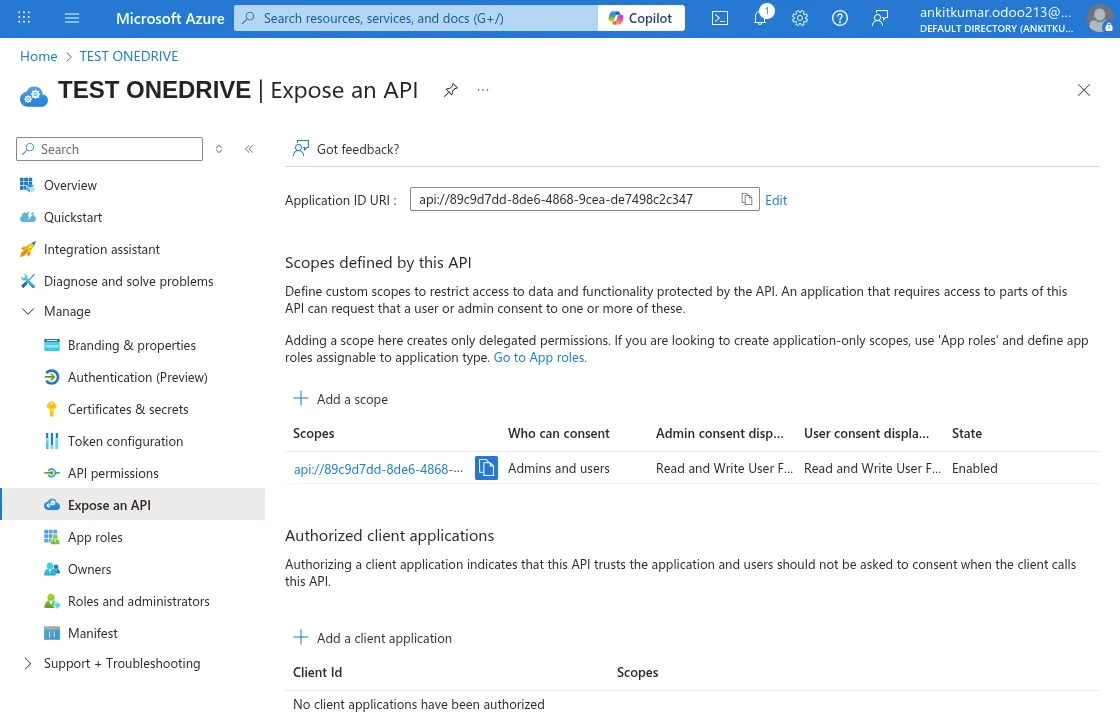
Now, you need to open “Manage” section from dropdown menu, and here you will see ‘Expose an API’. That’s what you need to open.
Hence, you need to “Add the Scope” of the application.
Make sure to set the Scope name as ‘Files.ReadWrite.All’ and fill in the details as configuration below.

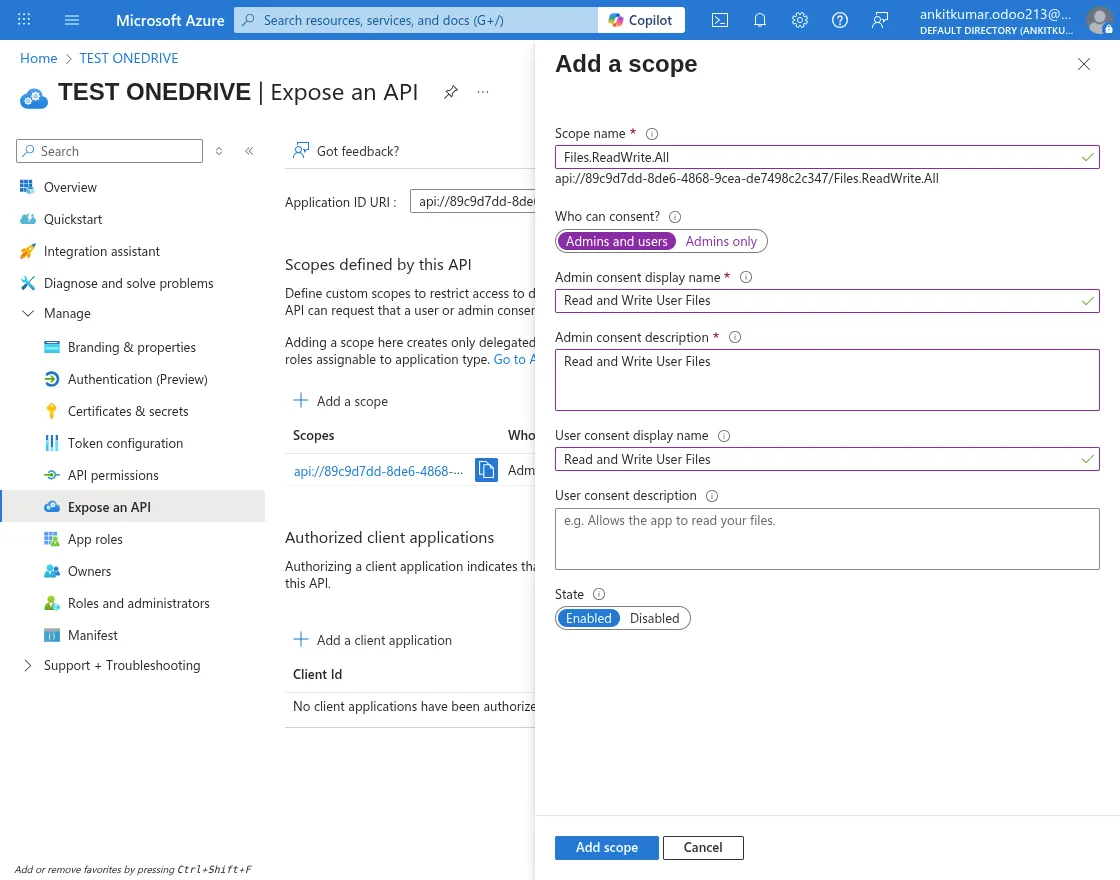
It will look like the image below after you add the scope.
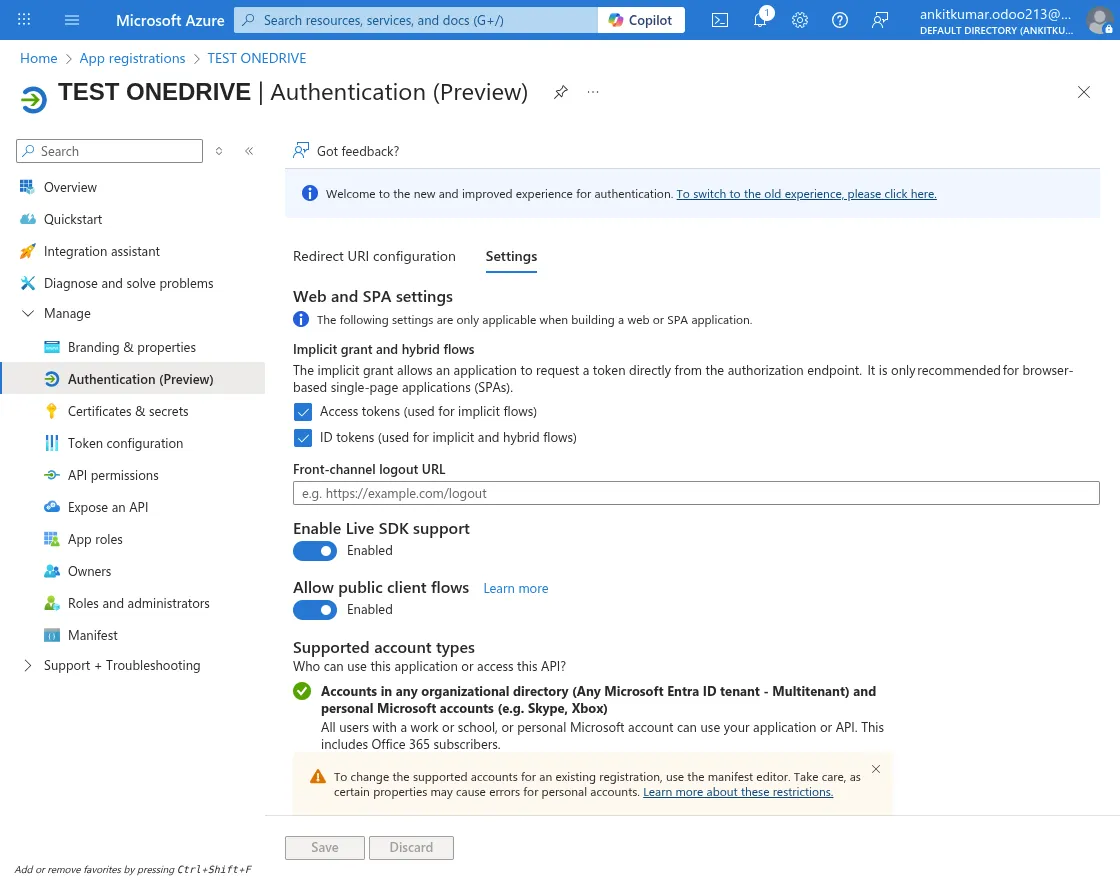
Now, open “Authentication” tab from the manage section.
Hence, you need to allow the public client flows under the ‘Authentication’ section.
Thus, in this way, the Microsoft Graph app is configured on the Azure console
3. Configuration at Odoo End:
Open OneDrive Configuration in Backup Operations. Here, you need to put your OneDrive Client ID and secret key.
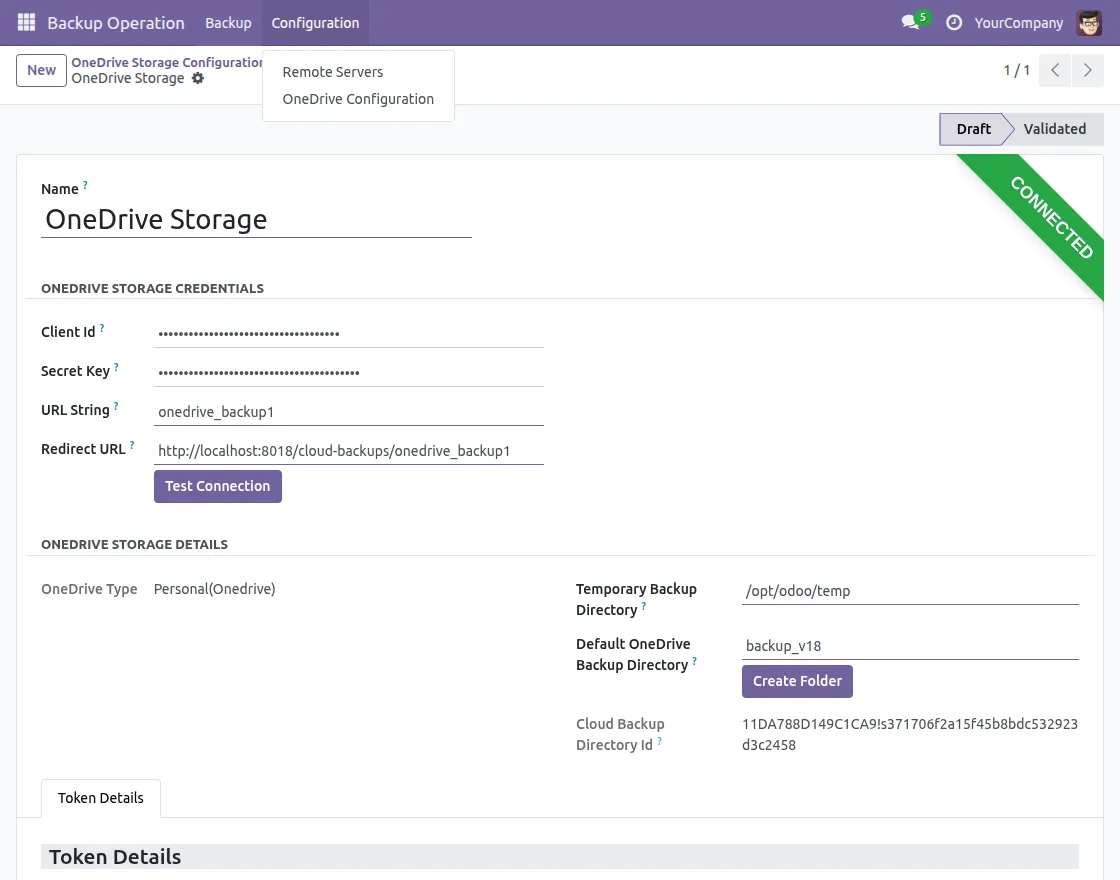
Note: If you are an Odoo Saas Kit user and have configured a Remote Server, then you will see remote servers in configuration menu.
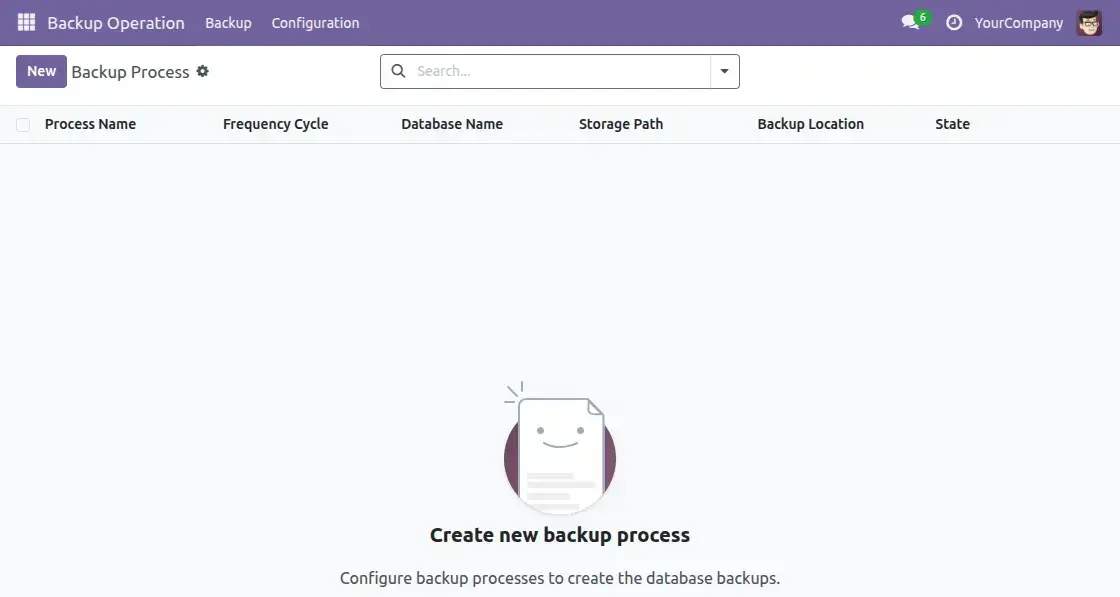
4. Configure a New Backup Process
Open Backup Operations by navigating to Backup >> Backup Process and click on New button to create a new backup process.

To create a new backup process, you need to enter all required details as shown in the image below:

Frequency Cycle:
From the dropdown menu, select how often your backup should run, for example, Daily, Twice a Day, Weekly, or Monthly.
Backup Starting Time:
You can set your exact time when your backup will begin, so you can set it according to your convenience.
Database Name:
The Database Name is where you specify which database to back up. For example, if your database is called bkp_db, that’s the one whose backup will be stored.
Backup Format:
It decides how backup is saved. You can use zip, which saves both the database and all related files, or pg dump custom format, which only saves the database itself.
Backup Location:
For this backup process, you will need to decide where you want to keep your backup. You can choose local storage, OneDrive, or a Remote server from the dropdown menu.
OneDrive Storage:
Hence it goes to the connected Microsoft OneDrive account, where the backup files will be uploaded. It lets you choose which OneDrive configuration will store the backups for this operation.
Storage Path:
The Storage Path specifies the OneDrive folder where the system saves your database backups, helping you keep files organized.
Drop Old Backups:
When enabled, this option automatically removes older backups. It helps free up storage space by keeping only the latest backups.
Backup Retention Count:
This decides how many old backups to keep before they are deleted, letting you maintain a history of backups while managing storage efficiently.
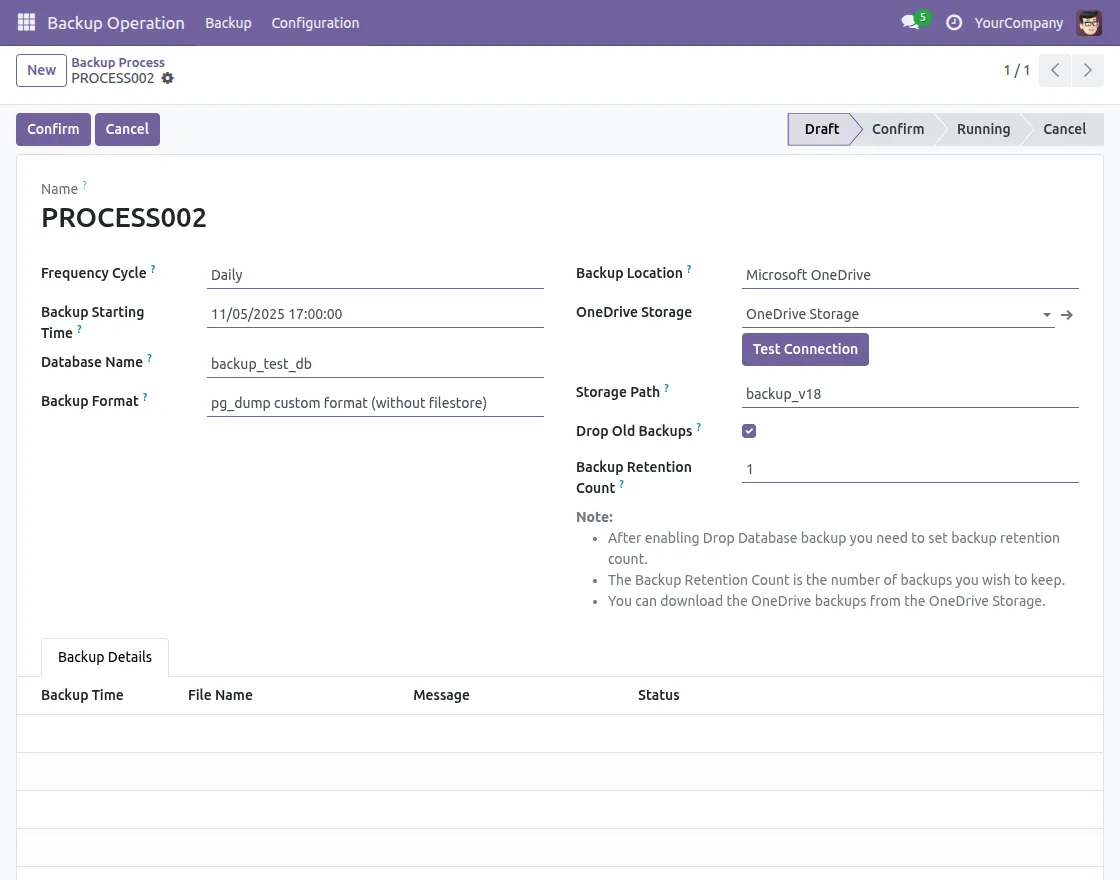
Note:
If “Drop Old Backups” is enabled, you need to set a retention count. Retention count controls how many past backups are saved.
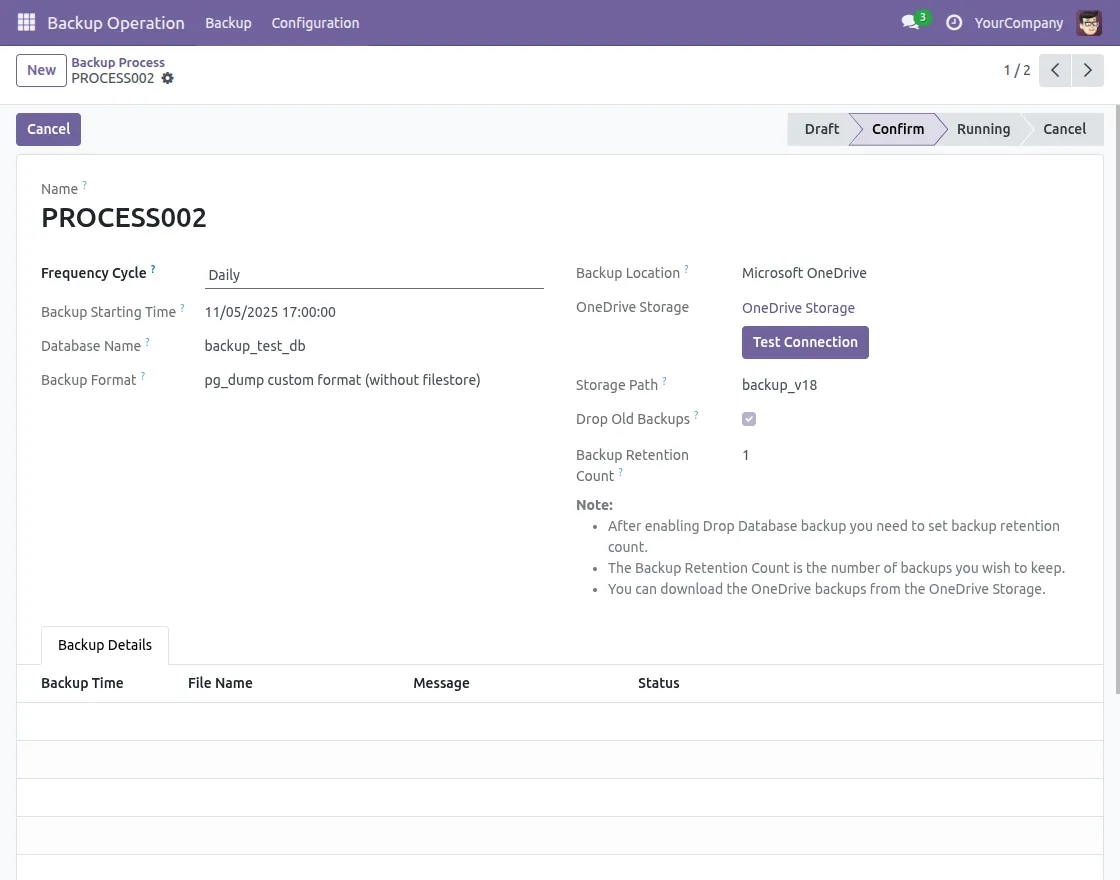
After entering all details, click the Confirm button to initiate your backup process.
Backup Failure Alerts:
If backup doesn’t complete, internal users will instantly get notified via email to save data from loss.
5. Cron for Backup Process
There are generally two basic CRON that are configured to automate the process of backing up data.
a) Backup Process Ignite Cron:
This cron checks for confirmed backup processes that are scheduled to start before its run time.
Finally, it marks them as running and creates a system cron to perform your backup.
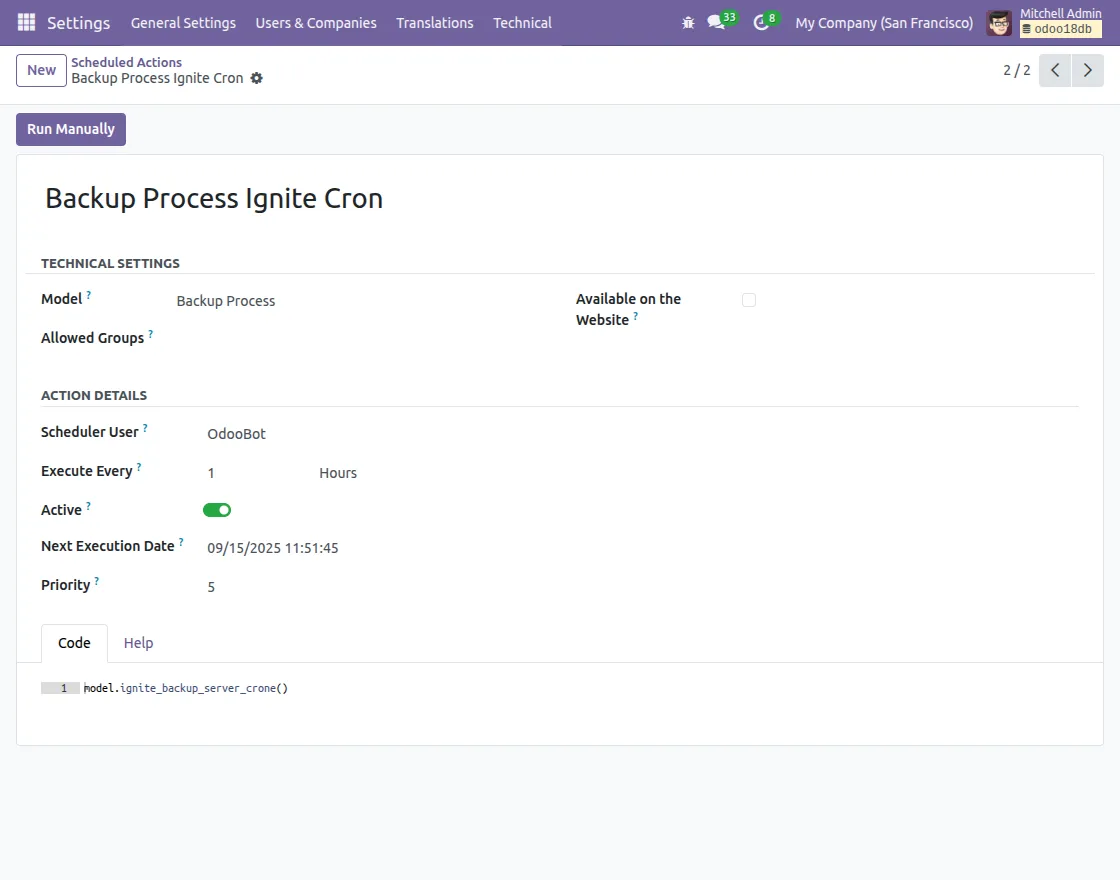
Backup Transition: Confirm to Running
This Backup Process Ignite cron ensures that your scheduled backups move forward automatically.
When the cron runs and your backup start time arrives, it changes the backup process state from Confirmed to Running, allowing the backup to begin without any manual intervention.
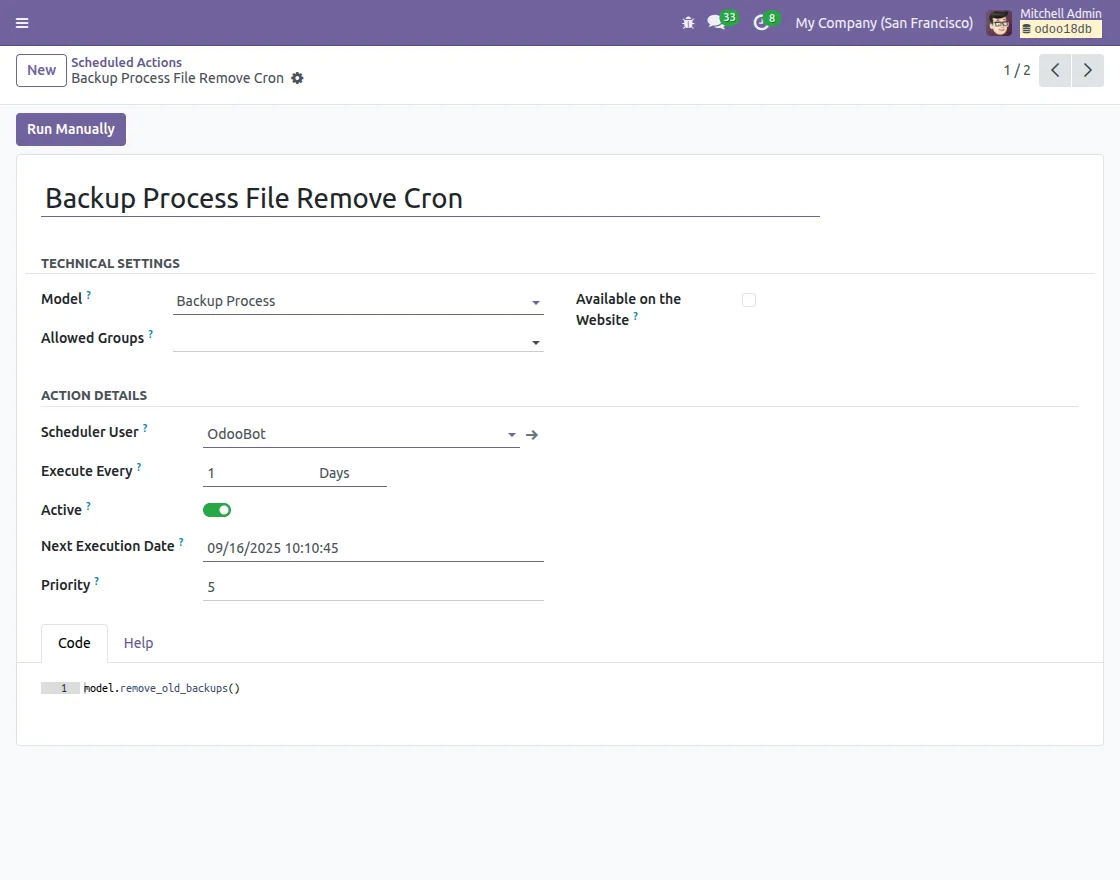
b) Backup Process File Remove Cron:
This Backup Process File Remove cron handles the removal of older backup files.
It checks if “Drop Old Backup” is enabled for your backup process that is in a running state.
Then the system retains only the number of backup files defined in the retention count for your backup processes, and automatically drops your old backup
Thus, the system optimizes storage and automatically removes older files without requiring any manual work on your server or in your main Odoo.
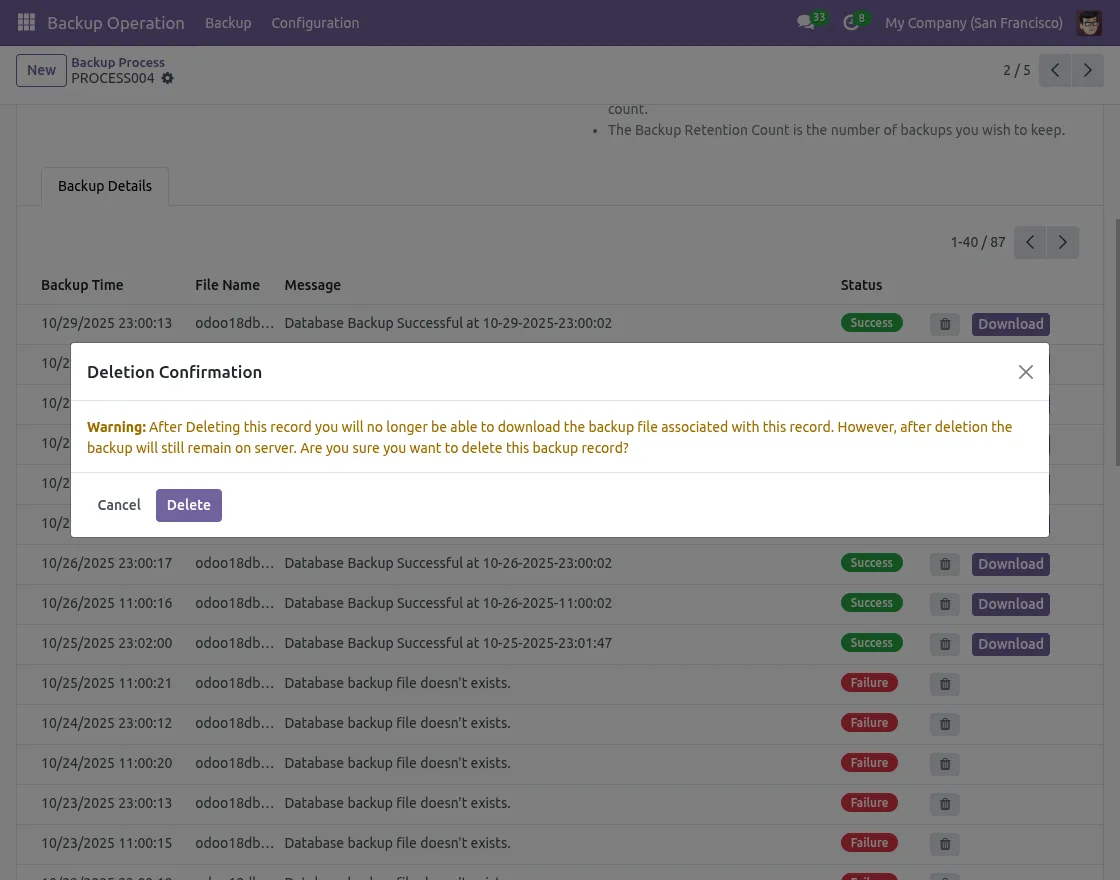
6. Track the Status of your Backups
You can view the status of your backup process here, whether it is Dropped, Failure, or Success. You can stop it at any time by clicking the Cancel Process button.
Note: If you delete any success backups, you will no longer be able to download your backup file associated with your record.
However, after deletion, your backup will still remain on your server.
A warning message will show up on your screen when you click on the delete button.
7. How to create a backup process for your SaaS Clients
If you need to create a backup process for your SaaS clients, first go to Backup Operations and click the New button to start a new backup setup.
Then you need to select the SaaS client in the backup instance field
You will then see a Linked Client option, which lets you specify the client for whom you want to create the backup process.
Similarly the other steps for creating a backup process are same as we do in Self-backup process.

NEED HELP?
Hope you find guide helpful! Please feel free to share your feedback in the comments below.
If you still have any issues/queries, please create a ticket at the UV Desk.
I hope this helps. In case of any further queries, contact us at our support mail.
Thanks for paying attention!!