User Guide for Laravel ShipRocket Shipping
Laravel ShipRocket Shipping integrates live courier rates into Bagisto v2.4.x checkout, pushes orders automatically to ShipRocket, and generates shipping labels from the admin panel.
Moreover, this user guide walks you through installation, configuration, and every feature of the ShipRocket shipping method.
User Guide for Laravel ShipRocket Shipping
Features
- Enable/disable per channel: Admin can enable or disable the ShipRocket shipping method per channel specifically so that shipping availability can be controlled by market particularly when managing multiple storefronts.
- Configure title and description: Admin can set the shipping method title and description displayed on the storefront as well as customize the customer-facing text hence the brand message remains consistent.
- Per-courier rates: Every courier ShipRocket can service for the delivery pincode is offered as its own rate at checkout consequently customers see precise pricing for their location therefore they choose the most suitable option.
- Credentials configuration: Admin can configure the ShipRocket credentials and select a pickup location from the account meanwhile managing other store settings additionally other configurations remain accessible.
- Quote couriers: Admin can quote couriers for cash on delivery or for prepaid orders consequently store owners choose the payment model that matches their business specifically Cash on Delivery or Prepaid.
- Default package settings: Admin can set the default package weight and dimensions used when the cart carries none specifically when weight is below the ShipRocket quoting threshold especially for lightweight carts.
- Country restrictions: Shipping can be configured for all supported countries or limited to specific countries likewise other shipping methods offer zone-based restrictions especially when targeting specific markets.
- Automatic order creation: The ShipRocket order is created and its AWB assigned automatically when a shipment is created additionally reducing manual processing time hence staff focus on other tasks.
- Label generation: Admin can generate and download the shipping label for a shipment similarly to other carrier label workflows consequently the process is familiar.
- Searchable AWB: The AWB number is added as a searchable column on the shipments listing particularly helpful for large order histories specifically when searching thousands of records.
Installation
Follow these steps to install the ShipRocket shipping module on your Bagisto v2.4.x project first then begin configuring the method after reviewing the requirements.
Step 1: Extract Package
Unzip the extension package and merge the packages folder into your project root.
Step 2: Register Service Provider
Go to the bootstrap/providers.php file and add the following line under 'providers':
use Webkul\ShipRocketShipping\Providers\ShipRocketShippingServiceProvider;

return [
    ShipRocketShippingServiceProvider::class,
];
Step 3: Update composer.json
Open the composer.json file and add the following line under the psr-4 section:
"Webkul\\ShipRocketShipping\\": "packages/Webkul/ShipRocketShipping/src"
Run Setup Commands
composer dump-autoload
php artisan shiprocket:install
Laravel ShipRocket Shipping Configuration
Navigate to: Admin → Configure → Sales → Shipping Methods → ShipRocket. Configure the following settings especially the core carrier settings specifically the API credentials particularly when securing the account connection.
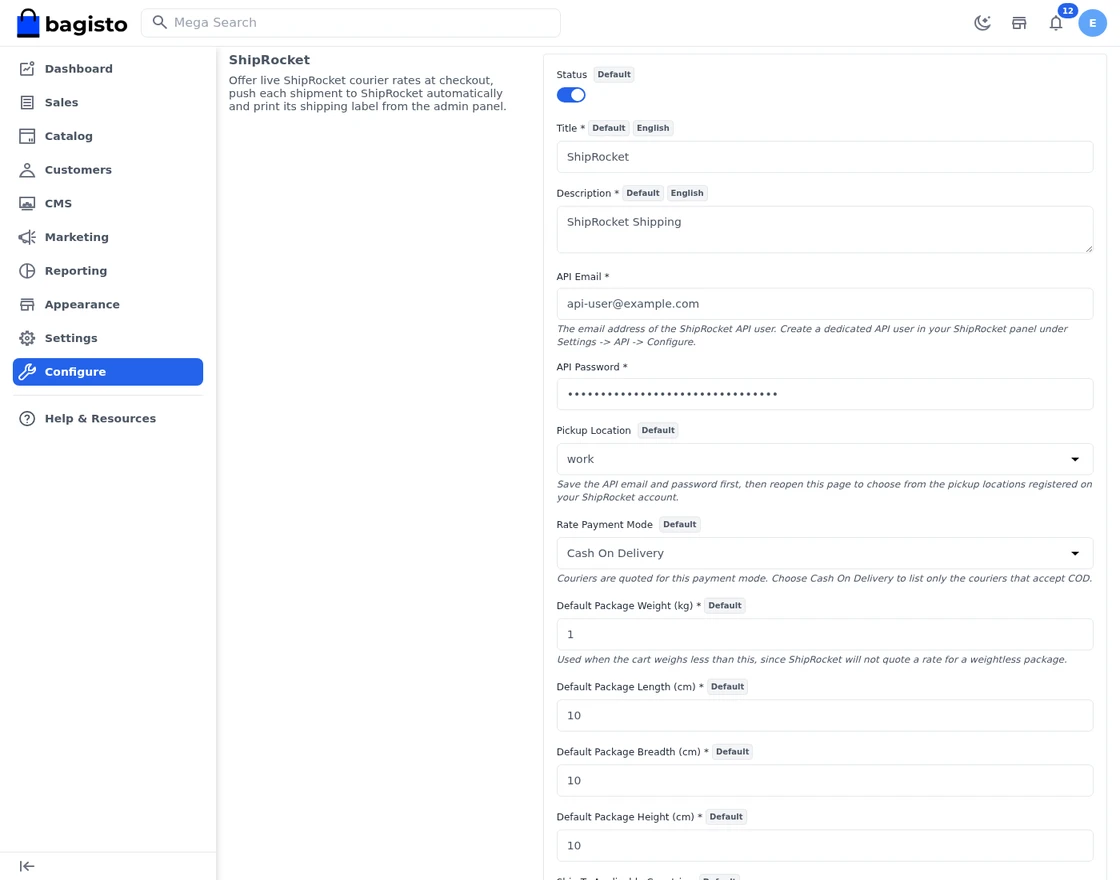
Step-by-Step: Configure ShipRocket Shipping
- Go to Admin → Configure → Sales → Shipping Methods → ShipRocket first.
- Enable the ShipRocket shipping method by toggling the Status switch to
Activethereafter other fields appear. - Enter the Title displayed to customers during checkout specifically the carrier name customers see.
- Add a Description shown below the shipping method at checkout as well for additional customer information.
- Provide the API Email of the ShipRocket API user used for authentication particularly when securing the account connection.
- Provide the API Password of the ShipRocket API user used for authentication similarly to other API-integrated services.
- Note: Save the API Email and Password before selecting a Pickup Location. Reopen the configuration page thereafter to load the available pickup locations from ShipRocket.
- Select the Pickup Location fetched from your ShipRocket account consequently the dropdown populates with available options.
- Choose the Rate Payment Mode:
Cash on DeliveryorPrepaidhence the correct quote mode is selected. - Set the Default Package Weight (kg) used when the cart weighs less than this threshold specifically for packages without a registered weight.
- Specify the Default Package Length, Breadth, Height (cm) sent with the ShipRocket order particularly when dimensional weight matters.
- Select Ship To Applicable Countries:
All Allowed CountriesorSelected Countries Onlylikewise other shipping methods restrict geography. - If restricted mode is enabled, list the Specific Countries where shipping is available especially target market countries.
- Toggle Show Method If Not Applicable to display a message at checkout when no courier can deliver thereby managing customer expectations.
- Enter a Displayed Error Message shown when shipping is unavailable (maximum 255 characters) specifically for the error text limit.
- Click the Save button to persist all configuration thereafter changes take effect.
Currency Configuration
ShipRocket quotes every rate and reads every amount sent to it in Indian Rupees (INR). Consequently unless the channel base currency is already INR, add an exchange rate with INR as the target currency therefore rates convert correctly hence the declared order value is accurate.
Navigate to: Admin → Configure → Currencies → Exchange Rates. Add an exchange rate configuration specifically so that ShipRocket rates convert correctly into your store’s trading currency hence the declared order value is accurate.
Laravel ShipRocket Shipping Checkout

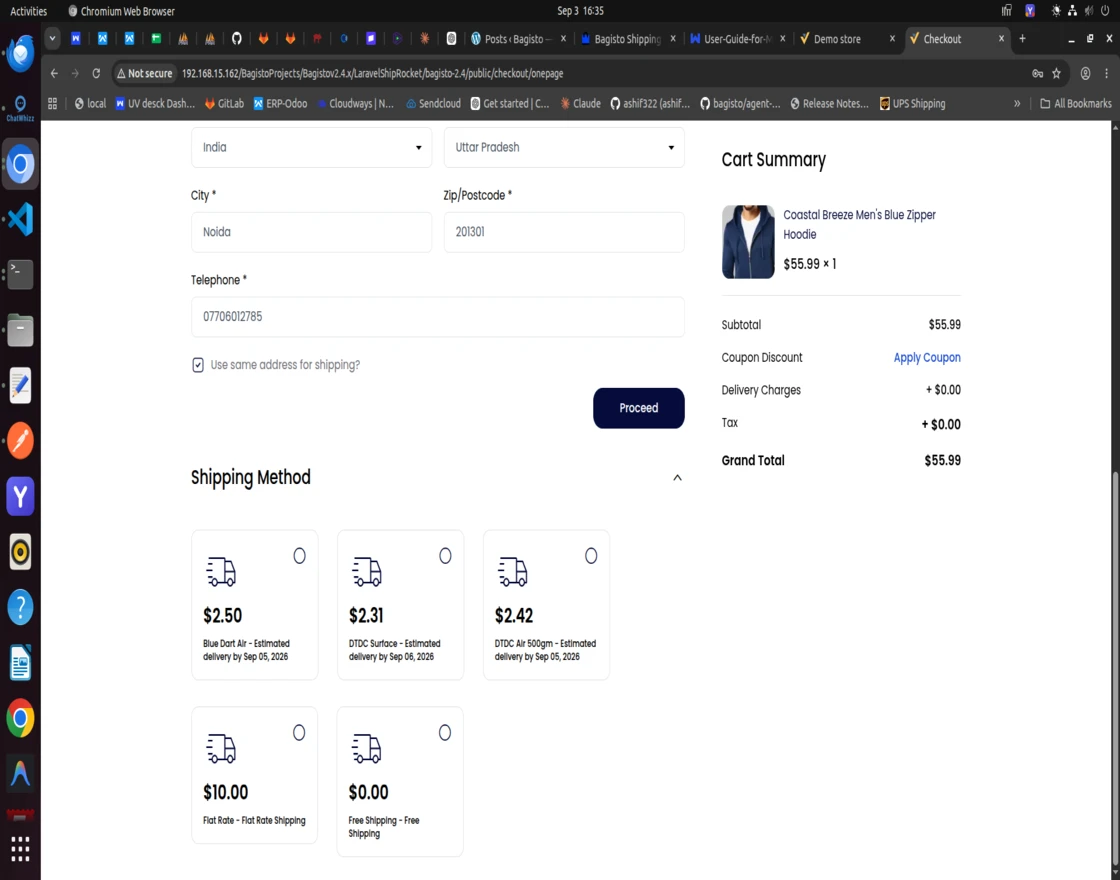
When customers reach the checkout page, the system automatically sends the delivery pincode and cart weight to ShipRocket thereafter retrieving every courier service able to deliver to that address consequently one live shipping rate per courier displays based on pickup location, delivery address, cart weight and Cash on Delivery availability hence the estimated delivery date returns for each courier.
- Customer enters delivery address and pincode at checkout.
- Cart weight is calculated and sent to ShipRocket API.
- ShipRocket returns every courier service able to deliver to the address.
- Live shipping rates per courier are displayed based on pickup location, weight and COD availability.
- Customer selects a courier service and proceeds to payment.
If shipping is unavailable for the selected address, the shipping method is either hidden or shown with an error message, based on the admin configuration therefore the correct fallback behavior activates additionally the error message guides the customer.
Step-by-Step: Checkout Process
- Customer enters delivery address and pincode at checkout.
- Cart weight is calculated and sent to ShipRocket API.
- ShipRocket returns every courier service able to deliver to the address.
- Live shipping rates per courier are displayed based on pickup location, weight and COD availability.
- Customer selects a courier service and proceeds to payment.
Laravel ShipRocket Shipping Shipment Processing
When an administrator creates a shipment, the module automatically sends the shipment information to ShipRocket thereafter the ShipRocket order is created first then the AWB is booked against the exact courier the customer selected at checkout hence the tracking number updates on the order additionally the process completes automatically.
Note: Nothing is sent to ShipRocket when the order is placed instead the push happens on shipment creation because it carries the shipped items and their quantities thereby ensuring accurate tracking.
Step-by-Step: Shipment Processing
- Administrator navigates to Sales → Shipments and views the target shipment.
- Administrator clicks Create Shipment to generate a shipment record.
- Module sends shipment information to ShipRocket API automatically.
- ShipRocket order is created and AWB is booked against the selected courier.
- AWB number is stored as the tracking number of the shipment.
- Customer can see the AWB/tracking number on their order details page.
Shipping Label Generation
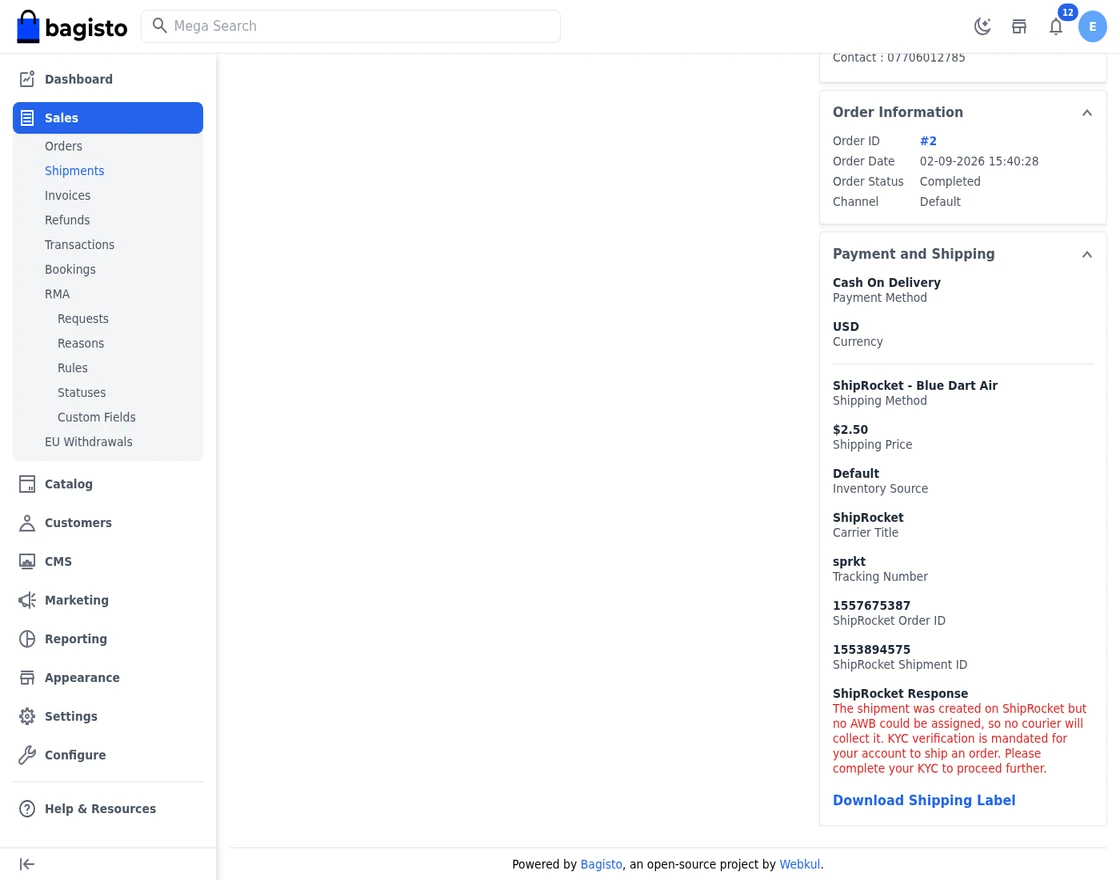
After a shipment has been synchronized with ShipRocket, shipping labels can be generated directly from the application subsequently to label request furthermore the process remains efficient.
Admin Panel: Navigate to: Sales → Shipments → View. If the shipment has been successfully synchronized, a Download Shipping Label option will be available thereafter the label fetches.
The shipment view also shows the ShipRocket Order ID, the ShipRocket Shipment ID and the assigned courier particularly when identifying the correct carrier if ShipRocket refuses the booking, the ShipRocket Response field shows the reason it gave therefore the failure does not have to be traced through the log.
The downloaded label can be printed and attached to the shipment before dispatch hence the package is ready for carrier pickup.
Step-by-Step: Generate Shipping Label
- Navigate to Sales → Shipments → View and open the target shipment.
- Verify the shipment has a valid ShipRocket Shipment ID.
- Click the Download Shipping Label button.
- The label URL is fetched from ShipRocket and the browser redirects to the download location.
- Print the label and attach it to the shipment before dispatch.
Support
So, that was much about the User Guide of Laravel ShipRocket Shipping. For any queries or doubts reach out to us at support@webkul.com.
You can also raise a ticket at our HelpDesk System.
Please explore our Laravel Development Services and Quality Bagisto Extensions.
Tags: Bagisto