User Guide for UnoPim Supplier Data Portal
UnoPim Supplier Data Portal is a web-based Unopim module that allows businesses to collaborate with multiple suppliers and manage product data through a controlled approval process.
Suppliers can log in to the portal to create or import products, which are submitted for review.
Authorized admins or supplier handlers can review, approve, or reject products—individually or in bulk.
Rejected products can be updated and resubmitted by suppliers. Once approved, products are published directly to the UnoPim catalog, ensuring secure, efficient, and centrally controlled supplier data management.
Apart from this, you can also check the UnoPim Maker-Checker Connector to manage product data using a maker–checker approval workflow within UnoPim.
Basic Requirement
- This module works with UnoPim version v1.0.0
- Node and Yarn packages need to be installed.
- For the UnoPim installation, make sure your server should meet these system requirements.
Features
- Dedicated Supplier Login Portal – Suppliers access UnoPim through a separate login URL to create or import product data.
- Supplier-Specific Attribute Family Assignment – Attribute families are assigned at the time of supplier account creation, ensuring suppliers work only with relevant product attributes.
- Review-Based Product Workflow – All suppliers-saved products automatically move to the review stage before appearing in the UnoPim catalog.
- Single and Mass Product Approval – Admins or supplier handler users can approve products individually or in bulk to handle large product volumes efficiently.
- Product Rejection with Comments – Products can be rejected with comments, allowing suppliers to clearly understand required corrections.
- Supplier Dashboard with Status Tracking – Suppliers can track approved, rejected, and pending products along with their assigned attribute family from one dashboard.
- Resubmission Workflow for Rejected Products – Suppliers can update rejected products and resubmit them for review without creating new entries.
- Centralized Supplier Management – Admins and supplier handler users can manage supplier accounts, approvals, and activities from a single control point.
Installation
Manual Installation
Follow the steps below to install the Supplier integration:
1. Merge Extension Files
- Unzip the Supplier extension package.
- Merge the
packagesfolder into your project root directory.
2. Register Service Provider
- Open
config/app.php. - Add the following line to the
providerssection:
Webkul\Supplier\Providers\SupplierServiceProvider::class,
3. Update Composer Autoload
- Open the
composer.jsonfile. - Add the following line under the
psr-4section:
"Webkul\\Supplier\\": "packages/Webkul/Supplier/src"
4. Optimize and Clear Cache
Run the following commands:
composer dump-autoload
php artisan optimize:clear
5. Migrate Supplier Tables
To migrate all Supplier-related tables, run:
php artisan migrate
6. Admin Package Build
Note: The Supplier package icons are provided inside a ZIP file.
- Copy the logo_supplier.svg and dark_logo_supplier.svg from the unopim-supplier-logo folder.
- Ensure to paste these icons in the correct resources/assets/images directory of the Admin package.
- Also need to add the updated logo for the Supplier dashboard pages these logo into the Supplier Assets.
icon-supplier-approved.svgicon-supplier-pending.svgicon-supplier-reject.svg
Build the NPM assets to display the Supplier package logo:
npm install
npm run build
7. Supplier Package Build
Build the NPM assets for the Supplier UI:
npm install
npm run build
Configuration Updates
8. Update audit.php (Unopim Core)
- File Path:
config/audit.php - Update the following configuration block:
'user' => [
    'primary_key' => 'id',
    'foreign_key' => 'user_id',
    'model'       => null,
    'resolver'    => OwenIt\Auditing\Resolvers\UserResolver::class,
    'guards'      => [
        'admin',
        'supplier',
    ],
],
9. Update auth.php (Unopim Core)
- File Path:
config/auth.php - Update the following sections:
10. Publish the Supplier Service Provider
Publish the Supplier UI assets by running:
'guards' => [
    ...
    'supplier' => [
        'driver'   => 'session',
        'provider' => 'suppliers',
    ],
],

'providers' => [
    ...
    'suppliers' => [
        'driver' => 'eloquent',
        'model'  => Webkul\Supplier\Models\Supplier::class,
    ],
],

'passwords' => [
    ...
    'suppliers' => [
        'provider' => 'suppliers',
        'table'    => 'supplier_password_reset',
        'expire'   => 60,
        'throttle' => 60,
    ],
],
php artisan vendor:publish
When prompted, select SupplierServiceProvider from the list.
11. Add the Supplier Middleware Group
To properly handle supplier-specific sessions, CSRF protection, and route bindings, you must register a dedicated middleware group for suppliers.
📍 File Location
app/Http/Kernel.php
Step 1: Register supplier.web Middleware Group
Add the following entry to the $middlewareGroups array:
'supplier.web' => [
    \App\Http\Middleware\EncryptCookies::class,
    \Illuminate\Cookie\Middleware\AddQueuedCookiesToResponse::class,
    \Webkul\Supplier\Http\Middleware\SupplierSession::class,
    \Illuminate\Session\Middleware\StartSession::class,
    \Illuminate\View\Middleware\ShareErrorsFromSession::class,
    \App\Http\Middleware\VerifyCsrfToken::class,
    \Illuminate\Routing\Middleware\SubstituteBindings::class,
],
This middleware group mirrors the default web stack while introducing a dedicated SupplierSession middleware to isolate supplier authentication and session state.
Step 2: Register Supplier Middleware Alias
Next, add the supplier middleware alias to the $middlewareAliases array:
protected $middlewareAliases = [
    // ...
    'supplier.session' => \Webkul\Supplier\Http\Middleware\SupplierSession::class,
];
This alias allows the SupplierSession middleware to be reused independently when needed.
Notes
- The
supplier.webgroup must be used for all supplier routes - This setup ensures:
- Isolated supplier sessions
- Proper CSRF handling
- Clean separation from admin and customer contexts
How to Use the UnoPim Supplier Data Portal
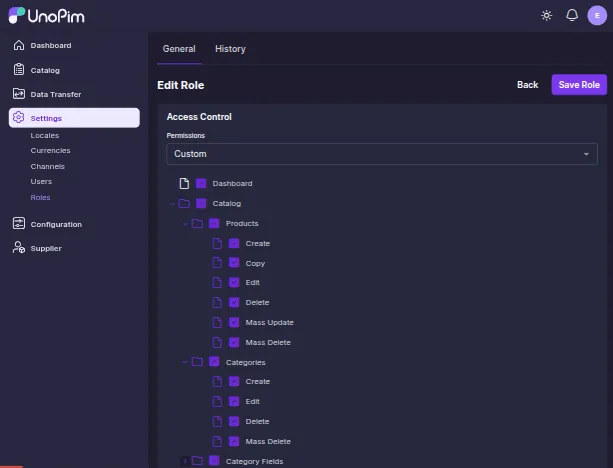
Step 1: Create a Supplier Handler Role
Navigate to Settings → Roles → Create Role and create a new role based on your business needs.
Assign Custom permissions to allow the user to:
- Create, edit, and delete supplier accounts
- Access the supplier portal management
- Approve, Mass Apporve or reject supplier products
- Access the product approval Page
- Access the main UnoPim dashboard
- Access the Catalog.
Save the role after assigning the required permissions.
You can manage your Supplier as a super admin too.


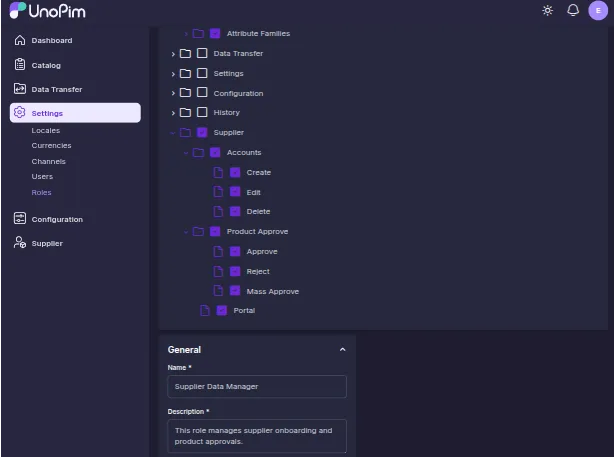
Step 2: Assign the Role to a Handler Unopim User
Create a new user or update an existing user and assign the newly created Supplier Data Manager role.
This user will be responsible for managing suppliers and reviewing product data.

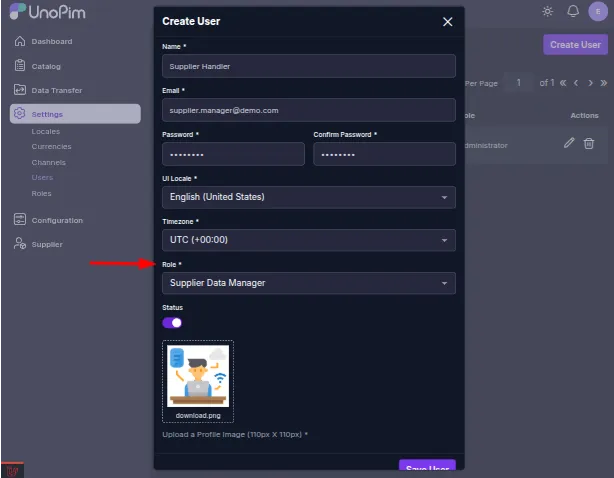
The images display all UnoPim users who have been granted permissions to manage suppliers.


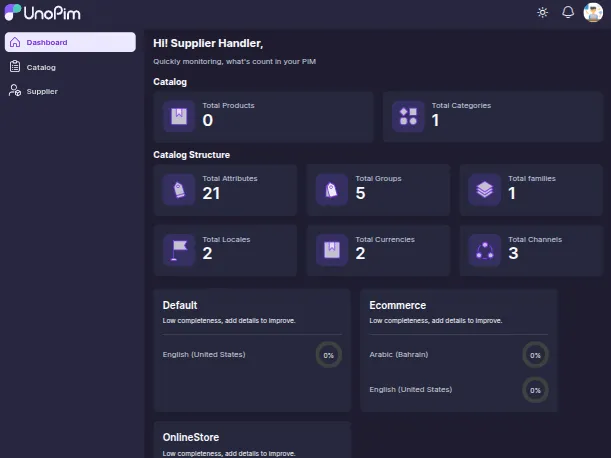
Step 3: Log In as Supplier Handler
Log in using the unopim supplier handler user credentials.
Once logged in, the handler will have access to supplier management, product approval, and dashboard views.

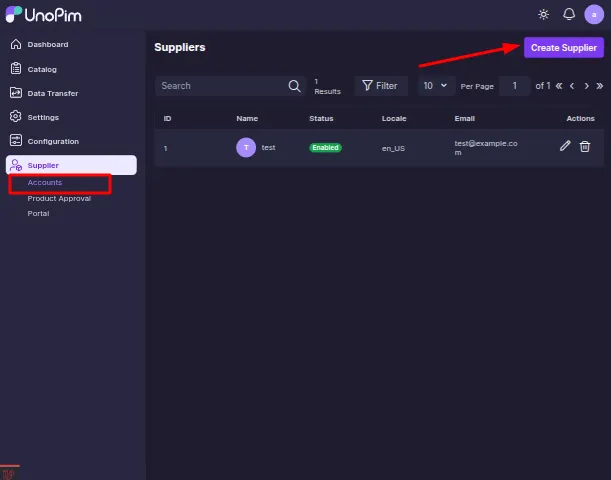
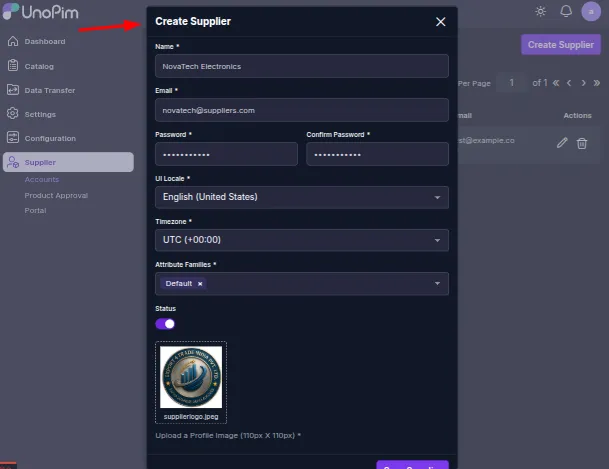
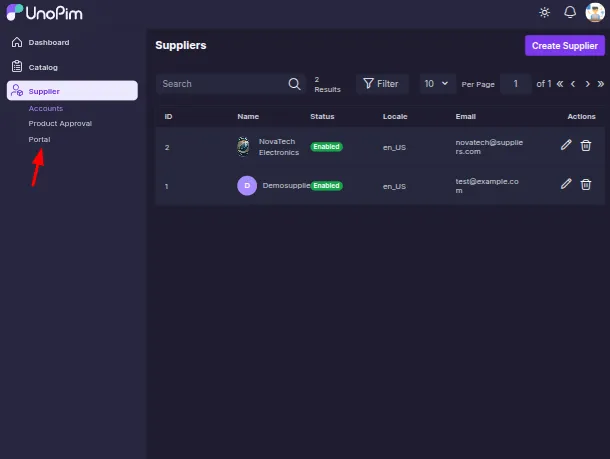
Step 4: Create Supplier Accounts
Navigate to Supplier → Accounts → Create Supplier to create a new supplier.
Provide the required supplier details, assign an attribute family, and enable the supplier account.
Repeat these steps to create multiple supplier accounts as needed.


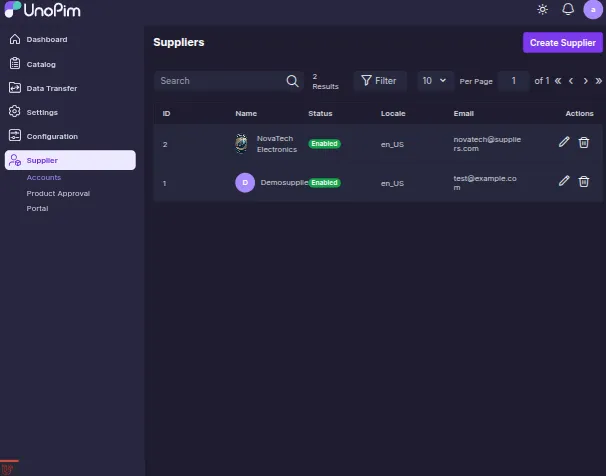
The image above illustrates the supplier account listing in UnoPim.
Step 5: Share Supplier Login Credentials
After creating the supplier account, share the supplier login URL, username, and password with the supplier.
Suppliers will use these credentials to access the Supplier Data Portal.


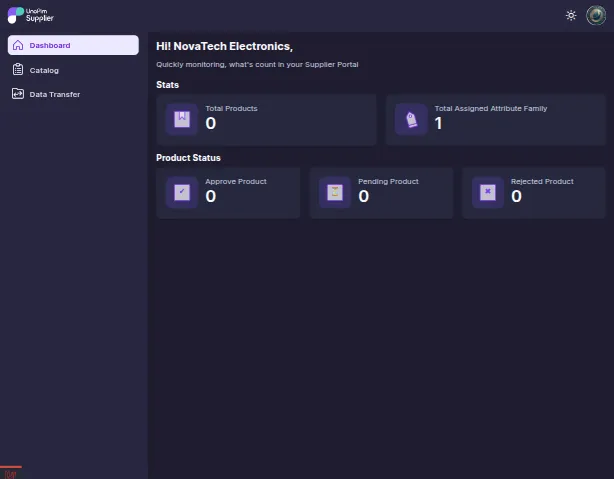
Step 6: Supplier Login and Dashboard View
When a supplier logs in for the first time, the dashboard will display:
- Total products: 0
- Approved products: 0
- Pending products: 0
- Rejected products: 0
- Assigned attribute family (as configured)
This dashboard updates automatically as product status changes.

Step 7: Create or Import Products as Supplier
Suppliers can create products by clicking Create Product for single entries.

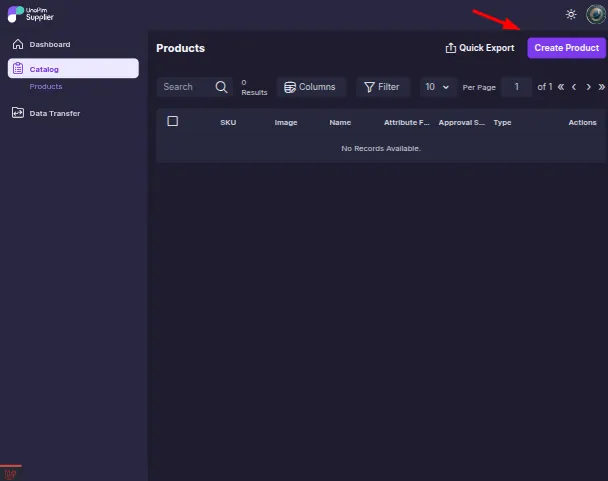

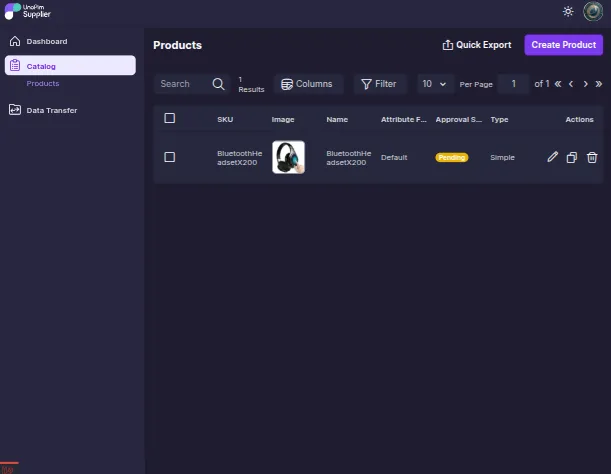

To submit multiple products, suppliers can run a product import job and upload an XLS, XLSX, or CSV file and execute the import job.
All imported products will be moved to the review stage.
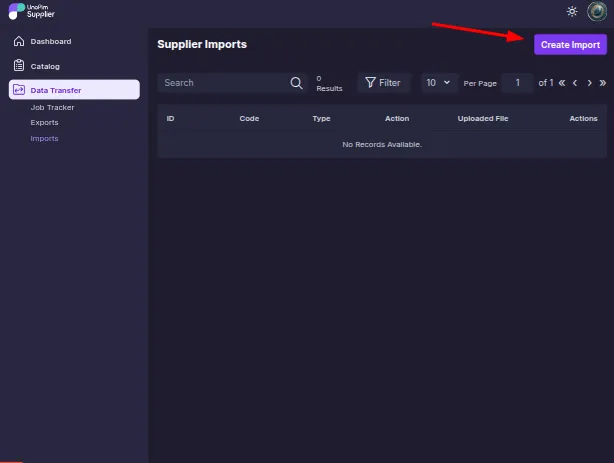
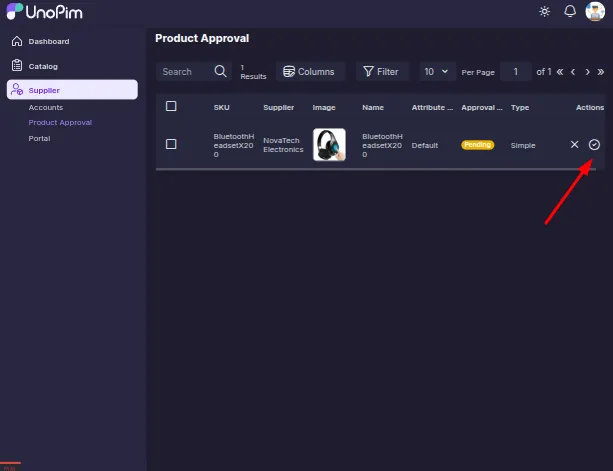
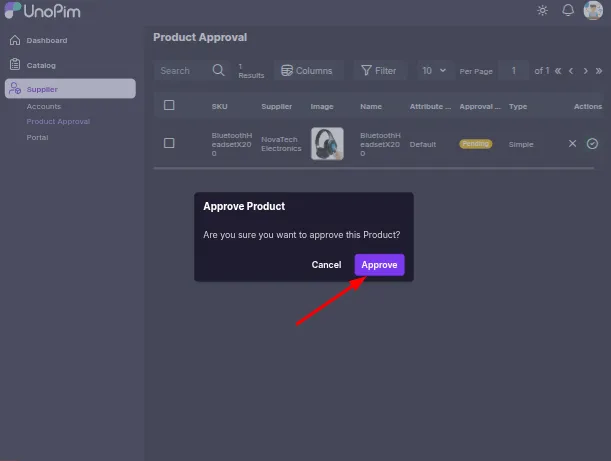
Step 8: Review and Approve Products
The supplier handler or admin navigates to the Product Approval Page to review submitted products.
Products can be approved:
- One by one
- By opening the edit view and verifying details
- Using mass approval for multiple products


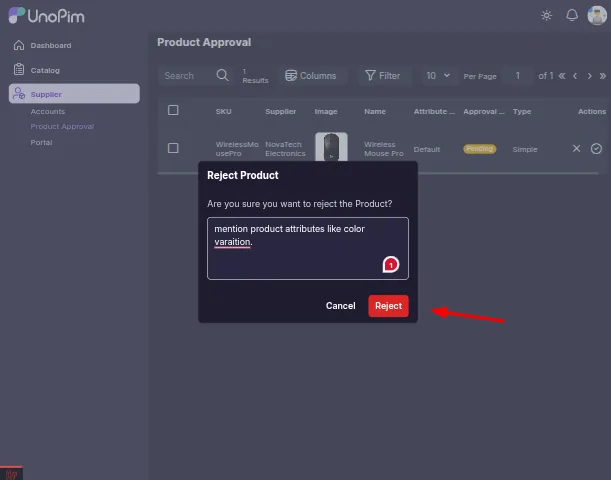
Step 9: Reject Products with Comments
If a product does not meet requirements, it can be rejected with comments.
The supplier will see the rejected product and check the comments on the product edit page.
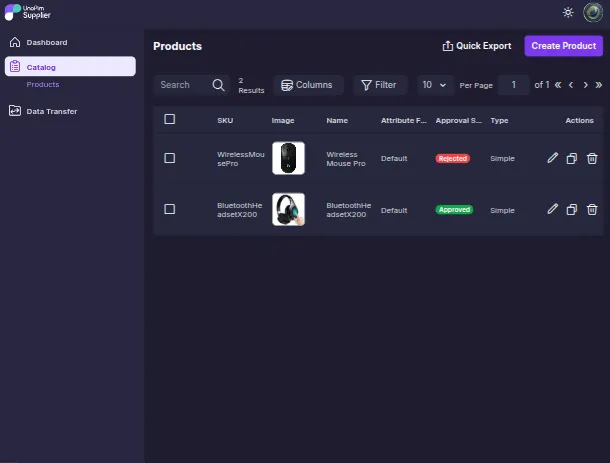
Step 10: Resubmission and Final Approval
Suppliers can update rejected products and resubmit them for review.
Once approved by the handler or admin, the product appears on the UnoPim Catalog Product Page.
The supplier dashboard updates automatically to reflect the new product status. Also product status will be updated as per the action performed by admin/handler.


Support
So that is all for the Unopim Suppliers Integration.
Moreover, If you have any queries or suggestions, then feel free to add a ticket at our HelpDesk system or reach out to us at support@webkul.com.