PrestaShop WhatsApp Business Order Notifications | Sales Campaign {User Guide}
PrestaShop WhatsApp Business Order Notifications:
Notify or alert your customers of time-sensitive information, such as Order confirmation, Order status update, and Tracking number added to an order, by sending them notifications on WhatsApp.
In addition to it, you can create WhatsApp campaigns and send them to the customers.
Note: PrestaShop WhatsApp Business Order Notifications module is compatible with PrestaShop multi-store feature.
Features of PrestaShop WhatsApp Business Order Notifications
Let’s look closer at WhatsApp Business Order Notifications module features:
- Notify customers about their order confirmation, order status, order’s tracking number directly on WhatsApp.
- Select the order status to which the notification will be sent to the customers.
- Create message templates for each event (order confirm, order status update, cart abandoned, tracking number added to order and OTP) separately.
- Integrate module with AI like Anthropic (Claude), OpenAI, and Google Gemini to improve WhatsApp text message templates.
- Allow the admin to receive WhatsApp alert when receiving a new order.
- Allow customers to add a WhatsApp number during registration to receive notifications.
- Verify the WhatsApp number during customer registration.
- Create campaigns for marketing purposes and send them to your customers on WhatsApp.
- Add category link to campaign.
- Delete the campaign from Meta on deleting from module’s end.
- View the list of customers who registered to receive the WhatsApp notification.
- Add interactive and more appealing buttons to your campaign messages. These buttons can be of 2 types:
– CTA
– Quick Reply - Automate responses to customer queries.
- Access Message Statistics.
Module Installation
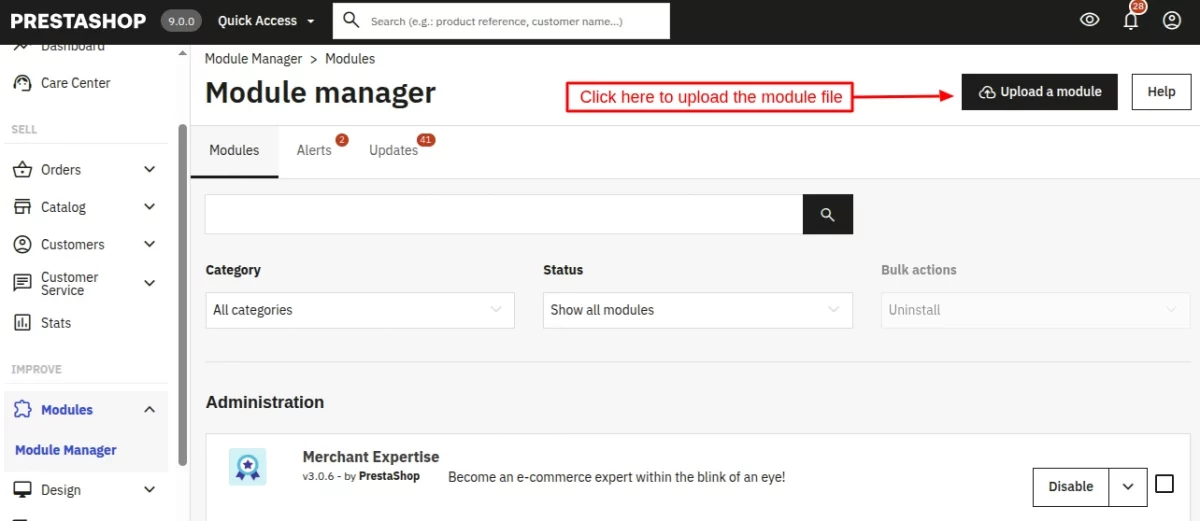
Firstly, go to the module manager in the back office and click on ‘upload a module’.
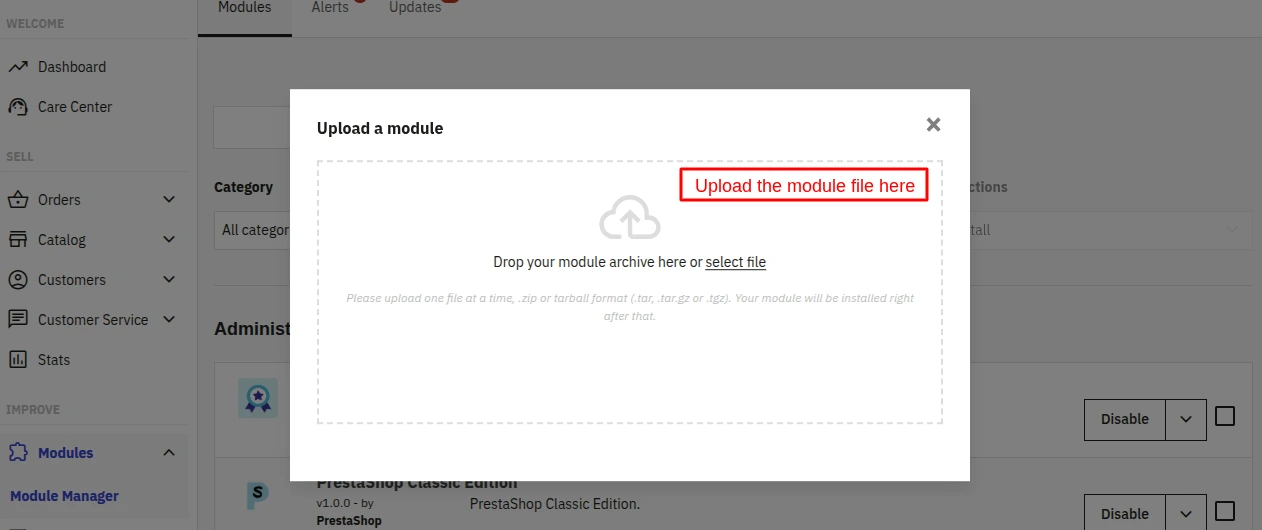
- After that, drag and drop the module file or select the file from the system.
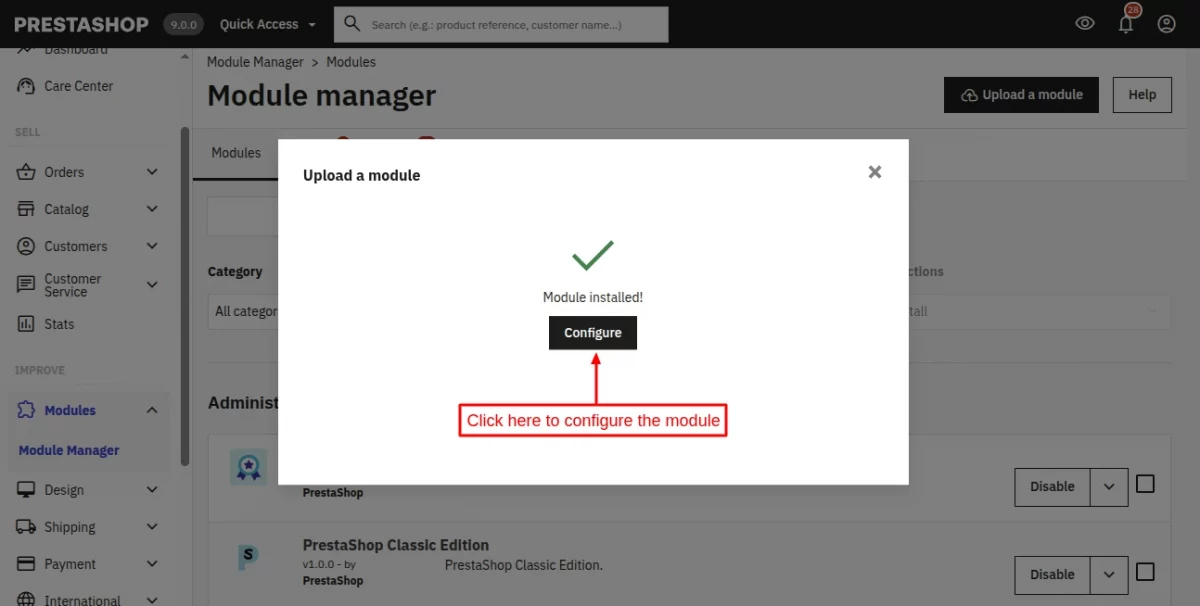
- In this way, the module installation will be successful.



Or, you can also configure the module from the module list page.

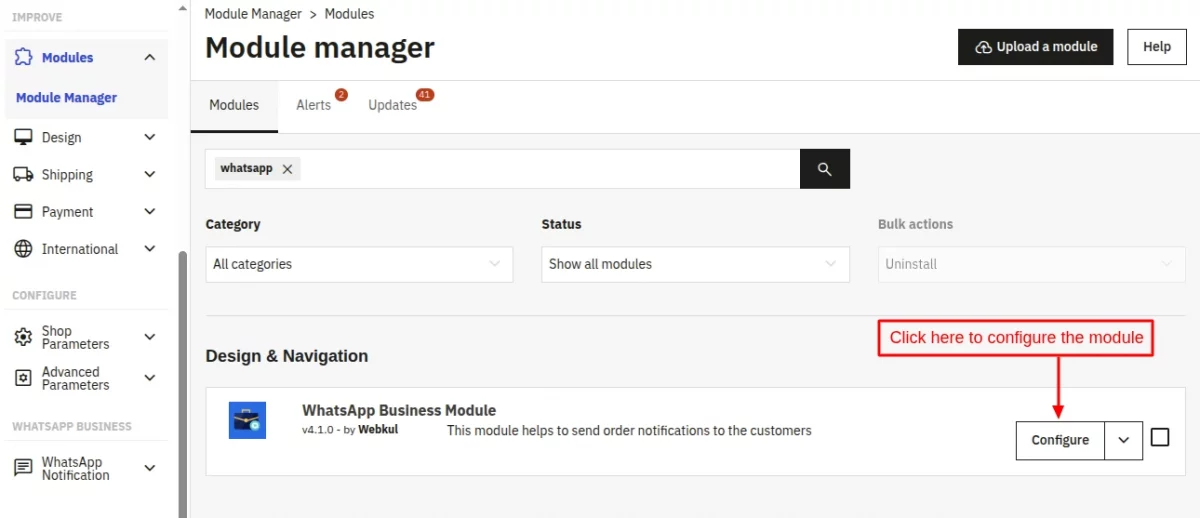
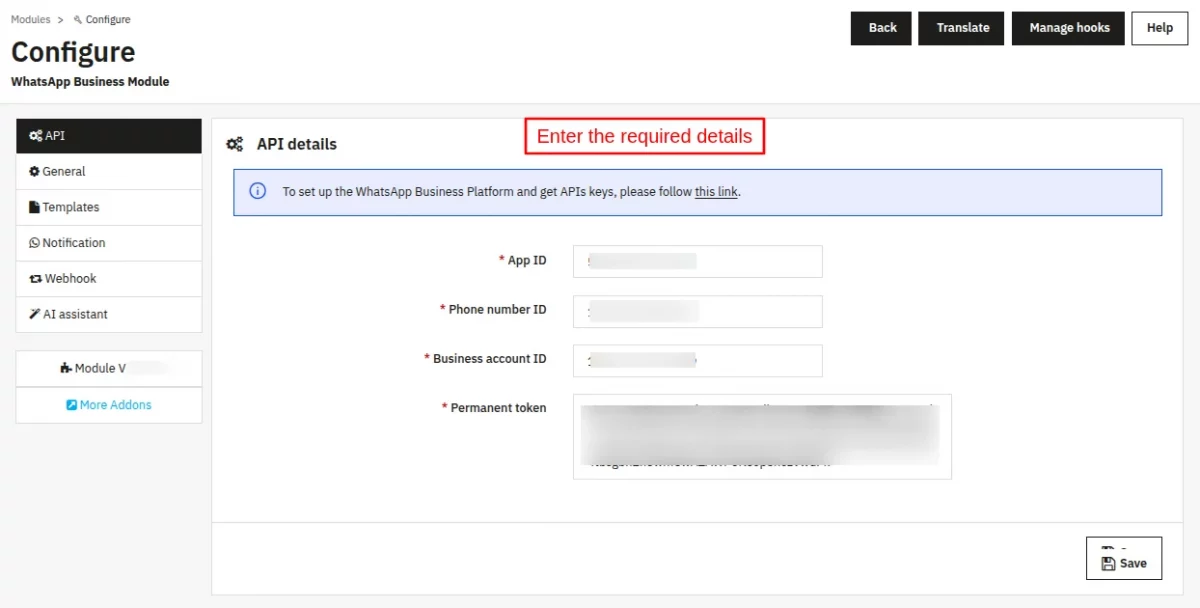
In order to configure this module, you must have the following details:
- App ID
- Phone Number ID
- Business Account ID
- Permanent Token

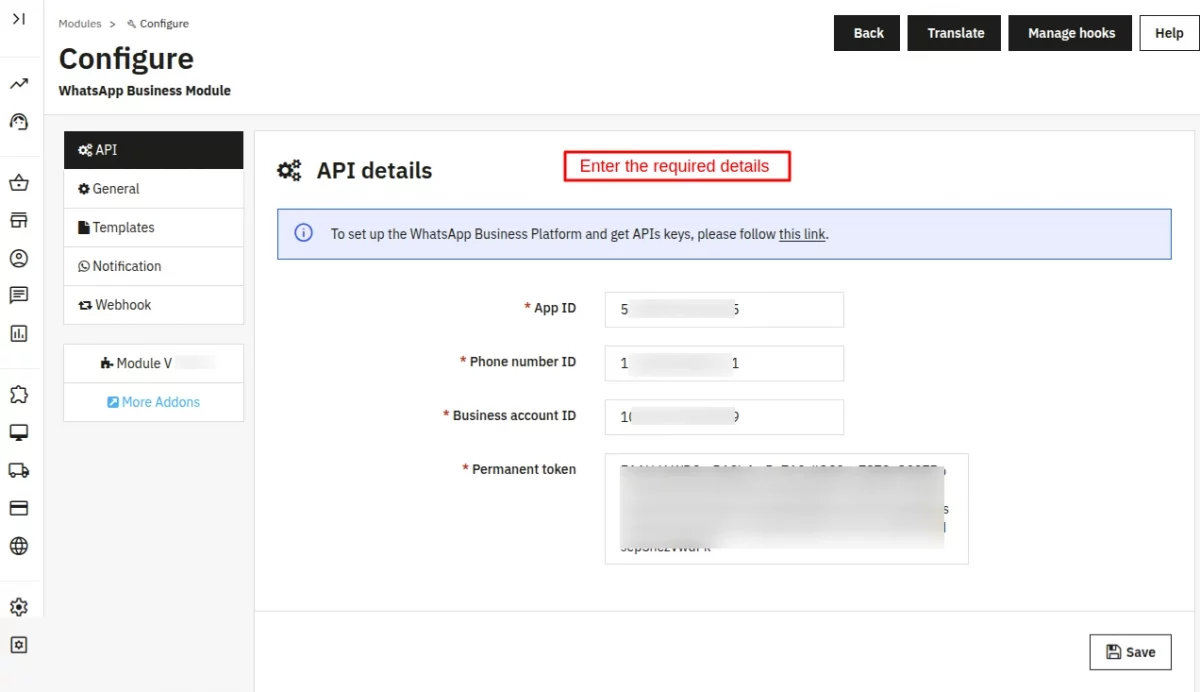
How to get the required Ids?
To get the API keys & add new apps to the account, you need to create a developer account on Facebook.
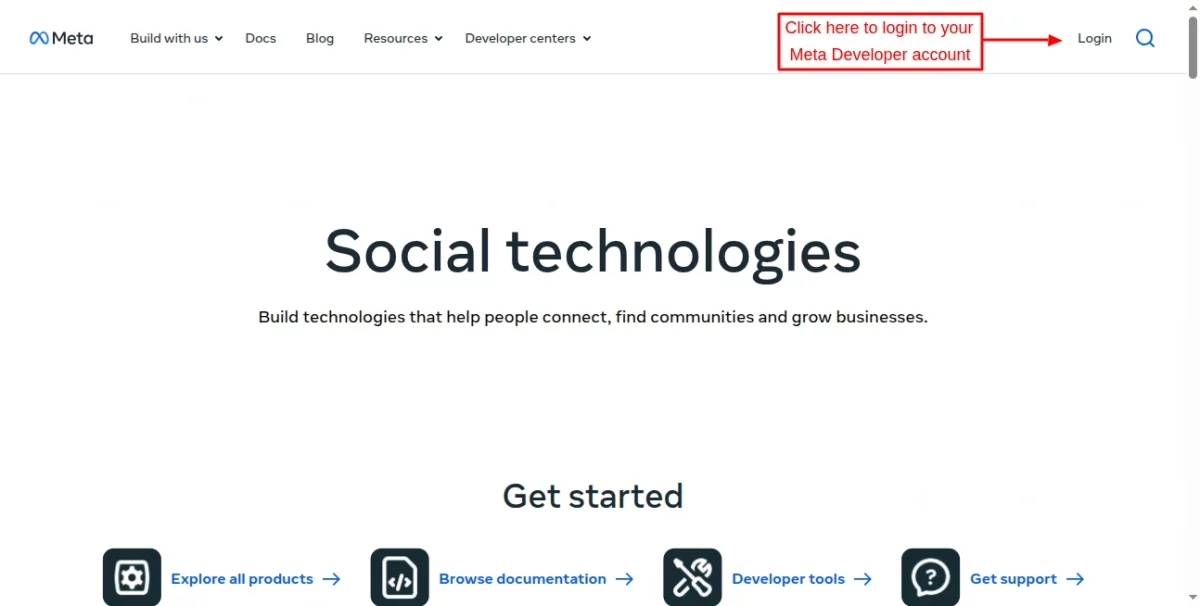
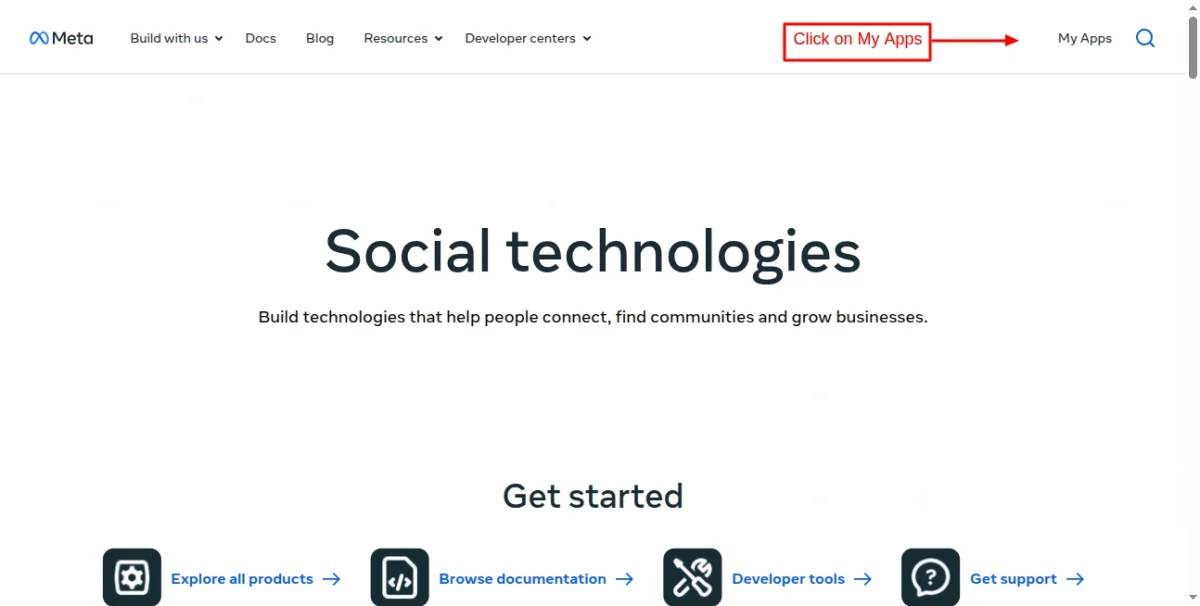
After logging in to the account, go to “My Apps” section.
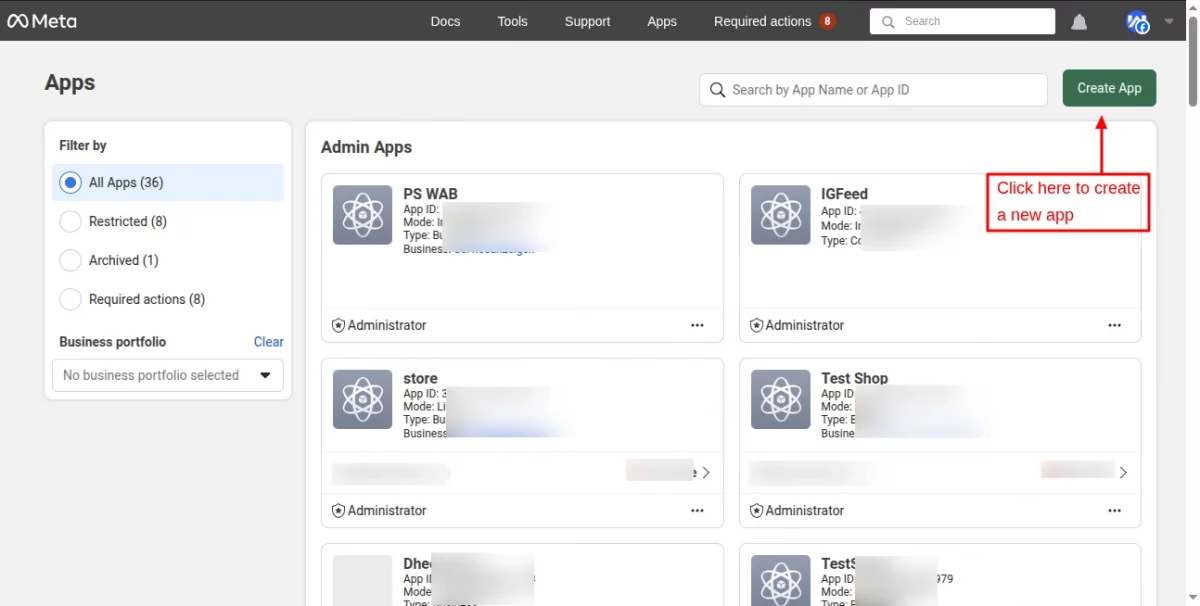
Click on the “Create App” button to create a new app.
Now, enter the “App name” and “App contact email” to create an app.

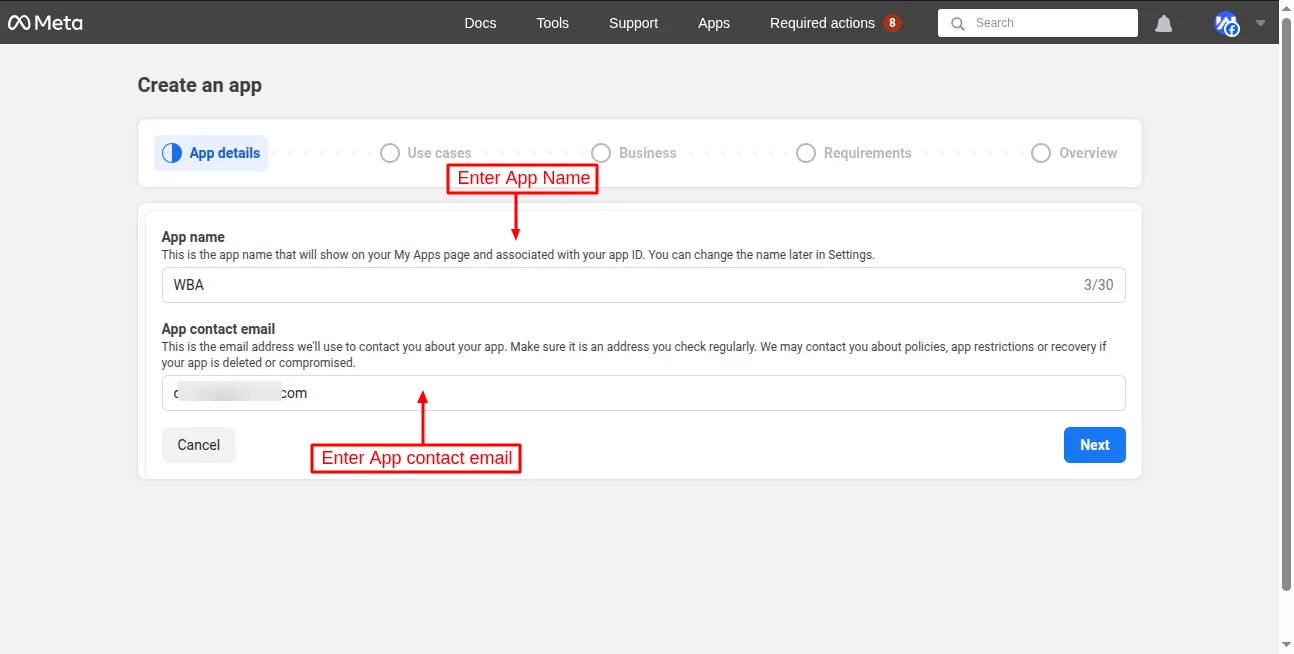
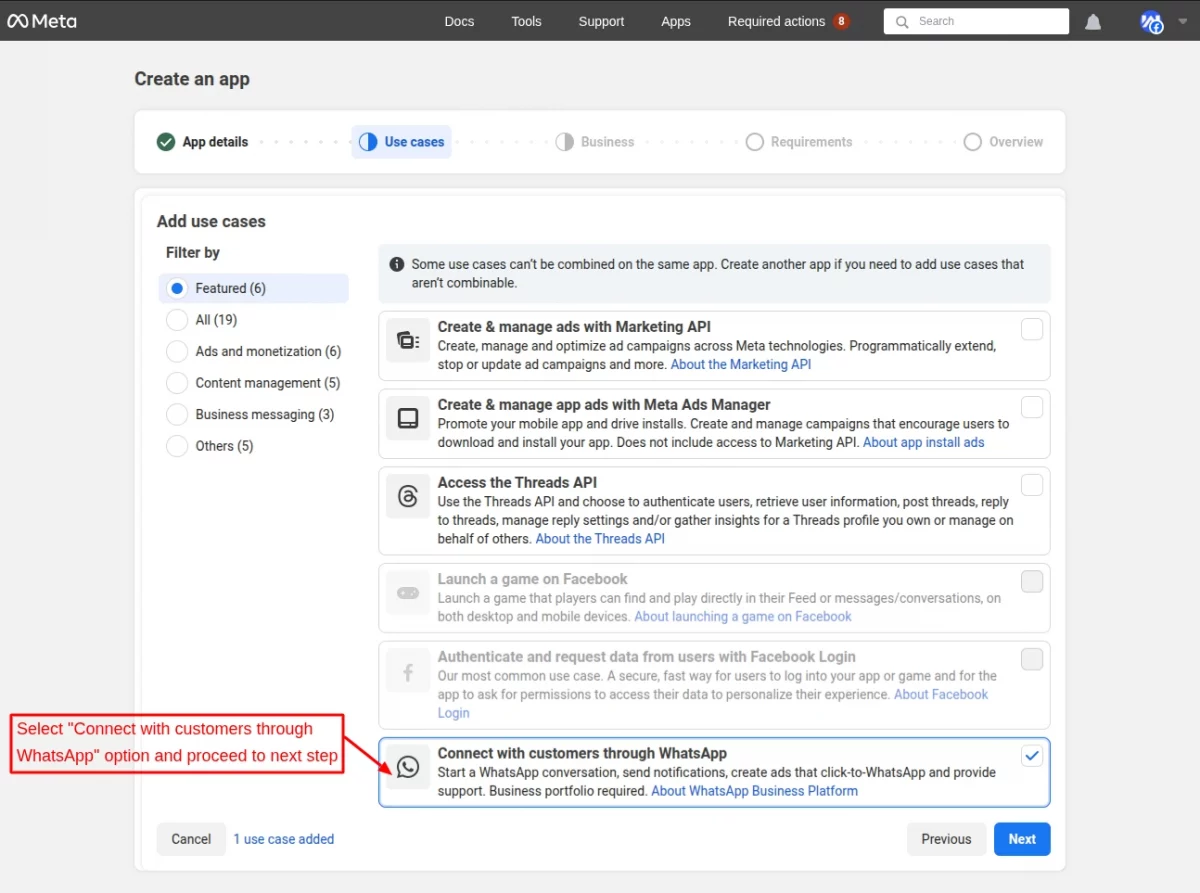
After entering the app name and contact email to create the App, you need to select the user case of the app.
Here, you have to select “Contact with customers through WhatsApp” and proceed to the next step.

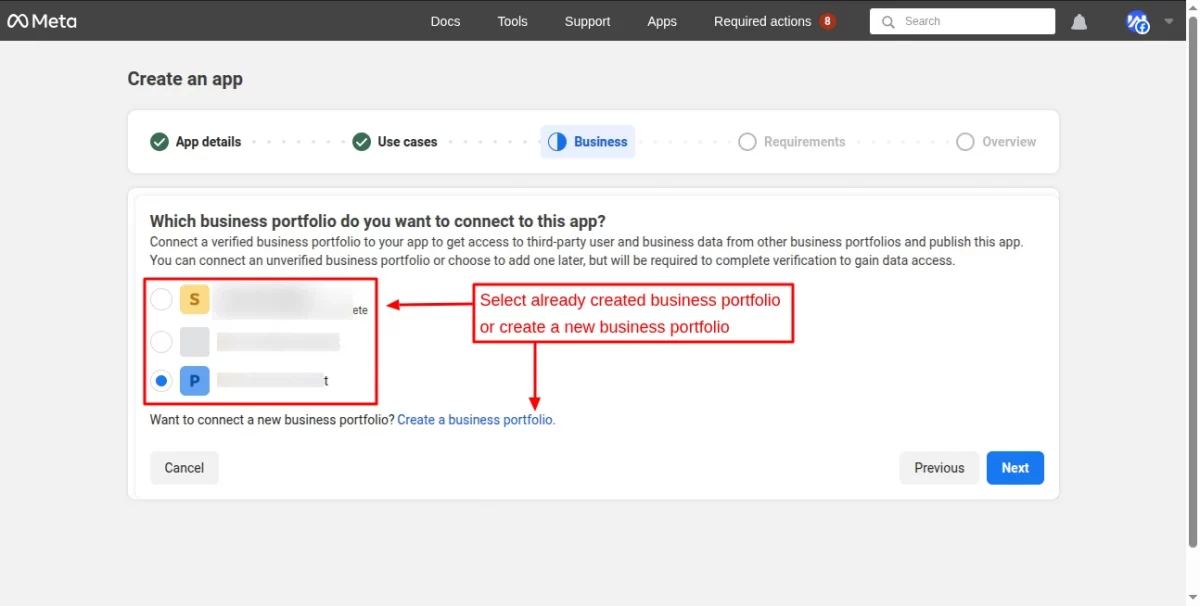
Now in the next step, you need to select the business portfolio for which you’re creating the app, or you can create a new business profile for creating the app.
Create a business portfolio:
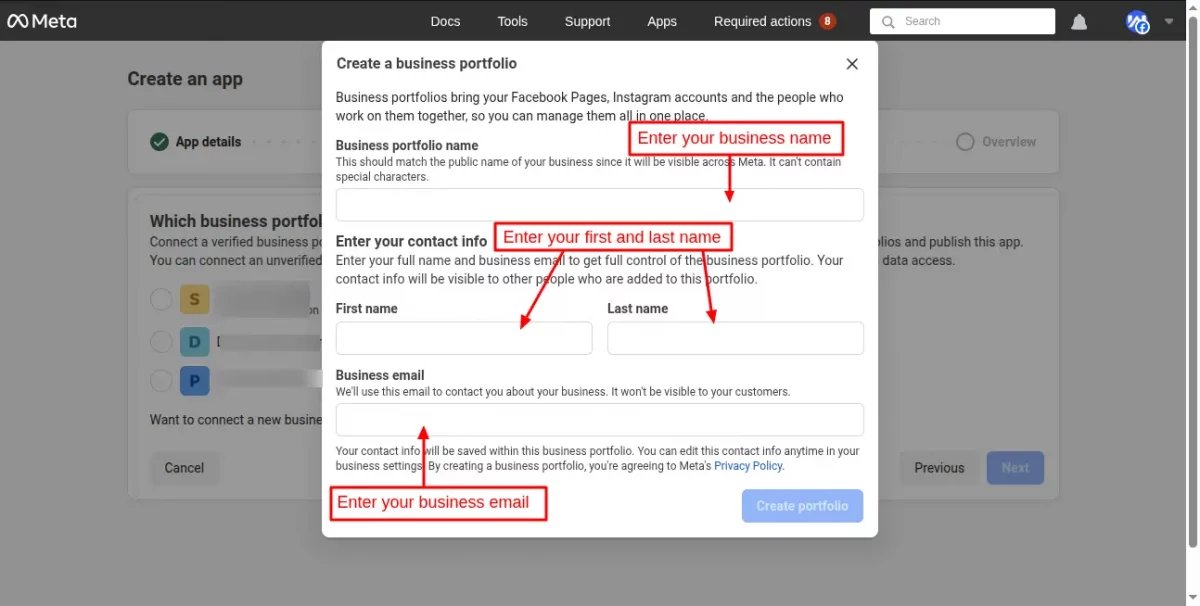
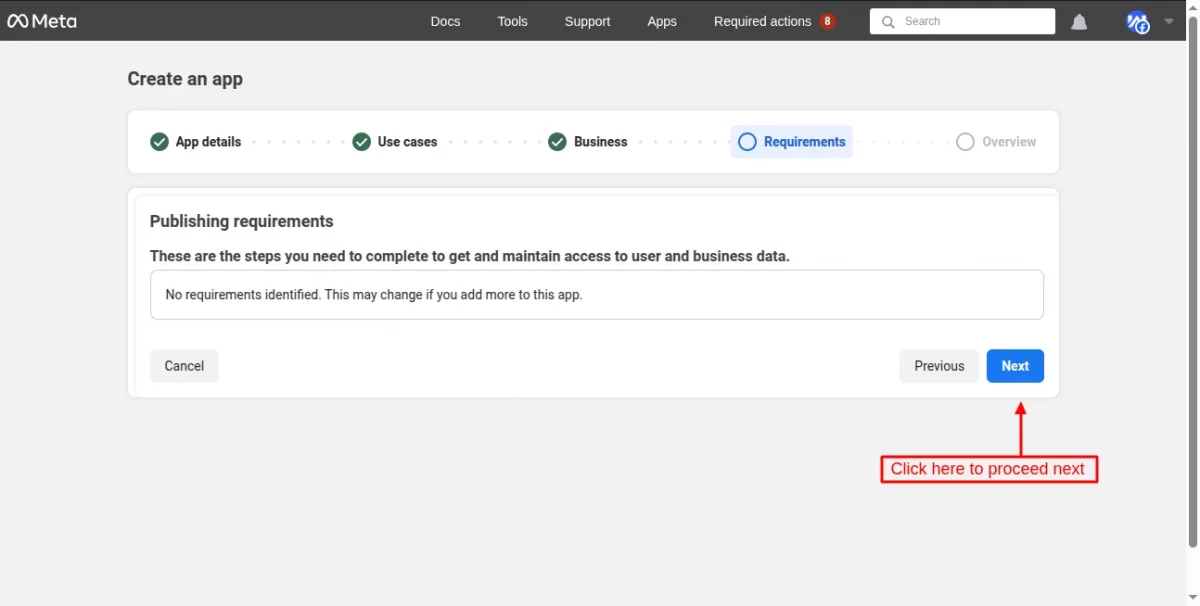
After selecting/creating business portfolio, you can proceed to next step “Requirements”.
Now, you can overview the details of the app that you are going to create.

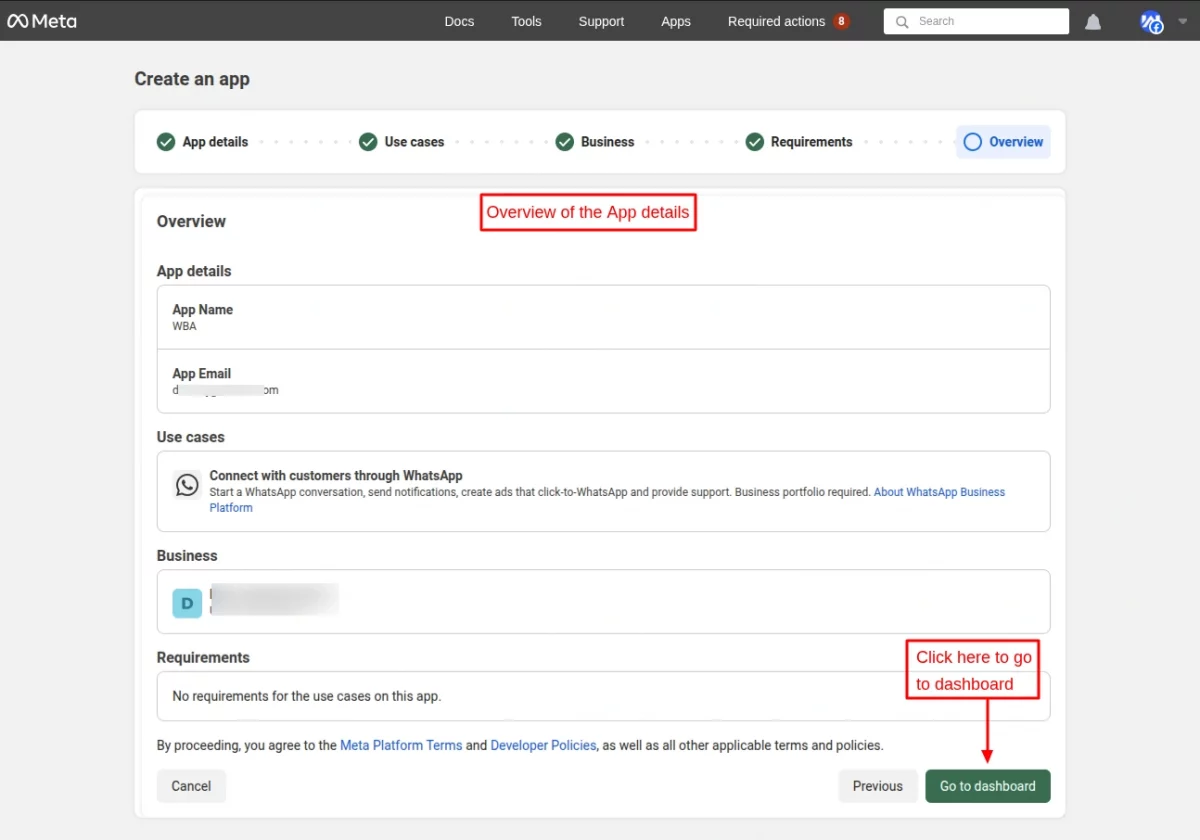
After verifying all the details and clicking the “Go to dashboard” button, you’ll be redirected to the App dashboard, and click on the “Use Cases” tab and then click on the “Configure” button.

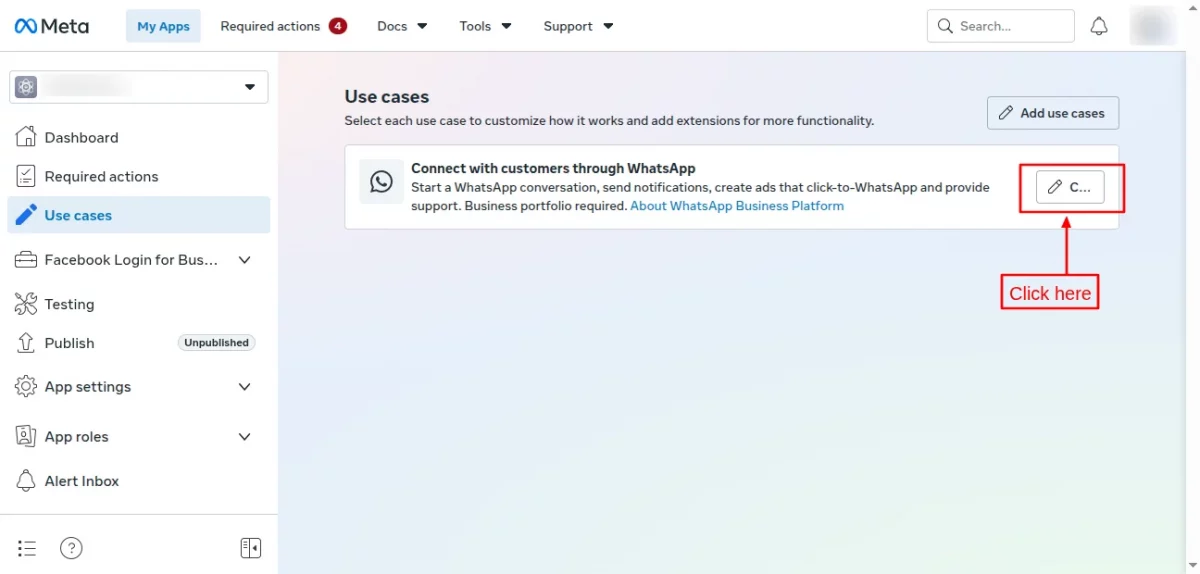
After clicking on the configure button, the user will be redirected to the App’s overview page, and then the user has to click on the “Step 1. Try it out” option.

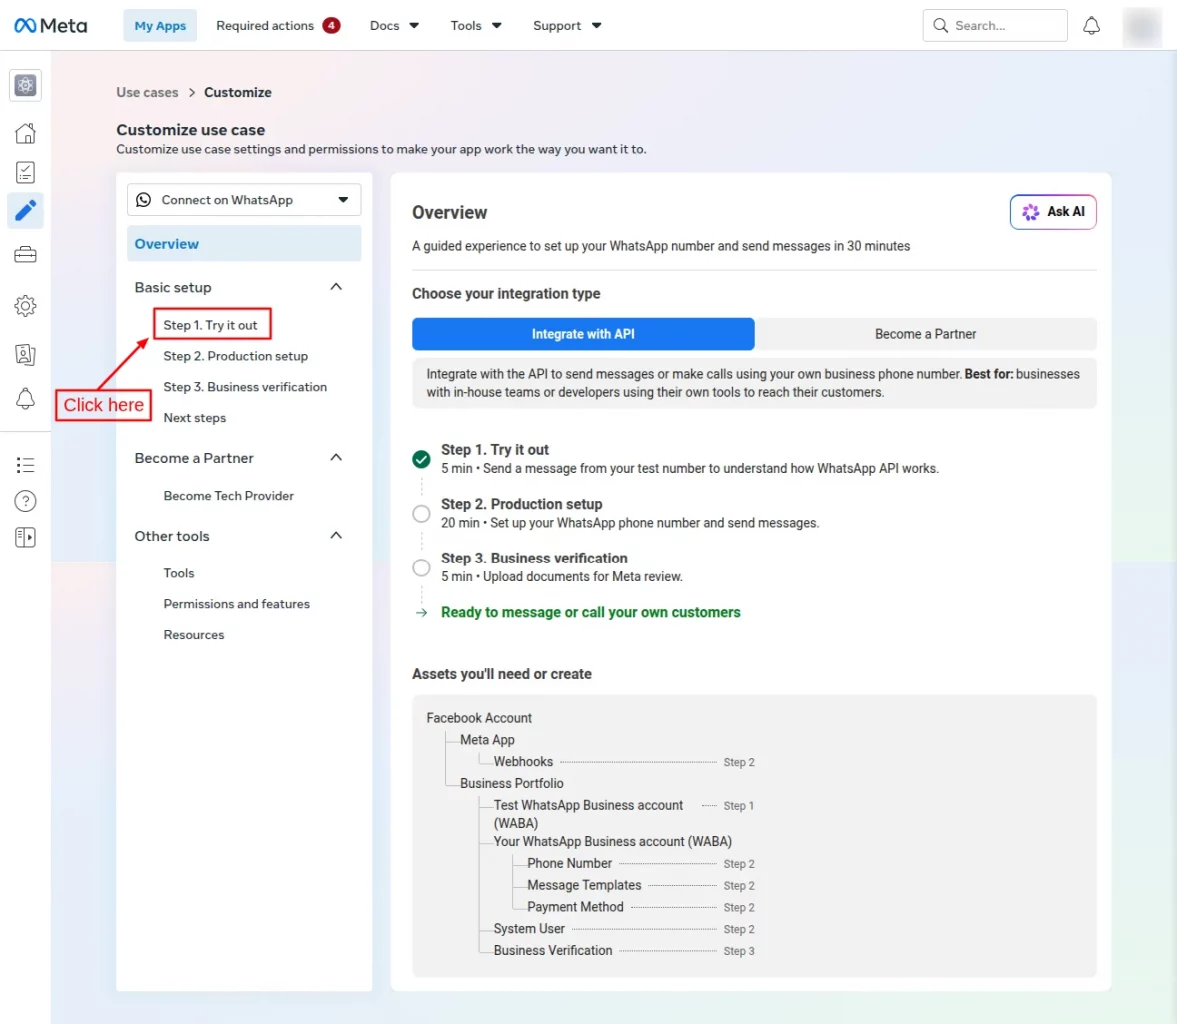
Step 1. Try it out:
Now, the user can generate the access token, enter the recipient WhatsApp number to send a test message.

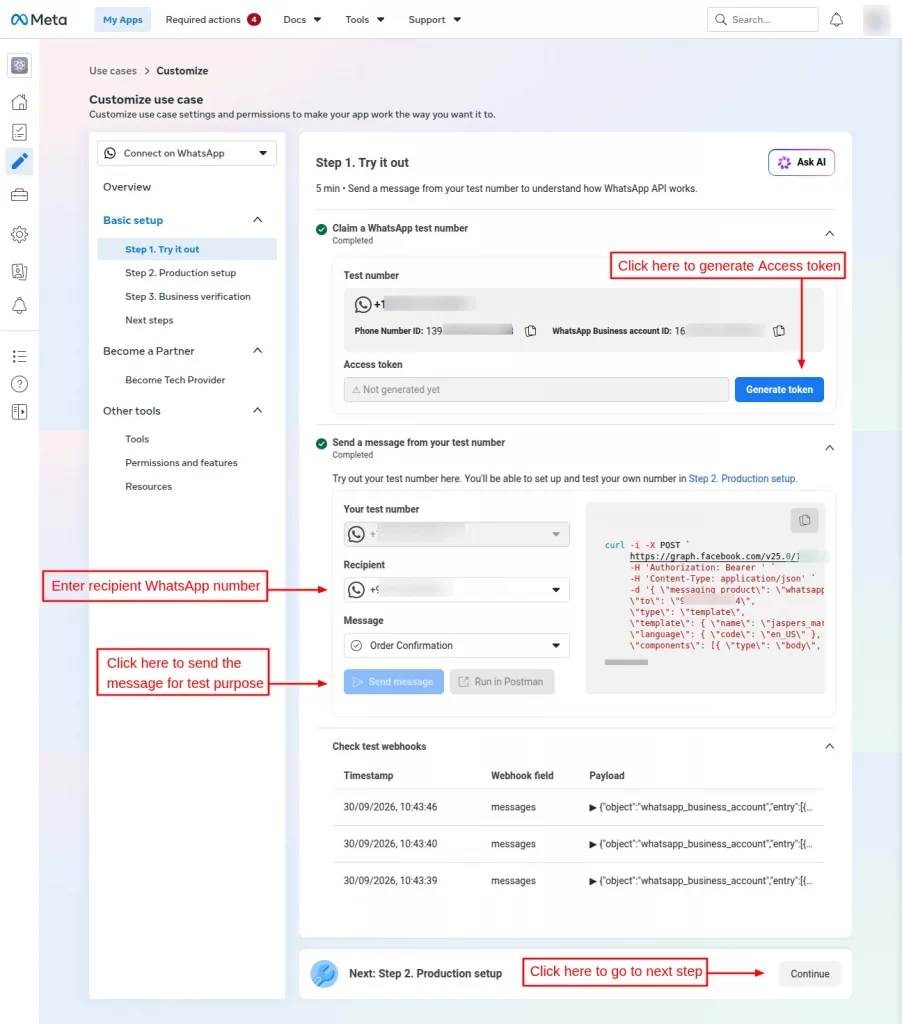
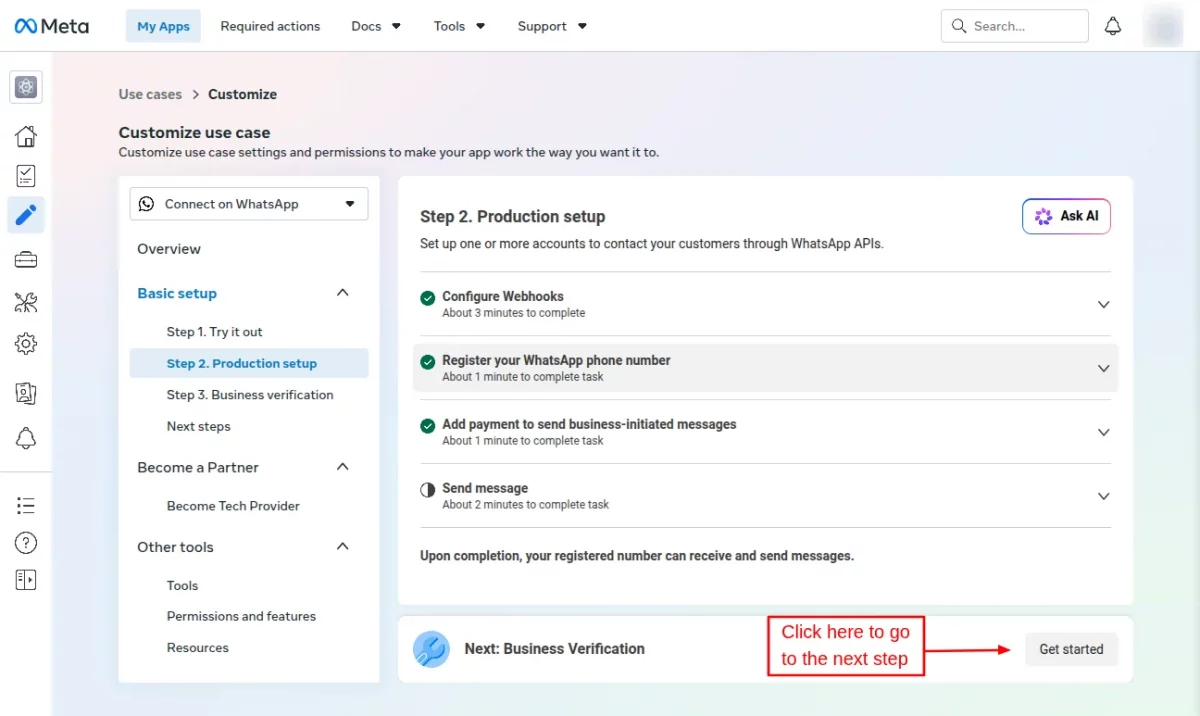
Step 2. Production setup
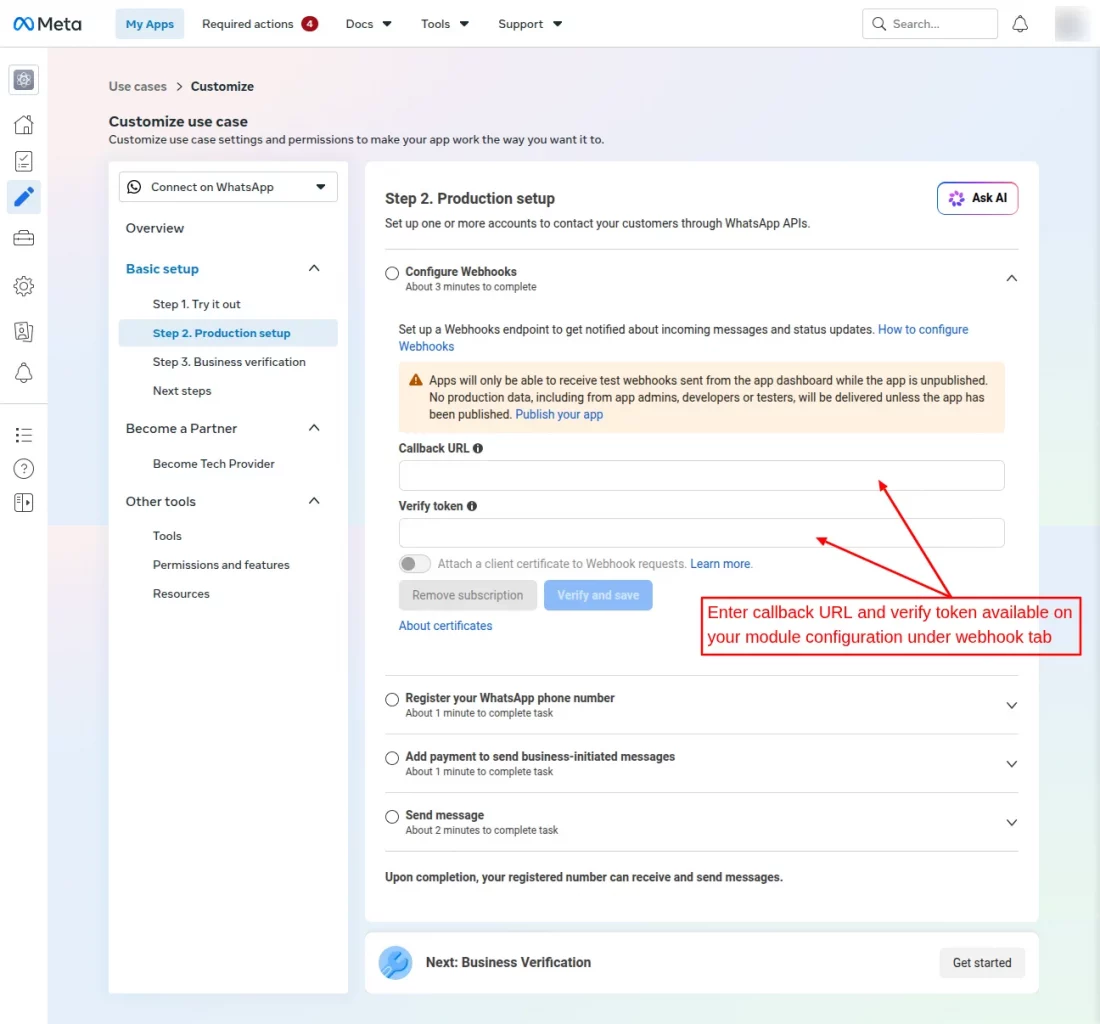
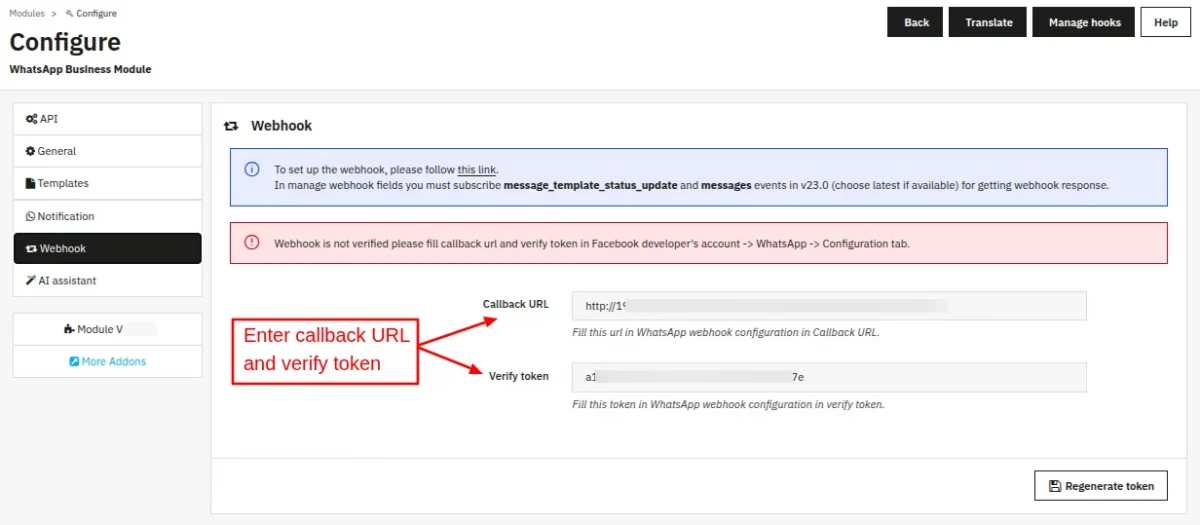
After clicking on the “Continue” button, the user will be redirected to Step 2. Production setup page, where the user has to enter the Callback URL and Verify token which is already available on the

Now, after verifying the callback URL and token, you have to select “WhatsApp Business Account” as product and subscribe message_template_status_update and messages events in v24.0.
Note: API version gets updated from time to time. You can use the latest version.

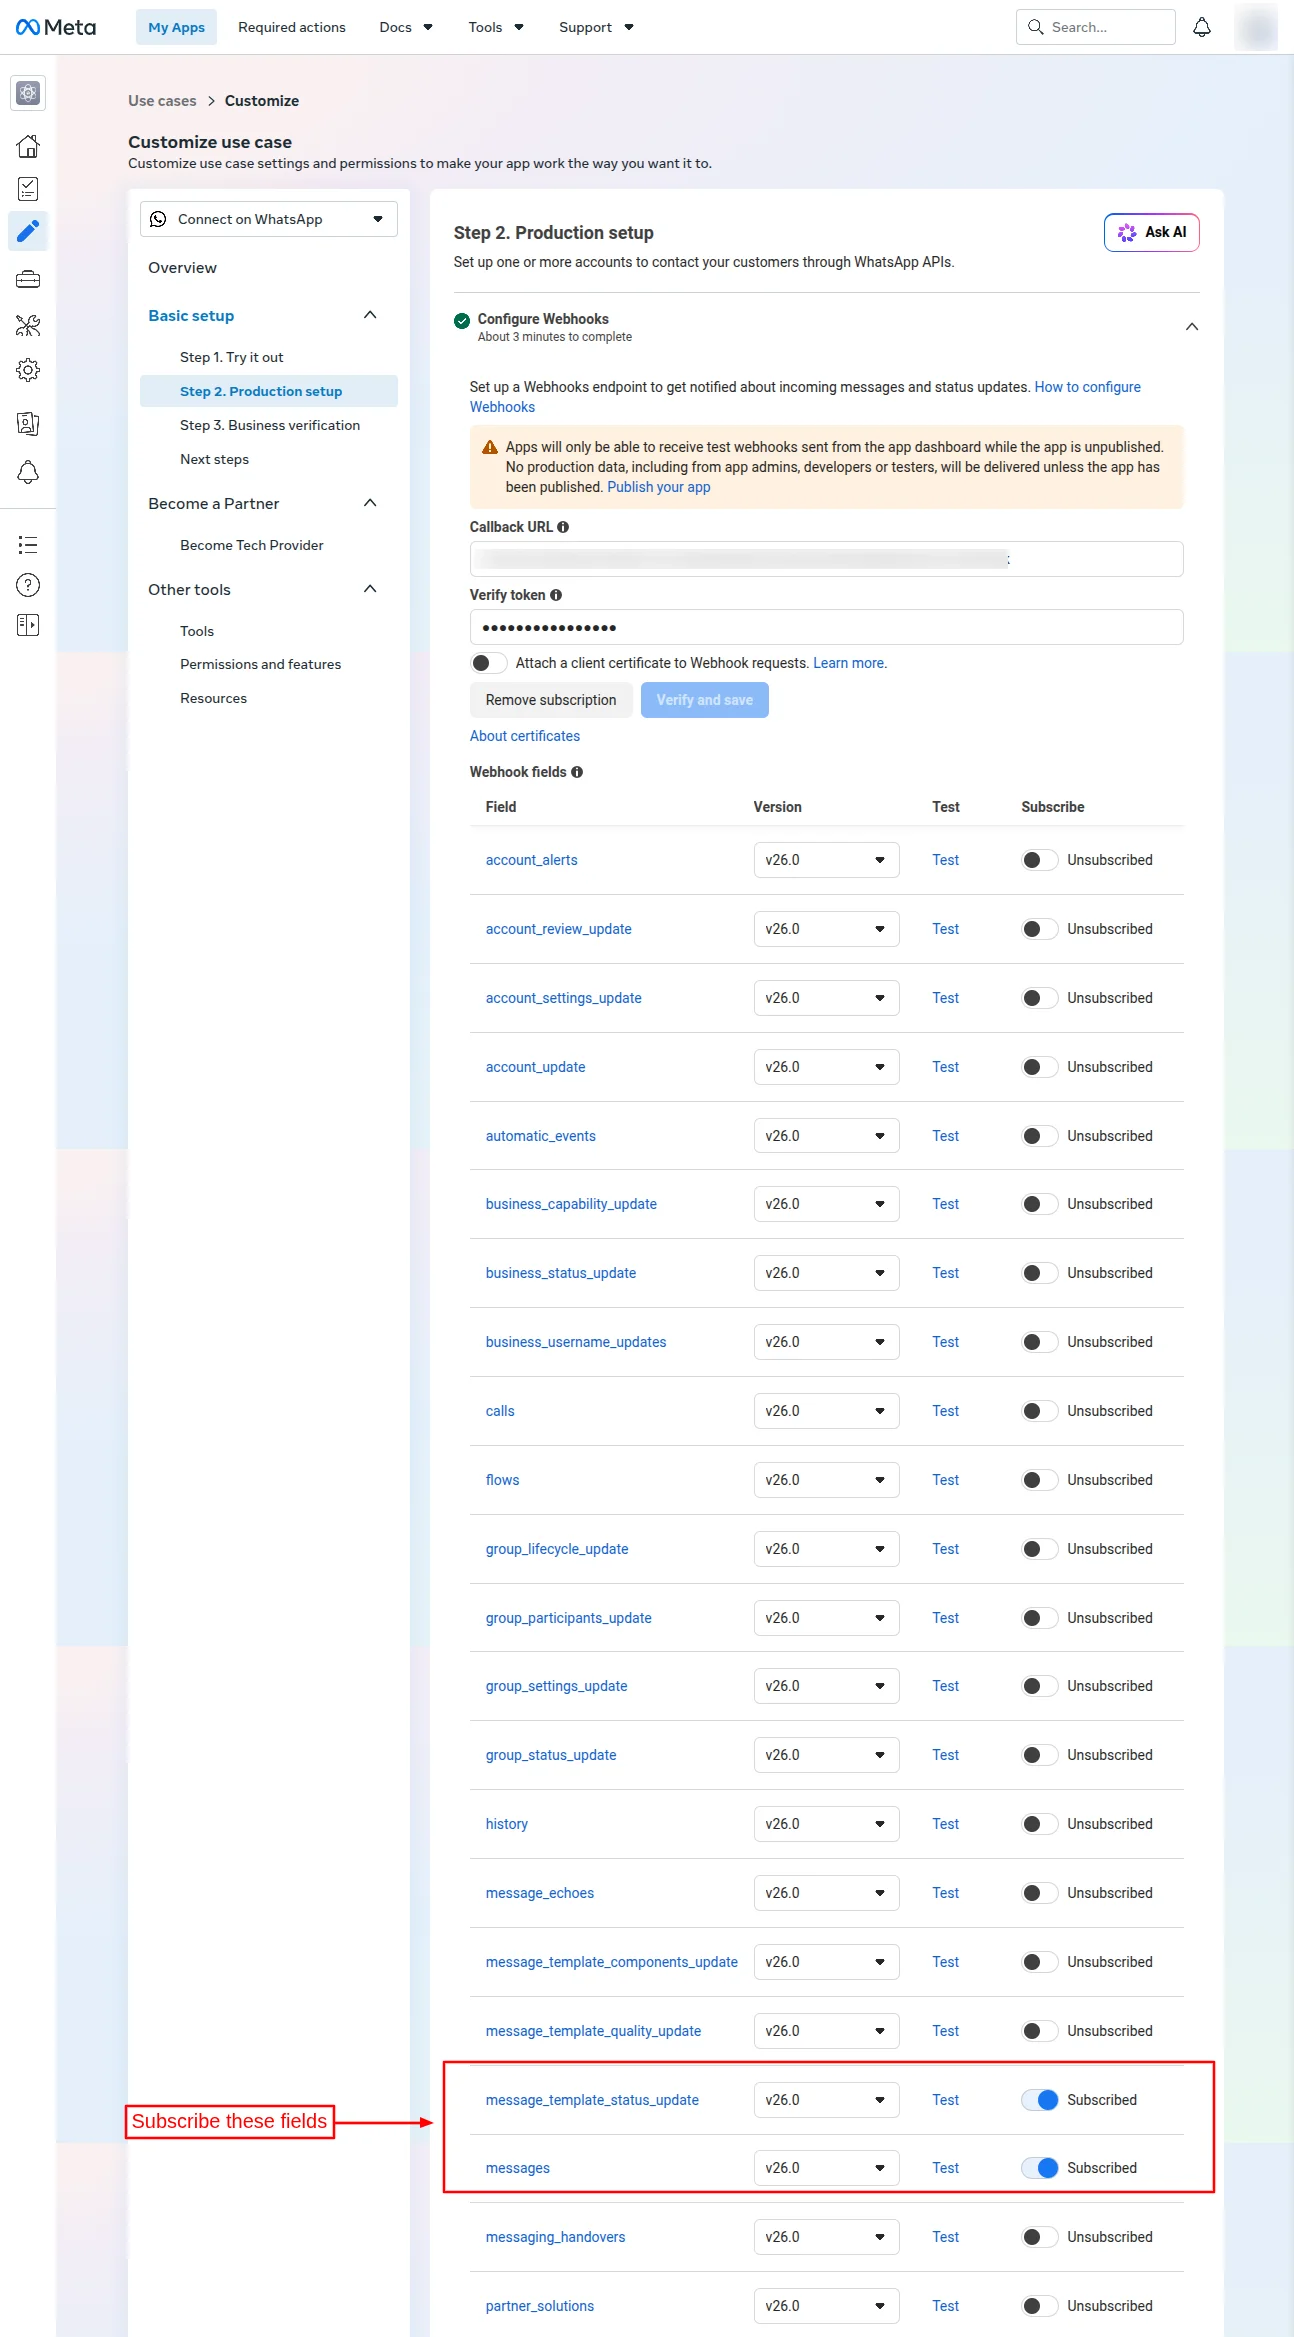
Now, after subscribing to the fields, the admin has to register the WhatsApp phone number.
The admin can either choose their already verified WhatsApp number or can add a new WhatsApp number by clicking on “Add new number” button.

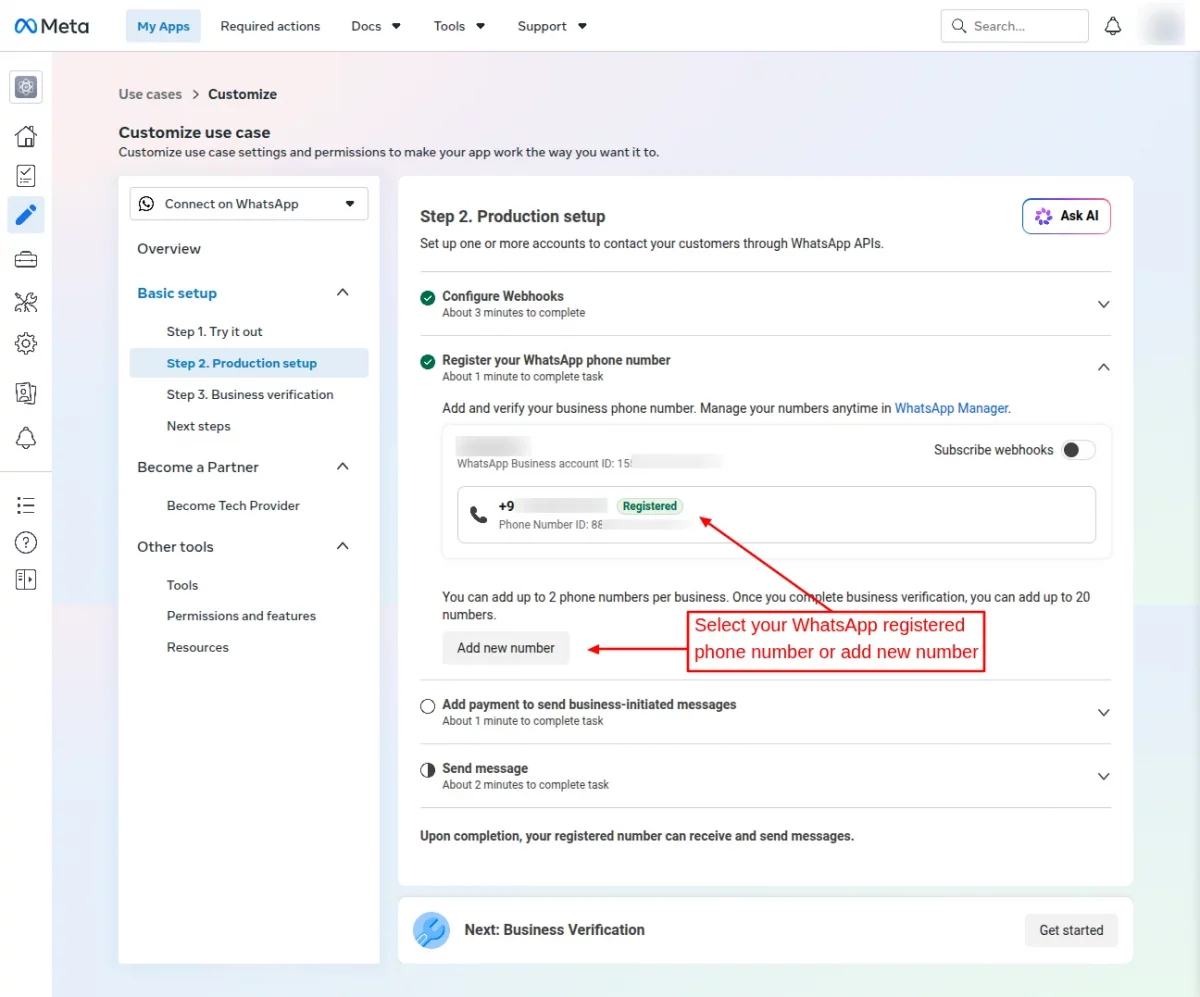
Add a new WhatsApp Number:
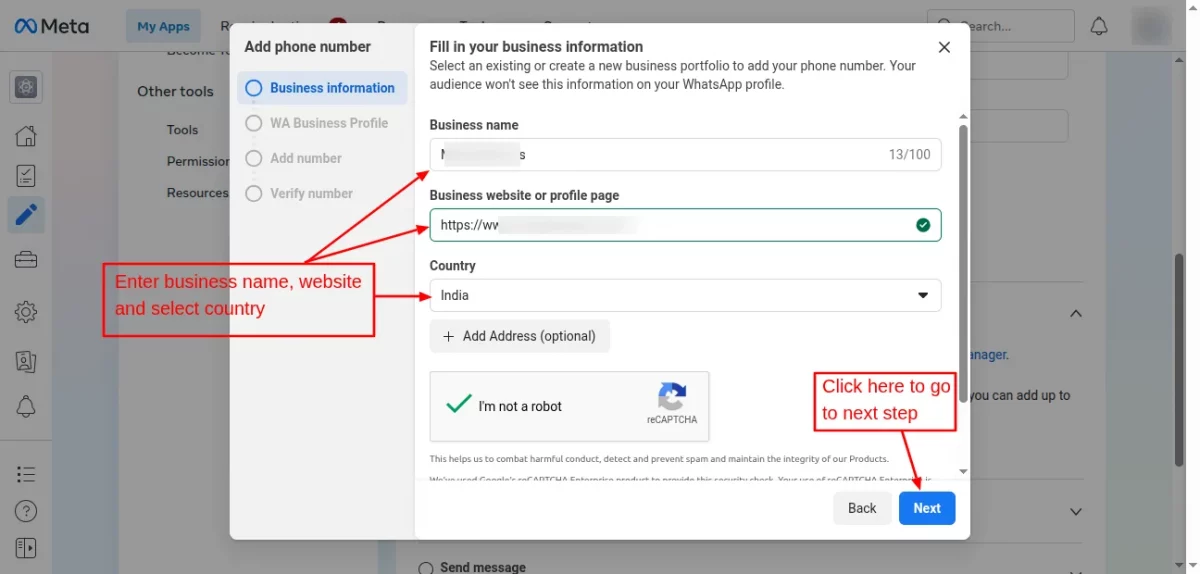
A new popup will appear when a user clicks on “Add new number” and the user has to enter their Business name, Business website, and Country.
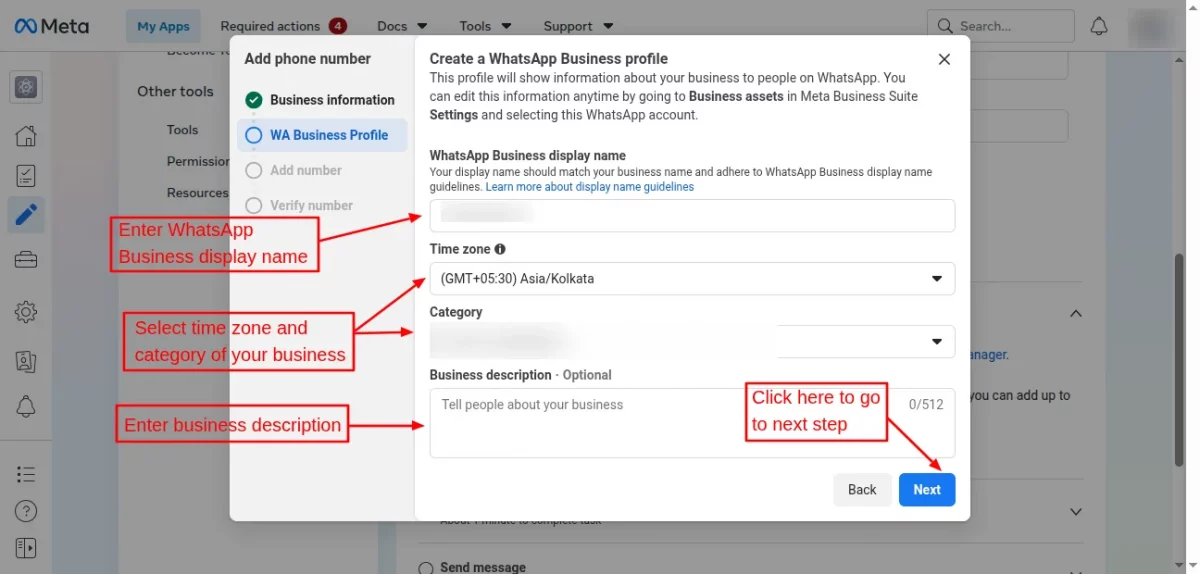
After filling in the business information, the user has to create a WhatsApp Business Profile by entering the Business display name, Time zone, Business category, and Business description.
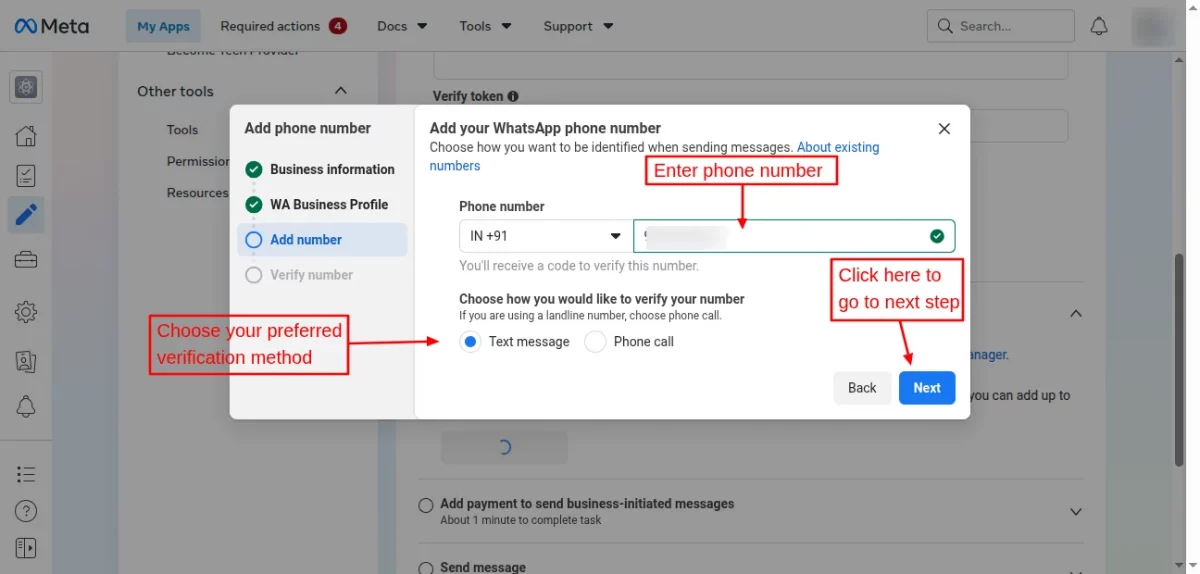
Now enter a new WhatsApp number and choose the verification method.
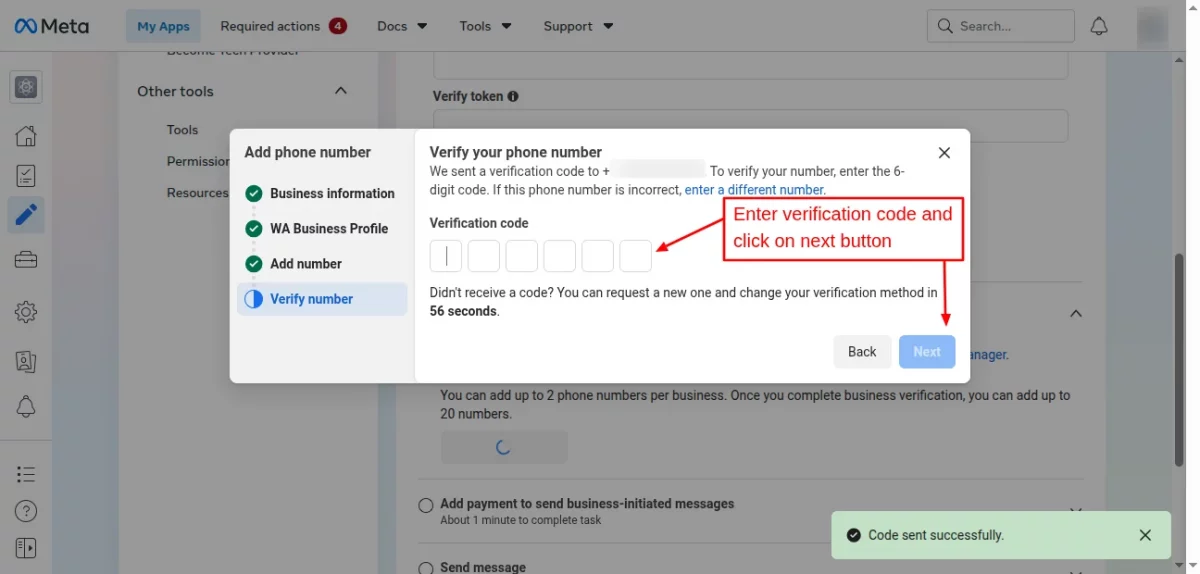
Enter the verification code sent to your entered number.
Add Payment Method:
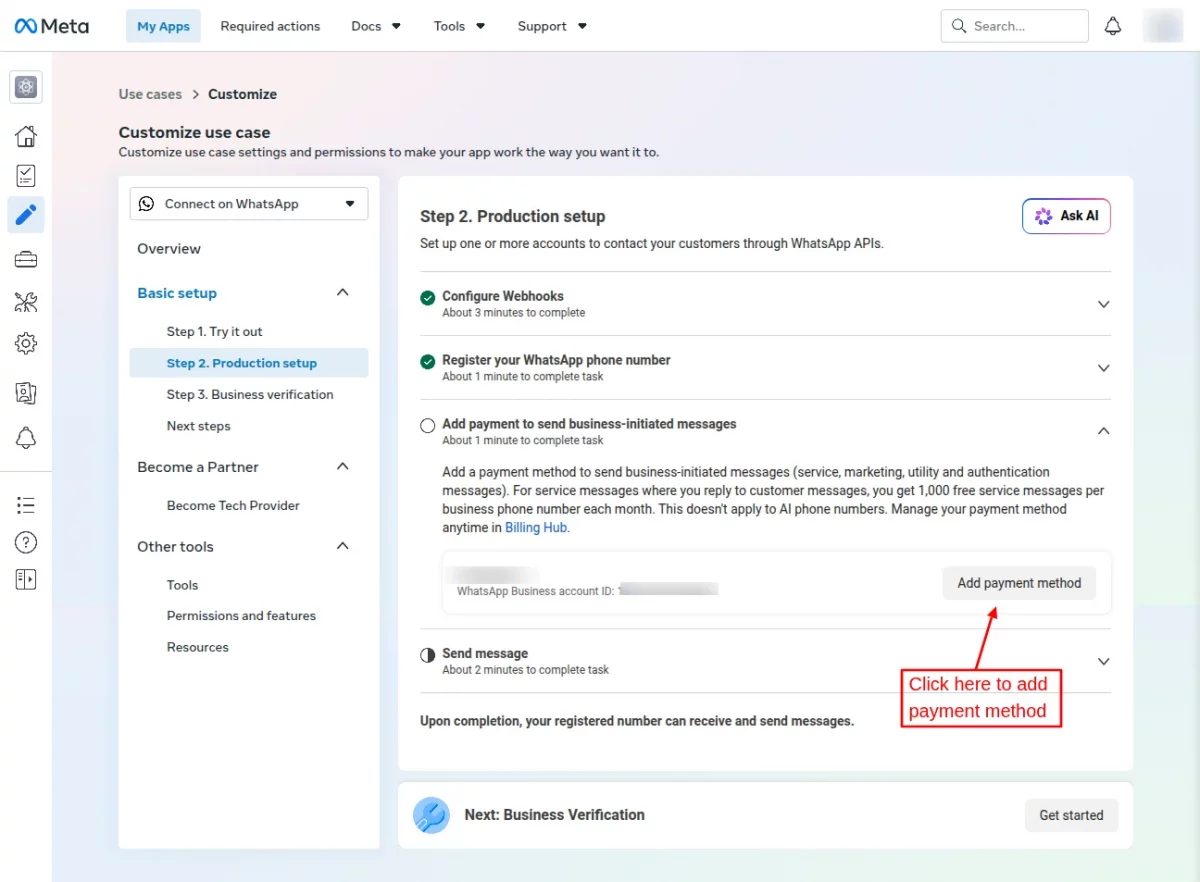
After verifying the WhatsApp number, the admin has to add the payment method to complete the billing process by clicking on “Add payment method” button.

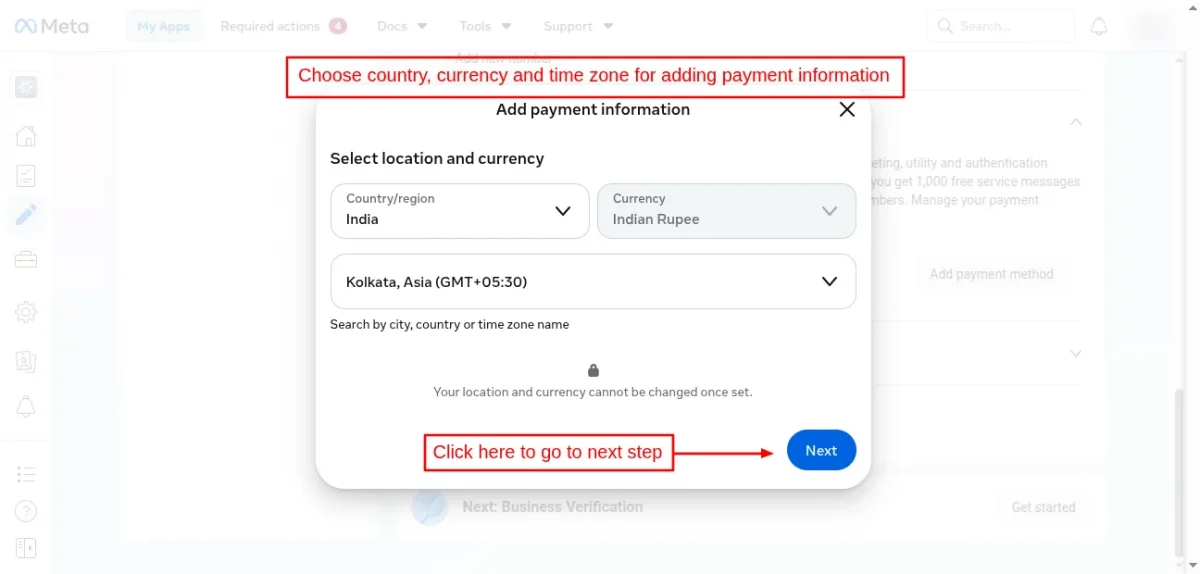
A new popup will appear on the screen to select the country, currency and time zone.
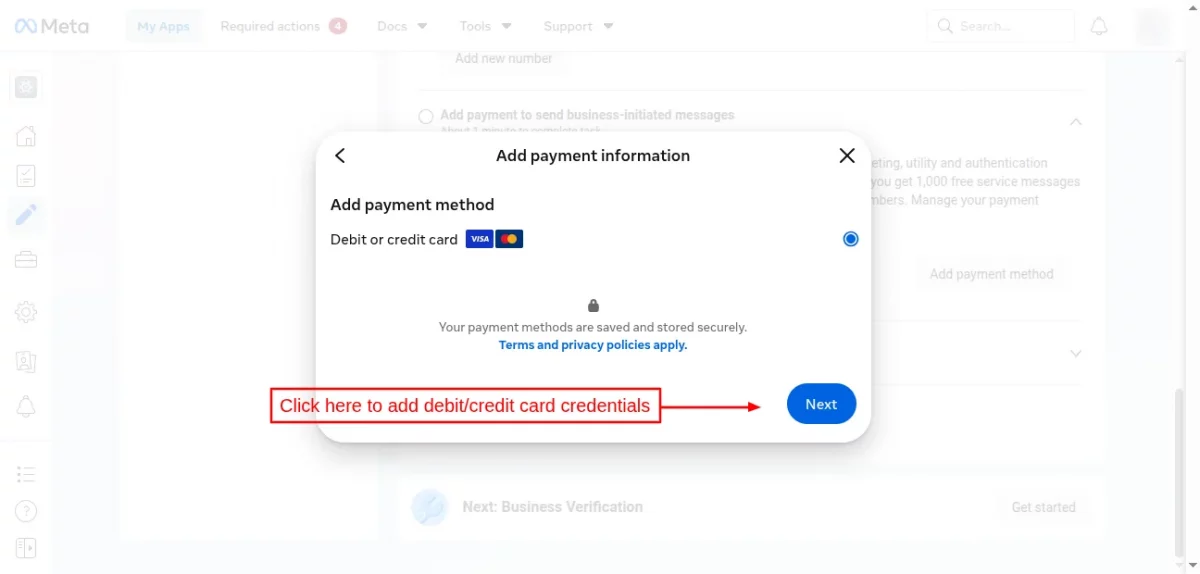
In the next step, the user has to choose from the available payment options and add the credentials to complete the payment.
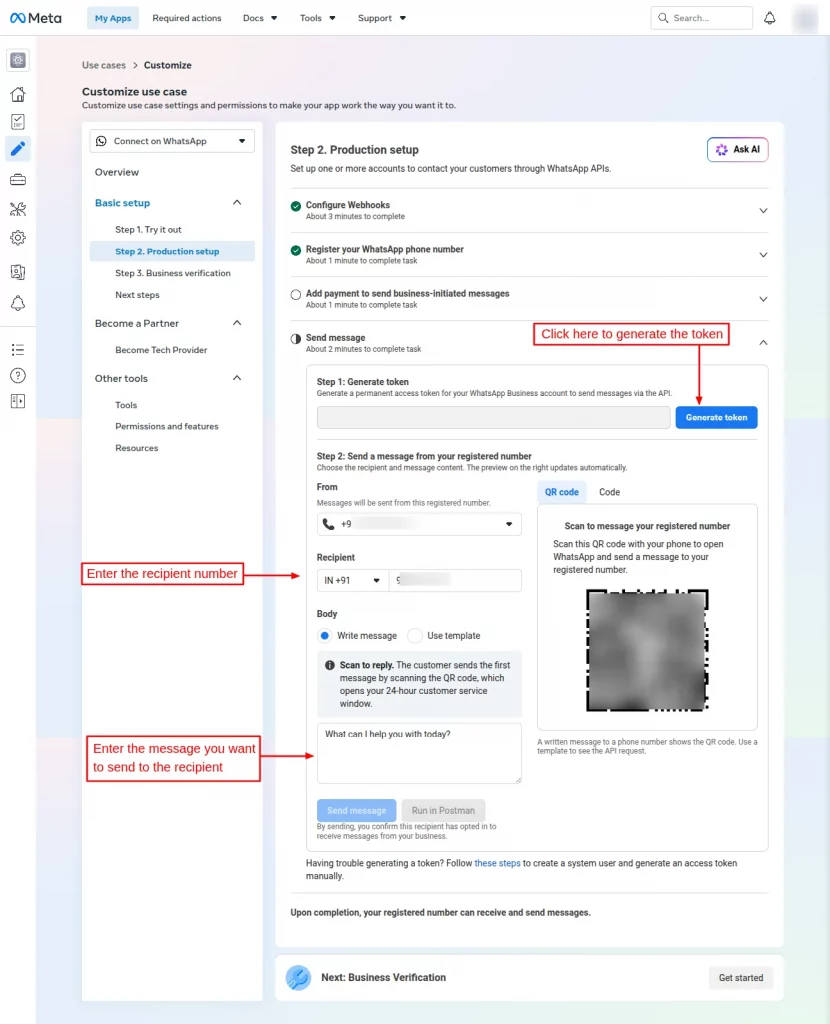
After completing the payment, the admin has to generate the permanent token and enter the recipient WhatsApp number to send the message with your registered WhatsApp number.
You can go through this link for WhatsApp pricing: https://developers.facebook.com/documentation/business-messaging/whatsapp/pricing

After sending the message to the recipient, click on the “Get started” button.

Step 3. Business verification
Now, the user has to verify their business by uploading the required documents like Business License, Tax Registration Certificate, etc.

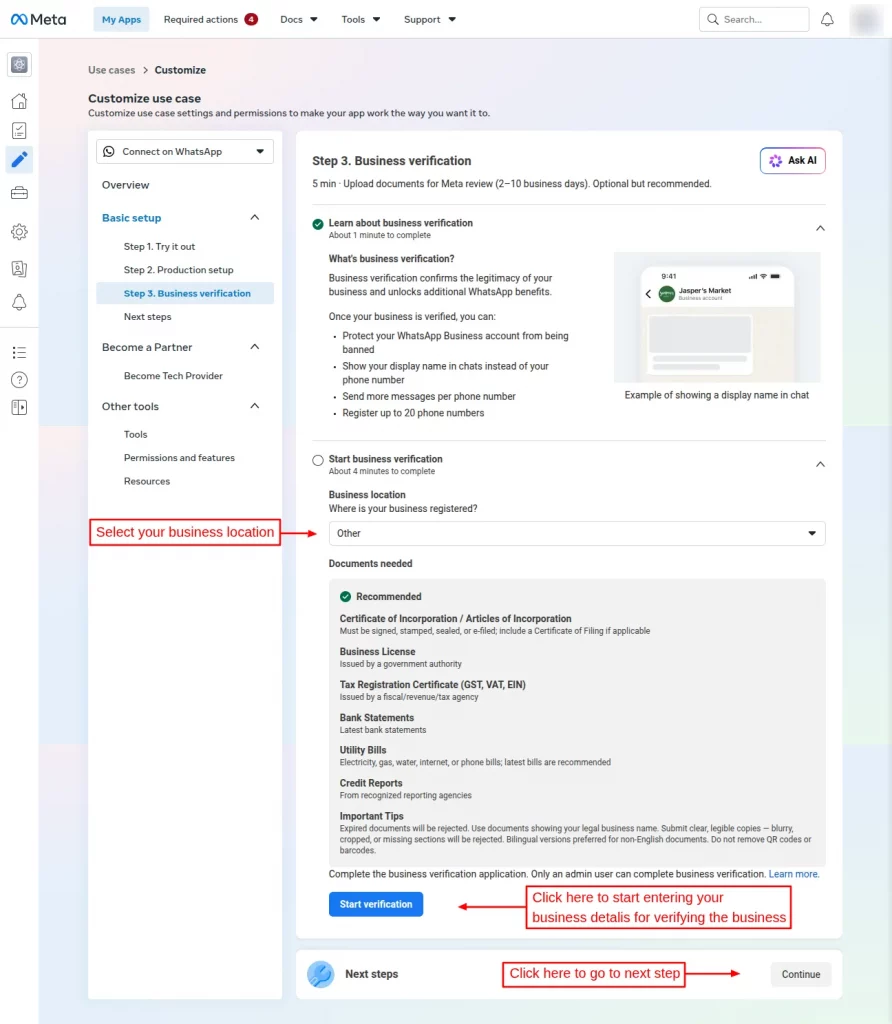
Once you enter all your business information and documents, your business verification will be approved and you have to click on the “Continue” button.
How to Generate Permanent Token
Firstly, go to Business Settings and select the account with which your app is associated.


Under Users, click on ‘System users’.
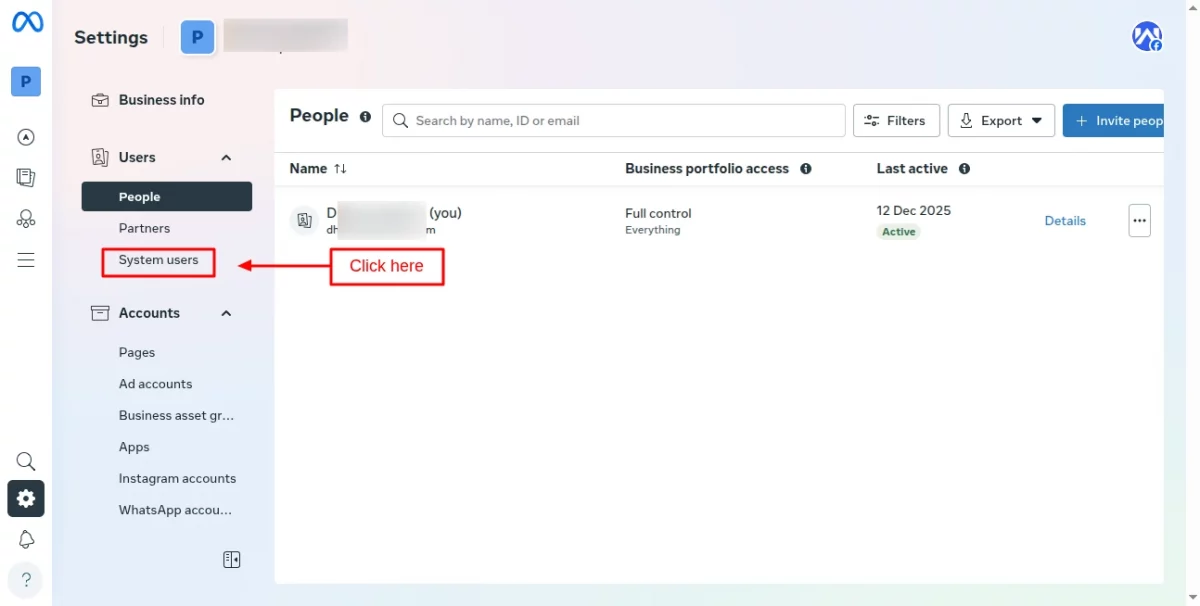
Now, click on the ‘Add’ button.
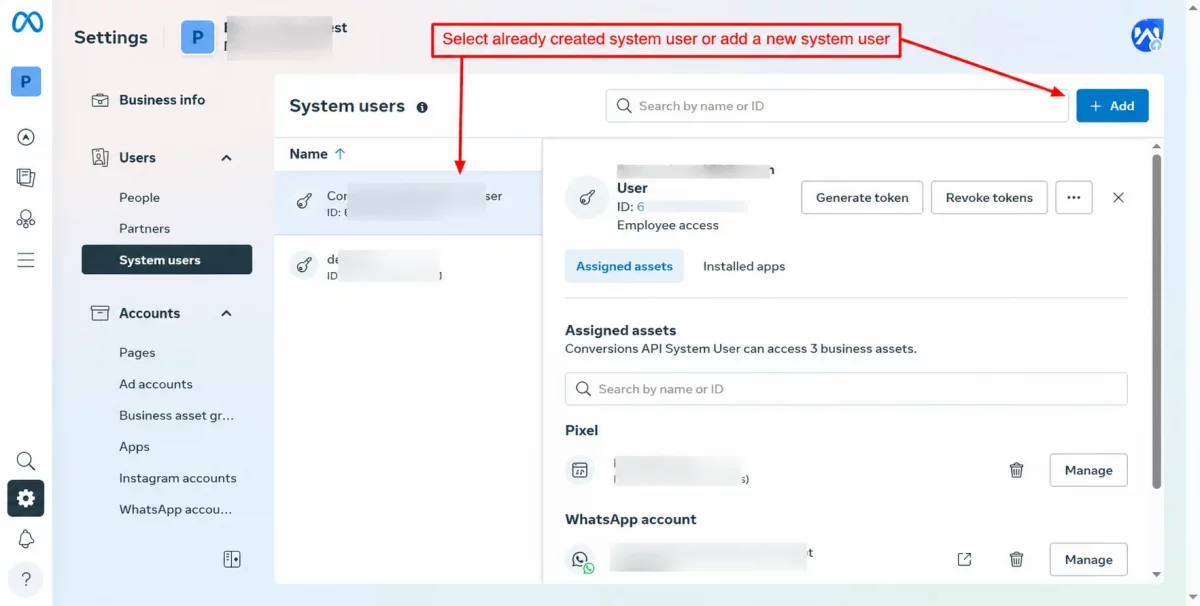
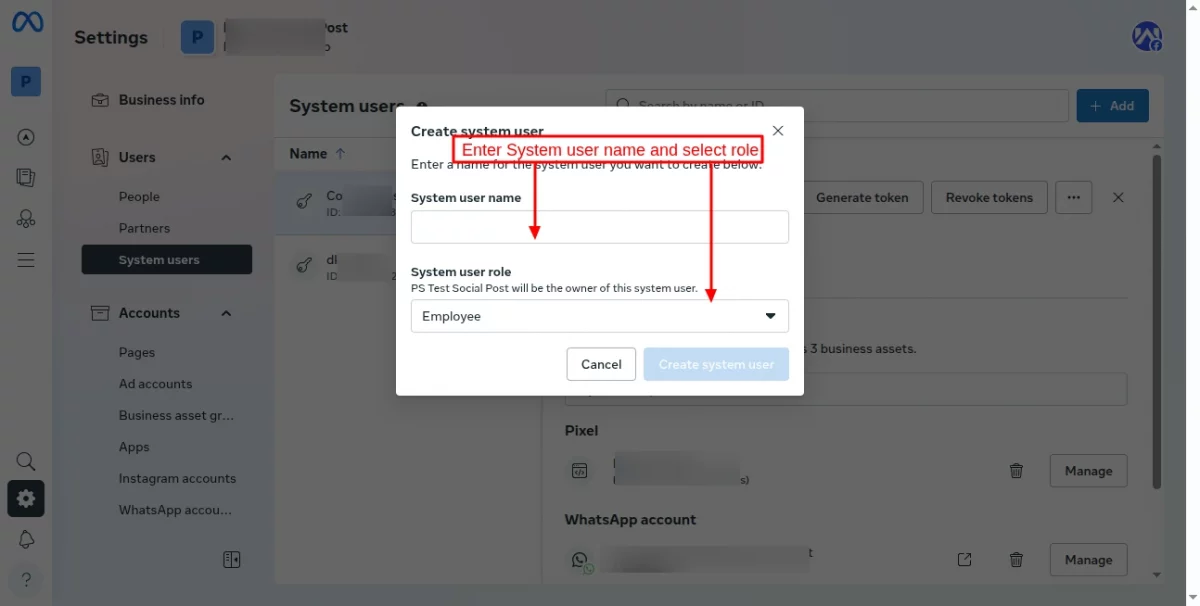
On clicking the ‘Add’ button, a pop-up appears on the page where you need to specify the system user name, select ‘Admin’ as the system user role, and click on the ‘Create system user’ button.
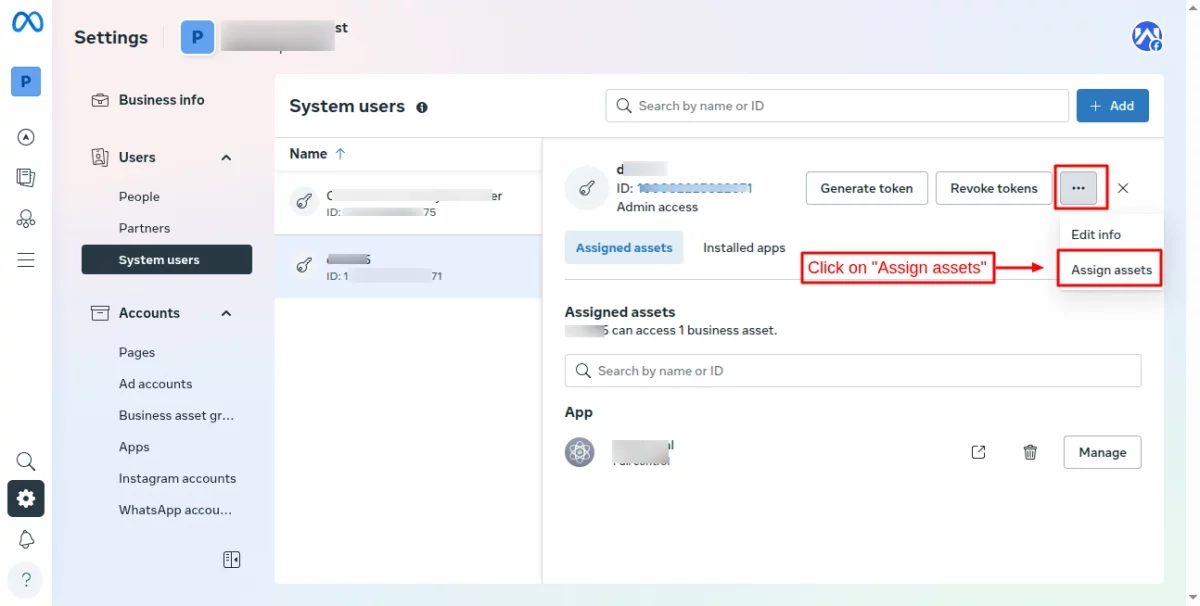
After creating/selecting the system user, you have to click on the “Assign assets” button.
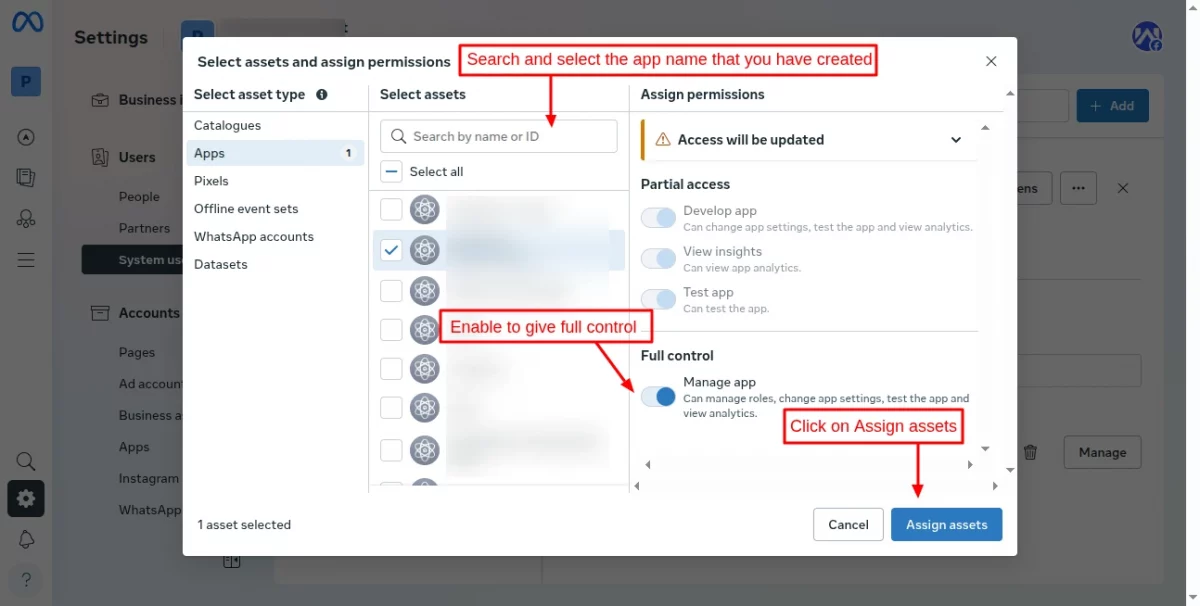
Now, the admin has to search for and select the app that you have created and give full control to the app.
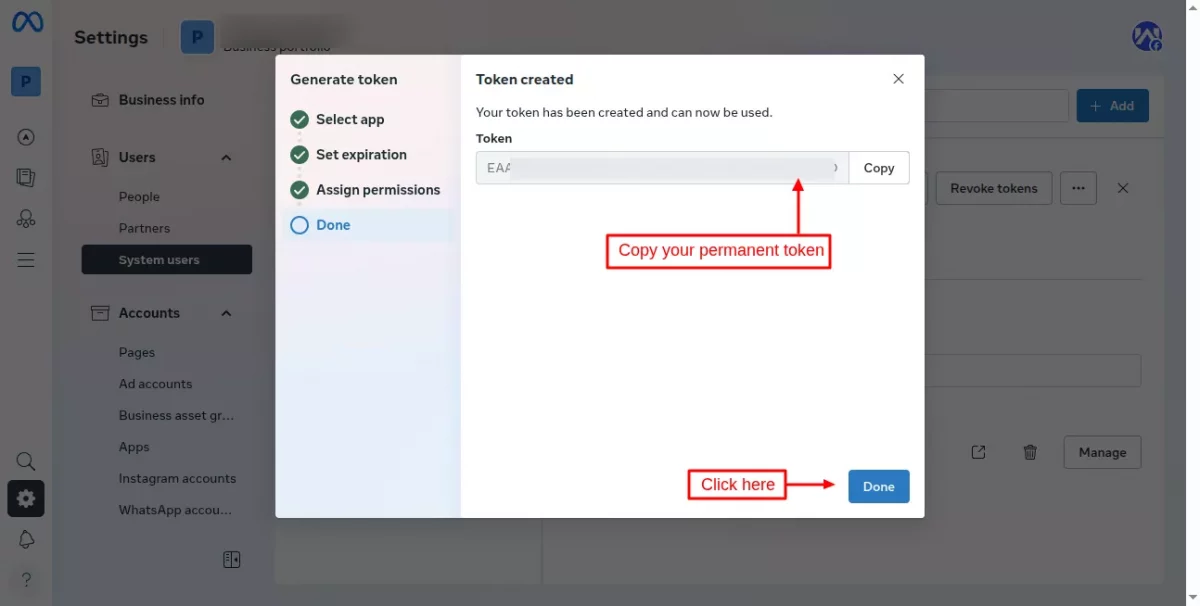
Click on the ‘Generate token‘ button.
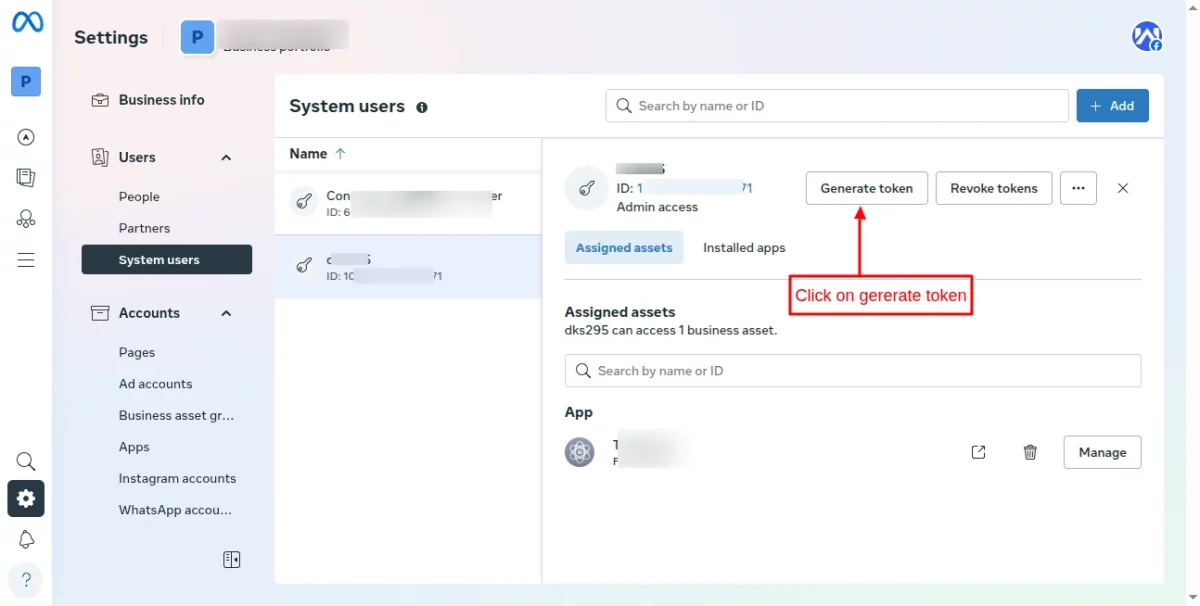
On clicking the button, a popup appears on the page where you need to select an app.
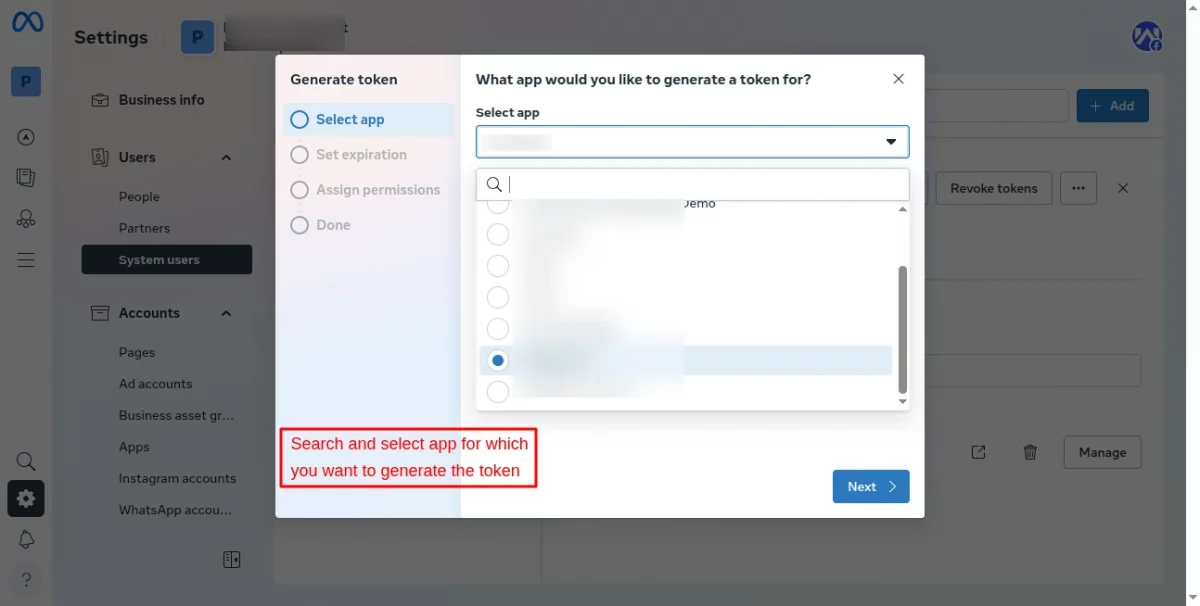
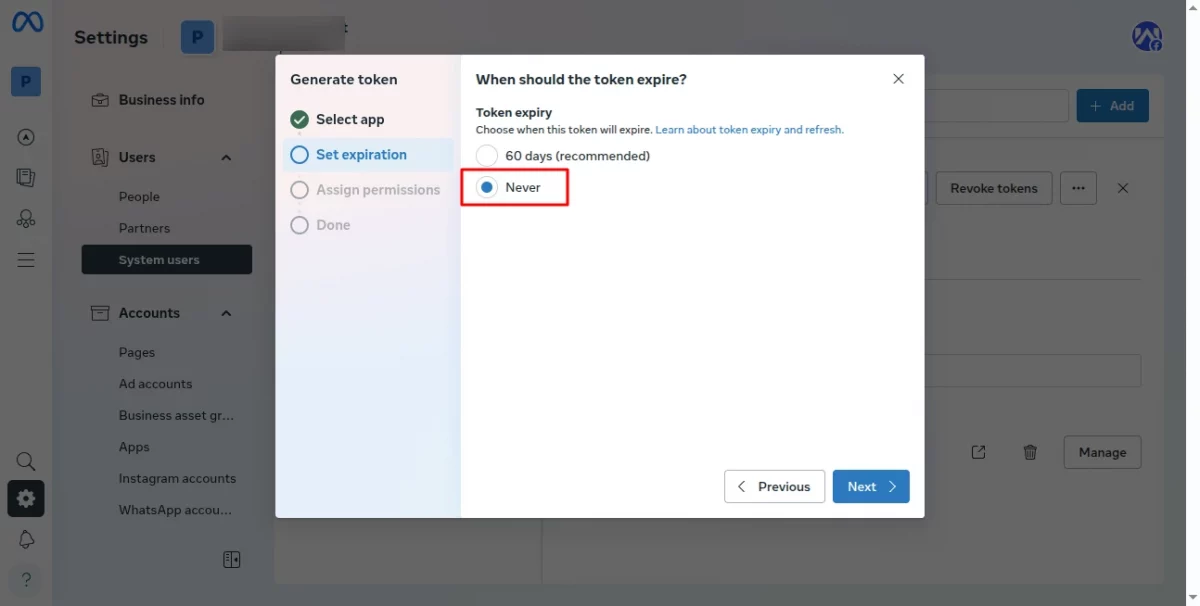
After selecting app, choose ‘Never’ for token expiration.
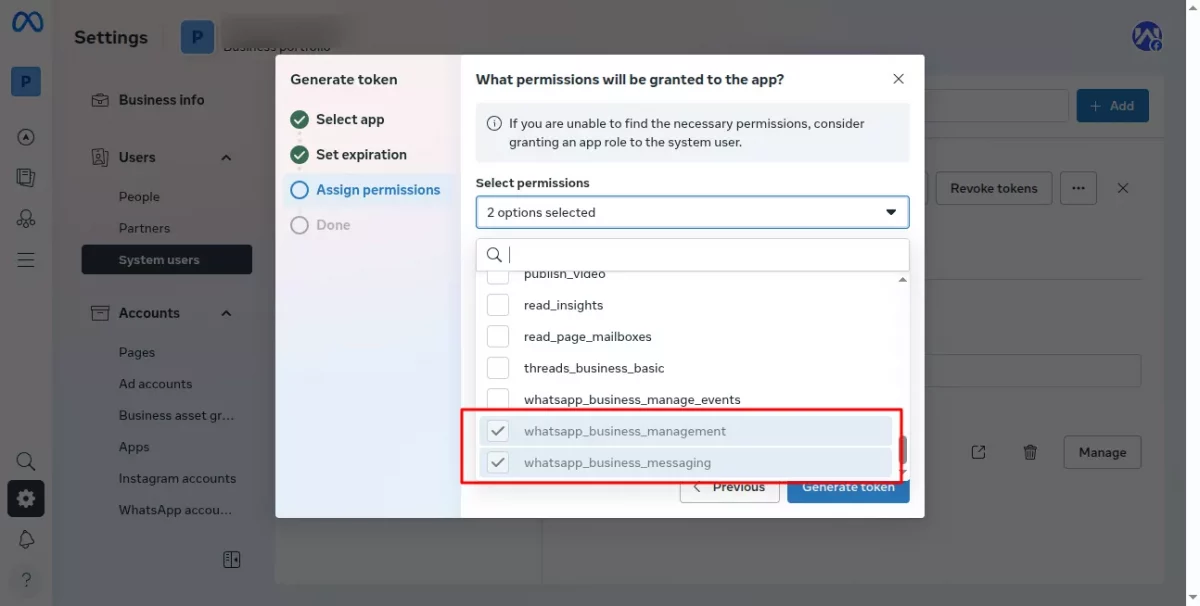
Select whatsapp_business_messaging, whatsapp_business_management permission under the “Select permissions” list.
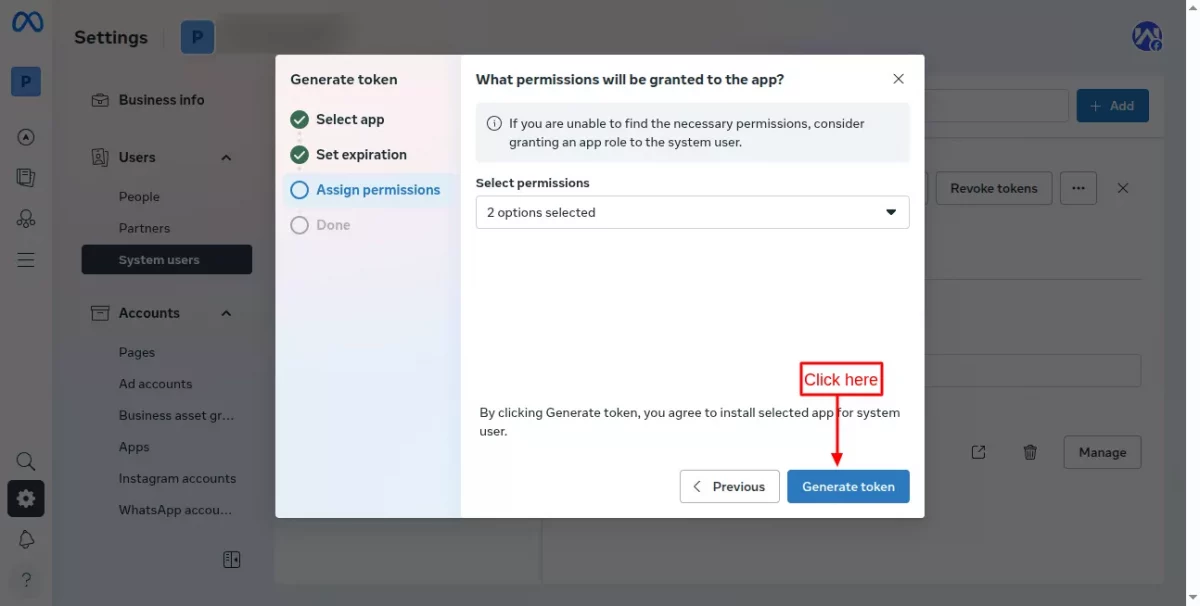
After selecting the permissions, click on ‘Generate token’ button.
Now, copy your permanent token and configure your module.
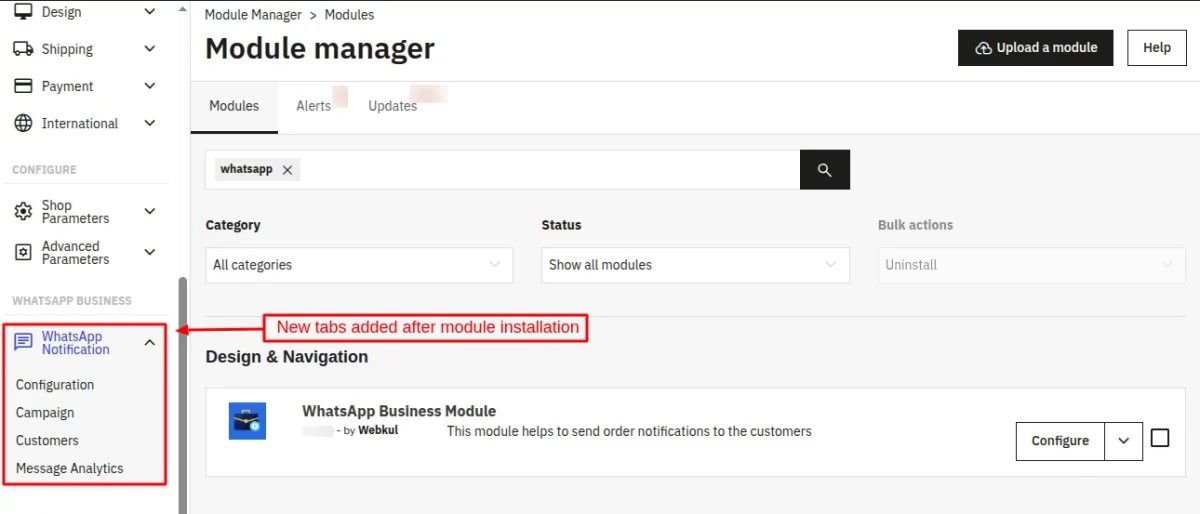
The module adds three new tabs in the back office. Those are:
1) Configuration
2) Campaign
3) Customers
4) Message Analytics
Module Configuration

Let’s understand each of them one by one. Starting with,
API:
You need to enter credentials like your Phone Number ID, Business Account ID, and Permanent Token to use this module.
Without these details, you will not be able to proceed further for module configuration process.

General:

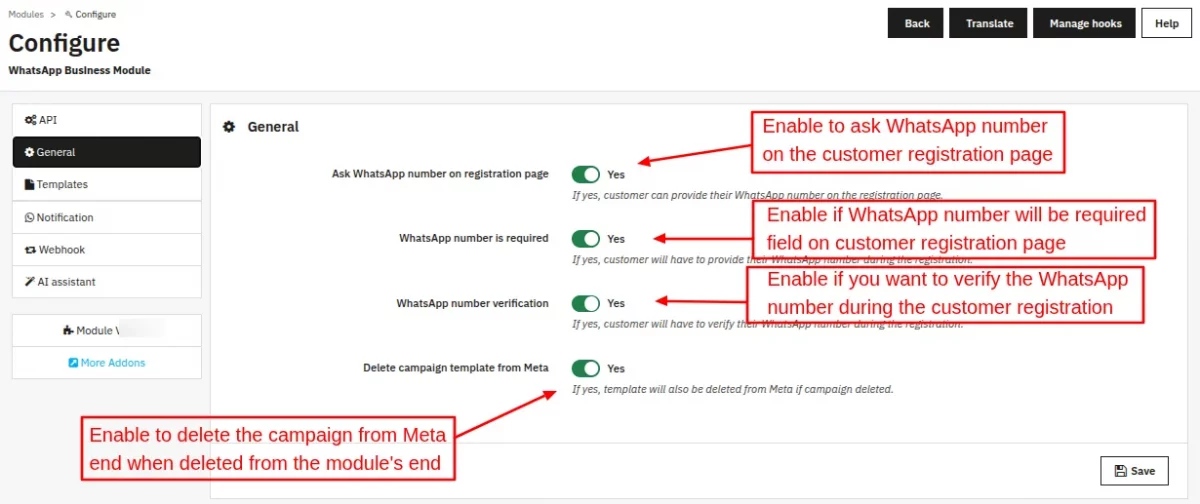
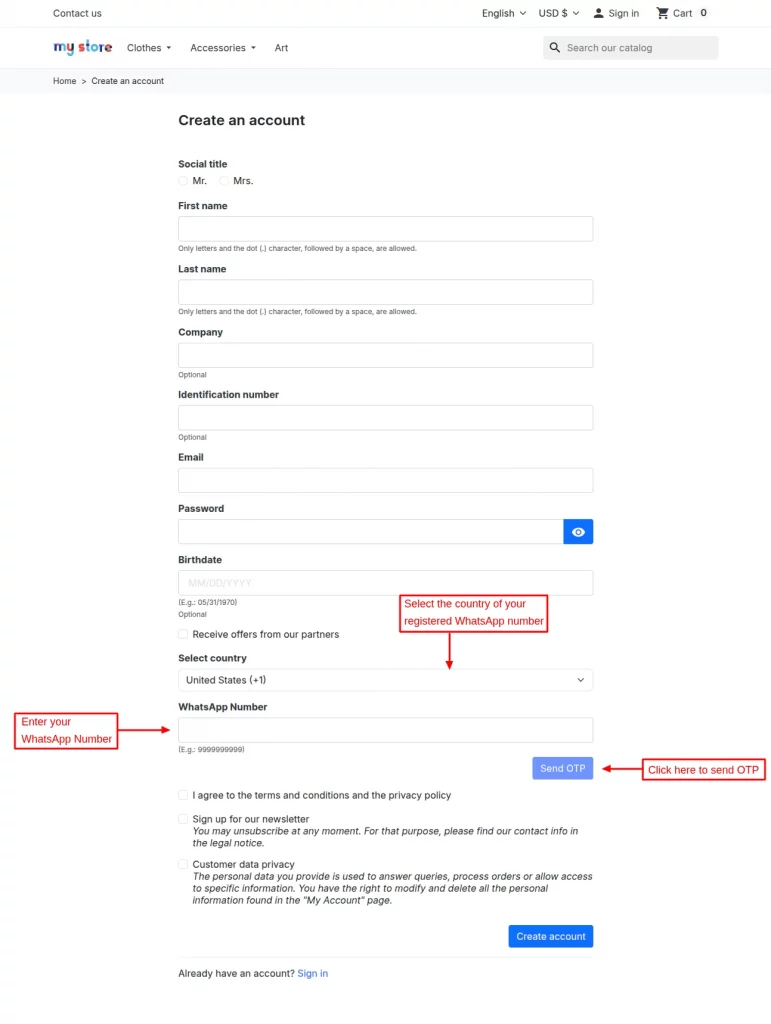
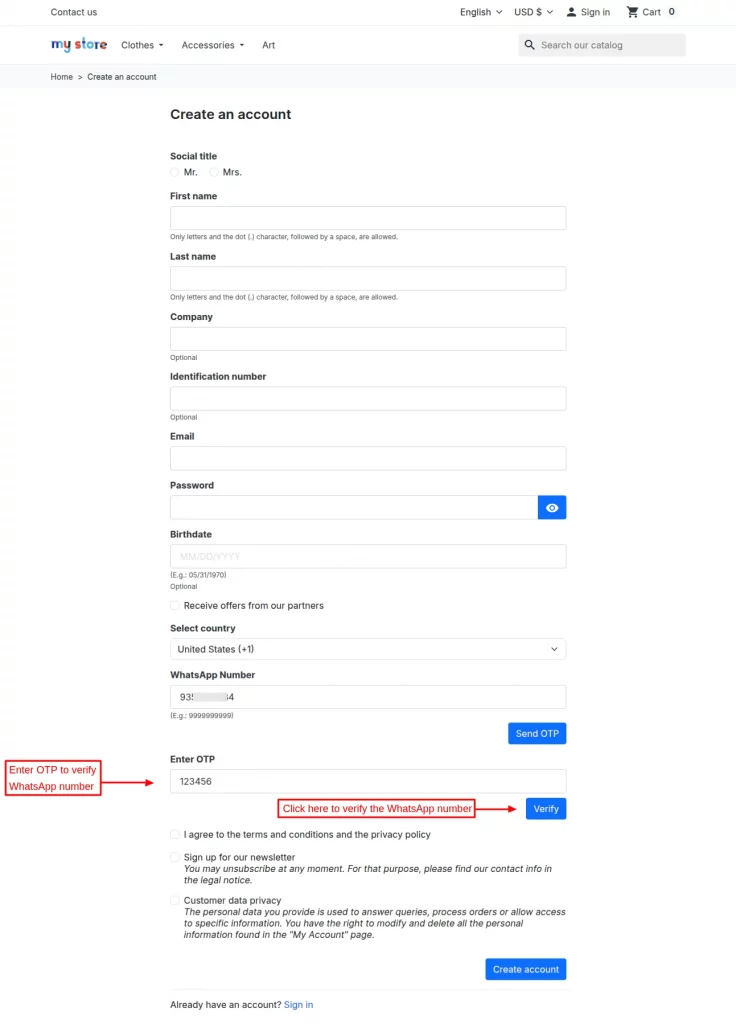
- Ask WhatsApp number on registration page: Enable this option for asking the customer to enter the WhatsApp number while registration.
- WhatsApp number is required: Enable this if you want to WhatsApp number field must be required during registration.
- WhatsApp number verification: Enable, WhatsApp number must be verified during the customer registration.


- Delete campaign template from Meta: Enable if you want to delete the campaign template from Meta’s end on deleting from the module’s end.
Templates:
You can send notifications to customers on the following 5 events:
- Order Confirmation
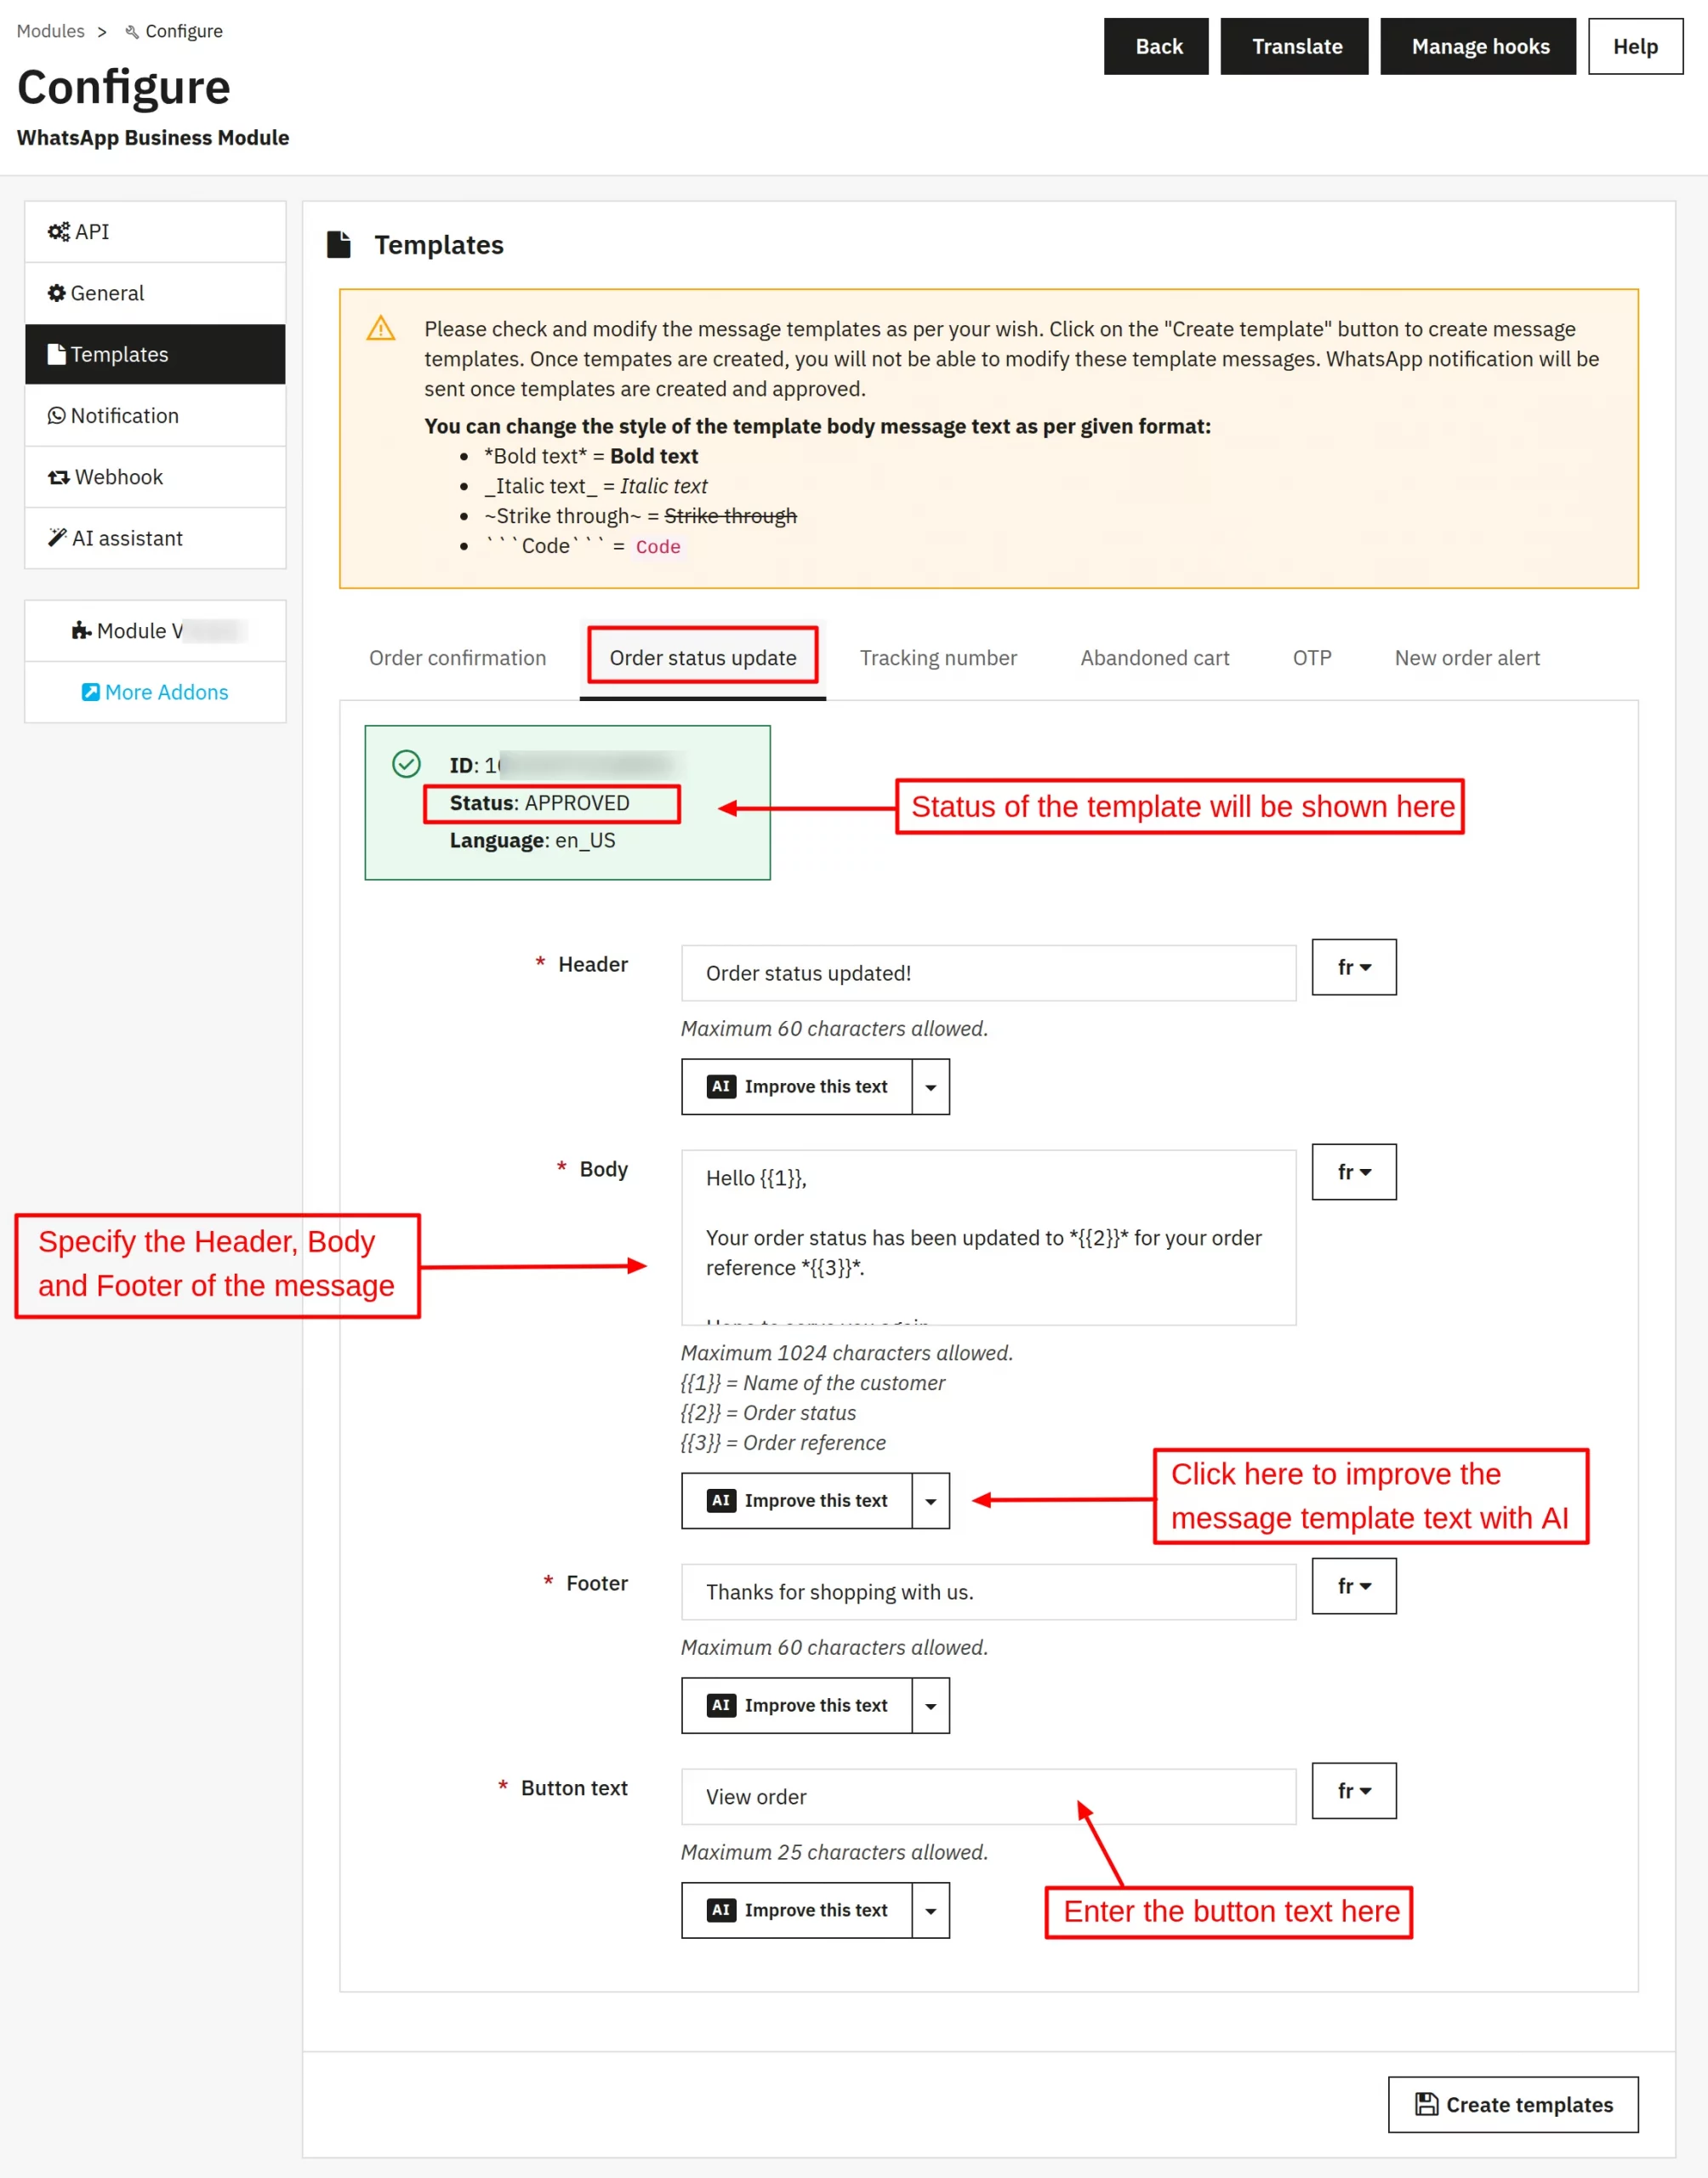
- Order Status Update
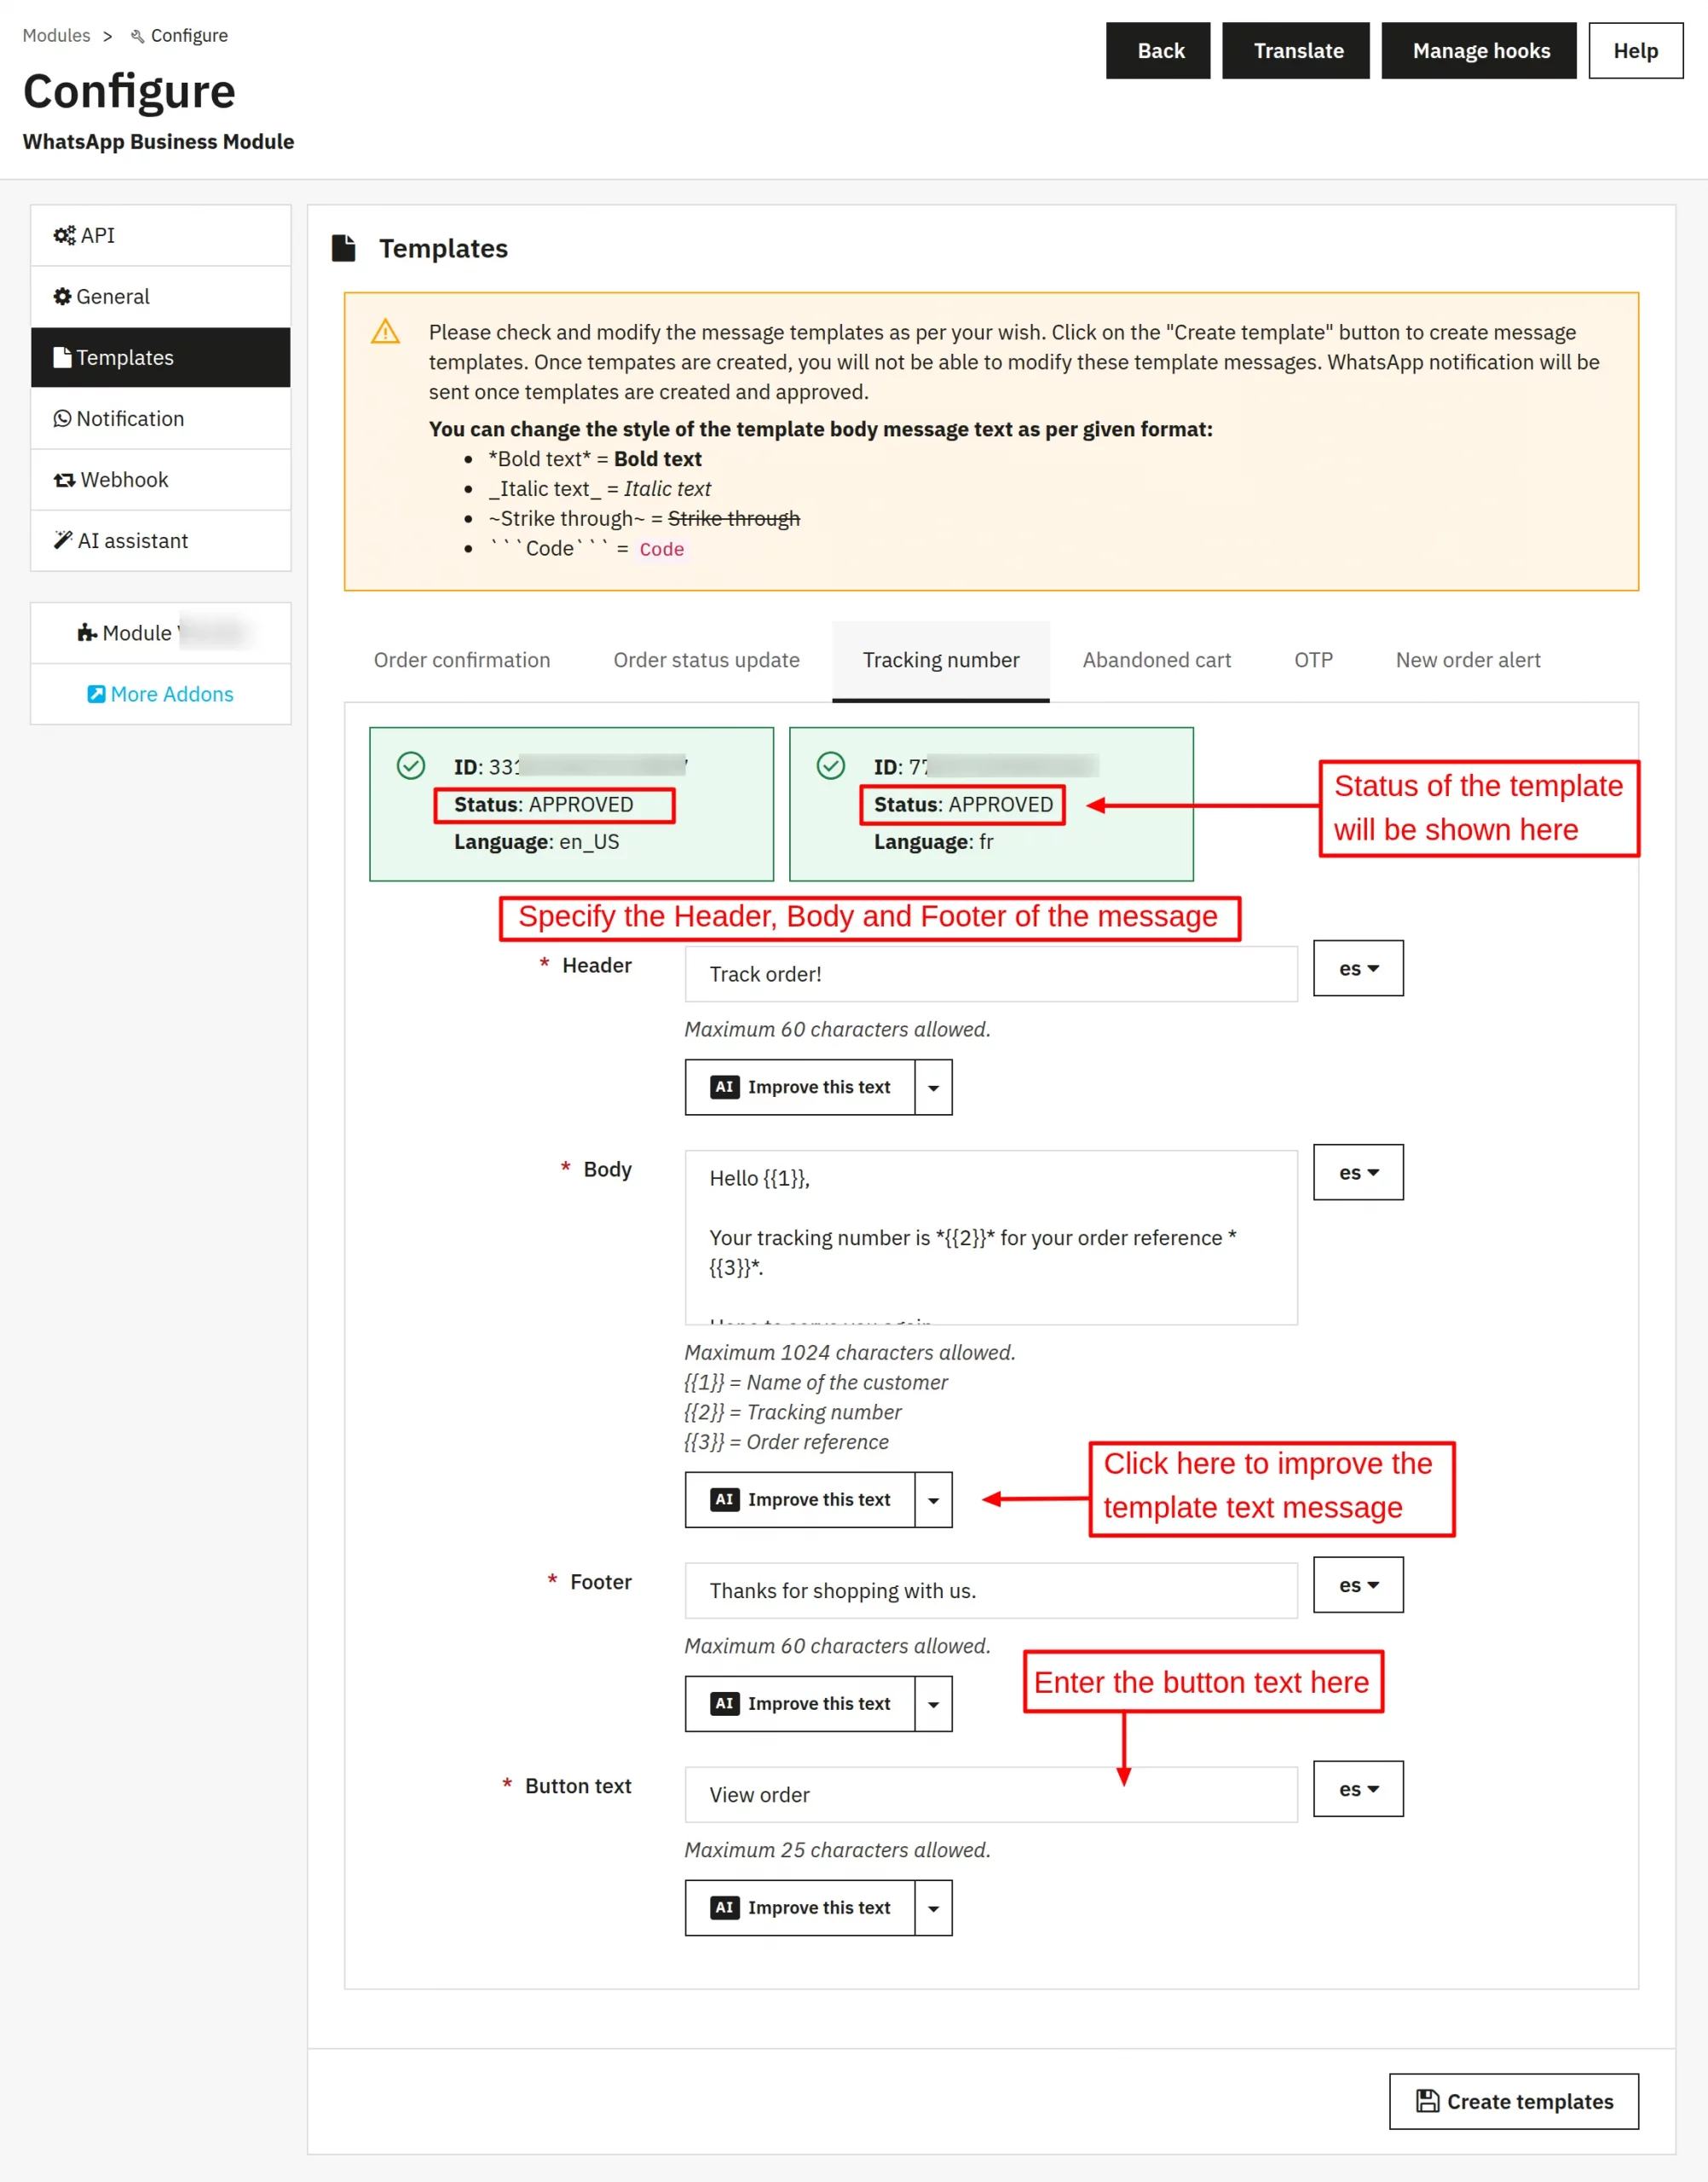
- Tracking Number
- Abandoned Cart
- OTP
- New order alert
For sending the notifications, you must define a template. So here, you can set a template for each event separately.
Also, note that message templates will require approval from WhatsApp before being sent out to customers.
Note: The template will be rejected by the Meta team if a template content does not comply with the WhatsApp Business Messaging and Commerce policies.
In this case, you can review the rejection reason and send it for review again after updating the template content.
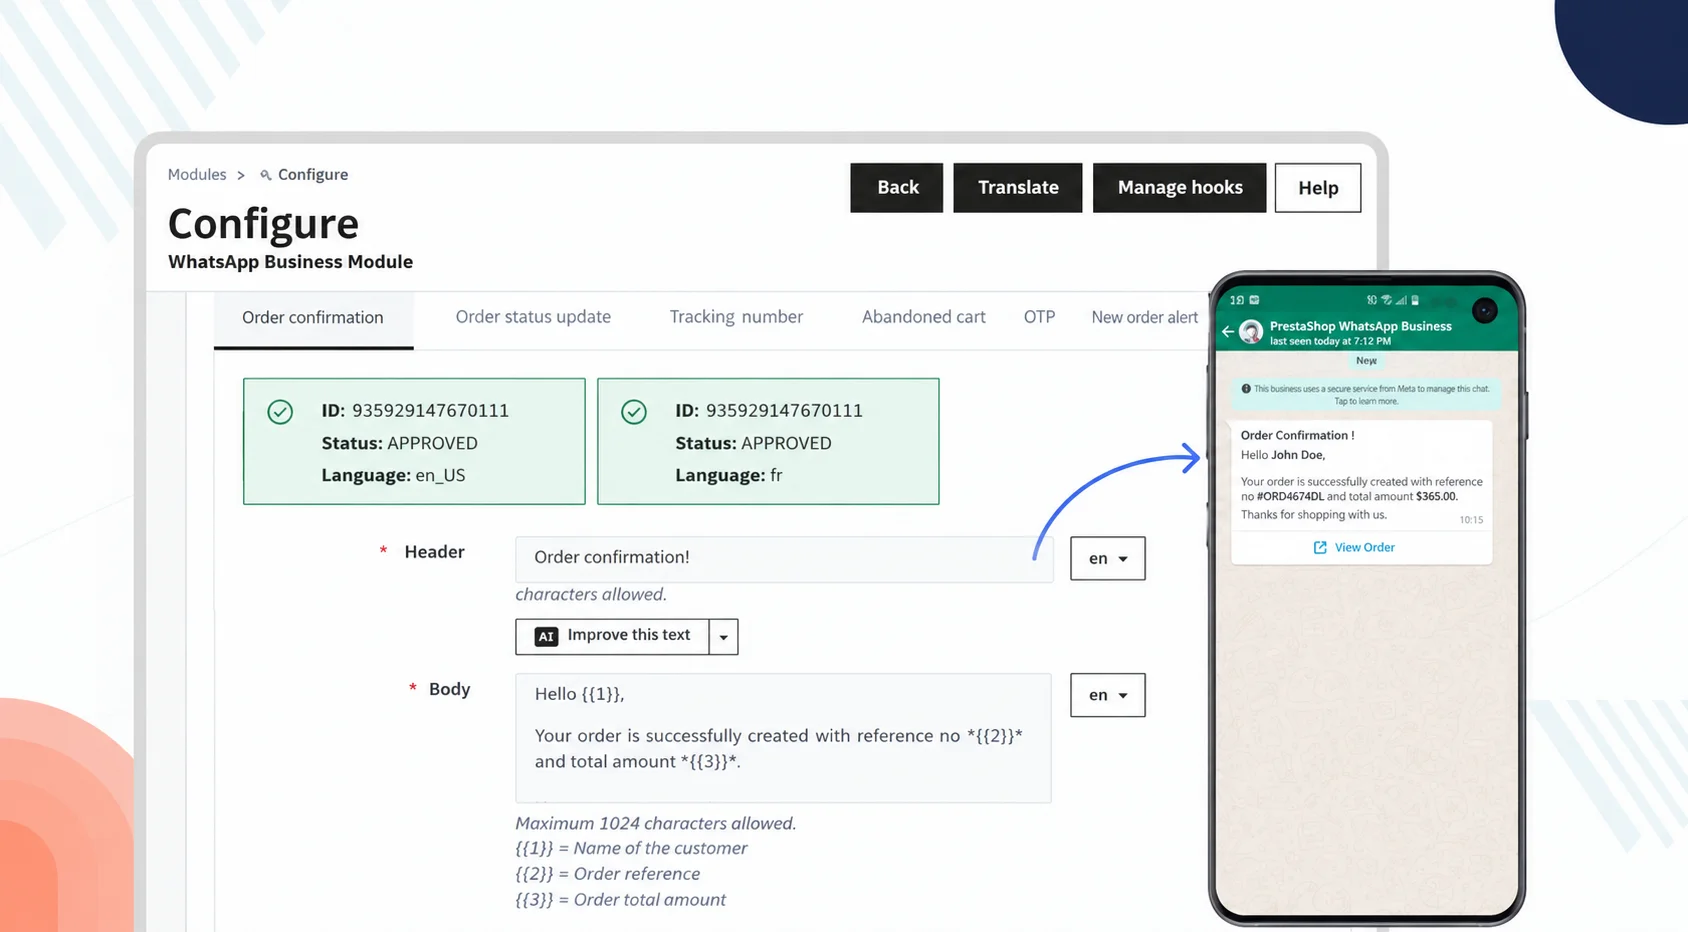
Order Confirmation:

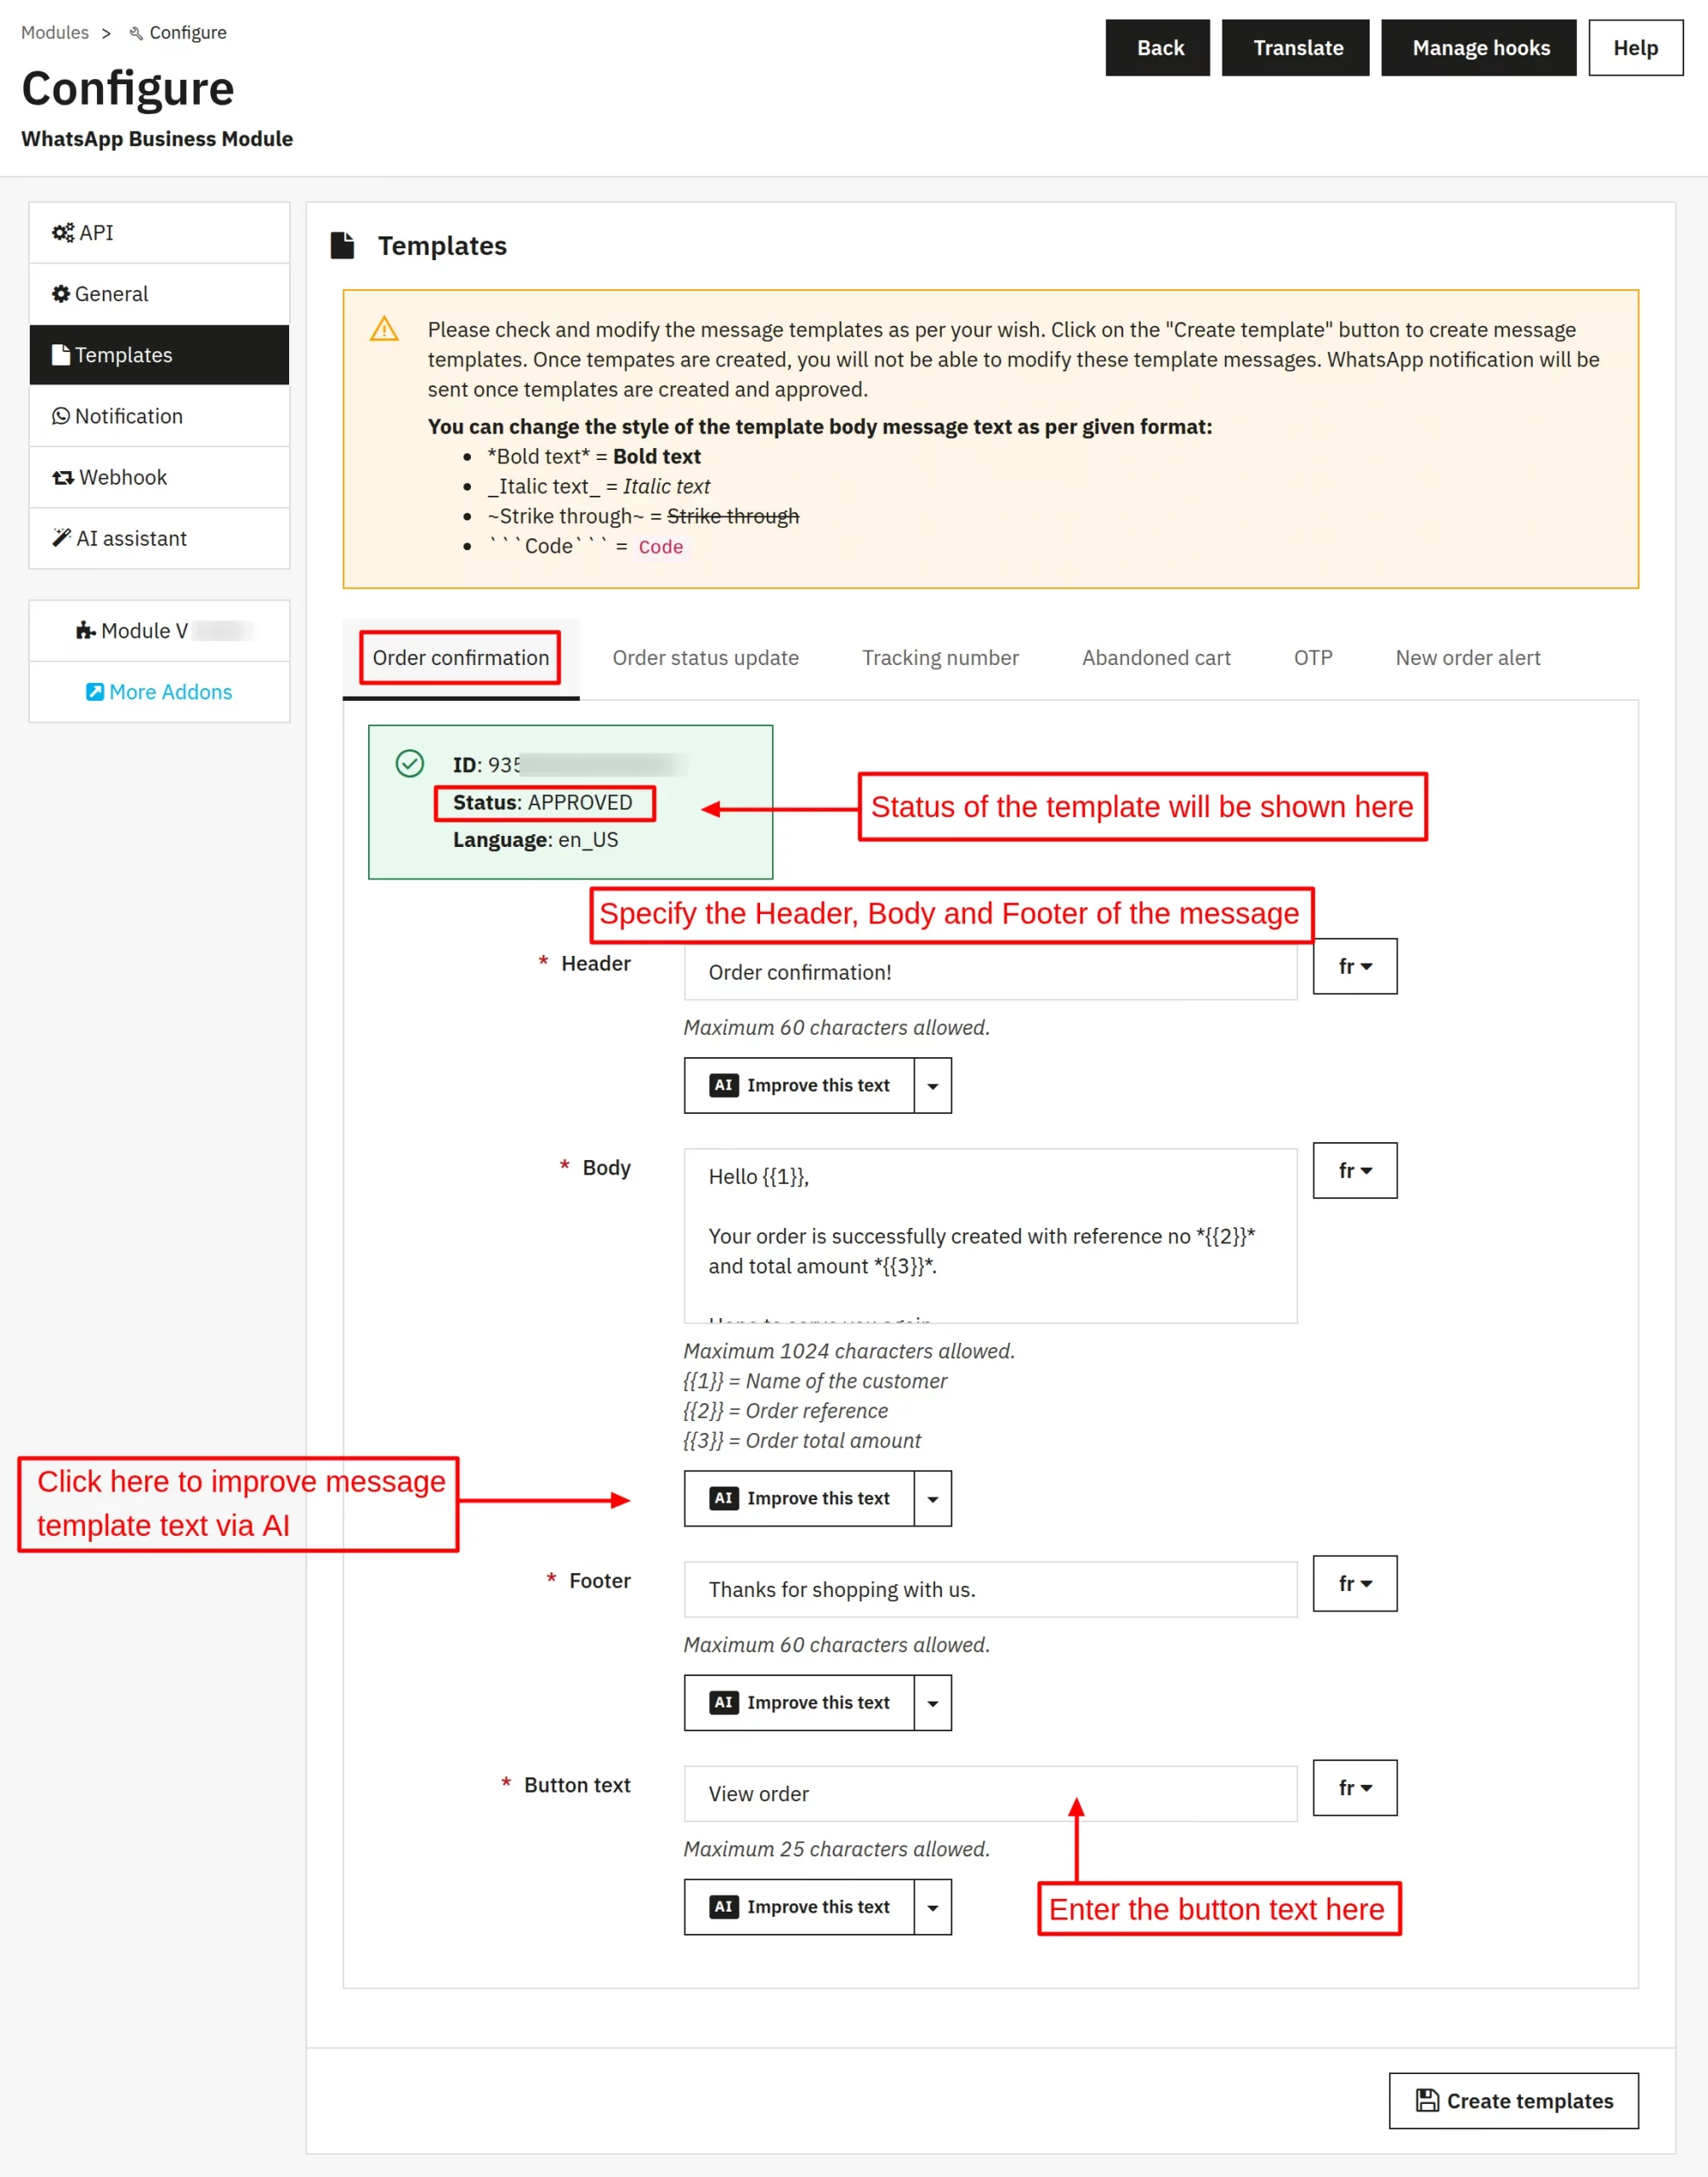
Improve this text:
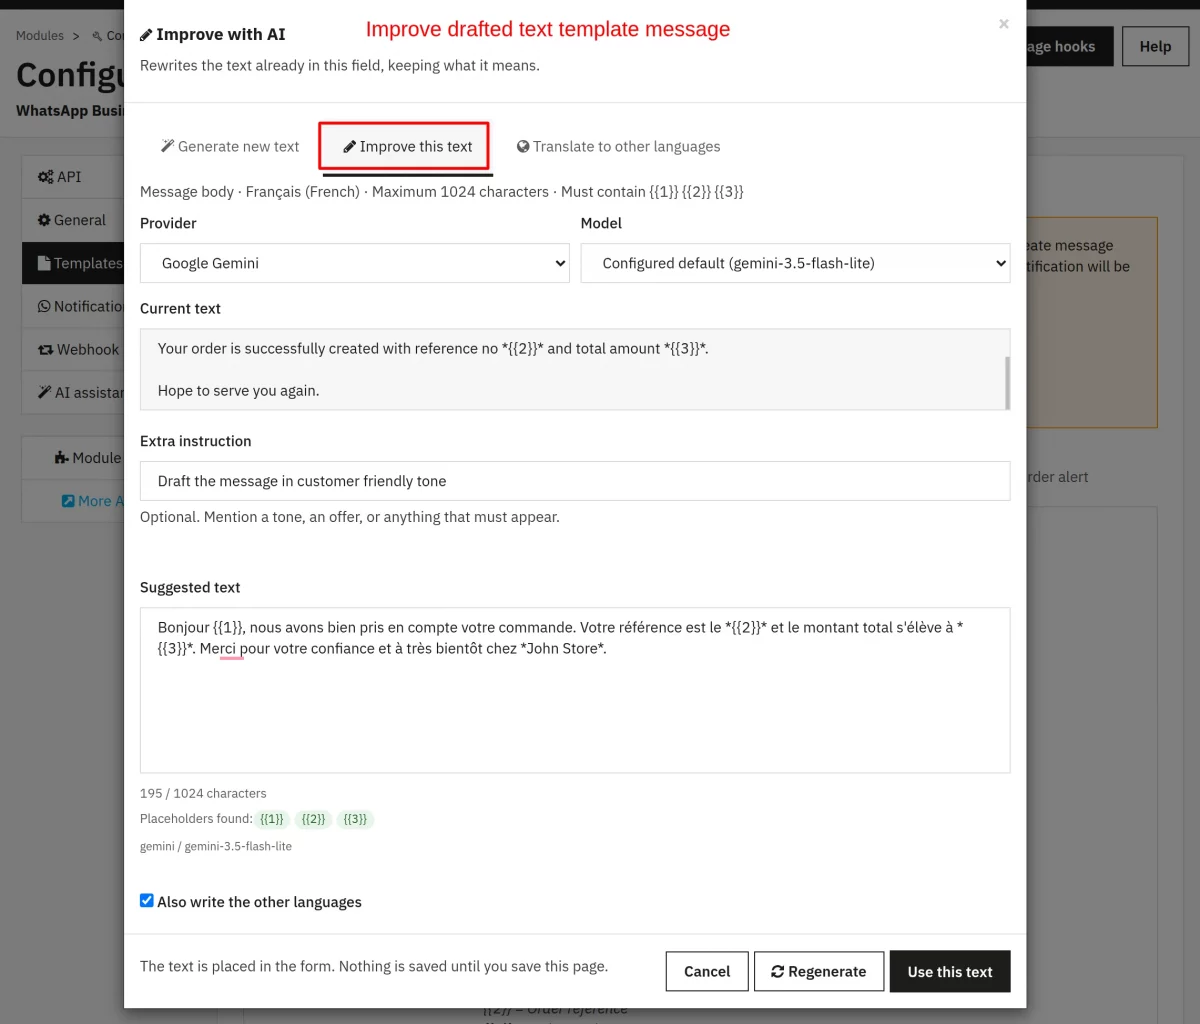
The admin can use this feature to improve the text message template that will be sent to customers. The admin can use this feature for the following reasons:
a) Generate new text: The admin has to select the provider, model, and instructions to generate new text for their purpose.

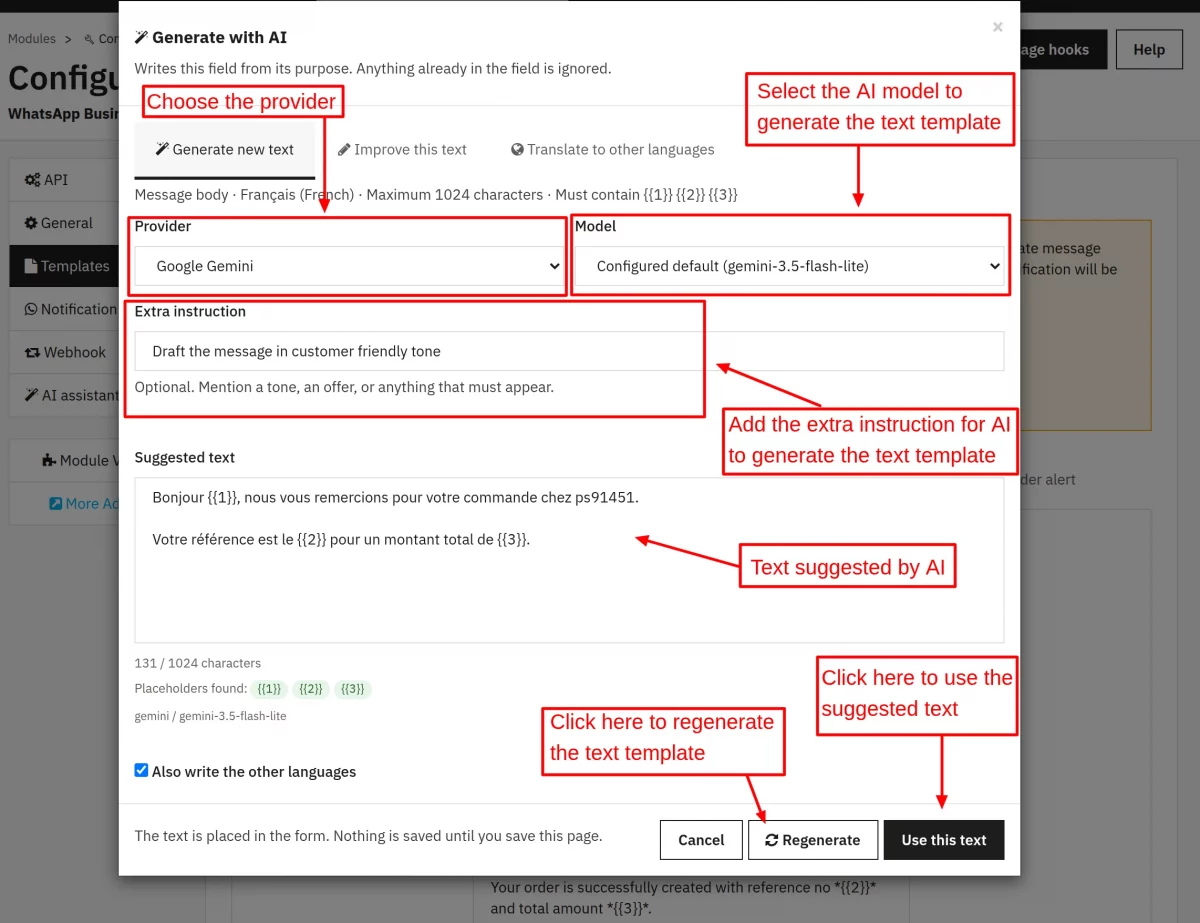
b) Improve this text: The admin can also use the AI to improve the already created text message template by adding some extra instructions for getting the desired AI text template result.

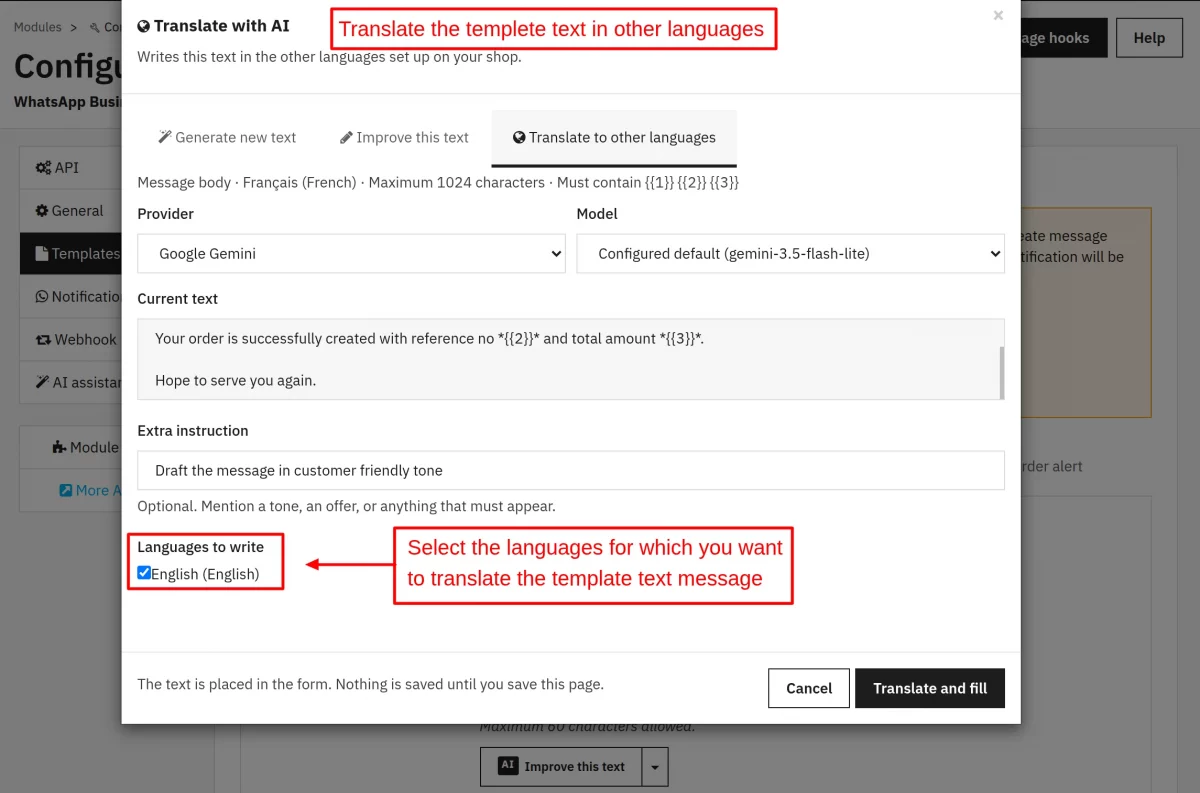
c) Translate to other languages: The admin can use this option to translate the generated/drafted text message template to any other language.
For this, the admin has to choose the AI and its model and the languages to which he wants to translate the text message.

View on WhatsApp:

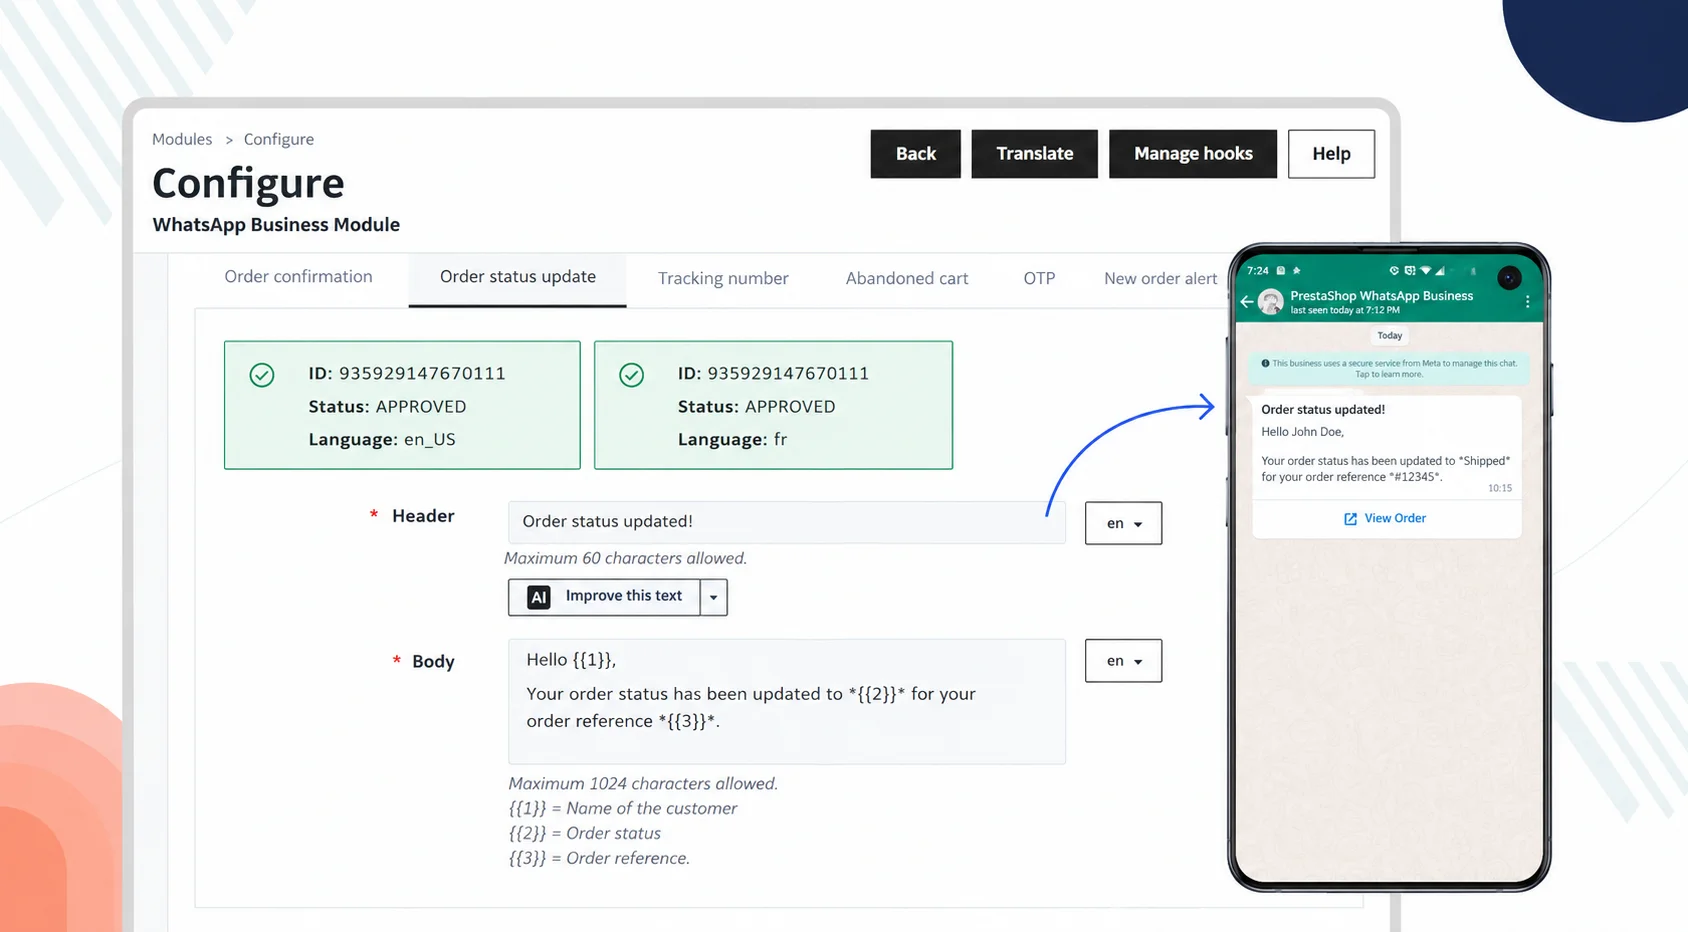
Order Status Update:

WhatsApp View:
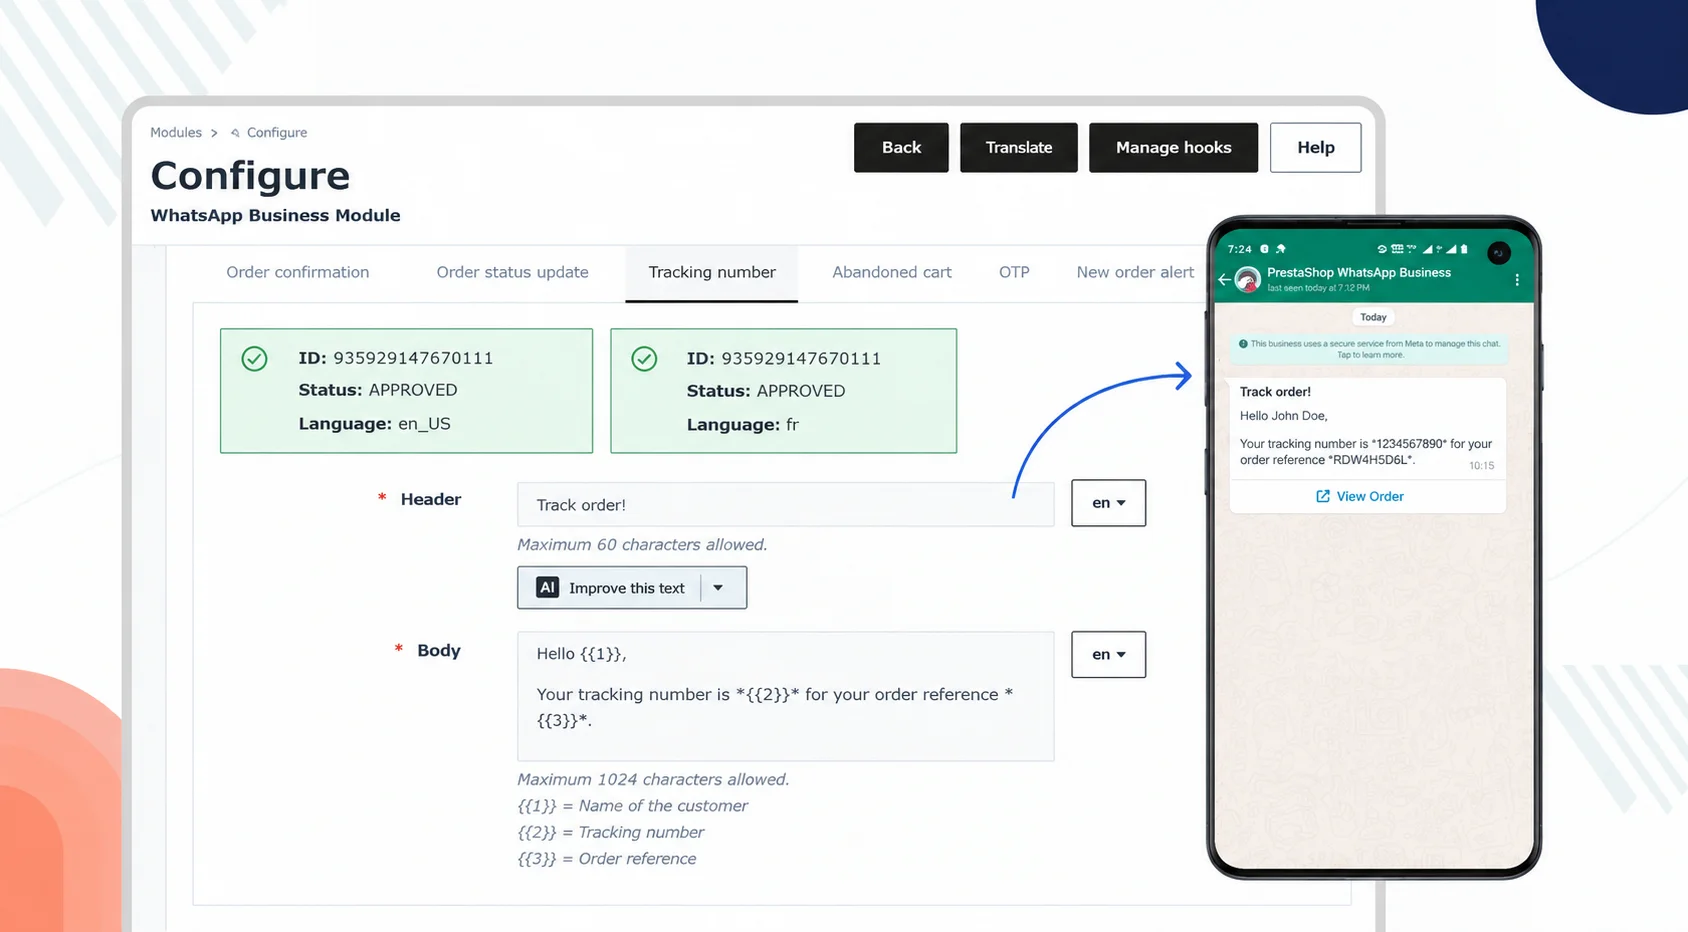
Tracking Number:

WhatsApp View:
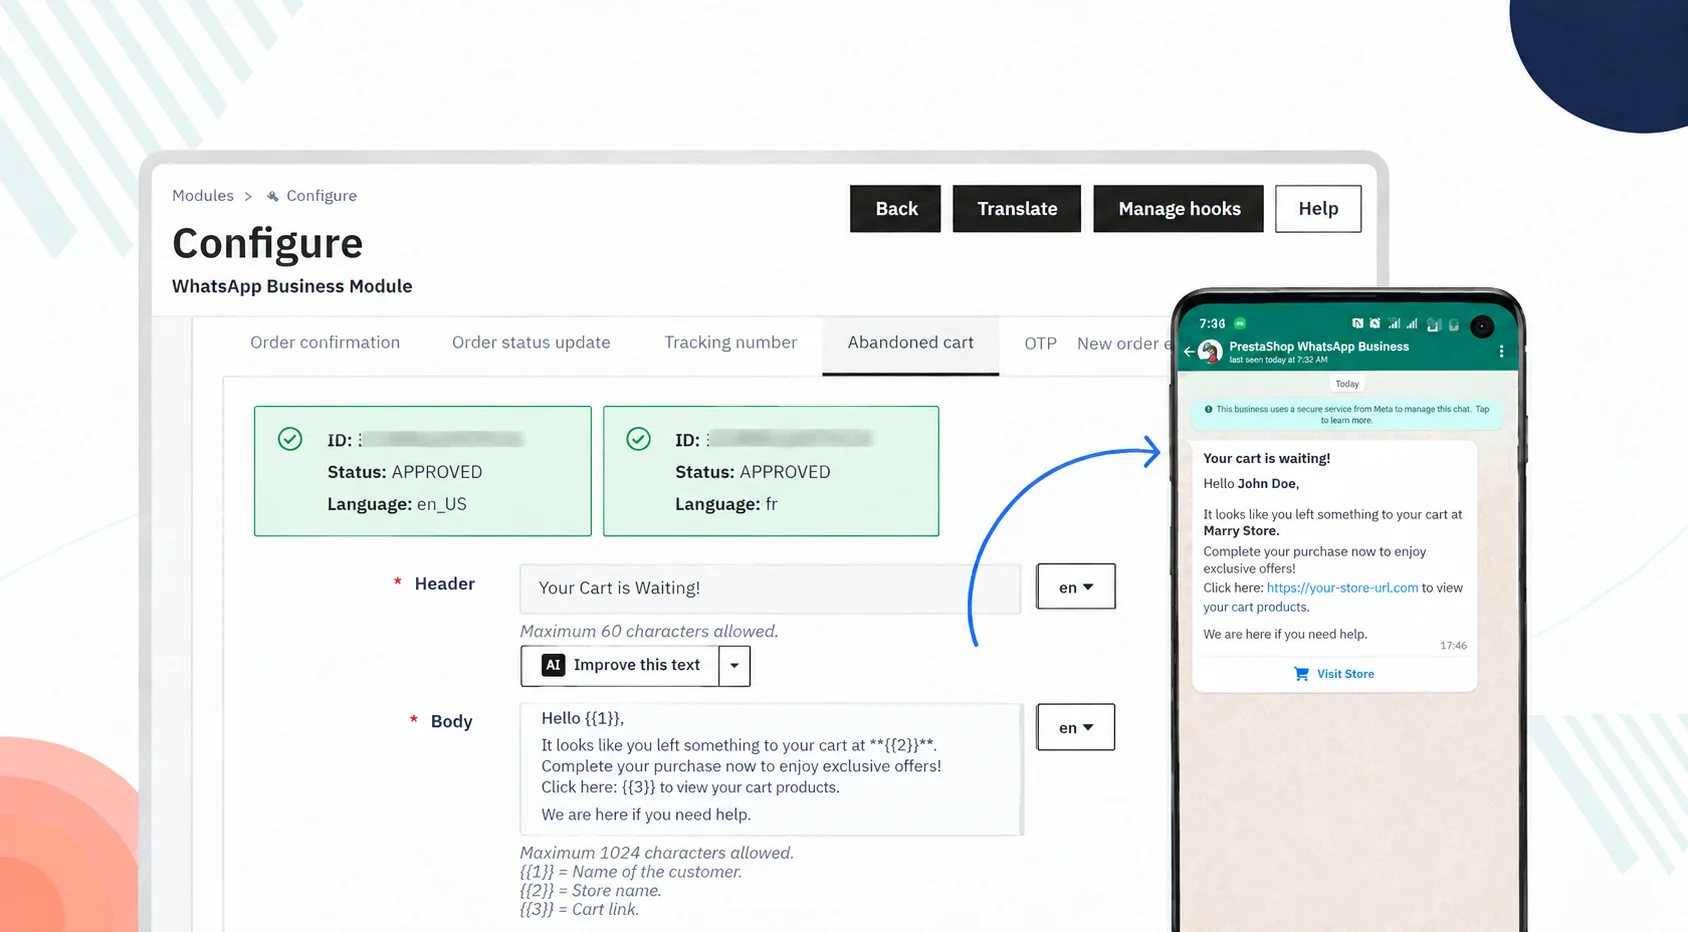
Abandoned Cart:
The admin can set the WhatsApp message template to send to the customers when their cart is abandoned.

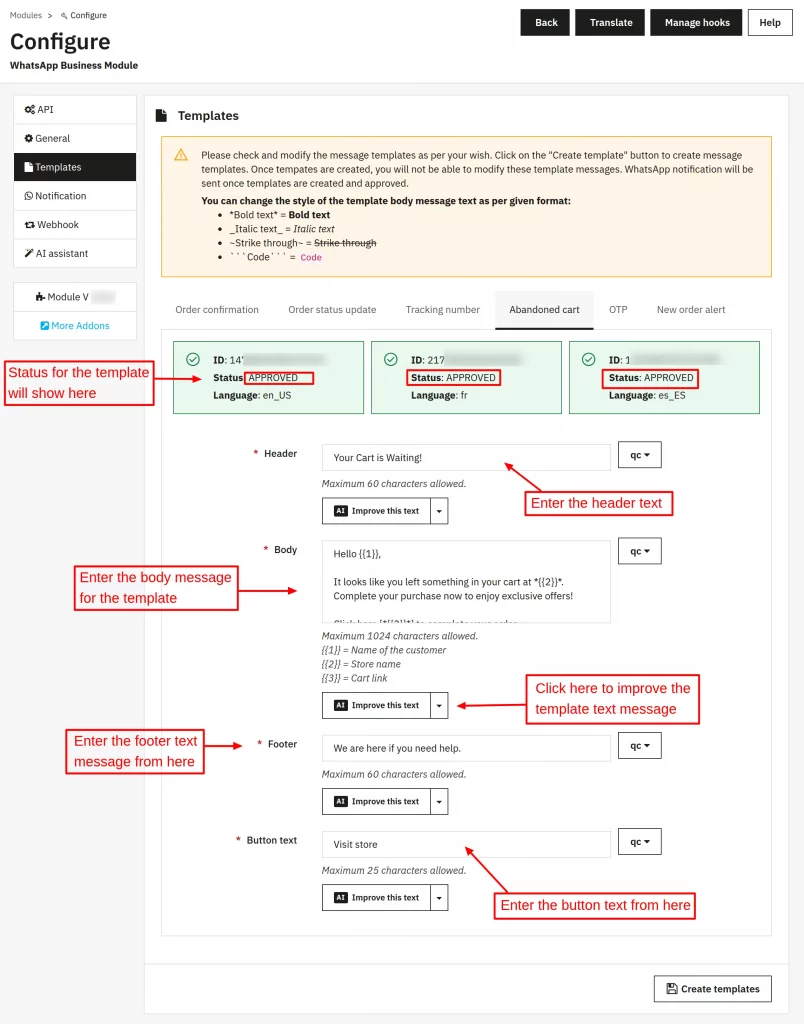
Note: A cart will be considered abandoned when a customer adds products to their cart and doesn’t purchase within 24 hours.
Also, the module will send the WhatsApp notification till 3 days when the customer’s cart is abandoned.
WhatsApp View:
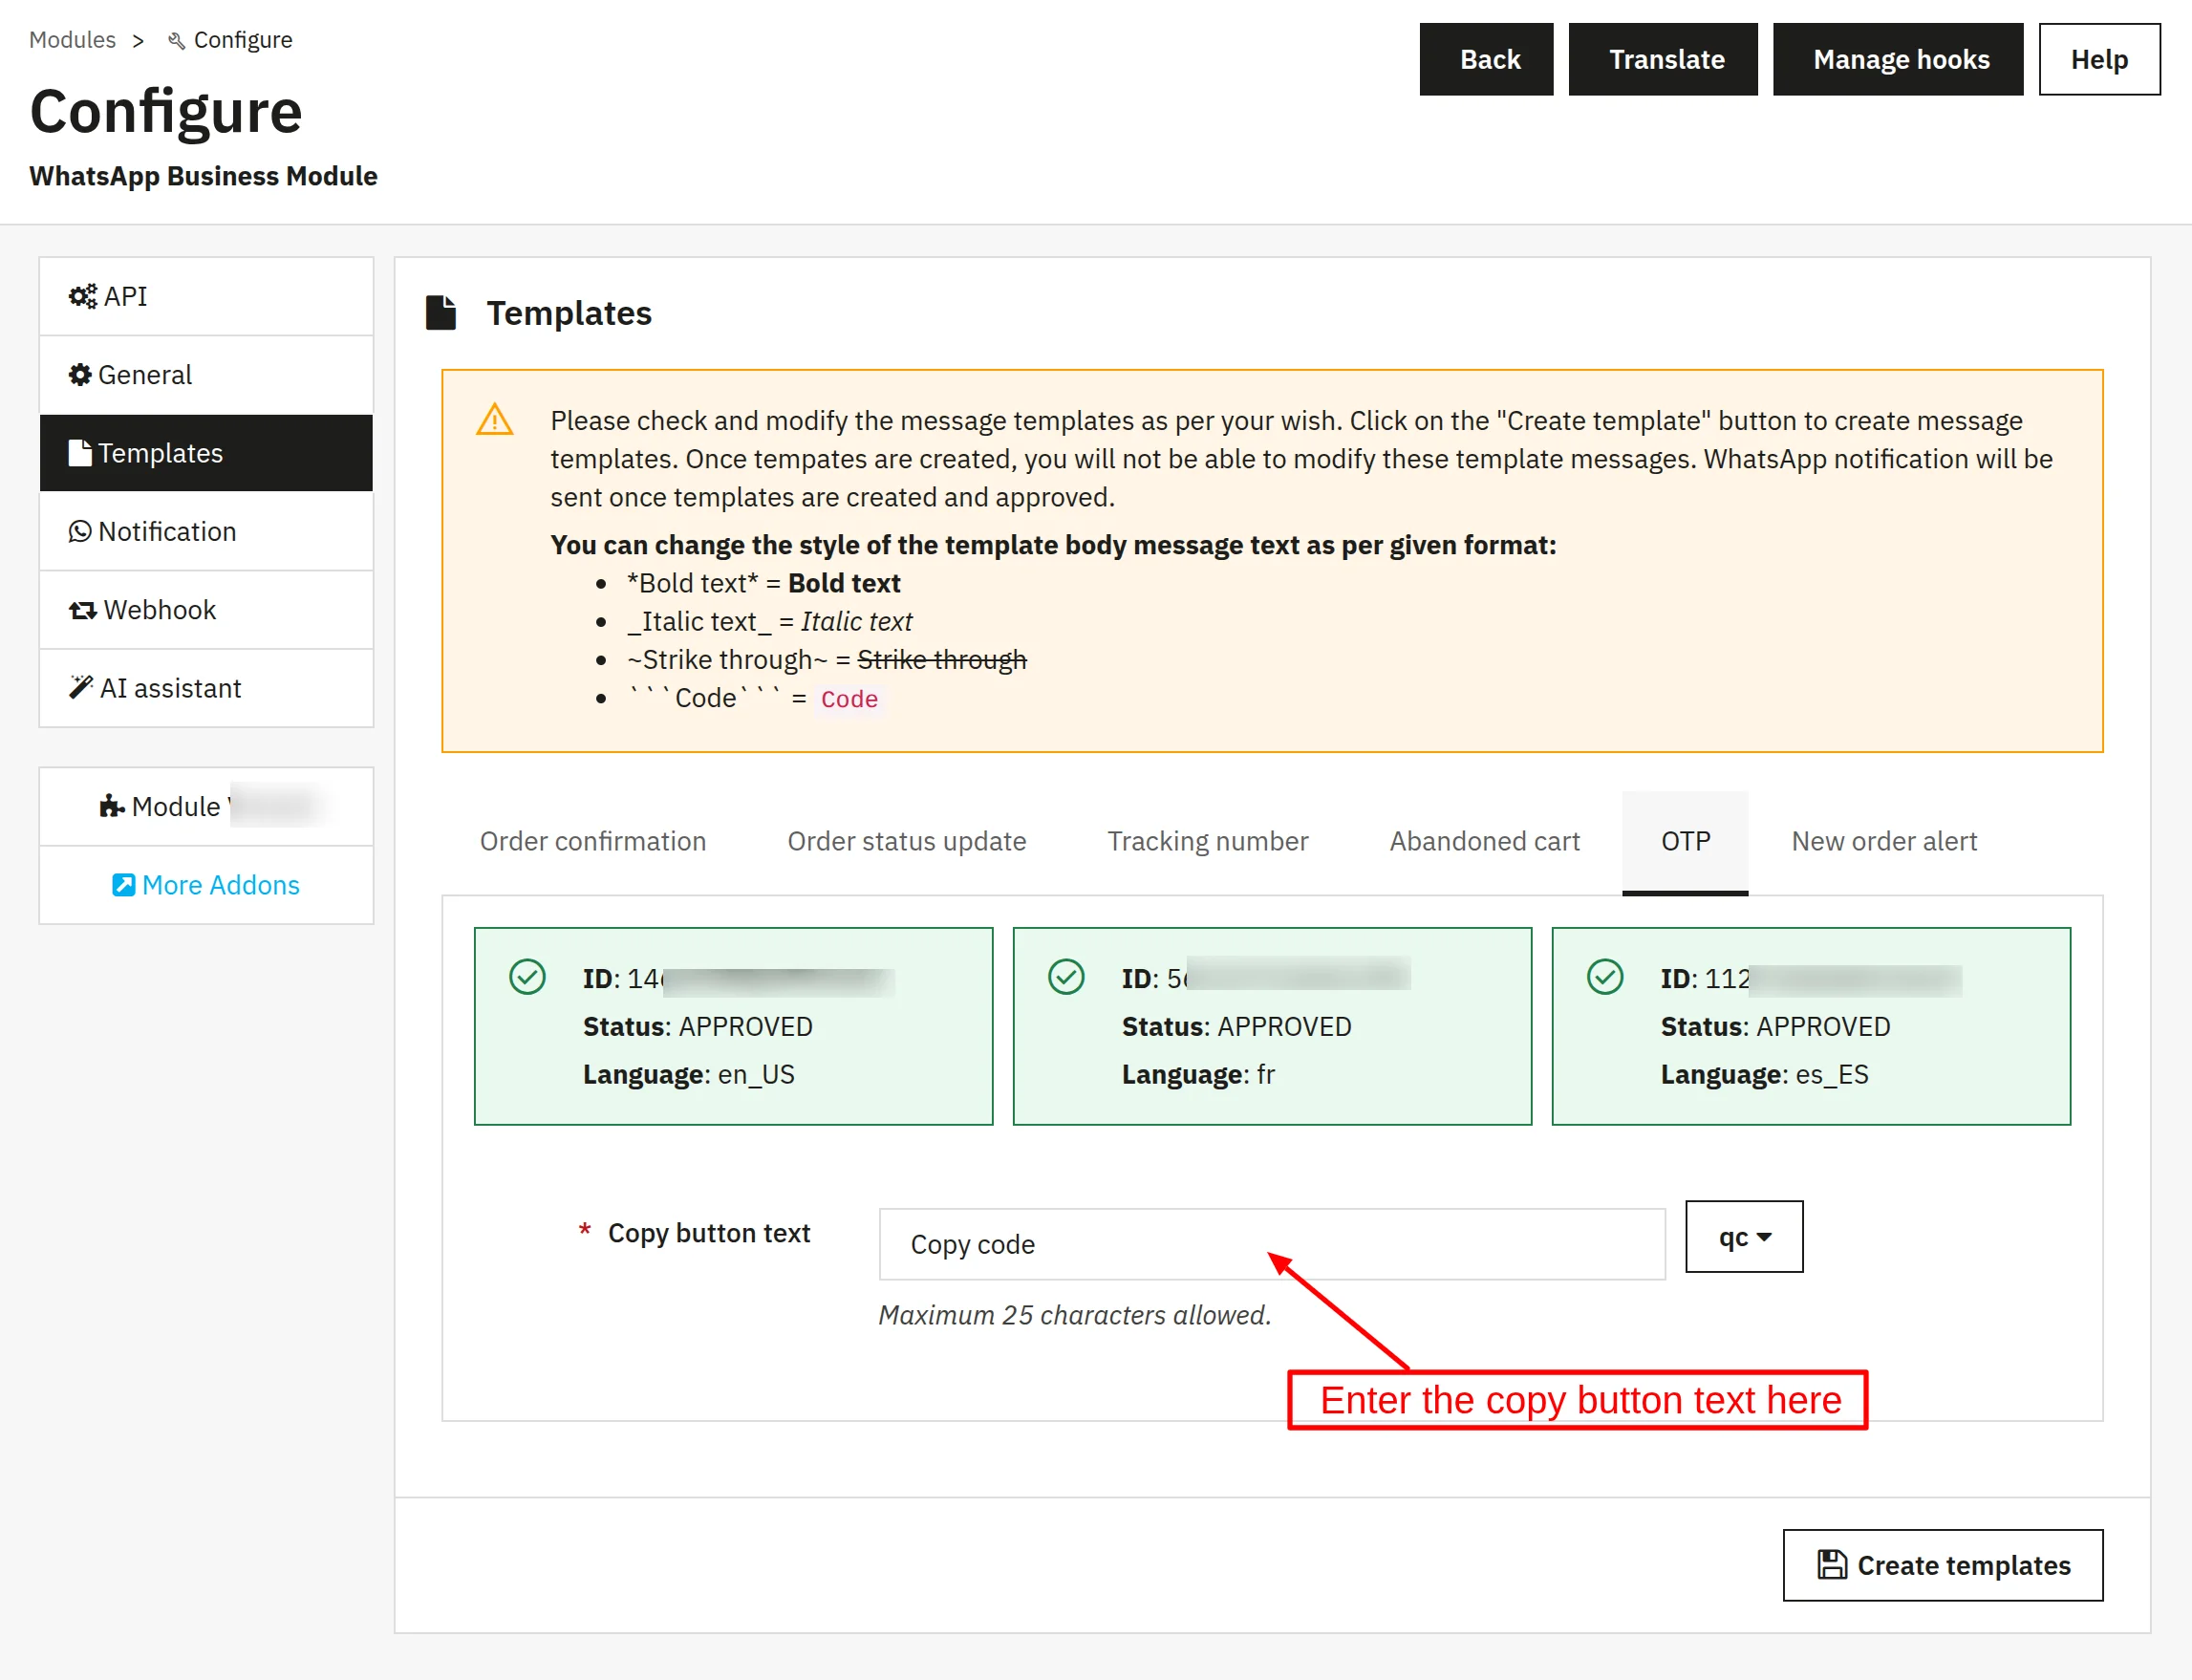
OTP:
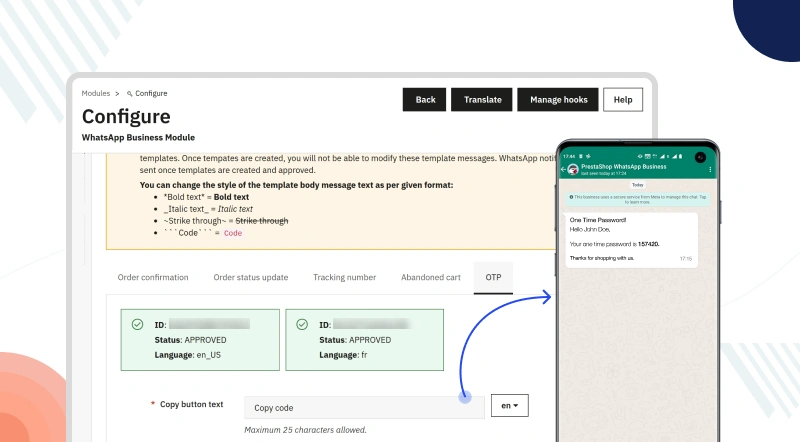
Here you will need to set the template of the OTP message which will be sent to the customer for WhatsApp number verification when he/she opts to receive the messages.

WhatsApp View:

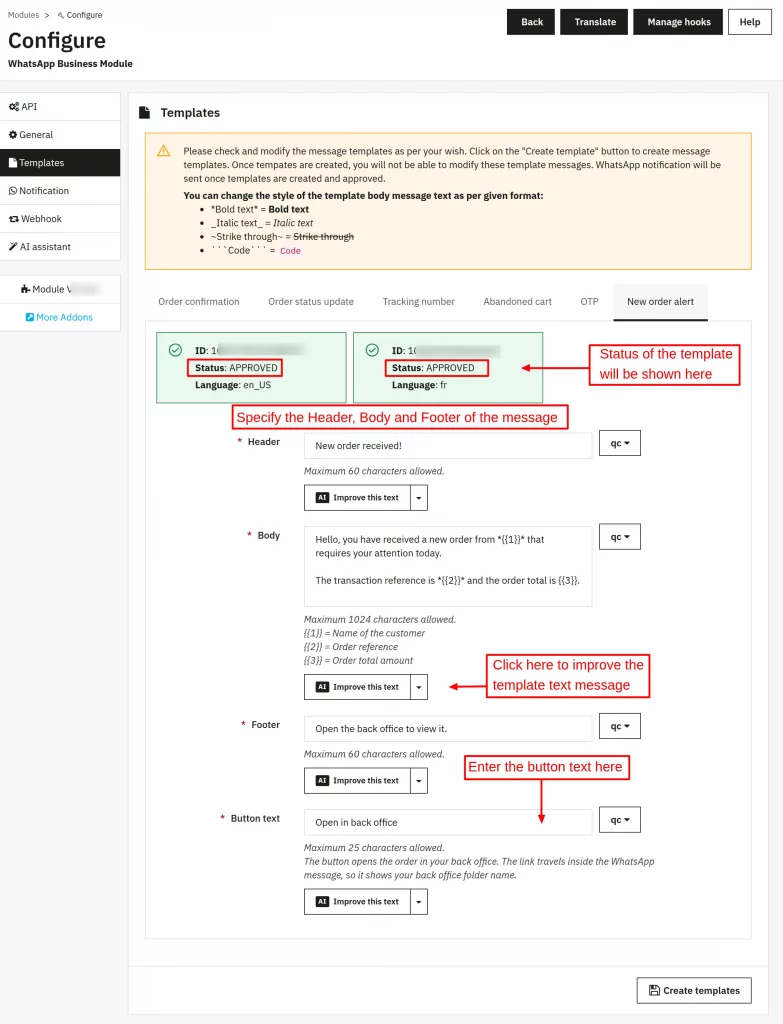
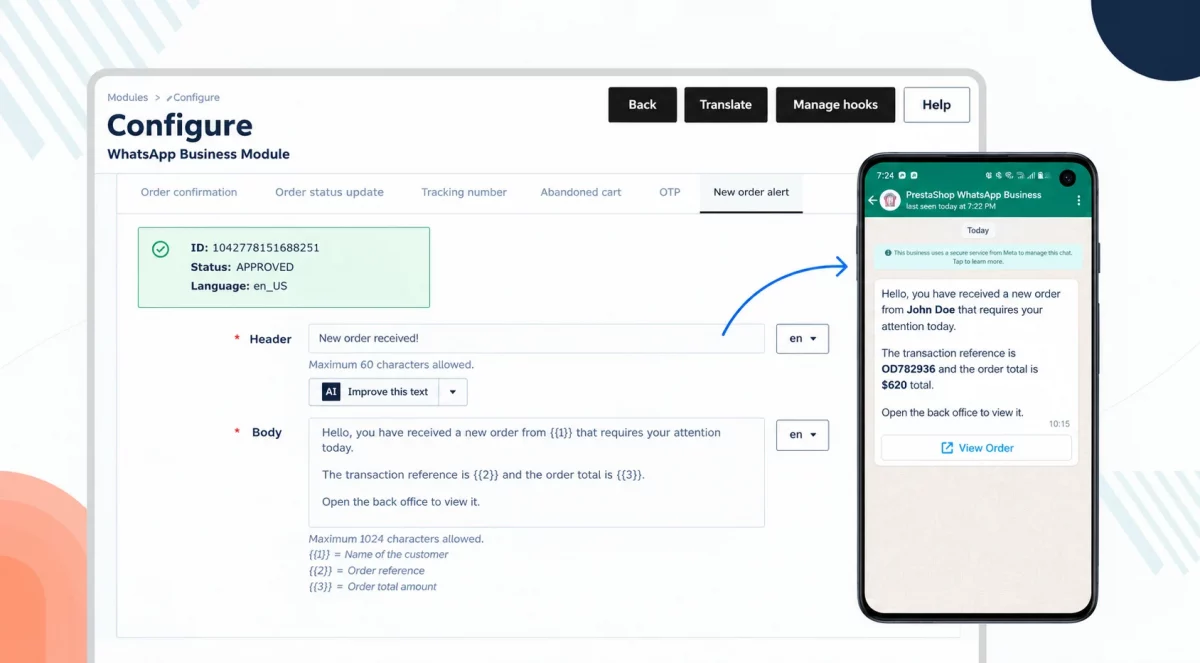
New order alert:
The admin can set the WhatsApp message template to receive on the configured WhatsApp number when any customer places a new order.

WhatsApp View:

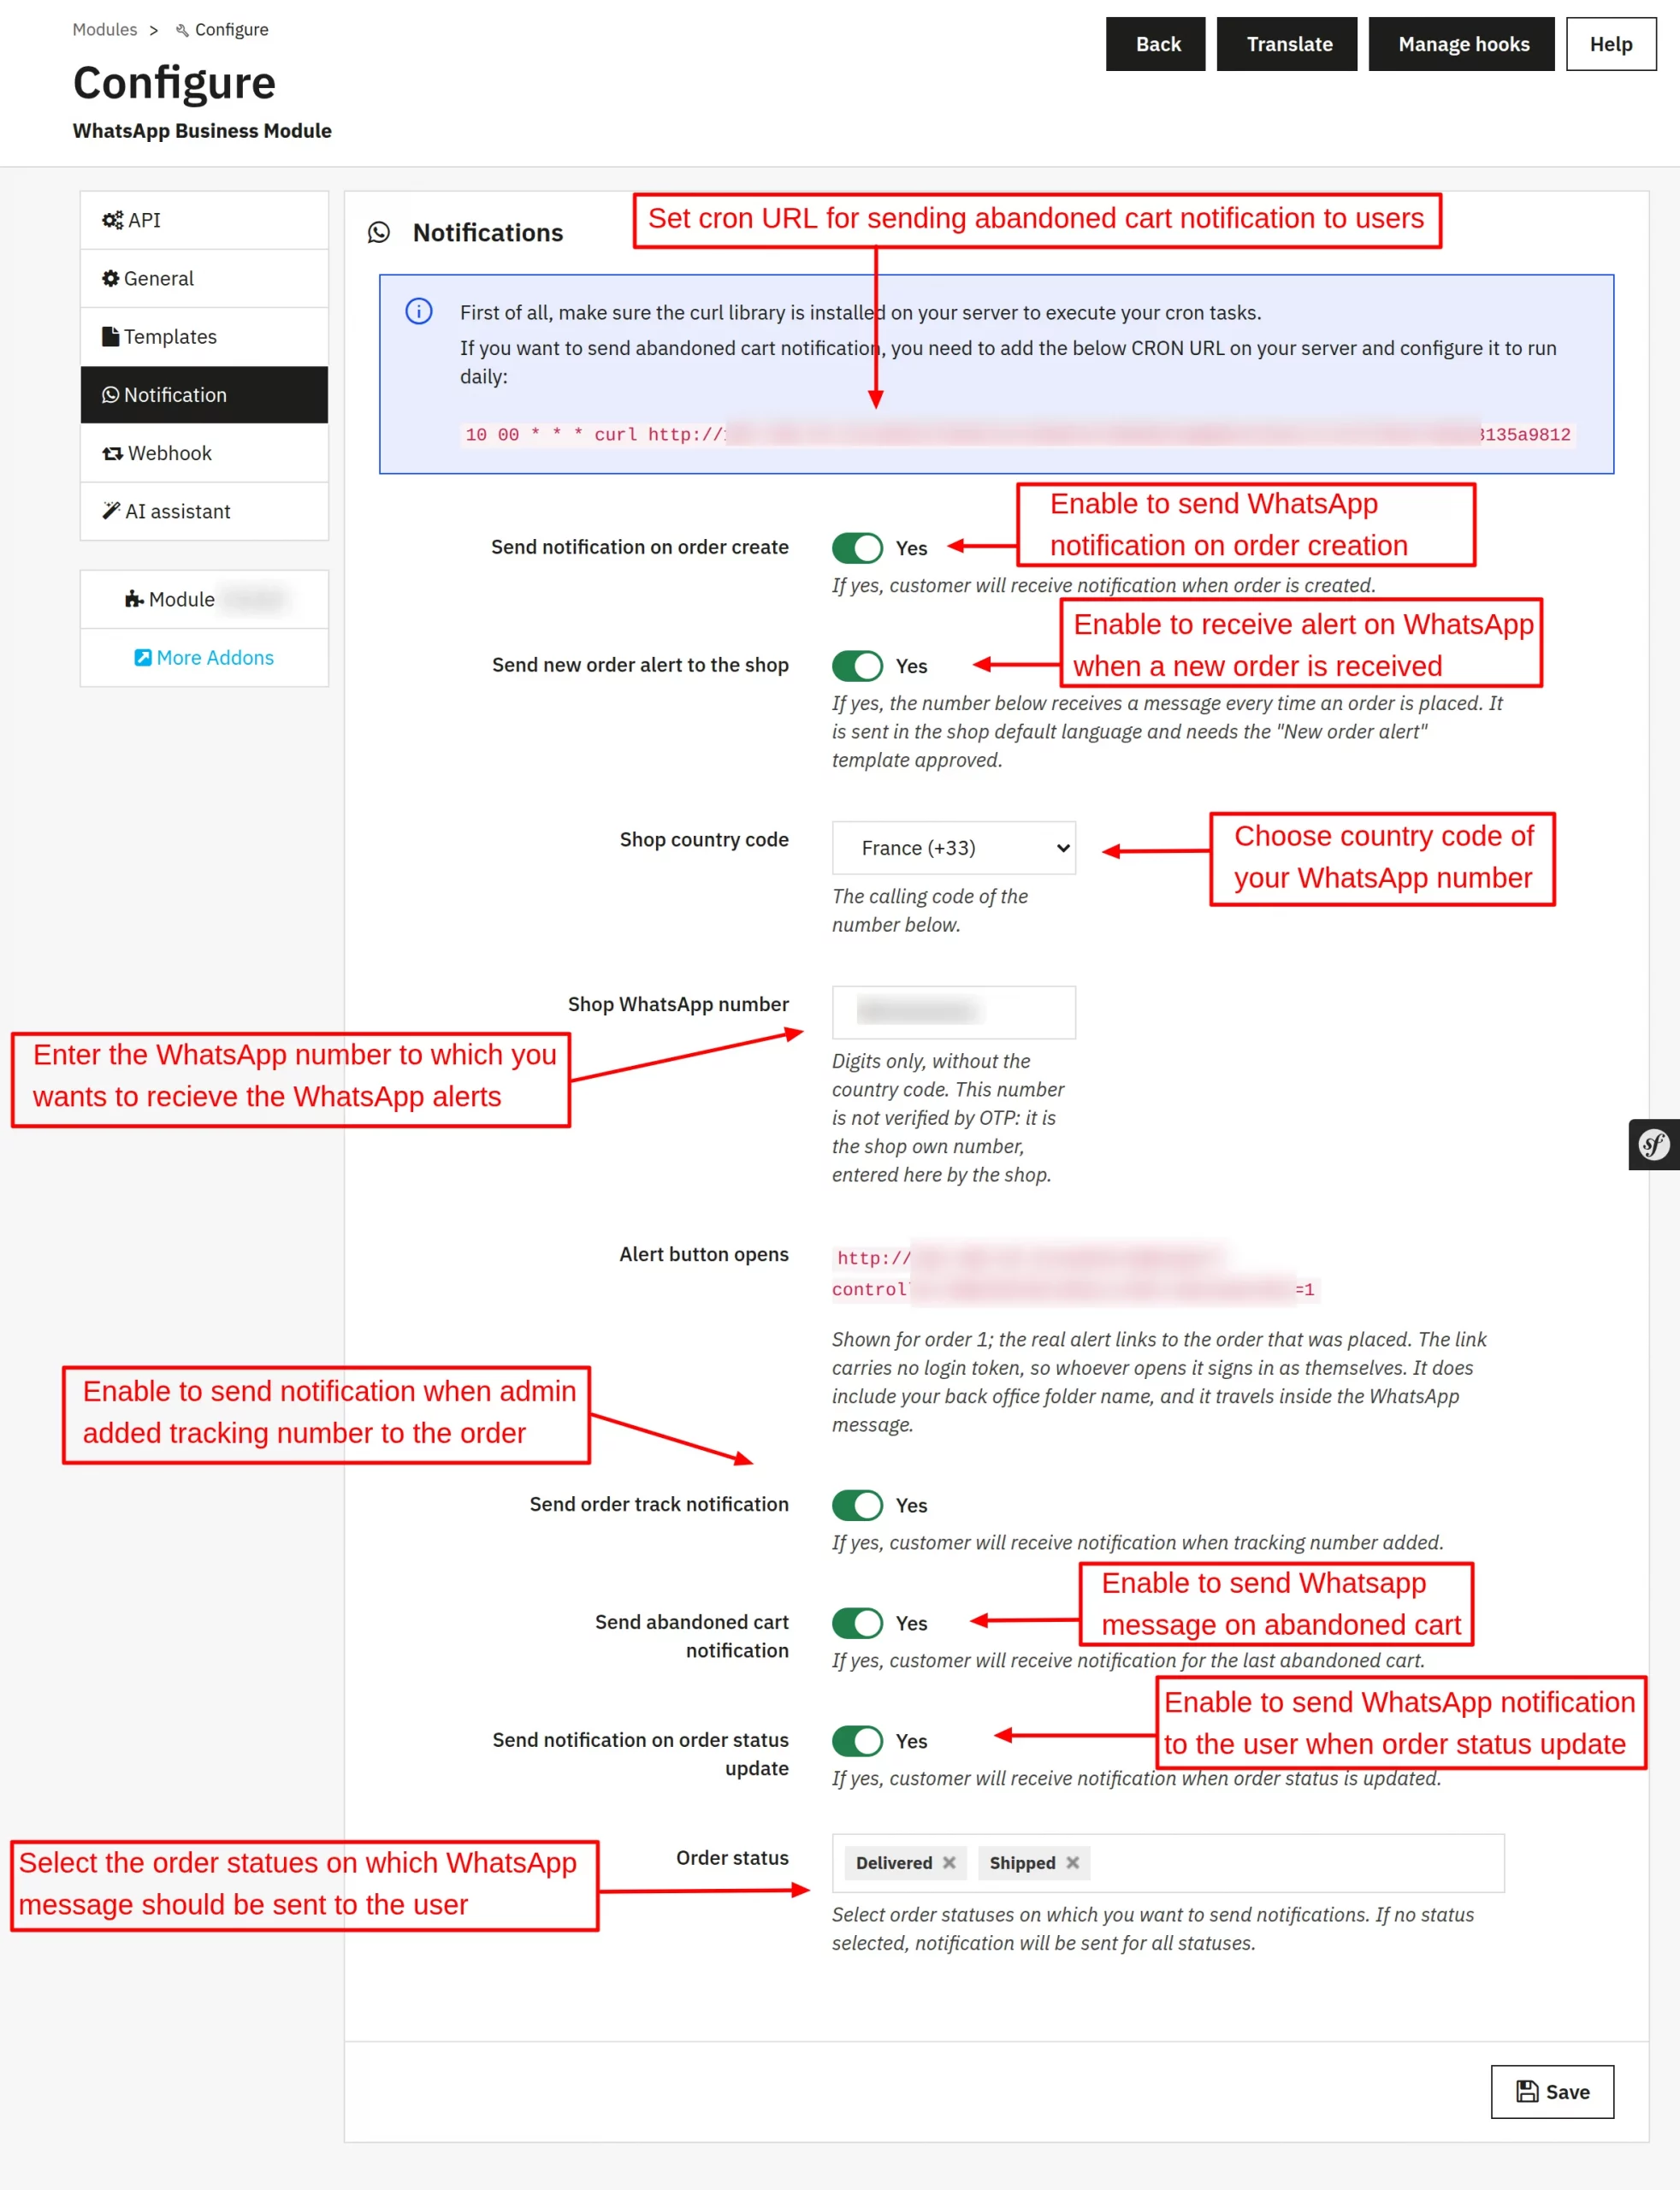
Notifications:
This tab lets the admin decide whether to send notifications to the user or not. You can configure it event-wise.
You can also select the order status for which the module sends WhatsApp notifications to the users.

Webhook:
By configuring this you can automate response to customer queries and also when you send campaign to customer there response will be replied by Webhook to proceed further.

Example:
Customer sends you any random message on WhatsApp. Say “Hi”. Now, after receiving “Hi” from customer, an automatic response will be generated and sent to the customer.


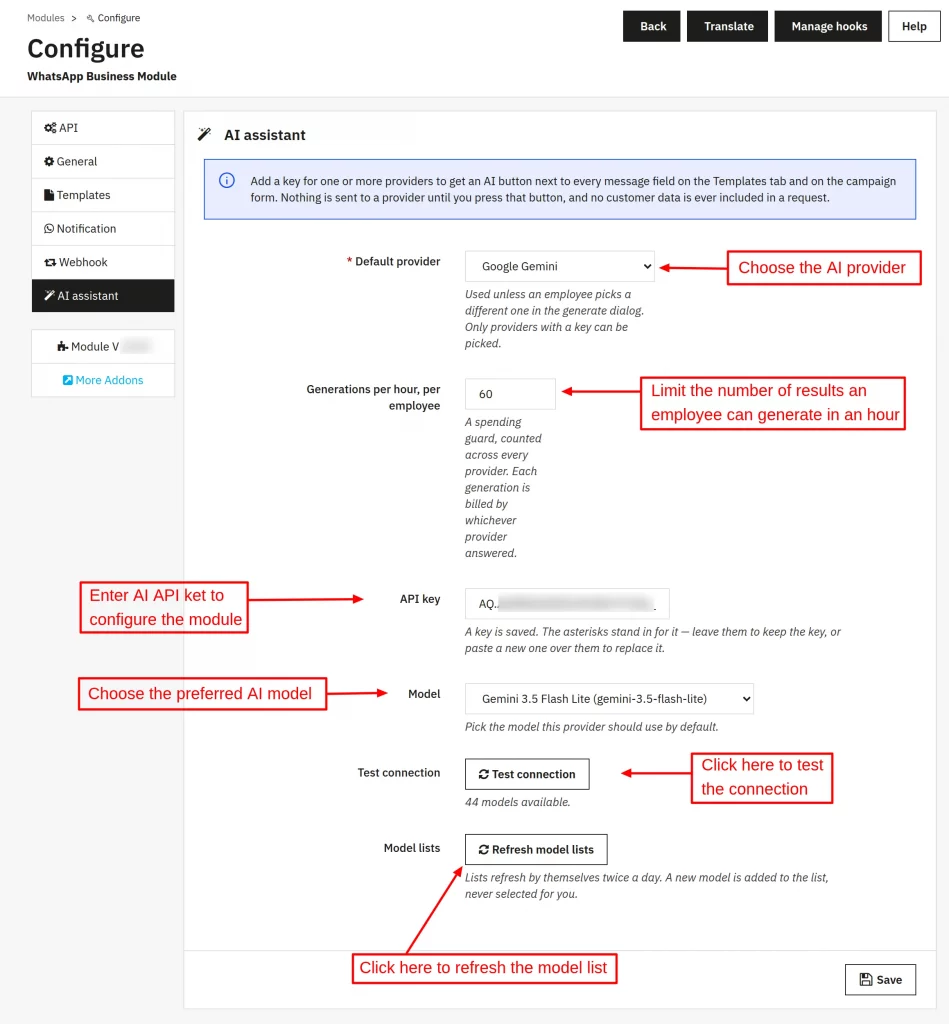
AI assistant:
The admin can integrate the module with AI like Anthropic (Claude), OpenAI, and Google Gemini, and choose their preferred models to improve the WhatsApp text message templates sent to the customers.

Add Campaigns
You can create campaigns for marketing purposes and send them to your customers on WhatsApp.

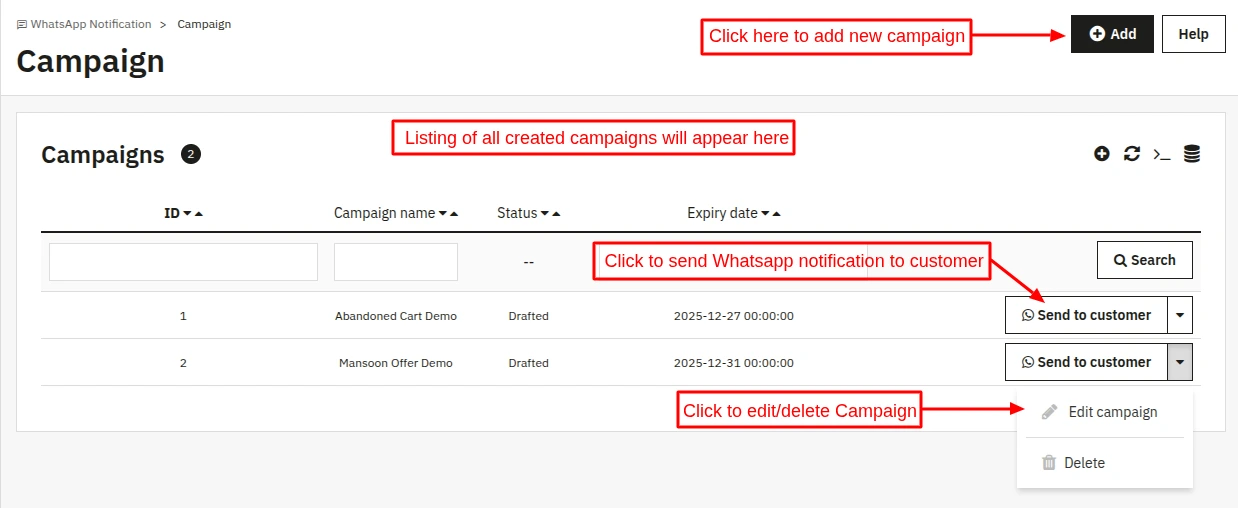
While creating Campaigns, you can set “Header Type” to either:
1) Text
2) Image
Furthermore, you can include interactive and more appealing buttons to your campaign messages. These buttons can be of 2 types:
– CTA (Call To Action):
a) Call
b) Visit Website
– Quick reply
Note: In case of campaign template rejection, you can review the reason on the Facebook developer account and take appropriate action as suggested by the Facebook team and send it again for review.
We are going to create few campaigns and see how do they look.
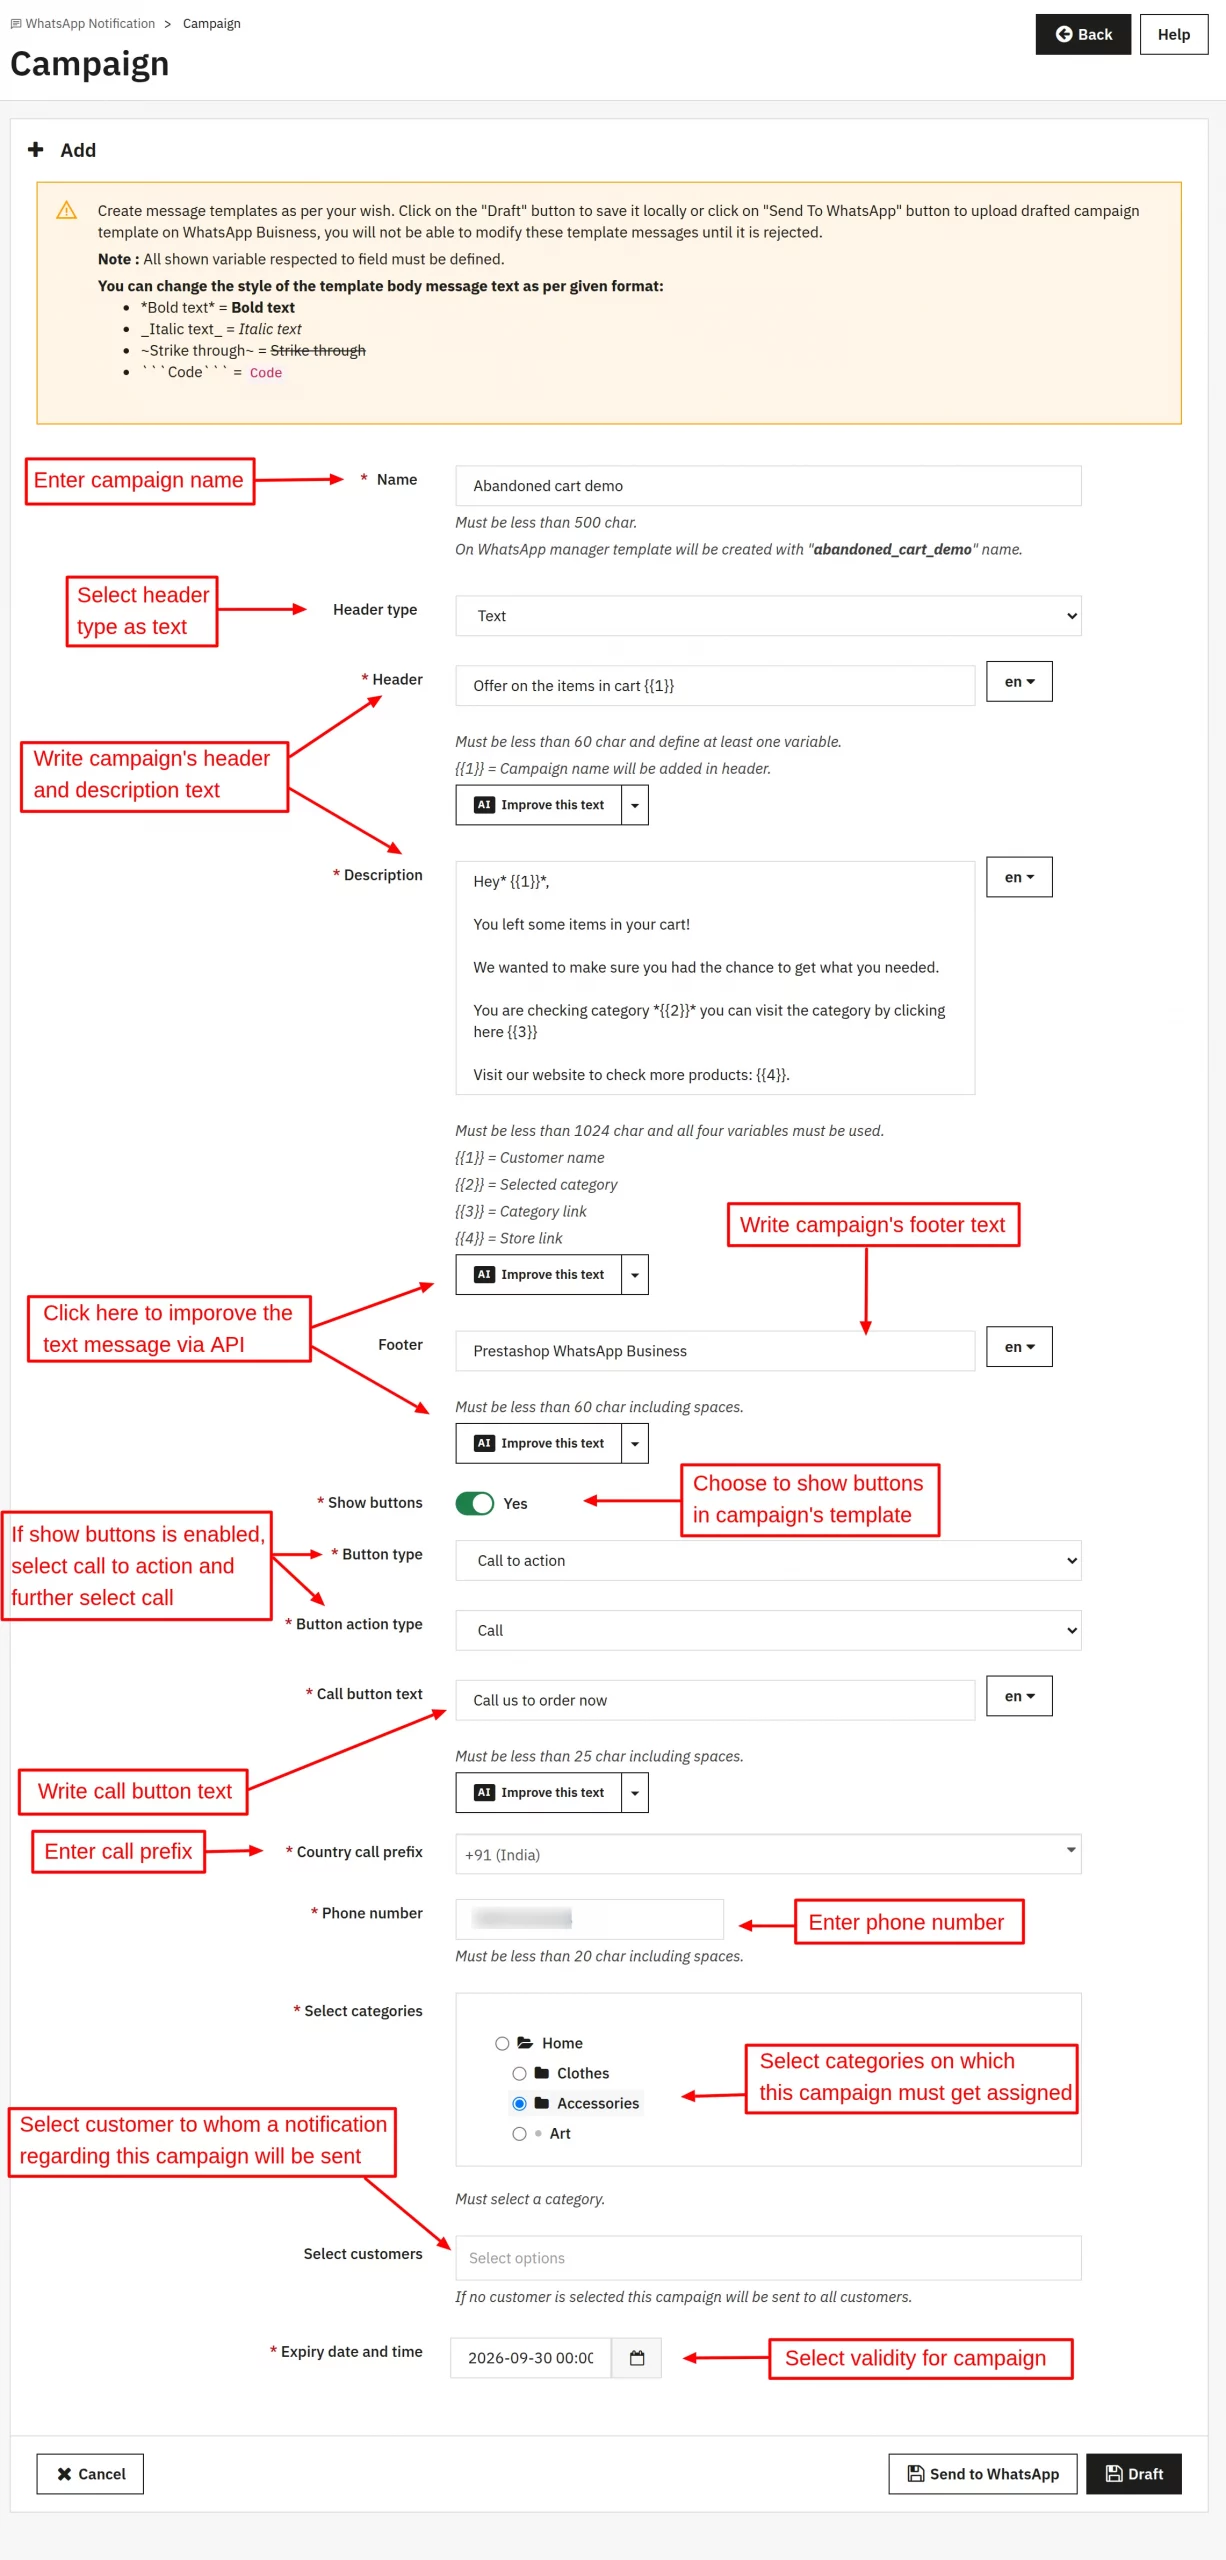
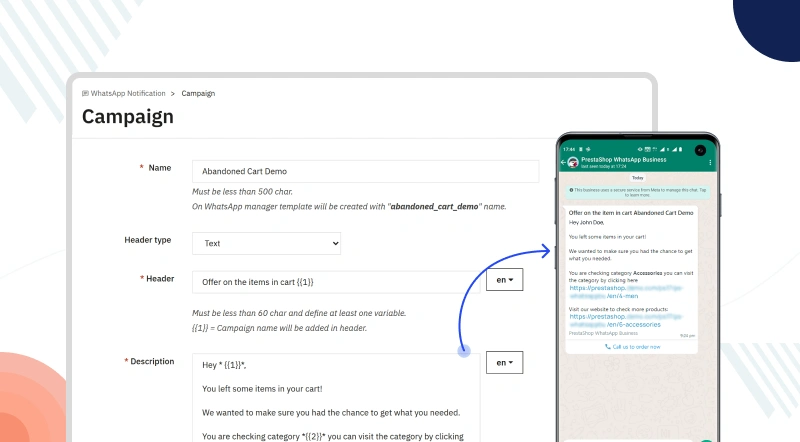
Campaign 1:
Campaign Name: Abandoned Cart Demo
Header Type: Text
Show Buttons: Enabled
Button Type: Call to Action
Button Action Type: Call

WhatsApp Look:
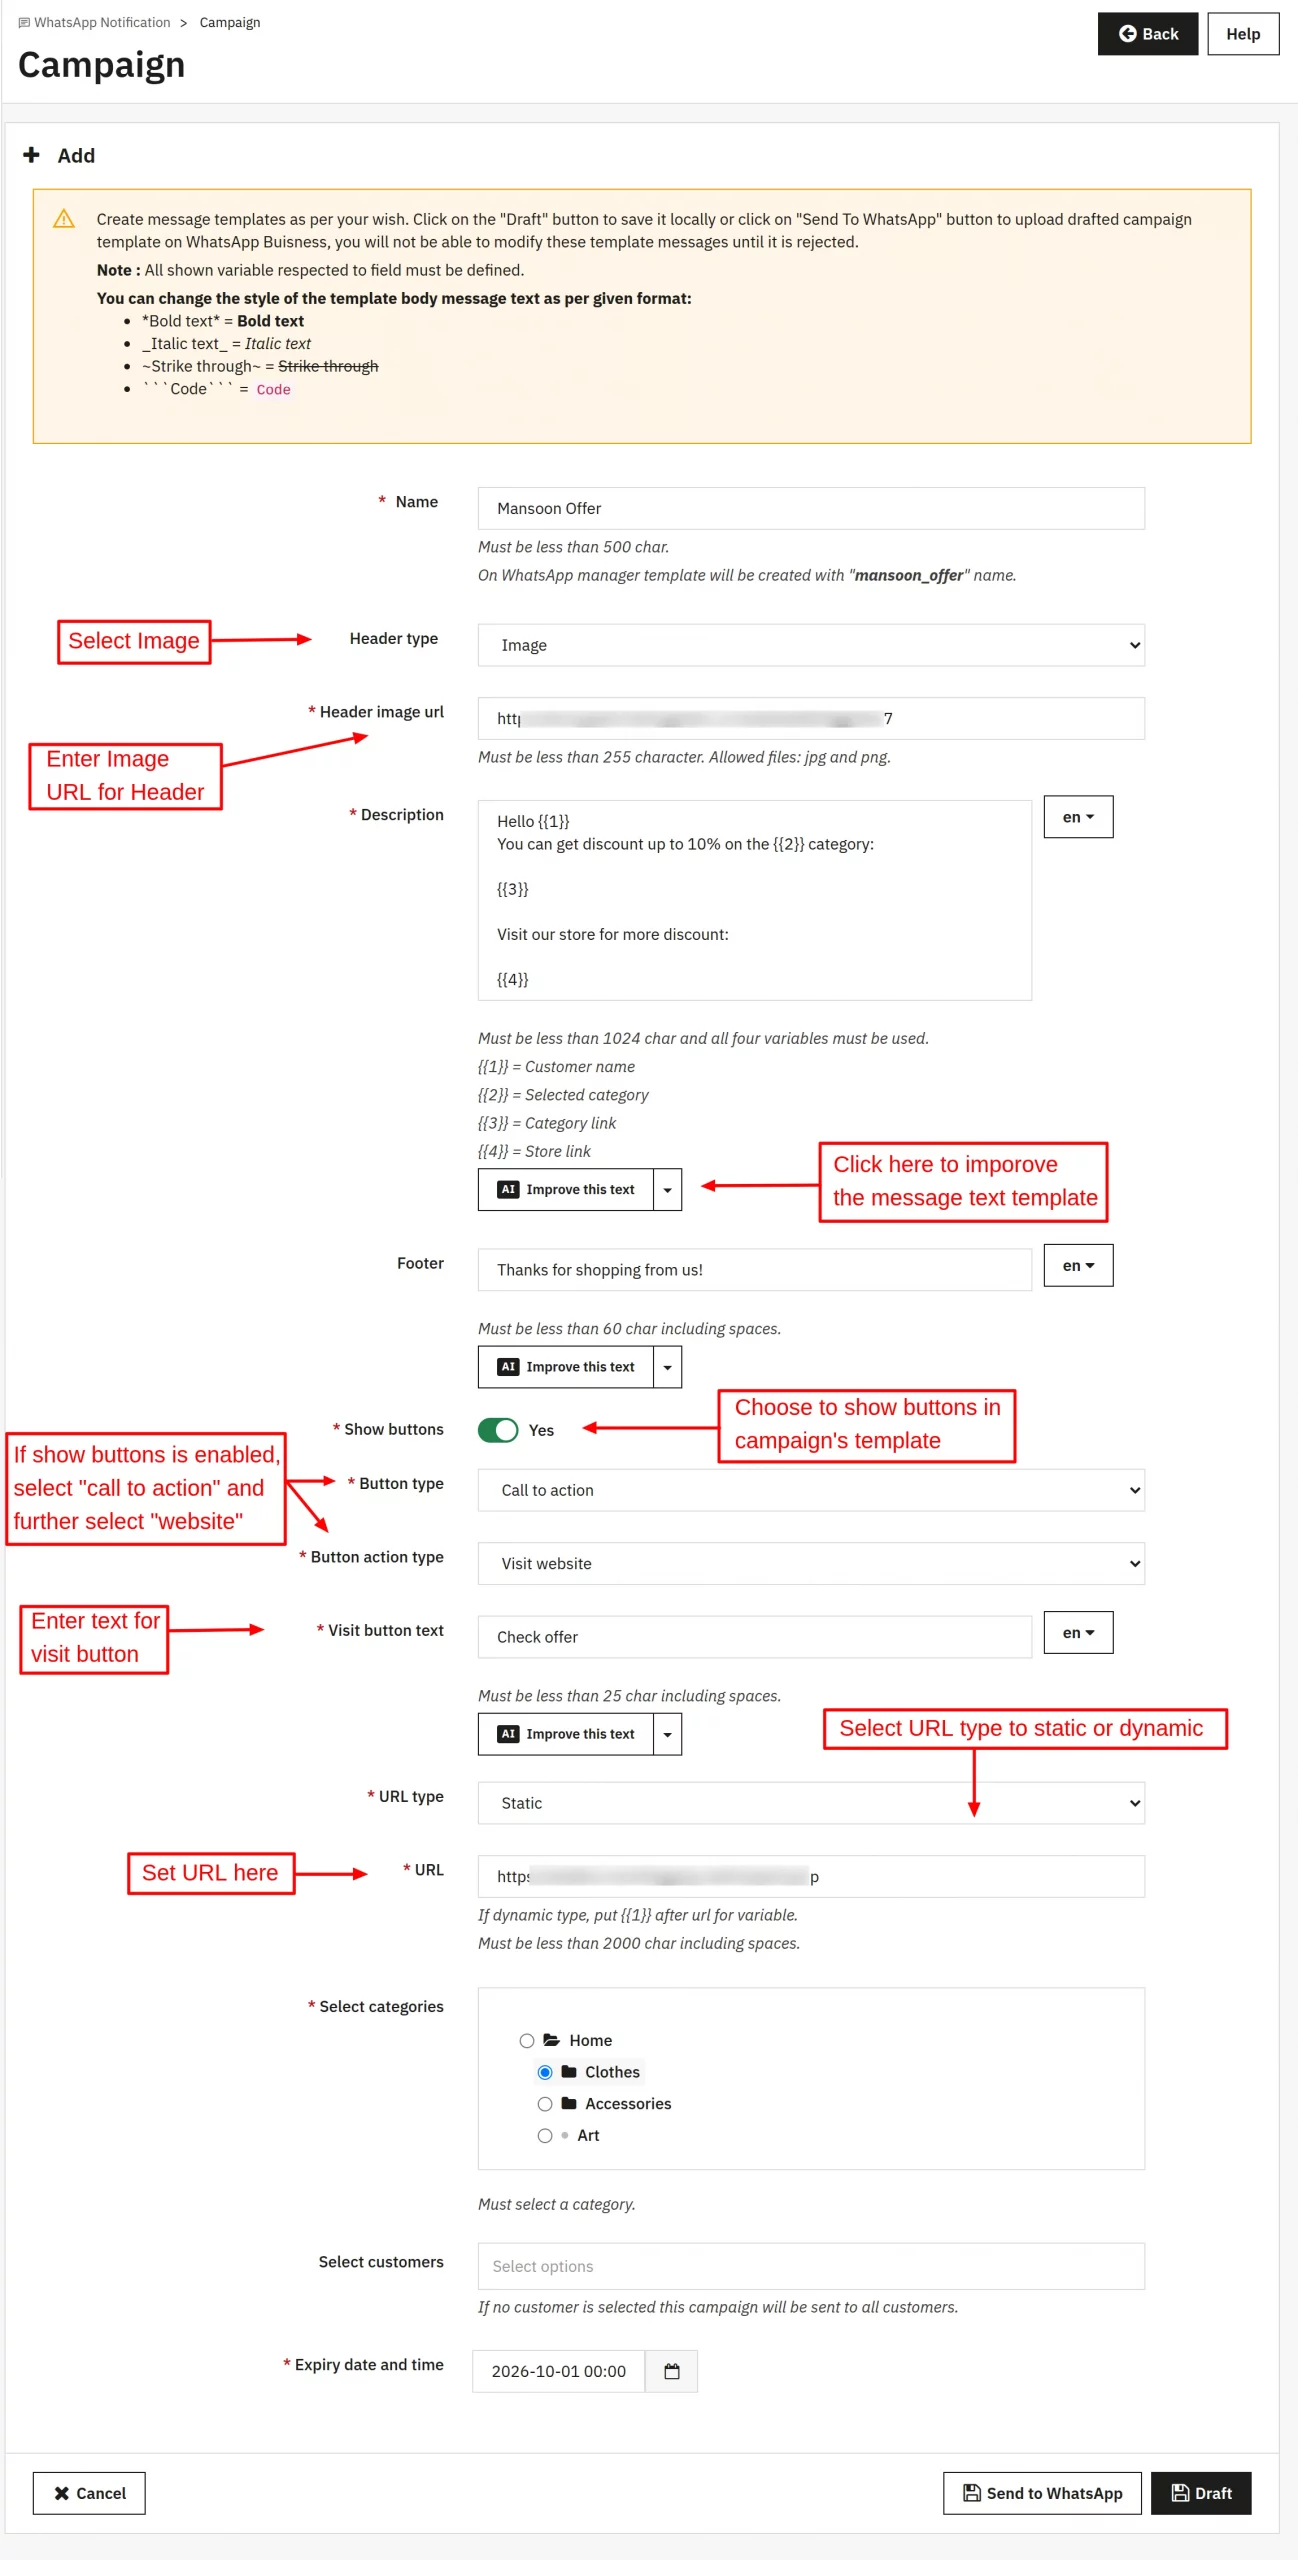
Campaign 2:
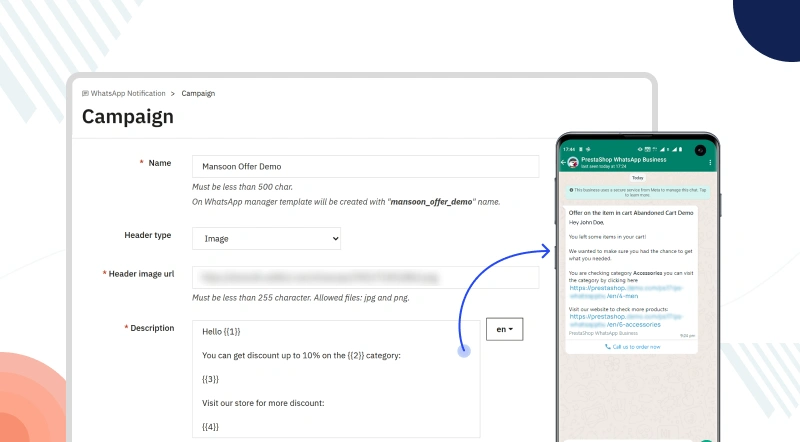
Campaign Name: Monsoon Offer
Header Type: Image
Show Buttons: Enabled
Button Type: Call to Action
Button Action Type: Visit Website

View on WhatsApp:
Campaign 3:
Campaign Name: Summer Offer
Header Type: Image
Show Buttons: Enabled
Button Type: Quick Reply
Button Action Type: Visit Website

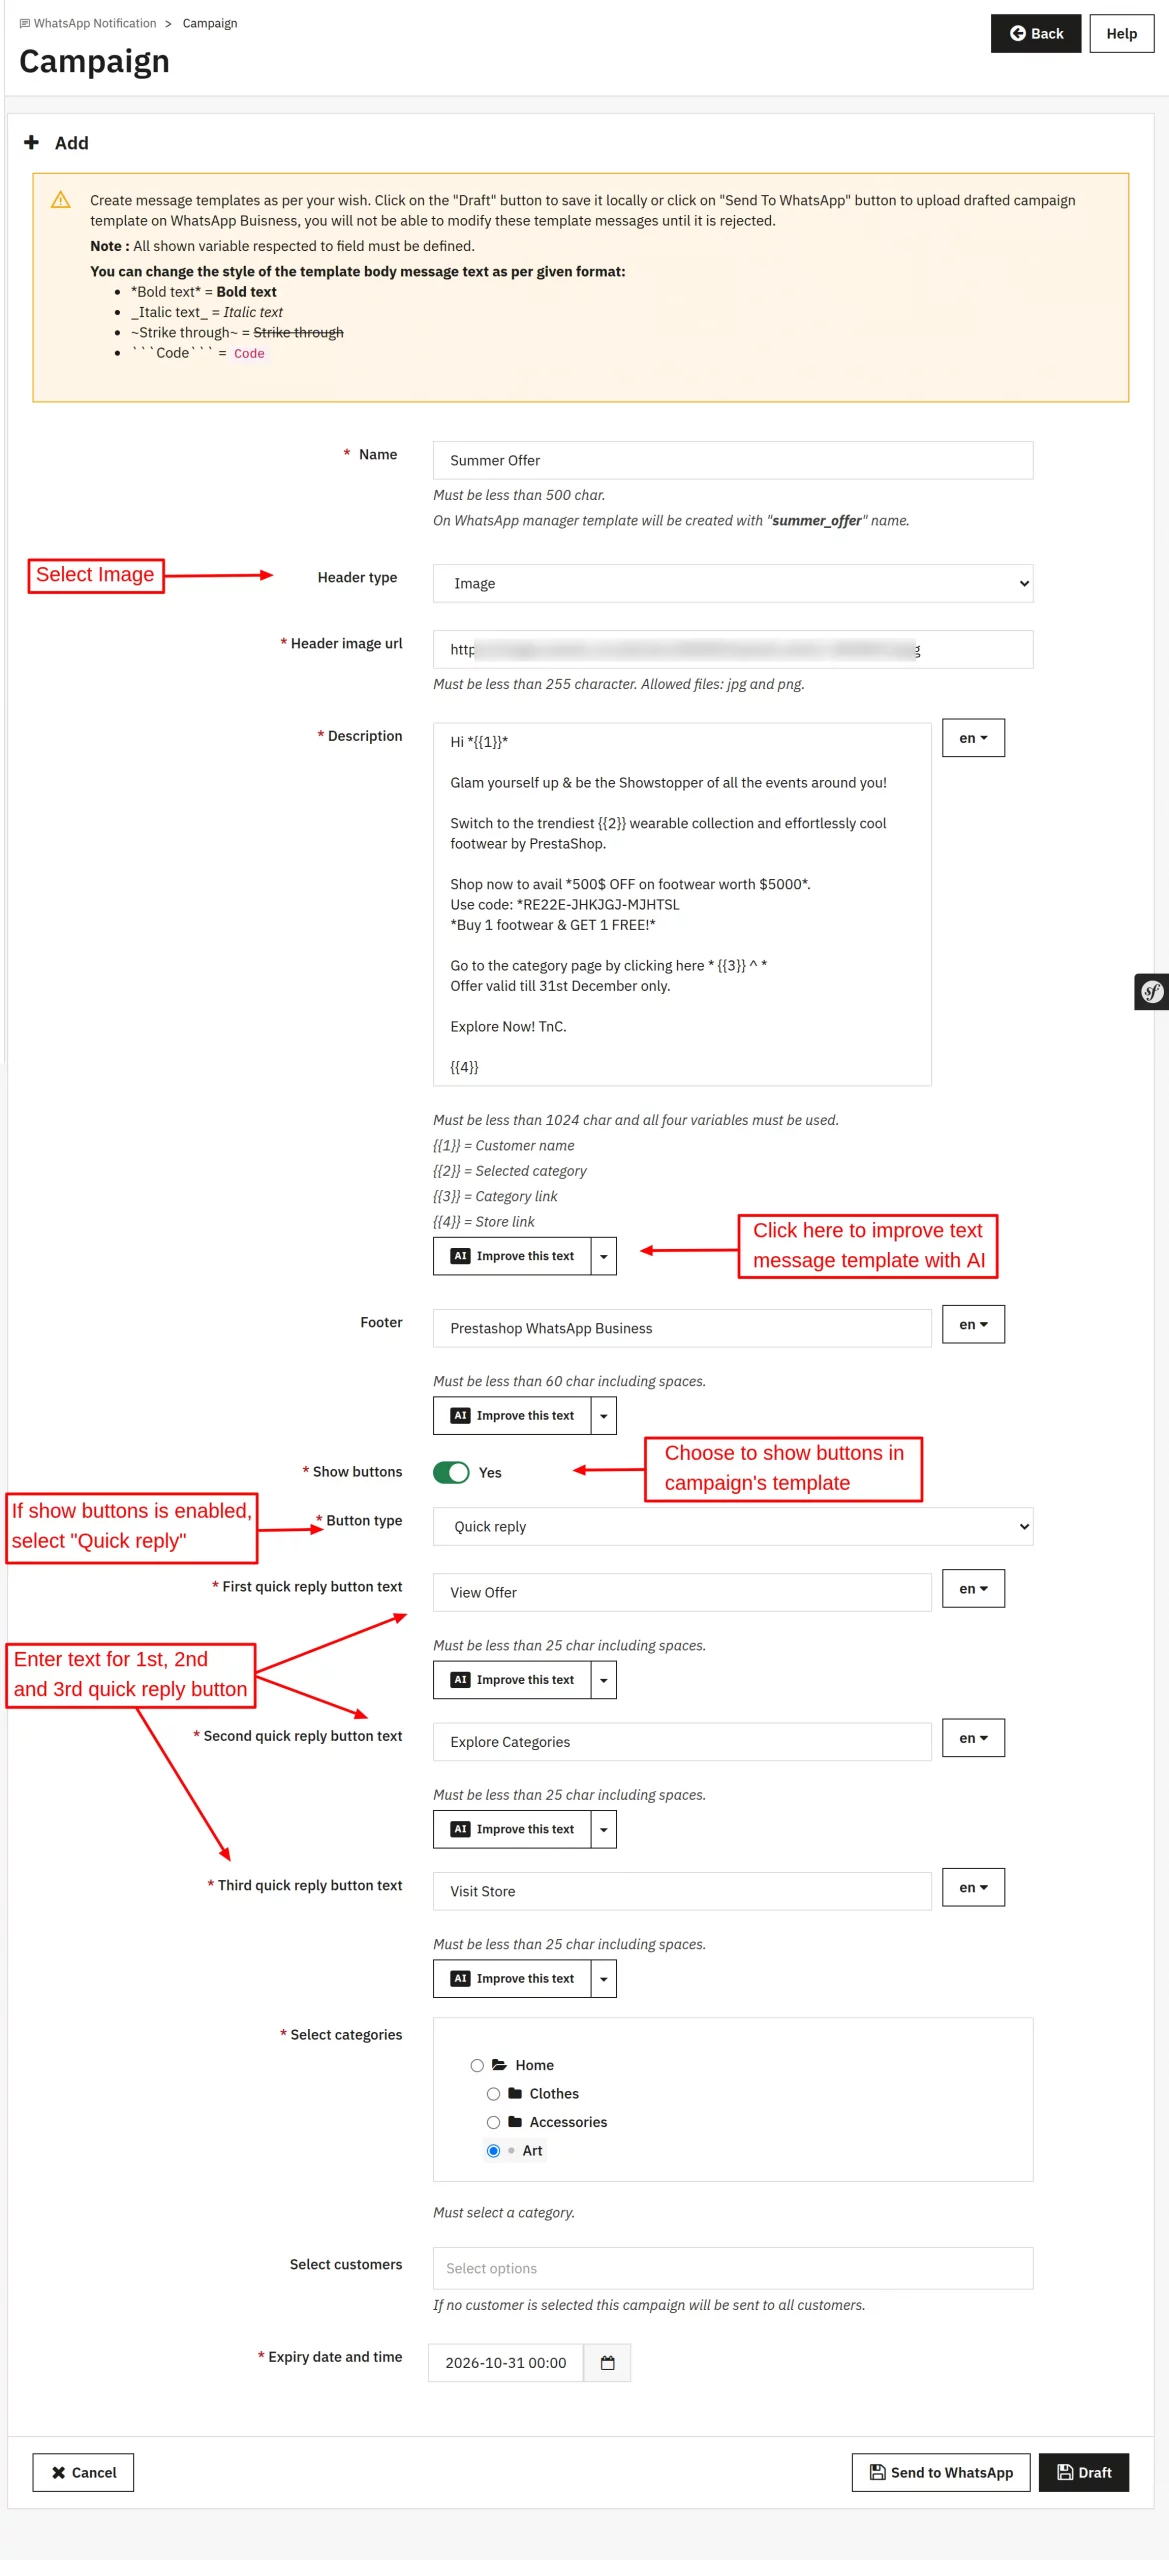
WhatsApp Look: On clicking “View Offer”.

On “Explore Categories” click.

Clicking “Visit Store“.

Customers
The admin can view the list of customers who have registered to receive the WhatsApp notification.
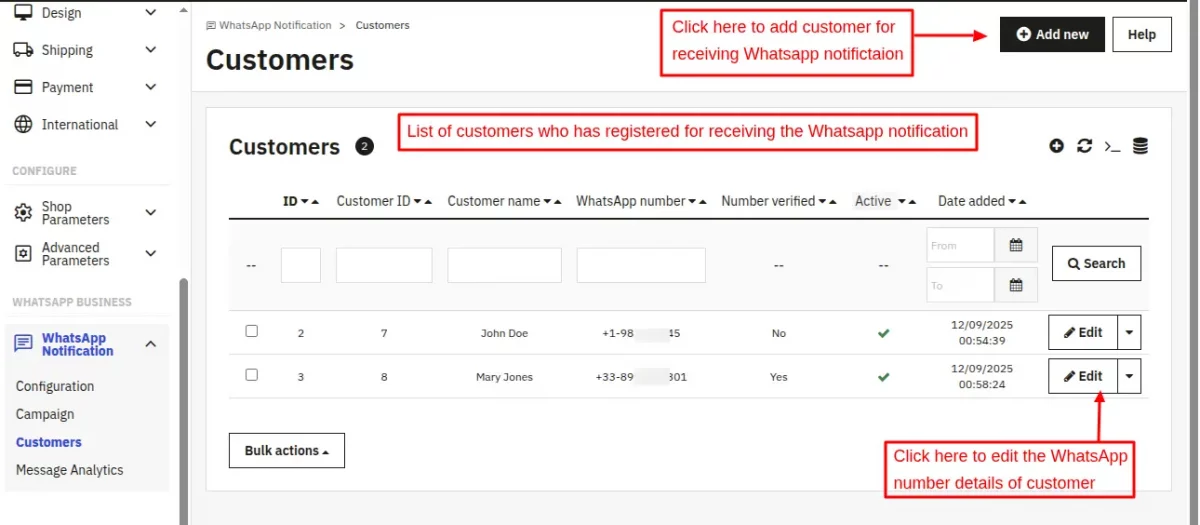
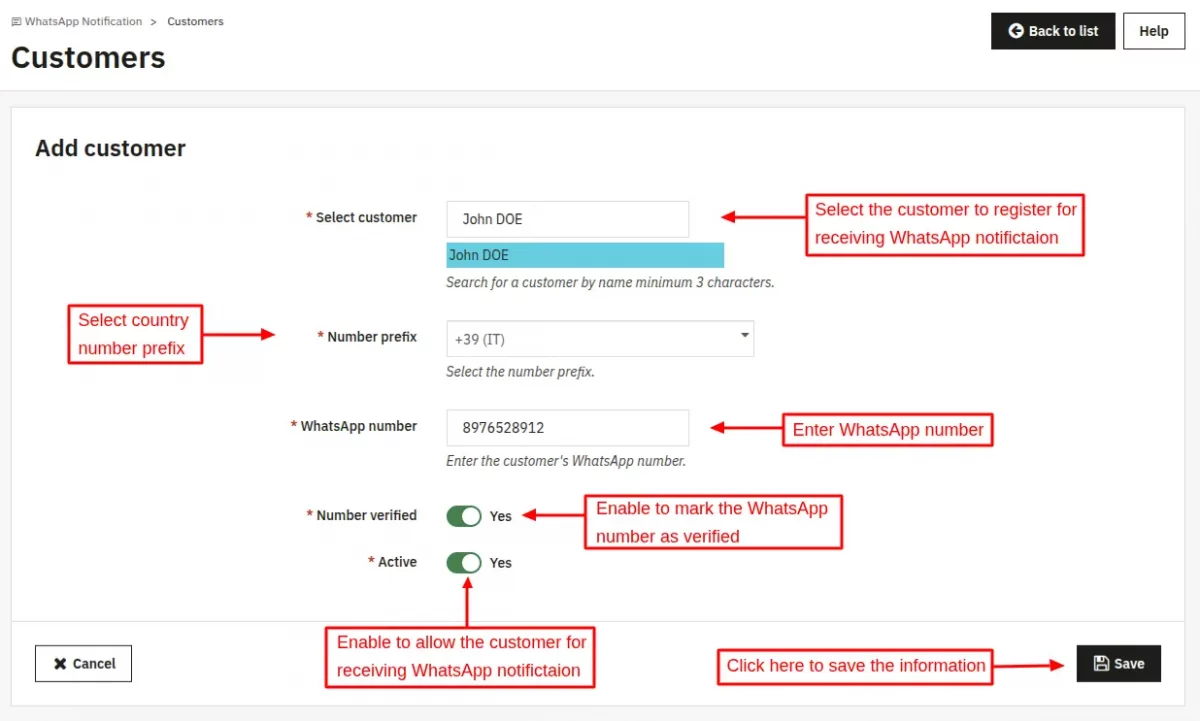
After clicking on the “Add new” button, the admin can add the customer’s WhatsApp number to receive the WhatsApp notification.

Message Analytics
You can track vital metrics, such as how many messages you have sent, delivered, and can filter data by date and view the information on a Half-hourly, Daily, or Monthly basis.


Customer End
The module will add a tab named ‘WhatsApp Notification’ in the customer account area.
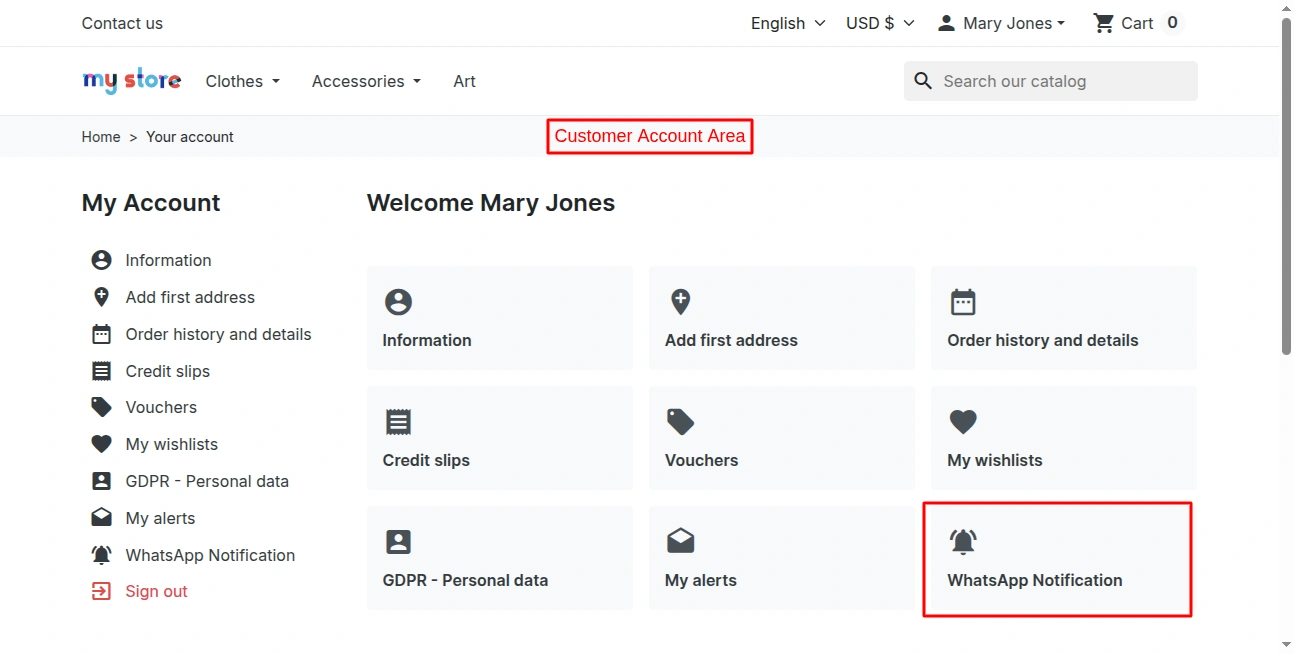
The customer can opt in to receive WhatsApp notifications from here.

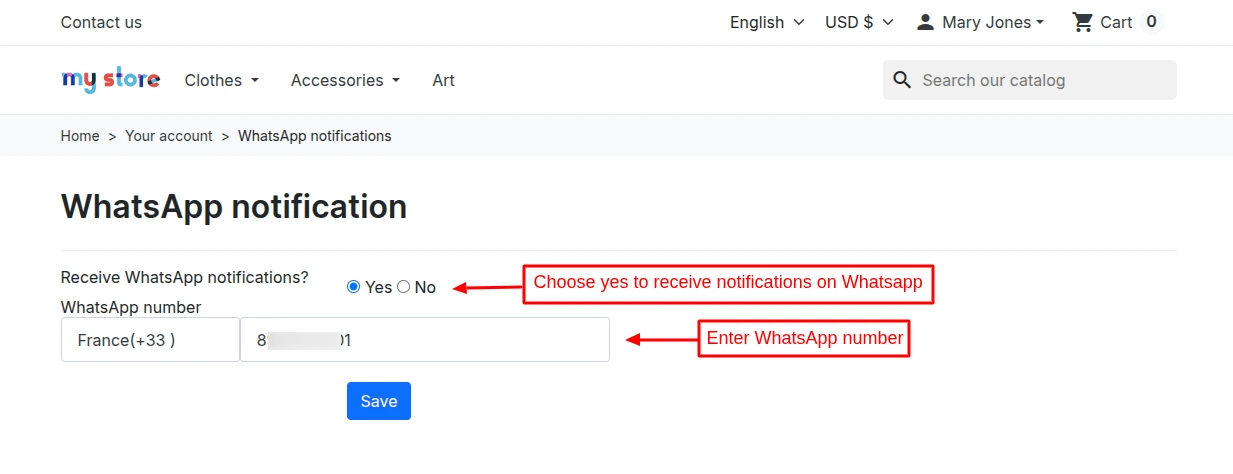

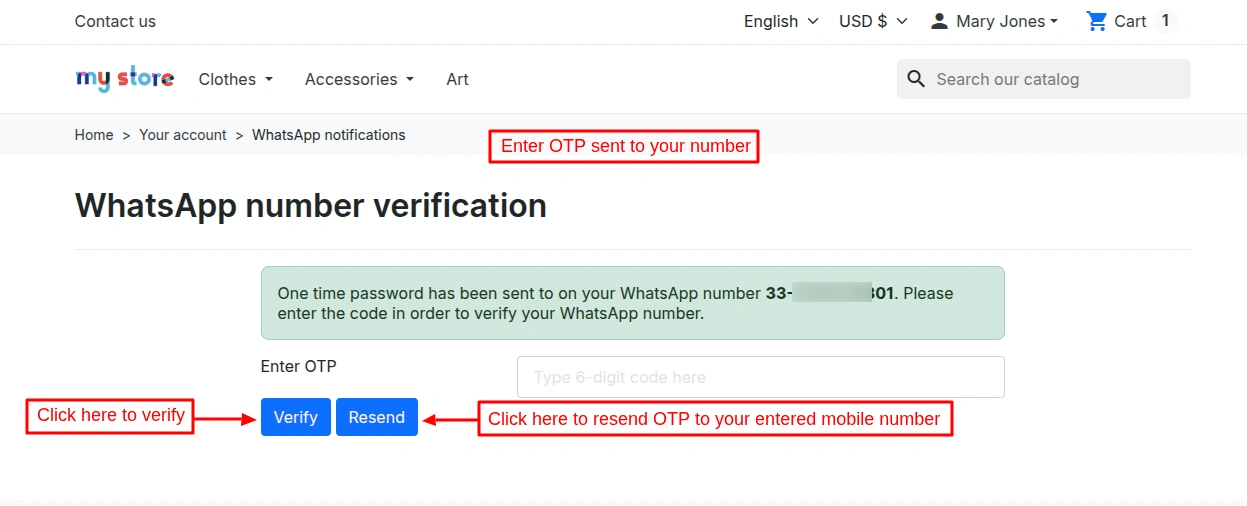
This was all about the WhatsApp Business Order Notifications | Sales Campaign Module. I hope this document will help you in checking the functionality of the module in a better way.
Also, do let us know about your views in the comments.
Support
For any kind of technical assistance or query, please raise a ticket at http://webkul.uvdesk.com or send us a mail at support@webkul.com
Also, please explore our PrestaShop development services & vast range of featureful PrestaShop Addons.