User Guide of PrestaShop Airwallex Payment Module
PrestaShop Airwallex Payments module integrates the Airwallex payment platform into your PrestaShop store. It enables you to accept payments from customers through Airwallex.
Supports both one-time purchases and recurring subscriptions and provides admin tools for managing transactions, refunds, and subscription plans.
Features of PrestaShop Airwallex Payment Module
- Dual checkout modes: hosted redirect or embedded inline card form.
- Subscription plan management with configurable frequency and billing cycles.
- Product-to-plan assignments supporting specific combinations.
- Full and partial refund processing from the admin panel.
- Automated Airwallex webhook handling with signature validation.
- Transaction list view with filtering and detail panels.
- Admin order panel integration with Airwallex activity and refund form.
- Customer-facing subscription management page.
- Multi-environment support (Demo and Production).
- Multi-store compatible with per-shop plan scoping.
- Request rate limiting on express checkout endpoints.
- Duplicate webhook event detection and prevention.
- Cart conflict prevention for mixed subscription and one-time products.
How to install the module
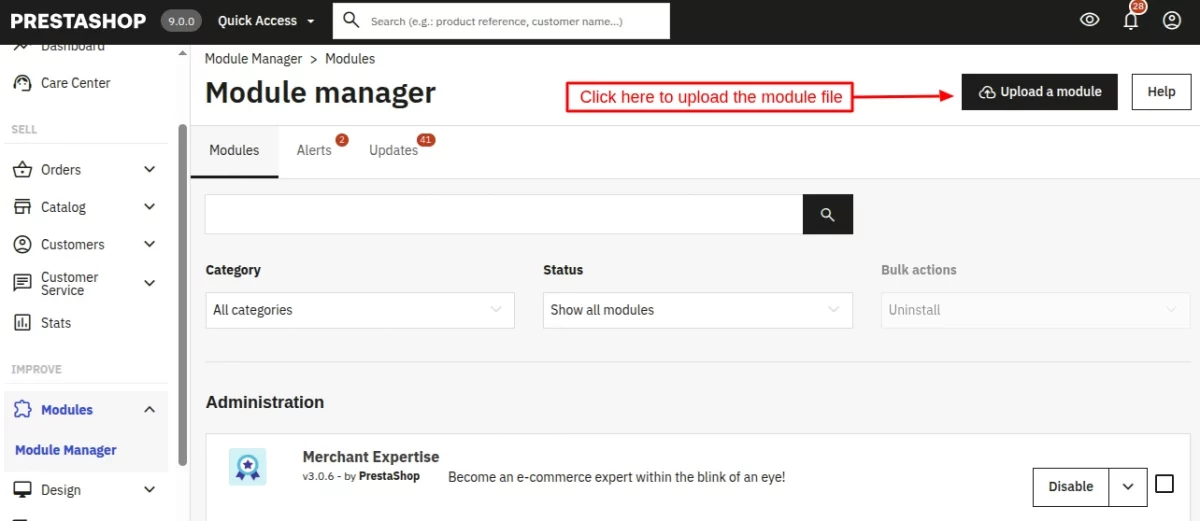
- Firstly, go to the module manager in the back office and click on ‘upload a module’.
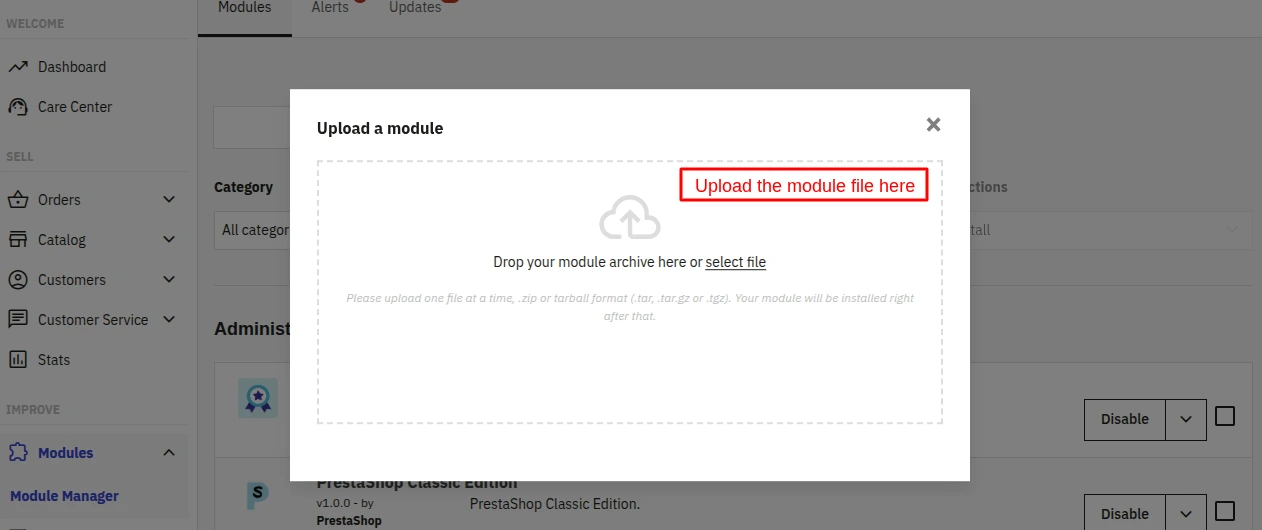
- After that, drag and drop the module file or select the file from the system.
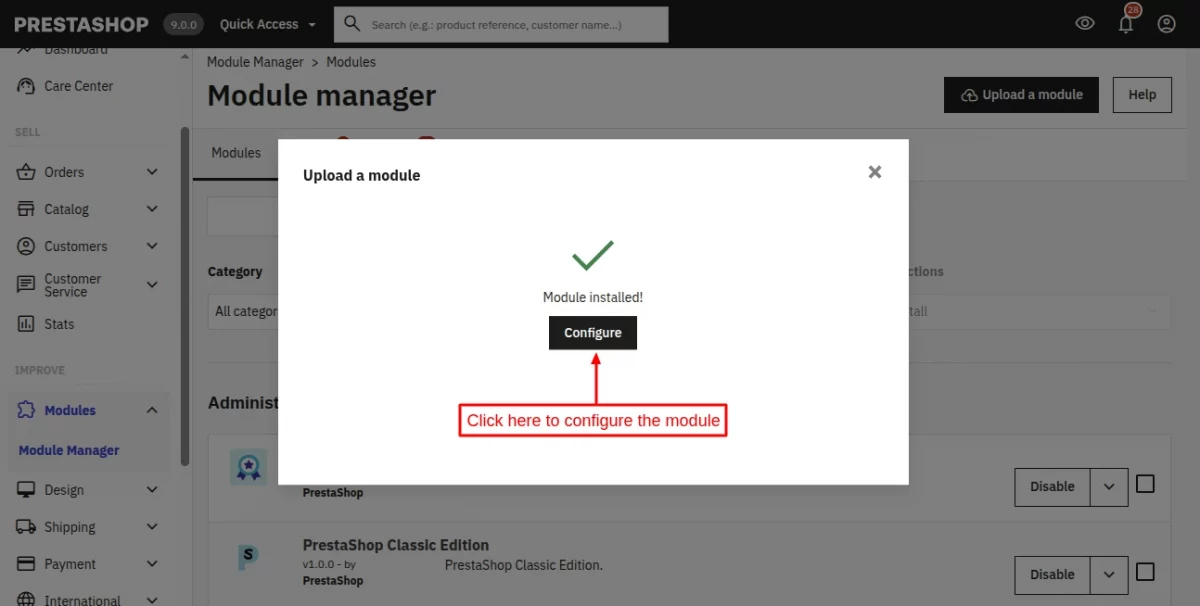
- In this way, the module installation will be successful.



How to Create an Airwallex Account and Get API Keys
Step 1 — Create an Account
Navigate to https://www.airwallex.com/ and sign up for an Airwallex account. If you already have an account, log in to the Airwallex Dashboard.
Step 2 — Find Your Billing Legal Entity ID
In the Airwallex Dashboard, go to Settings → Entities. Copy the Legal entity ID and paste it into the module’s configuration page.
Step 3 — Find Your Linked Payment Account ID
In the Airwallex Dashboard, select to Account.

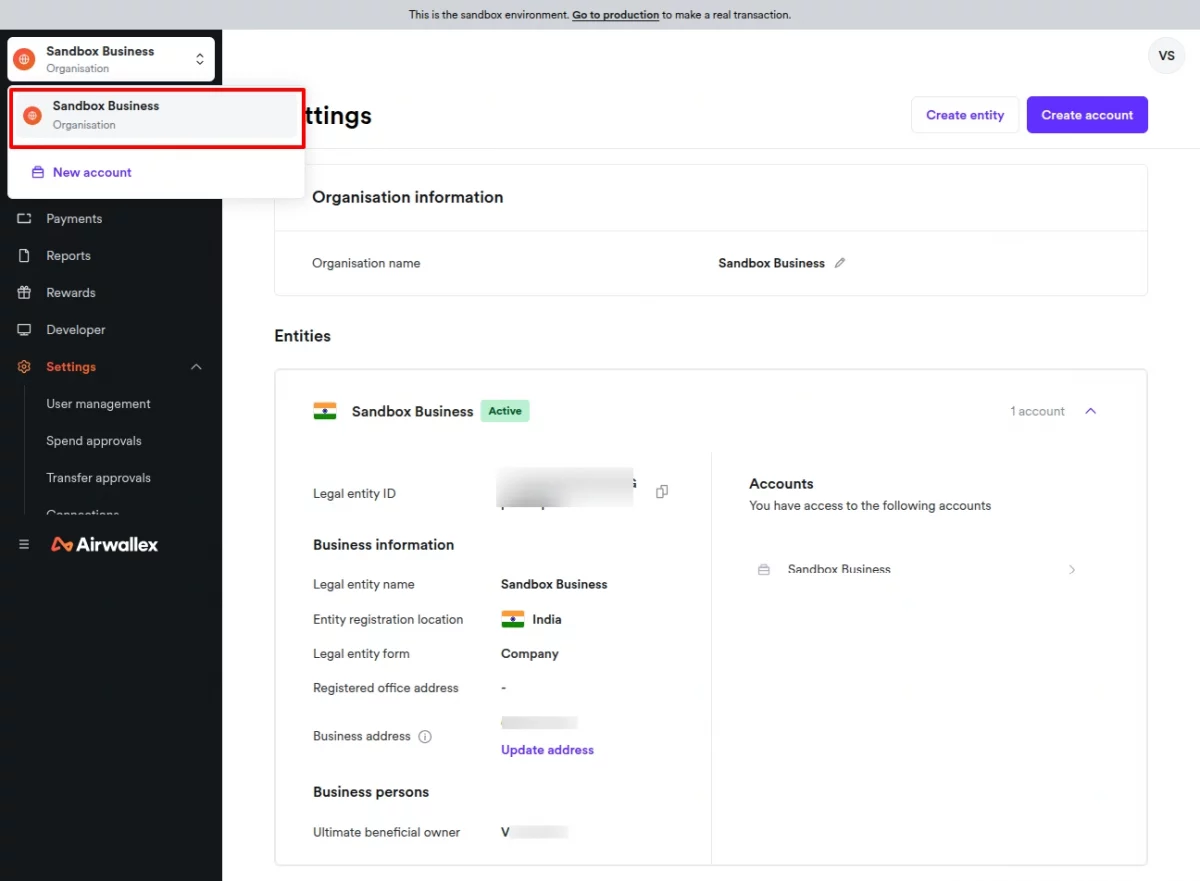
Then go to the “Accounts” section and click on the account.

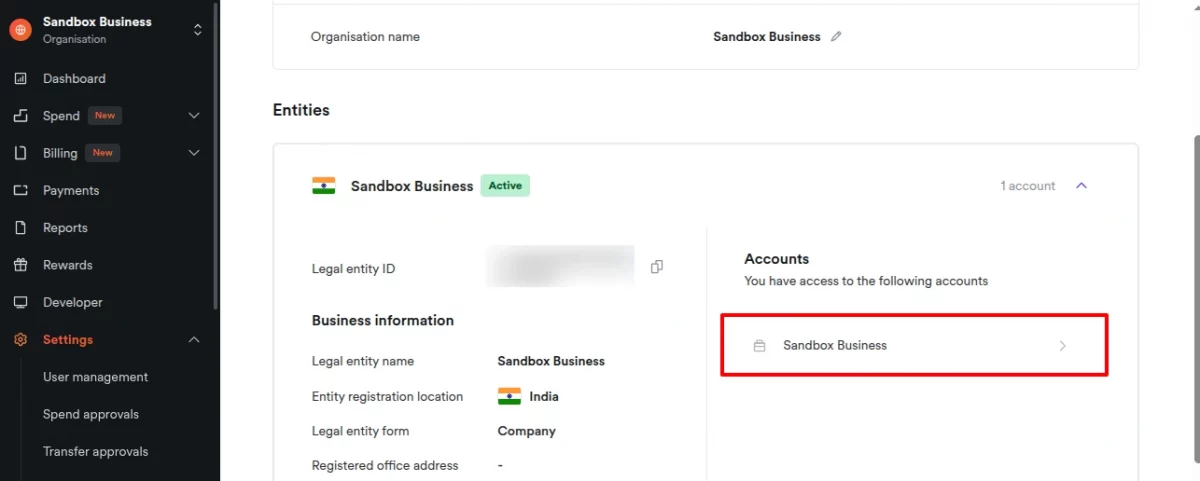
Then copy the Linked Payment Account ID and paste it to the module configuration page.

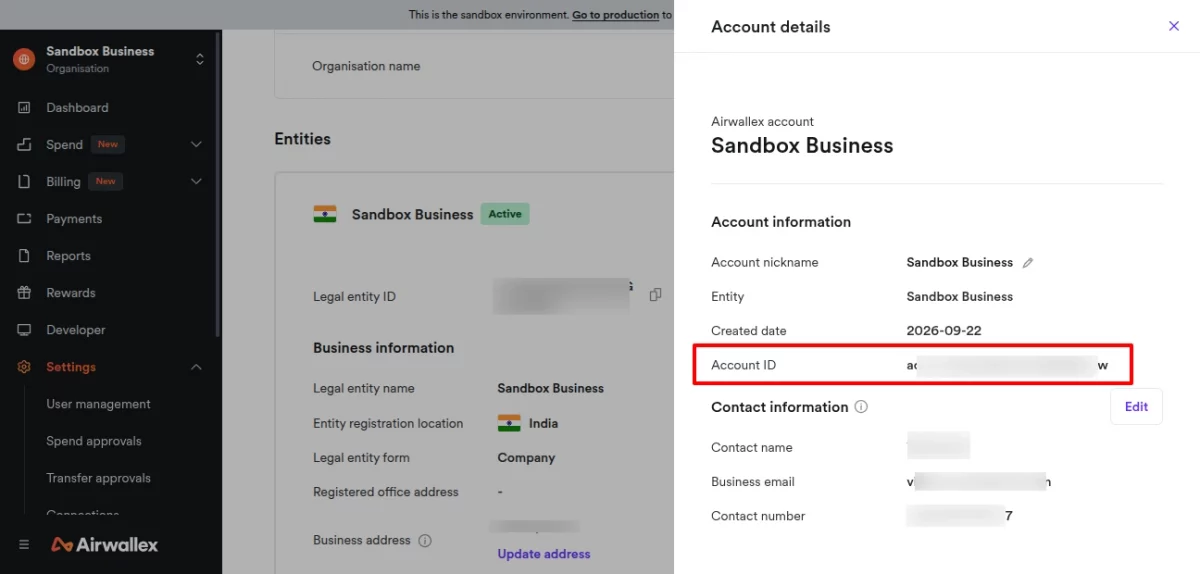
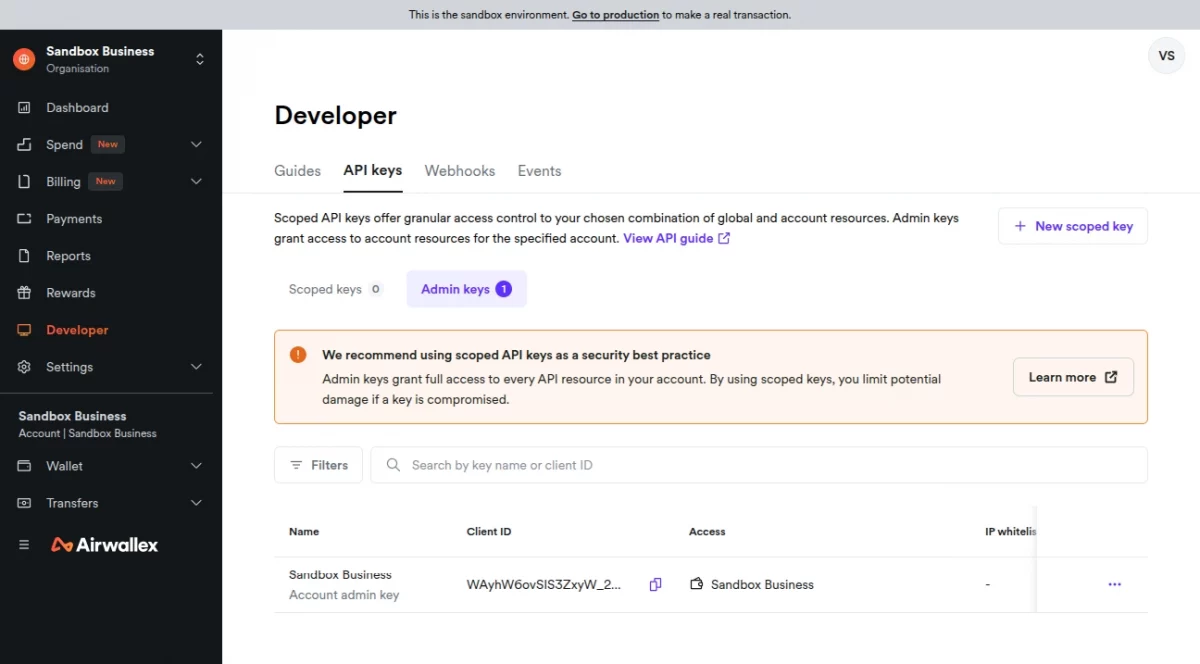
Step 4 — Find Your Admin Client ID API Credentials
In the Airwallex Dashboard, go to Developers → API keys → Admin keys. Copy the Client ID and paste it into the module’s configuration page.

Step 5 — Find Your Admin API Credentials
In the Airwallex Dashboard, go to Developers → API keys → Admin keys → click on the 3 dots → click on “Regenerate” and enter the account password.
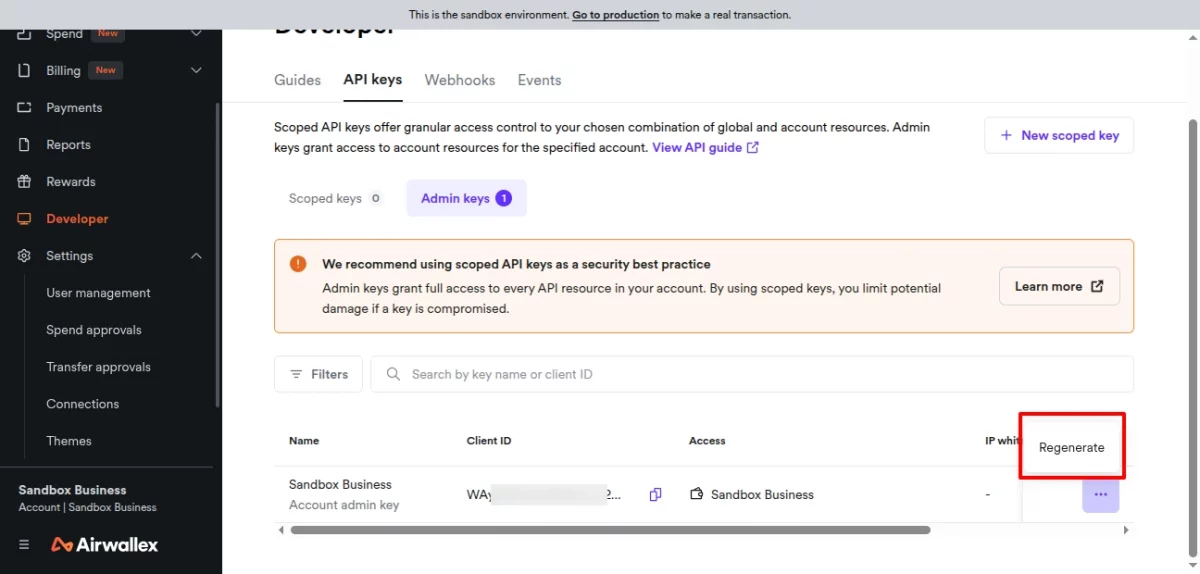
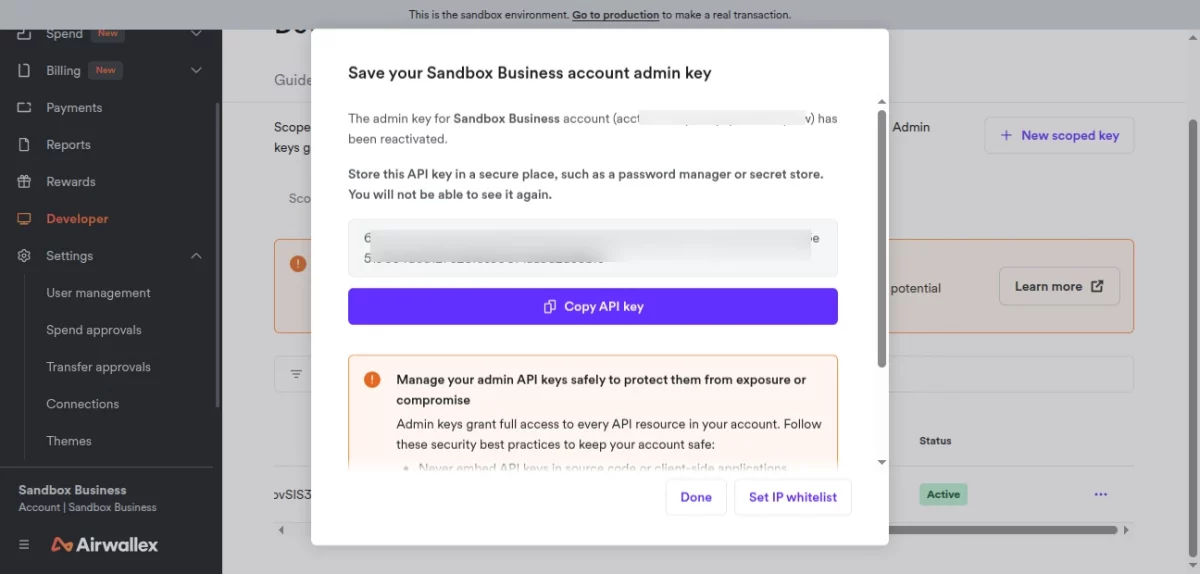
Copy the API key and paste it to the module configuration field.
Step 5 — Generate Webhook secret
In the Airwallex Dashboard, go to Developers → Webhooks → Add New webhook.
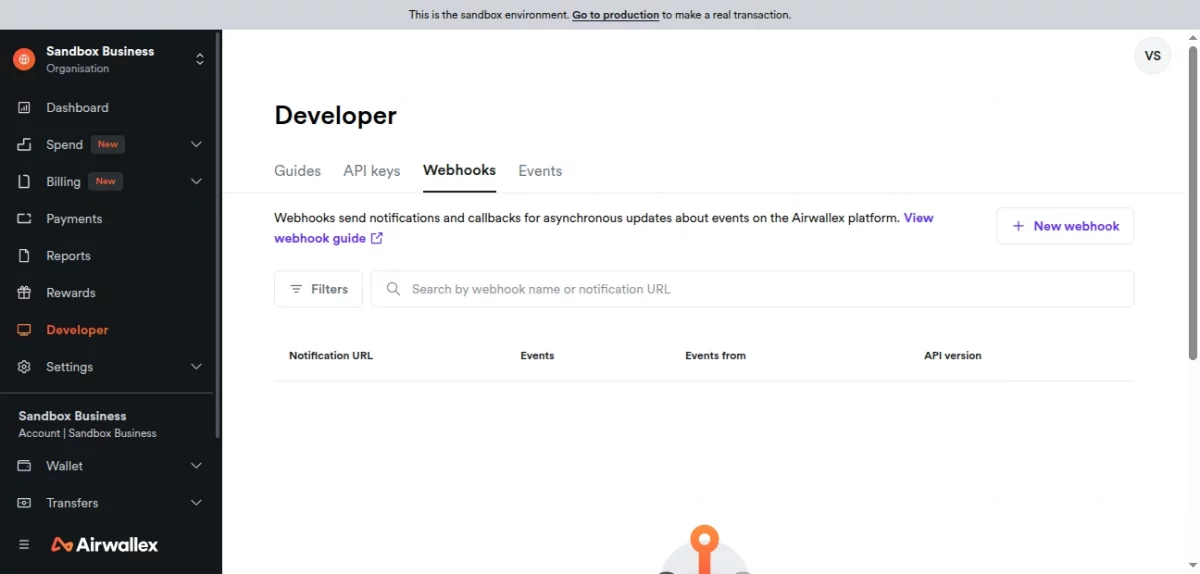
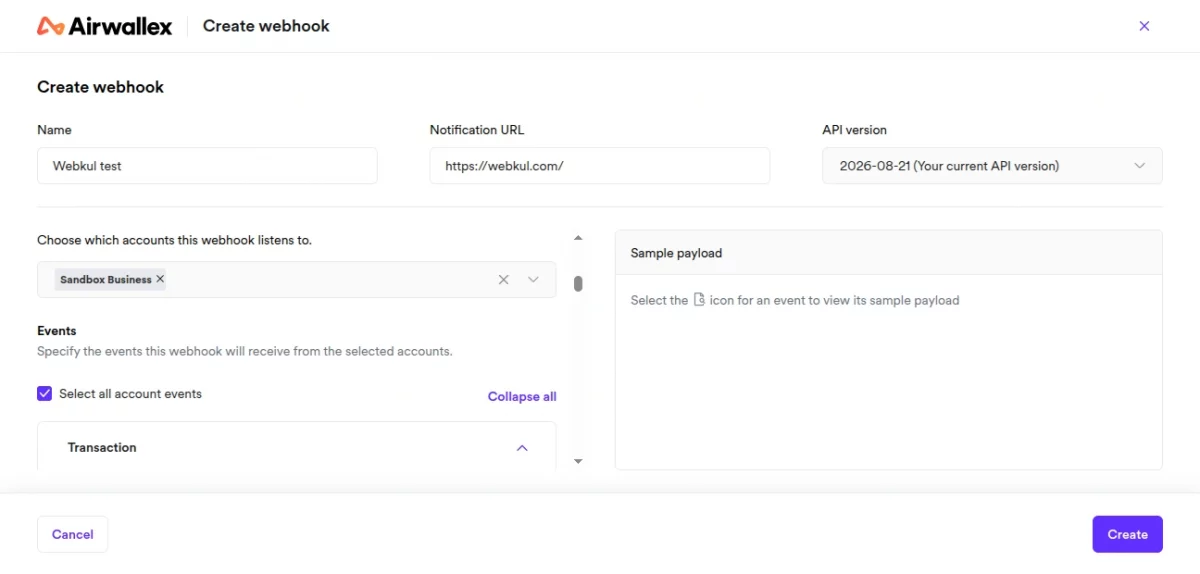
Now, enter the required fields, select the account, grant event permissions and click on “Create” button.
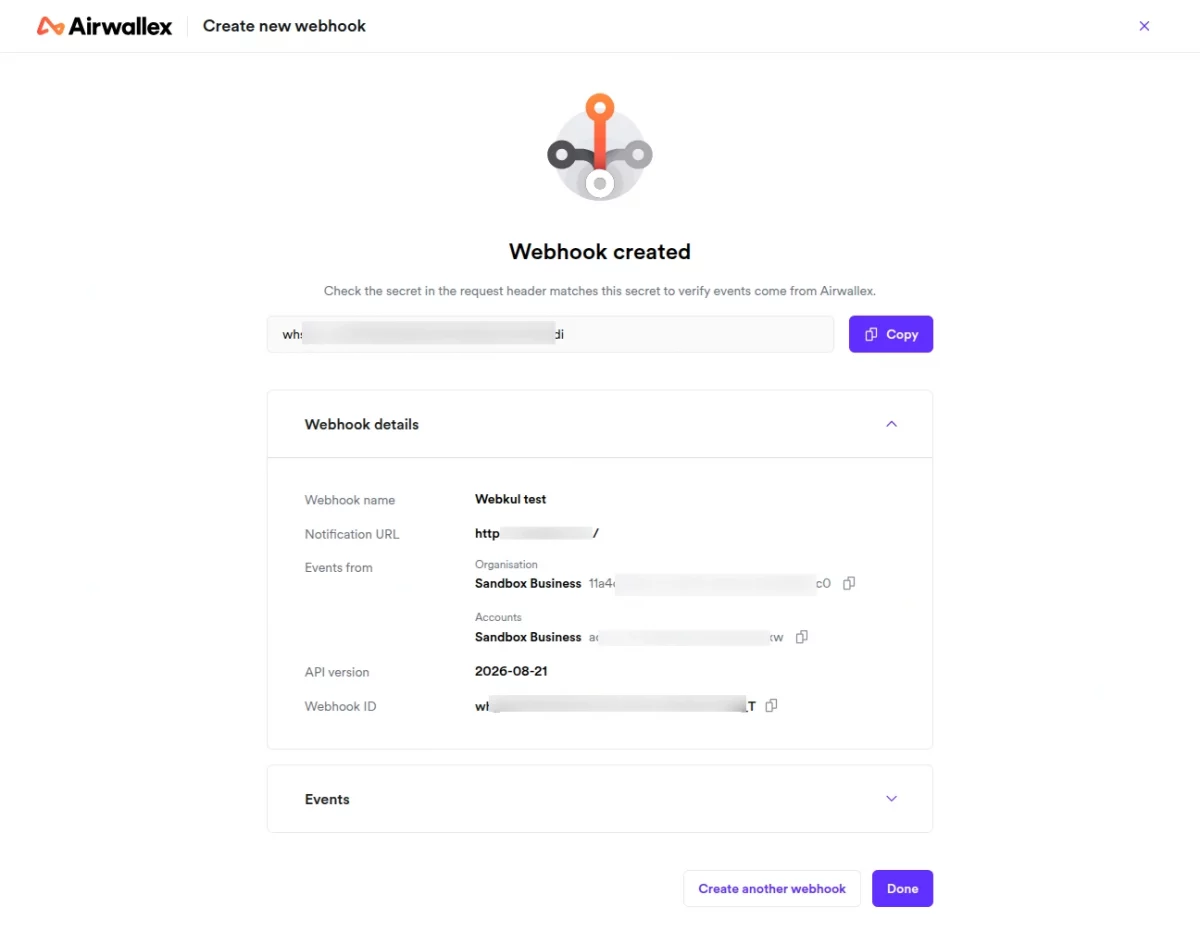
Copy the newly generated webhook API secret and paste it to the module configuration page.

PrestaShop Airwallex Payments Module Configuration
Navigate to: Modules → Module Manager → Airwallex Payments Pro → Configure.

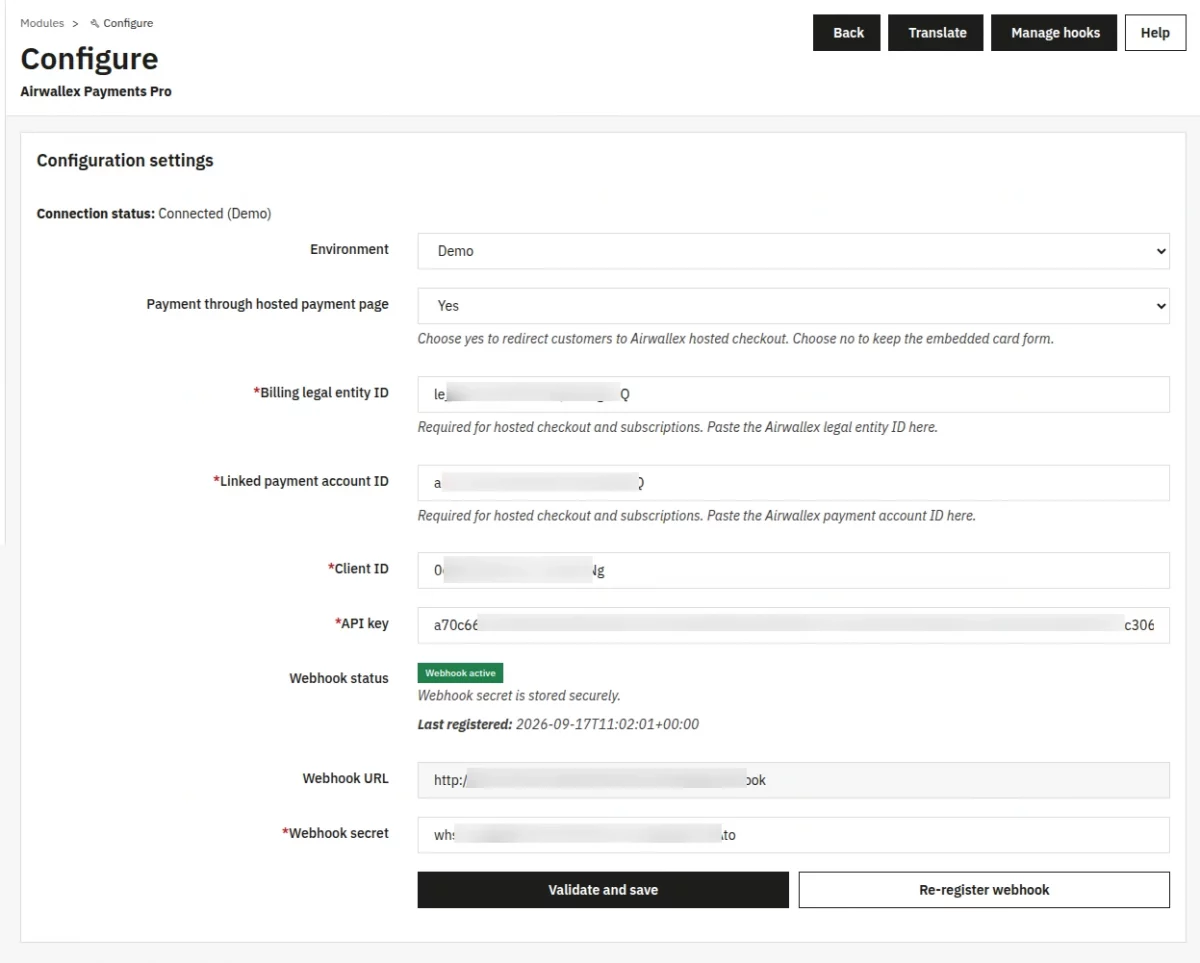
Environment
Select whether the module should communicate with the Airwallex Demo (Sandbox) or Production (live) environment. This determines which set of API credentials is used.
- Demo (Sandbox): Use for testing payments without real charges.
- Production: Use for live transactions with real money.
Payment through hosted payment page
Choose the checkout mode for your store.
- Yes: Customers will redirect to the Airwallex hosted checkout page to complete payment.
- No: An inline card form appears directly on the PrestaShop checkout page.
Billing legal entity ID
Paste your Airwallex billing legal entity ID here. This is required when ‘Payment through hosted payment page’ is set to Yes, and is also required for subscription checkouts.
Linked payment account ID
Paste your Airwallex linked payment account ID here. This is required when ‘Payment through hosted payment page’ is set to Yes, and is also required for subscription checkouts.
Client ID
Enter your Airwallex Client ID for the currently selected environment. The module validates this credential on save by making a test API call to Airwallex.
API key
Enter your Airwallex API key for the currently selected environment. The module validates this credential on save by making a test API call to Airwallex.
Webhook status
Displays the current webhook registration status. After saving valid credentials, the module automatically registers the webhook endpoint with Airwallex and stores the signing secret.
Webhook URL
The URL Airwallex sends webhook events to. This will generate automatically based on your store domain and cannot be edited.
Webhook secret
Enter the webhook signing secret provided by Airwallex. This is used to validate that incoming webhook requests actually originate from Airwallex.
Validate and save
Click this button to validate your Airwallex credentials, save all configuration values, store the webhook secret, and register the webhook endpoint with Airwallex.
- On success: displays a confirmation message and updates the connection status to ‘Connected’.
- On failure: displays validation errors if credentials are invalid or fields are missing.
Re-register webhook
Click this button to re-register the webhook endpoint with Airwallex without re-saving all credentials. Useful if the webhook deletes or needs to refresh.
- On success: displays a confirmation message and updates the webhook status to ‘Webhook active’.
- On failure: displays an error if the webhook secret is missing or the registration fails.
After entering all settings, click Save to apply the configuration.
Managing Airwallex Payments from the Admin Panel
Airwallex Payments Menu
After installation, the module adds the following four submenu options under the ‘Airwallex’ menu option:
- Transactions
- Subscription plans
- Plan products
- Subscriptions
Transactions
The Transactions panel lists all payment records stored by the module. The admin can filter the list by intent ID, checkout ID, subscription ID, status, order, and date.
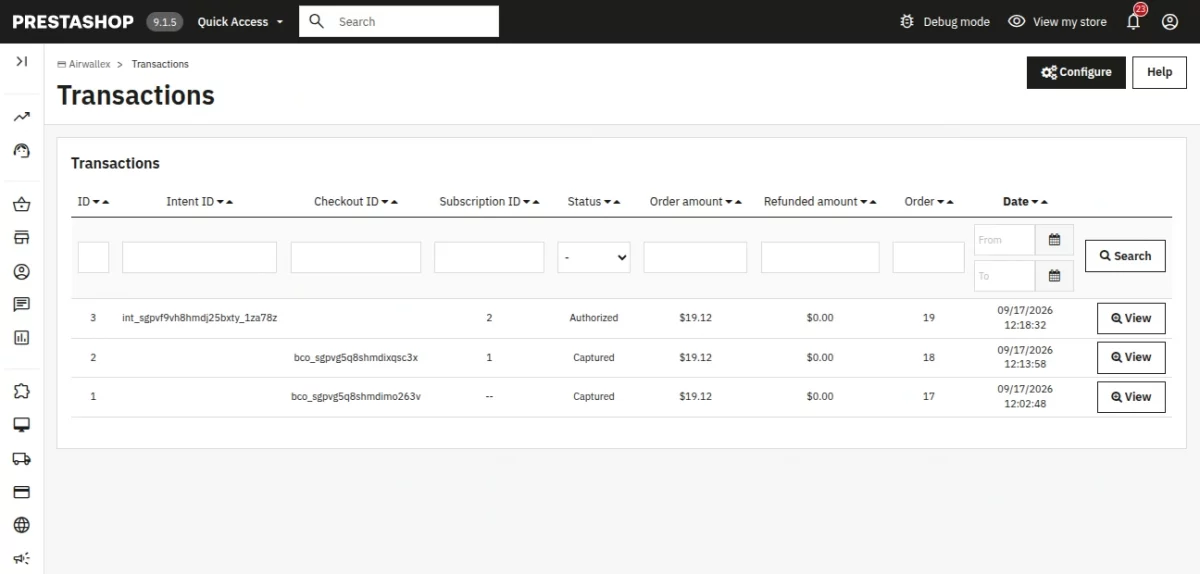
Each row shows: ID, Intent ID, Checkout ID, Subscription ID, Status, Order amount, Refunded amount, Order, and Date. Click the ‘view’ icon on any row to open the transaction detail page.
The detail page shows:
- Transaction reference
- Airwallex intent ID
- Airwallex checkout ID
- Airwallex payment ID
- Status
- Order amount
- Settlement amount
- Captured amount
- Refunded amount
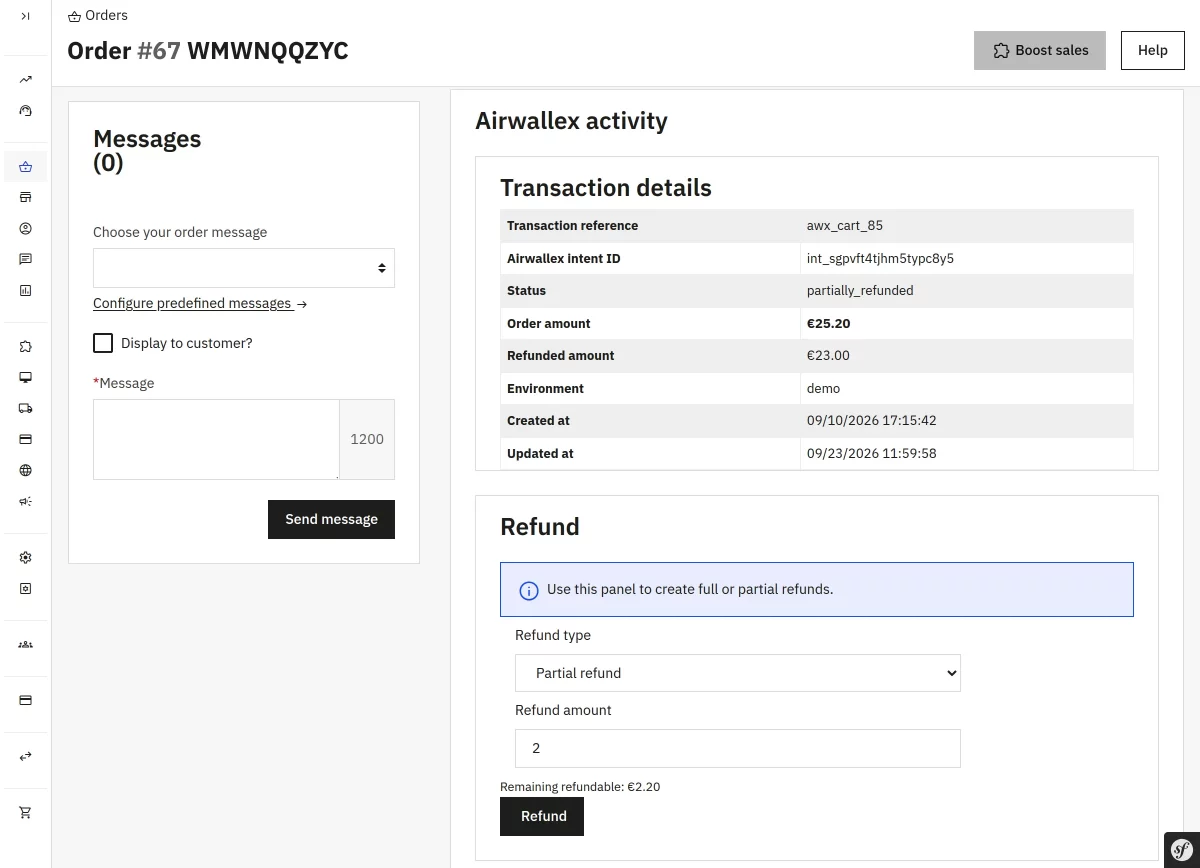
- Refund panel

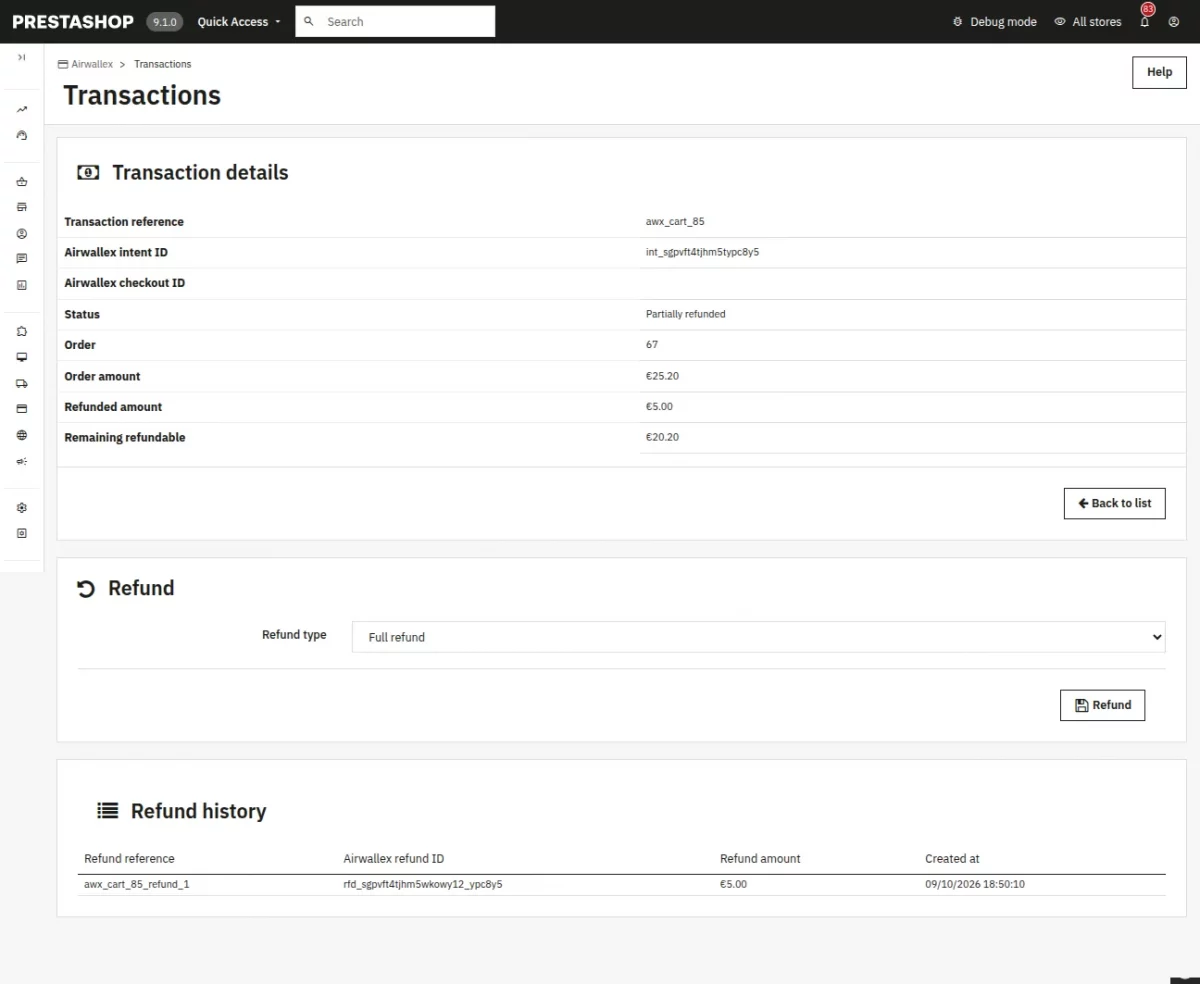
- The refund panel supports full refunds (one-click) and partial refunds.

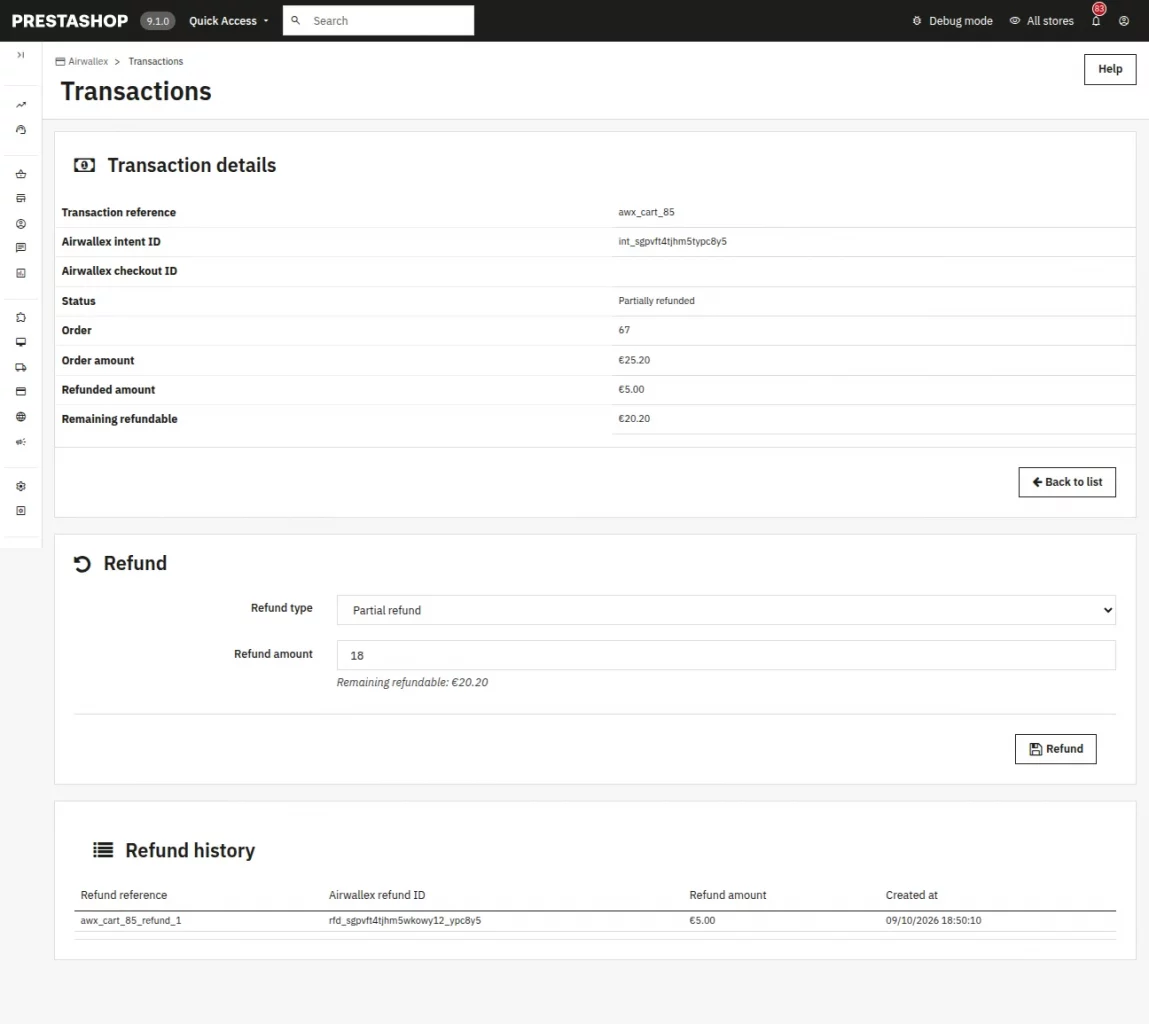
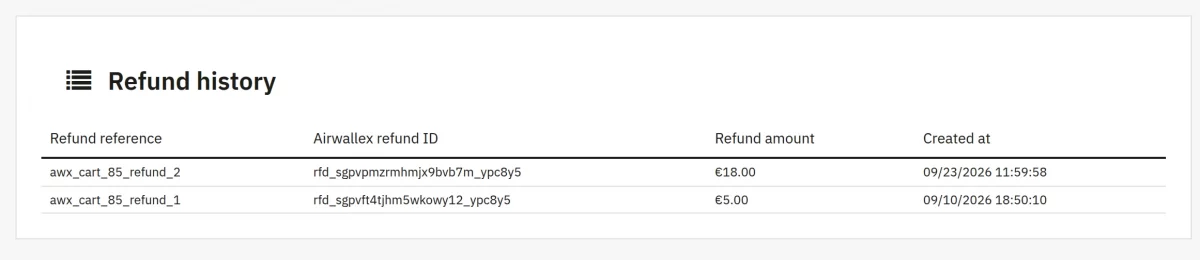
- The detail page also shows a refund history table with refund reference, Airwallex refund ID, amount, credit slip link, and creation date.

- Status options in the filter: Created, Authorized, Captured, Partially refunded, Refunded.
- Admin can also initiate the refund and view transaction details from the back office order detail page.

Subscription plans
The Subscription plans panel lets you create and manage recurring billing plans.

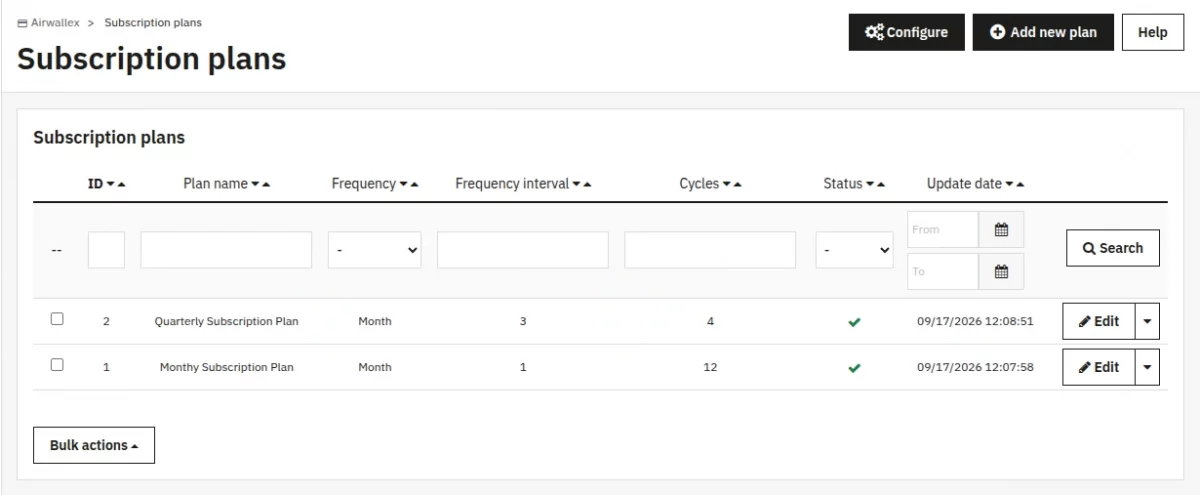
- Each row shows: ID, Plan name, Frequency, Frequency interval, Cycles, Status, and Update date.
- Click ‘edit‘ on a row to open the plan edit form, or use the ‘Add new plan’ header button to create a plan.
- Bulk actions: delete selected plans (plans in use cannot be deleted).
- Status can be toggled inline — yes/no switch updates the active flag for the current shop context.
Create Subscription Plan Form

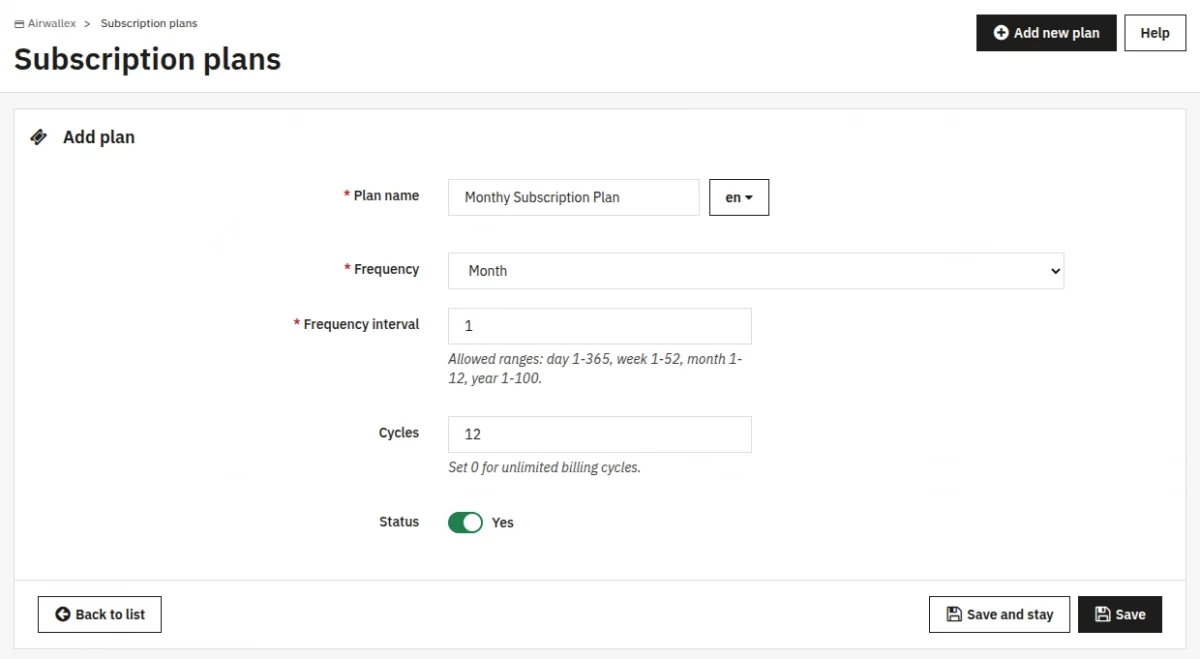
- Plan name: The name shown to customers and in the admin.
- Frequency: Day, Week, Month, or Year.
- Frequency interval: The number of frequency units between billings. Allowed ranges: day 1-365, week 1-52, month 1-12, year 1-100.
- Cycles: Number of billing cycles. Set 0 for unlimited.
- Status: Active (Yes) or inactive (No).
- Save button: saves and returns to the list.
- Save and stay button: saves and keeps the form open for further edits.
- Back to list button: returns to the list without saving.
Plan products
The Plan products panel manages the assignment of subscription plans to products. Assignments link a plan to a specific product or product combination.

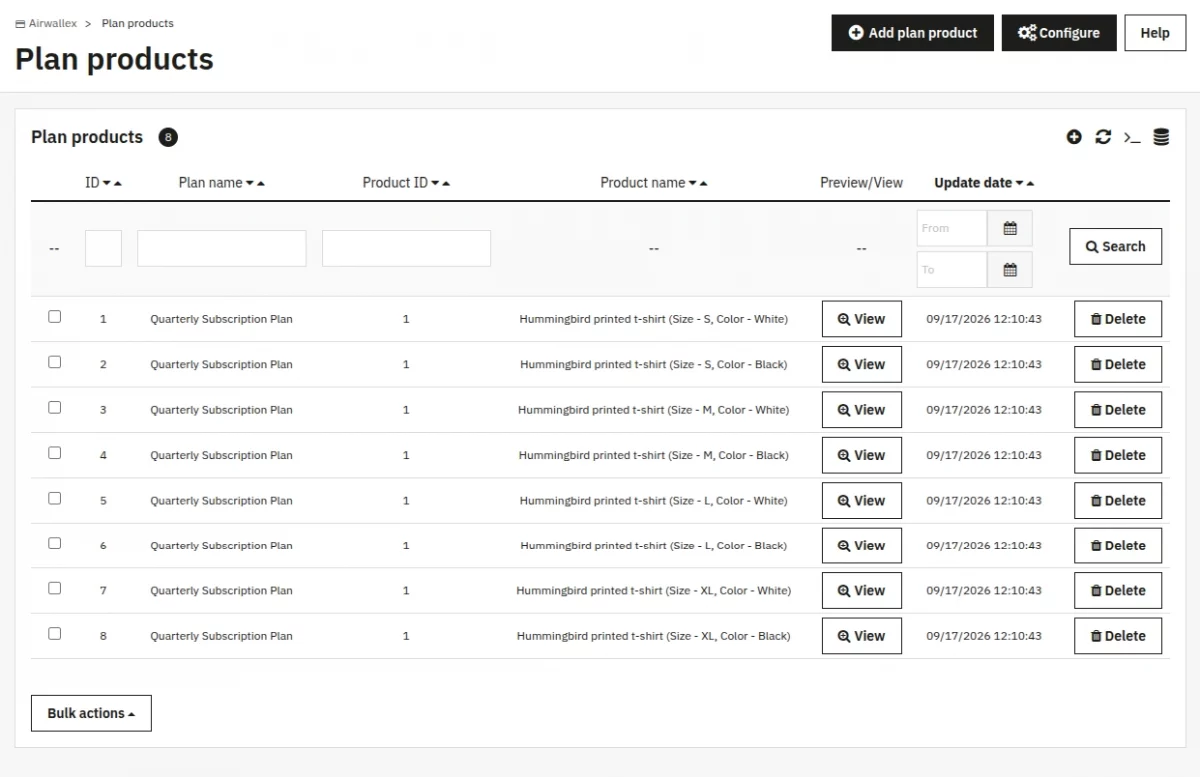
- Each row shows: ID, Plan name, Product ID, Product name (with combination attributes), Preview/View, and Update date.
- The ‘Preview/View’ column links to the front-office product page for the assigned product.
- Click ‘add’ or use the ‘Add plan product’ header button to open the assignment form.
- Bulk delete: remove selected assignments.
Assign Subscription Plan to Products

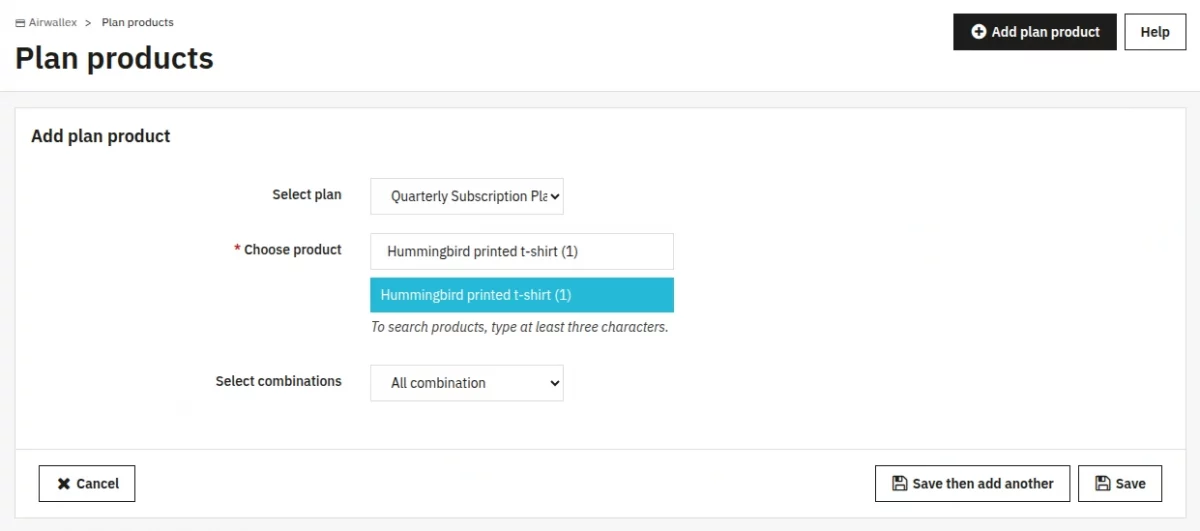
- Product search: type to search and select a product from your catalog.
- Plan selection: choose which subscription plan to assign.
- All combinations checkbox: if checked, the plan applies to all combinations of the product.
- Specific combinations: select which combinations the plan applies to (only shown when ‘All combinations’ is unchecked).
- Submit: saves the assignment and returns to the list.
Note: A product can only be assigned to one plan at a time.
Subscriptions
The Subscriptions panel lists every subscription record created through the module. Subscriptions are listed per the current shop context.

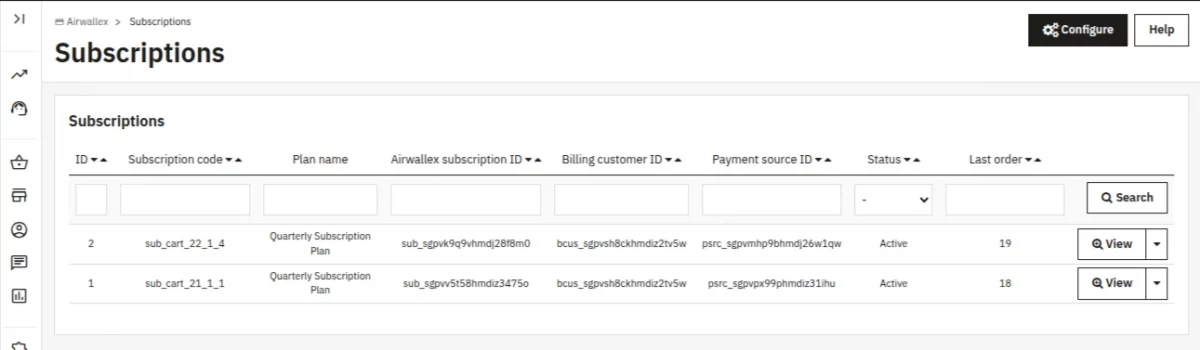
- Each row shows: ID, Subscription code, Plan name, Airwallex subscription ID, Billing customer ID, Payment source ID, Status, Last order, and Shop (all-shops context only).
- Status options: Active, Pending, Cancelled.
- Click ‘view‘ on a row to open the subscription detail page.
- Click the ‘Cancel‘ action icon to cancel an active subscription — this sends a cancellation request to Airwallex and updates the local record.

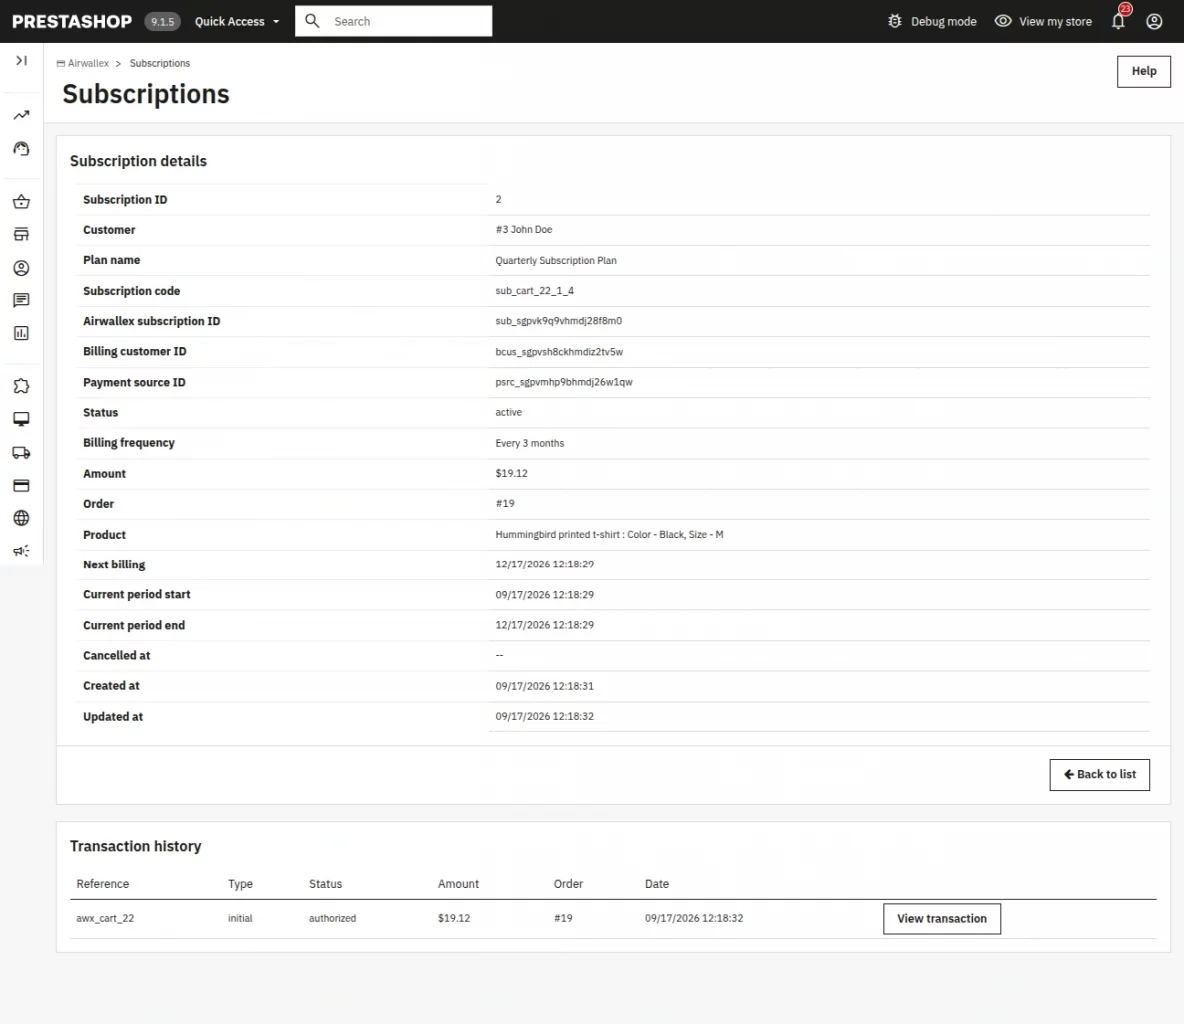
The subscription detail page shows: status, plan name, billing frequency, amount, billing date, start/end period, cancelled at, last order, created at, updated at, and a transaction history table.
The transaction history table in the subscription view shows each transaction’s reference, type (initial/recurring), status, amount, associated order (with link), and date.
- The ‘Back to list’ button returns to the subscriptions list.
Storefront Experience
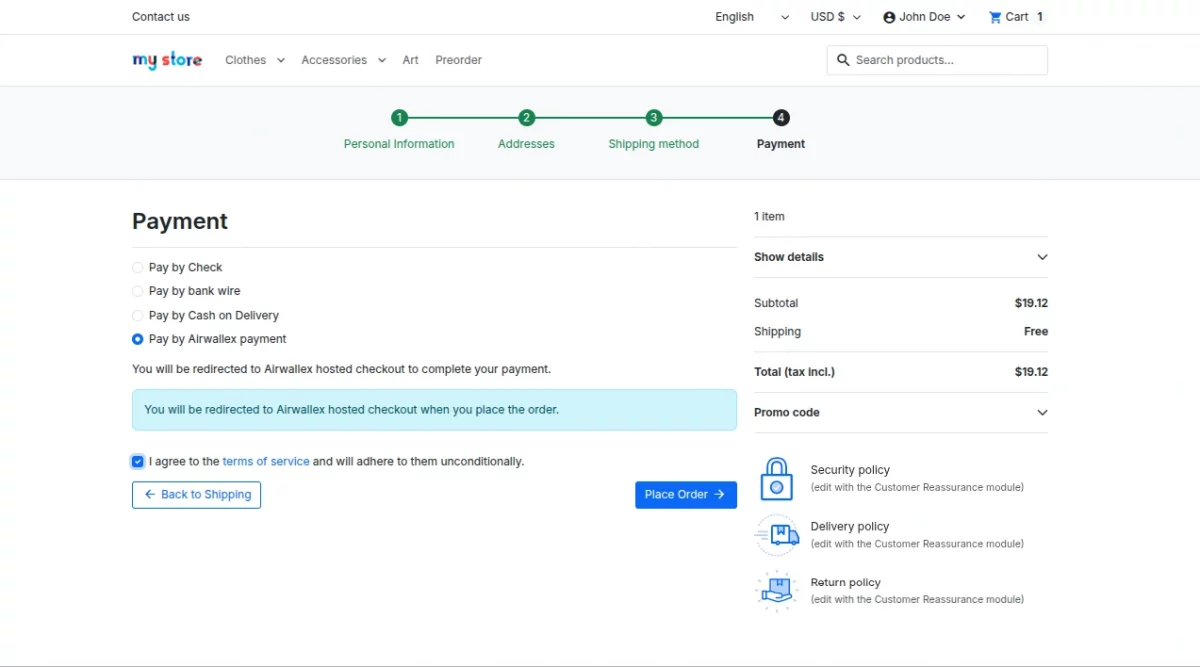
When a customer proceeds to checkout, the Airwallex payment option appears on the payment selection step.
The option is labeled ‘Pay by Airwallex payment’. The behavior depends on the configured checkout mode.
Hosted Checkout Mode
When ‘Payment through hosted payment page’ is set to Yes, clicking the Airwallex payment option redirects the customer to Airwallex’s secure hosted checkout page.


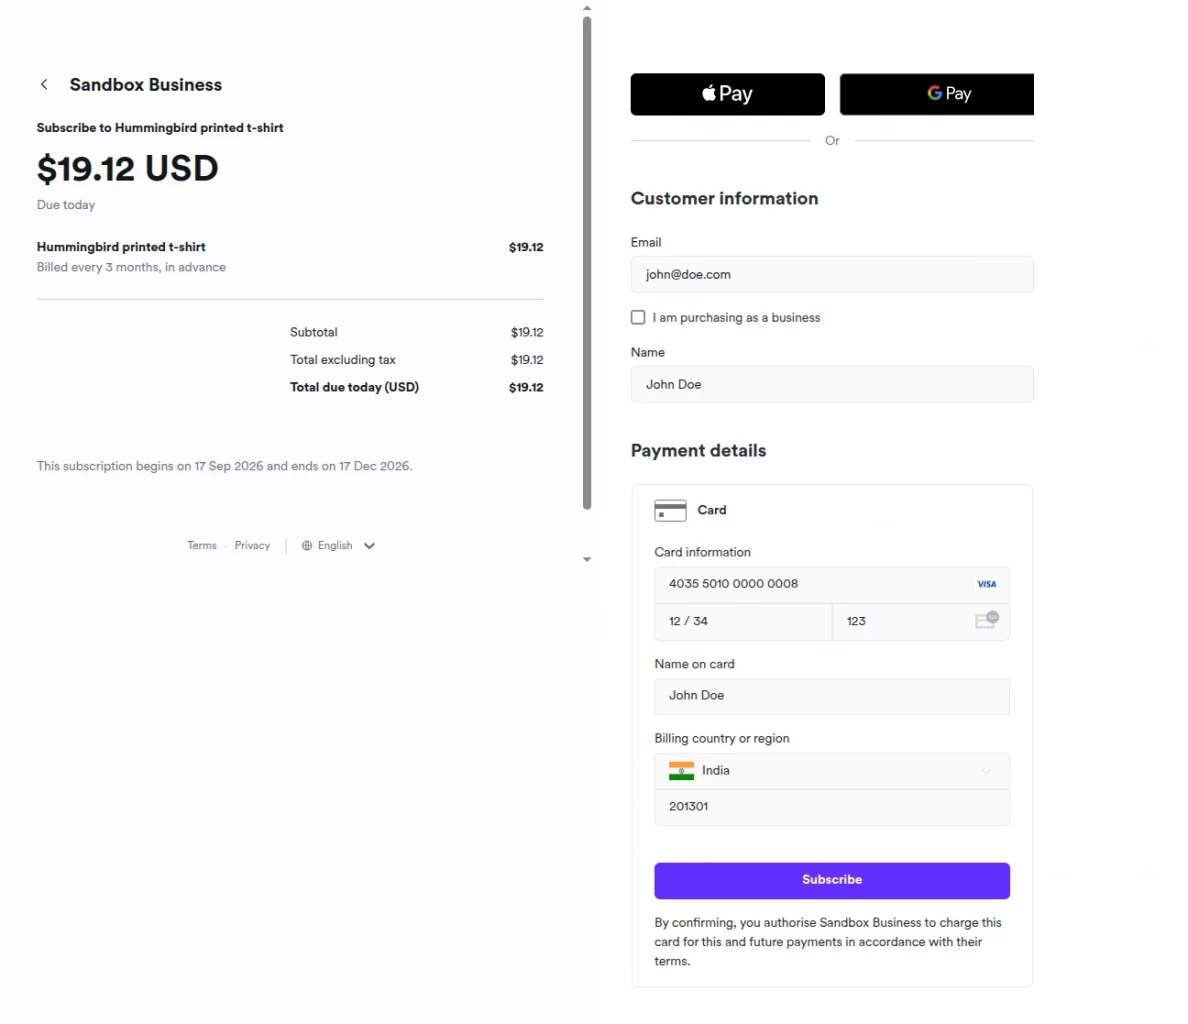
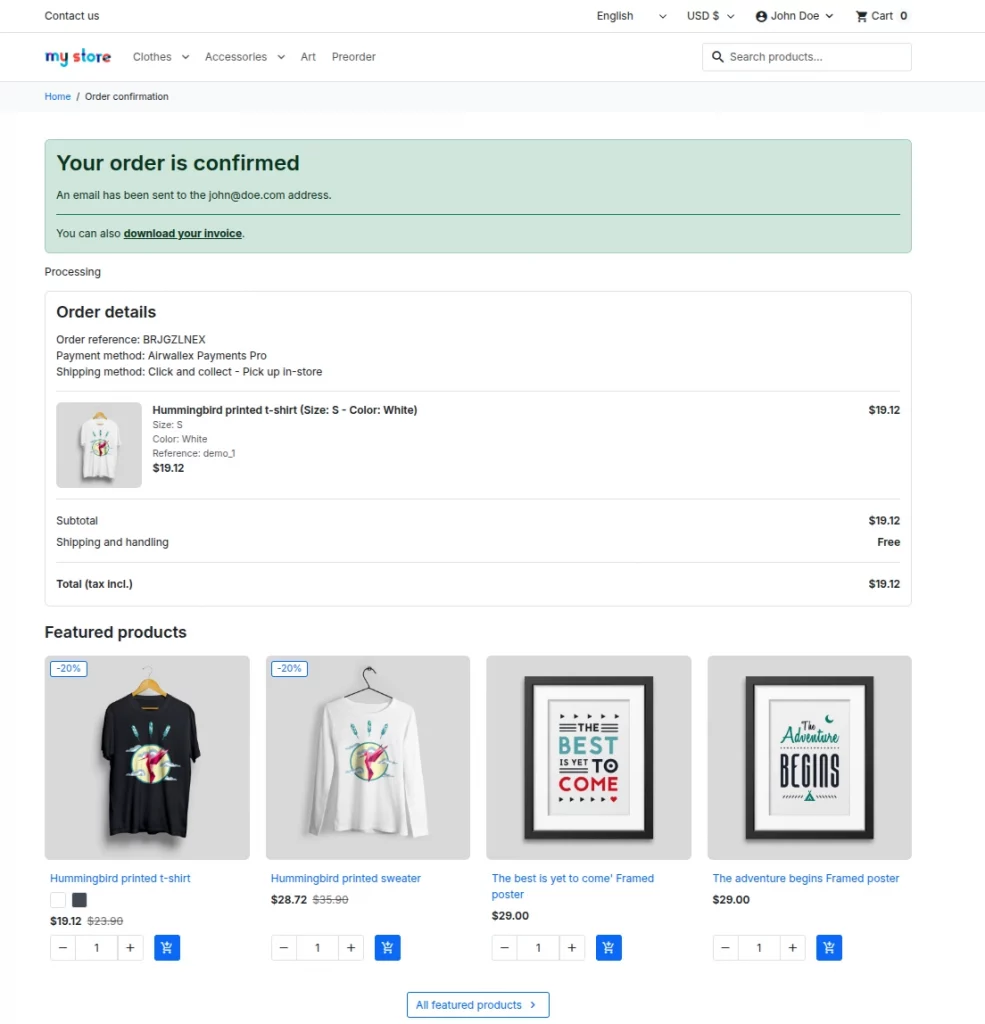
The page displays the order total, currency, and line items. After successful payment, the customer is redirected back to your store’s order confirmation page.

Embedded Checkout Mode
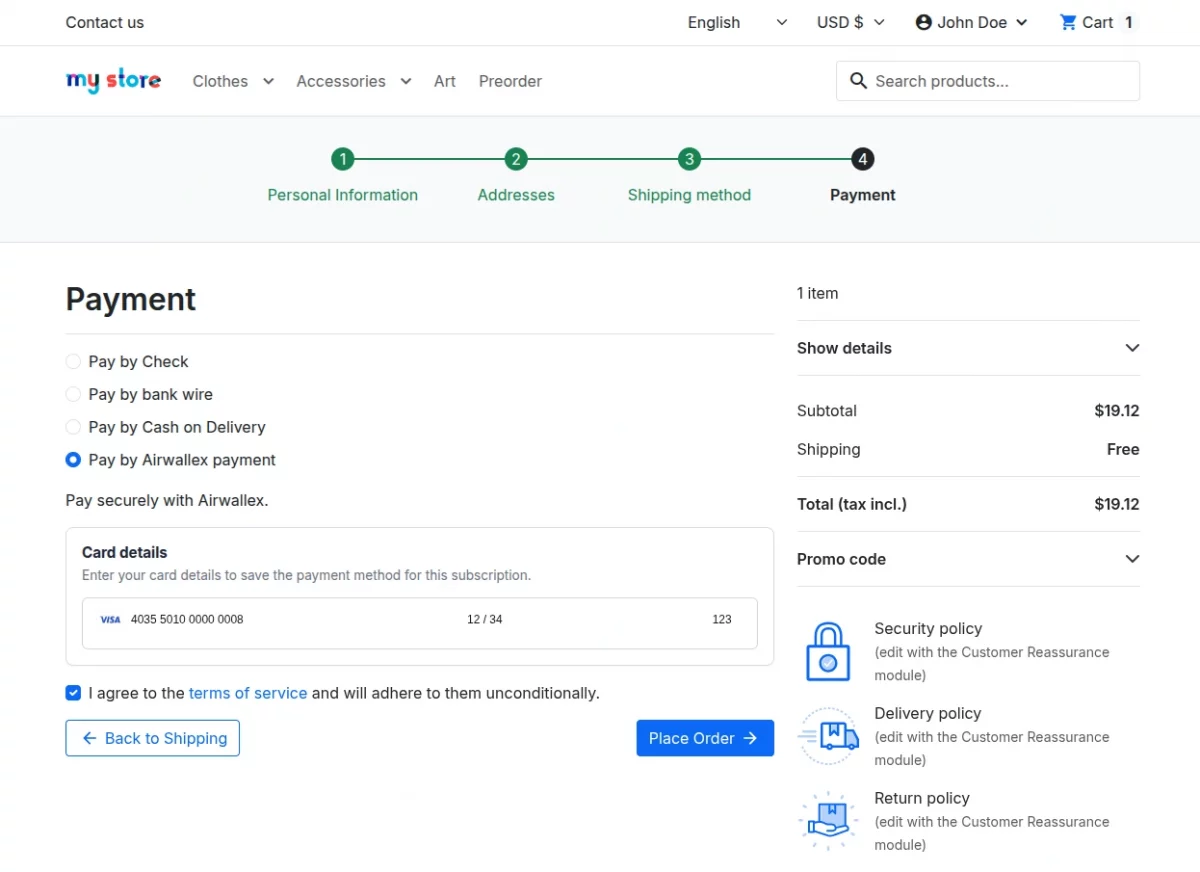
When ‘Payment through hosted payment page’ is set to “No”. An inline card form is rendered on the checkout page using the Airwallex JavaScript SDK.
Customers enter their card number, expiry date, and CVC directly in a secure field hosted by Airwallex.
Real-time validation indicates whether the card number, expiry, and CVC are valid.

Subscription Product Experience
When a product is assigned a subscription plan, customers see a purchase option selector on the product page and in the cart.
They can choose between a one-time purchase and subscribing to the product with the selected billing frequency.

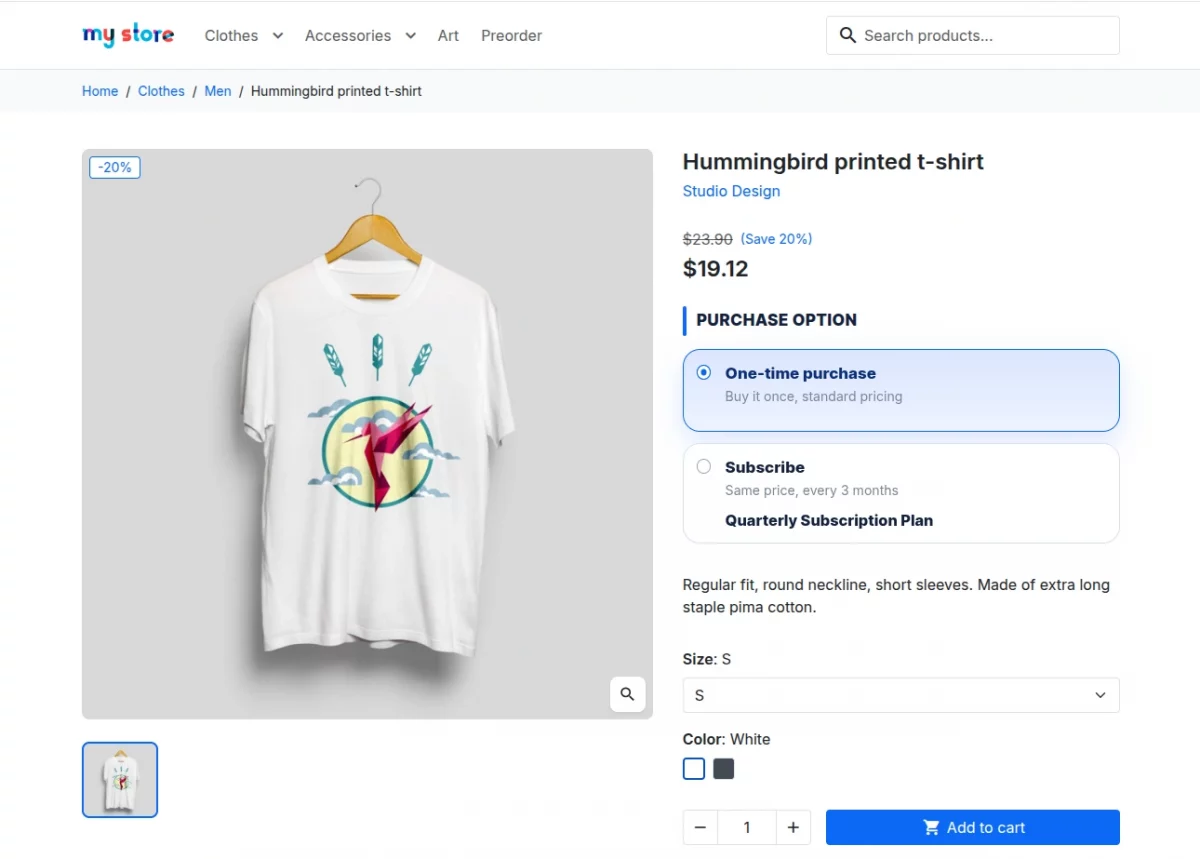
- On the product page, a subscription selector appears below the price showing ‘One-time purchase’ (standard pricing) and ‘Subscribe’ (recurring with the plan’s interval phrase, e.g. ‘Same price, every month’).
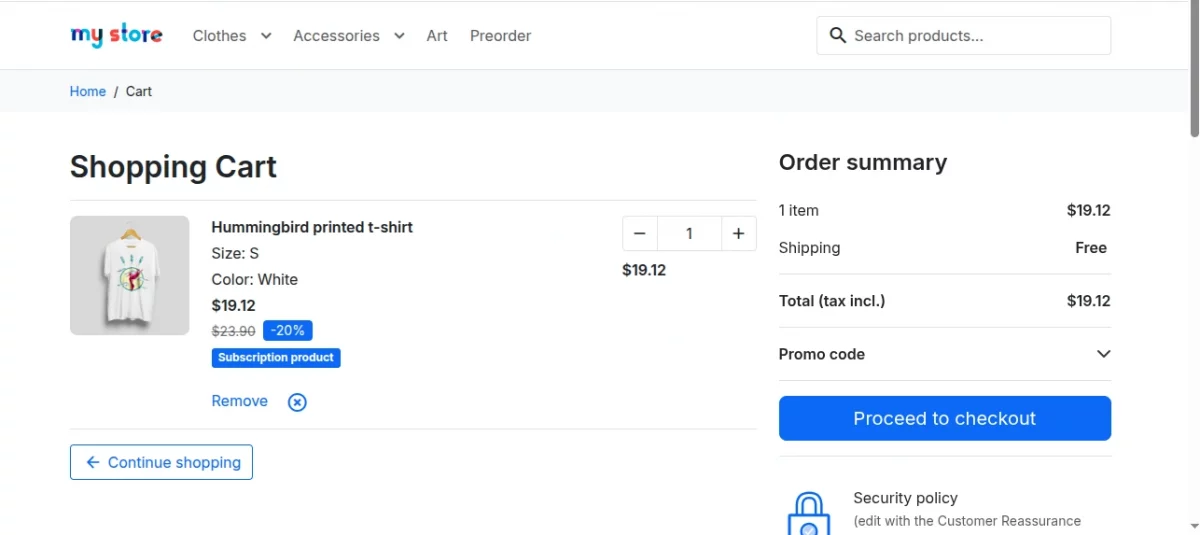
- In the cart, a badge ‘Subscription product’ appears next to assigned products.

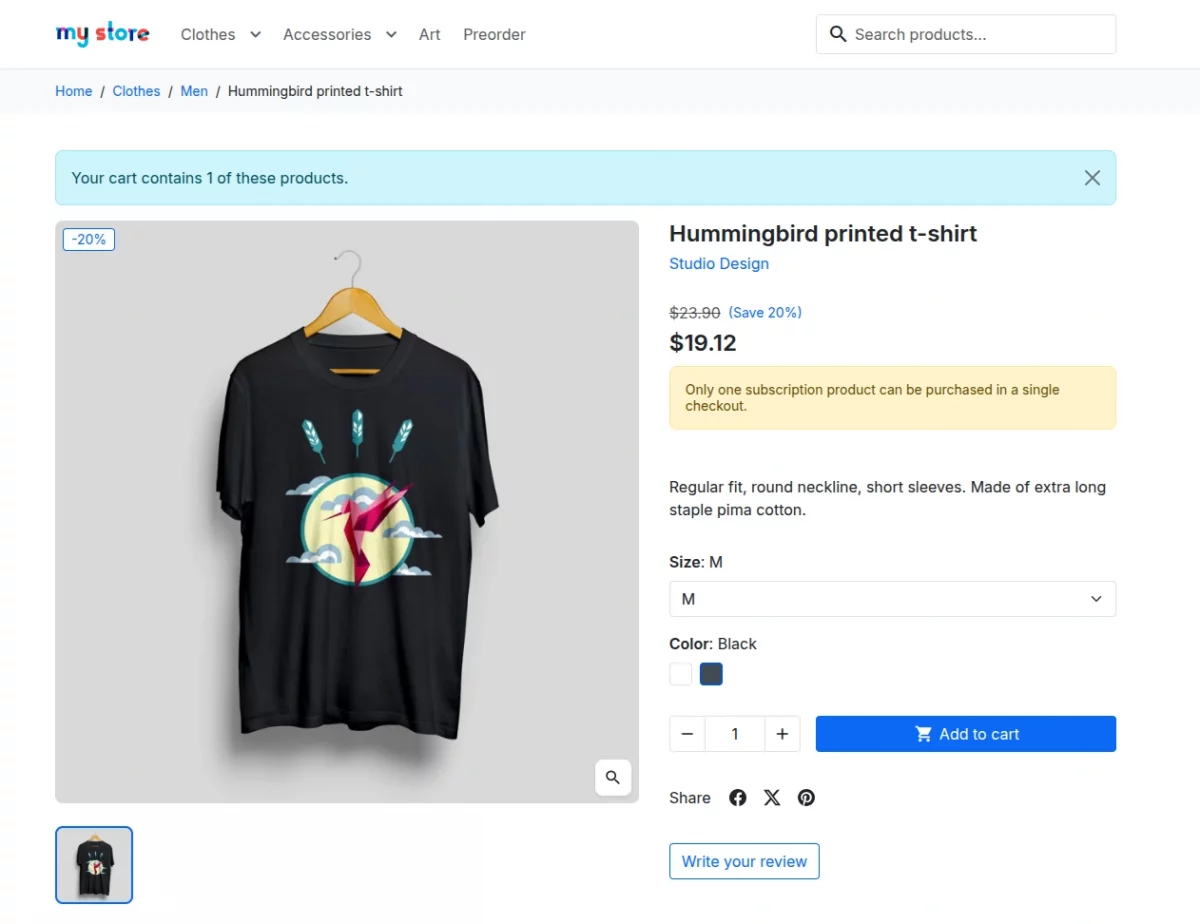
- Cart conflict handling: if a customer tries to add a subscription product while another subscription product is already in the cart, a warning will display ‘Only one subscription product can be purchased in a single checkout.’

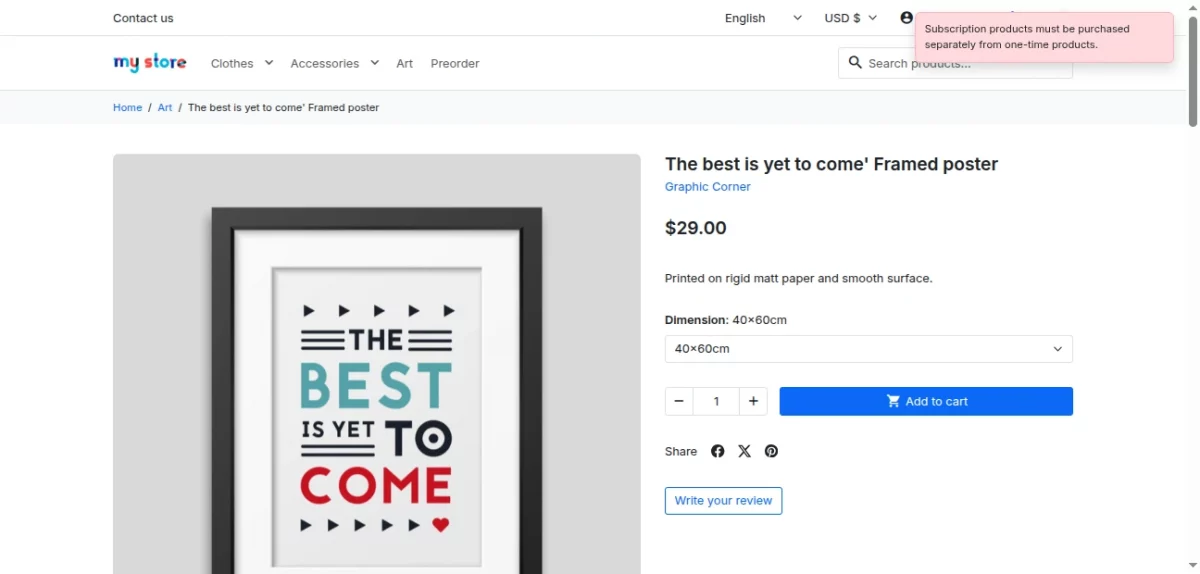
- If a customer tries to mix subscription and non-subscription products in the same cart, the subscription product will block and an error message will display at the top of the cart.
Customer Subscription Management Page
Logged-in customers can access their subscriptions via the ‘My Subscription’ link in their account navigation. This page lists all subscriptions associated with the customer’s account.

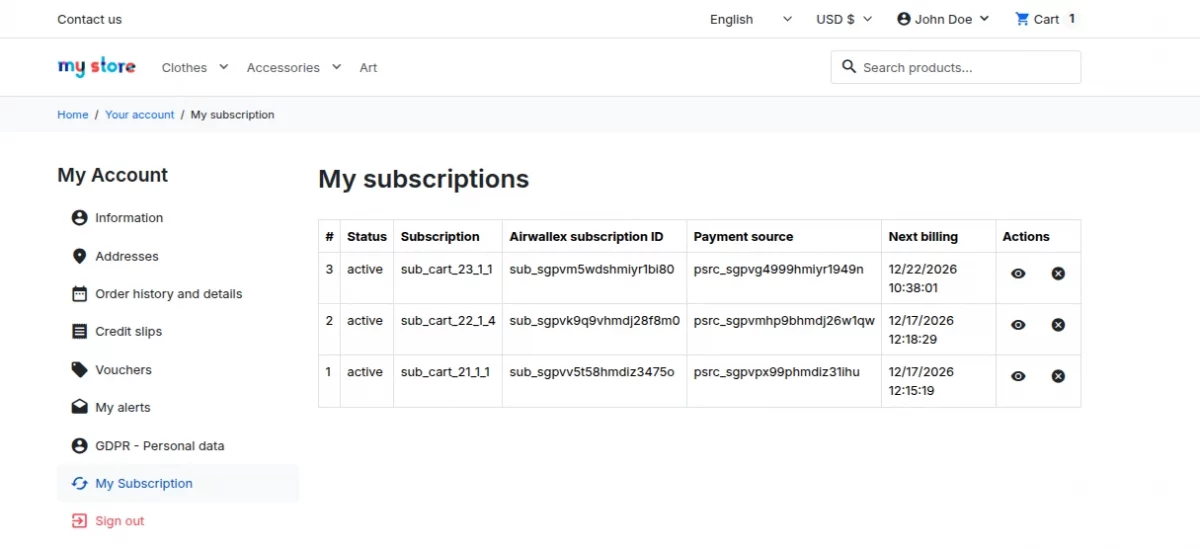
- The list shows: subscription ID, status, subscription code, Airwallex subscription ID, payment source ID, next billing date, and action buttons (View and Cancel).
- Clicking ‘View’ opens the subscription detail page showing full billing information, period dates, payment history, and a cancel button.
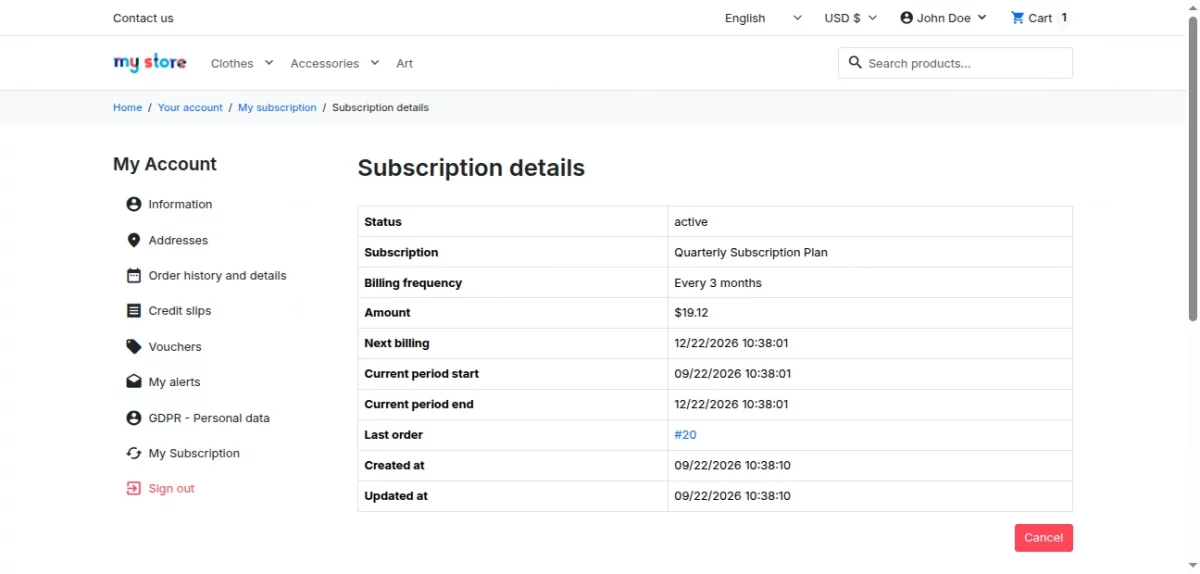
- Clicking ‘Cancel’ prompts for confirmation. If confirmed, the subscription will be cancel at Airwallex and the local record will update.
- Cancelled subscriptions display a ‘Cancelled’ label instead of the cancel button.
Support
For any kind of technical assistance or query, please raise a ticket or send us a mail at support@webkul.com
Also, please explore our Prestashop development services and vast range of quality Prestashop addons.