The Point of Sale (POS) System: It refers to a system where the merchant can create the order from his physical store using the POS and the order will be generated in Magento.
The Basic feature of the POS system for Magento is to create the order in front of the customer so that customer can purchase the goods from his/her physical store as well as from his/her online eCommerce store. With the help of this module, merchants can manage POS inventory and customers.
The system can work in both online and offline mode. In offline mode, all the orders, and transaction are saved locally. When the internet is available for use, then the agent can easily synchronize the offline data to the online data. The module is very useful for increasing the overall revenue by having online stores along with the physical stores.
Note- You can even have Magento POS Native App Builder which will convert you POS into a mobile application for Android devices.
Features of Point of Sale (POS) System
- Admin can easily manage the inventory and sales.
- Easy transaction process.
- The admin can create outlets and can assign a salesperson to the outlets.
- Admin can create more salesperson to operate the POS system.
- Admin can print the barcode slip.
- Admin can enter the Main and subtitle, which is visible on login page in the front end.
- Admin can set the configuration for allowing the salesperson to login on a single system(or same IP Address) at a time.
- Admin can select inventory management on catalog only or different inventories.
- It also works in offline mode or in poor internet connection.
- Admin can manage the Customers’ data.
- The salesperson can add New Customers.
- Real-time synchronization.
- Products can be added to cart by Barcode and SKU.
- Centralized and different Inventory Management for Magento Online Store and POS outlet ad per admin settings.
- The admin can assign products to the POS outlet and can also manage the quantity of the products to be assigned to the POS outlet.
- Taxation is calculated in online mode(only).
- The salesperson can add a note(as a custom message) for admin on each order while checkout.
- The Salesperson can add a custom discount for the customer.
Please Note-
- The Magento POS connects only to the Printer, and barcode reader, whereas it doesn’t connect directly with the cash drawer and card swapping machine.
- POS requires a browser to work on it.
- POS supports 7.5 screen size minimum.
- For now, you cannot add the new customer in Offline mode.
- POS uses Browser Local Storage – The local storage is a Web Storage. The local storage uses the localStorage object to store data for your entire website. Each piece of data is stored in key/value pairs.
How to Increase the Local Storage Limit of Browser –
To Increase the local storage limit of the browser, we can use Firefox browser.
Please find the steps to increase the limit of local storage are
First step:
Please search the following text in the URL search bar : about:config

Second Step :
Then search for the following text: dom.storage.default_quota after clicking on ” I accept the risk” button as shown below –
Third Step :
We can increase local storage limit by clicking on “dom.storage.default_quota ” as shown below –

Now we can see the increased local storage limit –

Installation
The point of Sale (POS) System module installation is super easy you need to move app, js, skin folders and pos.mf file into the Magento root directory that’s it as per the screenshot.

After moving all the folders and file, flush the cache from Magento admin panel. Under System > Cache Management.

Admin Backend Configuration For POS
POS CONFIGURATION
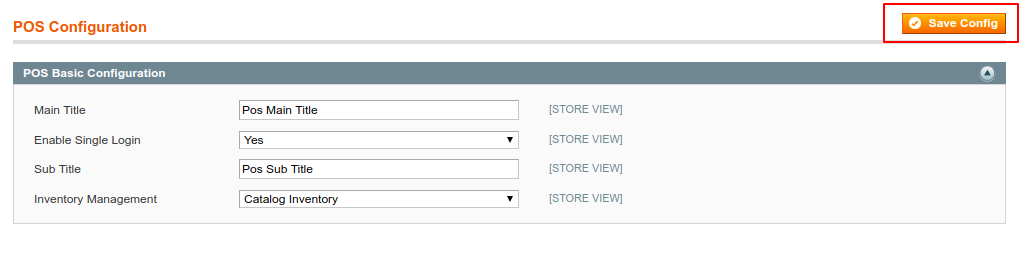
POS configuration section is meant for admin to enter the titles, which is reflected in login panel of Sales agent (Front-end). Admin can navigate to POS>POS Configuration.
Main Title-The title of the store as admin wants.
Enable Single Login-By setting ‘Yes’ the admin can enable single login for the POS user. That is a POS user can login with the login credentials on only one IP.
Sub Title-The sub-title or any information about the store.
Inventory Management- The admin can select here the inventory which will be updated when a purchase will take place on POS. The admin can select from Catalog or Different inventory options.
- Catalog inventory- This will decrease the online as well as POS inventory with the purchase on POS.
- Different inventory- This will decrease the POS inventory only with purchase on POS.
Add / Manage Outlet
After the successful installation of the POS system module admin will be able to view the POS system tab where he/she can add/manage outlets by navigating through POS> Add/Manage Outlet.

After clicking on Add/Manage Outlet the admin will be redirected to the Outlet Manage page.
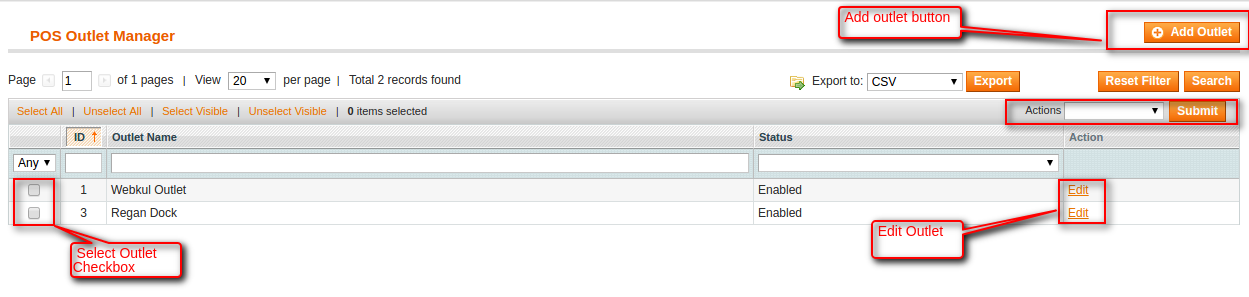
- The admin can delete/enable/disable the selected outlets from “Actions” drop-down.
- Outlet check-box for deleting/enabling/disabling outlets.
- Edit button for viewing/editing outlets.
- Add Outlet for adding the new outlet to the store. The admin has to fill some fields of Outlet Information to add a new outlet.

- Outlet Name for naming the outlet.
- Outlet Address for giving the address of the outlet. The address section has HTML edit option and tools.
- Status of the outlet can be enabled or disabled.
1- When in admin configuration the Inventory Management is set as Different inventory-
After providing the Outlet Information, the admin can add associated products to the outlets. Here any purchase on POS will be reflected only on the POS inventory.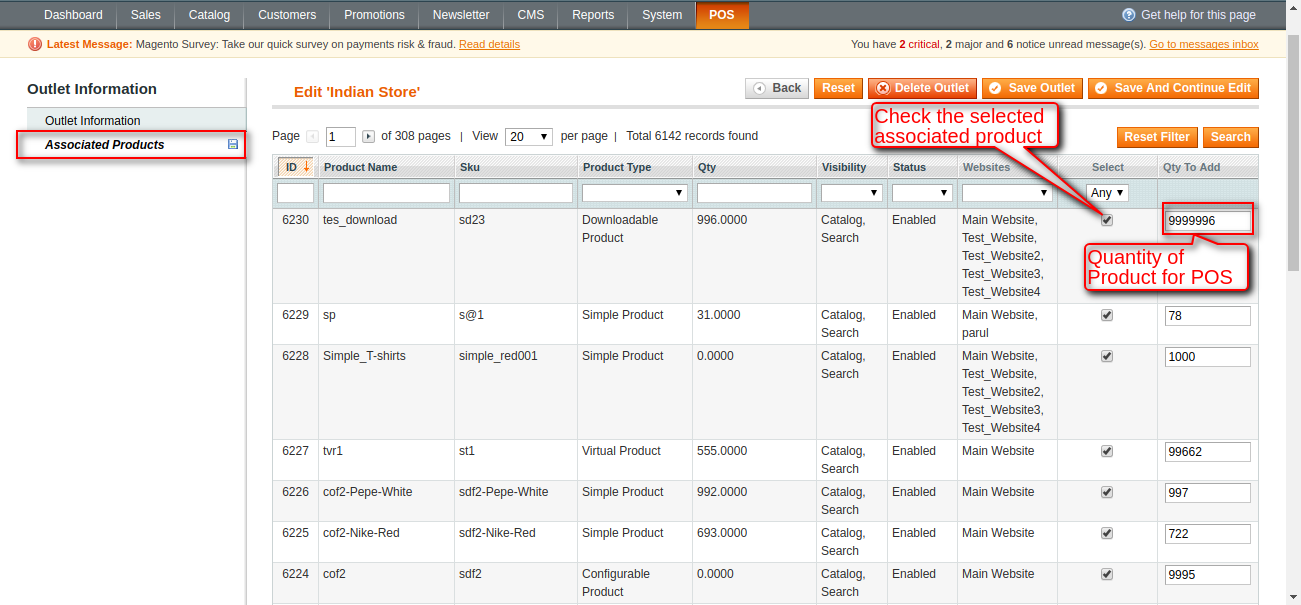
- The admin can select the associated products for the outlet by checking the respective check-box of the product.
- The admin can provide the quantity of the product for POS via “Qty To Add” column.
2- When in admin configuration the Inventory Management is set as Catalog inventory.
In this case both the inventory, that is, online as well as physical store inventory will be same and deduction due to purchase will be reflected in the catalog inventory.

Add / Manage Salesperson
The admin can add/manage cashiers by navigating through POS -> Add/Manage Sales Person
- The admin can delete/enable/disable the selected salesperson from “Actions” drop-down.
- Salesperson check-box for deleting/enabling/disabling salesperson.
- Edit button for viewing/editing salesperson.
- Add Sales Person for adding new cashier for an outlet. The admin has to fill some fields of salesperson information to add a new salesperson.

- The admin can Choose file for uploading the profile picture of the salesperson.
- Full Name of the salesperson.
- Last Name of the salesperson.
- Email Address of the salesperson.
- Contact No. of the salesperson.
- Password for the salesperson’s account.
- Confirm Password for confirming the salesperson’s password.
- Sort Order for the salesperson.
- The admin can choose outlet for which the salesperson account is been added.
- The admin can enable or disable the salesperson’s account by changing its status.
After filling all the required information, you can save the user and the user can Login the POS system (fronted) by using the username (email address) and password.
NOTE- The fields with Asterix mark (*) is for required fields.
Print Barcode Slips
Print Barcode Slips help the admin to print the barcode of the respective product.The printed barcode then can be attached to the product. Admin can navigate to POS>Print Barcode Slips.

The admin can here select the product and in Action can choose Print. This will generate a PDF which admin can print.

POS Front-End
The POS panel link can be obtained by adding “/pos” to the base URL of the website.
For eg. www.example.com/pos
In the given demo the base URL is http://magento.webkul.com/magento-pos/index.php. If we add “/pos” then we will get the POS link for the demo website which will be http://magento.webkul.com/magento-pos/index.php/pos
The salesperson can easily Login the POS System (fronted) by using the Username (email address) and Password which is created by Admin.

After the Sign-up the Salesperson will be redirected to his/her POS panel. The image below shows the POS panel of a Salesperson.

- The POS panel shows all the products in the default category. The salesperson can change the category to view the product category wise.
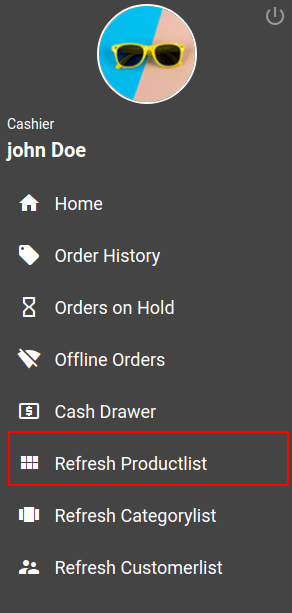
- Salesperson POS menus for sales management like Orders, Orders on hold, Offline Orders and Cash Drawer.
- Product Search for searching the product by Name and SKU.
- Offline/Online mode indicator. The POS panel can work in both online and offline mode. The green icon shows online mode and the grey icon shows offline mode.
- Cart Hold icon can be used for holding a cart for later checkout or product addition. The held cart can be continued for processing by the salesperson.
- Synchronise button icon to synchronize offline data to online data when the internet is available. The salesperson can view offline mode orders by navigating to Offline Orders in the POS menu.
- The cart icon shows the count of the products present in the cart.
- The salesperson can add a product to the cart by clicking on it. The number of clicks on the product is the number of unit of the products added to the cart.
- Cart area has all the product with quantity detail. The salesperson can directly delete products from the cart.
- The salesperson can use a barcode reader to add products to the cart by enabling Barcode Reader input via Barcode button.
- The salesperson can add products to the cart by product’s SKU.
- The Full-Screen button helps in expanding the view of the screen to full screen. You can exit Full-Screen mode by clicking back on the same Button.
Adding products to cart
The salesperson can add products via multiple methods. The products can be added by clicking on the products, by product SKU, and through Barcode (via Barcode reader).
The salesperson can add products by clicking on the products. The number of clicks on a product is the number of units of that product added to the cart.

- The salesperson can view the products category wise by choosing a category from the category select drop down.
- Product search is for searching a product by name or SKU.
- The products of the cart can be deleted by Delete Product icon button present on each product is shown in the cart.
- The Products are shown in the cart with details like name of the product, unit of product, price per unit and the total price of the product by adding all units price.
- The salesperson can see the subtotal and grand total price of the cart.
- The salesperson can change the quantity of a product by selecting the product and clicking on the “Quantity” button icon. The salesperson can give the required quantity and save it by clicking on “Done” button.
- The salesperson can directly delete the whole cart by “Delete Cart” button.
The salesperson can add products to the cart by scanning barcodes of the products by a barcode reader.
Please Note: The barcode reader must be attached to the salesperson system for adding the products to the cart via barcode option.

- Barcode icon button is for enabling the input from barcode reader to add a product to the cart.
- After clicking on “Barcode” icon a pop-up window appears. Scan the product’s barcode from barcode reader to add the product to the cart. When all the required products are added then the salesperson can click “Close” to disable input from the barcode reader.
- Unit of product in cart increase with number scan of a product.

The salesperson can add products to the cart by their SKU.

- On clicking the SKU button a popup screen appears, through which the salesperson can add products to the cart.
- The salesperson will enter the product’s SKU and press enter to add the product to the cart.
- Unit of product in cart increase with number times the SKU has been entered.

Customer Management by salesperson
After all the required products of a customer has been added to the cart then, the salesperson can choose/add customer for which the order has to be made. Click on Choose/Add customer icon.
- The salesperson can choose a customer from the registered customer list. The salesperson can search registered customers by name.

- If a customer is not registered to the store then, the salesperson can add customer by clicking on the “Add Customer” icon.

- First Name of the customer.
- Last Name of the customer.
- Email-Id of the customer.
- The telephone number of the customer.
- Street Address of the customer
- Street Address 2 is for a much detailed street address.
- City name of the customer.
- Zip/Postal Code of the customer’s location.
- Country name of the customer.
- State of the customer.
- Lastly, the salesperson will click “Continue” to register the customer and redirecting to Place Order page.
Completing Orders
After the customer has been added to the cart for creating an order, the salesperson will complete the order by placing the order to generate the invoice.
- If the customer is registered then select the customer from the registered customer list and click on “Pay” button. After clicking the button the Place Order page will appear on the screen.
- If the customer is not registered then, the salesperson will add the customer and click on “Continue” to register the customer and redirecting to Place Order page.
- Custom Message is meant to add a note to admin for any order.

- The place order page shows the name of the customer.
- Amount to pay is the total amount of products in the cart, Amount paid is the amount paid against the total amount. Sometimes the paid amount is more or less than the total payable amount so the Extra amount to return or take is shown below the total payable amount.
- Address of the customer can be chosen and saved by “Done” button. The customer can change/add an address of the customer by clicking on Edit button. Here, you can review customers address and if required you can change the address by clicking on “Add New“, then a page related to the address details will open where you can edit the address. Change the address and continue to place the order with a new address.

- Lastly, the salesperson will click on Place Order to place the order and generate the invoice. The salesperson can print the invoice and move to next order.

Custom Discount
The POS user can now give the Custom discount to its valuable customers. Custom discount is the discount given at the time of checkout generally against a voucher or coupon or other offers on the store.

Here the salesperson can add the discount by clicking on the product and then clicking the discount button will enable the custom discount field to enter the discount amount.
The customer can find this discount on the invoice generated post payment.

Order On Hold
The salesperson can put the cart on hold for the later processes and can continue to process on the held cart when required. The salesperson can put a cart on hold by clicking on “Put cart on hold” icon situated on the right side of the header.

- The salesperson can navigate to the “Order on Hold” through POS menu icon -> Order on Hold.
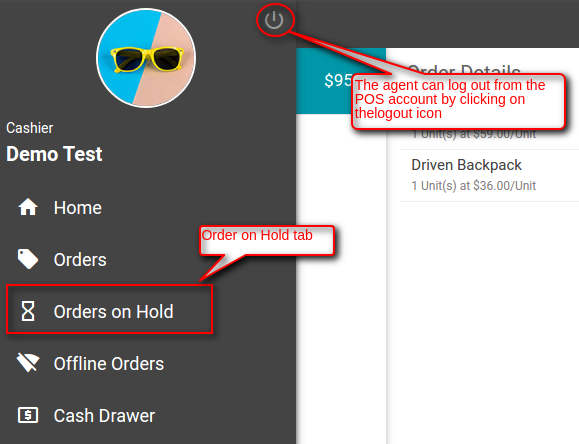
After Clicking on the Order on Hold tab the salesperson will be redirected to the orders on hold.
- List of orders on hold.
- Order Details including the product information along with the price and grand total.
- The salesperson can Re-cart the held order to continue the further processes.
- The salesperson can Remove Cart from the held order list.

Orders
The salesperson can check the orders by navigating through POS menu -> Orders.
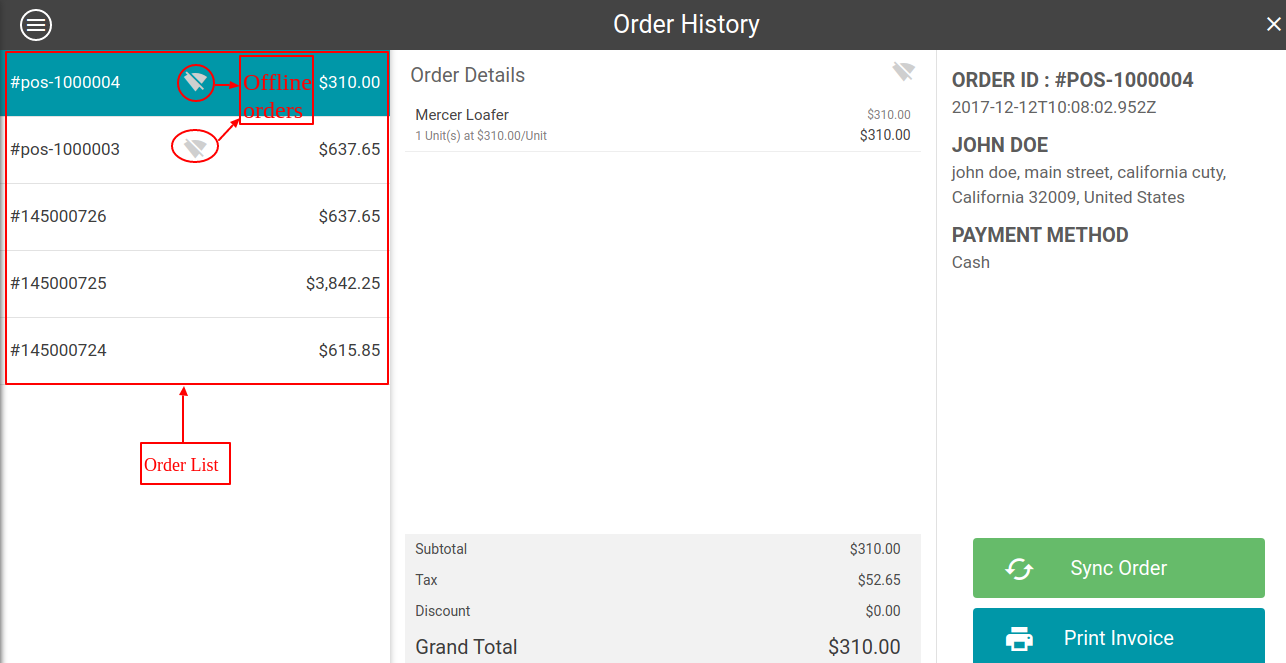
- List of the orders including all the online and offline orders.
- Order Detail of each order.
- Customer Details like name and address.
- Date, time and time zone of order.
- Payment method detail.
- Print Invoice button to print the invoice.
Offline Orders
The salesperson can check the offline orders by navigating through POS menu -> Offline Orders.

- List of the offline orders includes all the offline orders.
- Offline Order Detail of each order.
- Customer Details like name and address.
- Date, time and time zone of order.
- Payment method detail.
- Print Invoice button to print the invoice.
- Sync Order button to synchronize the order to online orders and data. The salesperson can also sync offline orders by Sync icon on the home page.

Cash Drawer
As the salesperson Sign in, he checks the cash amount in his Cash Drawer. After checking, the amount is submitted initially just after the Sign in.
- The Credit amount is the amount taken by the salesperson from the customer against the payable amount of an order.
- The Debit amount is the return of extra money as a change to the customer.
- The Balance is the net amount added to the cash drawer after debit and credit.
- Opening Balance is the starting balance amount in the cash drawer.
- Closing Balance is the closing amount is the cash drawer after a set of work hour.

Refresh Productlist
This helps in refreshing the product list, any changes done by admin is reflected on the frontend. Thus, avoiding the requirement of reloading the whole page.
Refresh Category list
This helps in refreshing the category list, any changes done by the admin is reflected on the front. Thus, avoiding the requirement of reloading the whole page.

Refresh Customerlist
This helps in refreshing the customer list, any changes done by admin is reflected on the frontend. Thus, avoiding the requirement of reloading the whole page.

For any query or doubt, please add a ticket at https://webkul.uvdesk.com/
Current Product Version - 2.0.1
Supported Framework Version - 1.9.x.x

32 comments
Thanks for the valuable words. Moreover, you can share further information or requirement on [email protected].
Regards.
1) Show customers in POS based on the sales agents.
— We need option in admin to assign agents to customers. So, one agent can’t see/access customers assigned to another agents from POS.
2) Show past orders for sales agents in the offline mode.
— Currently if we refresh the page or login to POS from different device than agents can’t check the past orders. But, we need to show past orders for sales agents in POS.
3) Sync New Products/Inventory on regular basis.
— Currently there is no option to sync new products/inventory from POS. We need some option for that.
Point 2 and Point 3 should be part of the module as seeing the past orders and inventory synchronization is the basic requirements. Please provide quotation for the point 1.
It will be very great if you could check the replies and send the message via our Helpdesk System. https://webkul.uvdesk.com/en/customer/login
You can click to forgot password link – https://webkul.uvdesk.com/en/customer/forgot-password
To set up the password. All the emails and replies are maintained here and that will be easy for both of us to track the record.
If you face any issue then please let us know at [email protected]
USERNAME: demo PASSWORD: demo123
Thanks
Currently, the POS has the cash payment mode. You can use external card swipe machine to collect the payment at point of sale.
Please mail us at [email protected] so that we can discuss in more details.
Now, barcode option is available in the module. If you have any query or requirements please feel free to contact us at [email protected]
Our POS system has the barcode scanning feature. You can check our demo version as well.
If you have any query or requirements please feel free to contact us at [email protected]
You will get this functionality with our updated demo version so that a POS user can add new customer at the time of purchasing/checkout in a very simplest way.
For any query or requirements please add a ticket at https://webkul.uvdesk.com/
We have updated the demo version, Now you can check the feature where a POS user can add new customers.
Thanks,
We can create a drop down menu at the POS fronted so that you can choose the POS System according to your stores. Also, you can easily manage your inventory for each store.
For any query or requirements please add a ticket at https://webkul.uvdesk.com/
Please let us know the issue that you are facing during the add customer so that we can help you in a better way.
Also, you can create a ticket here – https://webkul.uvdesk.com/ so we can discuss on our ticket system. It will help both of us to get quick responses.
Thanks,
I would like to tell you that the POS System will work with multi seller module or marketplace module and it will display all the products of Magento Marketplace Store. Currently, it will not work for individual seller.
Do you want to use this for particular sellers ? So that your seller also can sell his products by using the POS system at his physical store and it will display only the particular seller’s products.