User Guide for ONDC Odoo Connector
Table of Content
Introduction
Webkul Ecomviser is a dedicated ONDC Seller App that helps businesses register on the ONDC network, list products, manage inventory, shipping, and orders in one place.
It acts as the main seller platform that connects your business to ONDC with the help of ONDC Odoo Connector.
ONDC Odoo Connector serves as a bridge. It connects your Odoo system to ONDC. With this bridge, you can sell your products on ONDC easily and manage everything directly from Odoo.
Odoo as your business command center – where you manage products, stock, as well as orders. ONDC is like a huge online shopping network that helps you reach more customers.
Features
- Manage product data on both Odoo and Seller App.
- Keep inventory levels accurate across both platforms.
- You can onboard sellers on ONDC quickly and easily.
- ONDC Odoo Connector helps you connect Odoo with Seller App.
- You can export products directly from Odoo.
- It allows you to import products from ONDC.
- Keep inventory levels accurate across both platforms.
- It helps keep your inventory updated in real time.
- You can import orders via cron or Webhook.
- You can fulfill orders manually directly within Odoo.
- ONDC Odoo Connector allows you to accept or reject orders in Odoo.
- It ensures secure and standard-compliant ONDC integration.
Prerequisites for using ONDC Odoo Connector
Sellers must be registered on the Webkul eComviser App before using ONDC Odoo Connector. Note :- A commission fee of 1% will be applied to each sale order processed through the eComviser platform.
Installation
- Once you purchase App from Webkul store, you will receive a link to download module’s zip file.
- Extract file on your system after download finishes. As a result, you will be able to view a folder named- ‘ondc_odoo_connector’
- Copy and paste this folder inside your Odoo Add-Ons path.
- Now, open Odoo App and click on Settings menu. Here, click on Activate Developer Mode.
- Then, open Apps menu and click on ‘Update Modules List.’
- In search bar, remove all filters and search ‘ondc_odoo_connector’
- You will be able to see module in the search results. Click on ‘Activate’ button to install it.
Workflow
How to Register on Webkul eComwiser Seller App
1. To get started with the ONDC Odoo Connector, you’ll first need to create an account on the Webkul eComviser Seller App platform.
Seller Name: Enter the name of your business or shop exactly as you want it to appear on the platform, so customers can easily identify you.
Email: Please provide a valid and active email address that you regularly use, since it will be required for login, notifications, and account verification.
Password: Create a strong and secure password with at least eight characters, including uppercase and lowercase letters, numbers, and symbols, to keep your account safe.
Confirm Password: Re-enter the same password carefully to avoid typing errors and ensure that your password matches.
Terms and Conditions Checkbox: Read the terms and conditions, then tick the checkbox to confirm that you agree to comply with the platform’s rules and policies.
“I’m not a robot” CAPTCHA box: Complete the CAPTCHA challenge to verify that you are a real person and not an automated bot.
Create my Account button: Once all fields are correctly filled, click the button to submit your registration and create your seller account on the platform.


2. Then complete the seller product details, and choose the option according to your needs.
Mention the product type you want to deal with or want to sell on the platform.

3. To begin with ONDC Odoo Connector, you need to create an account on the Webkul Ecomviser Seller App platform by providing your registered business address.
Enter your address and other related details; note that all fields marked with a star must be completed.

4. Add your PAN number, GSTN, FSSAI license number (if you’re dealing in food-related products), and any other relevant regulatory or compliance information
5. Choose shipping-related info in Webkul Ecomwizer, select the range, country, and state.

6. Select hyperlocal status(hyperlocal in eCommerce means selling and delivering products to customers who live nearby), and add your convenience distance.

7. After selecting Odoo, you will need to generate API credentials to establish a secure connection in the Ecomviser platform.
8. Add a time slot according to your needs and activate the time slot button in ONDC Odoo Connector.

9. After creating an account on Webkul eComwizer, a dashboard will appear on the webpage.

10. Once you activate the hyperlocal status, the “Add Location” dashboard will appear, prompting you to enter Address Line 1, Latitude, Country, State, and ZIP Code.

11. API credentials are added in the profile section and should be securely saved elsewhere for future reference and use.

12. In the Configuration section, go to Add Shipping Method, then enable the shipping types based on your specific requirements.

13. In the Profile tab, you must add a short description, long description, and seller policy. This is a required step to make it easier for you to add products later.

14. Navigate to Products >> Product Listings >> Add a New Product.
Fill in all required fields, such as product type, name, description, image, weight unit, number of accessible days, and number of downloads. Finally, click the Save button.

15. Once the product is added, it will appear in the product list, displaying the product ID, image, quantity, status, and available actions.

Connection
- Once installed, sign in to your Odoo account, go to the Muti channel app, and click on the ONDC button to begin the setup.

2. Add a new channel and choose ONDC as the channel type. Once selected, the ONDC channel configuration settings will become available for setup.


3. Click on the Credential section, then enter the URL of the Ecomviser, add the Access Token and Refresh Token.
You can simply copy these tokens from the Ecomviser app and paste them into the ONDC Odoo Connector and click on test.

The connection has now been established. You can also reset it by clicking the Reset button.
Basic Configuration
4. Click on basic configuration and select the following field:
- Auto-Evaluate: Enabling this option will automatically check and evaluate the imported data feed without manual input.
- API Record Limit: This setting allows you to define the maximum number of records that will be synced between Odoo and ONDC.
- Company: Select the default company for the data imported from ONDC to Odoo.
- Channel Time Zone: Select the appropriate time zone to ensure all data and activities align correctly with the channel’s local time.
- Total Record Limit: for Import Process defines the maximum number of records (such as products, orders, or customers) that can be imported from ONDC
- Advanced Configuration: In the Advanced Configuration section, you can customize the theme color, color index, blog URL, and store URL for your Odoo Multichannel Sale setup.

5. Click on ONDC and fill the details in the following field
- ONDC Category: Select the product category you want to sell through the Ecomviser Seller App.
- Auto Order Approve: Enable the Auto Approve option to approve orders as soon as the Ecomviser Seller App lists them for sale.
- Default Data: If the product is a grocery item, fill in the necessary details under Default Data, such as nutritional information, additive details, FSSAI number, manufacturer’s name and address, and date of manufacture.
- Default Data (General): Enter the general default information that applies to all products, including Group ID, shipping time, return window, and whether the product is cancellable.

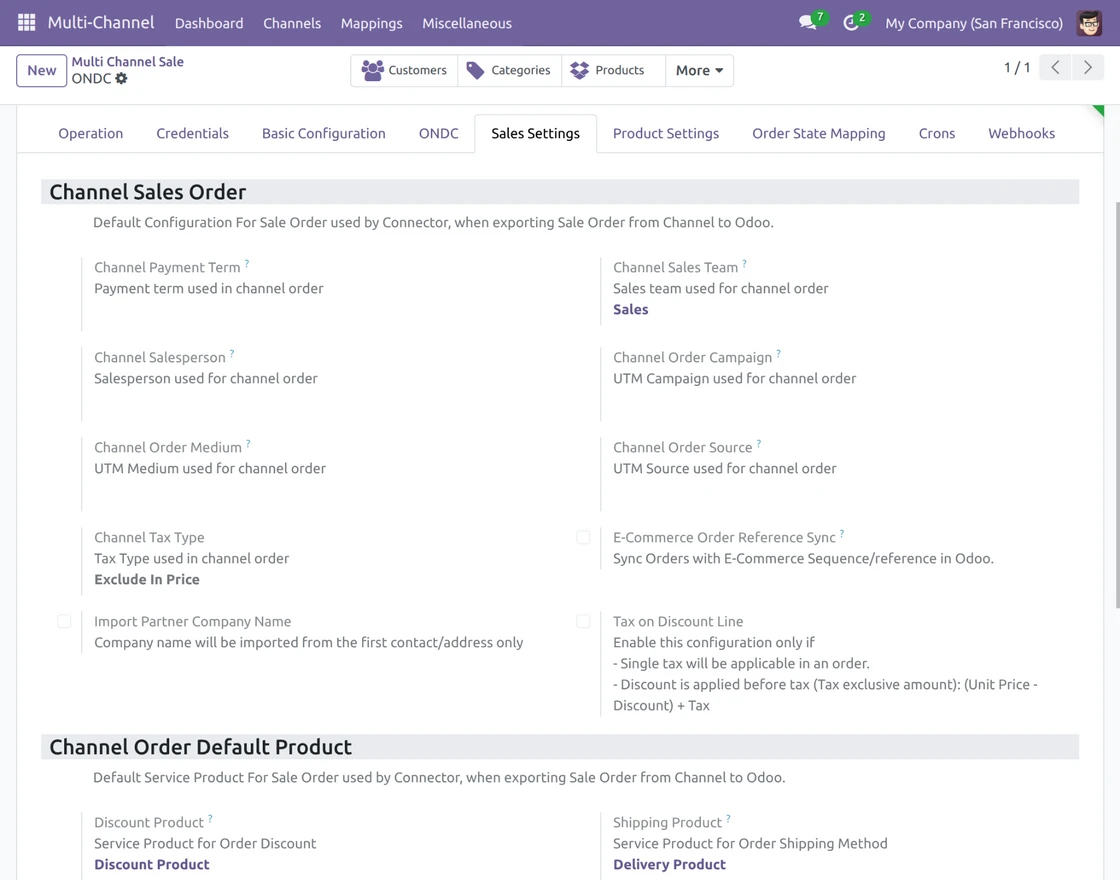
Sales Settings
6. Now click on Sale Settings
- Payment Term: Set the payment terms for ONDC sales orders.
- Sales Team: Assign a sales team to manage ONDC orders.
- Salesperson: Choose a salesperson responsible for ONDC orders.
- Campaign: Set the UTM campaign for tracking ONDC order sources.
- Medium: Define the marketing medium for ONDC orders.
- Source: Specify the order source for tracking ONDC sales.
- Tax Type: Choose whether taxes are included or excluded in ONDC orders.
- E-Commerce Order Reference Sync: When enabled, orders will be created in Odoo using the ONDC order sequence.
Channel Order Default Product:
- Discount Product: Set a service product to apply discounts on imported sale orders.
- Shipping Product: Set a service product to handle shipping charges for imported sale orders.
7. Go to the product settings section.
Default Settings:
- Category: ONDC supports multiple categories, but Odoo allows only one category per product. Set a default category for storing imported ONDC products in Odoo.
- Pricelist: This defines the original product price for items imported from ONDC into Odoo.
- Language: The selected language will be applied to all items synced from ONDC to Odoo.
- Channel Category: When exporting products from Odoo to ONDC, they will be assigned to the selected default category.
- SKU Pattern: If no SKU is provided, Odoo will use the configured pattern as the product’s SKU.
- Avoid Duplicate Products: When enabled, Odoo will prevent duplicate entries during import by checking the SKU (Internal Reference) and Barcode.
Stock Settings:
- Auto Stock Sync: If enabled, Odoo will automatically sync product stock to ONDC in real time.
If you enable this setting, Odoo automatically syncs updated stock to ONDC in real-time whenever there is stock movement.
- Stock Action: Choose whether to sync the on-hand quantity or forecasted quantity of a product to ONDC.
- Warehouse: Select the default warehouse used for storing products imported from ONDC.
- Location: Set the default stock location where imported ONDC products will be stored in Odoo.

8. Here, you can map the order statuses from ONDC to their corresponding statuses in Odoo.
Make sure to enter the exact order status name in the channel order status field.
9. You can also set a default status mapping and configure actions like invoice creation and shipment processing for orders marked as paid or open.

10. In addition, the cron feature automatically imports data from ONDC to Odoo. The import process runs based on the Created/Updated After date you define.

Webhook Configuration in ONDC Odoo Connector
11. ONDC Odoo Connector provides two webhook options to sync real-time data between the Ecomviser App and the ONDC platform:
- Order Webhook
- Whenever the Ecomviser App creates a new order, it instantly syncs the data with ONDC in real time.
- Whenever the Ecomviser App creates a new order, it instantly syncs the data with ONDC in real time.
- Order Update Webhook
- If the order status is updated in the Ecomviser App (for example, marked as Done), the same update is immediately reflected on Odoo.
- If the order status is updated in the Ecomviser App (for example, marked as Done), the same update is immediately reflected on Odoo.
This ensures that both orders and their status updates remain consistent between Ecomviser and ONDC without any manual intervention.

How to Import data from eComwiser to Odoo
12. Furthermore, you can import products, categories, orders, customers, and shipping methods listed on the Webkul eComviser App into the module.
Once you click on Import, you can select the object type (Product, Category, Order, or Shipping Method). Based on your selection, relevant filters will appear.
For example, if you select Product, the filter allows you to import either all records or only records of a specific Store ID.

How to Check Data Mapping
13. Whenever you synchronize data between Webkul Ecomviser and Odoo, the ONDC Odoo Connector maps the data automatically.
The Mapping section allows you to check which data is mapped between ONDC and Odoo.
Additionally, it includes details such as Products, Product Templates, Attributes, Attribute Values, Orders, Categories, Shipping Methods, and Payment Methods.
By setting these mappings, the connector ensures smooth synchronization.


What is Feed
14. Whenever you import data like Product, Order, Category, or others from the Webkul Ecomviser App, it first goes to the Feed section in our module.
A feed basically acts as a record that helps you verify imported data before creating or updating it in Odoo.
If Odoo evaluates the feed successfully, it will create or update the record.
If the system fails to evaluate the feed, it shows an error that you can review in the feed section.
Feeds are available for Category, Product, Partner, Order, and Shipping.
They help you review the imported data and ensure everything is correct before syncing it with Odoo.
Global Configurations
15. The Global Configuration settings apply to all configured channels in Odoo.
Moreover, from this section, you can efficiently manage import schedulers for Customers, Categories, Products, and Orders.
You can also set up other options like cron jobs and Clear Sync History.
An additional option, Avoid Duplicity (Default Code), helps you prevent duplicate records during the import process.
You can enable this option in global configuration settings.
Using SKU as a unique identifier, ONDC Odoo Connector prevents duplicate products. When the connector imports or syncs products, it checks the SKU.
If the SKU already exists in Odoo, the system maps the product with the existing one instead of creating a duplicate.
Odoo creates and maps a new product entry whenever it detects a new SKU.
This ensures clean product mapping, prevents duplicates, and keeps your product catalog consistent across Odoo and ONDC.


Need Help?
Hope you find the guide helpful! Please feel free to share your feedback in the comments below.
If you still have any issues/queries, please create a ticket at the UV Desk.
I hope this helps. In case of any further queries, contact us at our support mail.
Thanks for paying attention!!