User Guide for Odoo ShipTime Shipping Integration
Table of Content
Introduction
Odoo ShipTime Shipping Integration connects your Odoo system with ShipTime to manage all shipping tasks from one place.
Furthermore, you can fetch live shipping rates, create shipments, generate labels, track deliveries, and cancel shipments directly inside Odoo.
Odoo ShipTime Shipping Integration automates daily shipping tasks to save time and reduce manual errors. Additionally, it supports multiple carriers with real-time rate comparison directly from the Delivery Order.
With Live Rate Fetching and Real-Time Shipment Tracking, businesses can manage all shipping operations in a simple and organized way without switching platforms.
Features
- Live Rate Fetching from multiple carriers directly in Odoo.
- Compare rates from multiple carriers and select the best option.
- Create shipments from the Delivery Order easily.
- Shipping labels are generated automatically once the shipment is created.
- Track real-time shipment details using the tracking button on the Delivery Order.
- Cancel shipments directly from Odoo as long as the carrier allows.
- Sync tracking numbers and shipment details automatically.
Installation
- Once you purchase the App from Webkul store, you will receive a link to download module’s zip file.
- Extract the file on your system after download finishes. As a result, you will be able to see a folder named- ‘shiptime_delivery_carrier’.
- Copy and paste this folder inside your Odoo Add-Ons path.
- Now, open Odoo App and click on the Settings menu. Here, click on Activate Developer Mode.
- Then, open Apps menu and click on ‘Update Modules List’.
- In the search bar, remove all the filters and search ‘shiptime_delivery_carrier’.
- You will be able to see module in the search results. Click on ‘Activate’ to install it.
Workflow
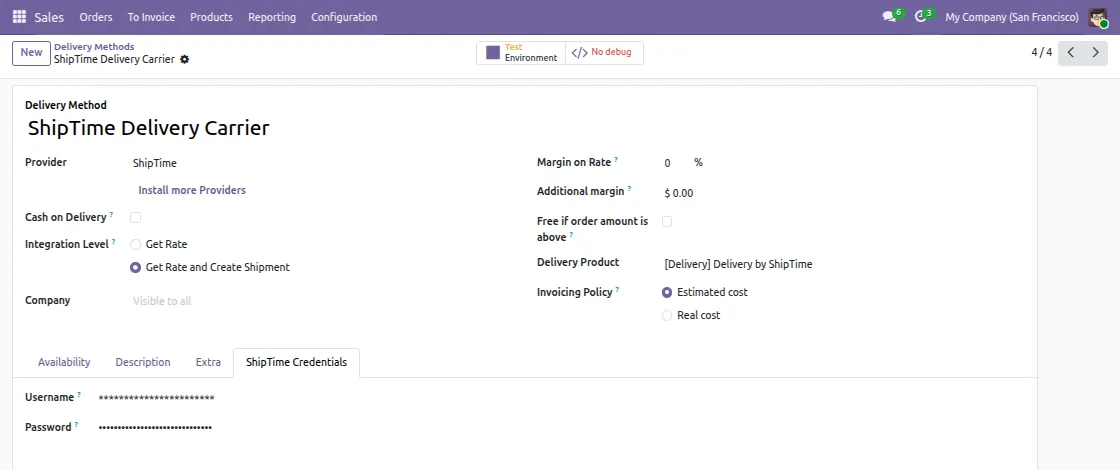
1. ShipTime Configuration
Go to Sales > Configuration > Delivery Methods and open ShipTime Delivery Carrier. Then, enter your ShipTime Username and Password under the ShipTime Credentials tab.
Next, set the Integration Level and Create Shipment as needed.

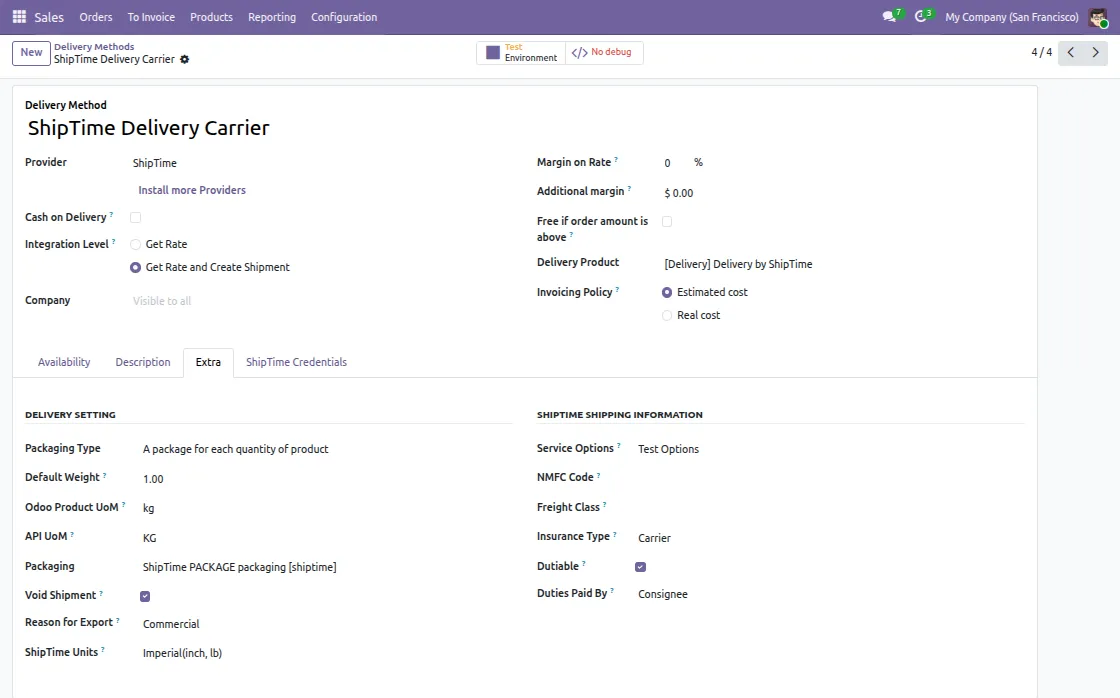
2. Extra Delivery Settings
Open the Extra tab in the ShipTime Delivery Carrier settings. Then, set Packaging Type, Default Weight, and API UoM.
Furthermore, configure Freight Class, Insurance Type and Dutiable under ShipTime Shipping Information.

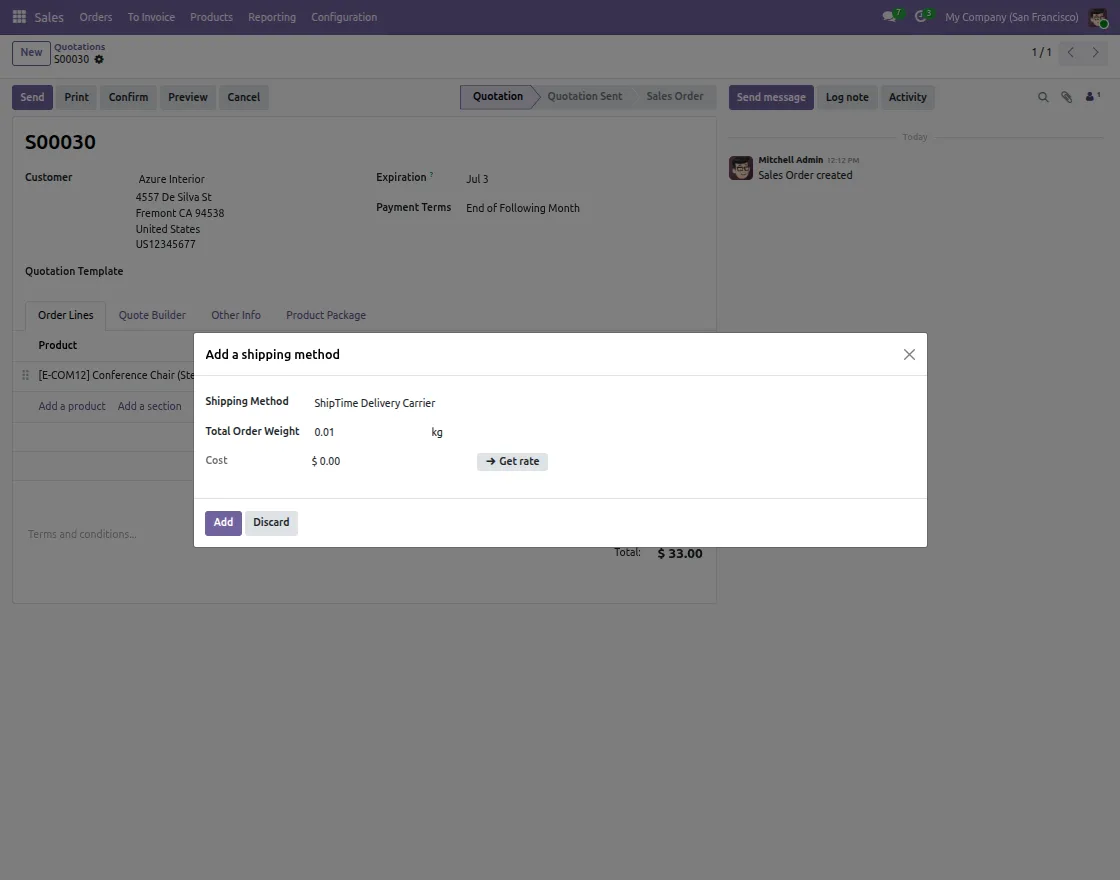
3. Add Shipping Method
Open a Delivery Order and click Add Shipping. Then, select ShipTime Delivery Carrier as the Shipping Method.
Finally, review the Total Order Weight and click Get Rate to fetch live shipping rates from ShipTime.

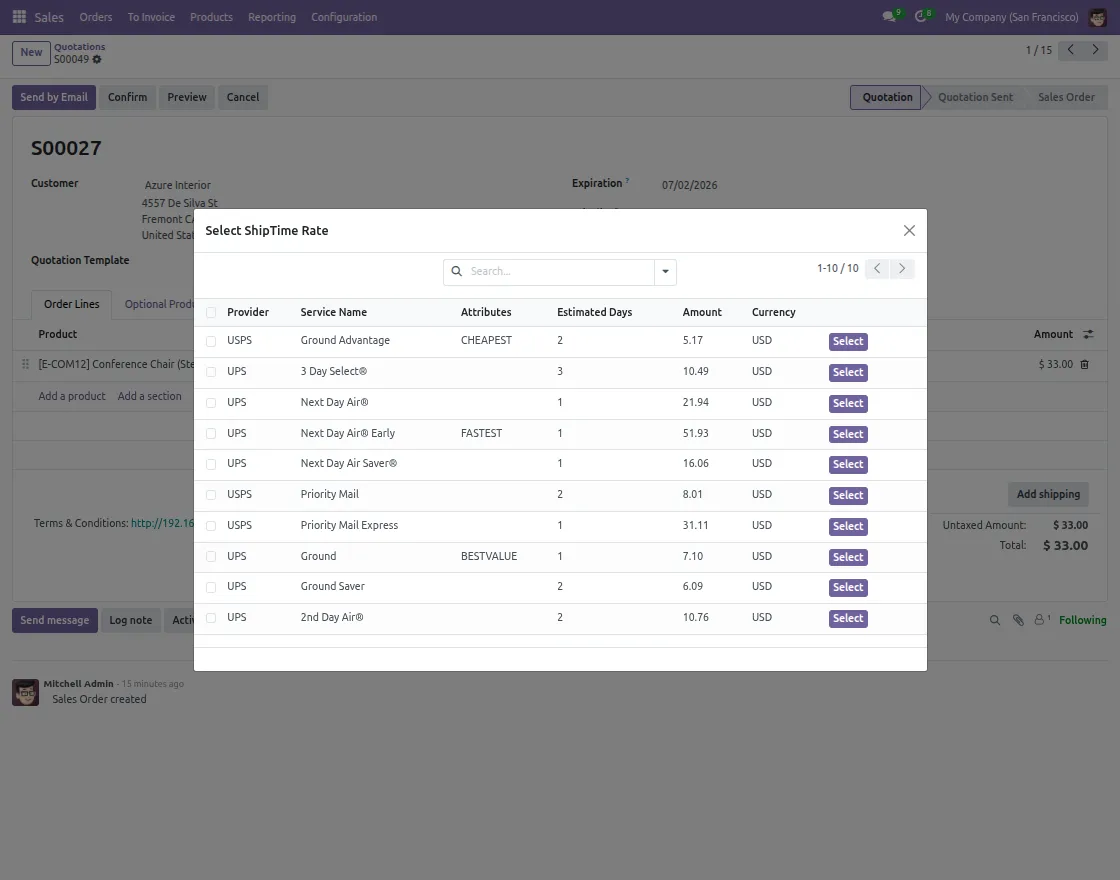
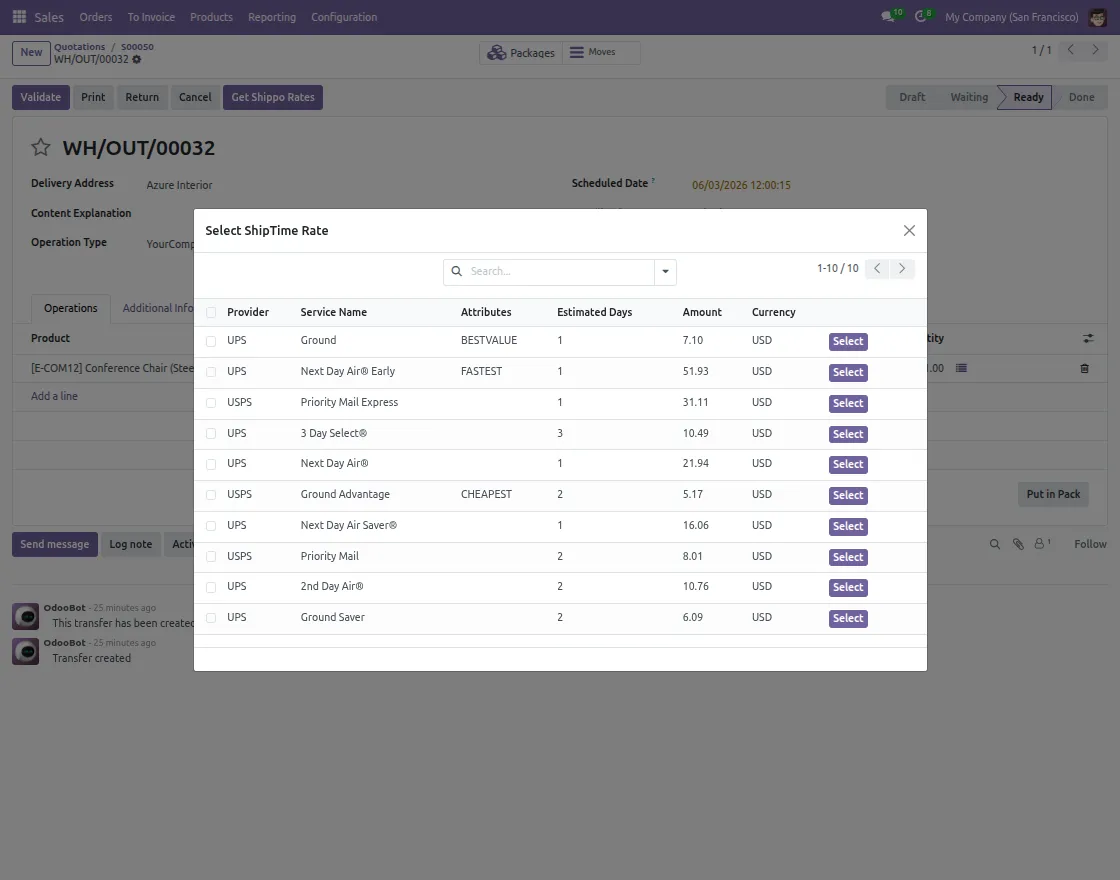
4. Select ShipTime Rate
The Select ShipTime Rate popup opens after clicking Get Rate. All available carrier rates are displayed instantly in one place.
Then, click Select to apply the preferred rate to the order.
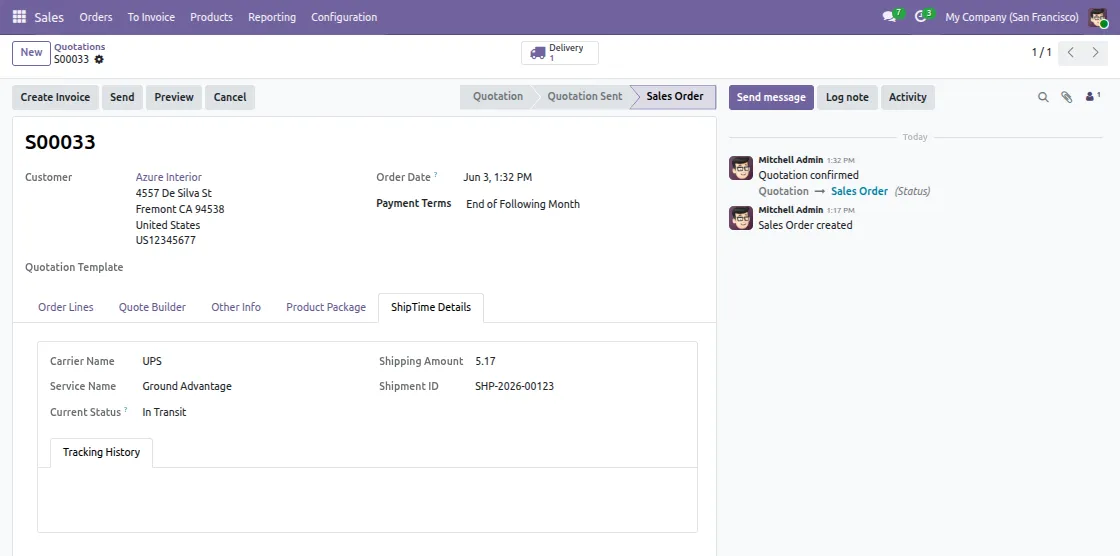
5. ShipTime Details
After selecting the rate, the ShipTime Details tab appears on the Delivery Order. It shows Carrier Name, Service Name, Current Status, Shipping Amount, and Shipment ID.
Click Tracking History to view complete shipment tracking updates in real time.

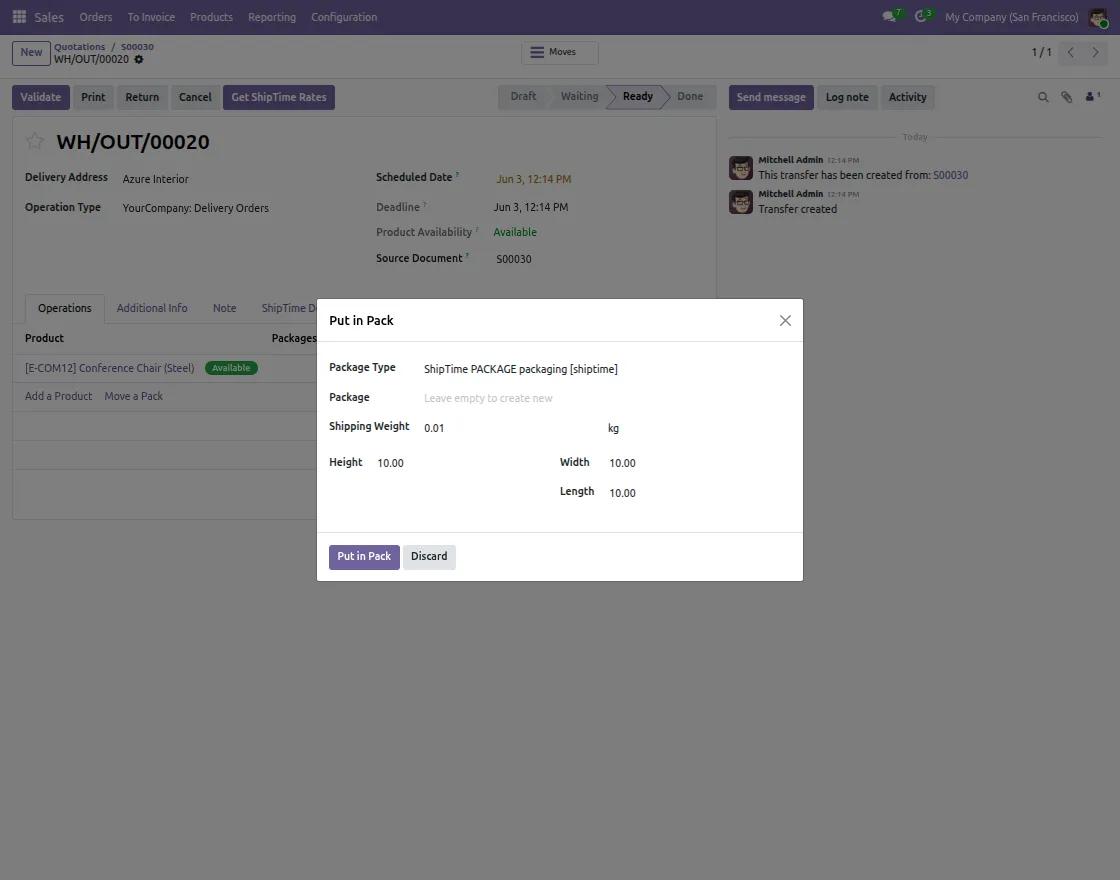
6. Put in Pack
Open the Delivery Order and click Put in Pack to define the package. Then, select the Package Type and set Shipping Weight, Height, Width, and Length.
Finally, click Put in Pack to save the package details.
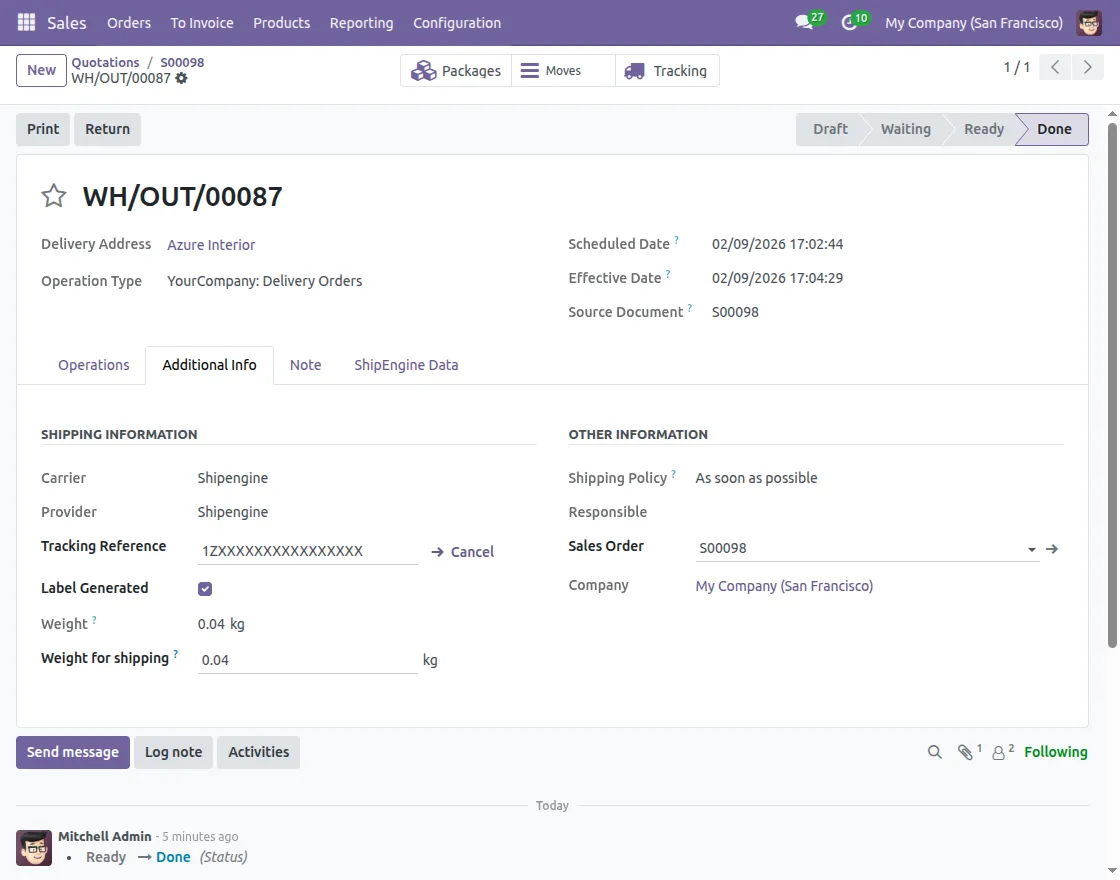
7. Shipment Information
Open the Additional Info tab on the Delivery Order after shipment creation. It shows Carrier Name, Provider, Tracking Reference, and Label Generated status.
Furthermore, Weight for Shipping are also displayed for quick reference.
8. Shipment Creation & Label Generation
Click Validate on the Delivery Order to create the shipment in ShipTime automatically. As a result, a tracking number is assigned right away.
The shipping label is generated automatically and attached as a downloadable PDF in the Delivery Order chatter.

9. Shipment Cancellation
Open the Additional Info tab on the Delivery Order. Then, click Cancel beside the Tracking Reference to cancel the shipment, as long as the carrier allows.
Furthermore, the cancellation is synced with ShipTime instantly.


10. Shipment Cancellation Confirmation
After cancellation, the chatter updates with the confirmation message.
As a result, the Tracking Reference is cleared and Label Generated status is unchecked automatically.


11. Get ShipTime Rates from Delivery Order
You can also fetch live rates directly from the Delivery Order. Then, click Get ShipTime Rates to open the rate selection popup.
Furthermore, all available carrier rates are displayed instantly for easy comparison.


12. Select Rate from Delivery Order
Compare all available carrier rates and choose the best option. Then, proceed with the shipment directly from the Delivery Order.
Need Help?
Hope you find guide helpful! Please feel free to share your feedback in the comments below.
If you still have any issues/queries, please create a ticket at the UV Desk.
I hope this helps. In case of any further queries, contact us at our support mail.
Thanks for paying attention!!