User Guide for Odoo Asterisk VoIP Connector
Table of Content
Introduction
Odoo Asterisk VoIP Connector connects Asterisk (FreePBX) with CRM to manage calls, logs, and recordings directly inside the system.
It allows users to make and receive calls using a built-in VoIP dialer with secure WebSocket (WSS) communication.
The module automatically logs calls, stores recordings, and shows caller details to help teams track communication easily.
Features
- Click-to-Call Dialing from CRM records to start outbound calls instantly without manual number entry.
- Automatic Call Logging with complete details like user, partner, call status, direction, and duration.
- Call Recording Sync with Chatter to store and access call recordings directly from the communication history.
- Inbound Caller Popup Interface that shows customer details instantly when receiving incoming calls.
- Secure WebSocket (WSS) Communication to ensure a real-time and encrypted connection between Asterisk and CRM.
- Agent Wise Call Tracking to monitor call activities, performance, and call handling per user.
- Built-in VoIP Dialer Panel with keypad, contacts, and recent calls for easy call management.
- User Extension Mapping (PJSIP) to assign SIP extensions for handling inbound and outbound calls properly.
- Trunk Configuration Support to connect external lines using SIP/PJSIP trunks in FreePBX for call routing.
Installation
- Once you purchase the App from Webkul store, you will receive a link to download module’s zip file.
- Extract the file on your system after download finishes. As a result, you will be able to see a folder named- ‘wk_asterisk_voip’.
- Copy and paste this folder inside your Odoo Add-Ons path.
- Now, open Odoo App and click on the Settings menu. Here, click on Activate Developer Mode.
- Then, open Apps menu and click on ‘Update Modules List.’
- In the search bar, remove all the filters and search ‘wk_asterisk_voip’.
- You will be able to see module in the search results. Click on ‘Activate’ to install it.
Workflow
Configuration of Odoo Asterisk VoIP Connector
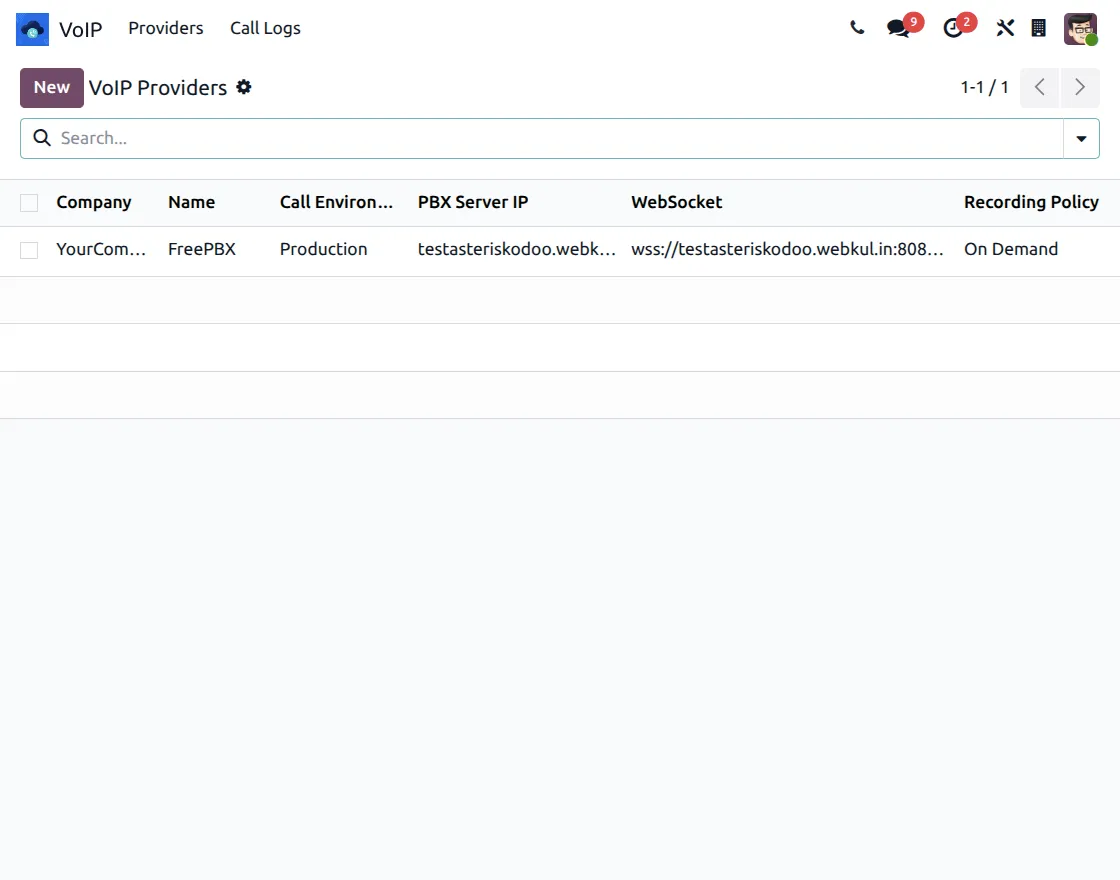
1. Go to VoIP → Providers, then click on New, and create a VoIP provider by entering the PBX Server IP and WebSocket (WSS) URL.
Next, set the call recording policy (On Demand), then connect FreePBX as the provider, and finally save the configuration to activate VoIP communication.

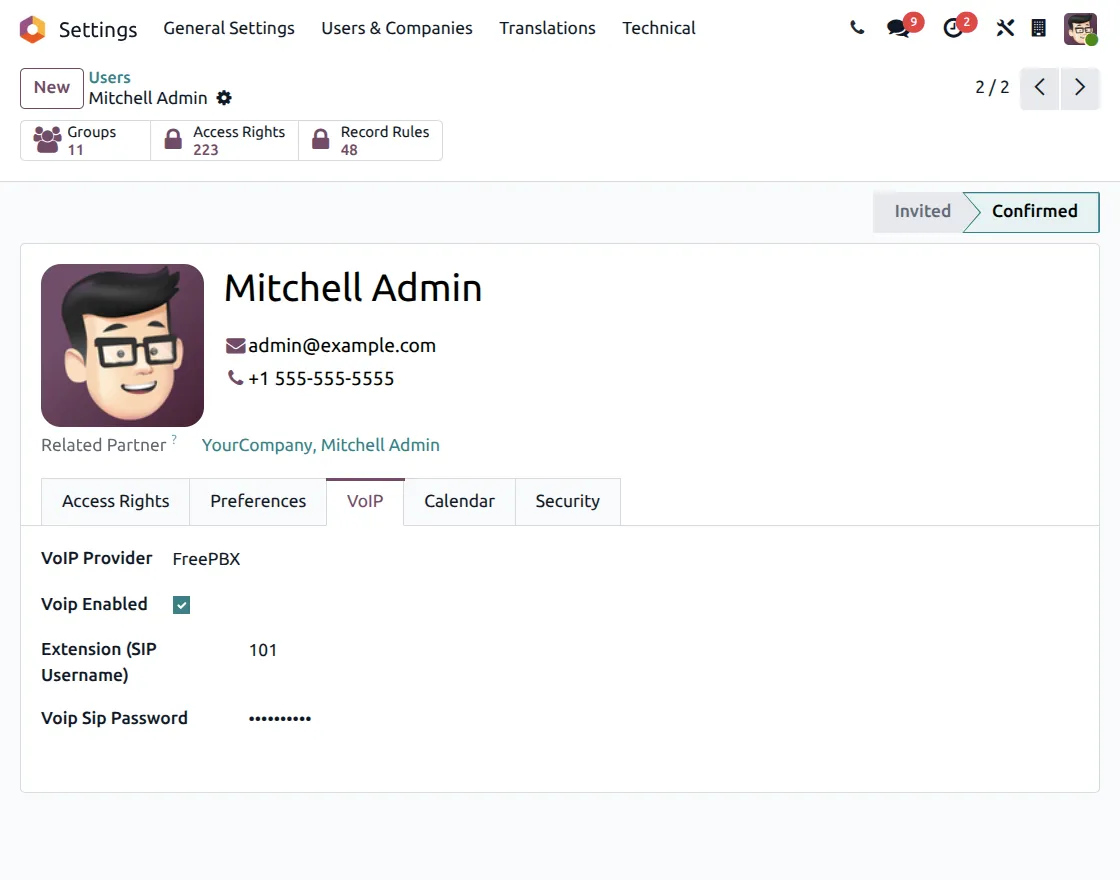
2. Go to Settings → Users & Companies → Users, open the user form, and navigate to the VoIP tab.
Select the VoIP provider, enable VoIP, enter the Extension (PJSIP username) and SIP password, then save the settings to configure user calling access.
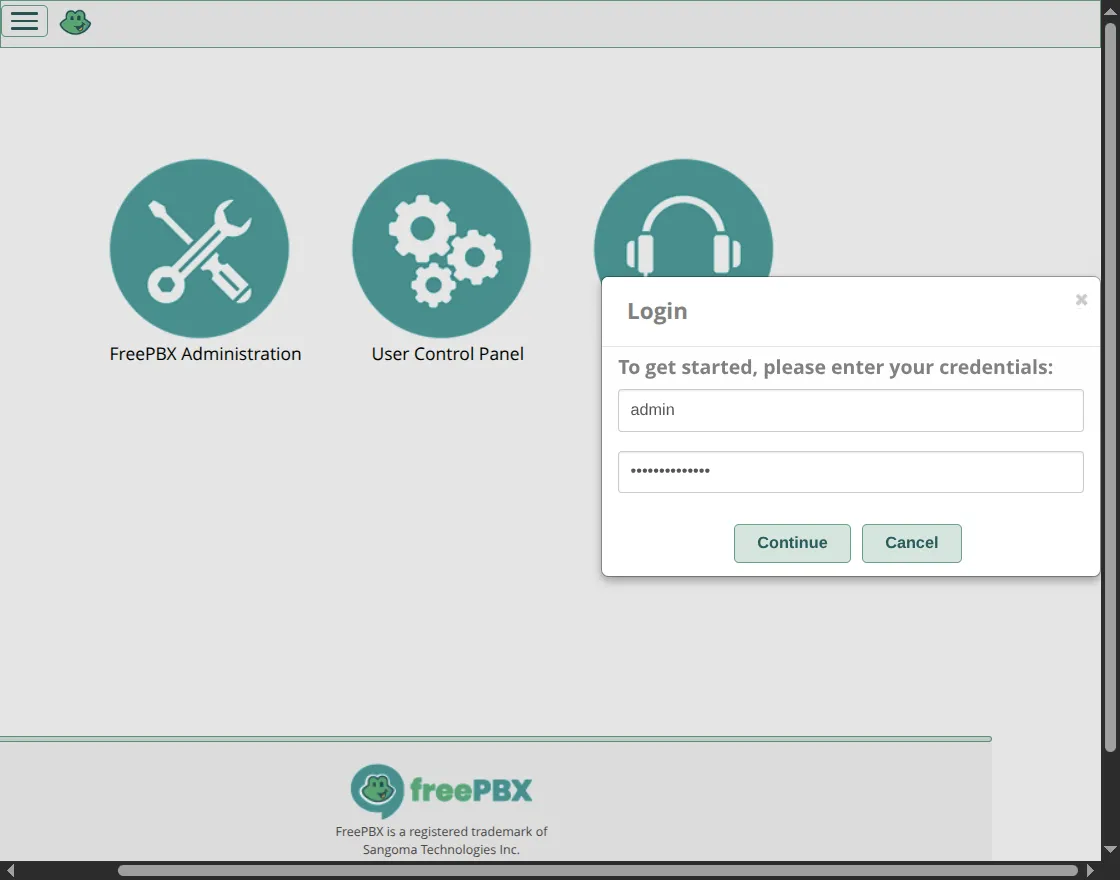
3. Open the FreePBX admin panel in your browser, then enter your admin username and password, and finally click on Continue to access the dashboard.
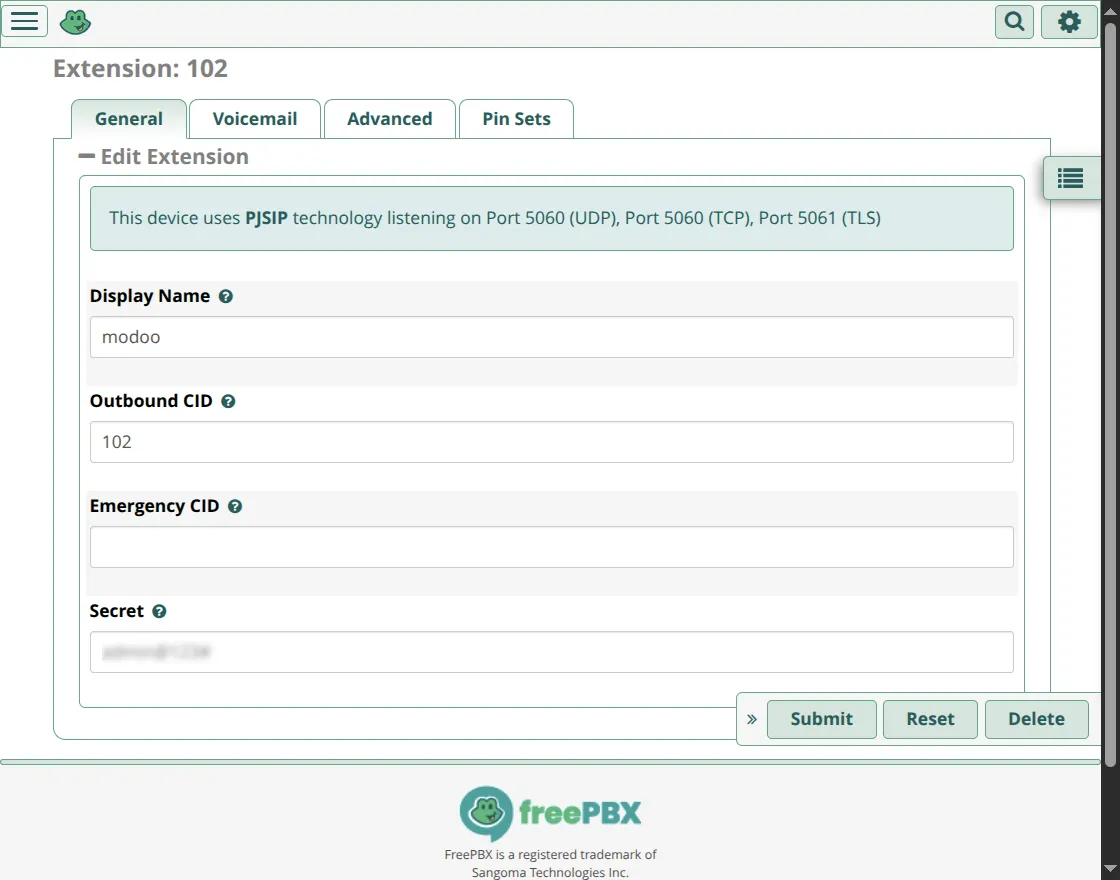
4. After logging in, first go to Applications → Extensions from the FreePBX dashboard, where you can then access and manage extension settings.

5. After opening Extensions, create or edit a PJSIP extension, enter the extension number, display name, and secret (password), then save and apply the configuration.
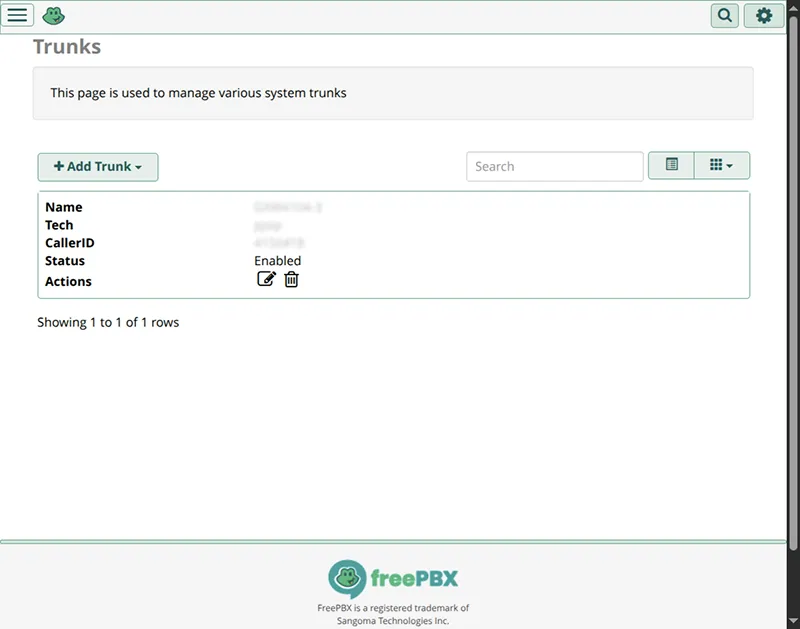
6. Go to Connectivity → Trunks, create or edit a SIP/PJSIP trunk, configure trunk name, caller ID, and connection details, then save and apply the configuration.

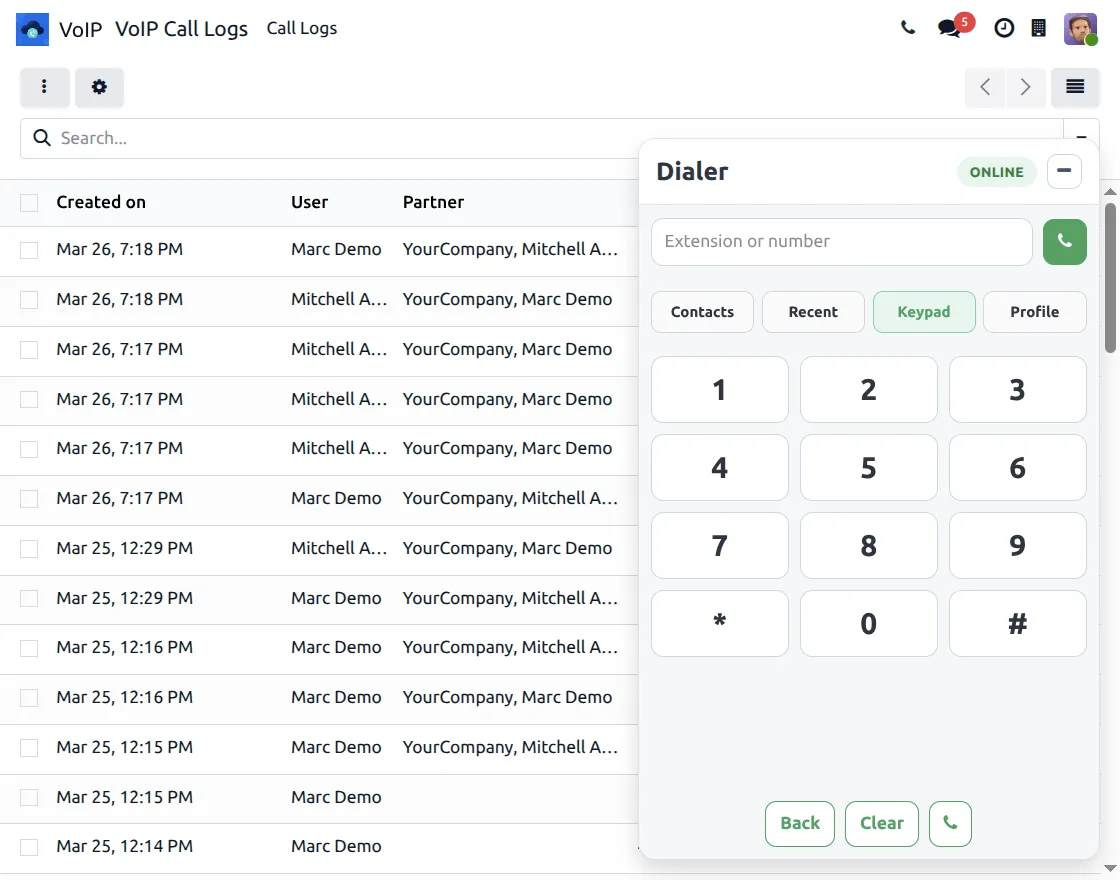
7. Open the VoIP dialer from the top panel, then enter a number or extension; after that, use the keypad for dialing, and also manage calls using the Contacts, Recent, and Keypad tabs.
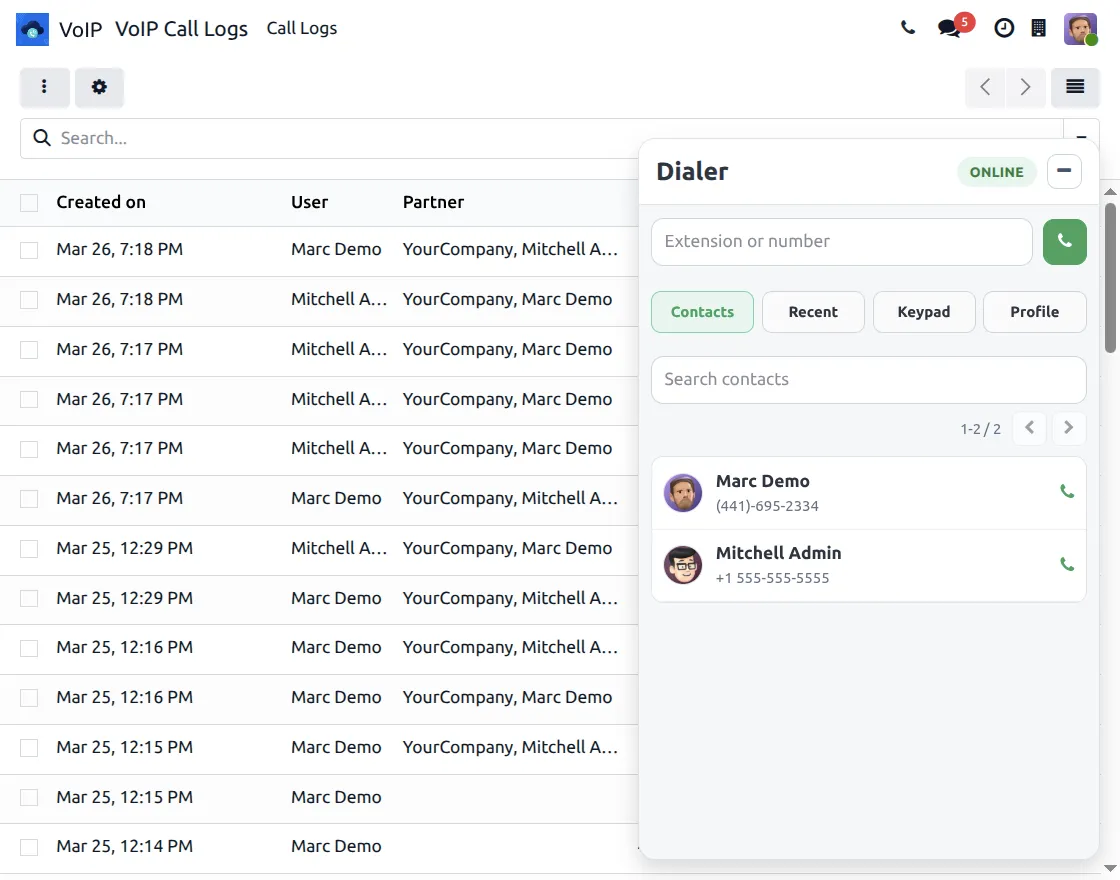
8. Open the VoIP dialer, then go to the Contacts tab, where you can search or select a contact, and then click the call icon to start a call directly.
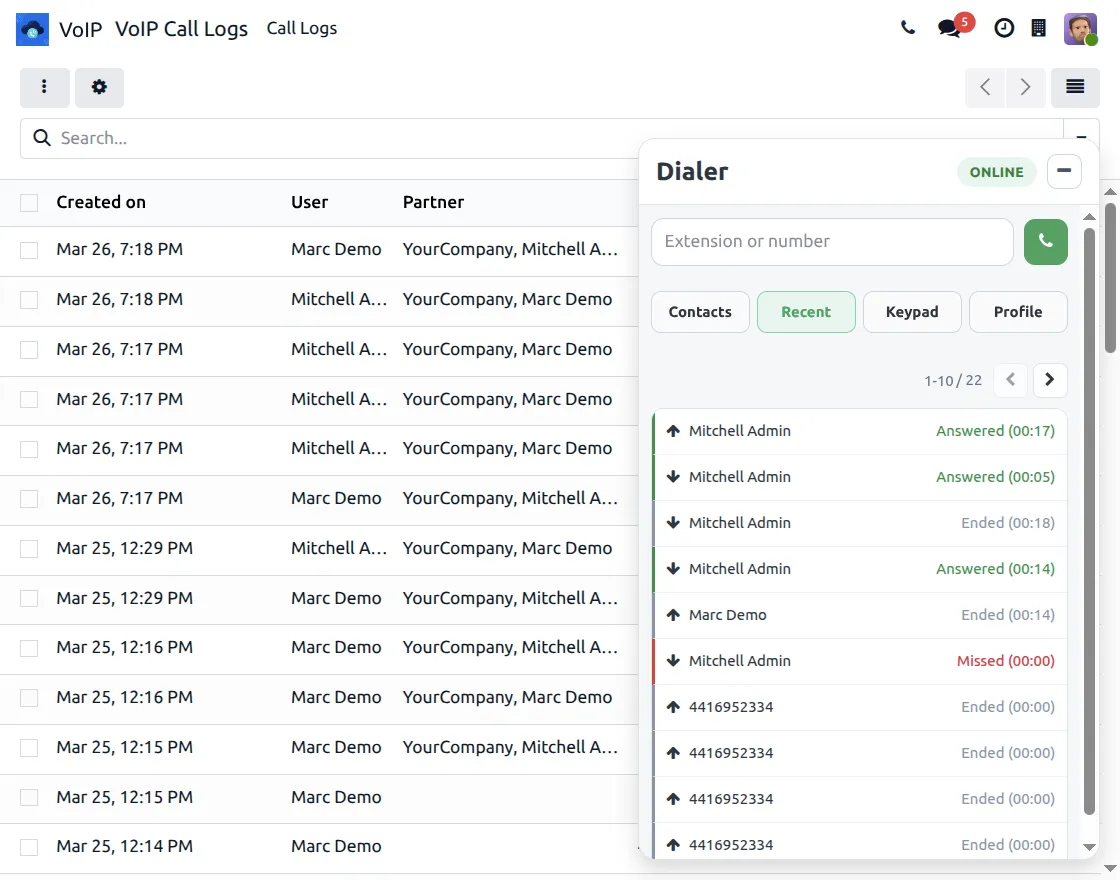
9. Open the VoIP dialer, then go to the Recent tab, where you can view call history with status (Answered, Missed, Ended), and then click to call again directly.
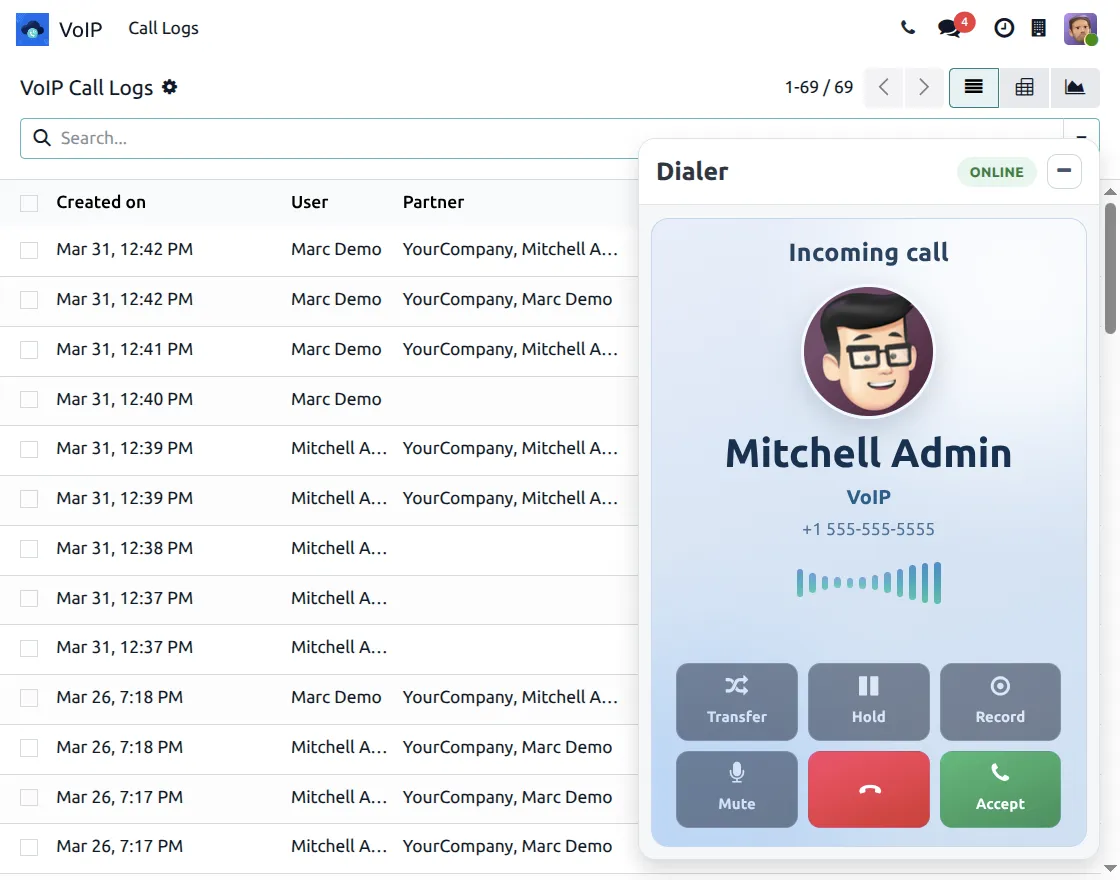
10. When a call is received, the VoIP dialer shows an incoming call screen with caller details, and you can accept, reject, or manage the call using available options.
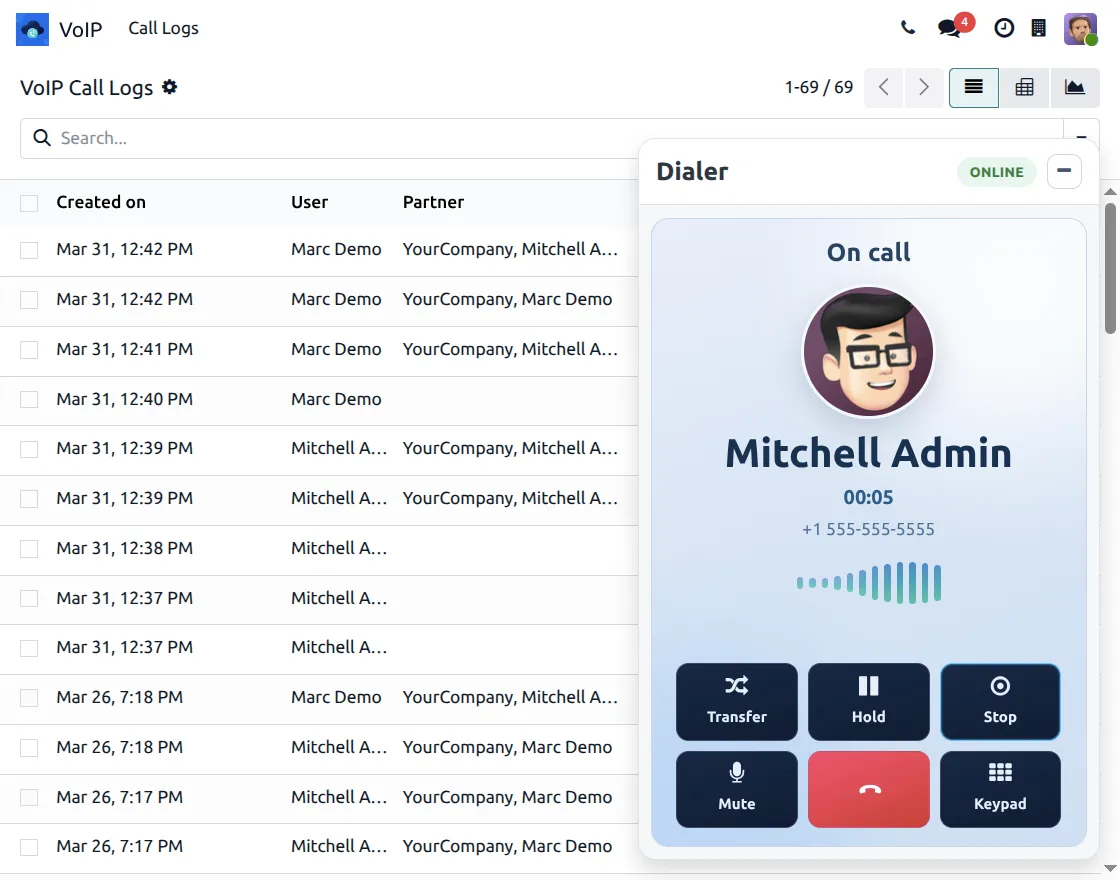
11. Once the call is connected, the dialer shows the active call screen, where you can then hold, mute, transfer, use the keypad, or end the call.
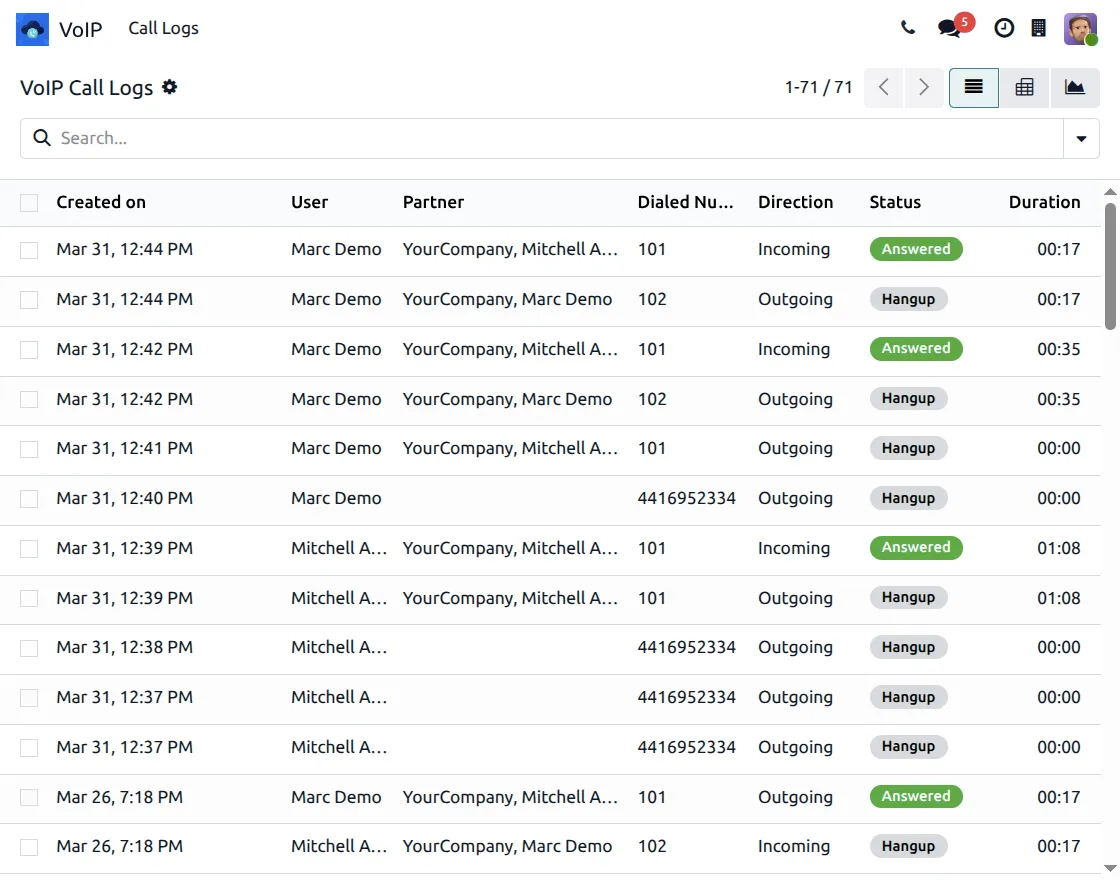
12. Go to VoIP → Call Logs, where you can view all calls; additionally, you can see details like user, partner, direction, status, and duration for complete tracking.
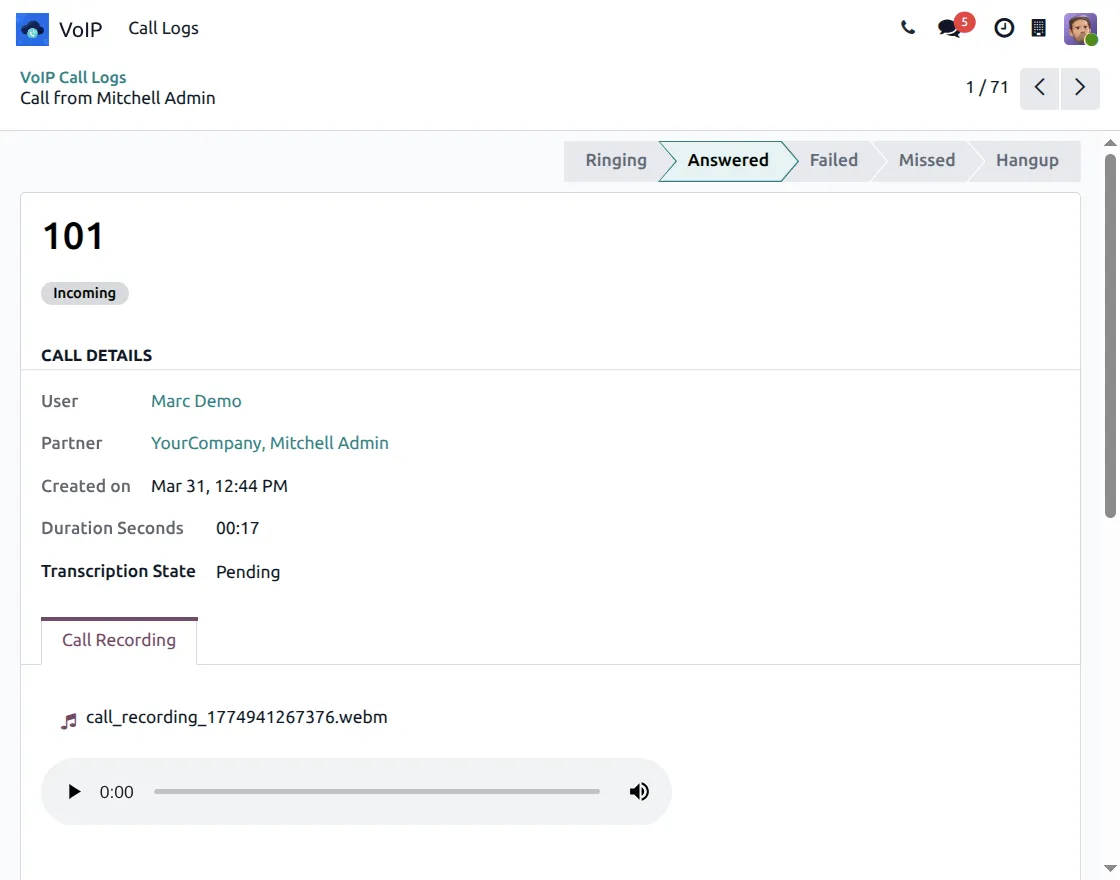
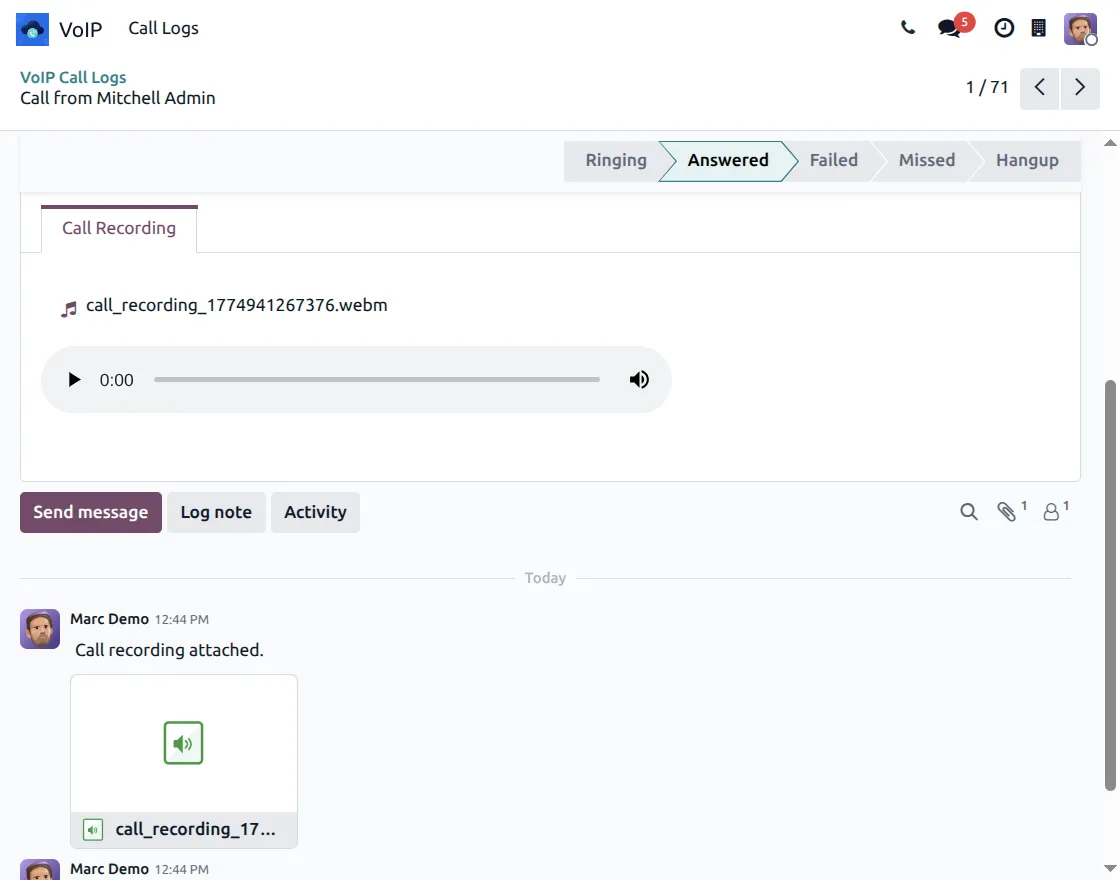
13. Open a call record from VoIP → Call Logs, then view the complete call details, and easily play the attached call recording directly from the log.
14. Open the related record, then go to the Chatter section, where you can easily view the attached call recording for better access and communication tracking.
Need Help?
Hope you find guide helpful! Please feel free to share your feedback in the comments below.
If you still have any issues/queries, please create a ticket at the UV Desk.
I hope this helps. In case of any further queries, contact us at our support mail.
Thanks for paying attention!!