User Guide for Magento 2 Zoho CRM Integration
Magento 2 Zoho CRM Integration helps businesses manage customer and sales data efficiently by connecting Magento 2 with Zoho CRM.
Managing leads, contacts, and deals across different platforms can be complex and time-consuming.
Magento does not natively provide access to Zoho CRM data, which often requires switching between systems and reduces productivity.
Magento 2 Zoho CRM Integration allows admins to import Zoho CRM leads, contacts, and deals directly into Magento and link Magento orders with CRM deals for better tracking.
This module solves the problem of scattered data and manual processes by centralizing CRM information within Magento.
Additionally, it improves workflow efficiency. Moreover, it automatically updates deal stage to “Closed Won” when an order is created.
This module is designed for Magento 2 store owners, administrators, and businesses using Zoho CRM who want streamlined data management and improved sales tracking.
Furthermore, if you are looking for seamless Zoho CRM and Odoo integration, you can automate leads, customers, and sales pipelines while improving efficiency. Therefore, you should check the Odoo Zoho CRM Connector.
Features
- Import Zoho CRM leads, contacts, and deals into Magento 2
- Link Magento orders with Zoho CRM deals
- Automatically update deal stage to “Closed Won” on order creation
- Configure field mapping for accurate data transfer
- Maintain consistent customer and sales data
- Secure API-based Zoho CRM integration
- Support multiple Zoho CRM accounts
- View imported CRM data in dedicated admin sections
Installation
The installation is quite simple, just like the standard Magento 2 extensions.
#Download Module
Firstly, log in to the Webkul Store. Next, go to My Account > My Purchased Products and verify your purchase. After that, download the zip folder and extract its contents on your system.
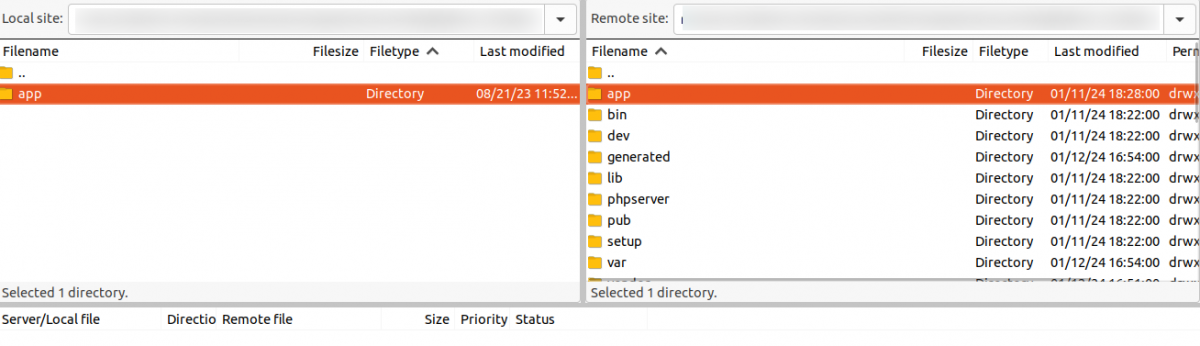
#Upload Folder
Once the module zip extracts, follow the path src>app and copy the app folder into the Magento 2 root directory on the server as shown below:

#Run Commands
php bin/magento setup:upgrade
php bin/magento setup:di:compile
php bin/magento setup:static-content:deploy
php bin/magento queue:consumers:start webkul.zohocrm.contact.import &
php bin/magento queue:consumers:start webkul.zohocrm.lead.import &
php bin/magento indexer:reindex
php bin/magento cache:flush
Language Translation
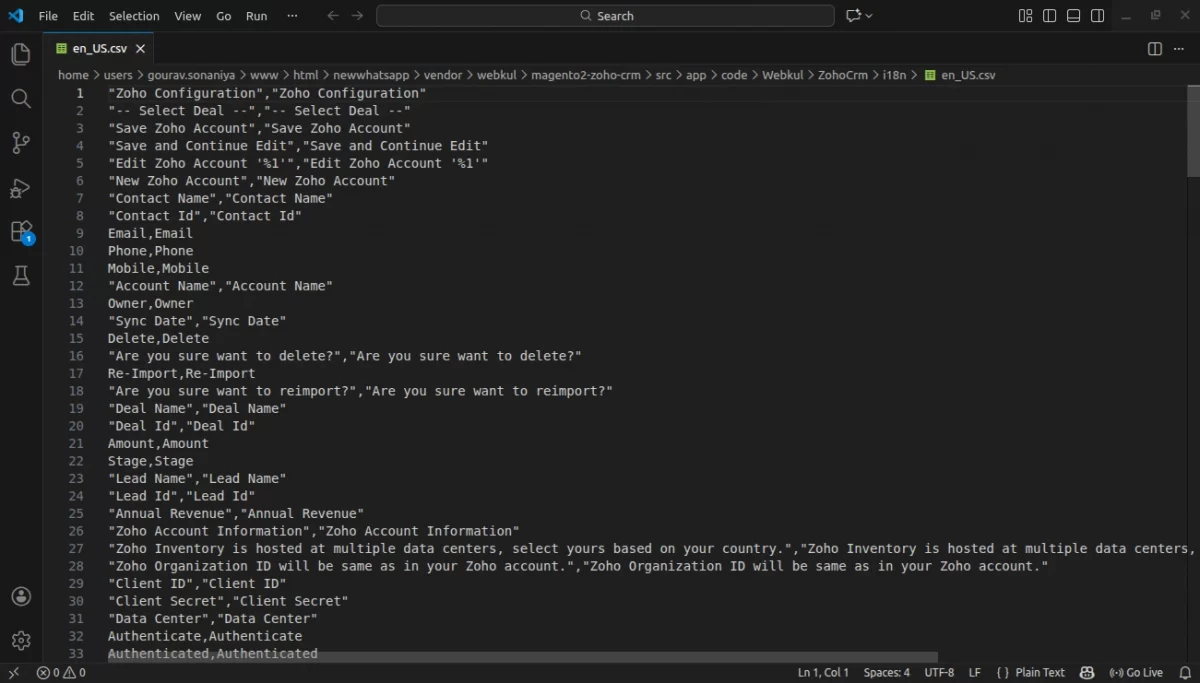
For translating the module language, navigate through the app/code/Webkul/ZohoCrm /i18n and edit the en_US.csv file.
Thereafter, rename the CSV as “en_SA.csv” and translate all right-side content after the comma in the Arabic language. After editing the CSV, save it.

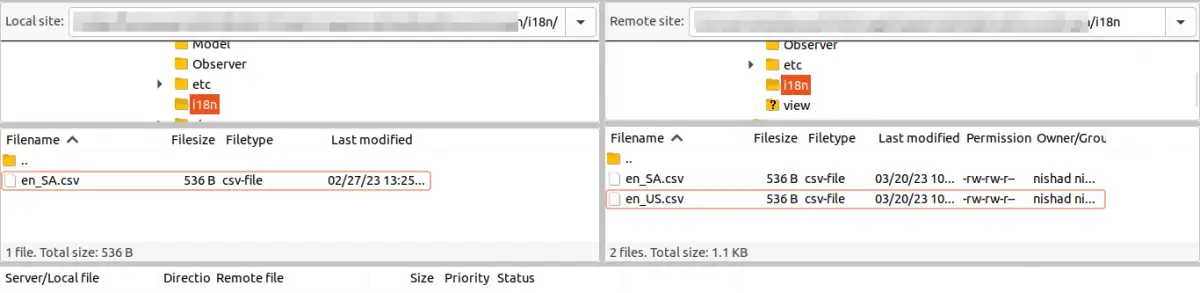
Now, upload it to the path app/code/Webkul/ZohoCrm /i18n where the installation of Magento 2 is on the server.
Additionally, Magento 2 Zoho CRM Integration Extension supports Arabic translation. Moreover, it is compatible with both RTL and LTR languages.
The user can edit the CSV like the image below.

Engage and hire Magento developers to solely concentrate on your personalized e-commerce projects for a unique experience
Configuration – Magento 2 Zoho CRM Integration
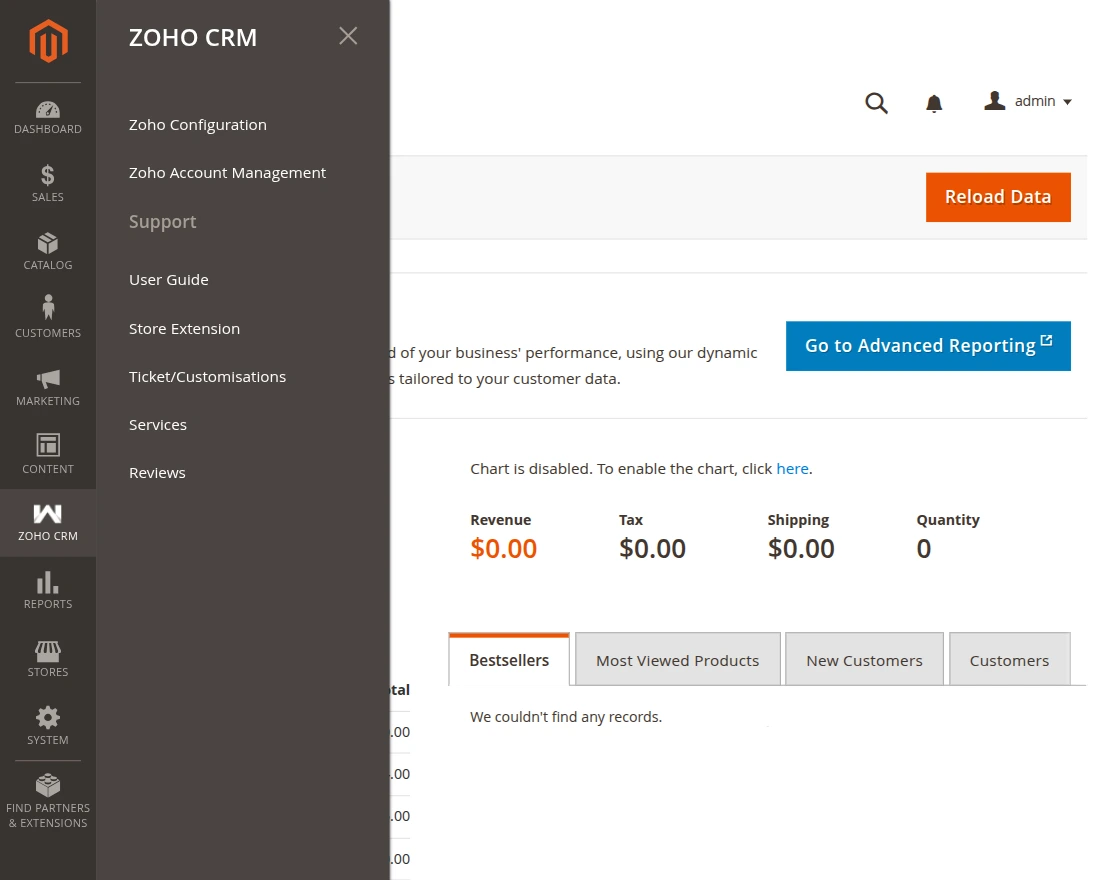
After installing the module, the admin can configure its settings. Next, Magento admin navigates to Zoho CRM > Zoho Configuration to access the settings page.

Admin can configure the Webkul Zoho CRM settings of the module by navigating to Stores > Configuration > Webkul > Zoho CRM > General Configuration
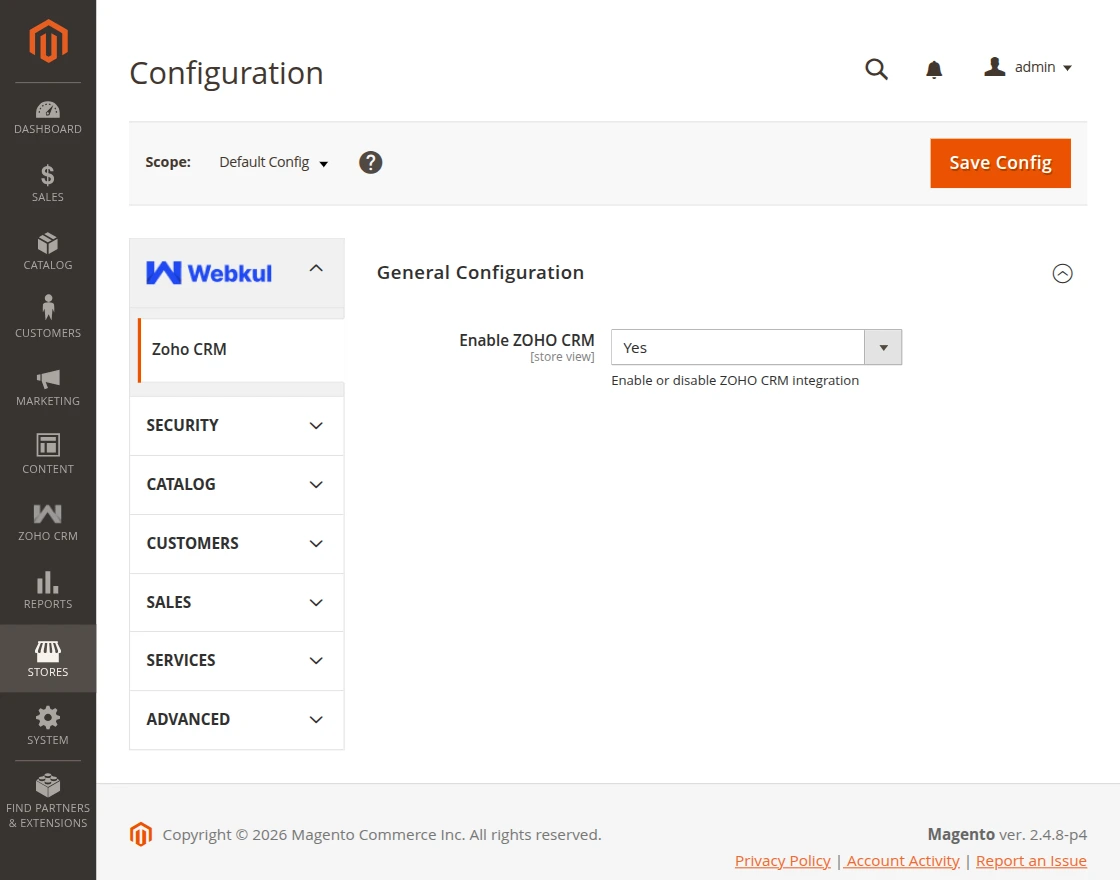
Enable ZOHO CRM: This option allows the admin to enable or disable the Zoho CRM integration.
After enabling the module, click on the Save Config button to save the module configuration.
Zoho Account Management
After enabling the Zoho CRM module, the admin can manage Zoho CRM accounts from this section.
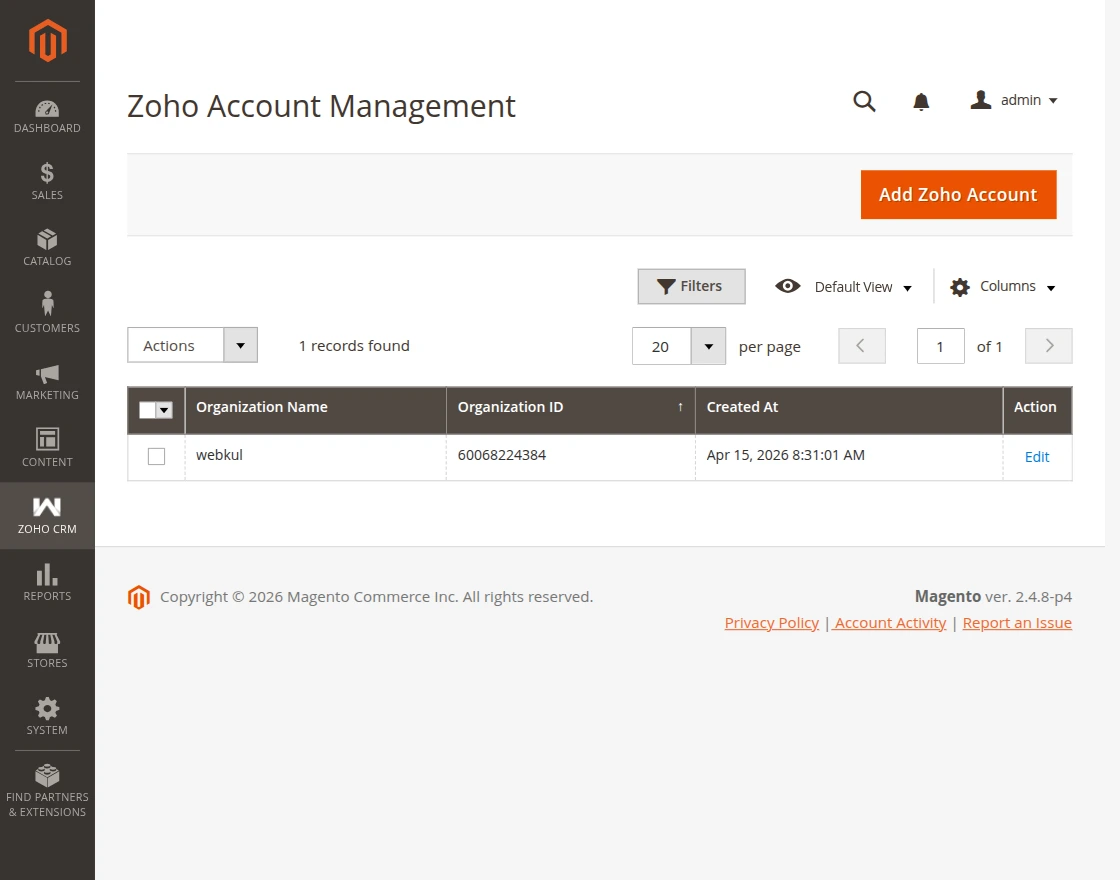
Additionally, this panel displays all connected Zoho accounts. Moreover, it includes important details such as Organization Name, Organization ID, and Created Date.
Additionally, it helps admins quickly review account information. Moreover, they can manage everything from a single place.
Add Zoho Account: To connect a Zoho CRM account, click on the “Add Zoho Account” button.
This allows the admin to enter the required API credentials and integrate Zoho CRM with Magento.
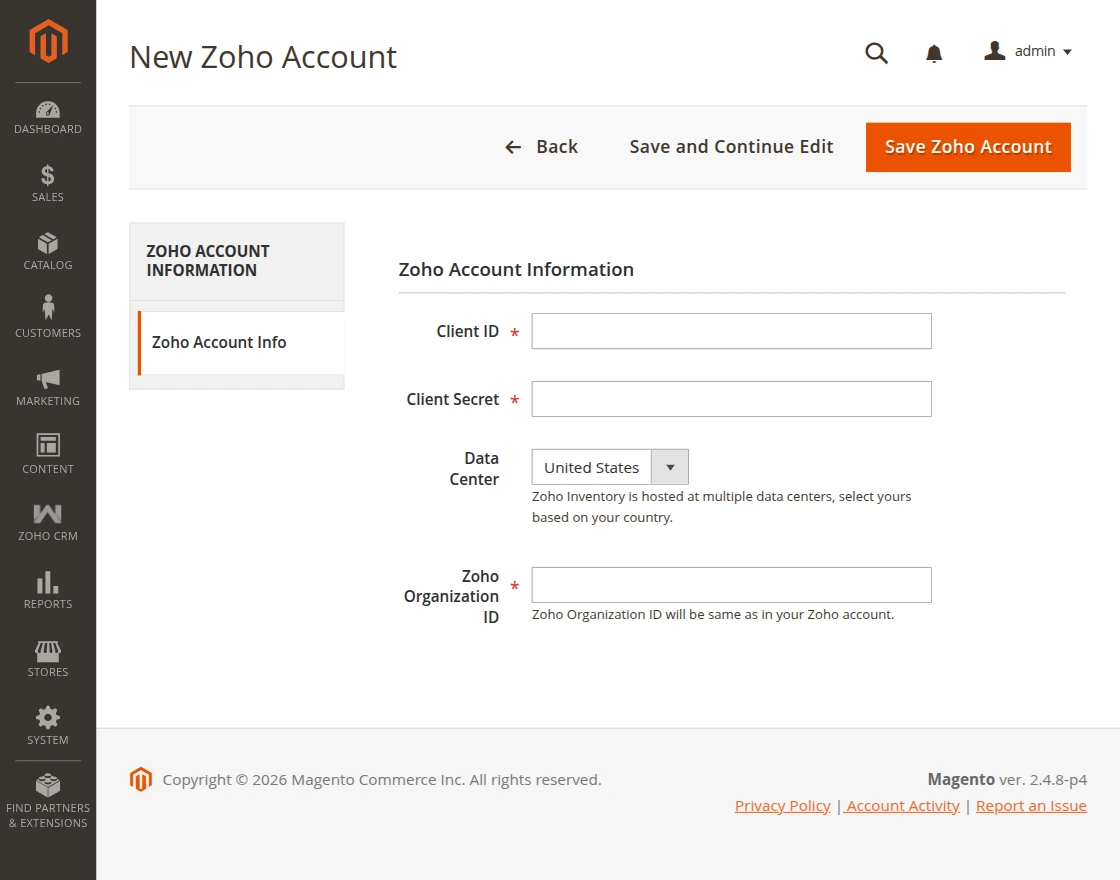
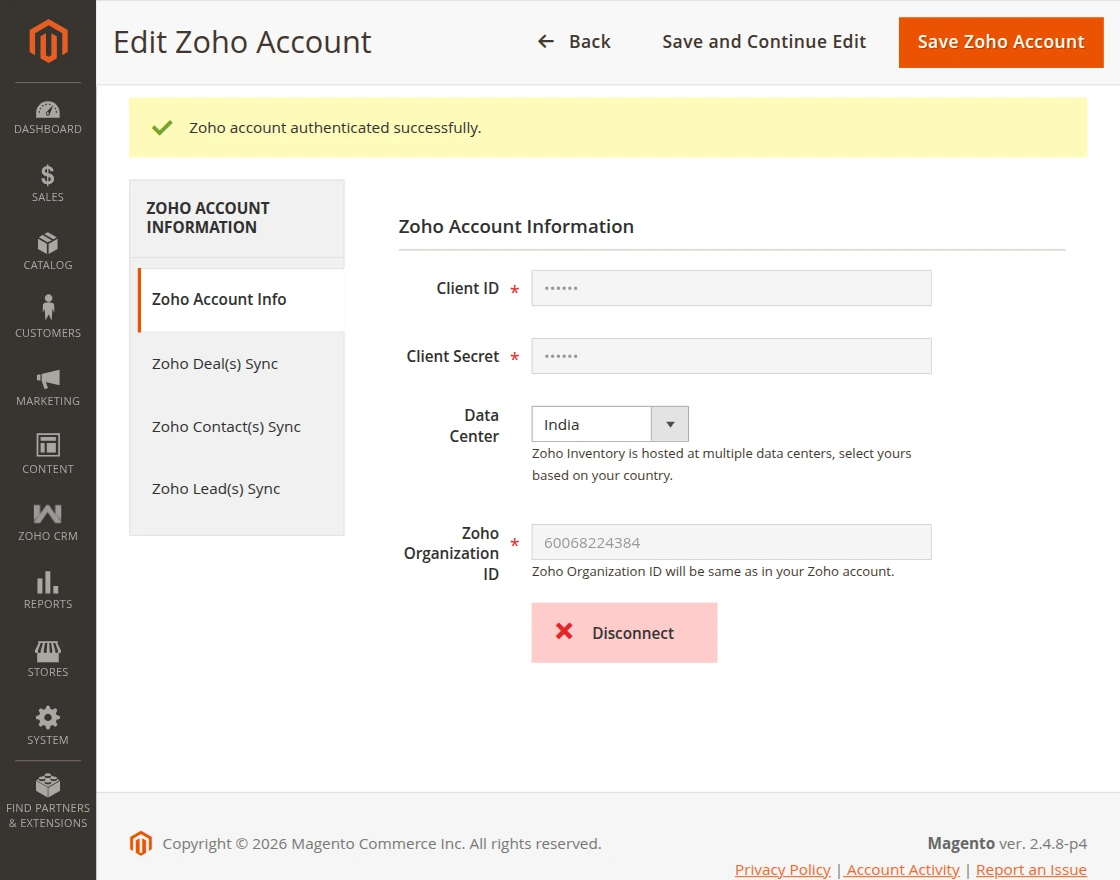
After clicking the ‘Add Zoho Account’ button, the admin is redirected to the New Zoho Account page, where they must enter the required Zoho CRM credentials to establish the connection.
Client ID: Enter the Client ID provided by Zoho CRM for API authentication.
Client Secret: Enter the Client Secret associated with the Zoho application.
Data Center: Select the appropriate data center (e.g., United States, India, Europe) based on your Zoho account region. This ensures proper connection.
Zoho Organization ID: Enter the Organization ID of your Zoho account. This ID should match your Zoho CRM organization.
Save and Continue Edit: Saves the account and allows you to continue editing the configuration.
To get the Zoho API credentials, such as Client ID and Client Secret, click here to access the Zoho API Console.
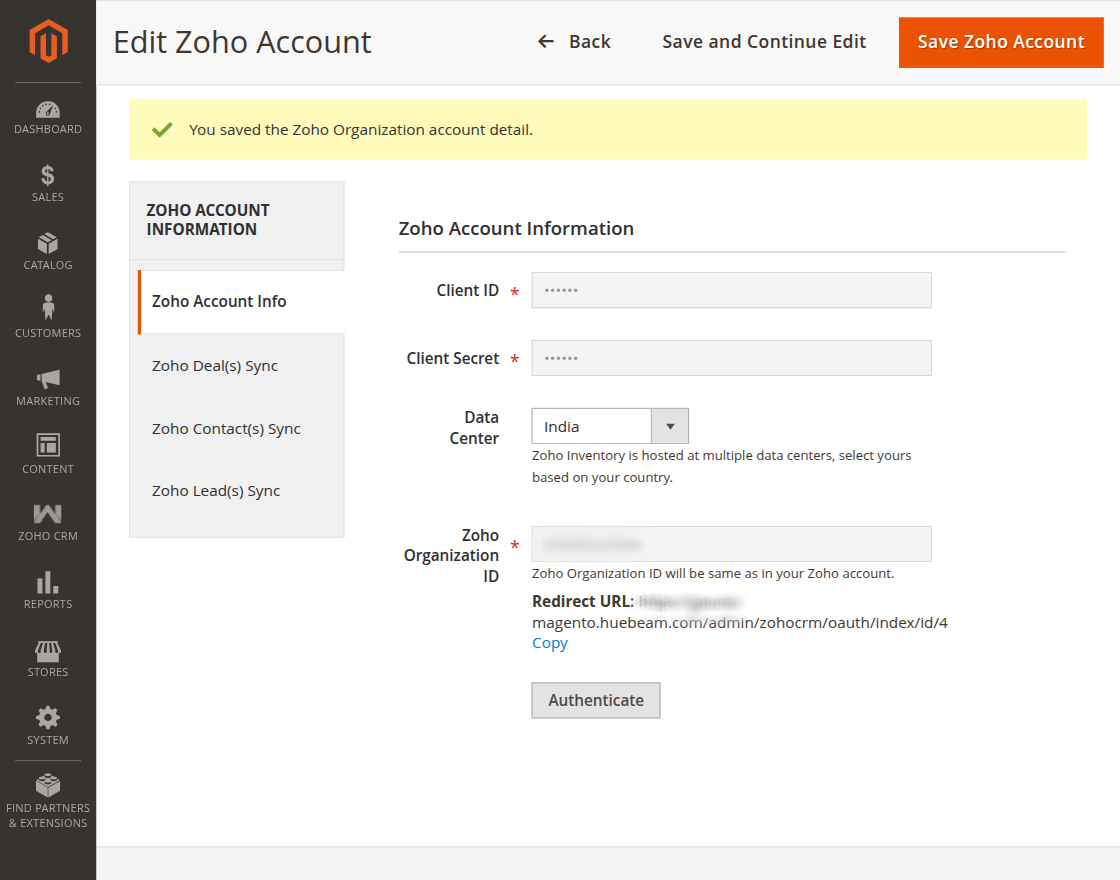
Redirect URL
Magento automatically generates a Redirect URL.
- Click on “Copy” to copy the URL
- Paste this URL into the Authorized Redirect URIs section in the Zoho API Console
You must complete this step to establish a secure connection between Magento and Zoho CRM.
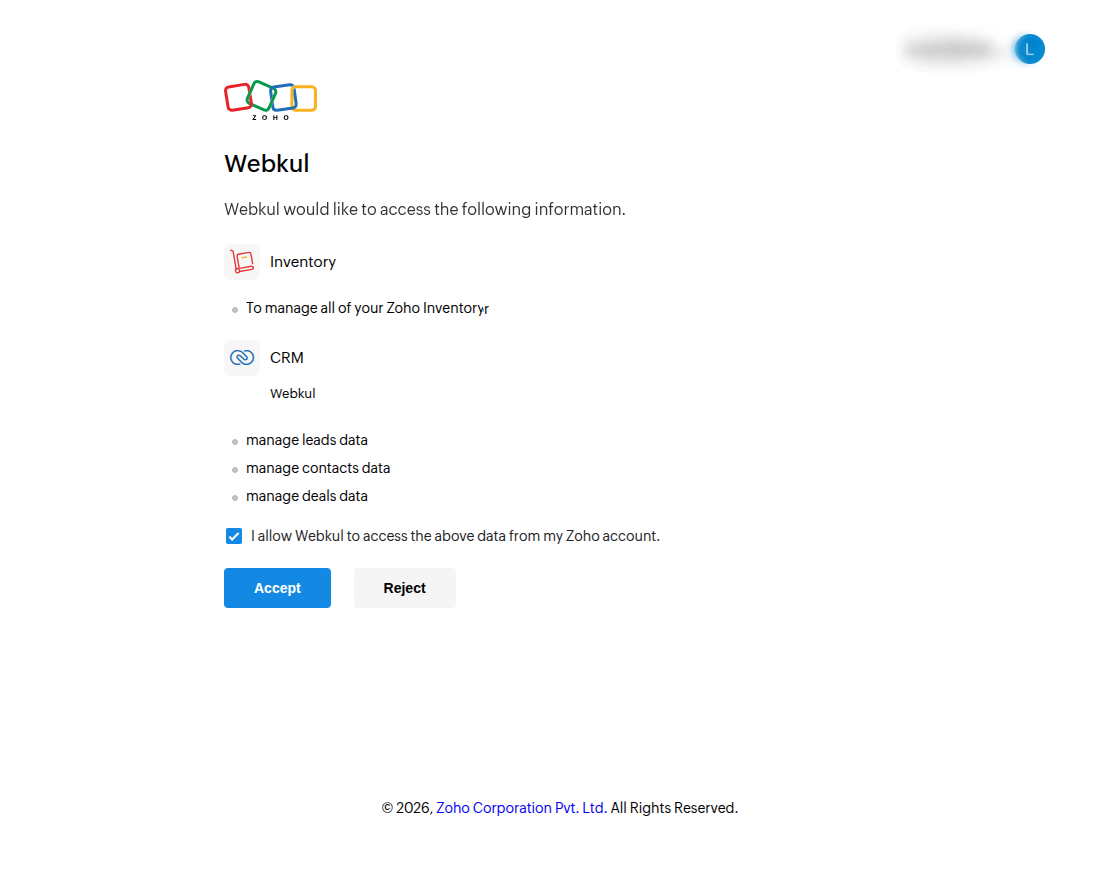
The checkbox “I allow Webkul to access the above data from my Zoho account” needs to be ticked to grant access.
Accept – allows Webkul to access and manage the listed data from your Zoho account.
After clicking on the “Authenticate” button and completing the verification process, the Zoho account is successfully connected with Magento.
Disconnect Button: Allows the admin to remove the Zoho CRM connection by unlinking the Zoho account from Magento.
How the Import Works
Click “Import Deal(s) From Zoho” to pull all deals from your Zoho CRM account.
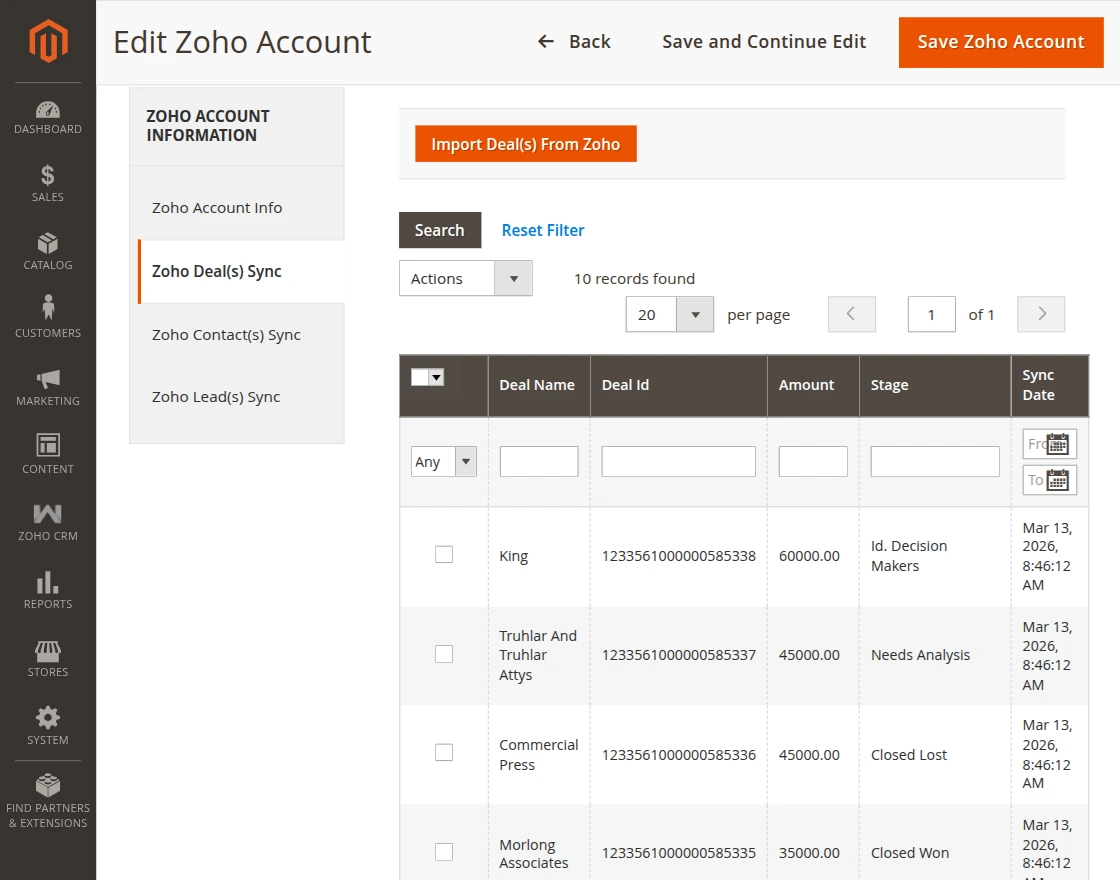
Use the table filters to search deals by name, ID, amount, stage, or sync date.
Track progress at a glance with stages like Needs Analysis, Decision Makers, Closed Won, or Closed Lost.
Contact Sync Works –
Click “Import Contact(s) From Zoho” to pull all contacts from your Zoho CRM account.
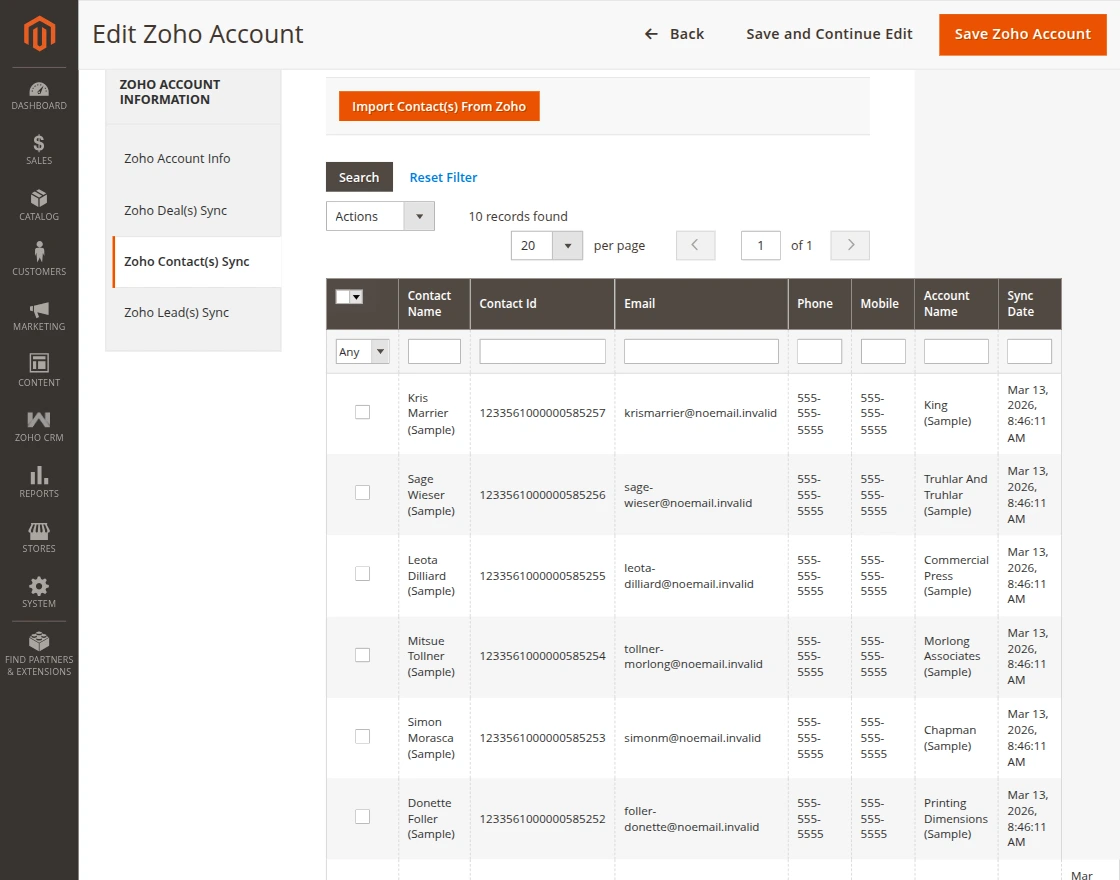
Use filters to search contacts by name, email, phone, or account. Track the last sync date to ensure your contact list is current.
Apply bulk actions to manage multiple contacts at once.
Contact Sync Works –
Click “Import Lead(s) From Zoho” to pull all leads from your Zoho CRM account.
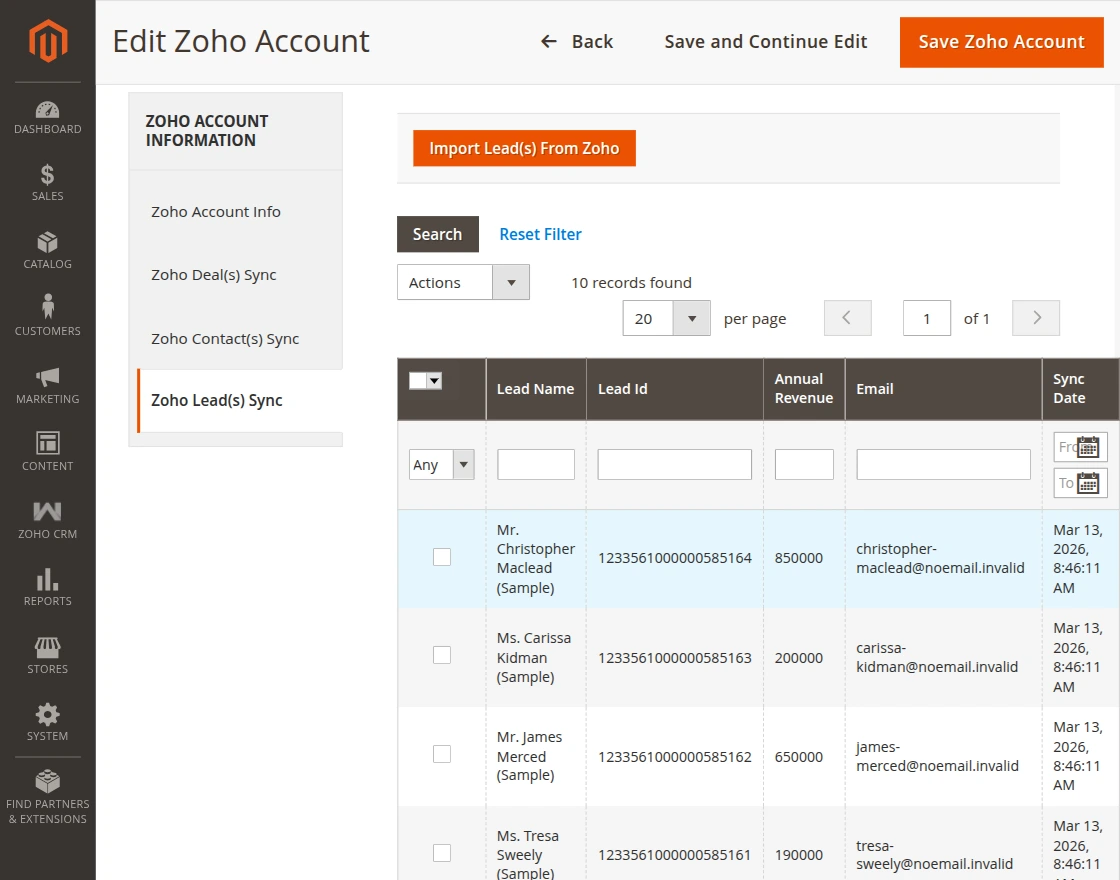
Use Leads Sync table to search and filter leads by name, ID, email, revenue, or sync date, and quickly import records using the Zoho integration with Zoho CRM.
Track lead details at a glance, prioritize high-value prospects, and manage updates efficiently with bulk actions to improve follow-ups and boost conversions.
Link Order to Zoho Deal
Admin can link the order to Zoho Deal by navigating to Sales > Orders > Create New Order > Select Customer > Add Products
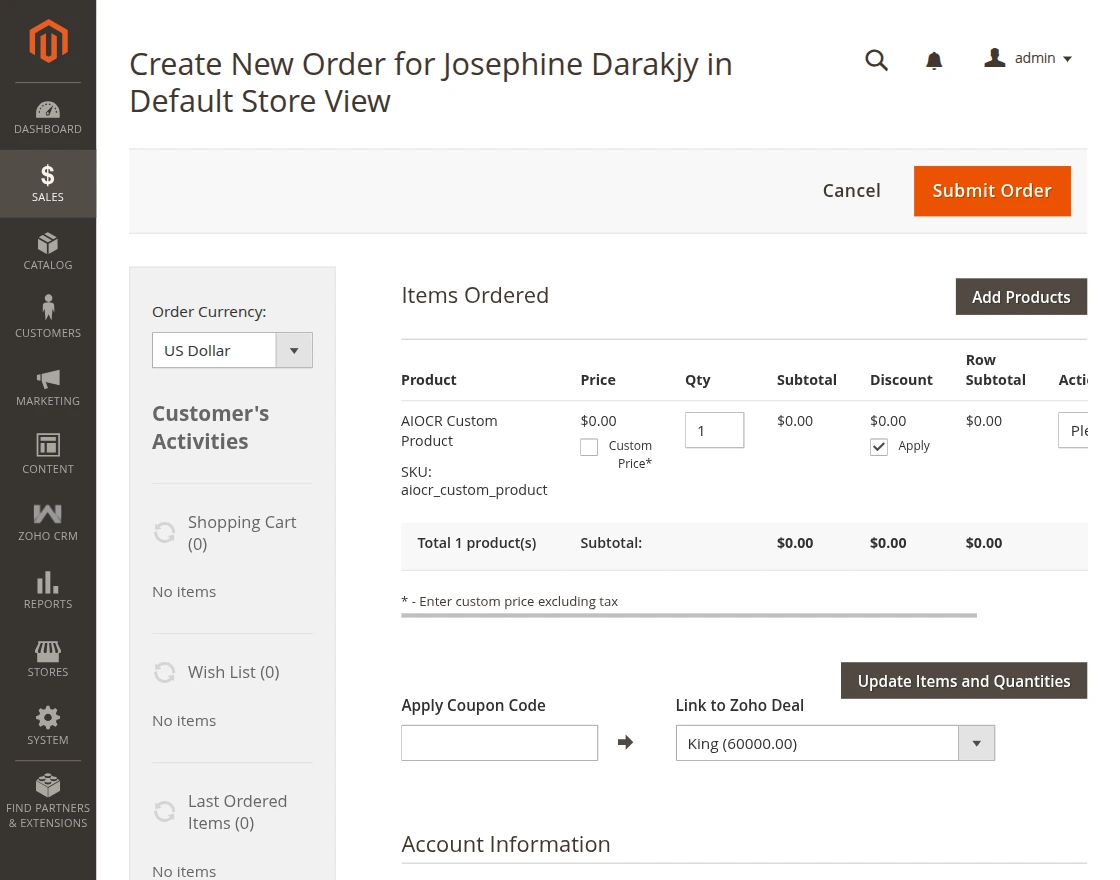
Link to Zoho Deal: Select the relevant deal from Zoho CRM.
After selecting the Zoho deal, click on the Submit Order button to place the order.
Magento Order Successfully Linked with Zoho Deal –
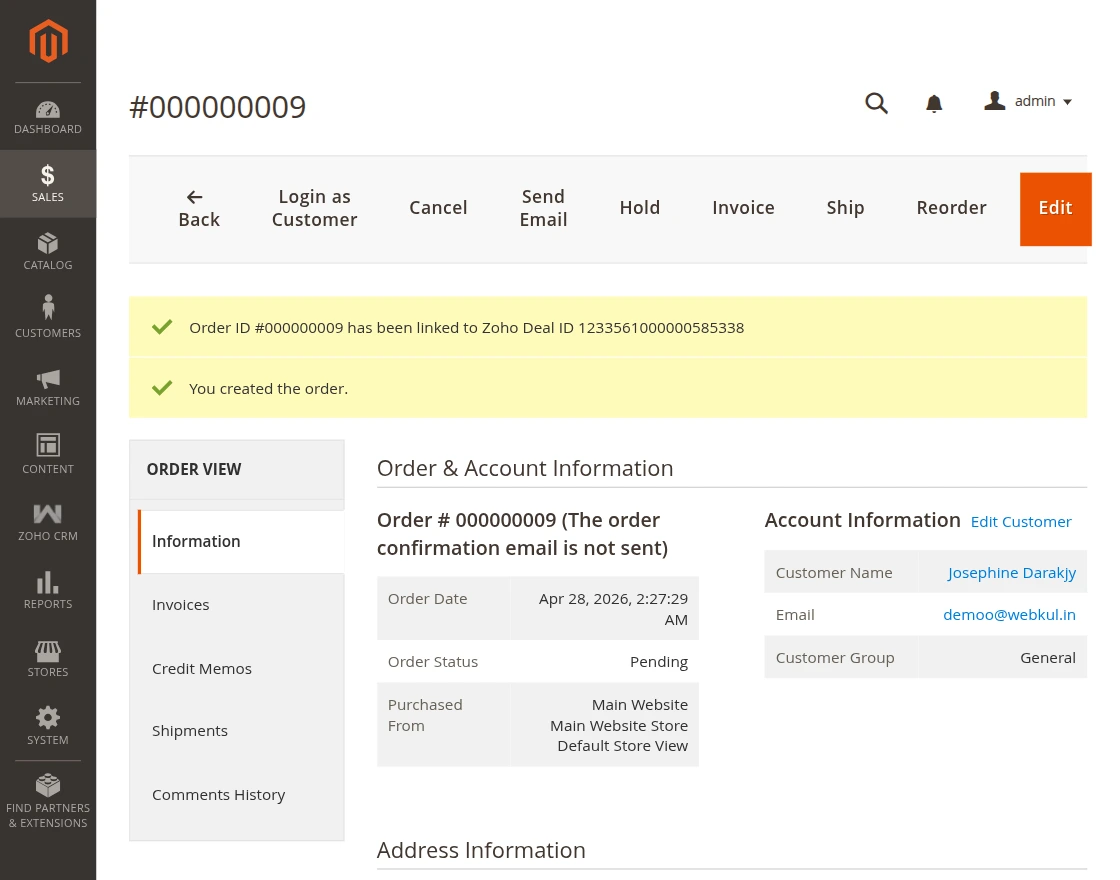
Deal Stage Update After Order Placement –

For example, deal associated with the order (e.g., “King”) is therefore marked as Closed Won.
This indicates that once the order is successfully placed in Magento, the corresponding Zoho deal stage is automatically updated to “Closed Won”.
Supports
Finally, and most importantly, this concludes the Magento 2 Zoho CRM Extension User Guide.
If you have any further queries or need assistance, feel free to email us at support@webkul.com.
Furthermore, there is no need to search elsewhere; seize the chance to initiate your projects with the accredited Magento 2 development company.
For a personalized touch, engage and hire Magento developers who are focused on delivering exceptional results for your custom e-commerce projects.