User Guide for Magento 2 Razorpay Magic Checkout
Table of Content
Magento 2 Razorpay Magic Checkout module helps merchants accept secure online payments through Razorpay. It also provides a faster and more optimized checkout experience..
This module supports multiple payment methods. It also provides QuickBuy, autofill, coupon integration, webhook synchronization, and online refund management.
Built on Razorpay Magic Checkout, this module delivers a secure checkout experience. In addition, it helps reduce cart abandonment and improve conversions.
Features- Razorpay Magic Payment
- Supports Razorpay Standard Checkout and Magic Checkout.
- Automatically fills in customer details, including email, phone number, and saved addresses.
- Supports UPI, cards, wallets, net banking, EMI, and Pay Later.
- Offers smart COD options and filters risky COD orders.
- Syncs orders between Magento and Razorpay automatically.
- Uses secure webhooks to receive real-time payment updates.
- Supports checkout for both guest and logged-in customers.
- Offers QuickBuy for faster order placement.
- Provides logs and debug mode to help with troubleshooting.
- Supports multiple stores and currencies.
- Generates invoices automatically and manages payment statuses.
- Lets admins set the Magic Checkout button text and display location.
- Compatible with Hyvä storefront and checkout.
Installation Download Module
Firstly, you need to log in to the Webkul Store, go to My Account>My Purchased Products section, verify, and then download and extract the contents of this zip folder on the system.
Upload Folder
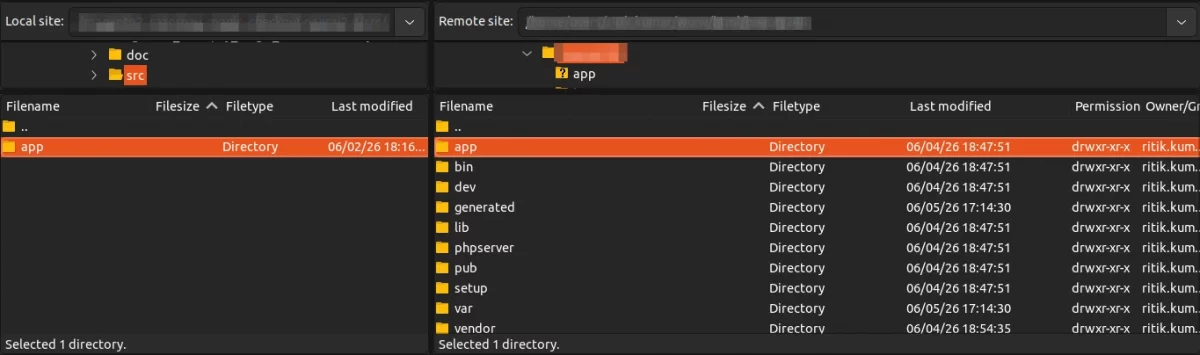
Once the module zip is extracted, follow path src>app and then copy the app folder into the Magento 2 root directory on the server as shown below:

Run Commands
You need to run the following commands:
php bin/magento setup:upgrade
php bin/magento setup:di:compile
php bin/magento setup:static-content:deploy
php bin/magento indexer:reindex
php bin/magento cache:flush
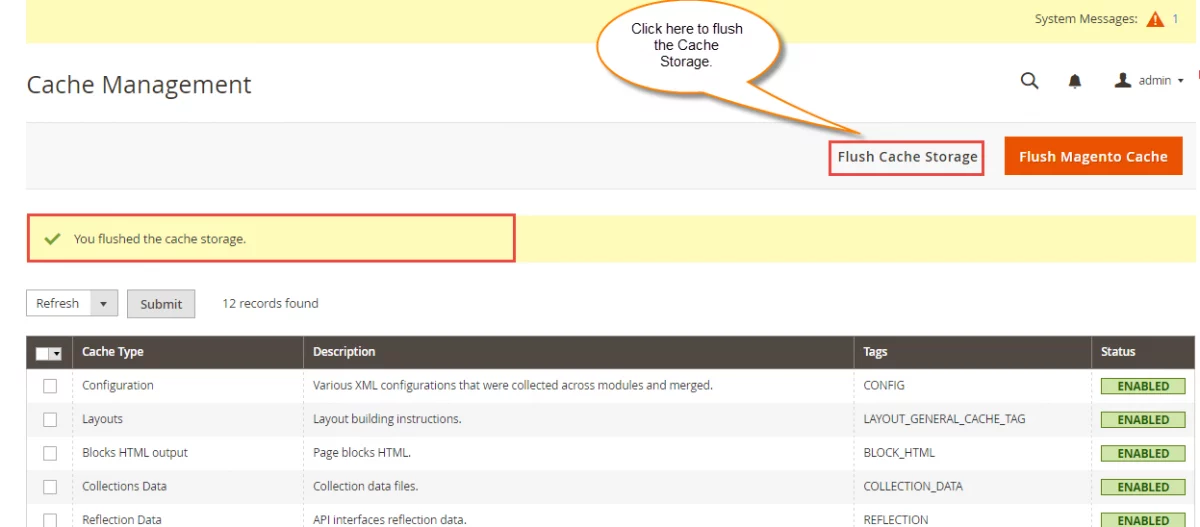
After running the commands, you have to flush the cache from the Adobe Commerce Cloud admin panel by navigating through->System->Cache management as shown below.

Language Translation
To translate the module language, go to src/app/code/Webkul/RazorpayMagicCheckout/ and modify the en_US.csv file.
After editing, rename the file to en_SA.csv and translate all content on the right side of the comma into Arabic, then save the changes.

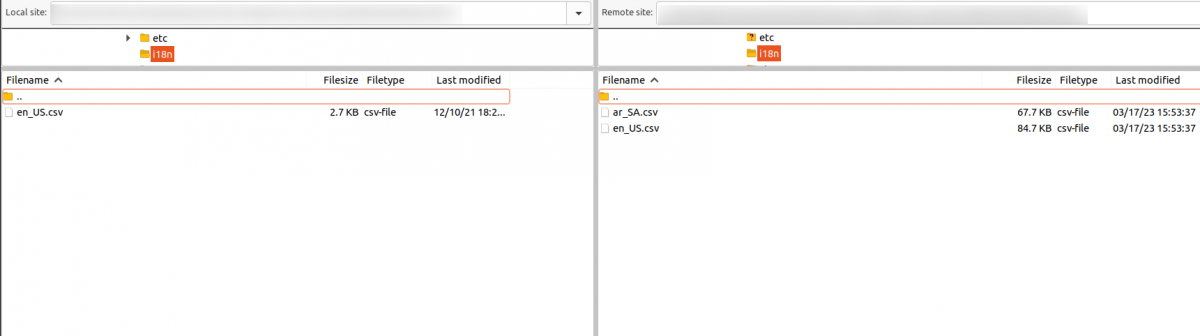
Then upload it to the path src/app/code/Webkul/RazorpayMagicCheckout/ where Magento 2 is install on the server.
The module gets translated into the Arabic Language. It supports both RTL and LTR languages.
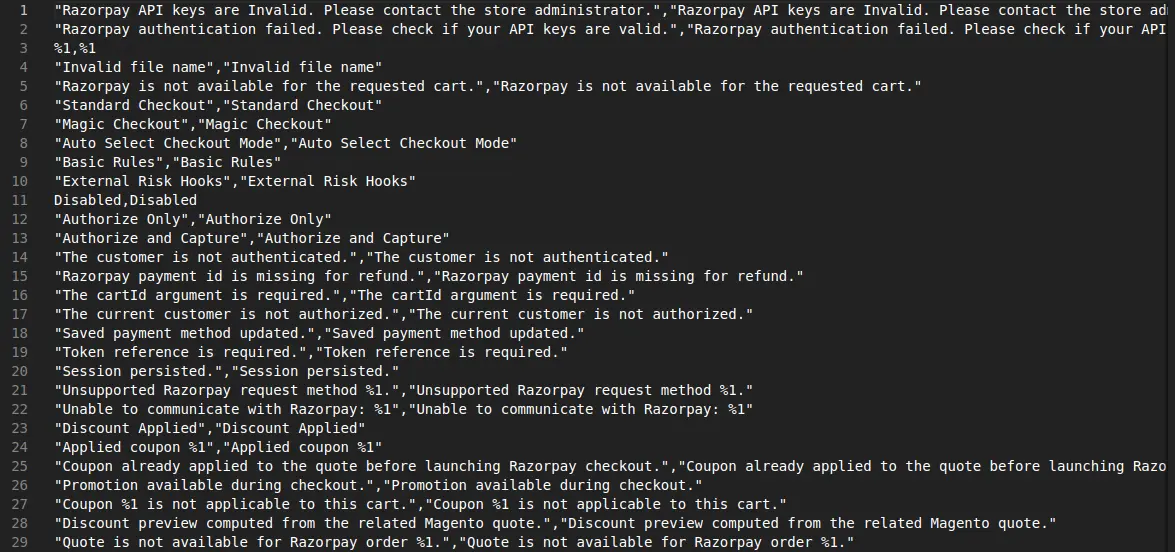
The user can edit the CSV like the image below, the configuration of Razorpay

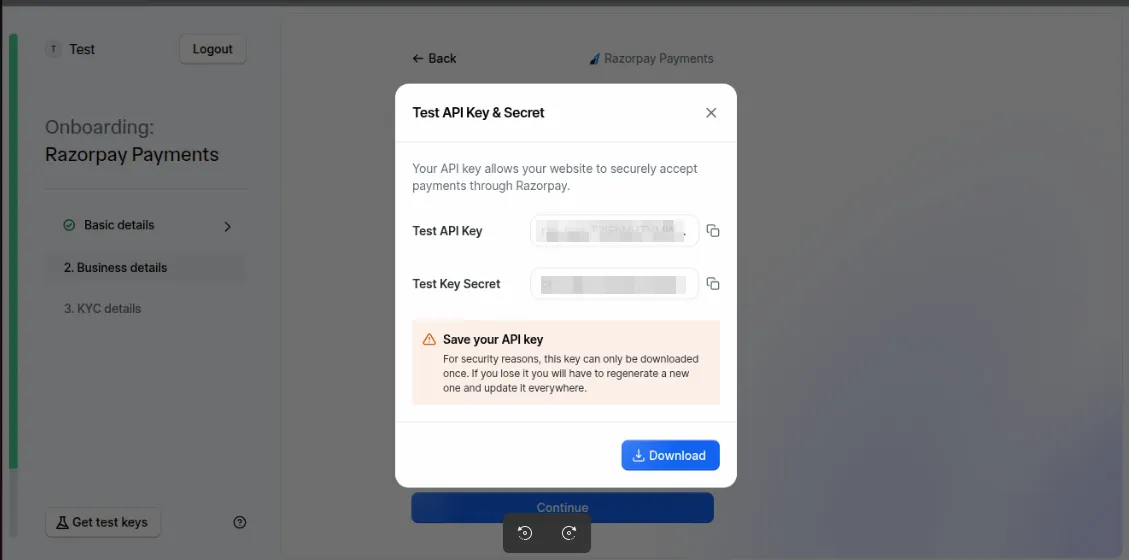
Generate API Key and Secret Key
To get the API Key and Secret Key click here.

Register for Webhook details
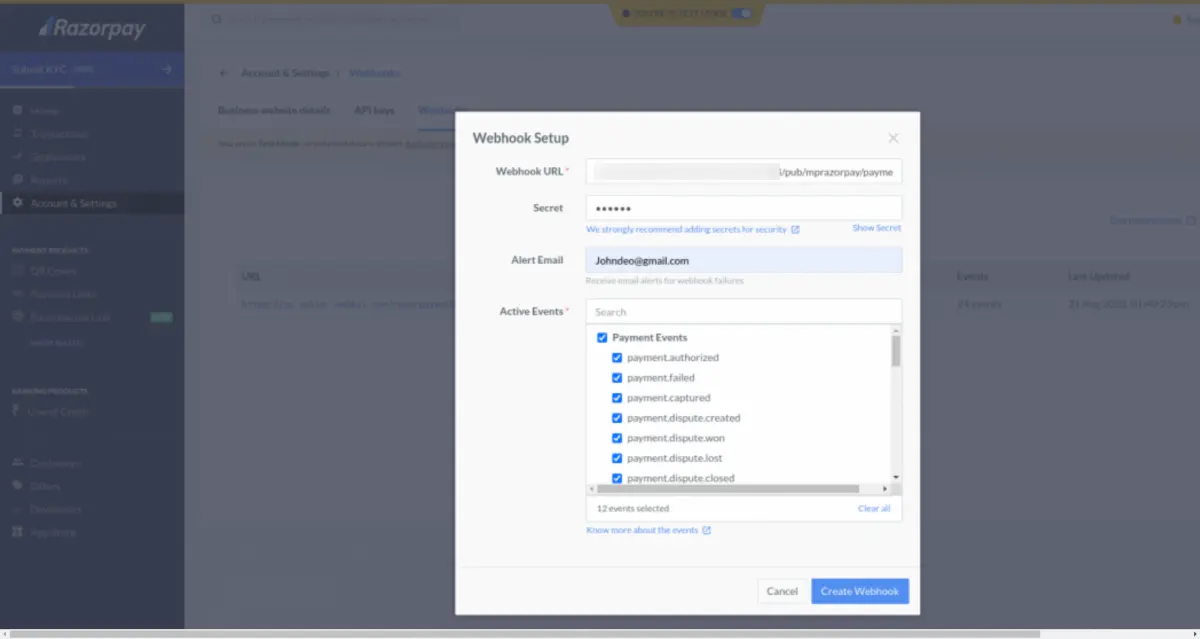
Webhooks automate communication between apps. Events trigger them and send data about the event to the specified URL.
Navigate to the “My Account & Settings” section in your Razorpay dashboard.
In the “Developer Controls” section, you’ll find options related to webhooks. Click on “Edit Webhooks.”
To add a webhook, you need to find the webhook URL, create a secret key, choose the event, and click a button.
Add “payout.processed” and “payout.reversed” as active events.

Admin Configuration: Razorpay Magic Checkout for Magento2
From Magento 2 admin panel, navigate to Stores > Configuration > Sales > Payment Methods and check for Webkul Razorpay Magic Checkout.
From here admin can manage the configuration as shown in images below :

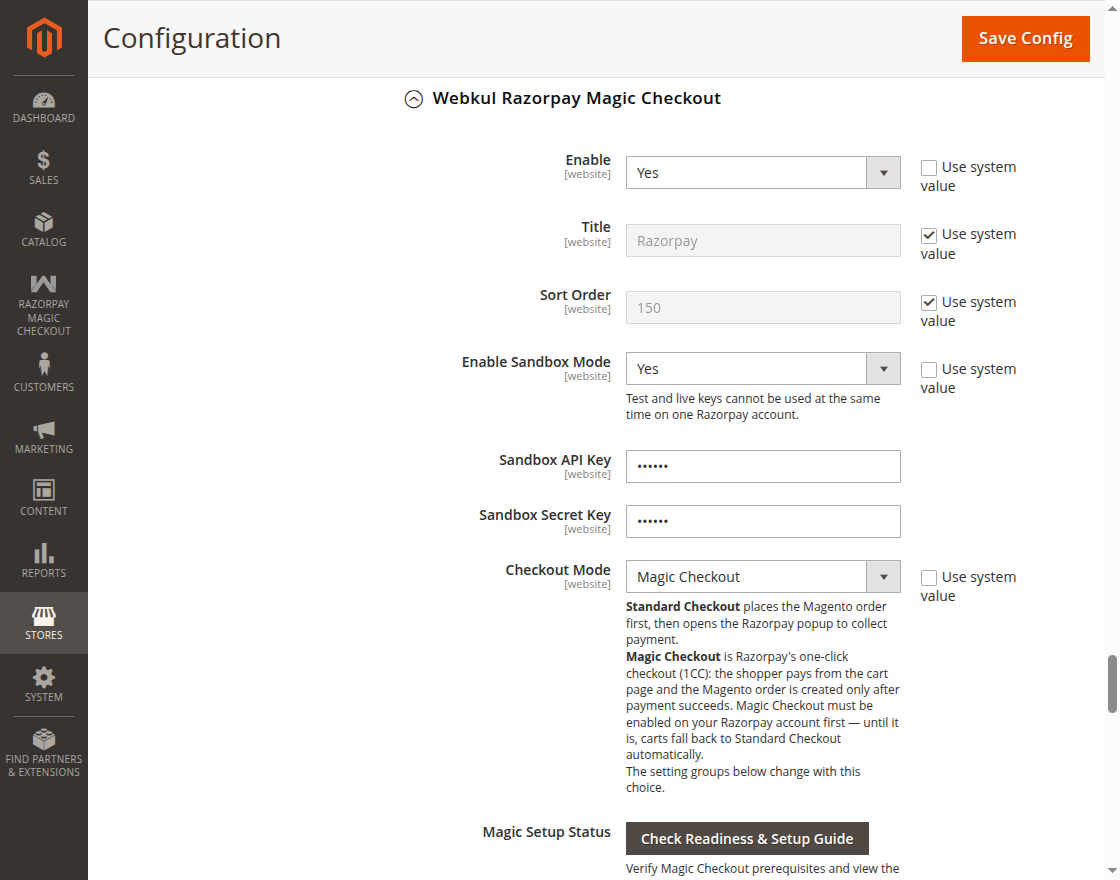
- Enable: Admin can enable or disable the Razorpay Magic Checkout payment method.
- Title: Admin can add Title for the Razorpay Magic Checkout payment method.
- Sort Order: Admin can set the sort order for displaying the payment method.
- Enable Sandbox Mode: The admin can enable or disable Sandbox Mode for testing transactions.
- Sandbox API Key: The admin can enter the Sandbox API Key provided by Razorpay.
- Sandbox Secret Key: The admin can enter the Sandbox Secret Key provided by Razorpay.
- Checkout Mode: The admin can select the preferred checkout mode for processing payments. The available options are as follows:
- Standard Checkout:Standard Checkout follows Magento’s regular checkout flow. Customers enter their details and place the order first. Magento creates a pending payment order before opening Razorpay Checkout for payment.
- Magic Checkout: Magic Checkout lets customers skip Magento checkout and pay through Razorpay’s one-click checkout. Razorpay collects required details, and Magento creates the order only after successful payment.
- Standard Checkout:Standard Checkout follows Magento’s regular checkout flow. Customers enter their details and place the order first. Magento creates a pending payment order before opening Razorpay Checkout for payment.
When Magic Checkout is Selected :
when magic checkout will be selected following configuration field will be visible.
Magic Setup Status: The admin can check whether Magic Checkout prerequisites are configured and view the callback URLs required for registration in the Razorpay Dashboard.
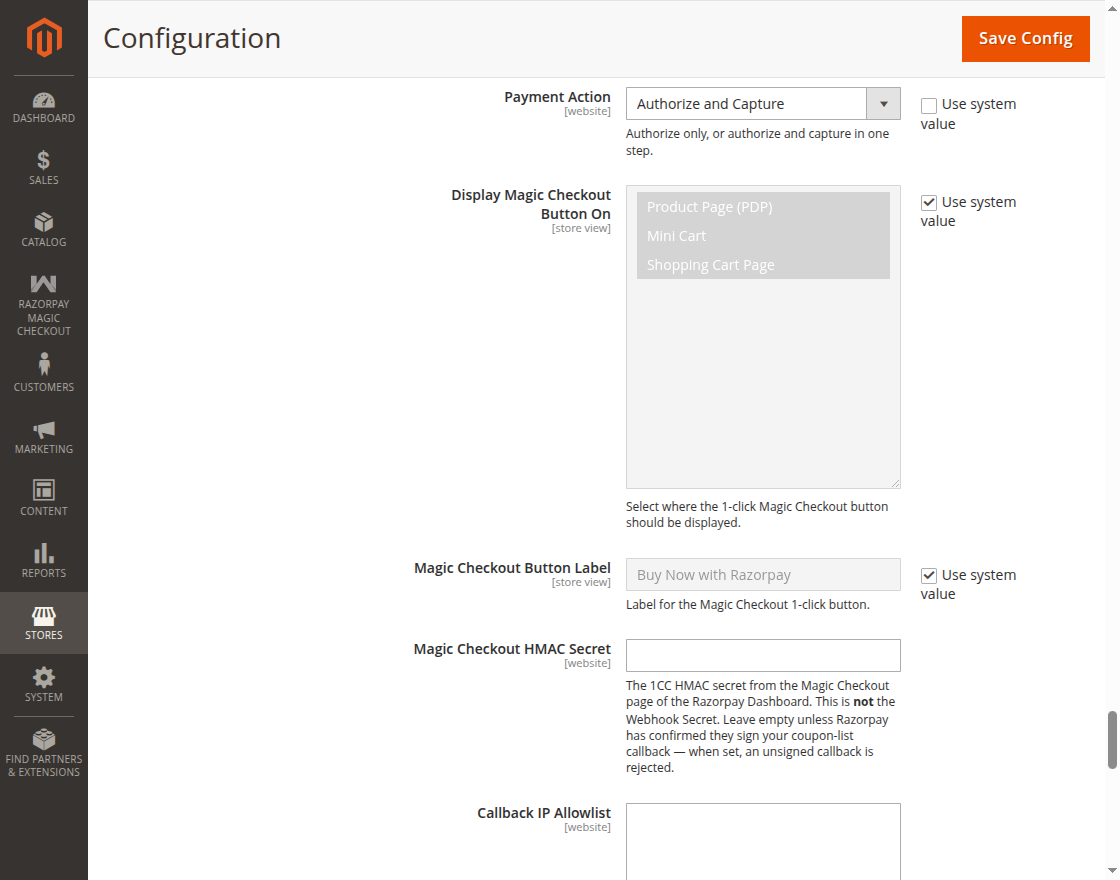
Payment Action: The admin can select whether to authorize the payment only or authorize and capture it in a single step.
Display Magic Checkout Button On: The admin can select the store pages where the Magic Checkout 1-click button should be displayed, such as the product page, mini cart, or shopping cart page.
Magic Checkout Button Label: The admin can enter the label to display on the Magic Checkout 1-click button.
Magic Checkout HMAC Secret: The admin can enter the 1CC HMAC Secret provided on the Magic Checkout page in the Razorpay Dashboard.
This is different from the Webhook Secret and is required only when Razorpay confirms that coupon-list callbacks are signed.
Callback IP Allowlist: Enter comma-separated IPv4 addresses or CIDR ranges to allow Razorpay callbacks for shipping and promotion requests. Leave empty unless Razorpay provides its egress IP ranges.

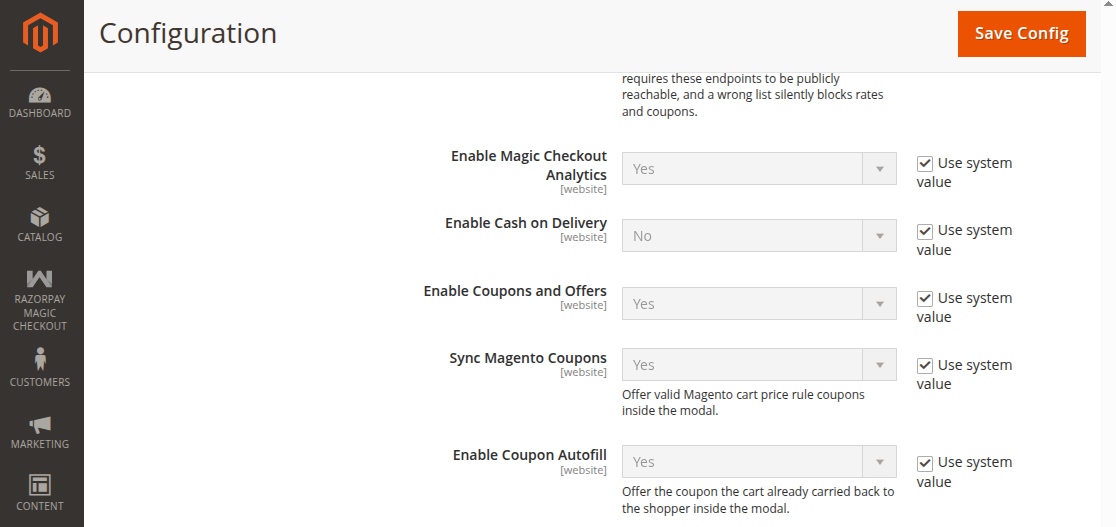
Enable Magic Checkout Analytics: Enable this option to track and analyze customer activity and conversion data from Magic Checkout.
Enable Cash on Delivery: Enable this option to allow customers to select Cash on Delivery as a payment method in Magic Checkout.
Manage Coupons and Offers: Enable this option to display available coupons and offers in the Magic Checkout modal.
Sync Magento Coupons: Enable this option to offer valid Magento cart price rule coupons directly inside the Magic Checkout modal.
Enable Coupon Autofill: Enable this option to display the coupon already applied to the cart inside the Magic Checkout modal.
When Standard Checkout is Selected :
when standard checkout will be selected following related extra configuration field will be visible.
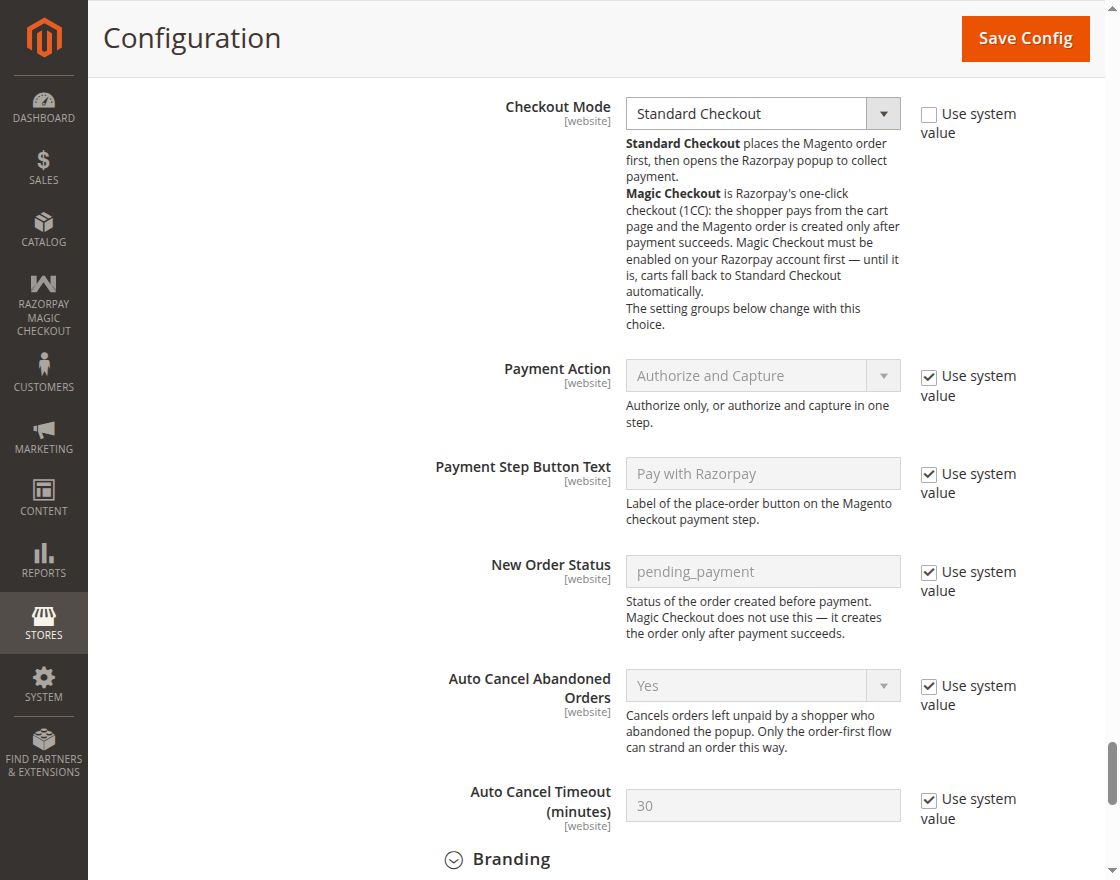
Payment Step Button Text: Enter the text displayed on the place-order button in the Magento checkout payment step.
New Order Status: Select the status assigned to an order created before payment. This setting applies to Standard Checkout and not Magic Checkout.
Auto Cancel Abandoned Orders: Enable this option to automatically cancel unpaid orders when shoppers abandon the Razorpay payment popup.
Auto Cancel Timeout (minutes): Enter the number of minutes to wait before automatically cancelling an unpaid abandoned order.
Manage Razorpay Branding and Payment Options Settings
Under branding admin can manage following configurations as sohwn in image below :-
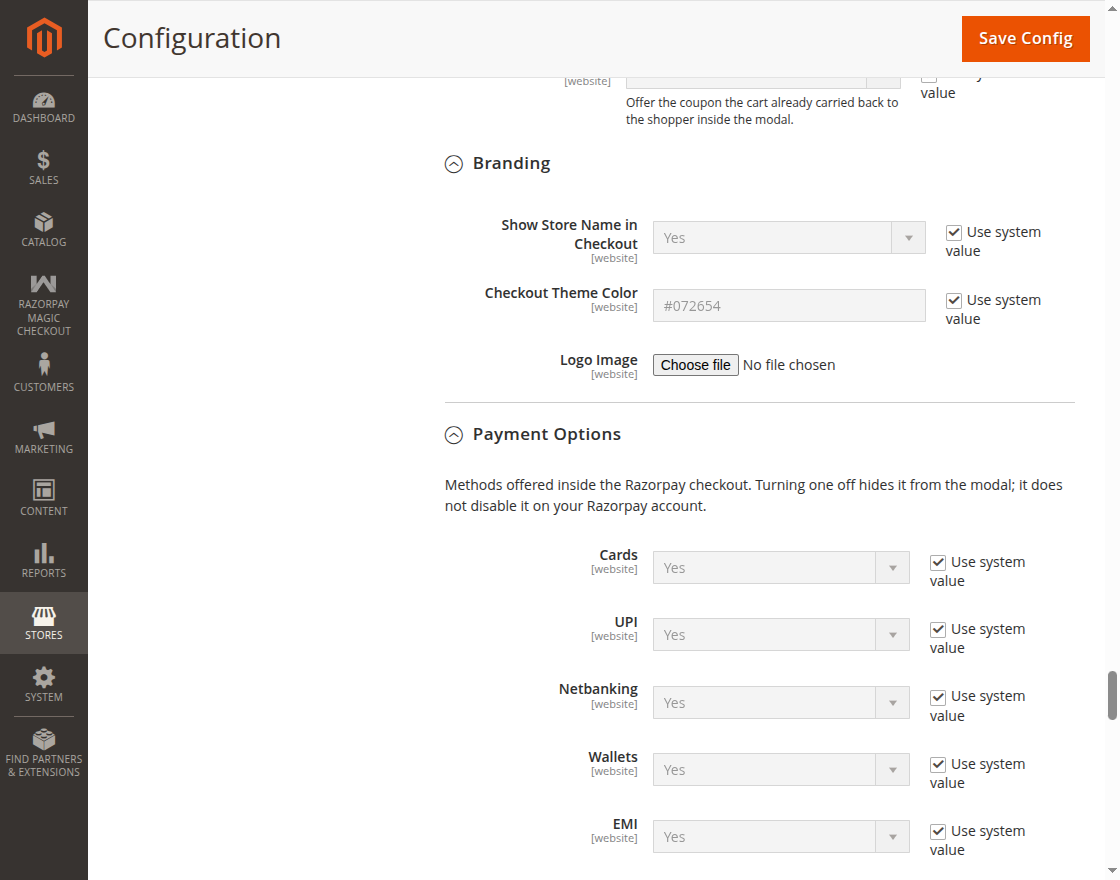
Show Store Name in Checkout: Enable this option to display the store name in the Razorpay Magic Checkout experience.
Checkout Theme Color: Select the color used for the Magic Checkout interface to match the store’s branding.
Logo Image: Upload the store logo to display it in the Magic Checkout experience.
Payment Options :
Under Payment option tab admin can enable or disable the available payment methods offered in the Razorpay Checkout.
Cards: Enable this option to offer card payments in the Razorpay Checkout.
UPI: Enable this option to offer UPI payments in the Razorpay Checkout.
Netbanking: Enable this option to offer net banking payments in the Razorpay Checkout.
Wallets: Enable this option to offer supported wallet payments in the Razorpay Checkout.
EMI: Enable this option to offer eligible EMI payment options in the Razorpay Checkout.
Pay Later: Enable this option to offer supported Pay Later payment options in the Razorpay Checkout.
Order Status Mapping and Webhook Settings
Admin can manage order status mapping and webhook config as shown in the image below :
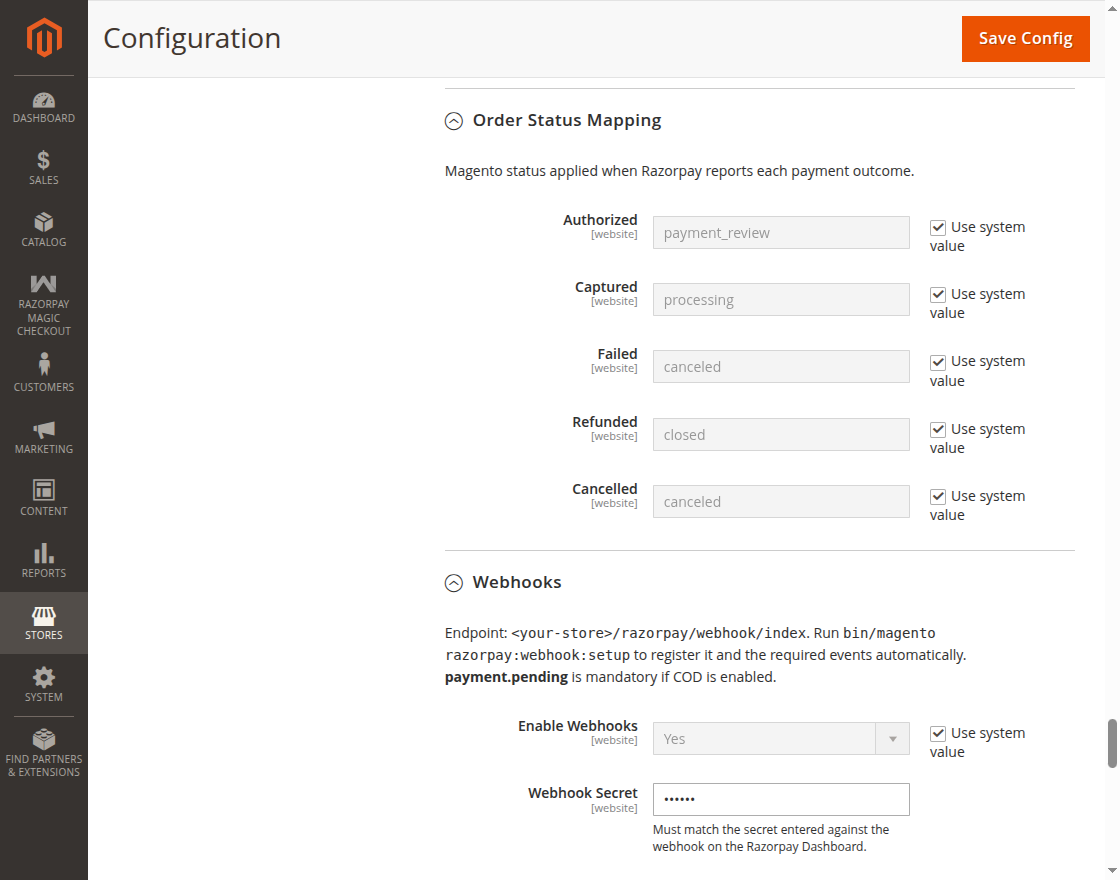
Authorized: Select the Magento order status applied when Razorpay successfully authorizes the payment.
Captured: Select the Magento order status applied when Razorpay successfully captures the payment.
Failed: Select the Magento order status applied when the Razorpay payment fails.
Refunded: Select the Magento order status applied when the Razorpay payment is refunded.
Cancelled: Select the Magento order status applied when the Razorpay payment is cancelled.
Enable Webhooks: Enable this option to receive payment updates from Razorpay through webhooks and automatically update the corresponding Magento order.
Webhook Secret: Enter the secret configured for the webhook in the Razorpay Dashboard. It must match the secret configured for the webhook.

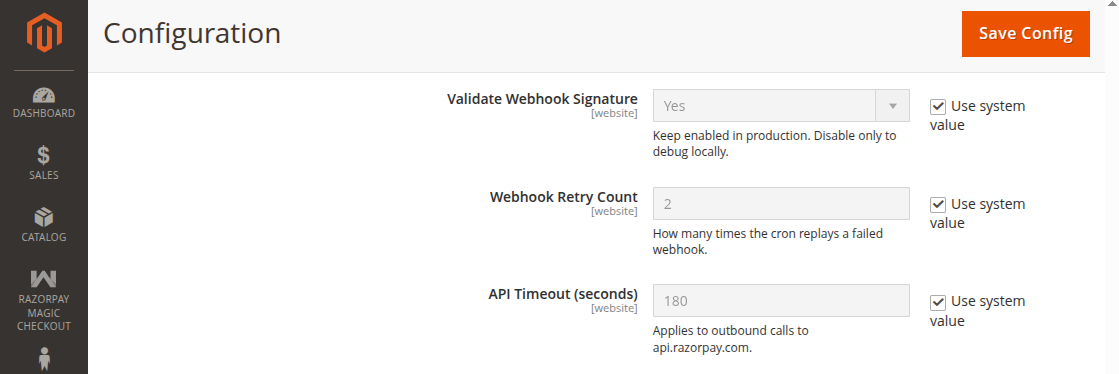
Validate Webhook Signature: Enable this option to verify that incoming webhook requests are from Razorpay. Keep it enabled in production and disable it only for local debugging.
Webhook Retry Count: Enter the number of times the system should retry a failed webhook through cron.
API Timeout (seconds): Enter the maximum time allowed for requests sent to the Razorpay API before they time out.
Manage Availability Restrictions, Logging and Diagnostics
Admin can manage allowed countries for razorpay, minimum and maximum order amout, logging and debug configurations as shown in the image below :
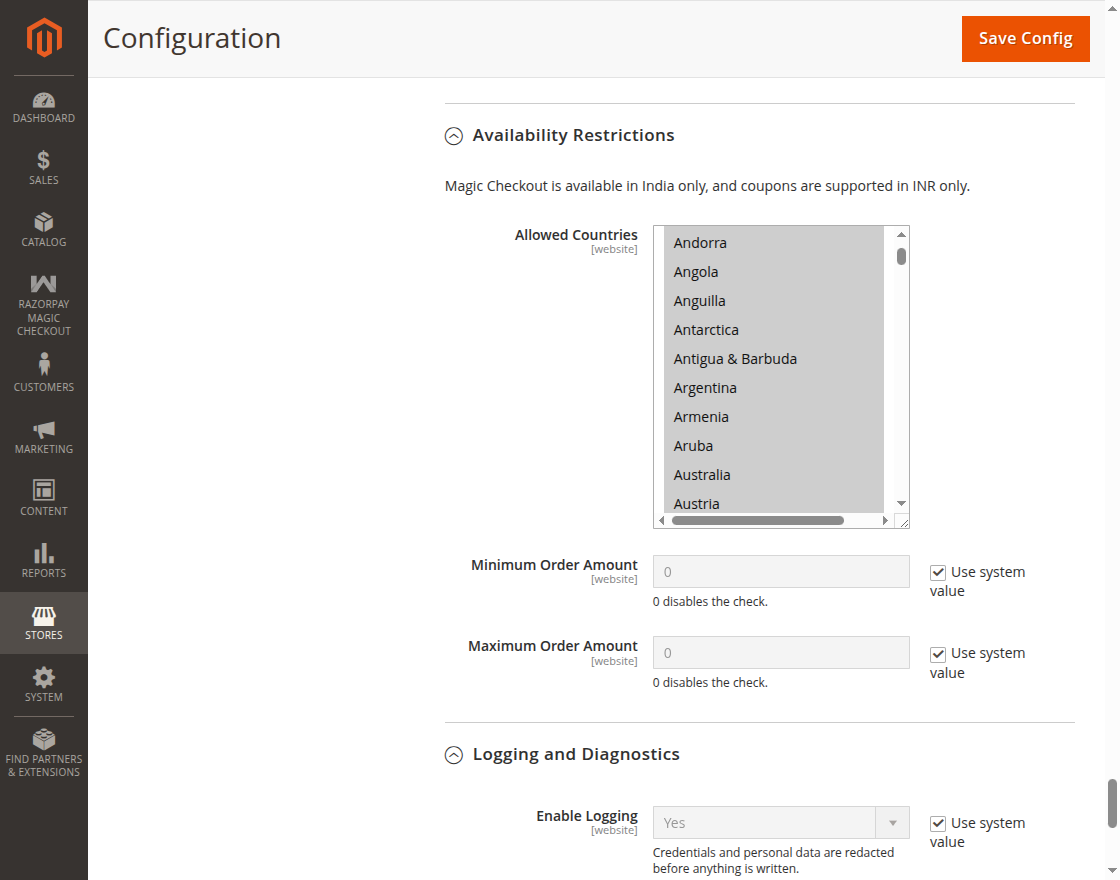
Allowed Countries: Select the countries where customers are allowed to use Razorpay for payments.
Minimum Order Amount: Enter the minimum order value required to use Razorpay. Enter 0 to disable the minimum amount check.
Maximum Order Amount: Enter the maximum order value allowed for Razorpay payments. Enter 0 to disable the maximum amount check.
Note: Razorpay Magic Checkout is currently available only in India and coupon are supported only in INR currency.
Enable Logging: The admin can enable or disable logging to maintain records of Razorpay transactions and events.
Debug Mode: The admin can enable or disable debug mode to troubleshoot and monitor Razorpay payment requests and responses.
Customer Workflow – Razorpay Magic Checkout
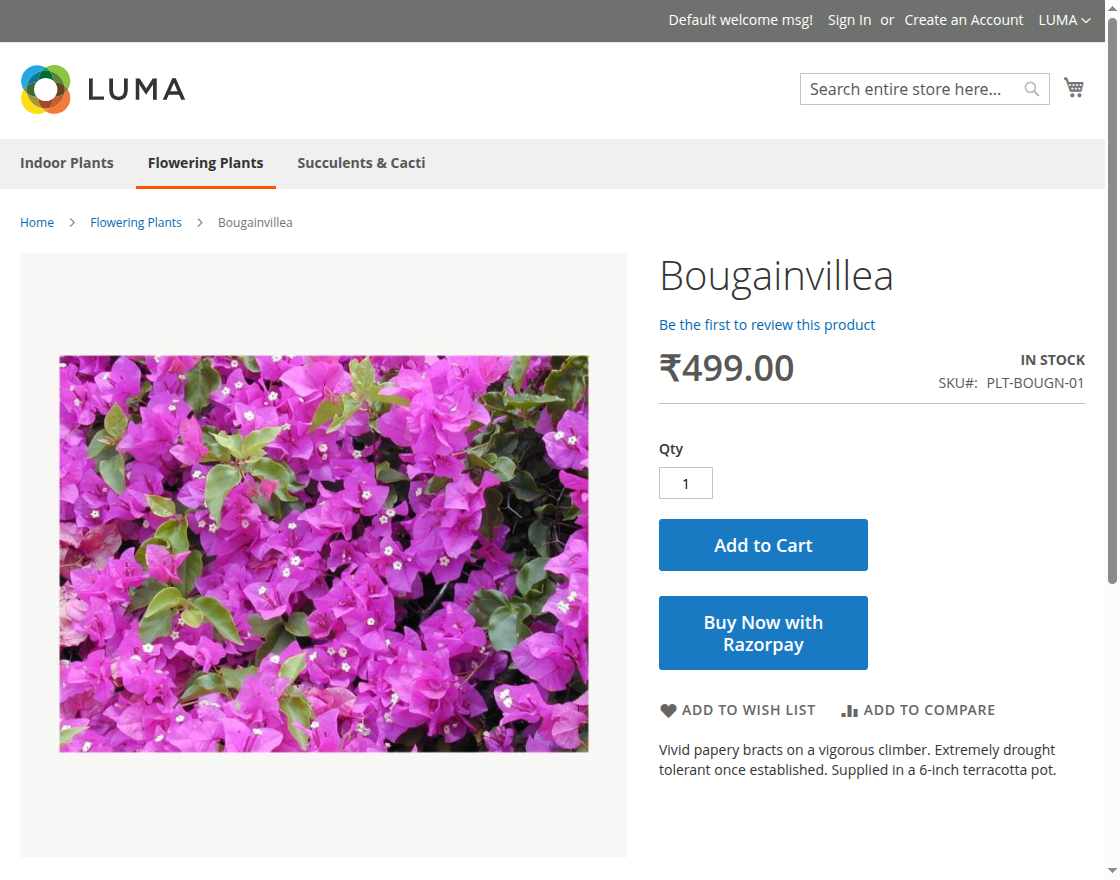
Customer can click on ‘Buy Now with Razorpay’ button at product display page to place order with razorpay magic checkout as shown in the image below :
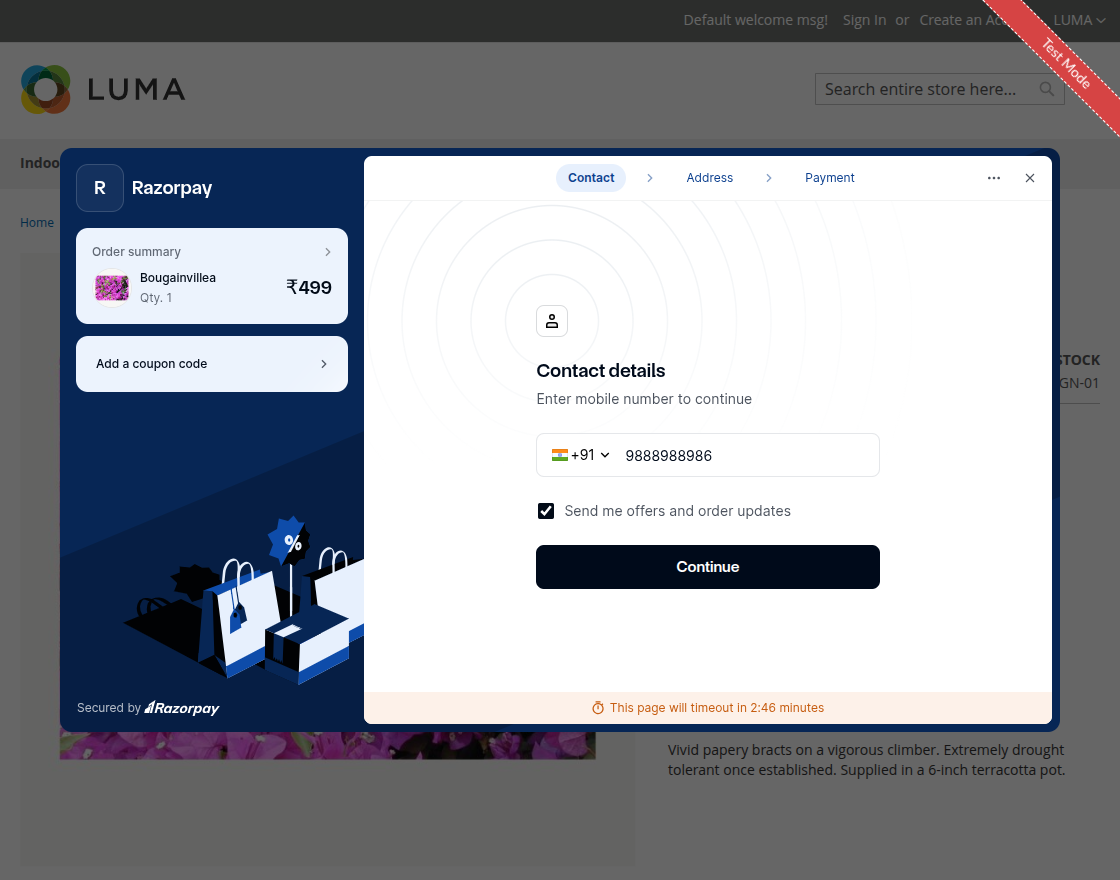
After this step, the customer will be redirected to the Contact Details page where they need to enter the mobile number, as shown in the image below.
After filling contact details customer will be redirected to delivery address page, where customer need to fill their delviery address as shown in the below image:
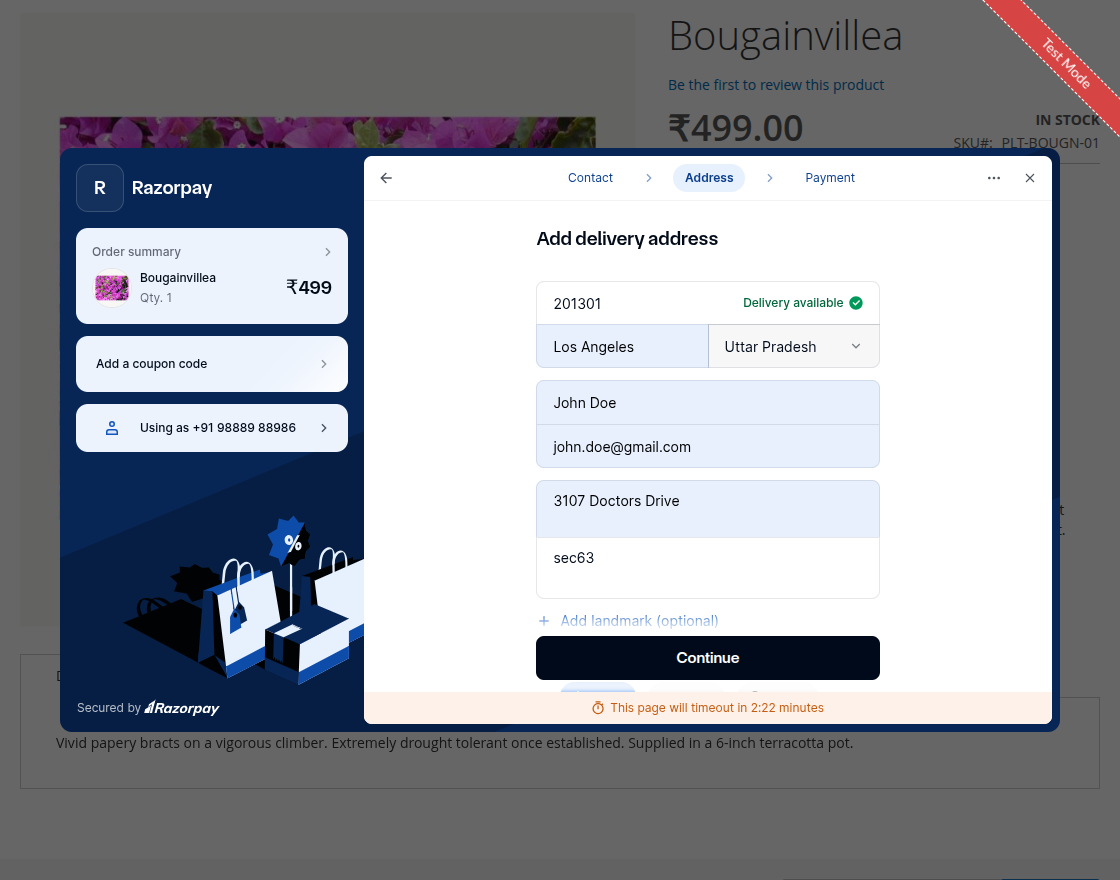
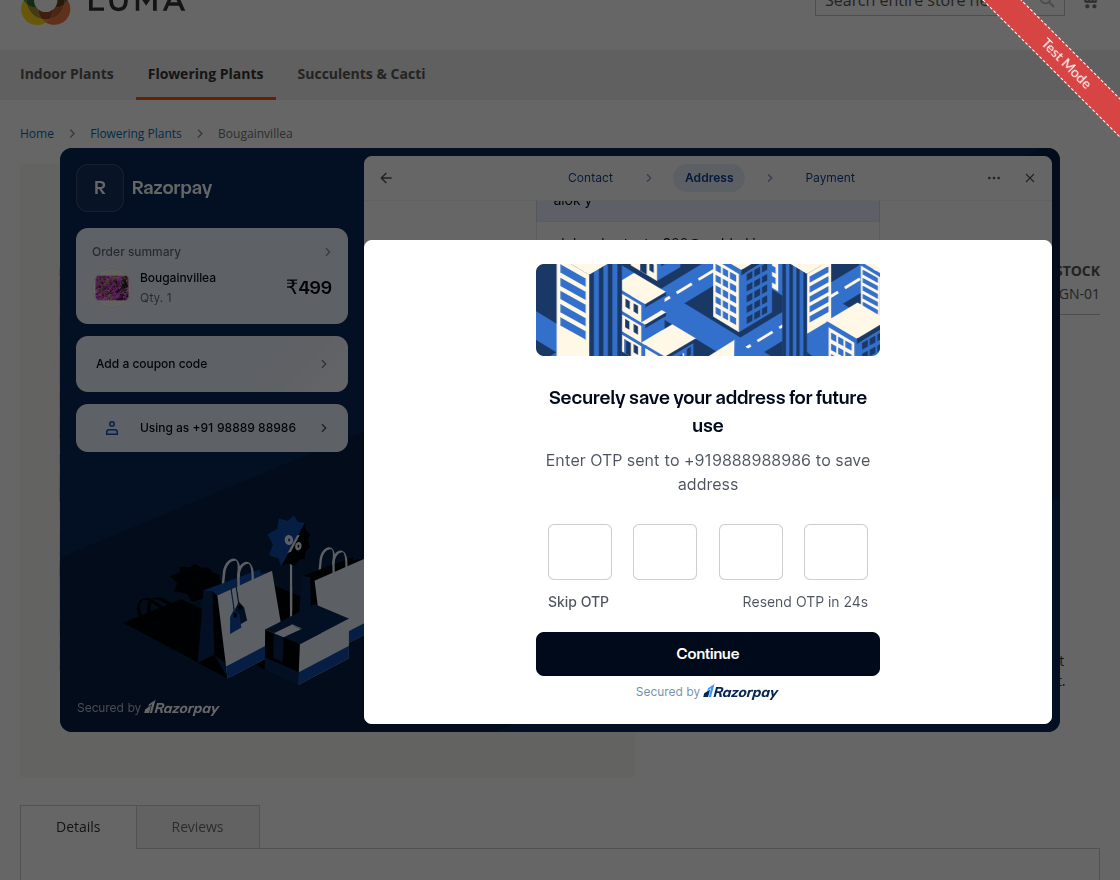
Once delivery address is filled customers will be redirected to opt screen to validate their details.
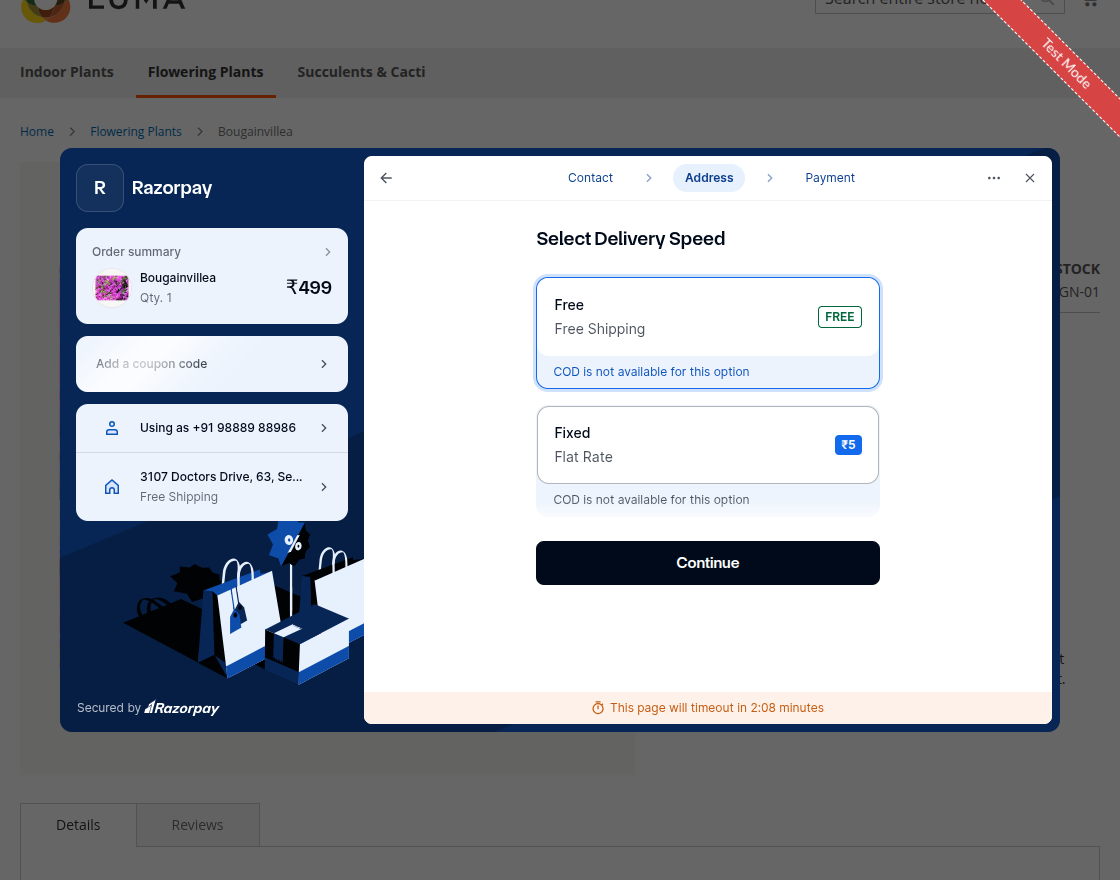
Furthermore, the customer selects a delivery method from the available options on the Delivery Methods page.
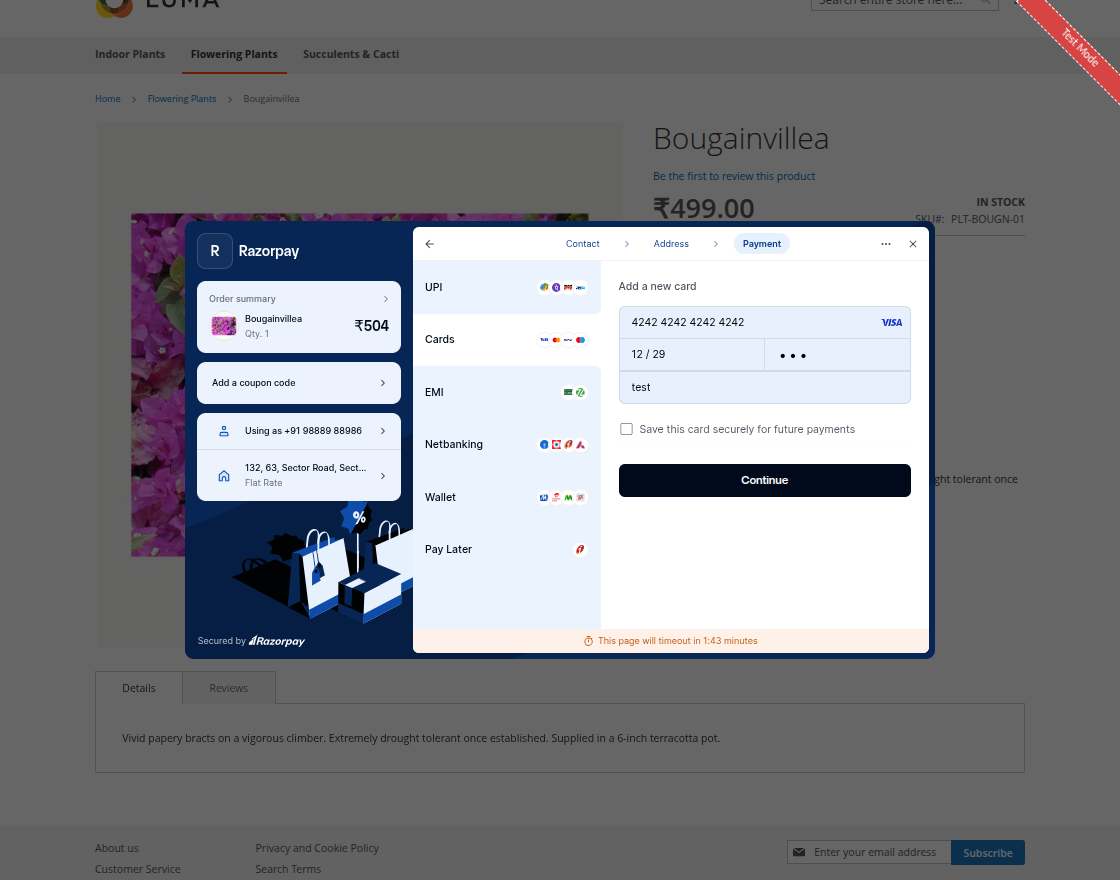
After selecting the shipping method, the customer moves to the Payment Method section, selects a preferred payment method, and places the order using Razorpay Magic Checkout.
Once the payment succeeds, the customer will see a Payment Success popup, as shown in the image below.


After successful payment order id will be generated as shown in the image below.
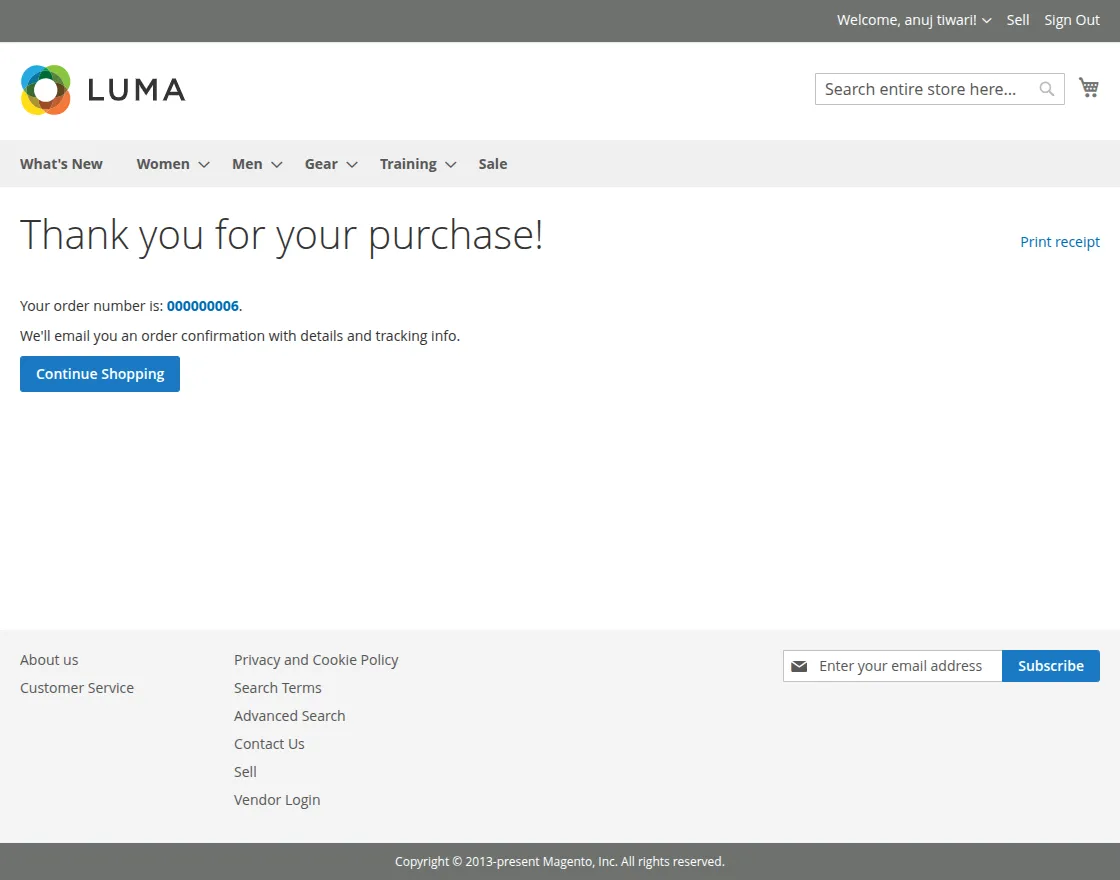
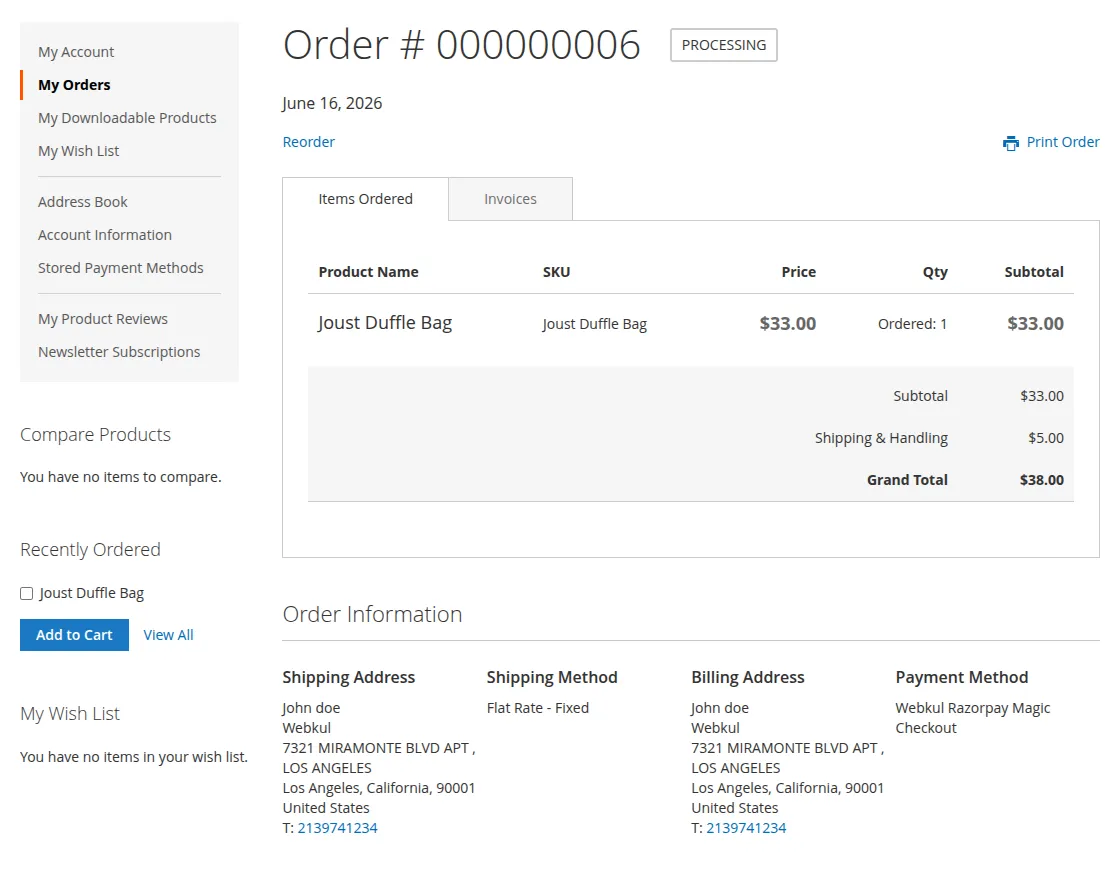
Customers can check order details under the My Order section.
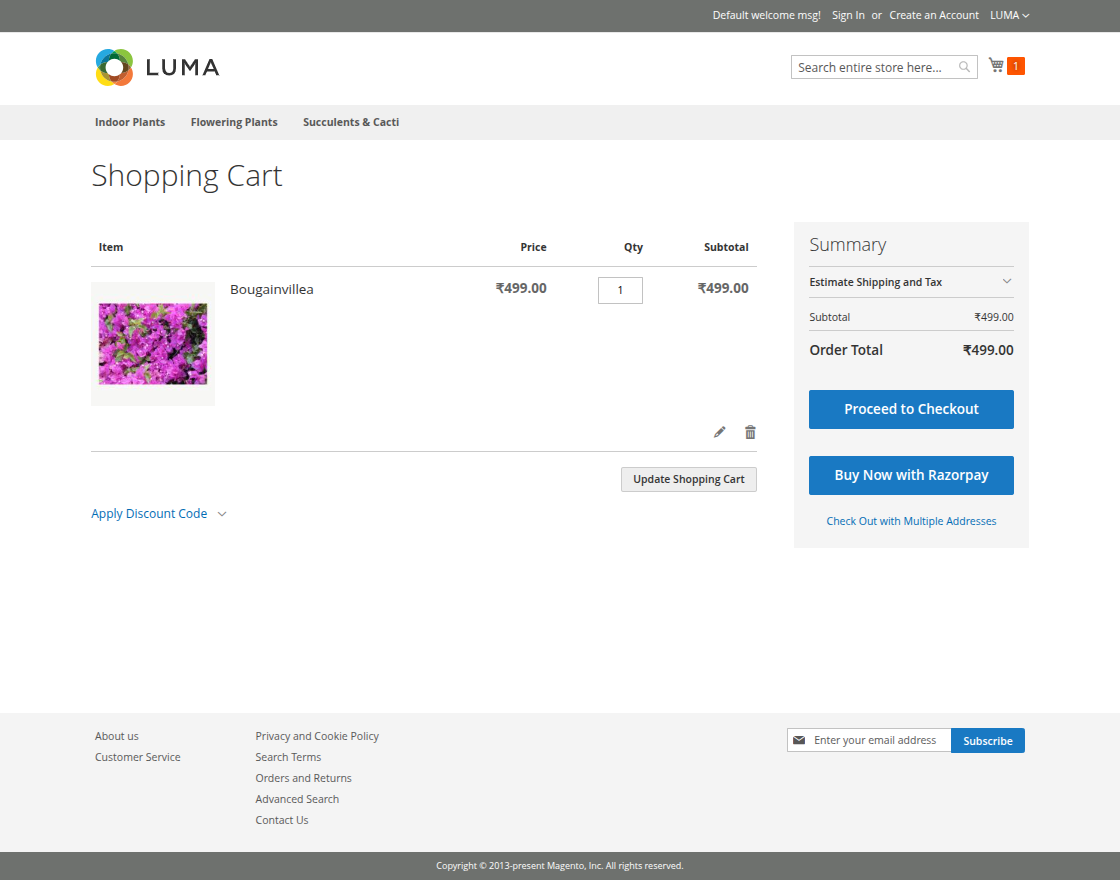
Customer can also place order from mini cart and cart view page using ‘Buy Now with Razorpay’ button as shown in the images below :
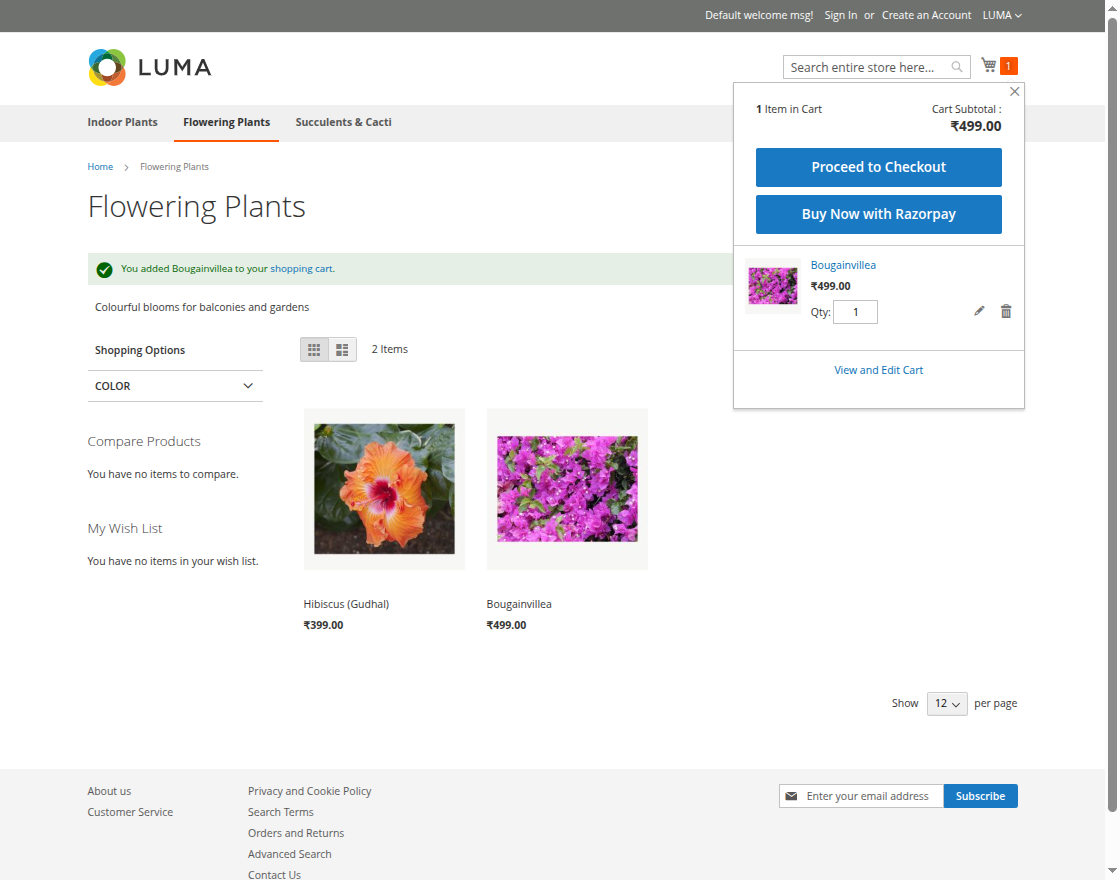
Customers can click on ‘Buy Now with Razorpay’ button at mini cart and cart view page and complete the checkout with razorpay magic checkout same as product display page.
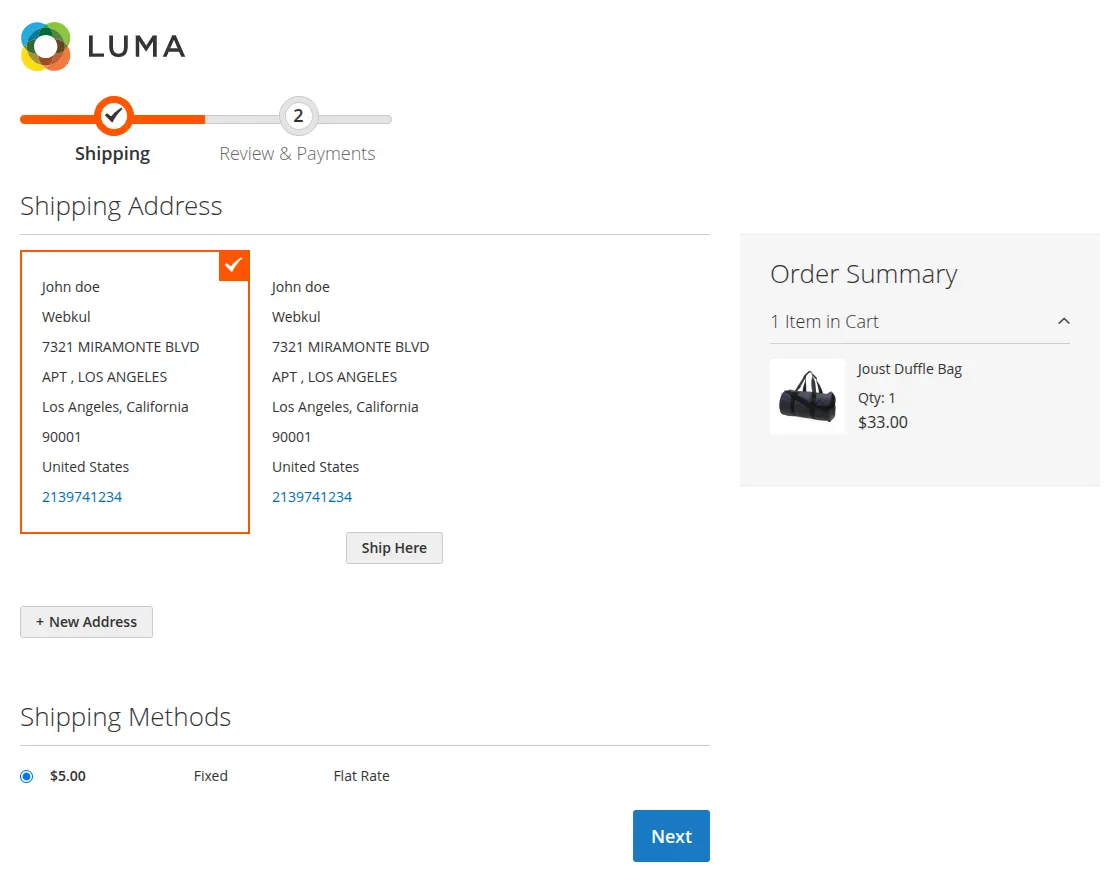
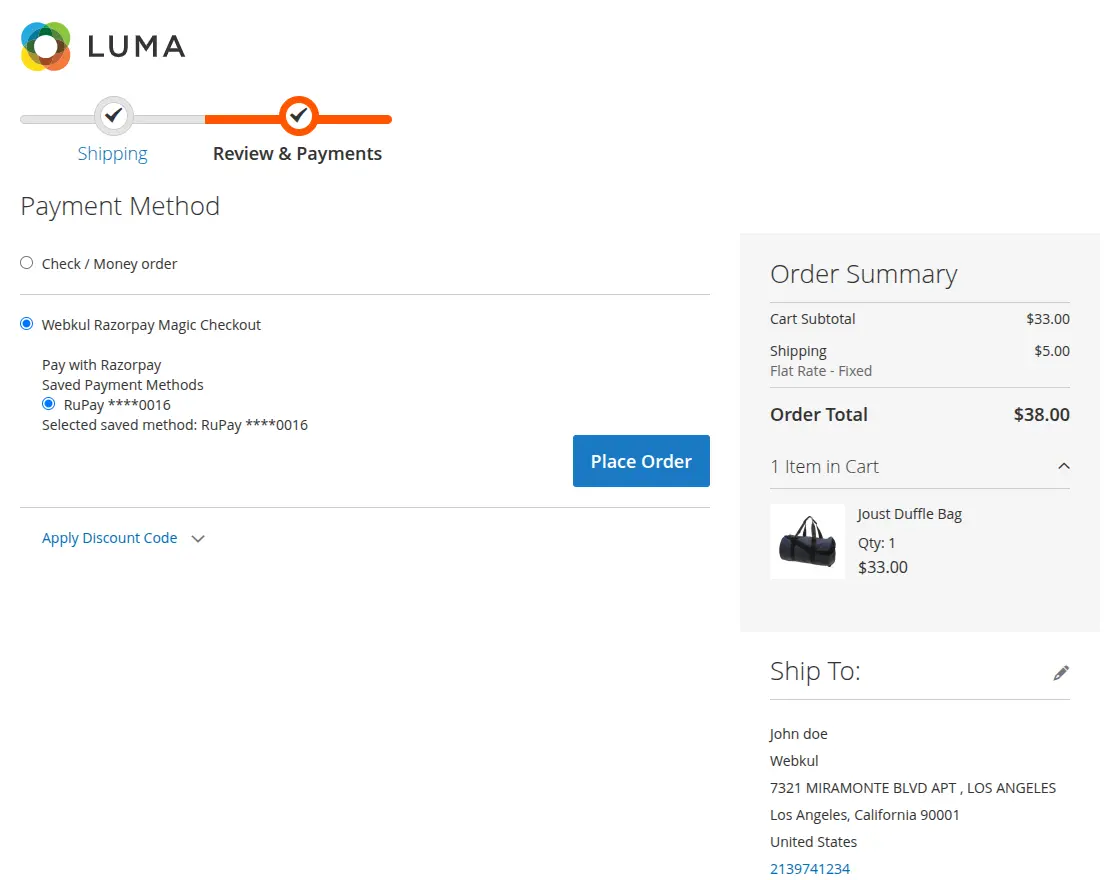
Customer can also use standard proceed to checkout and complete payment on payment method page as shown in the images below :
At the payment step, choose “Razorpay Magic Checkout” as the payment method.
Payment Actions: Status
Razorpay supports two types of payment actions:
Authorize Only: Select this option to authorize the customer’s payment without capturing the funds immediately. Capture the payment later.
In case of authorize invoice will be generated once admin captures the payment.
Authorize and Capture: Select this option to authorize and capture the customer’s payment in a single step. Capture the funds immediately after successful authorization.
Invoice will be generated automatically in Authorize and Capture type.
Online Refund – Admin End
Admin can process refunds directly from the Magento Admin Panel. Refund support includes full refunds and partial refunds with refund status synchronization.
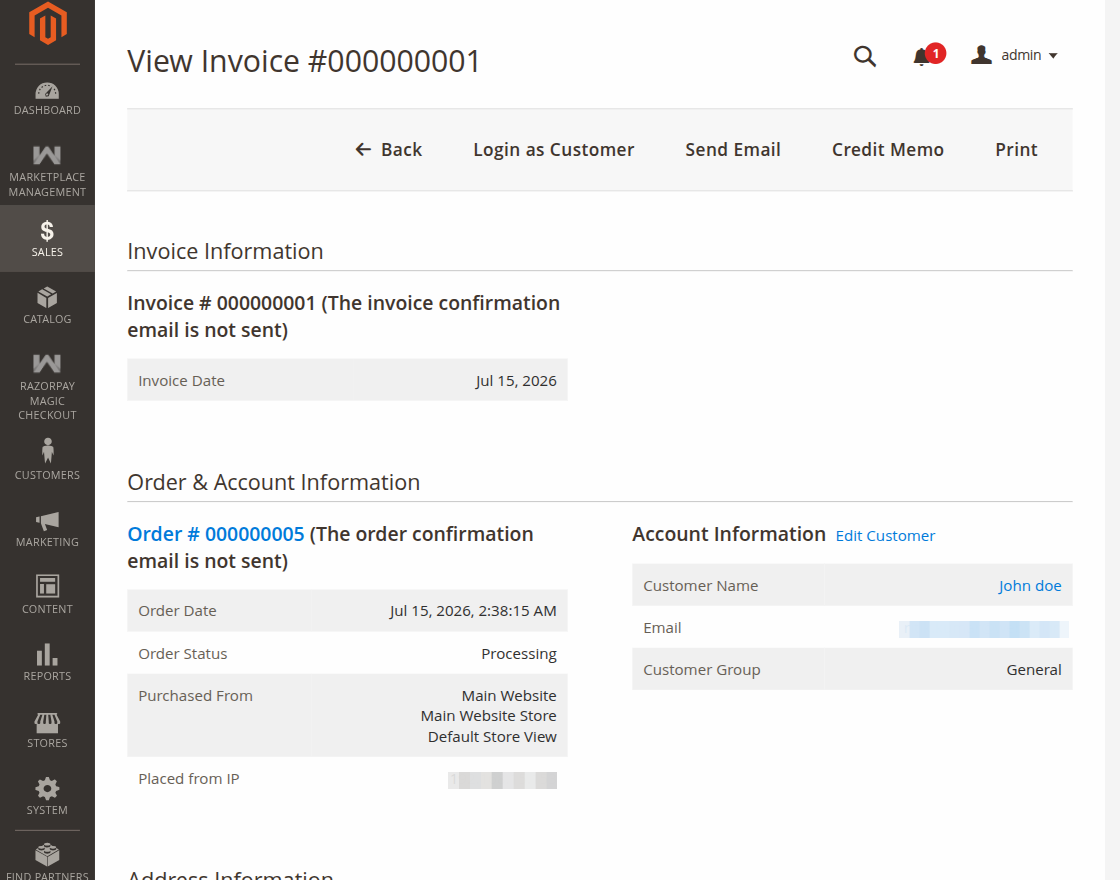
Steps:
- Navigate to Sales > Orders and open the desired order.
- Open the related invoice and click Credit Memo.
- On the Credit Memo page, select the Items to Refund and adjust the quantities for a partial refund.
- Click Refund Online to process the refund through Razorpay.
- Razorpay returns the refunded amount to the customer’s original payment method, and Magento updates the refund status automatically.
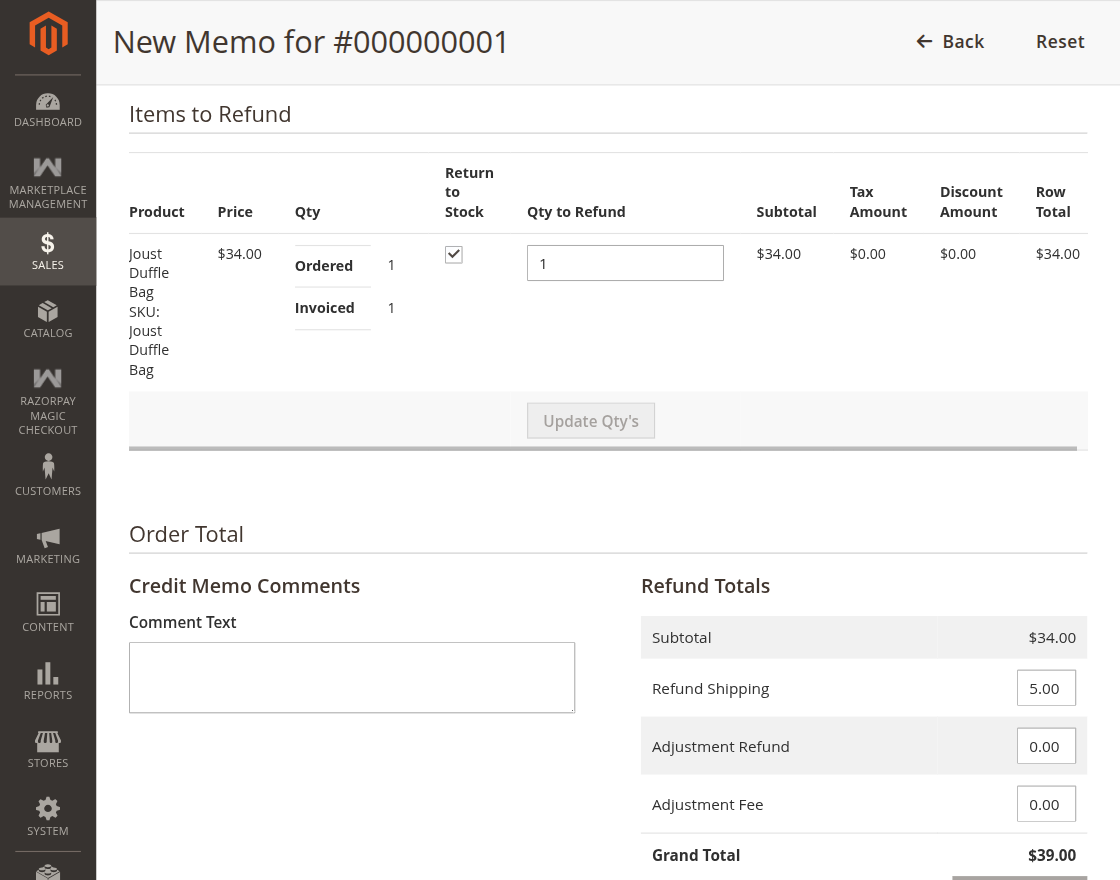
Items to Refund
The admin can update the quantity in the Qty to Refund field and then proceed with Refund Online to refund all items or selected items. Partial and full refunds are supported.
Support
That’s all about the Magento 2 Razorpay Magic Checkout module. In that case, if you have any issues or concerns, please email us at support@webkul.com.
Our team will be happy to assist you. In addition, we will provide the required support.
You may also browse Magento 2 extensions.