User Guide for Magento 2 LLMs TXT Generator
Magento 2 LLMs TXT Generator enables store owners to create an llms.txt file, making their website content more accessible to AI systems like ChatGPT, Gemini, Perplexity and Claude.
By default, Magento 2 stores are invisible to AI search engines, which cannot reliably read product catalogs, pricing, or categories from complex Magento HTML pages.
This enhances the way large language models interpret and display your store’s information during AI-driven searches or interactions.
This extension is part of the AI Discovery Infrastructure category and functions as an AI SEO extension for Magento, engineered specifically for AI Search Optimization
With this extension, the Admin can select which entities—such as CMS pages, products, and categories—should be included.
Additionally, the Admin can specify the company name, write descriptions, add extra details, and define how frequently the file is generated.
Accurate scheduling and clear file status tracking help keep everything automatically updated.
Apart from this, also check out the Magento 2 AI Reporting extension, which will help you quickly fetch data from your Magento 2 store data using LLM.
Check out this video for a quick overview of the module:
Features
- Admin can choose which entities (CMS Page, Product, Category) to include in the llms.txt file.
- Admin can set the frequency for automatic llms.txt file generation.
- Enter and display the Company name and description within the generated file.
- An input field is available to add extra information.
- Admin can precisely schedule the file generation by specifying the hour, minute, and second.
- Check the file status to confirm that the
llms.txtfile is generated. - Generate the llms.txt file website-wise.
- Supports multiple store views.
- Admins can exclude specific pages, products, or categories by entering their IDs.
- Allows the admin to include additional fields like description and meta title.
- Filter products by attributes to control which product data the system includes.
- Supports handling large volumes of product data, ensuring smooth and reliable performance.
- Added the AI Crawler Analytics dashboard to monitor AI bot crawls on llms.txt
- Per-website and per-store analytics filtering on the dashboard
- Replaced the Exclude Product Ids and Exclude Category Ids text fields with searchable selectors (category tree and product multiselect) for find-and-select exclusion
- Added a “Record Unknown Bots” setting; when disabled, hits from unrecognised User-Agents are not stored and the dashboard (including the URL Intelligence panel columns) shows only known bots
- Served /llms-full.txt with the correct content-type and filename, captured per-file crawl hits.
- Content Preview now shows the complete published file (no truncation), lists one selector entry per unique host with merged website titles, and shows a loading indicator while switching files
- Added a global “Generation Scope” setting: generate llms.txt per unique store-view base-URL host (default) or per Magento website (legacy)
Supports Magento Multi-Website, Multi-Store, and Multi-Store View:
- The module generates a separate llms.txt file for each website, including data from all multilingual stores enabled for that website.
- The module runs the cron automatically for all websites and stores where it is enabled, ensuring consistent and timely generation of the llms.txt file across your stores.
Installation of Magento 2 LLMs TXT Generator
The installation is quite simple, just like the standard Magento 2 extensions.
#Download Module
Firstly, you need to log in to the Webkul Store, go to My Account>My Purchased Products section, verify, and then download and extract the contents of this zip folder on the system.
#Upload Folder
Once the module zip extracts, follow path src>app and then copy the app folder into the Magento 2 root directory on the server as shown below:


#Run Commands
Next, You need to run the following commands,
php bin/magento setup:upgrade
php bin/magento setup:di:compile
php bin/magento setup:static-content:deploy
php bin/magento indexer:reindex
php bin/magento cache:flush
php bin/magento queue:consumers:start wkllmstxt.generate &
Language Translation
For translating the module language, navigate through the app/code/Webkul/LLMsTxtGenerator/i18n and edit the en_US.csv file.
Thereafter, rename the CSV as “en_SA.csv” and translate all right side content after the comma in the Arabic language. After editing the CSV, save it.


Now, upload it to the path app/code/Webkul/LLMsTxtGenerator/i18n, where the installation of Magento 2 is on the server.
The Magento 2 LLMs TXT Generator extension will be translated into the Arabic Language. It supports both RTL and LTR languages.
The user can edit the CSV like the image below.


Admin Configuration of Magento 2 LLMs TXT Generator
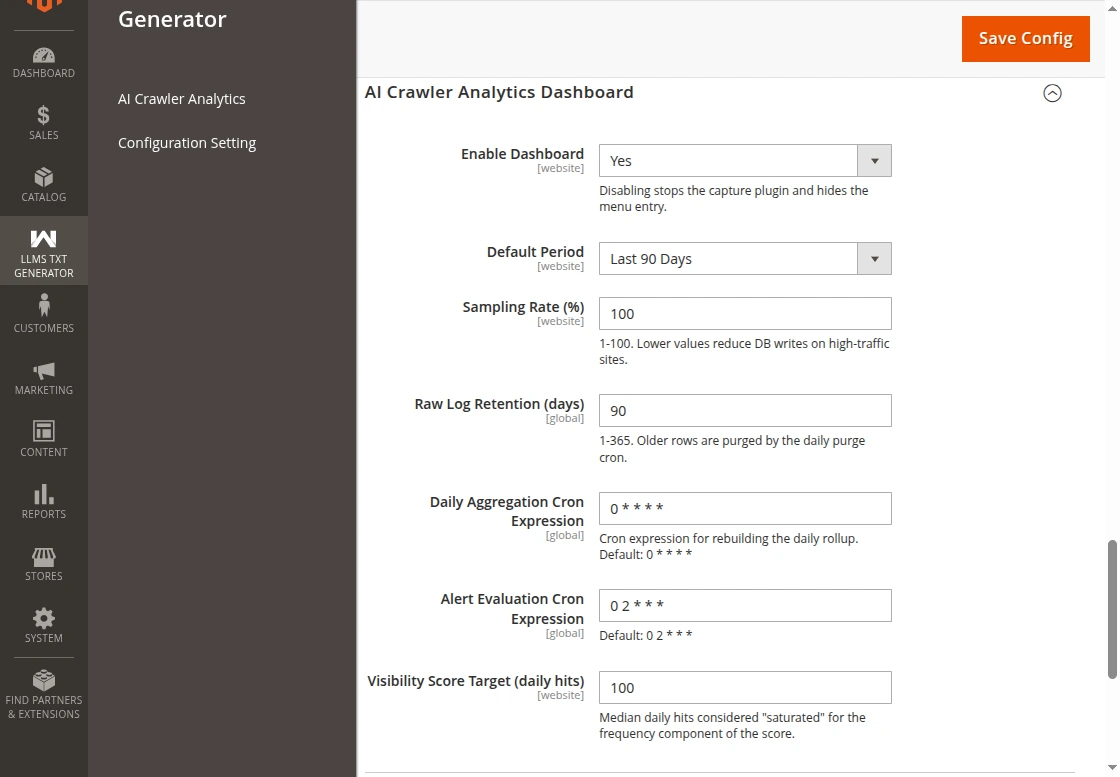
After the successful installation of the extension, the admin has to configure it. For it, they navigate to LLMs TXT Generator > Configuration Setting as per the image below,


Similarly, the admin can also navigate to Stores > Configuration > LLMs TXT Generator as per image below,

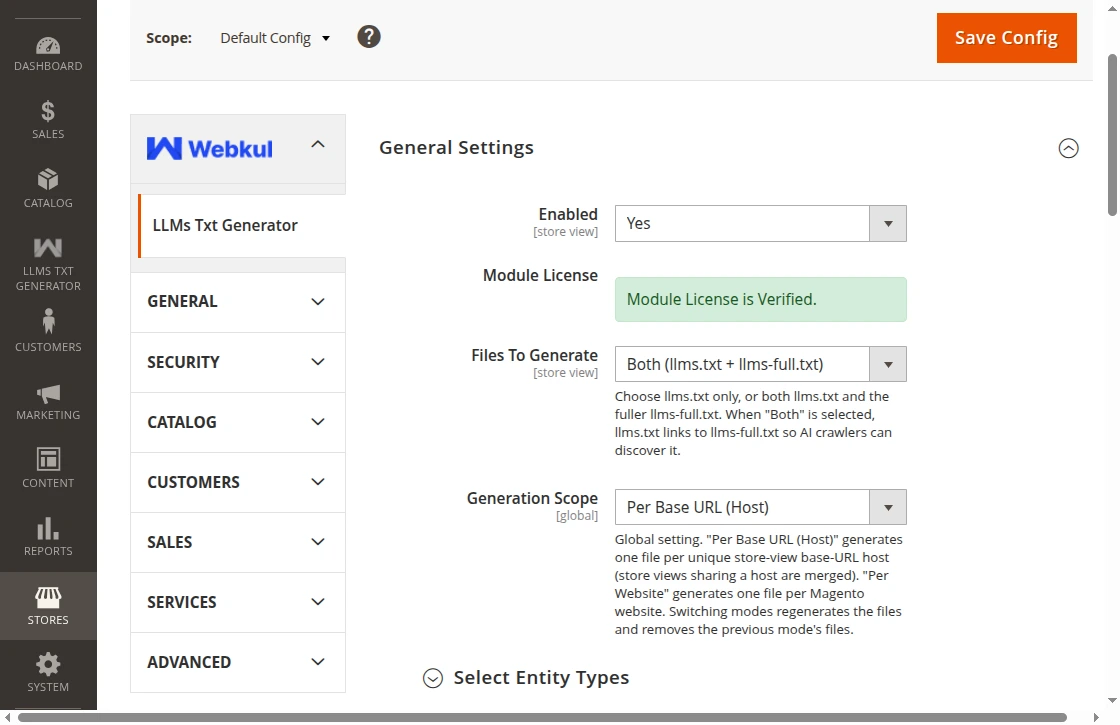
Here, Admin gets the following settings,
General Settings
- Enabled – Select Yes to Enable or No to Disable the module.
- Files To Generate – Choose whether the system creates only llms.txt,
llms-full.txt, or both files. - Generation Scope: Choose Per Base URL (Host) to merge store views sharing a domain, or Per Website to generate one file per website.
Note:
Per Base URL (Host) – default. Store views that share a domain merge into one llms.txt with # StoreView: sections; every catalog link carries its ?___store= code so crawlers resolve the exact view.
Per Website – legacy behaviour, one file per website.Switching scope automatically cleans up the previous scheme’s files on the next run.
Select Entity Types
Select Entity Types – Select the entity types to include in the llms.txt file.
– CMS Page
– Product
– Category


- CMS Page
– CMS Page: Enable or disable inclusion.
– Additional Page Content Fields: Select attributes (Description, Meta Title, etc.)
– Exclude CMS Pages: Add page titles to skip.
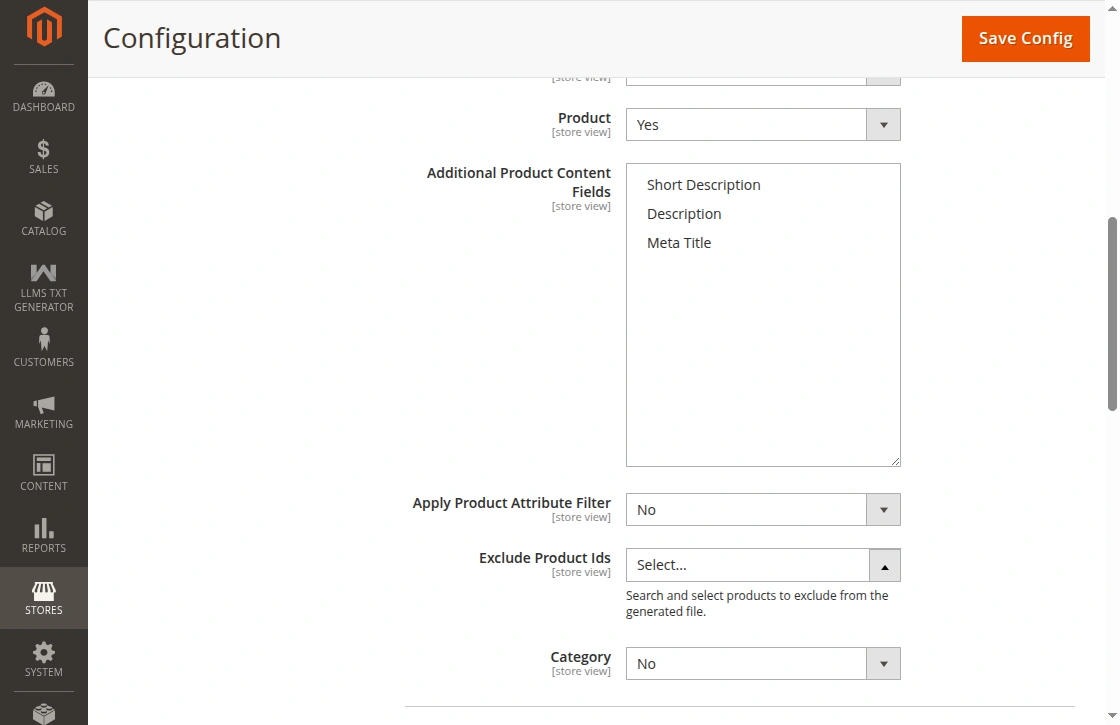
- Product:
– Product: Enable or disable including the product.
– Additional Product Content Fields: Choose fields such as Description, Short Description, or Meta Title.
– Apply Product Attribute Filter: Enable this option to filter products using selected attributes. When enabled, the file includes only matching products.
– Product Attributes Filter: Select an attribute and its value to filter products. The system includes only products that match this selection.
– Exclude Product IDs: Search and select products to exclude from the generated file.
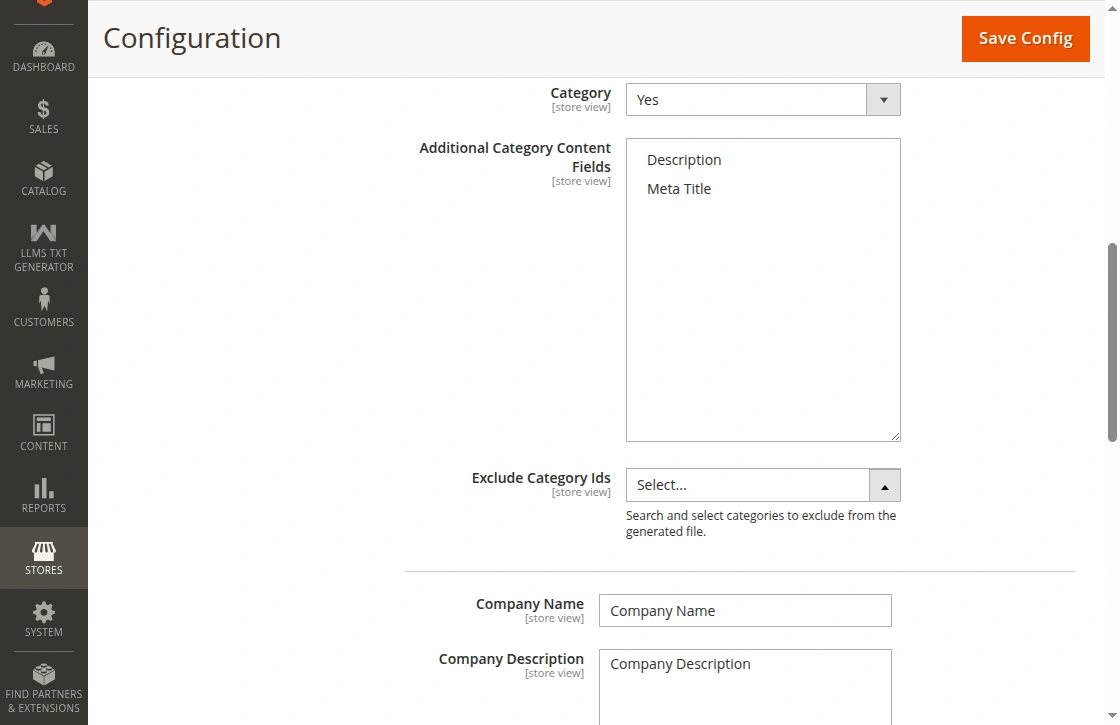
- Category:
– Category: Enable or disable, including the category.
– Additional Category Content Fields: Choose the attributes.
– Exclude Category IDs: Search and select categories to exclude from the generated file.

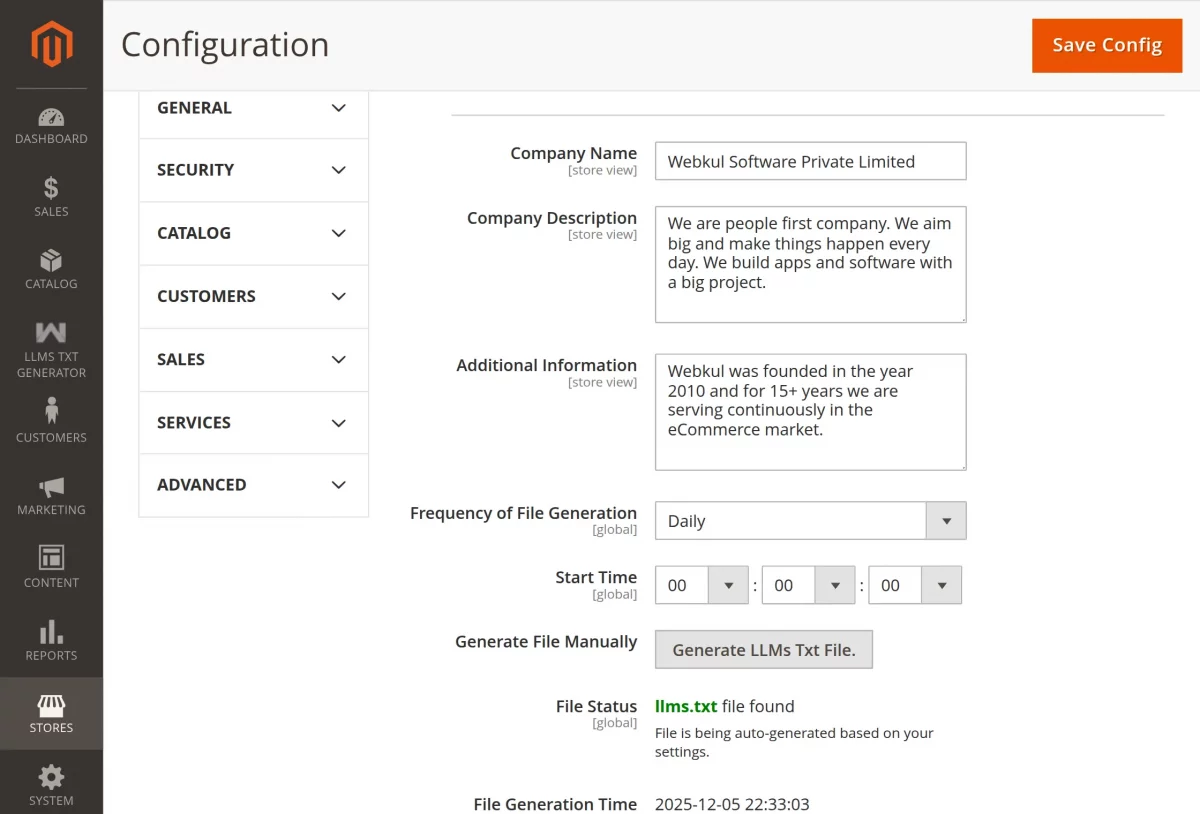
- Company Name – Field to enter the Company Name
- Company Description – Field to enter the company description.
- Additional Information – Field to add any other additional information.
Scrolling down further, Admin gets the Cron settings for generating the llms.txt file as per image below,

The following cron settings are available,
- Frequency of File Generation – Set the frequency of file generation as Daily, Weekly or Monthly.
- Start Time – Fix the Start time for file generation.
- Generate File Manually – Click here to generate the file manually.
- File Status – Check the status of the generated file and view it.
- File Generation Time – Last, File Generation Time
AI Crawler Analytics Dashboard
The AI Crawler Analytics Dashboard helps you track AI crawler activity on your store. It also helps you measure content visibility and discovery trends.
As a result, you can better understand how AI systems interact with your website.

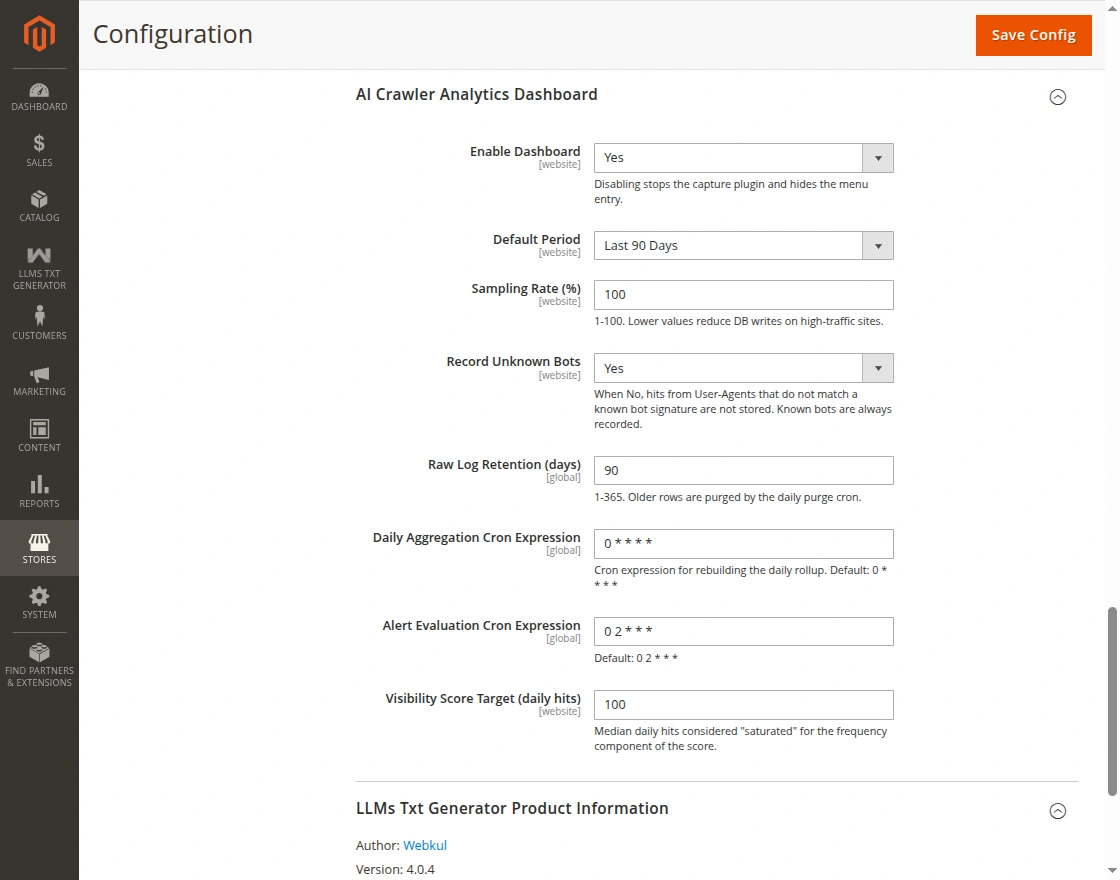
Dashboard Settings:
- Enable Dashboard: Enable or disable the AI Crawler Analytics Dashboard. When you disable this option, the system stops collecting analytics data. Additionally, it removes the dashboard menu from the Admin panel.
- Default Period: Select the default reporting period displayed when users open the dashboard. Therefore, administrators can review data without applying filters manually.
- Sampling Rate (%): Define the percentage of crawl requests that the system records. A lower value reduces database writes. Consequently, it helps improve performance on high-traffic stores.
- Record Unknown Bots: Use this toggle to filter crawl logs. Turn it off to ignore requests from unknown user-agents. This keeps dashboard charts clean.
- Raw Log Retention (Days): Specify how long the system stores raw crawl logs. After the retention period expires, the system removes outdated records automatically.
- Daily Aggregation Cron Expression: Configure the cron schedule used to aggregate crawl data. Furthermore, aggregation improves reporting speed and dashboard performance.
- Alert Evaluation Cron Expression: Configure the cron schedule used to evaluate alerts and monitoring rules. Therefore, the system can identify important changes on time.
- Visibility Score Target (Daily Hits): Set the target number of daily crawler hits used for visibility calculations. The dashboard uses this value as a performance benchmark.
The admin clicks the Save Config button to save the settings.
To access the dashboard, navigate to:
LLMs Txt Generator > AI Crawler Analytics
Dashboard Overview
The dashboard contains several sections. Each section highlights a different aspect of crawl activity and file performance.
Therefore, administrators can quickly identify trends and opportunities.
Period and Store Filter
The control bar appears at the top of the dashboard. Use it to select a reporting period and store scope.
Available periods include:
- Last 24 Hours
- Last 7 Days
- Last 30 Days
- Last 90 Days
- Custom Date Range
Additionally, you can choose a specific website or store view. As a result, all dashboard widgets update automatically.
Headline KPI Cards
The dashboard displays five key performance indicators. These metrics provide a quick overview of crawl activity. The available KPIs include:
- Total AI Visits
- Active AI Bots
- URLs Discovered
- llms.txt Score
- Blocked Requests
Furthermore, each card displays a trend comparison against the previous period. Therefore, you can identify growth or decline immediately.


llms.txt Visibility Score
The visibility score measures how discoverable your llms.txt file is. The dashboard displays the score on a scale from 0 to 100.
Additionally, a visual gauge shows the overall result. Several factors contribute to this score:
- Content Coverage
- Bot Accessibility
- Structure Quality
- URL Completeness
- Markdown Format
- Robots.txt Synchronization

Crawler Timeline and Frequency
This section displays crawl activity over time. The chart helps you understand how crawler activity changes. You can track:
- Total Visits
- Unique Bots
- URLs Discovered
Additionally, you can switch between 7-day, 14-day, and 31-day views. Therefore, it becomes easier to identify spikes and traffic trends.
Bot Distribution
The Bot Distribution chart shows how crawl traffic is divided among AI bots. A donut chart displays the percentage share of each crawler.
Additionally, a ranked legend provides more detail. As a result, you can quickly identify dominant crawlers.
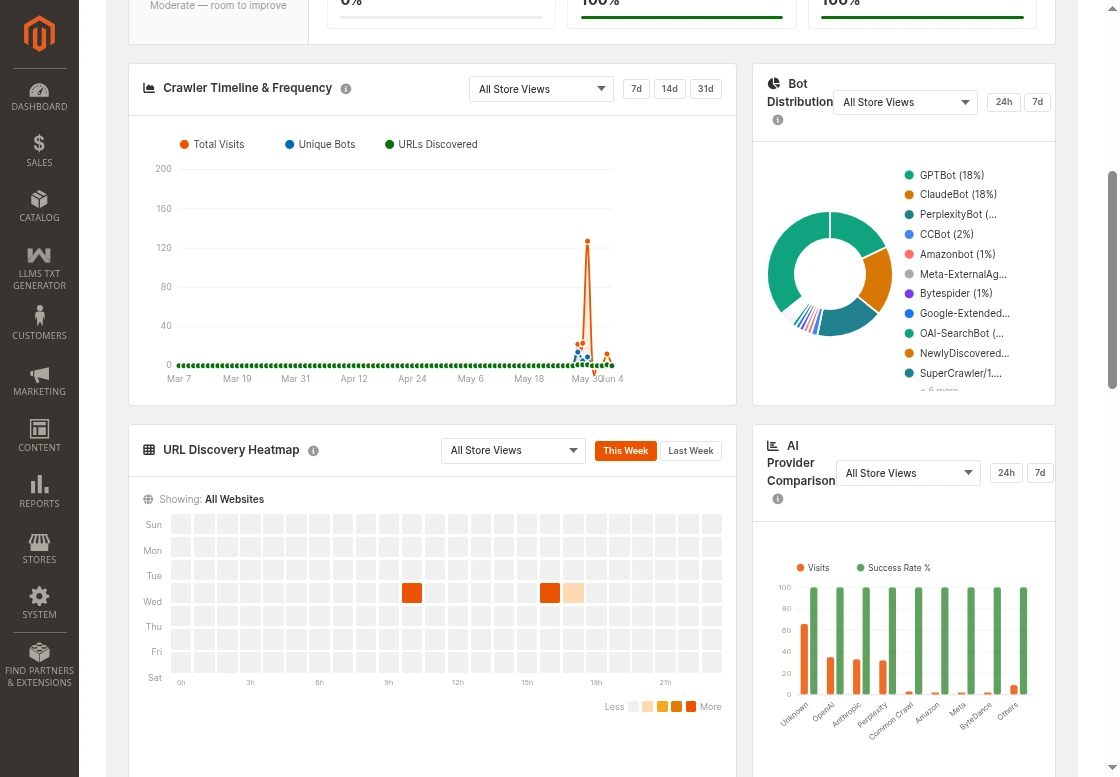
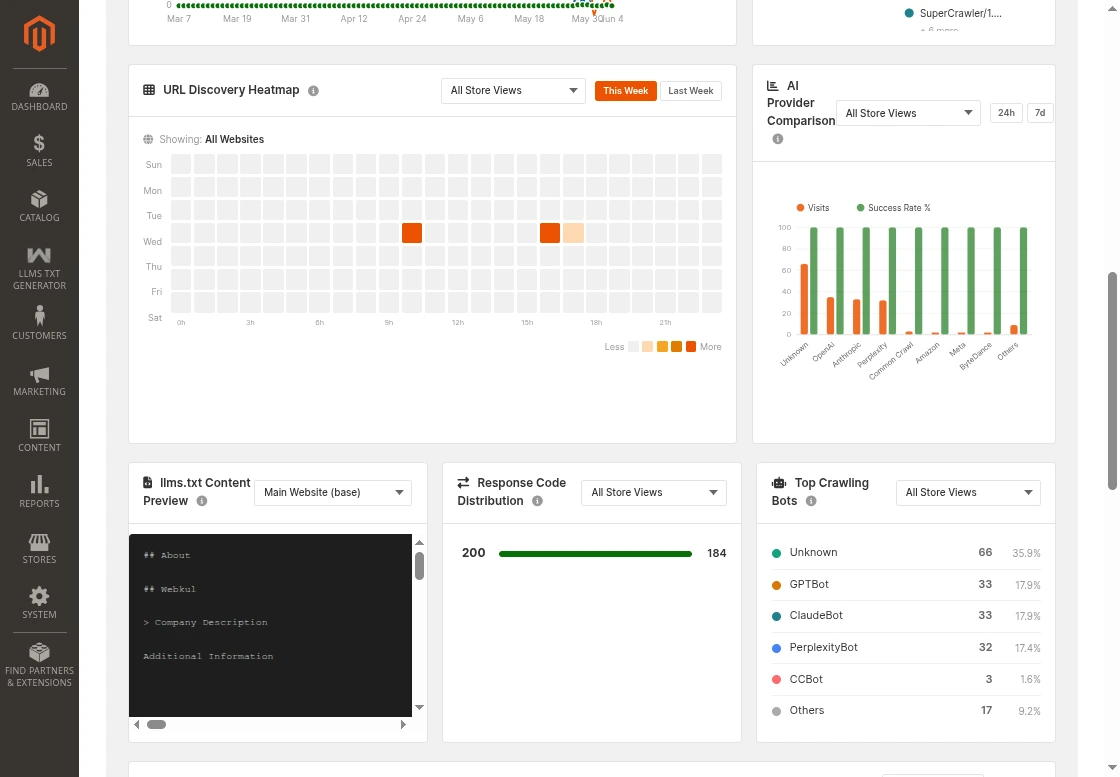
URL Discovery Heatmap
The heatmap shows when AI crawlers visit your website. It displays activity by weekday and hour. Darker cells represent higher crawl activity.
Furthermore, you can switch between the current week and the previous week. Therefore, you can identify peak crawling periods.
AI Provider Comparison
This section compares activity across AI providers. A grouped bar chart displays:
- Visit Volume
- Success Rate
Supported providers include OpenAI, Anthropic, Perplexity, and others. As a result, you can evaluate engagement levels across providers.
llms.txt Content Preview
The Content Preview widget renders the complete published file without any truncation. Click the size badges to toggle between the compact index and the full companion file.
The host selector displays merged website titles. A loading indicator shows while files
switch.
Response Code Distribution
This section summarizes the HTTP responses received by AI crawlers. It separates successful responses from errors. As a result, you can confirm that your file remains accessible.
Additionally, response trends help identify delivery issues quickly.
Top Crawling Bots
The dashboard ranks crawlers by visit count. The list highlights the most active AI bots. Furthermore, less active crawlers appear under the Others category.
Therefore, you can identify which bots generate the most traffic.
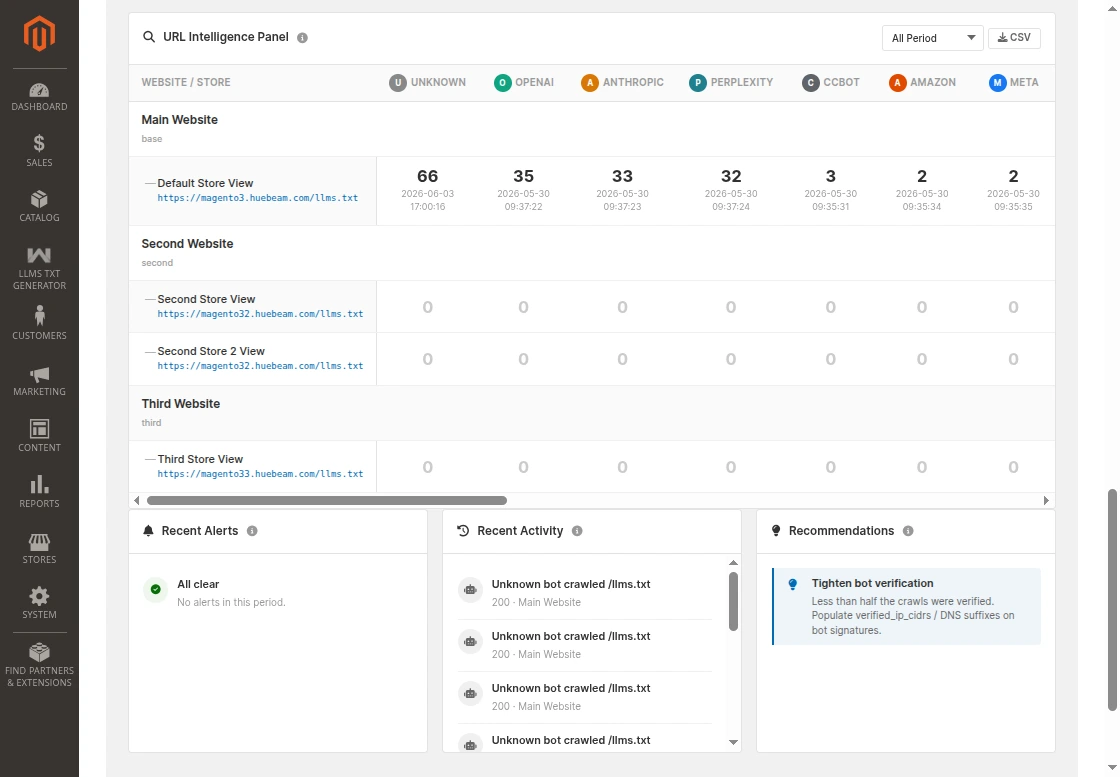
URL Intelligence Panel
The URL Intelligence Panel provides a detailed store-to-provider matrix. Each row represents a store. Each column represents an AI provider.
Additionally, each cell displays:
- Total Visits
- Last Visit Time
Every store row includes a link to its llms.txt file. Furthermore, you can export the entire table as a CSV file. The panel also includes an independent timeframe selector.
As a result, you can perform detailed analysis without affecting the main dashboard filters.
Recent Alerts
The Recent Alerts panel displays the latest notifications. The system lists alerts in chronological order. Examples include:
- Inactive AI Bots
- Newly Detected Crawlers
- Possible Bot Impersonation
When no issues exist, the dashboard displays an all-clear status.
Recent Activity
The Recent Activity feed displays the latest crawl requests. Each entry includes:
- Bot Name
- Requested Path
- Response Code
- Store View
Therefore, you can monitor crawler activity in near real time.
Recommendations
The Recommendations panel provides personalized suggestions. The system generates recommendations using collected analytics data. Examples include:
- Improve Content Coverage
- Increase URL Completeness
- Review Bot Verification Settings
As a result, you always know the next optimization step.
Condition for Product Fetching
The llms.txt file will fetch only those products that fulfil the conditions below.
- Their Visibility is set to Catalog and Search.
- Their Status is Enabled.

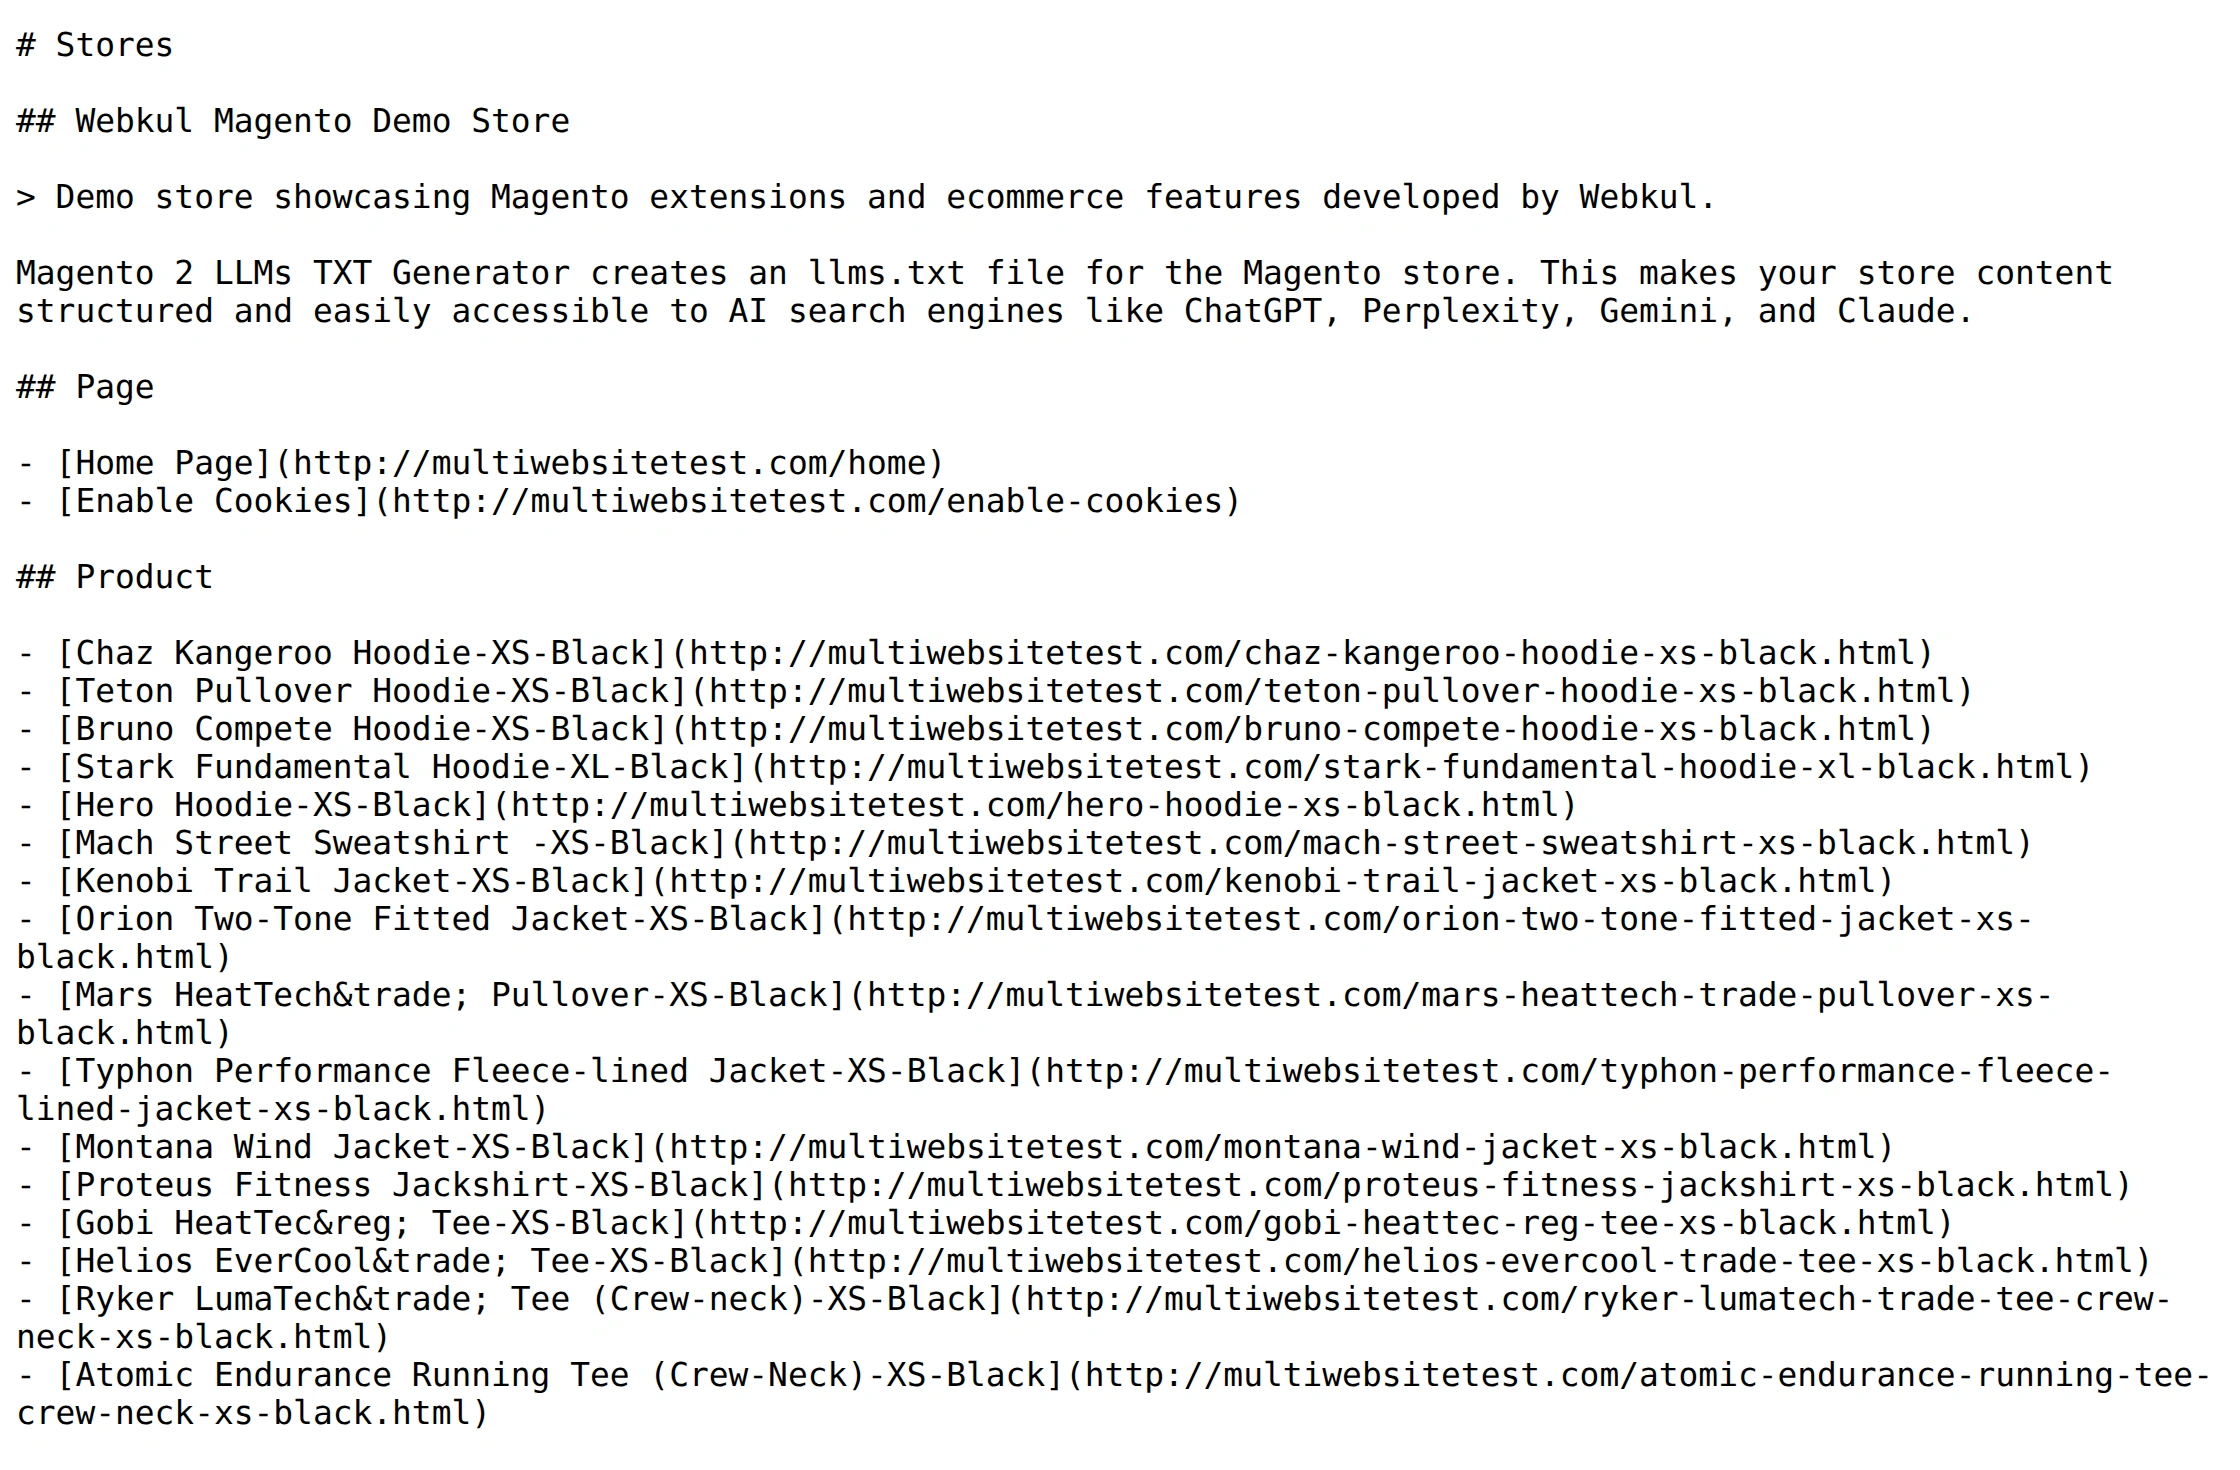
LLMs TXT File Generated
Once the admin fulfills the configuration and conditions and sets the Cron, it generates and stores the llms.txt file in the Magento directory.
Below is an example of the legacy multi-website setup. It generates a separate file for each website.
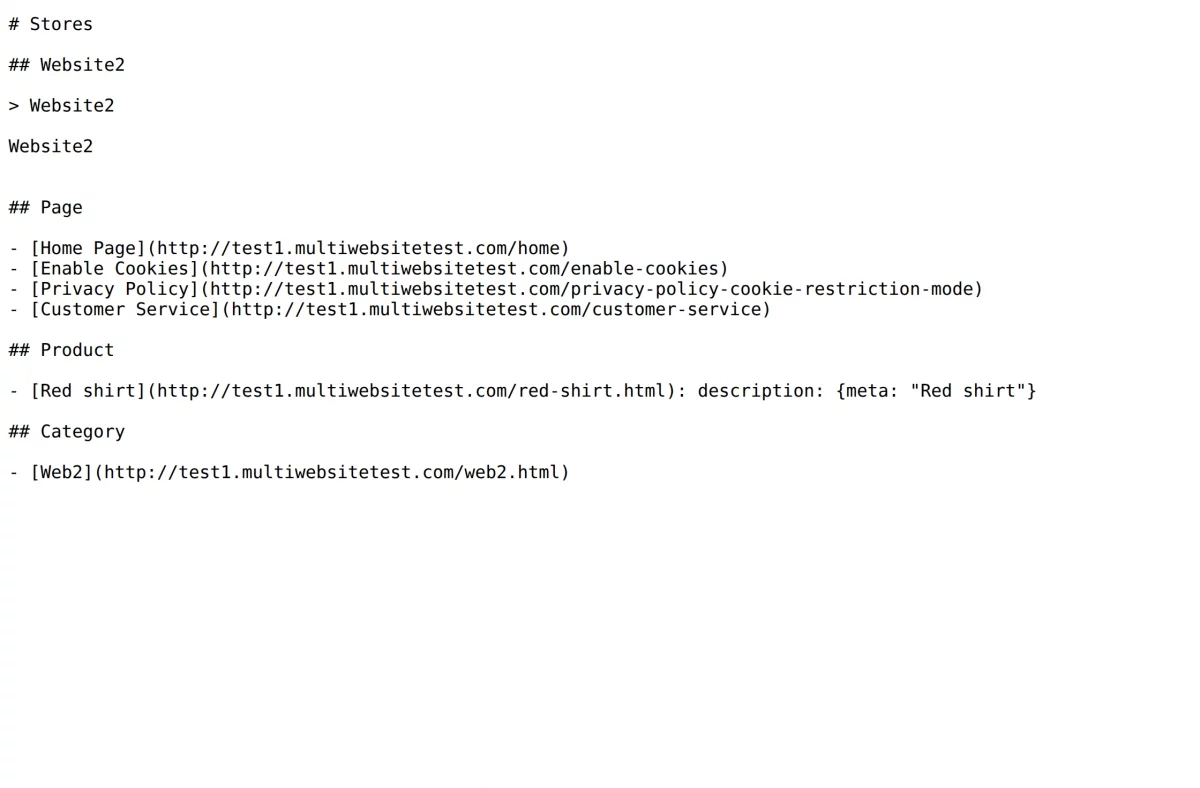
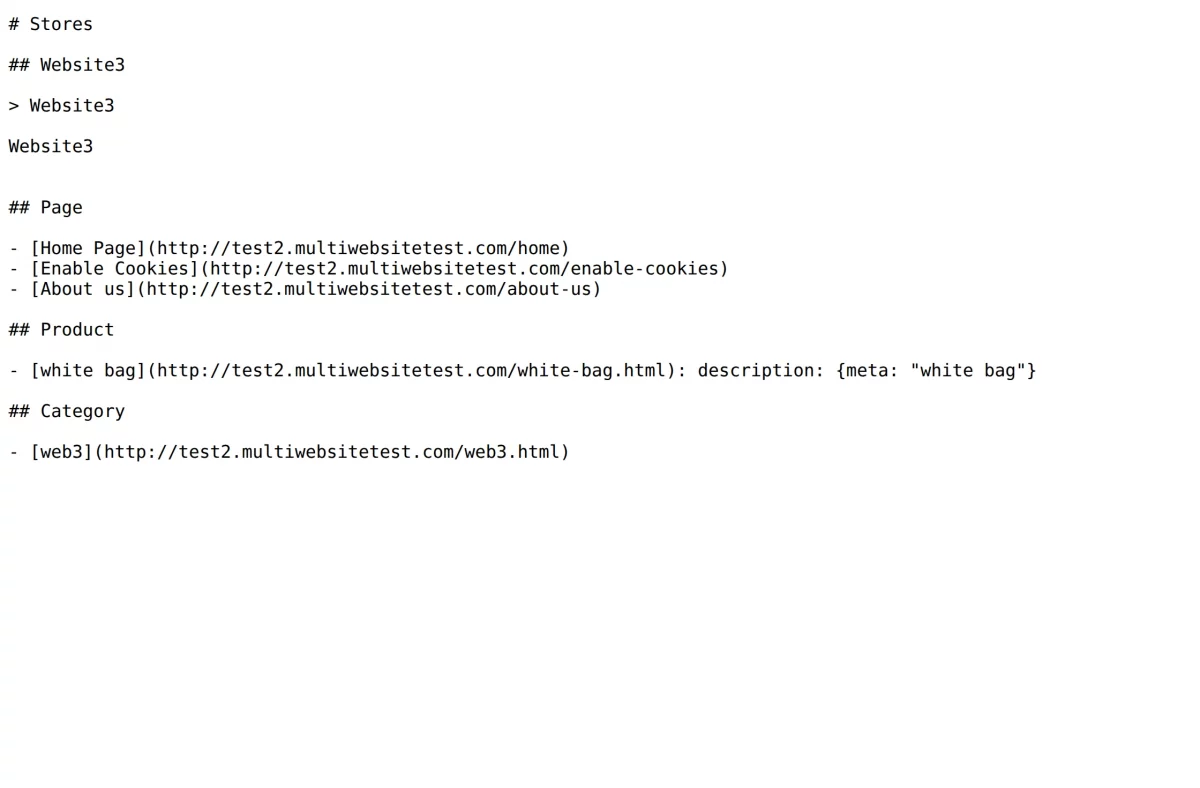
If you use the new default Generation Scope, the system merges store views sharing a domain. This creates a single file with store view headers.


Support
So, that is much about the Magento 2 LLMs TXT Generator extension.
If you have any more queries, please feel free to reach out ot us at support@webkul.com or create a ticket.