Guide for Magento 2 ChatGPT AI Extension
Table of Content
Live Demo
Magento 2 AI Content Generator Extension enables store admins to integrate OpenAI, Google Gemini AI, Anthropic, OpenRouter, Cerebras, DeepSeek, and Pre-configured into their online stores.
The admin can now create content for the website’s product pages automatically with its help.
The store admin can also perform mass action to create content for bulk products. The content gets created for long and short descriptions according to the topic search for the product.
The store admin can also generate the description using the page builder by clicking on fill the content with Magento 2 AI content Generator.
Now if you want to generate an AI concise product review summary on the product pages you can check the Magento 2 AI Product Review Summary Extension.
Also, you can check the Adobe Commerce AI reporting dashboard that give you an upper hand on enhanced data analysis within the Magento 2 store.
You can also check our complete Magento 2 extensions.
In the video below, check how the Magento 2 AI content Generator functionality works:
Check in the below video, how to create a description using Page Builder:
The video mentioned below shows an overview of how to create Precise content using the Prompt Template:
Features – Magento 2 AI content Generator Extension
- Generate short descriptions, full descriptions, and SEO content for products using AI.
- Seamless integration with Page Builder, including a “Fill Description with AI Content Generator” option.
- Create content using custom prompts via textarea or Page Builder.
- The admin can even add the description even if the page builder is disabled.
- Bulk generation of short and full descriptions for multiple products.
- Select specific product attributes to generate attribute-based content in bulk.
- Use selected attributes to populate short descriptions and full descriptions via mass actions.
- Enable or disable the module as needed.
- Multilingual support for global store management.
- Manage multiple AI providers (OpenAI, Gemini AI, Anthropic, OpenRouter, Cerebras, DeepSeek).
- Create, edit, and delete pre-configured prompt templates.
- Design prompt templates for products, categories, and CMS pages.
- Generate category descriptions and SEO content using AI providers or predefined templates.
- Add and update CMS page descriptions and SEO content via mass actions.
- The admin can generate CMS content using AI even when Page Builder is disabled.
- Use Page Builder to generate CMS descriptions with a single click via the AI content generator.
- Track product and category generation status and retry failed jobs
- Supports OpenAI-compatible LLMs for highly contextual and intelligent content generation.
Installation
The installation is quite simple, just like the standard Magento 2 extensions.
#Download Module
Firstly, you need to log in to the Webkul Store, go to My Account>My Purchased Products section, verify, and then download and extract the contents of this zip folder on the system.
#Upload Folder
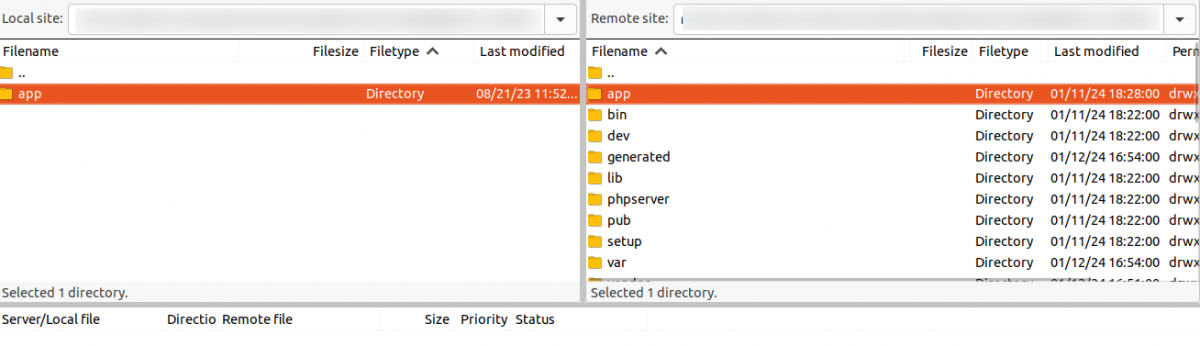
Once the module zip extracts, follow the path src>app and copy the app folder into the Magento 2 root directory on the server, as shown below:

#3 Run Commands
composer require symfony/ai-platform
php bin/magento setup:upgrade
php bin/magento setup:di:compile
php bin/magento setup:static-content:deploy
php bin/magento indexer:reindex
php bin/magento cache:flush
Language Translation
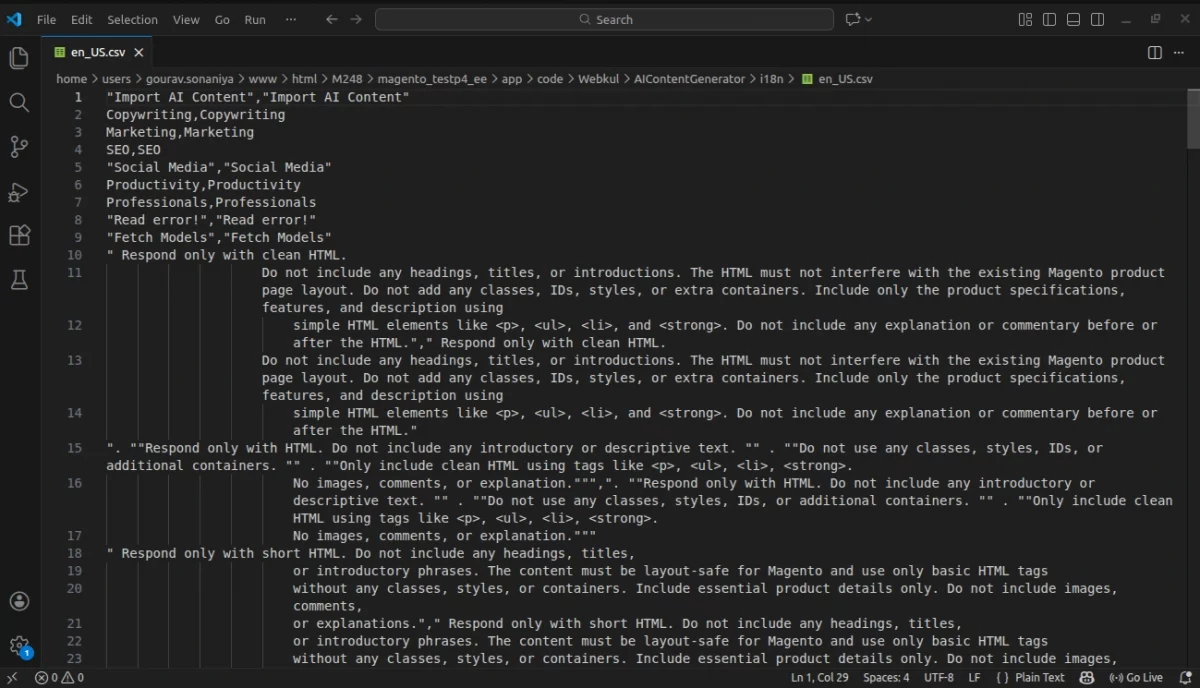
For translating the module language, navigate through the app/code/Webkul/AIContentGenerator /i18n and edit the en_US.csv file.
Thereafter, rename the CSV as “en_SA.csv” and translate all right-side content after the comma in the Arabic language. After editing the CSV, save it.

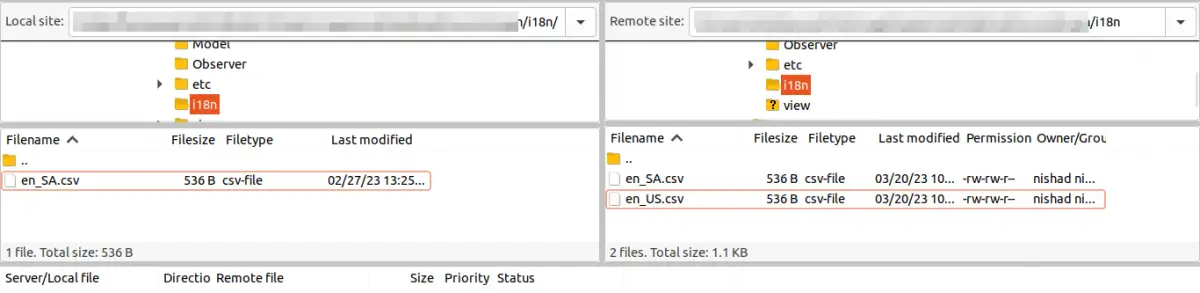
Now, upload it to the path app/code/Webkul/AIContentGenerator /i18n where the installation of Magento 2 is on the server.
Magento 2 AI content Generator Extension will support Arabic translation and both RTL and LTR languages.
The user can edit the CSV like the image below.

Engage and hire Magento developers to solely concentrate on your personalized e-commerce projects for a unique experience
Module License Verification & Activation
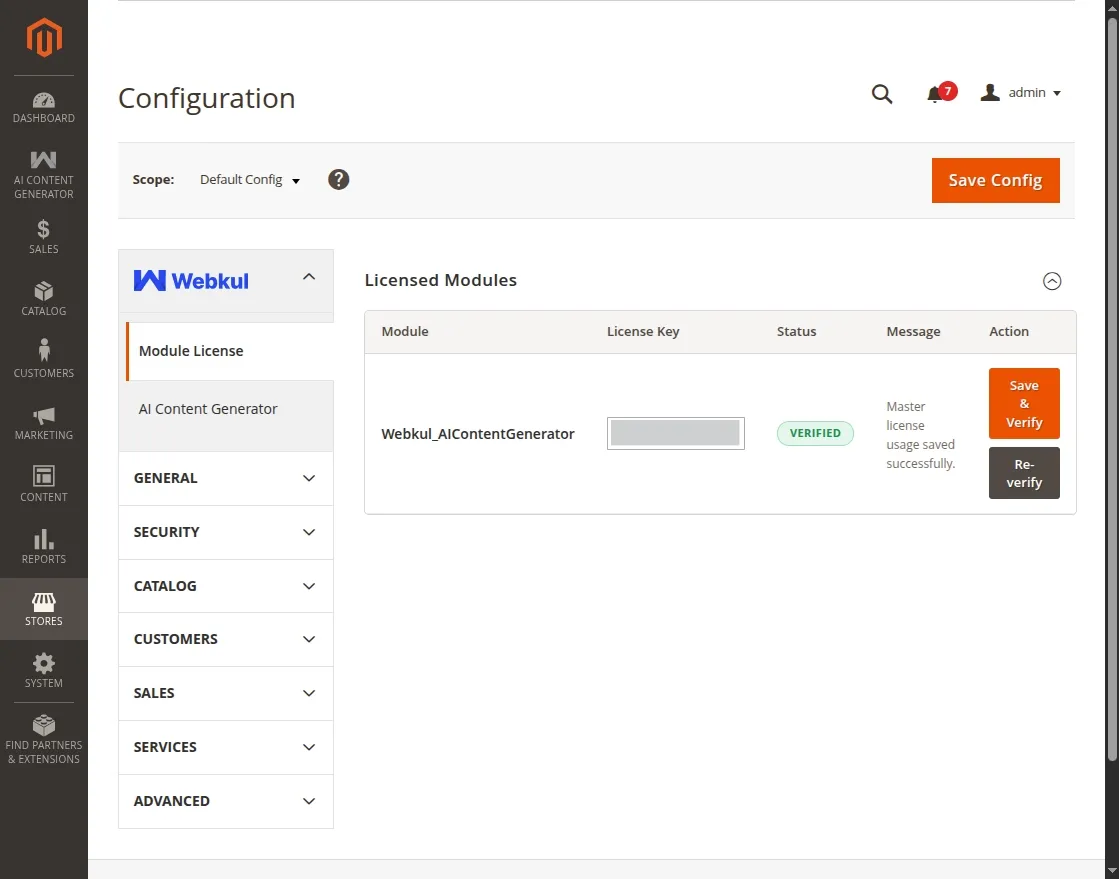
The AI Content Generator configurations are secured through centralized Webkul license verification. After installation, the configurations under AI Content Generator remain locked or hidden until the module license is successfully verified through the Webkul_Base management panel.

Verify Your License Key
- Log in to your Magento Admin Panel.
- Navigate to: Stores → Configuration → Webkul → Module License
- Under the Licensed Modules section, locate Webkul_AIContentGenerator.
- Enter your purchased License Key in the input field.
- Click the Verify button. The system validates the license key with Webkul’s centralized licensing service.
- Once the license is successfully verified, the module status is displayed as Verified.
After successful verification, the AI Content Generator configuration sections become available for setup and use.
Admin Configuration – Magento 2 AI content Generator Extension
Create Custom Prompt Templates for Content to be Generated – Custom prompt templates can be used to inform (OpenAI, Gemini, Anthropic, OpenRouter, Cerebras, DeepSeek)
and pre-configured to generate particular required content as required.
The admin can create prompt templates for the product, category, and CMS descriptions.
To create the custom prompt templates, the admin will navigate to the side panel option and tap on the AI Content generator menu option.
This brings up the list of already created templates if any. The admin can edit and delete the prompt templates as required.

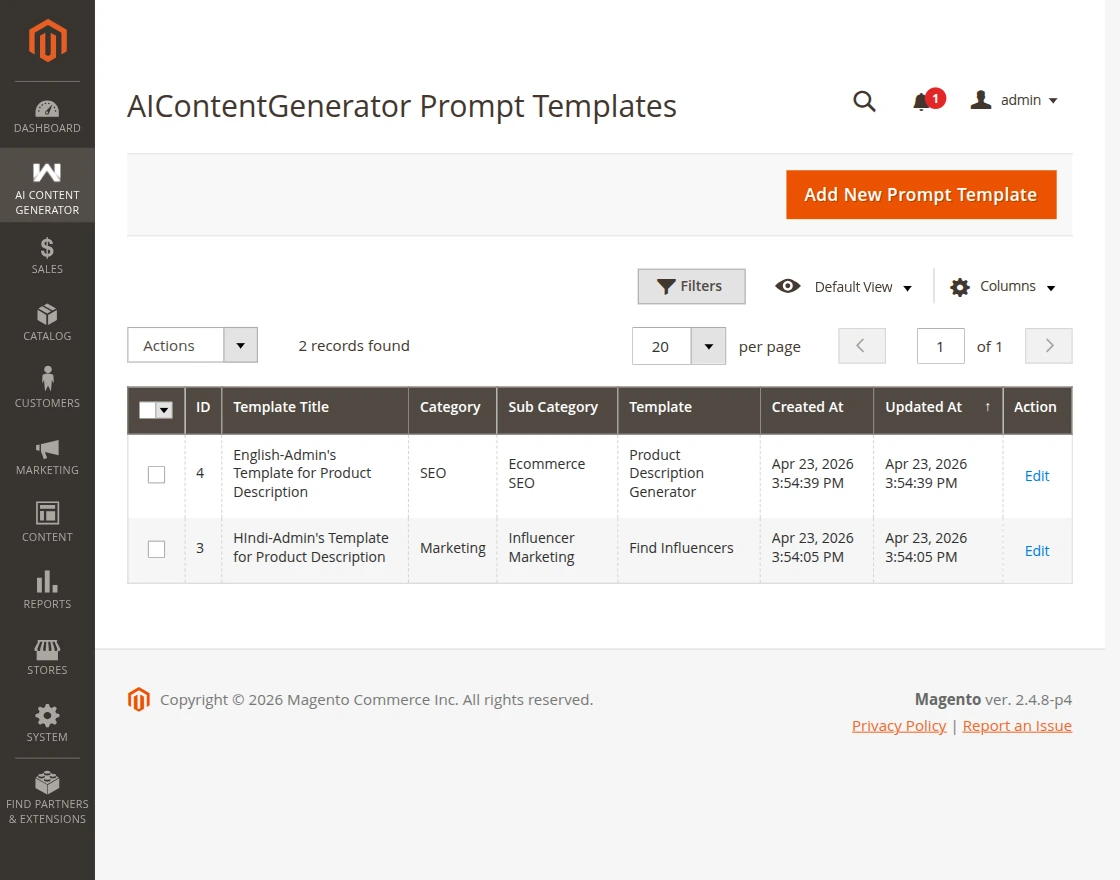
Tapping the Add New Prompt Template button brings up the below section.
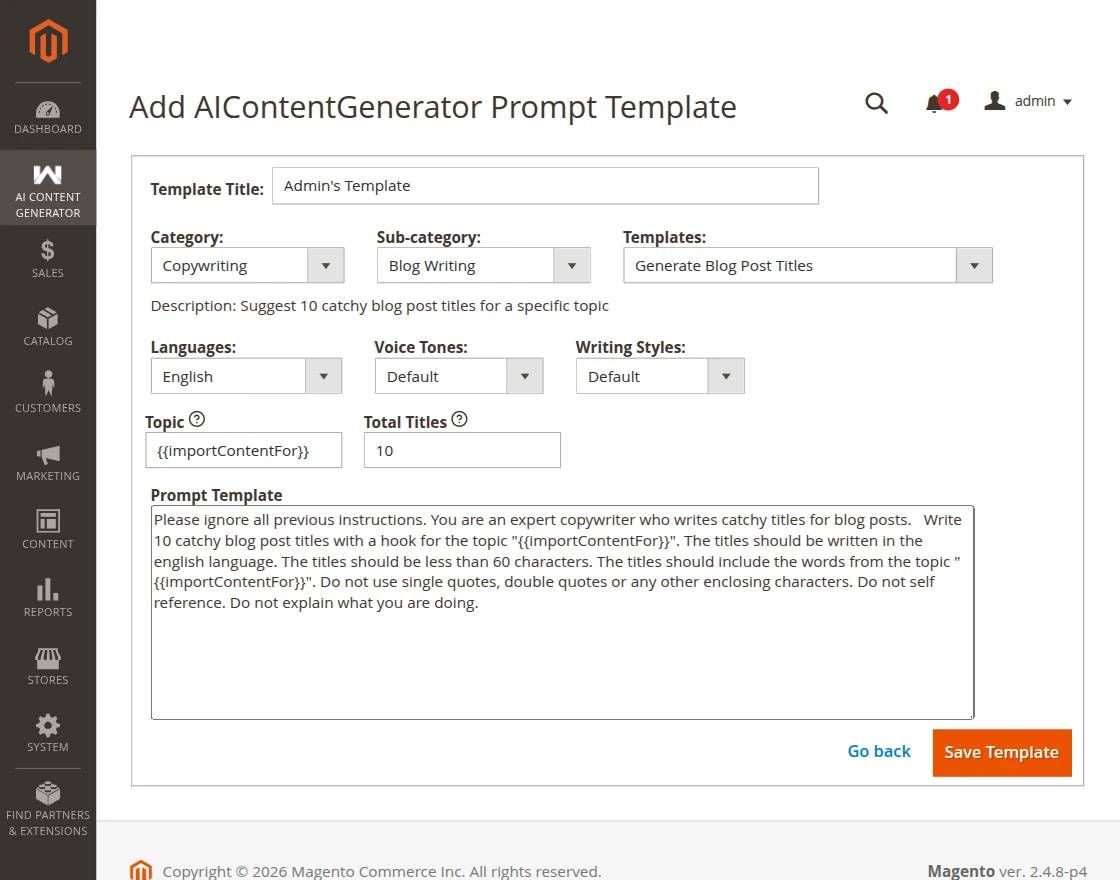
Here, the admin will –
- Enter the custom template title.
- Choose the category, sub-category, and template as required.
- The rest of the sections will be automatically populated.
Lastly, tap the Save Template button to save the template as required.
Initial Configuration Settings
The admin will navigate through Stores>Configuration>AI Content Generator to make a general configuration.
General Settings
Configure the basic module and AI server settings.
- Enable Module: Enable this option to activate the AI Content Generator module.
- AI Model Type:Select the AI configuration method to use for content generation. Choose Pre Configured Model to connect to a self-hosted or dedicated AI server, or LLM Provider to configure a supported LLM provider.
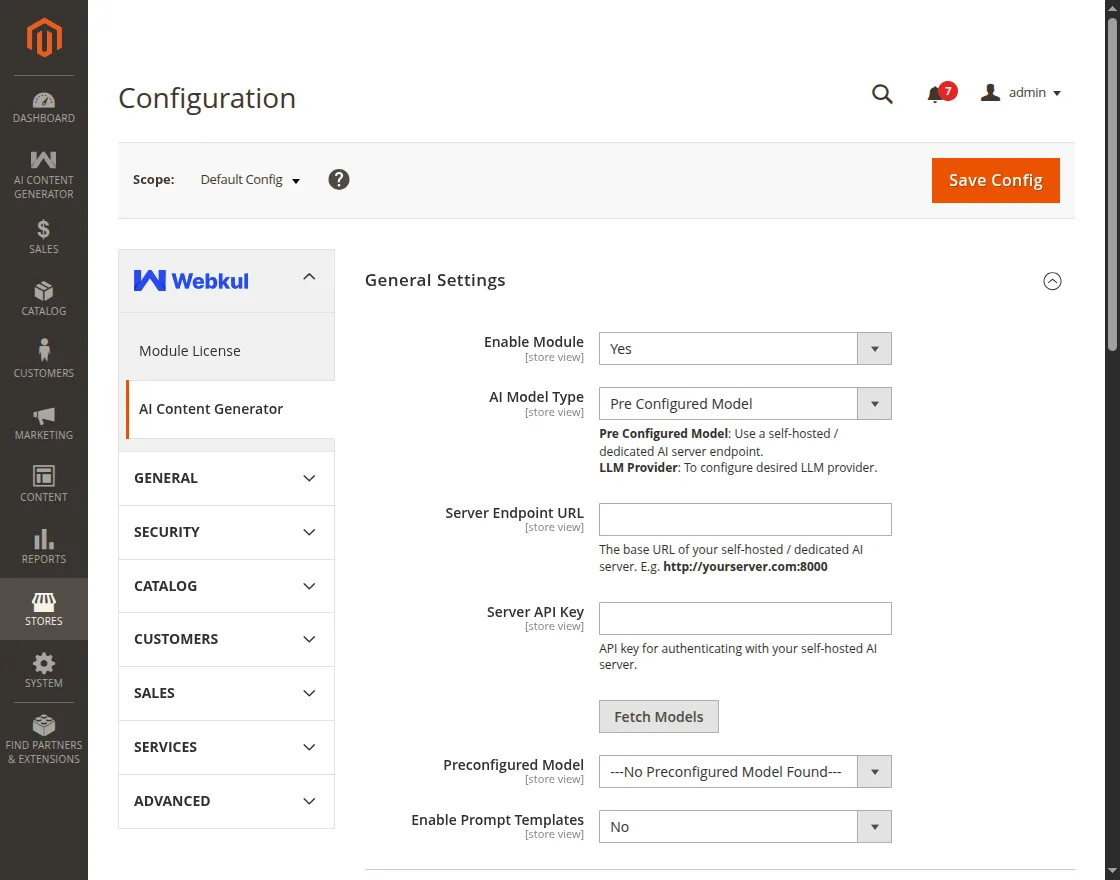
Pre Configured Model
When you select Pre Configured Model, configure the connection to your self-hosted or dedicated AI server.
- Server Endpoint URL: Enter the base URL of your self-hosted or dedicated AI server. For example, http://yourserver.com:8000.
- Server API Key: Enter the API key required to authenticate requests with your AI server.
- Fetch Models: Click Fetch Models to retrieve the AI models available from the configured server.
- Preconfigured Model Select the AI model to use for content generation from the models retrieved from the configured server.
LLM Provider
When you select LLM Provider, configure the LLM provider, API credentials, and content generation model.
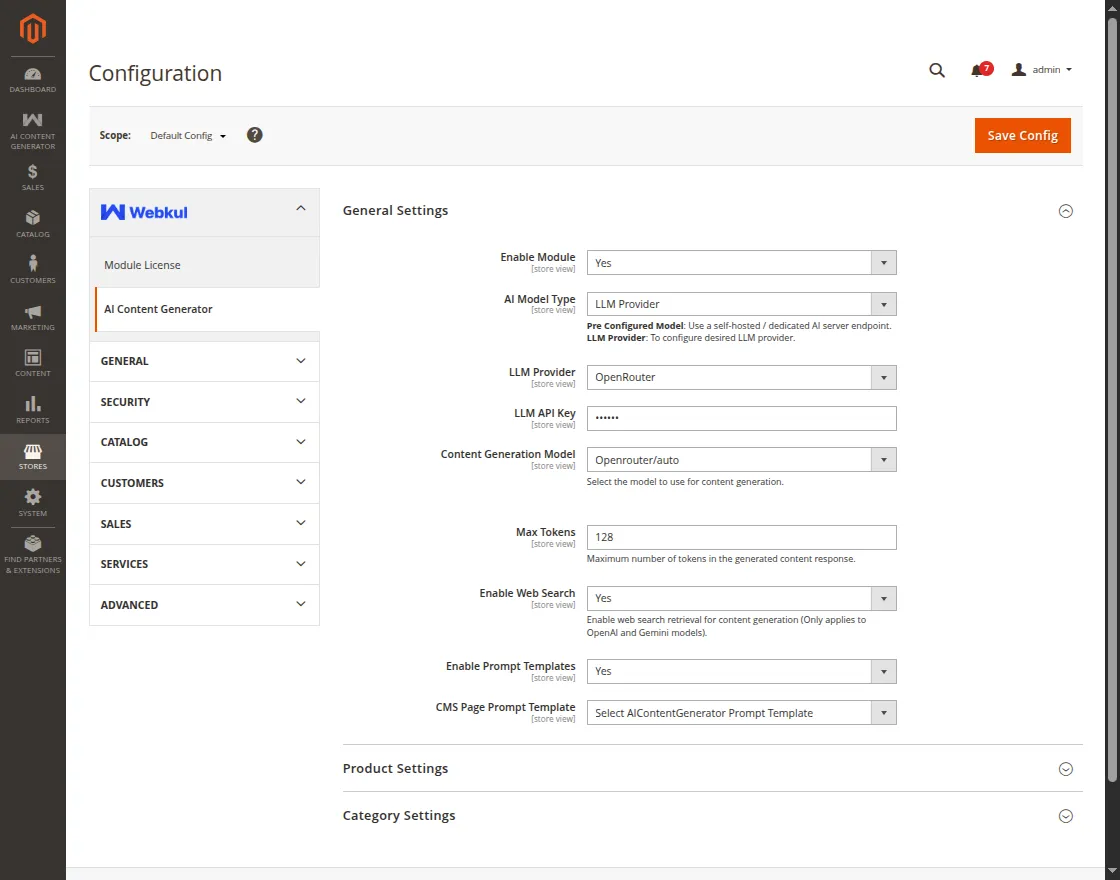
- LLM Provider: Select the LLM provider to use for content generation.
- LLM API Key: Enter the API key required to authenticate requests with the selected LLM provider.
- Content Generation Model: Select the AI model to use for content generation.
- Max Tokens: Set the maximum number of tokens the AI can generate in a single response.
Note- You can also set up your own cloud-based LLM server. For detailed instructions, please refer to the following guide: AI Models Server Installation Guide
Web Search and Prompt Templates
- Enable Web Search: Enable web search retrieval to provide additional web-based information as context during content generation. This option applies only to OpenAI and Gemini models.
- Enable Prompt Templates: Enable this option to use configured prompt templates for AI content generation.
- CMS Page Prompt Template: Select the prompt template to use when generating AI content for CMS pages.
Product Settings
The Product Settings section configures prompt template mappings and monitors product page content generation progress.
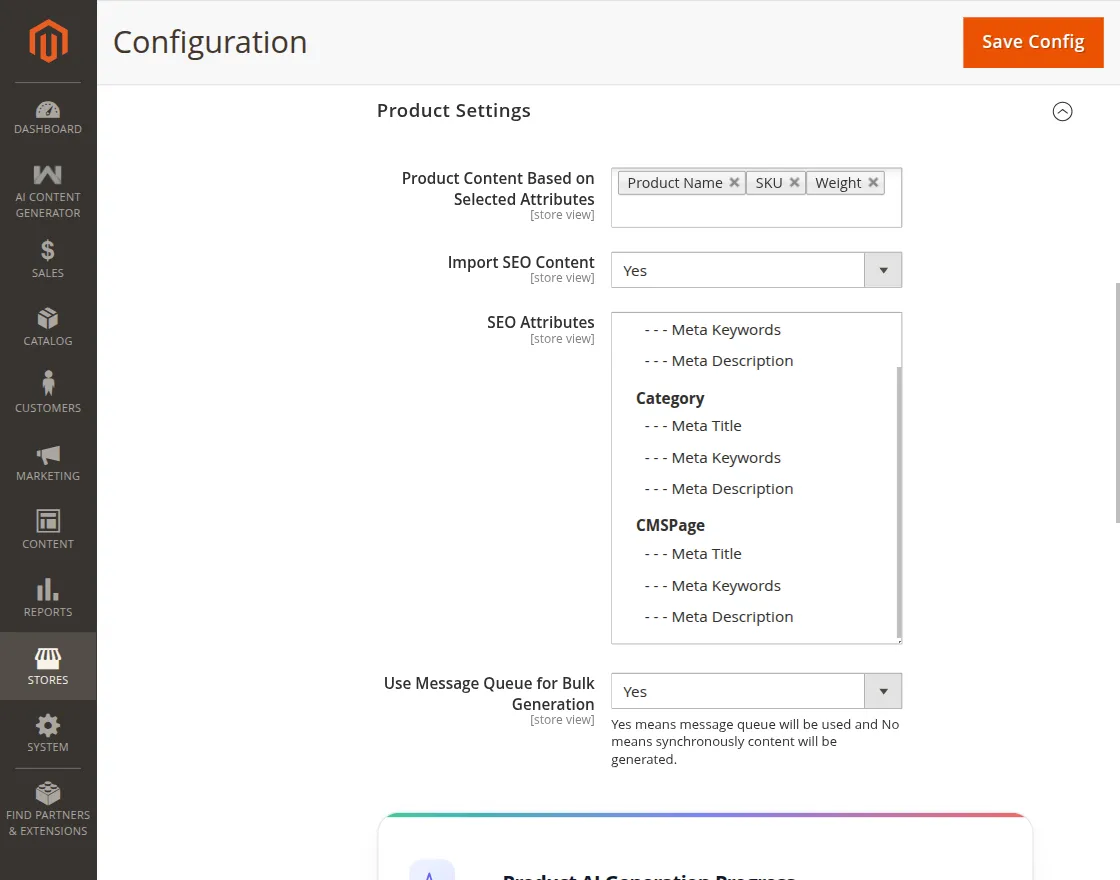
Product Content Based on Selected Attributes: Select the product attributes that will be provided to the AI as context during content generation. The selected attributes help the AI generate content based on the available product information.
SEO Content
- Import SEO Content: Enable this option to generate and import SEO content for products.
- SEO Attributes: Select the SEO attributes, such as Meta Title, Meta Keywords, and Meta Description, to generate or import.
Use Message Queue for Bulk Generation:
This option determines how the system processes bulk content generation.
- Yes: Bulk content will be generated using the Message Queue. Start the required queue consumers using the following commands:
php bin/magento queue:consumers:start webkulChatgptCategoryMassActionConsumer &
php bin/magento queue:consumers:start webkulChatgptProductMassActionConsumer &
- No: Select this option to generate bulk content synchronously without the Message Queue.
Note: Select No to generate content synchronously and keep the browser open until completion. Select Yes to process generation asynchronously in the background using the Magento Message Queue.
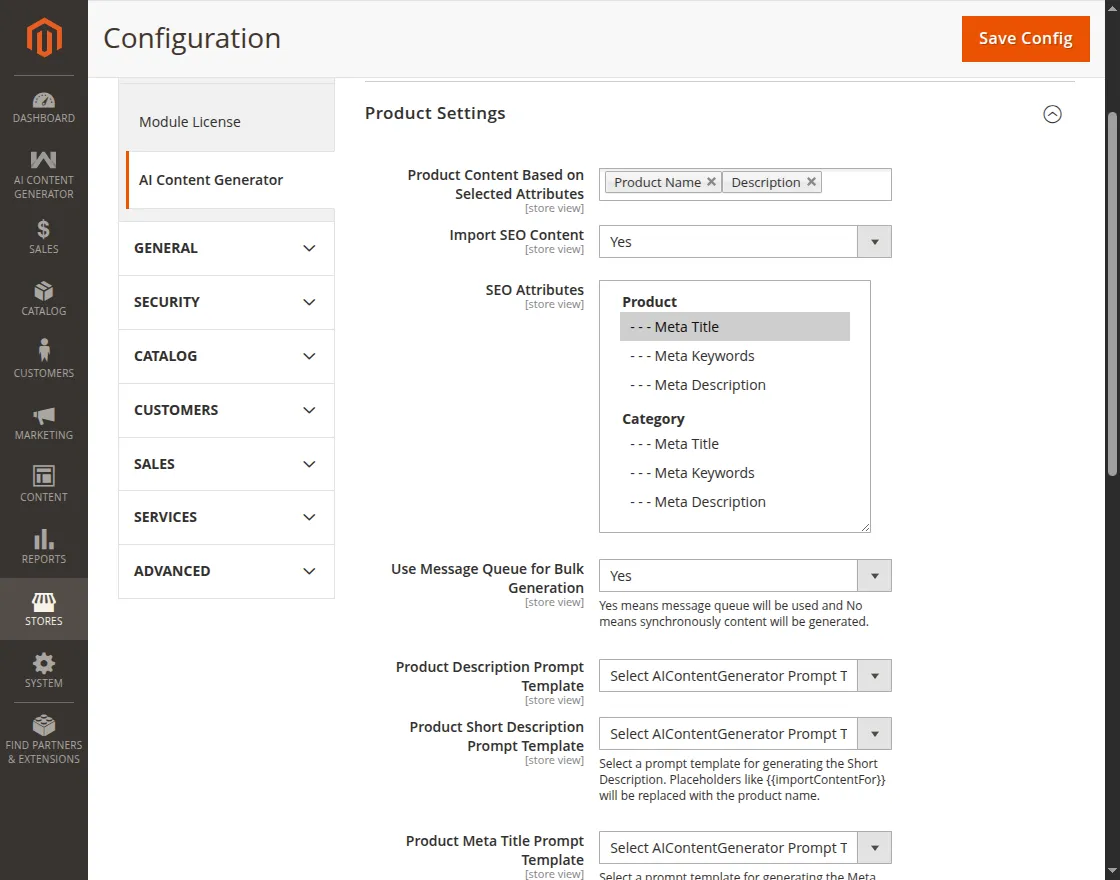
Product Prompt Templates
- Product Description Prompt Template: Select the prompt template to use for generating the product description.
- Product Short Description Prompt Template: Select the prompt template to use for generating the product short description. The {{importContentFor}} placeholder is replaced with the product name.
- Product Meta Title Prompt Template: Select the prompt template to use for generating the product Meta Title. The {{importContentFor}} placeholder is replaced with the product name.
- Product Meta Description Prompt Template: Select the prompt template to use for generating the product Meta Description. Supports {{importContentFor}} for the product name and {{product_description}} for the generated product description.
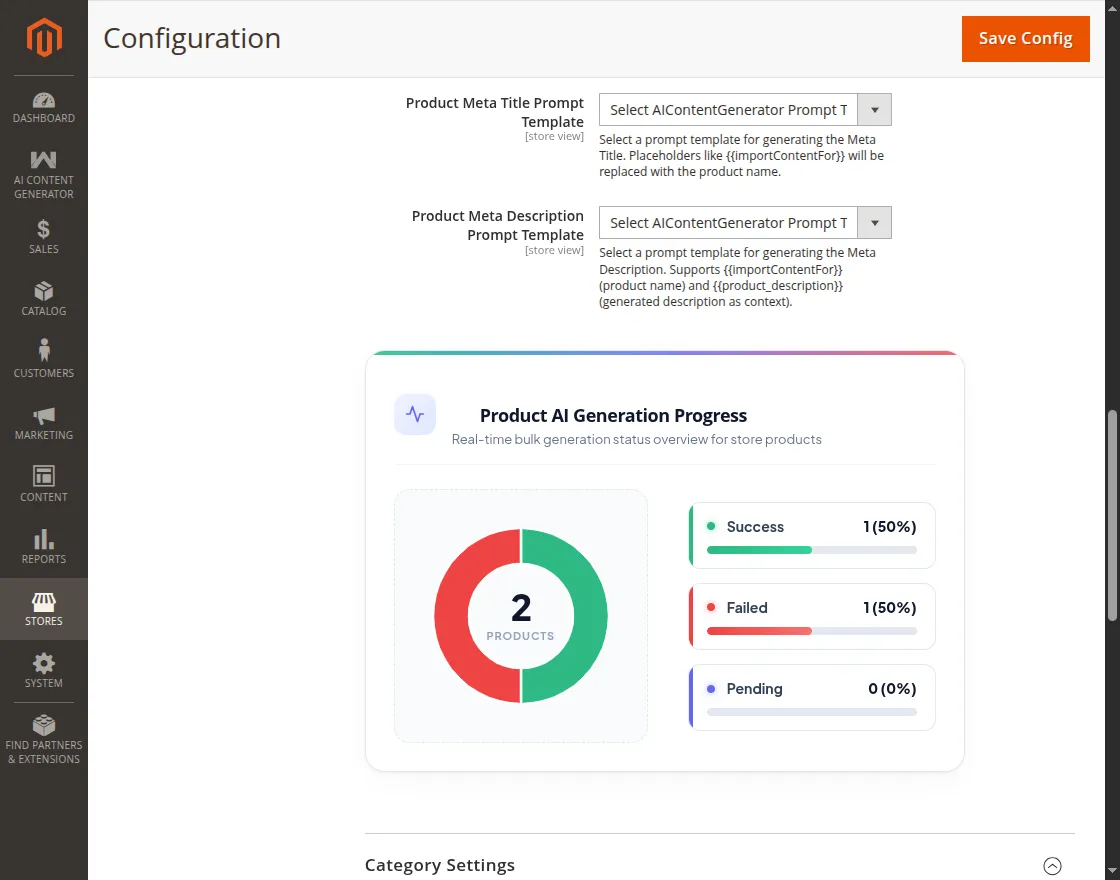
Product AI Generation Progress
The Product AI Generation Progress section provides a real-time overview of bulk content generation for store products.
- Products: Displays the total number of products included in the bulk generation process.
- Success: Shows the number and percentage of products with successfully generated content.
- Failed: Displays the number and percentage of products for which content generation failed.
- Pending: Shows the number and percentage of products awaiting processing.
Category Settings
Configure prompt templates for generating category descriptions and SEO content.
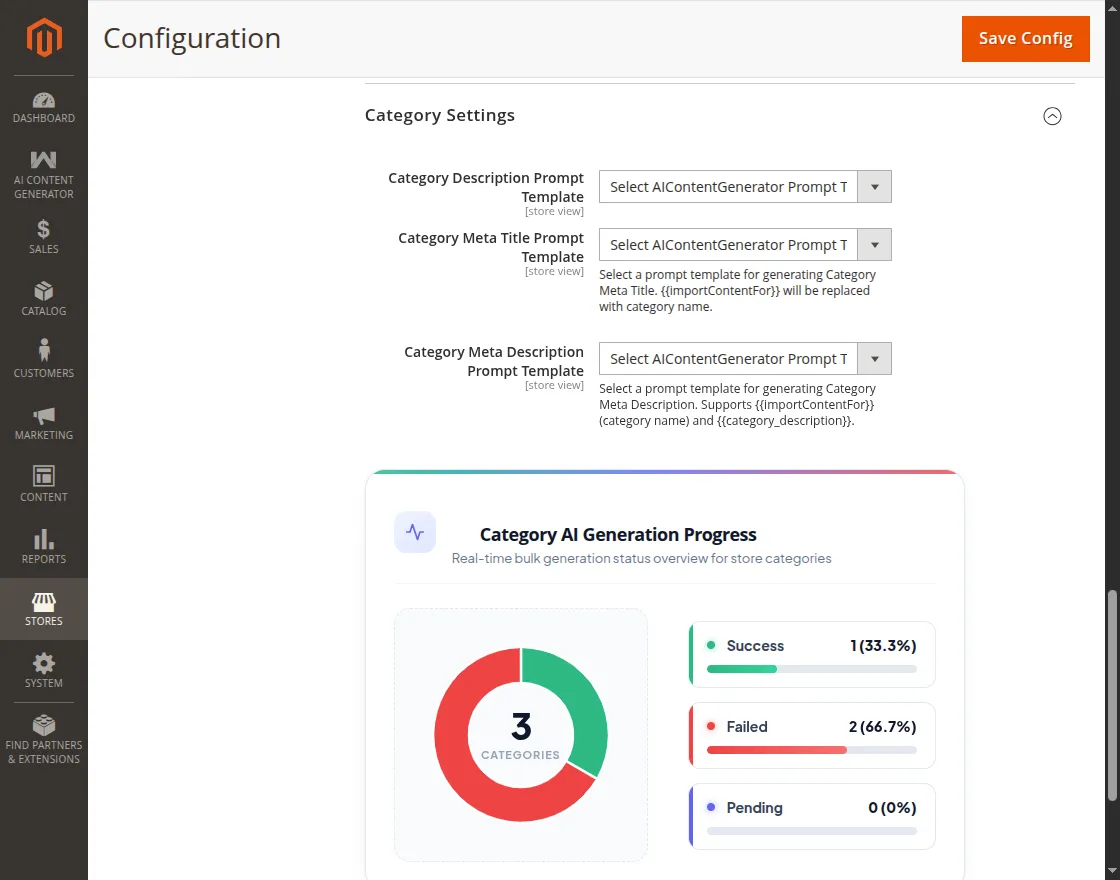
Category Prompt Templates
- Category Description Prompt Template: Select the prompt template to use for generating the category description.
- Category Meta Title Prompt Template: Select the prompt template to use for generating the category Meta Title. The {{importContentFor}} placeholder is replaced with the category name.
- Category Meta Description Prompt Template: Select the prompt template to use for generating the category Meta Description. Supports {{importContentFor}} for the category name and {{category_description}} for the generated category description.
Category AI Generation Progress
The Category AI Generation Progress section provides a real-time overview of bulk AI content generation for store categories.
- Categories: Displays the total number of categories included in the bulk generation process.
- Success: Shows the number and percentage of categories with successfully generated content.
- Failed: Displays the number and percentage of categories for which content generation failed.
- Pending: Shows the number and percentage of categories awaiting processing.
Now, the admin will save all the configurations by clicking on the Save Config button.
Also, if you want the same functionality for the Marketplace vendors where they can generate the content for their products then check Magento 2 Multi Vendor ChatGPT Content Generator Extension.
Product – AI Content Import
The admin can add a short description while creating the product through Catalog>Products>Add Product in the content section as shown in the image.

Also, you can also extract the invoice PDF data and create the orders in the store using Magento 2 AI OCR extension.
After filling in the required details the admin will have to enter the product name or the query.
The admin clicks Fill Description with Magento 2 AI Content Generator to automatically add a short description.
Likewise, the admin can add a long description for the product by clicking on the text area of the description section.
Here, the store admin clicks Fill the Description with the AI Content Generator to import the generated data.

Note: The page builder option must be enabled to use this functionality from the general configurations.
It is used to search a custom query otherwise, the product name would be taken as default to search the content.
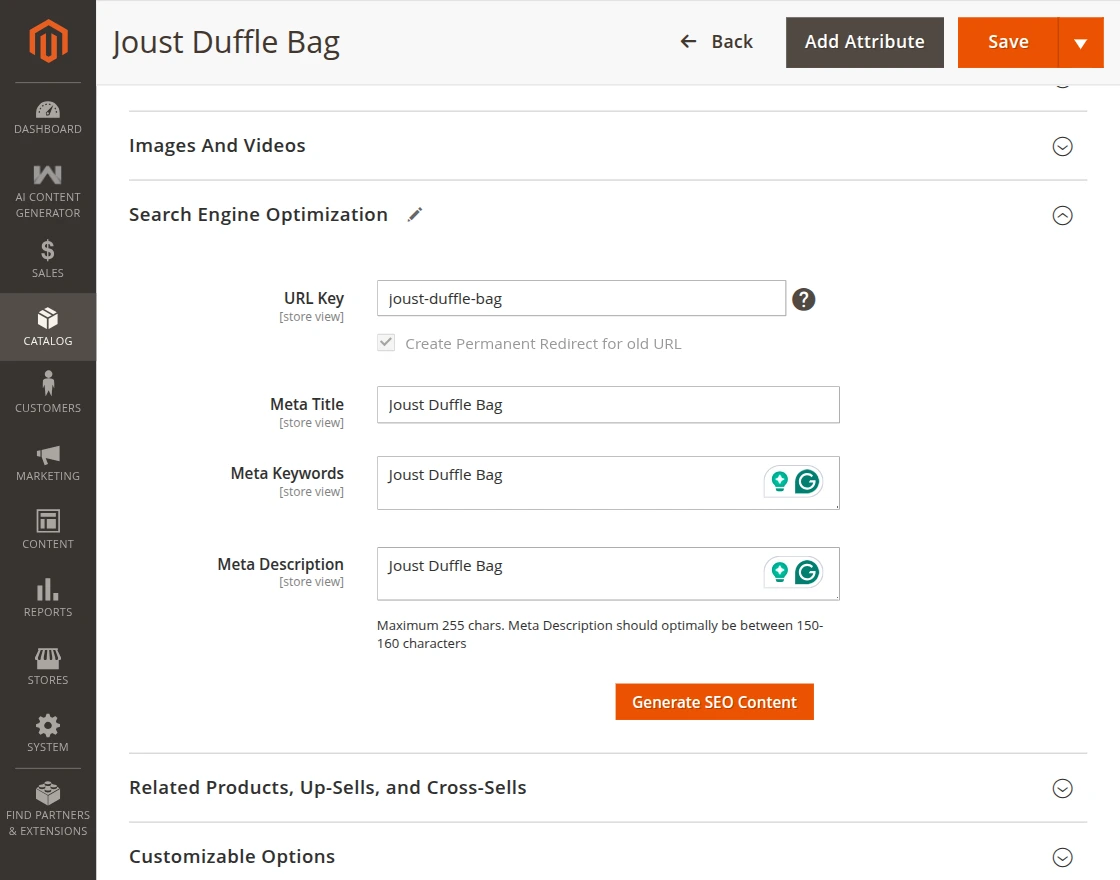
The admin can generate the SEO content using AI Content generator according to the selected attribute as shown in the screenshot.
Page Builder
If the page builder option is enabled then the Edit with Page Builder button will be visible in the description section.

Once the admin clicks on the button the page shown below will display.


Furthermore, the admin will click on the AI option present in the left corner. Now, click on the HTML code option and drag the dynamic block or HTML code.
When the admin hovers over the block, an icon to edit the code will appear and a page will display as per the image.

Here, write the product name or custom query and click on the Fill Description with AI generator button. The content will be filled out automatically in the text area.
Moreover, the store admin can also mass-upload the content at the same time with the help of this extension.
The admin has to navigate through Catalog>Products>Action>Import AI Content for mass upload based on the product attribute.
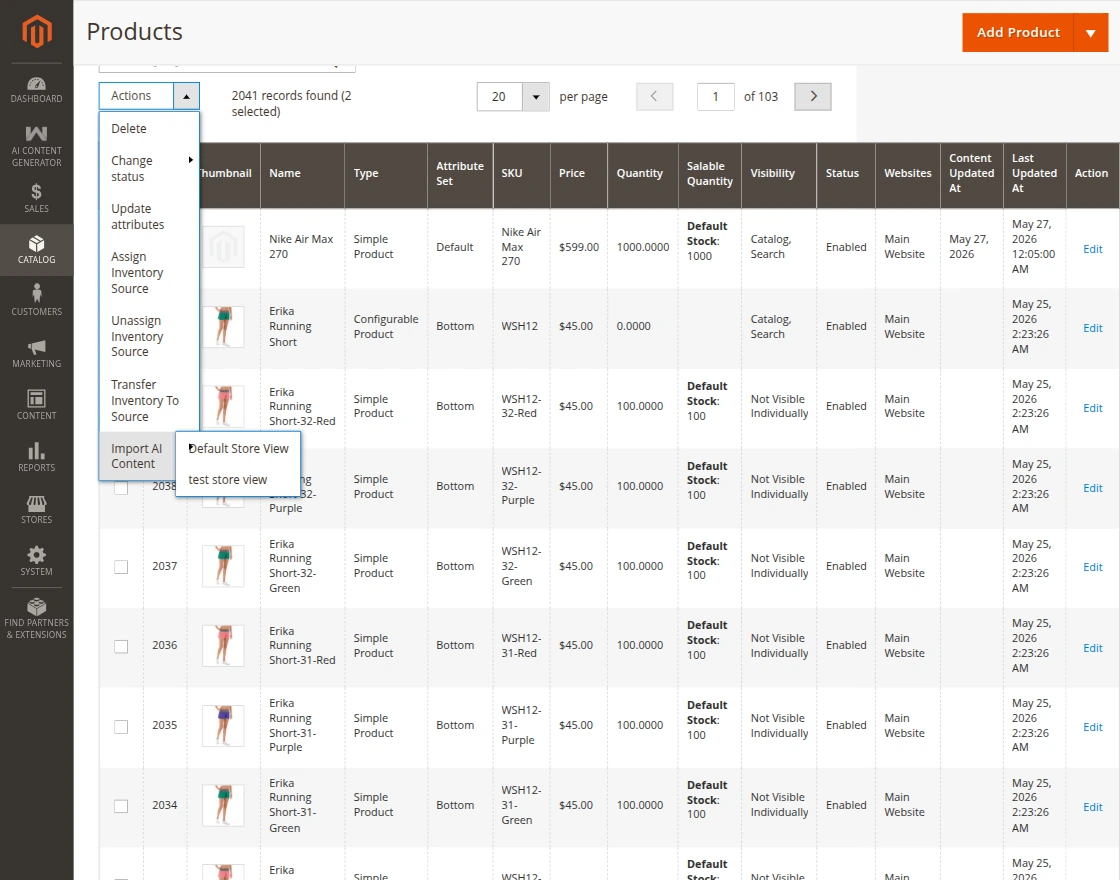
Note: The Import AI Content mass action works on the currently selected store view. Make sure to select the appropriate store view before generating content, as the AI-generated content will be imported only for that specific store view.
When the admin selects generate AI content, a popup will display with a message as shown in the screenshot.


When the admin clicks on the Ok button it starts the execution of the mass upload process as shown in the image.


Product Bulk Generation (Asynchronous Queue)
Select multiple products from Catalog → Products, choose Import AI Content from Actions, select the Store View, and choose the required content fields.
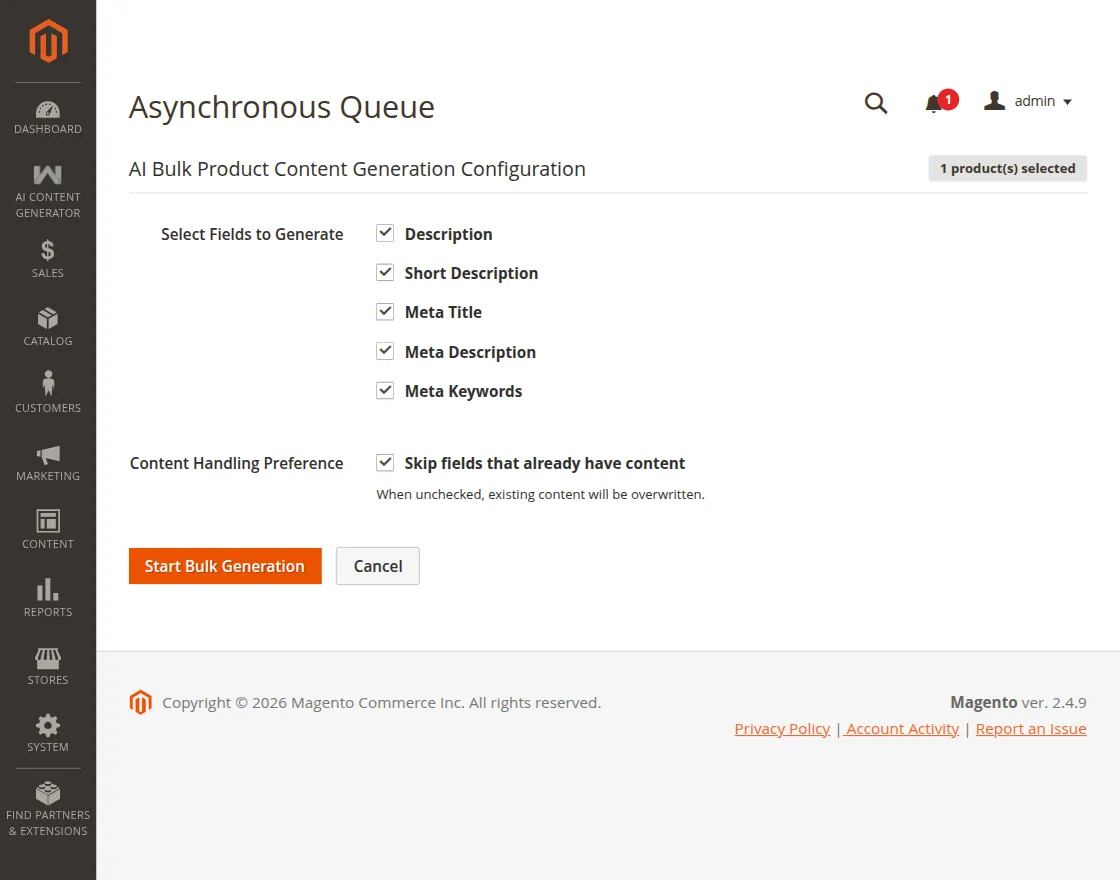
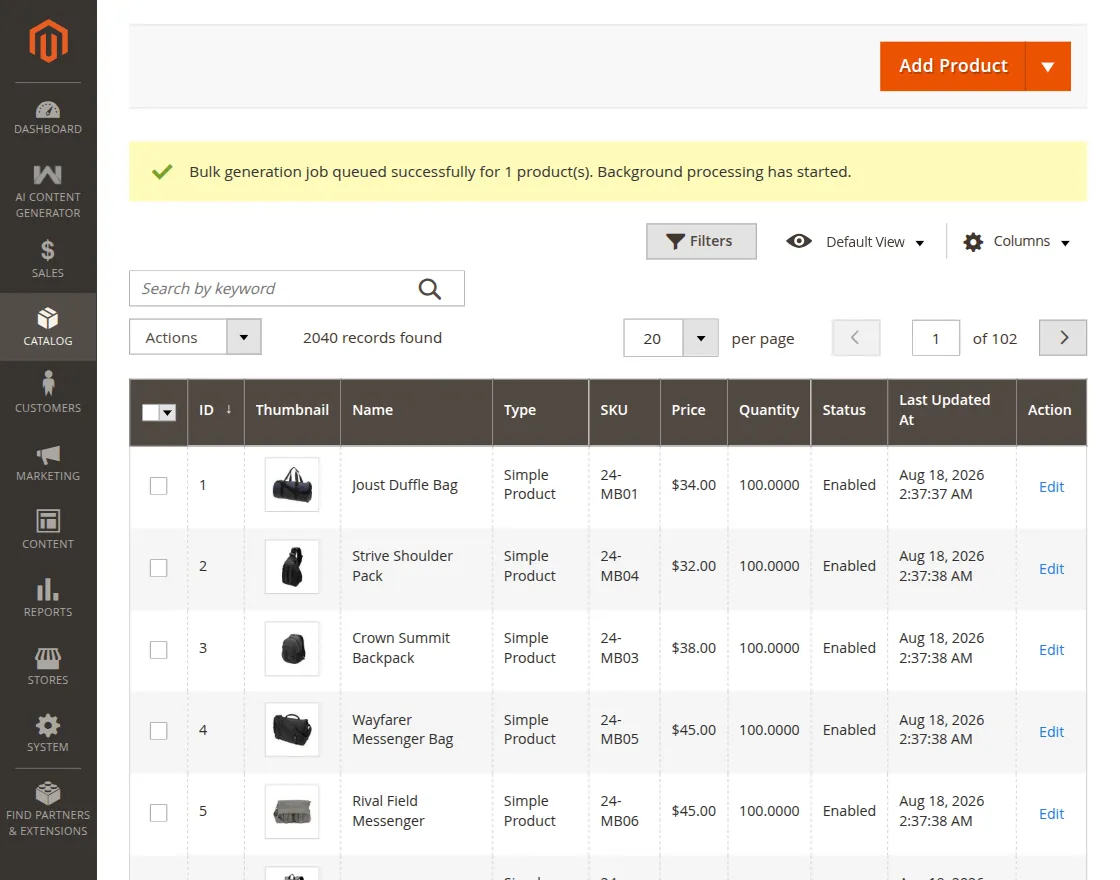
Configure the Content Handling Preference, then click Start Bulk Generation to queue the content generation tasks for background processing.
Category – AI Description & SEO Content Import
The admin can generate the AI content for the category description and SEO content sections. To do so, the admin will navigate through Catalog->Catgories.
Here, for the respective category, the admin needs to choose the scope(store view) for which the content is to be imported.
After that, select the category as required as shown below in the snapshot.
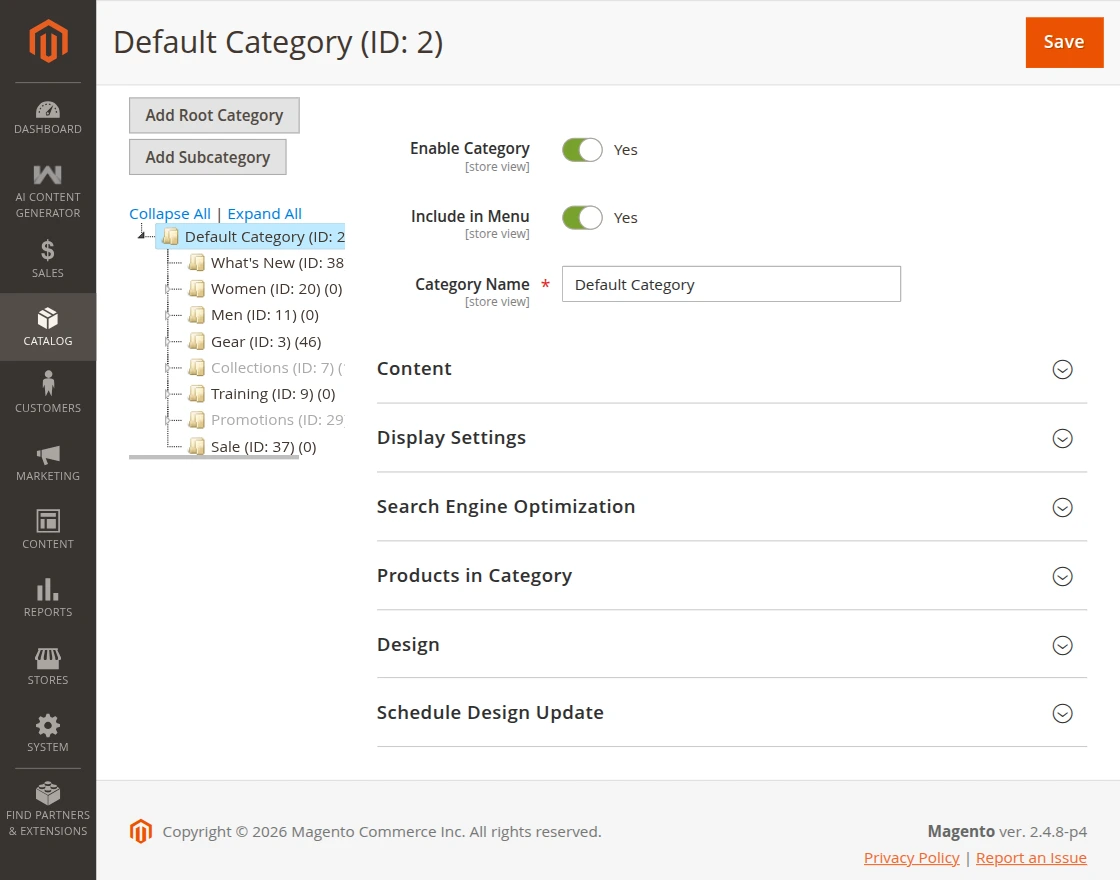
Now, navigate to the descriptive section for the category and tap the edit with page builder button.
Note, that even if the page builder is turned off you will still be able to generate the AI content for the description.

After that, tap the “Fill Description with AI Content Generator” button to fetch the content.
The content will be added based on the prompt template selected for the category description in the configuration settings.

The AI content will be fetched and then the admin can save the same by saving the category.

For the category SEO content import, the admin can tap the generate AI Content button under the respective section. After tapping the button the configured SEO contents will get imported.

Category Bulk Generation (Asynchronous Queue)
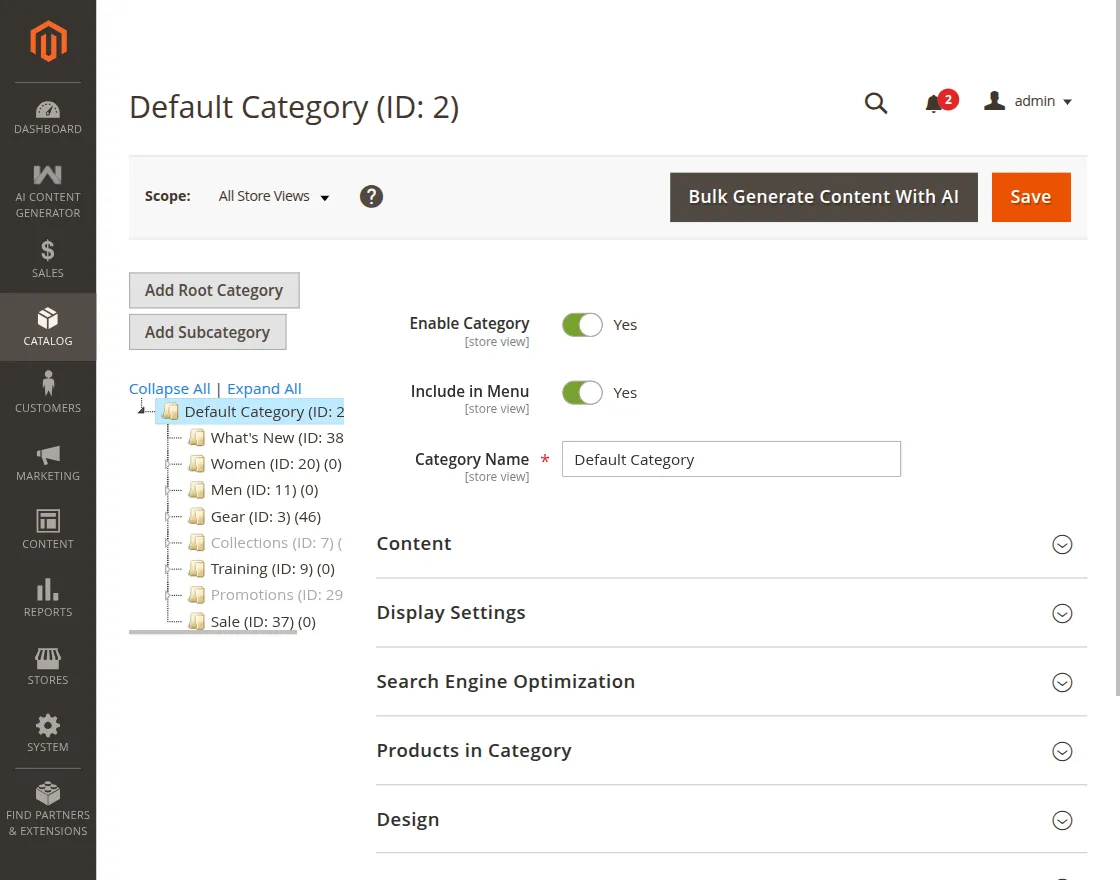
Click Bulk Generate Content With AI from the Categories page.
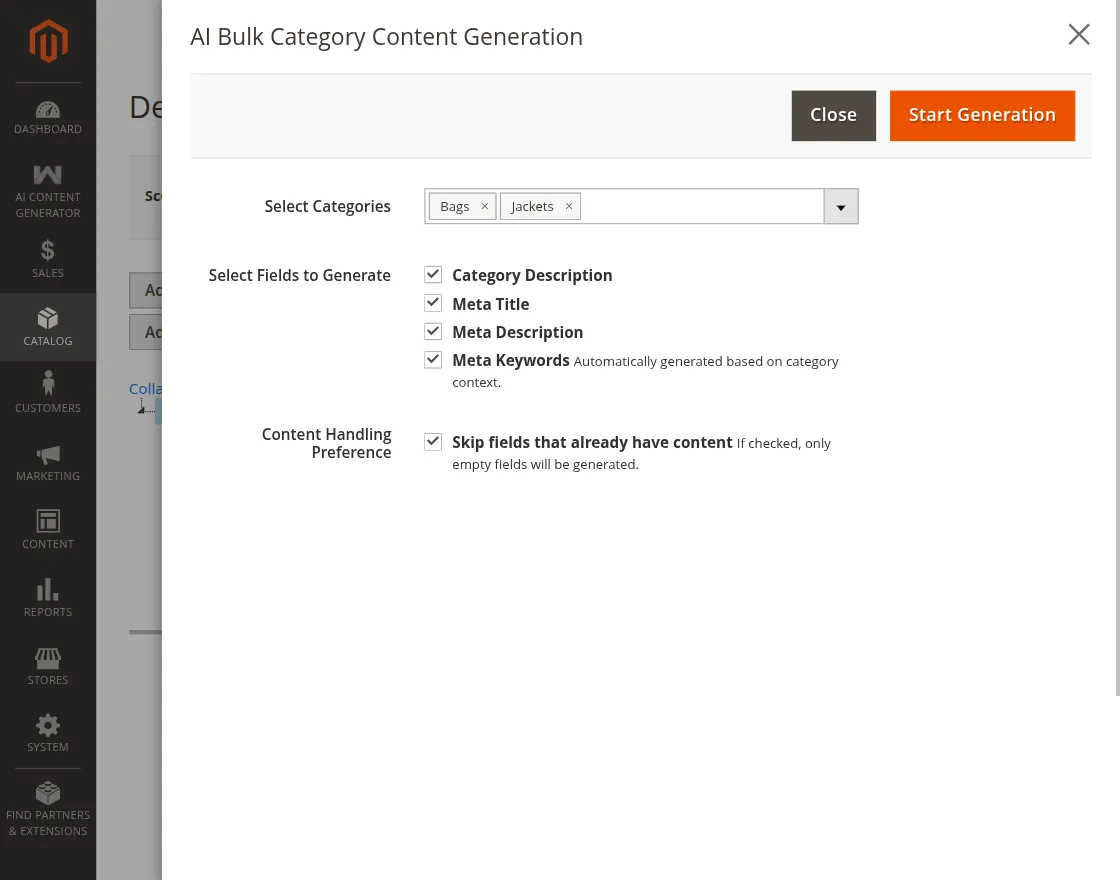
Select the required Categories and Fields to Generate, then click Start Generation
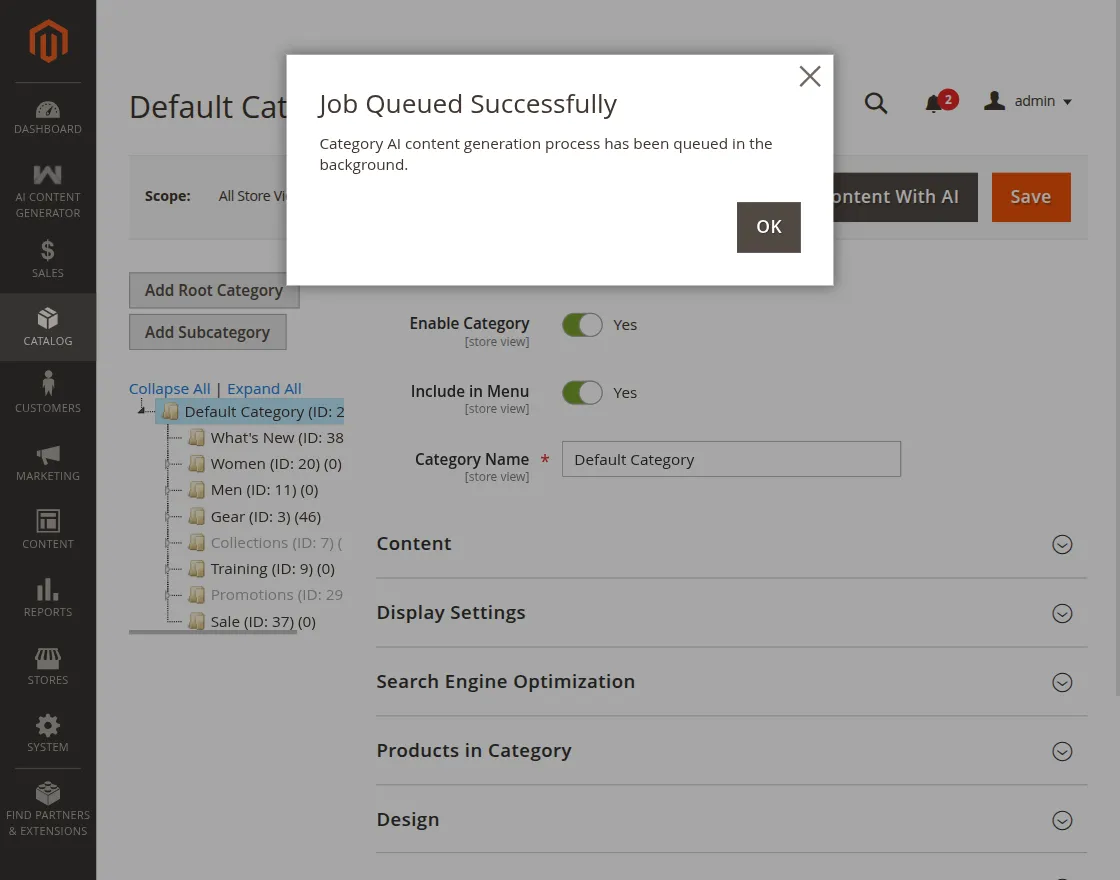
The selected categories are queued for processing, and the system displays a Content Generated Successfully message.
Category Generation Logs & Monitoring
To monitor background category content generation tasks and view their execution status, navigate to: AI Content Generator → Menu → Category Generation Status

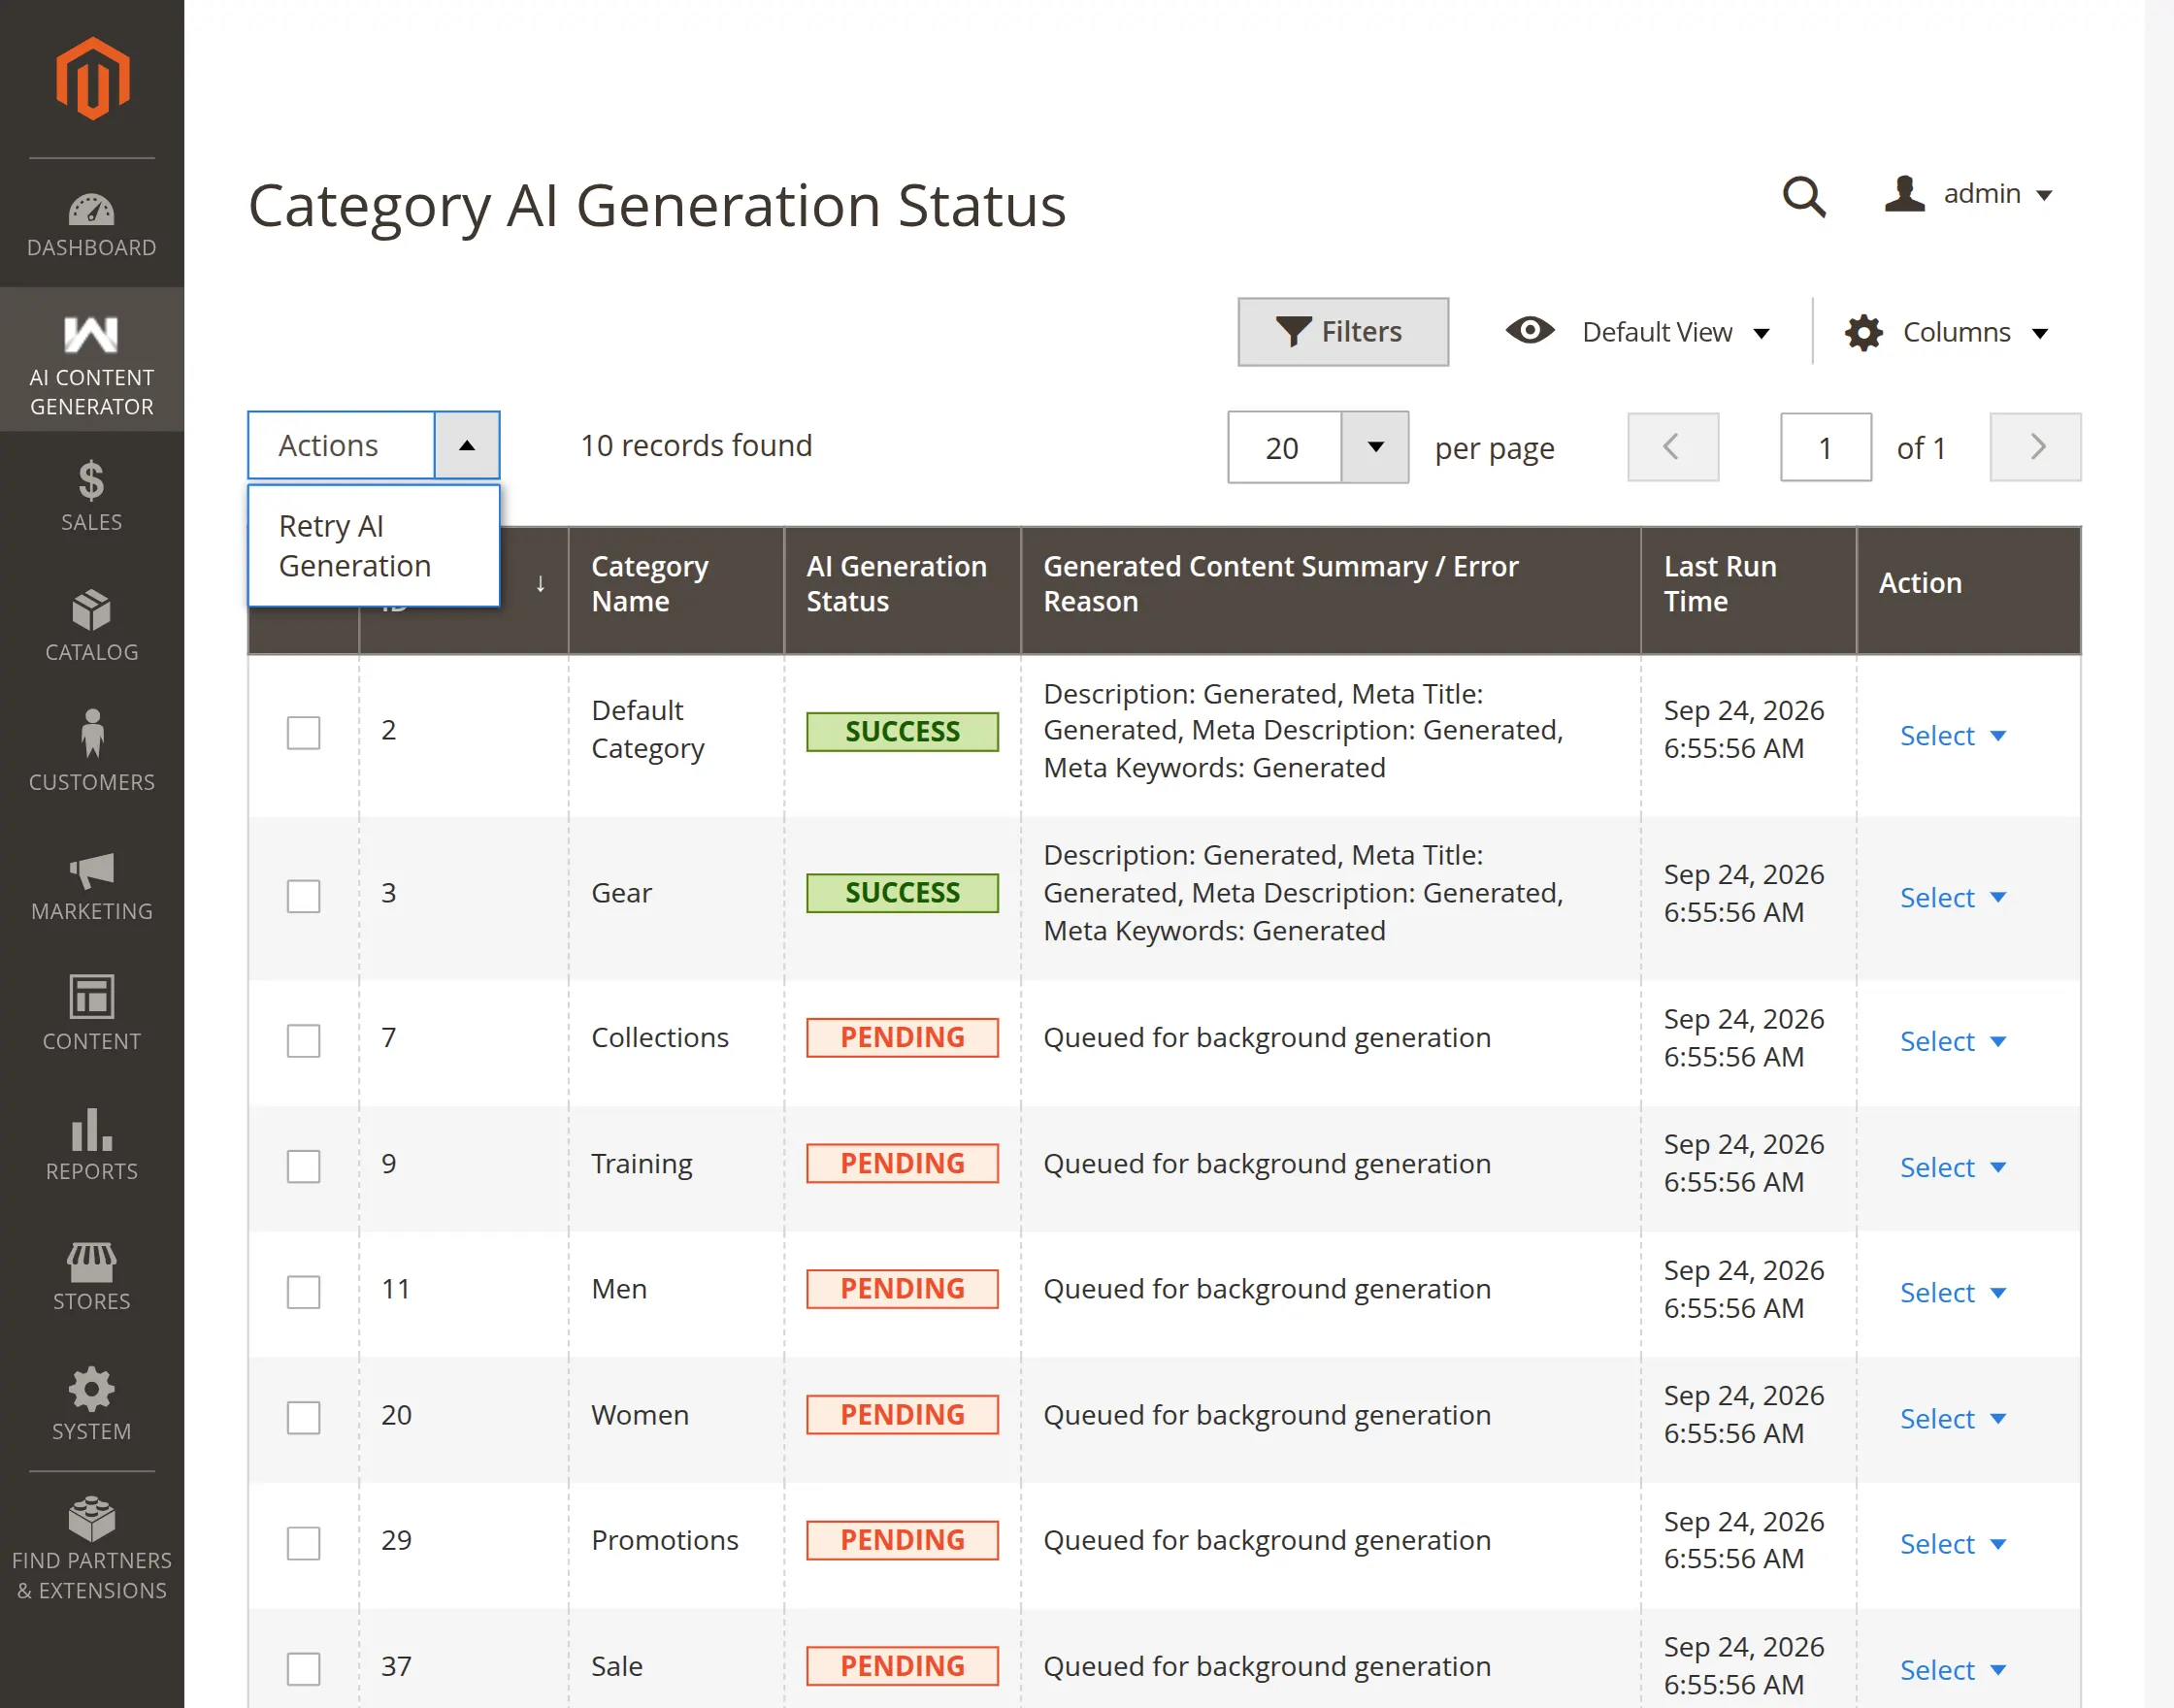
The Category AI Generation Status grid provides an overview of AI content generation activities for categories and helps administrators monitor the progress and results of background generation tasks.
This grid includes:
- Category ID & Name: Displays the category ID and name for the requested content generation.
- AI Generation Status: Shows the current generation status, such as
SuccessorFailed. - Generated Content Summary / Error Reason: Displays a summary of the generated content or the reason for a failed generation.
- Last Run Time: Shows when the category content generation last ran.
- Action: Allows you to open and edit the corresponding category.
- Retry AI Generation: Allows you to re-trigger content generation for items with a failed status.
Product Generation Logs & Monitoring
To monitor background product content generation tasks and view their execution status, navigate to: AI Content Generator → Menu → Product Generation Status
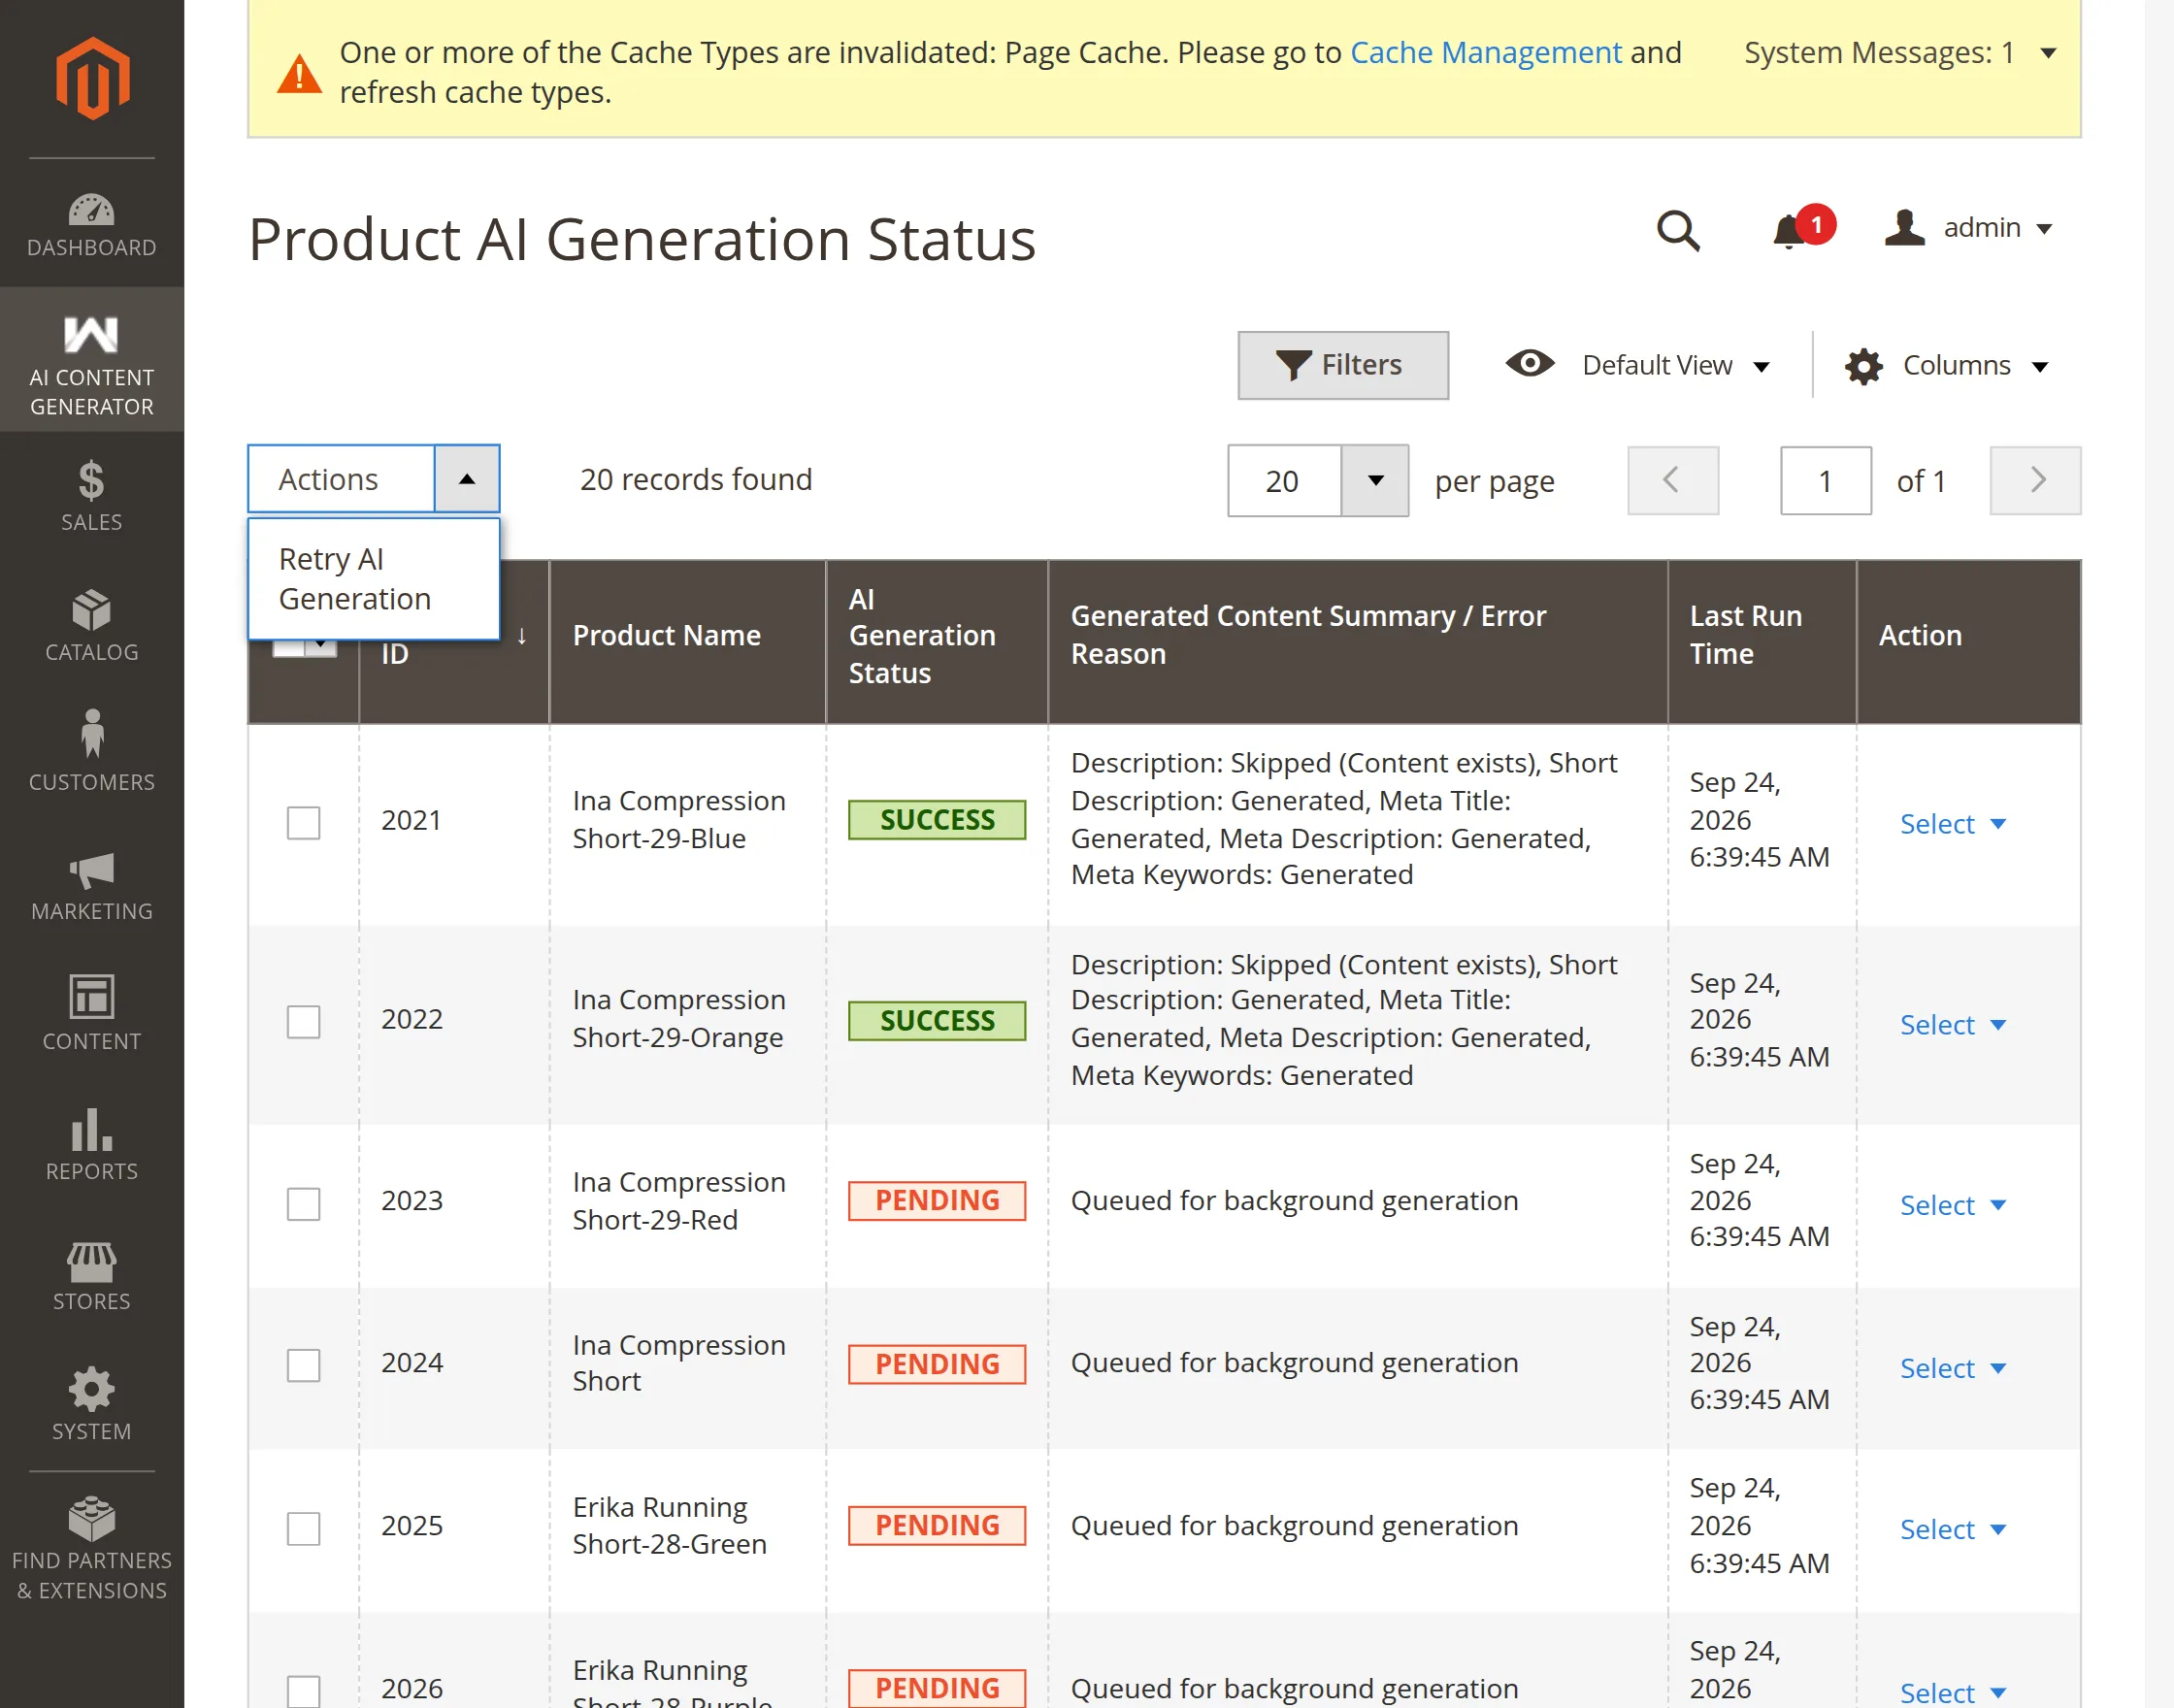
The Product Generation Status grid provides an overview of product content generation tasks.
This grid includes:
- Product ID & SKU: Displays the product ID and SKU for which content generation was requested.
- Store View: Displays the store view selected for content generation.
- Execution Status: Shows the current generation status, such as
Pending,Success, orFailure. - Timestamp: Displays when the generation task was submitted and completed.
- Actions: Allows you to re-trigger content generation for failed items.
- Retry AI Generation: Allows you to re-trigger content generation for items with a failed status.
CMS Page – Generate Page and SEO Content
The admin will be able to generate the CMS pages page and SEO content via the AI tool. To do so, the admin will navigate through Content->Pages.


Here, for the pages, the admin can mass action to generate the AI content for the Page and SEO content for multiple pages at the same time.
But at a time you can either generate the page content or the SEO content for the pages.
After selecting an option, you can see a prompt.


Tap, Ok on the prompt to generate the SEO or the Page content and the profiler will run to generate the AI content as per the below screenshot.


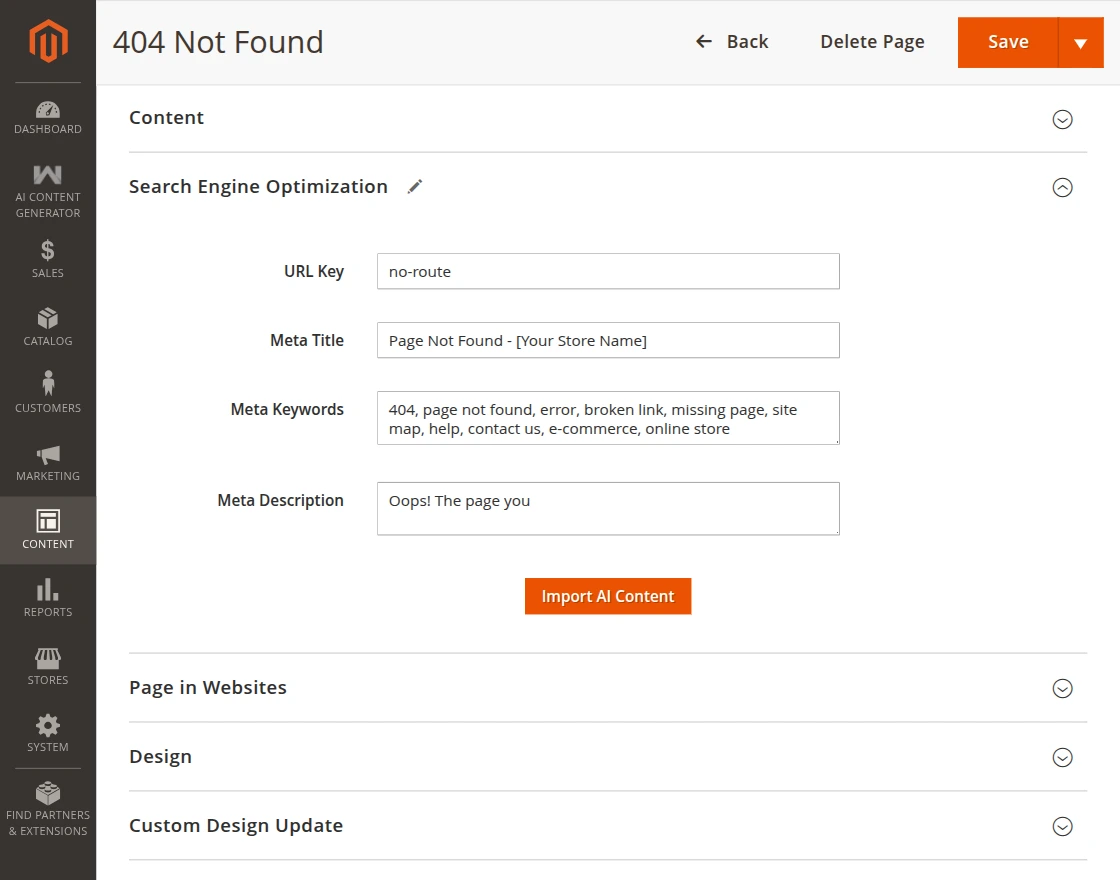
Now, you can edit the page to check the page content and the SEO content.
Page content:

SEO Content:
Multi-Lingual Support
The admin can also enable multi-lingual support for the feature. To do so, navigate through Stores->Configuration->General->Locale Options.
Here, first, choose the scope that is your store for which you want to enable the locale. Then under Locale options choose the respective locale in which you want the description to be added.
Lastly, tap the Save Config button.

Now, navigate to the product edit page and tap the “Fill Description with AI Content Generator” button. The description gets added in the respective locale as shown below in the snapshot.

After that, you can also navigate to the Page Builder section to generate the respective locale description content by tapping the respective button.


After saving the product, the short and long descriptions in the respective locale is visible on the product page as per the snapshot below.

Apart from that, if you want to integrate an AI ChatBot to your store which uses open source LLMs, you can check Magento 2 AI Chatbot using Open Source LLM.
Support
That is all about the Magento 2 AI Content Generator Extension. If you have any queries regarding the plugin, please contact us at Webkul Support System.
You may also check our top-quality Magento 2 Extensions & Magento 2 AI Extensions list.