How to Manage Custom & Odoo Modules in Odoo SaaS Kit
Table of Content
1. Introduction
Custom module management is a core part of running a SaaS business — beyond subscription plans and client provisioning, it also means deciding which applications and modules each client can access.
For example, you may want to:
- Provide standard Odoo applications to every client.
- Offer premium applications only in higher subscription plans.
- Distribute custom-developed or third-party modules plan-wise.
- Provide specific modules only to selected customers.
- Restrict clients so they can install and access only the applications included in their subscription.
To support these business requirements, the Odoo SaaS Kit provides a flexible module management system that allows administrators to manage both Odoo core modules and custom modules in a structured manner.
This guide explains how to configure and manage modules using the SaaS Kit, including server-side organization, SaaS Plan configuration, the Scan Feature, and the Restrict Client App Feature.
2. Understanding Custom Module Management Types
Before configuring SaaS Plans, it is important to understand the two types of modules that can exist inside a client instance.
2.1 Odoo Core Modules
Odoo Core Modules are the standard applications that are included with every Odoo installation.
Some common examples are:
- Sales
- CRM
- Inventory
- Accounting
- Purchase
- Website
- Project
These modules are already available in Odoo’s default addons directory, which is generally located at: /opt/odoo/addons

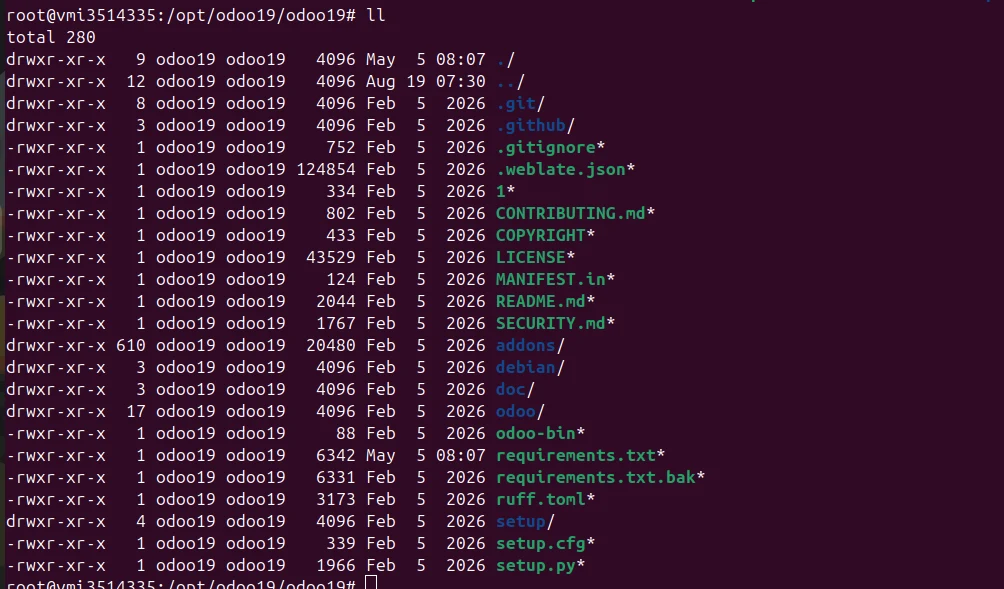
Since these modules are part of the Odoo installation, you do not need to upload them manually to the server.
If you want to control which Odoo applications are available to clients, you can use the Restrict Client App Feature. In this case, the required Odoo modules must first be registered as module entries in the SaaS Kit and then assigned to the appropriate SaaS Plan.
2.2 Custom Module Management for Third-Party Apps
Custom and Third-Party Modules are applications that are not included in the standard Odoo installation. These may include:
These may include:
- Custom-developed modules
- Marketplace applications
- Payment gateway integrations
- Shipping connectors
- Live chat integrations
- Business-specific customizations
- Any third-party add-ons
Examples include:
- Paystack Integration
- Dellyman Connector
- Tawk.to Integration
- Custom ERP modules
Unlike Odoo Core Modules, custom and third-party modules are not included in the standard Odoo installation and must be uploaded and managed separately.


If a custom module should be available to SaaS clients, it must be placed within the Common Add-ons Path or one of its plan-specific subdirectories configured for the respective SaaS Plan.
2.3 Webkul Add-on
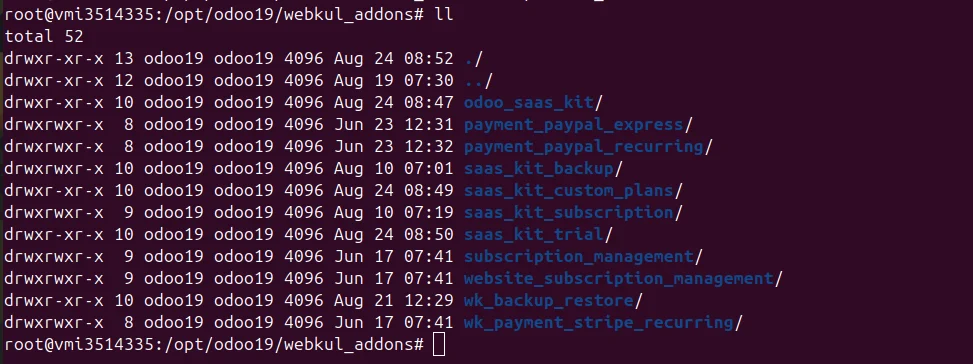
The Webkul Add-ons Path is the directory where the Odoo modules provided by Webkul are stored. This includes modules such as odoo_saas_kit, saas_kit_trial, saas_kit_backup, saas_kit_custom_plans, and other Webkul-developed modules required for the SaaS Kit and its related functionality.
If you need to install or add a module specifically to the main Odoo instance, you can place the module inside the Webkul Add-ons Path.
The Webkul Add-ons Path is different from the Common Add-ons Path. The Common Add-ons Path is used to manage custom and third-party modules that need to be made available to SaaS client instances, whereas the Webkul Add-ons Path is used for modules installed on the main Odoo/SaaS management instance.

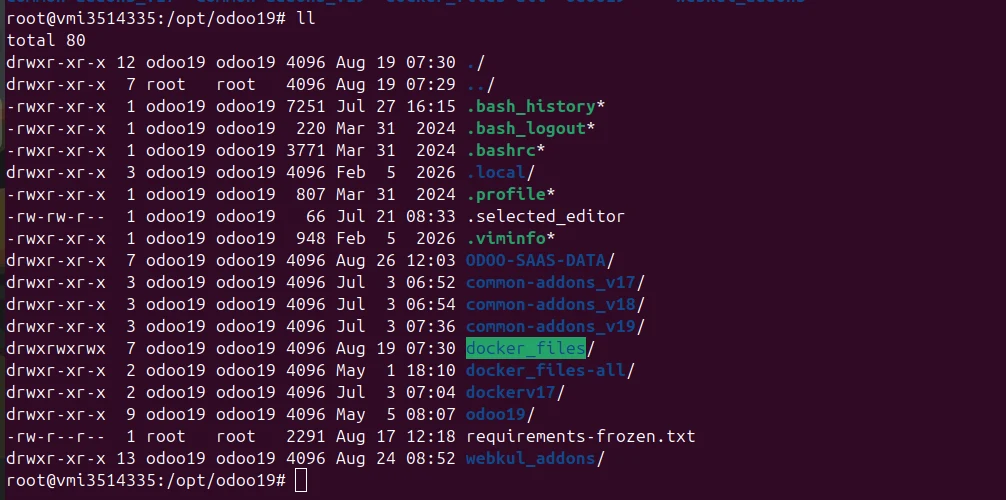
When you install and configure the Odoo SaaS Kit, it creates the Common Add-ons Path on the server for you. This path is version-specific, meaning that the SaaS Kit maintains a separate Common Add-ons Path for each supported Odoo version.
For example, if your current Odoo environment is Odoo 19, we provide Docker images for Odoo 17, Odoo 18, and Odoo 19. This allows you to create client instances on any of these three Odoo versions.
Since the Common Add-ons Path is version-specific, the SaaS Kit creates a separate path for each supported Odoo version:
/opt/common-addons_v17
3. Common Add-ons Path for Odoo SaaS Kit Modules
/opt/common-addons_v18
/opt/common-addons_v19
Each Common Add-ons Path corresponds to its respective Odoo version. Therefore, place custom modules that need to be available for Odoo 17, Odoo 18, or Odoo 19 client instances in the corresponding version-specific Common Add-ons Path.
This version-specific structure helps keep custom modules organized according to the Odoo version and ensures that the appropriate modules are available to client instances running on that version.
Note: The exact Common Add-ons Path may vary depending on your SaaS Kit deployment and server configuration. The paths shown above are examples.

4. Restrict Client App Feature for Managing Custom Modules
One of the most important features in the SaaS Kit is the Restrict Client App Feature, which you enable or disable during SaaS Plan Creation. Once you create a SaaS Client instance using the SaaS Plan, this feature controls which applications are visible and accessible within the client instance based on the “Restrict Client App Features”.

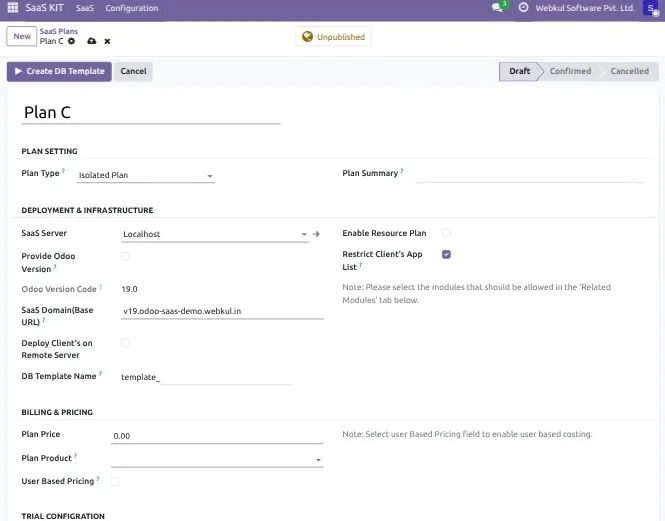
4.1 When you disable the Odoo SaaS Kit Restrict Feature
If you disable the Restrict Client App Feature while creating the SaaS Plan, client instances created using that plan will have access to all standard Odoo applications available in the Odoo installation, along with all custom modules available through the configured Common Add-ons Paths.
For example, if the Common Add-ons Path contains custom modules such as Module A, Module B, and Module C, and you disable the Restrict Client App Feature, every client instance created from this SaaS Plan will have access to:
- All standard Odoo applications.
- Module A, Module B, and Module C available through the Common Add-ons Path.
In this case, the SaaS Plan does not restrict application availability based on the modules selected in the plan.
This approach is suitable when you do not want to restrict access to Odoo Apps or custom applications available through the Common Add-ons Paths.
4.2 When you enable the Odoo SaaS Kit Restrict Feature
If you enable the Restrict Client App Feature for a SaaS Plan, the behavior changes. Only the following modules will be available to the client:
- Modules explicitly added to the SaaS Plan.
- Required dependency modules of those applications.
For example, if you add the Website (website) module to a SaaS Plan, the client will have access to the Website module along with its required dependent modules, such as eCommerce and Invoicing.
All other modules remain hidden, even if they exist on the server or inside the common add-ons paths.
This gives the SaaS administrator complete control over which applications each subscription plan can access.
4.3 When Custom Modules Configuration Becomes Useful:
- Different SaaS plans provide different applications.
- Premium applications are available only in higher-tier plans.
- Clients should not install applications outside their subscription.
- You require a controlled SaaS environment.
5. Creating Entries for Custom Modules Configuration
A module may already be available in Odoo or stored in the Common Add-ons Path, but custom module management in the SaaS Kit requires a module entry to manage that module within the SaaS environment.
The module entry acts as the SaaS Kit’s record for that application. After creating the entry, you can decide which SaaS Plans should include the module and, if required, whether to publish the module on the website as an additional application that customers can purchase.
This step is especially important when you want to use the Restrict Client App Feature, because you can only select and assign modules registered in the SaaS Kit to a SaaS Plan.
5.1 Creating Categories for Custom App Management
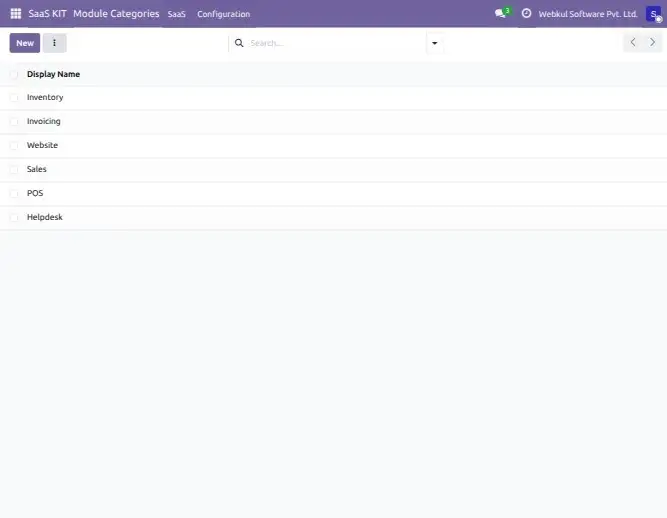
Navigate to Configuration → Module Categories, create a new category to organize related modules, such as Sales Applications, Accounting Applications, Integrations, Marketing, or Payment Modules, and then save the category.

5.2 Create a Module Entry
Navigate to Configuration → Modules and create a new module entry. In the module form, provide the required information such as the Module Name, Technical Name, Description, Module Category, and Odoo Version.
Then configure the Price and select the appropriate Module Type as either Core Module or Custom Module. For custom modules, specify the Addons Path where the module is located and use Verify Addon’s Path to verify that the configured path is valid.

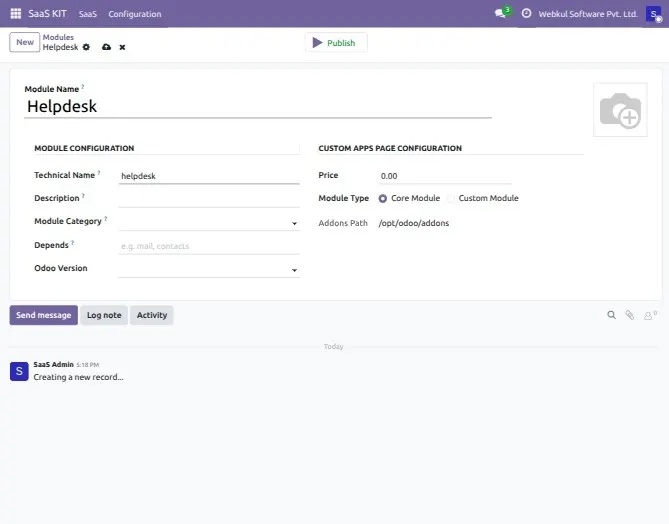
Note: The Technical Name must exactly match the technical name of the module used in Odoo. For example, if the technical name of the Odoo module is website, the same value must be entered in the Technical Name field.
Once the required information is entered, save the module record. The module can then be assigned to the required SaaS Plans.
Publishing a Module
Each module entry can be Published or Unpublished using the Publish option available on the module form.
A Published module can be displayed on the website and offered to customers as an additional application. The configured Price determines the price at which the module can be offered.
An Unpublished module remains available for internal SaaS configuration and can still be assigned to SaaS Plans, but it will not be displayed to customers on the website. This is useful when a module should be available to selected SaaS Plans or clients without being offered as a publicly available application.
6. When Are Odoo SaaS Kit Module Entries Required?
Module entries are required in the following situations.
6.1 When Using the Restrict Client App Feature
When the Restrict Client App Feature is enabled, only modules that have entries in the SaaS Kit can be added to a SaaS Plan.
Therefore, every Odoo Core Module or Custom Module that should be available to clients must first have a module entry.
6.2 When Selling Modules as Paid Add-ons
If a module is offered as a separately priced add-on, it must first be created as a module entry.
This allows the module to be:
- Assigned to SaaS Plans.
- Displayed on the website.
- Sold as an additional application.
6.3 Scan Feature for Custom Modules Discovery
The Scan Feature in a SaaS Plan allows you to automatically discover custom modules available in the configured Common Add-ons Path and its subdirectories, and then it automatically makes the module entries for the custom modules.
When you run the scan, the SaaS Kit identifies the available custom modules and adds them to the SaaS Plan. You can then review the discovered modules and keep or remove them from the plan based on your requirements.

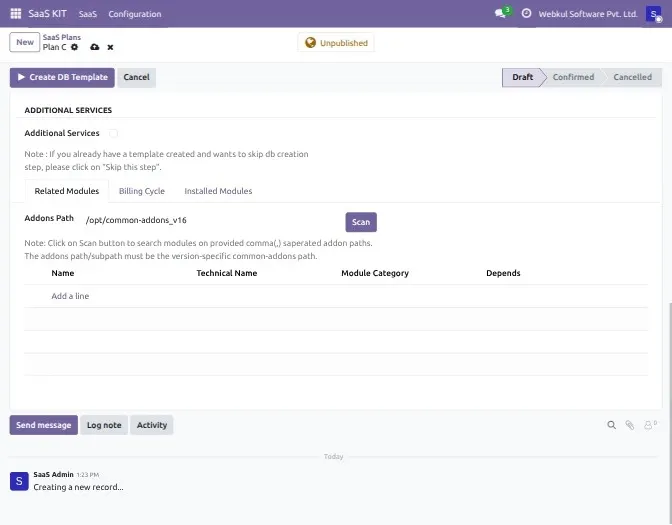
This is particularly useful when you have multiple custom modules stored in the Common Add-ons Path and want to quickly make them available for selection while configuring a SaaS Plan.
When the scan is performed:
- The SaaS Kit automatically creates module entries for any newly discovered modules.
- These module entries are created as Unpublished by default.
- The administrator can later review, publish, or assign them to SaaS Plans as required.
This significantly reduces manual configuration when managing a large number of custom modules.
7. Custom Module Management Using the Scan Feature
Before using the Scan Feature, effective custom module management starts with deciding how you want to distribute custom modules across your SaaS Plans.
For example, suppose your SaaS subscription plans are structured as follows:
| SaaS Plan | Modules Included |
| Free Plan | A, B |
| Bronze Plan | A, B, C |
| Silver Plan | A, B, C, D |
In addition to these plan-based modules, you may also have a module (for example, Module E) that should be available only to a specific client.
To support these scenarios, the SaaS Kit allows you to organize custom modules inside the Common Add-ons Path and map different directories to different SaaS Plans using the Scan Feature.
7.1 Directory Structure for Custom Module Management
Assume your Common Add-ons Path is:
/opt/common-addons_v16
Create separate directories for each SaaS Plan.
/opt/common-addons_v16/free_plan
/opt/common-addons_v16/bronze_plan
/opt/common-addons_v16/silver_plan
These directories allow you to organize custom modules according to your subscription plans.
8. Approach 1: Hierarchical Custom Module Management (Recommended)
This approach is recommended when each higher plan includes all the applications of the lower plans.
Using our example:
| SaaS Plan | Modules |
| Free | A, B |
| Bronze | A, B, C |
| Silver | A, B, C, D |
Since Module A is common to every plan, there is no need to duplicate it in every directory.
Place it directly inside the Common Add-ons Path.
/opt/common-addons_v16
└── Module A
Now place only the additional modules inside their respective plan directories.
Free Plan
/opt/common-addons_v16/free_plan
└── Module B
Bronze Plan
/opt/common-addons_v16/bronze_plan
└── Module C
Silver Plan
/opt/common-addons_v16/silver_plan
└── Module D
This structure avoids maintaining duplicate copies of the same module while ensuring that higher subscription plans inherit all modules from lower plans.
Use the Scan Feature
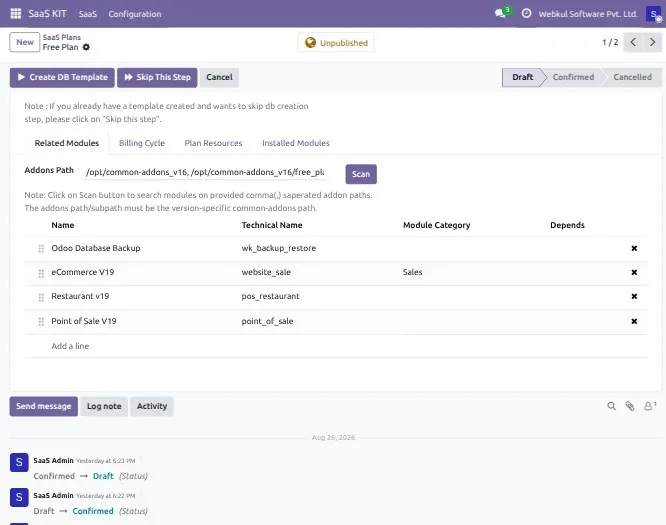
After organizing the modules on the server, copy the Add-ons Paths inside the scan feature while creating the SaaS Plans.
Free Plan
Add the following paths and click Scan using the comma separated.
/opt/common-addons_v16
/opt/common-addons_v16/free_plan
The Scan Feature will discover modules from both directories.
The Free Plan will therefore include:
- Module A
- Module B

Bronze Plan
When creating the Bronze Plan, configure the following paths using comma separated.
/opt/common-addons_v16
/opt/common-addons_v16/free_plan
/opt/common-addons_v16/bronze_plan
The Bronze Plan will include:
- Module A
- Module B
- Module C
- Module D
Silver Plan
When creating the Silver Plan, configure the following paths using comma separated.
/opt/common-addons_v16
/opt/common-addons_v16/free_plan
/opt/common-addons_v16/bronze_plan
/opt/common-addons_v16/silver_plan
The Silver Plan will include:
- Module A
- Module B
- Module C
- Module D
Once the Scan process is completed, all discovered modules become available for that SaaS Plan. Any client instance created using the plan will automatically receive those custom modules.
9. Approach 2: Custom Module Management with Independent Plan Directories
Another way to organize modules is to keep each plan directory independent.
Instead of inheriting modules from lower plans, every directory contains all modules required for that specific plan.
For example:
/opt/common-addons_v16
└── Module A
/opt/common-addons_v16/free_plan
└── Module B
/opt/common-addons_v16/bronze_plan
├── Module B
└── Module C
/opt/common-addons_v16/silver_plan
├── Module B
├── Module C
└── Module D
In this approach, some modules are intentionally duplicated across multiple directories.
Configuring the Scan Feature for Independent Directories
Free Plan
/opt/common-addons_v16
/opt/common-addons_v16/free_plan
The client receives:
- Module A
- Module B
Bronze Plan
/opt/common-addons_v16
/opt/common-addons_v16/bronze_plan
The client receives:
- Module A
- Module B
- Module C
Silver Plan
/opt/common-addons_v16
/opt/common-addons_v16/silver_plan
The client receives:
- Module A
- Module B
- Module C
- Module D
Unlike the first approach, there is no dependency between plan directories because every directory already contains all modules required for that plan.
Which Approach Should You Use?
Both approaches are supported by the SaaS Kit, and the choice depends on how you want to manage your custom modules.
Approach 1 – Hierarchical Module Management
Advantages
- No duplicate copies of modules.
- Easier maintenance.
- Updating a common module only once makes the changes available to all applicable plans.
- Better suited when higher plans inherit all custom modules of lower plans.
This is the recommended approach for most SaaS deployments.
Approach 2 – Independent Plan Directories
Advantages
- Every plan is completely independent.
- Easier to understand for administrators who prefer separate module sets for each plan.
- Changes made to one plan do not affect other plans.
10. Custom Module Management for a Specific Client
Custom module management sometimes requires providing a module only to a specific client rather than including it in a SaaS Plan for all clients.
Option 1: Managing a Module Directly for One Client
If the module is intended exclusively for one client, you can upload it directly to the client’s dedicated add-ons directory instead of placing it in the Common Add-ons Path or a plan-specific directory.
Note: Replace the above path with the actual client-specific add-ons path used in your SaaS deployment.


Since the module is available only within that client’s environment, it will not be available to other SaaS clients.
Option 2: Admin Adds the Application for the Client
The SaaS administrator can also add an application directly to a client’s contract from the backend. Depending on the business requirement, the administrator can either:
- Generate an invoice for the application, in which case the application is added to the client instance after the invoice is paid.
- Add the application without generating an invoice, when the application is being provided to the client at no additional cost.

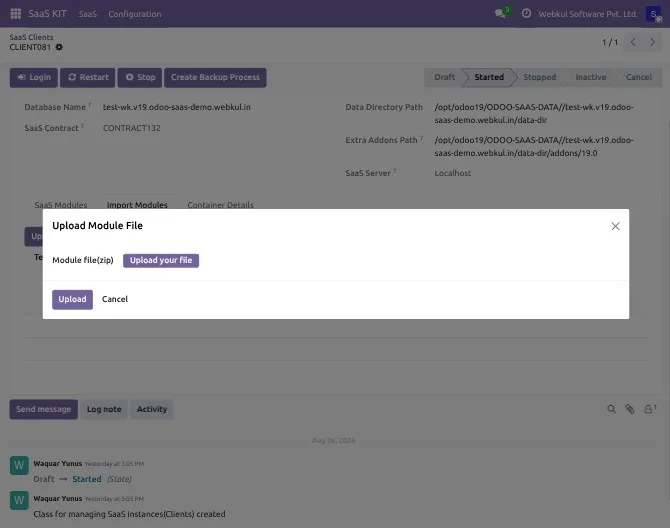
This provides the SaaS administrator with flexibility to decide whether a client-specific application should be paid or provided free of charge.
Option 3: Client Adds the Application from the Contract Portal
A client can also request or add an application directly from their Contract Portal. In this case, the system generates an invoice for the selected application. Once the invoice is paid, the application is added to the client’s instance.

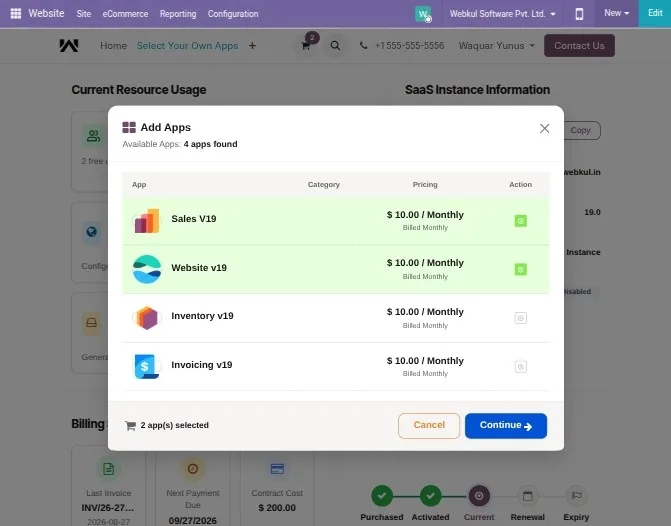
This approach is useful when the application is intended to be provided as a paid add-on to a specific client.
Note: If the Restrict Client App Feature is disabled for a SaaS Plan, the Add App feature will not be available for clients created from that plan. This is because the client instance already has access to all standard Odoo applications and all custom modules available through the configured Common Add-ons Path, so there is no need for the client to add applications separately.
However, if the SaaS admin wants to add a specific module in the client instance, then he can use options 1 and 2.
11. Scenario 1: Odoo SaaS Kit Clients Receive All Odoo & Custom Modules
In this scenario, every client created from the SaaS Plan should have access to all standard Odoo applications as well as all custom modules available through the Common Add-ons Path.
Configuration
- Disable the Restrict Client App Feature while creating the SaaS Plan.
- Place all custom modules that should be available to clients inside the Common Add-ons Path.
- The Scan Feature is optional in this scenario. You can use Scan to discover and add custom modules to the SaaS Plan, or you can leave the modules unselected.
- Since the Restrict Client App Feature is disabled, the modules selected in the SaaS Plan do not limit application availability. Any custom module available through the configured Common Add-ons Path will be accessible to the client.
Result
Every client created from this SaaS Plan will receive:
- All Odoo Core Modules.
- All custom modules available in the Common Add-ons Path.
12. Scenario 2: Client Should Receive All Odoo Modules but Only Selected Custom Modules
In this scenario, clients should have access to all standard Odoo applications, but only specific custom modules that you want to make available through the SaaS Plan.
For example, suppose you have the following custom modules:
- Module A – Custom Sales
- Module B – Custom CRM
- Module C – Payment Integration
- Module D – Shipping Integration
You want clients of the Basic Plan to receive only Module A and Module B, while Module C and Module D should not be available to them.
Configuration
First, create a plan-specific subdirectory inside the version-specific Common Add-ons Path. For example, if the clients are running Odoo 19 and you want to create a directory for the Basic Plan:
/opt/common-addons_v19/basic_plan
Place only the custom modules that should be available to the Basic Plan inside this directory. For example:
/opt/common-addons_v19/basic_plan
├── Module A
└── Module B
Then, while creating the SaaS Plan:
- Disable the Restrict Client App Feature.
- Add the plan-specific directory path to the Scan Feature field.
- Run the Scan operation to discover the custom modules available in that directory.
- Review the scanned modules and keep the modules that should be available for the plan.
For example, add the following path to the Scan field:
/opt/common-addons_v19/basic_plan
After scanning, Module A and Module B will be discovered and can be included in the SaaS Plan.
As a result, clients created from this plan will have access to all standard Odoo applications and all the custom modules placed in the configured plan-specific directory.
13. Scenario 3: Custom Module Management for Selected Access
This is the most controlled deployment model and is useful when different SaaS Plans need to provide different sets of Odoo and custom applications.
For example, you may want a Basic Plan to provide Website and CRM, while a Premium Plan provides Website, CRM, Accounting, and additional custom applications.
Configuration
- Enable the Restrict Client App Feature while creating the SaaS Plan.
- Create module entries in the SaaS Kit for the required Odoo Core Modules that you want to make available to the client.
- Place the required custom modules inside the Common Add-ons Path or the appropriate plan-specific subdirectories.
- Use the Scan Feature to discover the custom modules from the configured Add-ons Paths and add them to the SaaS Plan.
- Add only the required Odoo Core Modules and Custom Modules to the SaaS Plan.
Result
When a client instance is created from this SaaS Plan, the client will have access only to:
- The Odoo Core Modules selected in the SaaS Plan.
- The Custom Modules selected in the SaaS Plan.
- Any required dependency modules of the selected applications.
All other applications and modules available in the Odoo installation or through the configured Add-ons Paths will remain hidden from the client.
14. Scenario 4: Providing Modules Only to a Specific Client
Sometimes, you may need to provide a custom module to only one specific client, and you should not include it in any SaaS Plan or make it available to other clients.
Configuration
- Upload the module directly to the client’s dedicated Add-ons directory.
- Do not place the module inside the Common Add-ons Path or any plan-specific directory.
- If you provide the module as a paid application, you can also add it to the client’s contract through the Contract Portal or as the SaaS administrator. You can add the application with or without an invoice, depending on the requirement.

Best Practices for Custom Module Management:
To simplify long-term custom module management and maintenance, consider the following recommendations:
- Use a meaningful directory structure for plan-specific modules.
- Prefer the Hierarchical Module Management approach whenever higher plans inherit features from lower plans, as it avoids duplicate modules and simplifies maintenance.
- Use the Independent Directory approach only when each subscription plan requires complete isolation.
- Keep common modules in the Common Add-ons Path whenever multiple plans share them.
- Use client-specific add-ons directories only for customer-exclusive developments or integrations.
- Enable the Restrict Client App Feature when you need strict control over application visibility.
- Review scanned modules before publishing them on the website.
15. How the Scan Feature Works Internally
Once you configure the Add-ons Paths in a SaaS Plan and click the Scan button, the Odoo SaaS Kit performs two important operations.
1. Module Discovery
The SaaS Kit scans all configured directories and identifies every valid Odoo module available in those locations.
If a scanned module does not already exist in the SaaS Kit, the system automatically creates a module entry for it.
Note: The Scan Feature creates modules as Unpublished by default. The administrator can later publish them or assign them to SaaS Plans as required.
2. Add-ons Path Mapping
Whenever you create a client instance, the SaaS Kit automatically maps the configured add-ons paths into the client’s odoo.conf file.
By default, every client instance includes the Common Add-ons Path.
For example:
/opt/common-addons_v16
If you configure additional directories in the SaaS Plan using the Scan Feature, the system also maps those directories automatically.
For example, while creating the Silver Plan the admin has scanned the following path using comma separated:
/opt/common-addons_v16
/opt/common-addons_v16/free_plan
/opt/common-addons_v16/bronze_plan
/opt/common-addons_v16/silver_plan
The client’s odoo.conf file will contain all of these paths in its addons_path configuration.
As a result, our SaaS Kit loads modules from every configured directory, making those custom modules available within the client instance.
The SaaS Kit performs this mapping automatically whenever you create a client instance, regardless of whether you provision the instance from the frontend or the backend.
16. How the Restrict Client App Feature Works
Understanding how the Restrict Client App Feature works internally is important for controlling which applications clients can access.
Without Restrict Client App Feature
When you disable this feature, a client instance can access:
- All Odoo Core Modules.
- All custom modules available through the common add-ons paths.
As long as the module exists inside one of the common add-ons paths and its sub-directories, it can appear in the Apps menu, and the client can install it.
16.1 When Restrict Client App Feature Is Enabled
When the Restrict Client App Feature is enabled in the SaaS Plan and the client instance is launched using this plan. Only the modules assigned to the SaaS Plan are visible and accessible to the client, along with the required dependencies of those modules.
Modules that are not assigned to the SaaS Plan remain hidden from the client, even if they:
- Exist on the server.
- Are available in the Common Add-ons Path.
- Are available in any configured plan-specific directory.
These modules will not be available to the client through the Apps menu for browsing or installation. The SaaS kit make only the applications included in the SaaS Plan and their required dependencies available to the client.
This ensures that the SaaS Plan controls the applications available to each client, based on the modules included in their subscription.
17. Summary: Custom Module Management in Odoo Saas Kit
The Odoo SaaS Kit provides a flexible module management system that enables SaaS providers to distribute Odoo Core Modules and Custom Modules according to their business requirements.
Using the Common Add-ons Path, plan-specific directories, the Scan Feature, and the Restrict Client App Feature, administrators can:
- Organize custom modules efficiently.
- Configure different module combinations for different subscription plans.
- Automatically discover and register custom modules.
- Control which applications clients can access.
- Provide customer-specific modules without affecting other tenants.
- Manage both Odoo Core Modules and third-party modules through a single, centralized workflow.
By following the practices described in this guide, SaaS providers can build scalable subscription plans while maintaining complete control over application distribution and module visibility across all client instances.