CS-Cart QuickBooks Connector Documentation
CS-Cart QuickBooks Connector allows you to sync customer, product, and order details from your CS-Cart store with QuickBooks.
Whenever a new user registers, a product is added, or a customer places an order, the system automatically syncs all related data with your QuickBooks account.
The admin can easily import products and customers from QuickBooks to the CS-Cart store.
Additionally, when the admin updates customer, orders, or product information in CS-Cart, the changes are automatically synced with QuickBooks.
In the video below, check how the CS-Cart QuickBooks Connector works:
Features
- Well integrated with Multivendor and CS-Cart.
- Admin can manually synchronize the CS-Cart store – Customers, Products, and Orders with QuickBooks.
- Admin/Seller can import/export single or multiple products from the QuickBooks store to the CS-Cart store and CS-Cart to the QuickBooks store.
- When the admin creates an order in CS-Cart, the system automatically exports it to QuickBooks as an invoice.
- Admin can check all the payment methods.
- Admin can check all the accounts on one page for QuickBooks.
- Admins can export product categories.
- Admin / Seller can handle multiple store accounts from the CS-Cart Panel.
- Support Multi-Language.
- Admin/ Seller can import or export single or multiple customers in CS-Cart to QuickBooks.
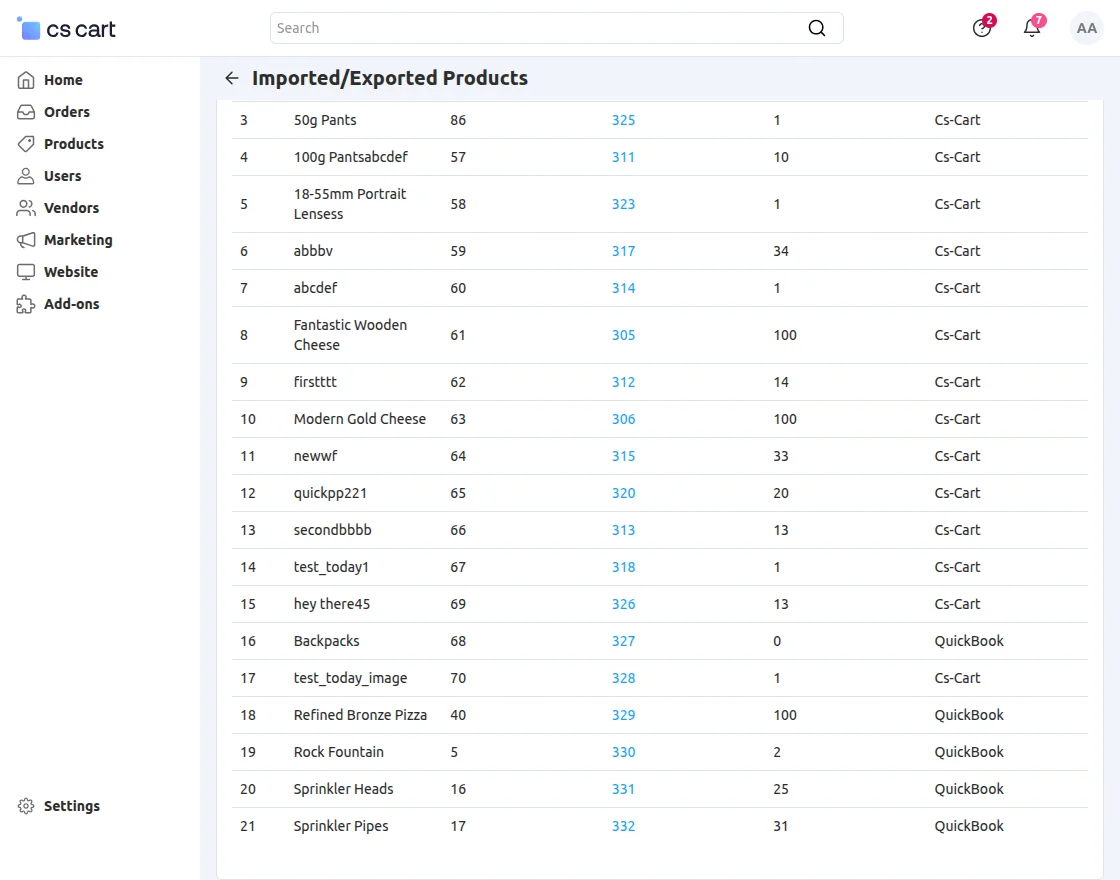
- The admin can check the separate page for imported or exported Products from the QuickBooks end.
- Admin checks product status settings during import from QuickBooks.
- A separate page for imported or exported Orders and customers from QuickBooks.
- Auto-Sync New Customer Registration from the CS-Cart Store to QuickBooks.
- The system automatically syncs newly added products from the CS-Cart store to QuickBooks.
- Real-time synchronization in QuickBooks to your CS-Cart store and CS-Cart store to QuickBooks.
- Batch processing helps reduce the time required for data synchronization.
Note: The QuickBooks Connector add-on works on a live server but does not function on a local server.
Installation
After downloading the CS-Cart QuickBooks Connector add-on, you will receive a ZIP file, an install.txt file, and a user guide document. Read the guide carefully to ensure proper configuration.
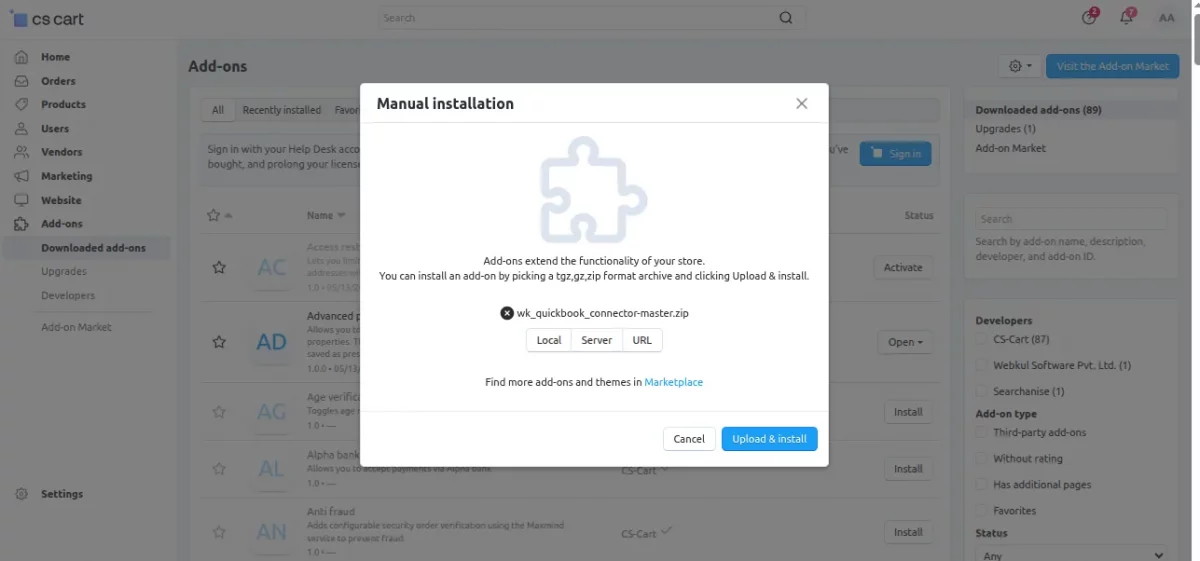
Go to Manage Add-ons, and click on “Manual Installation” as shown below in the snapshot


Click “Local” to browse and select the ZIP file, then click “Upload & Install” as shown in the snapshot below.

Add-on Configuration
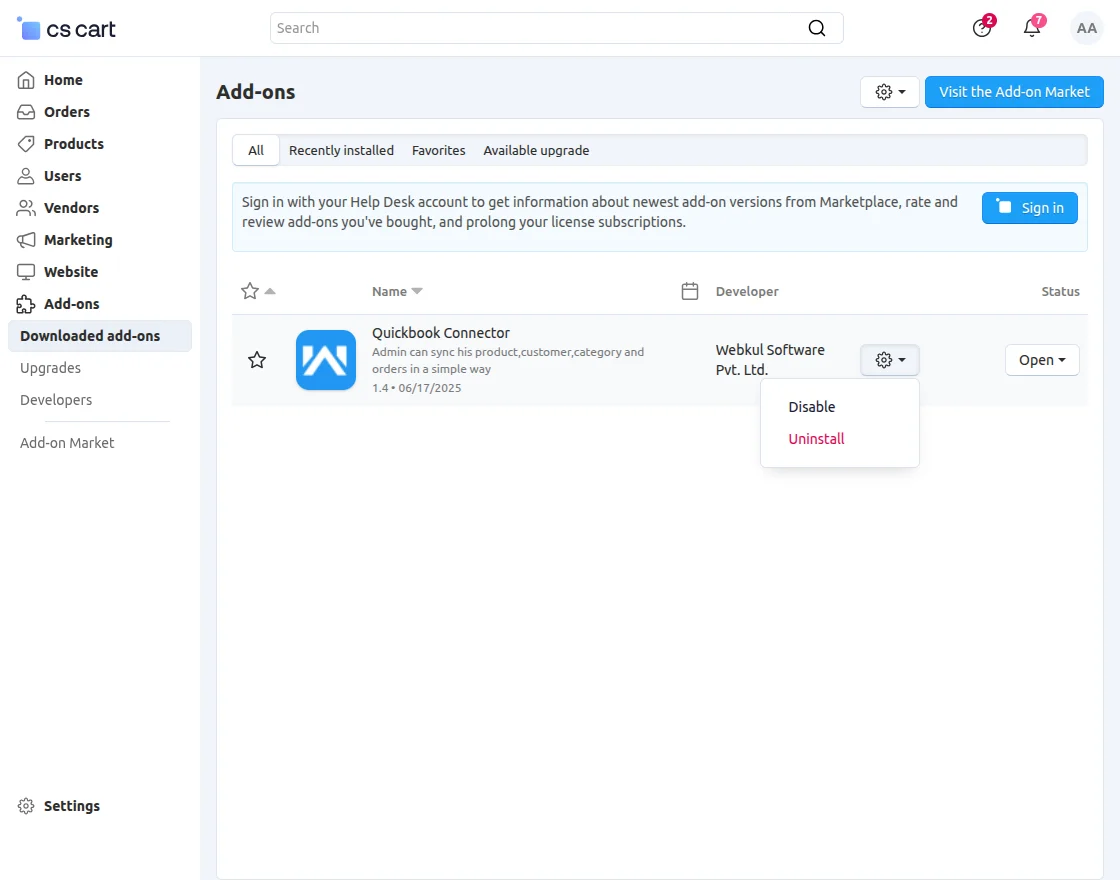
After installing the add-on, you will find CS-Cart QuickBooks Connector in the list of available add-ons. Next, we will configure the settings.
Click on “settings” to enable, disable, install, or refresh.
Activate the add-on, and confirm its status as shown in the snapshot below.
Library installation
You can also download the library manually if needed.
Navigate to the following location using the terminal:
app/addons/wk_quickbook/lib
Run the command:
composer update
Module Configuration | Admin
To configure the module, go to the Add-Ons >> Developers >> Webkul Software Pvt Ltd. >> Quickbook Connector >> Settings.
Completing these configurations enables seamless export and import of customers, products, and orders between CS-Cart and QuickBooks.

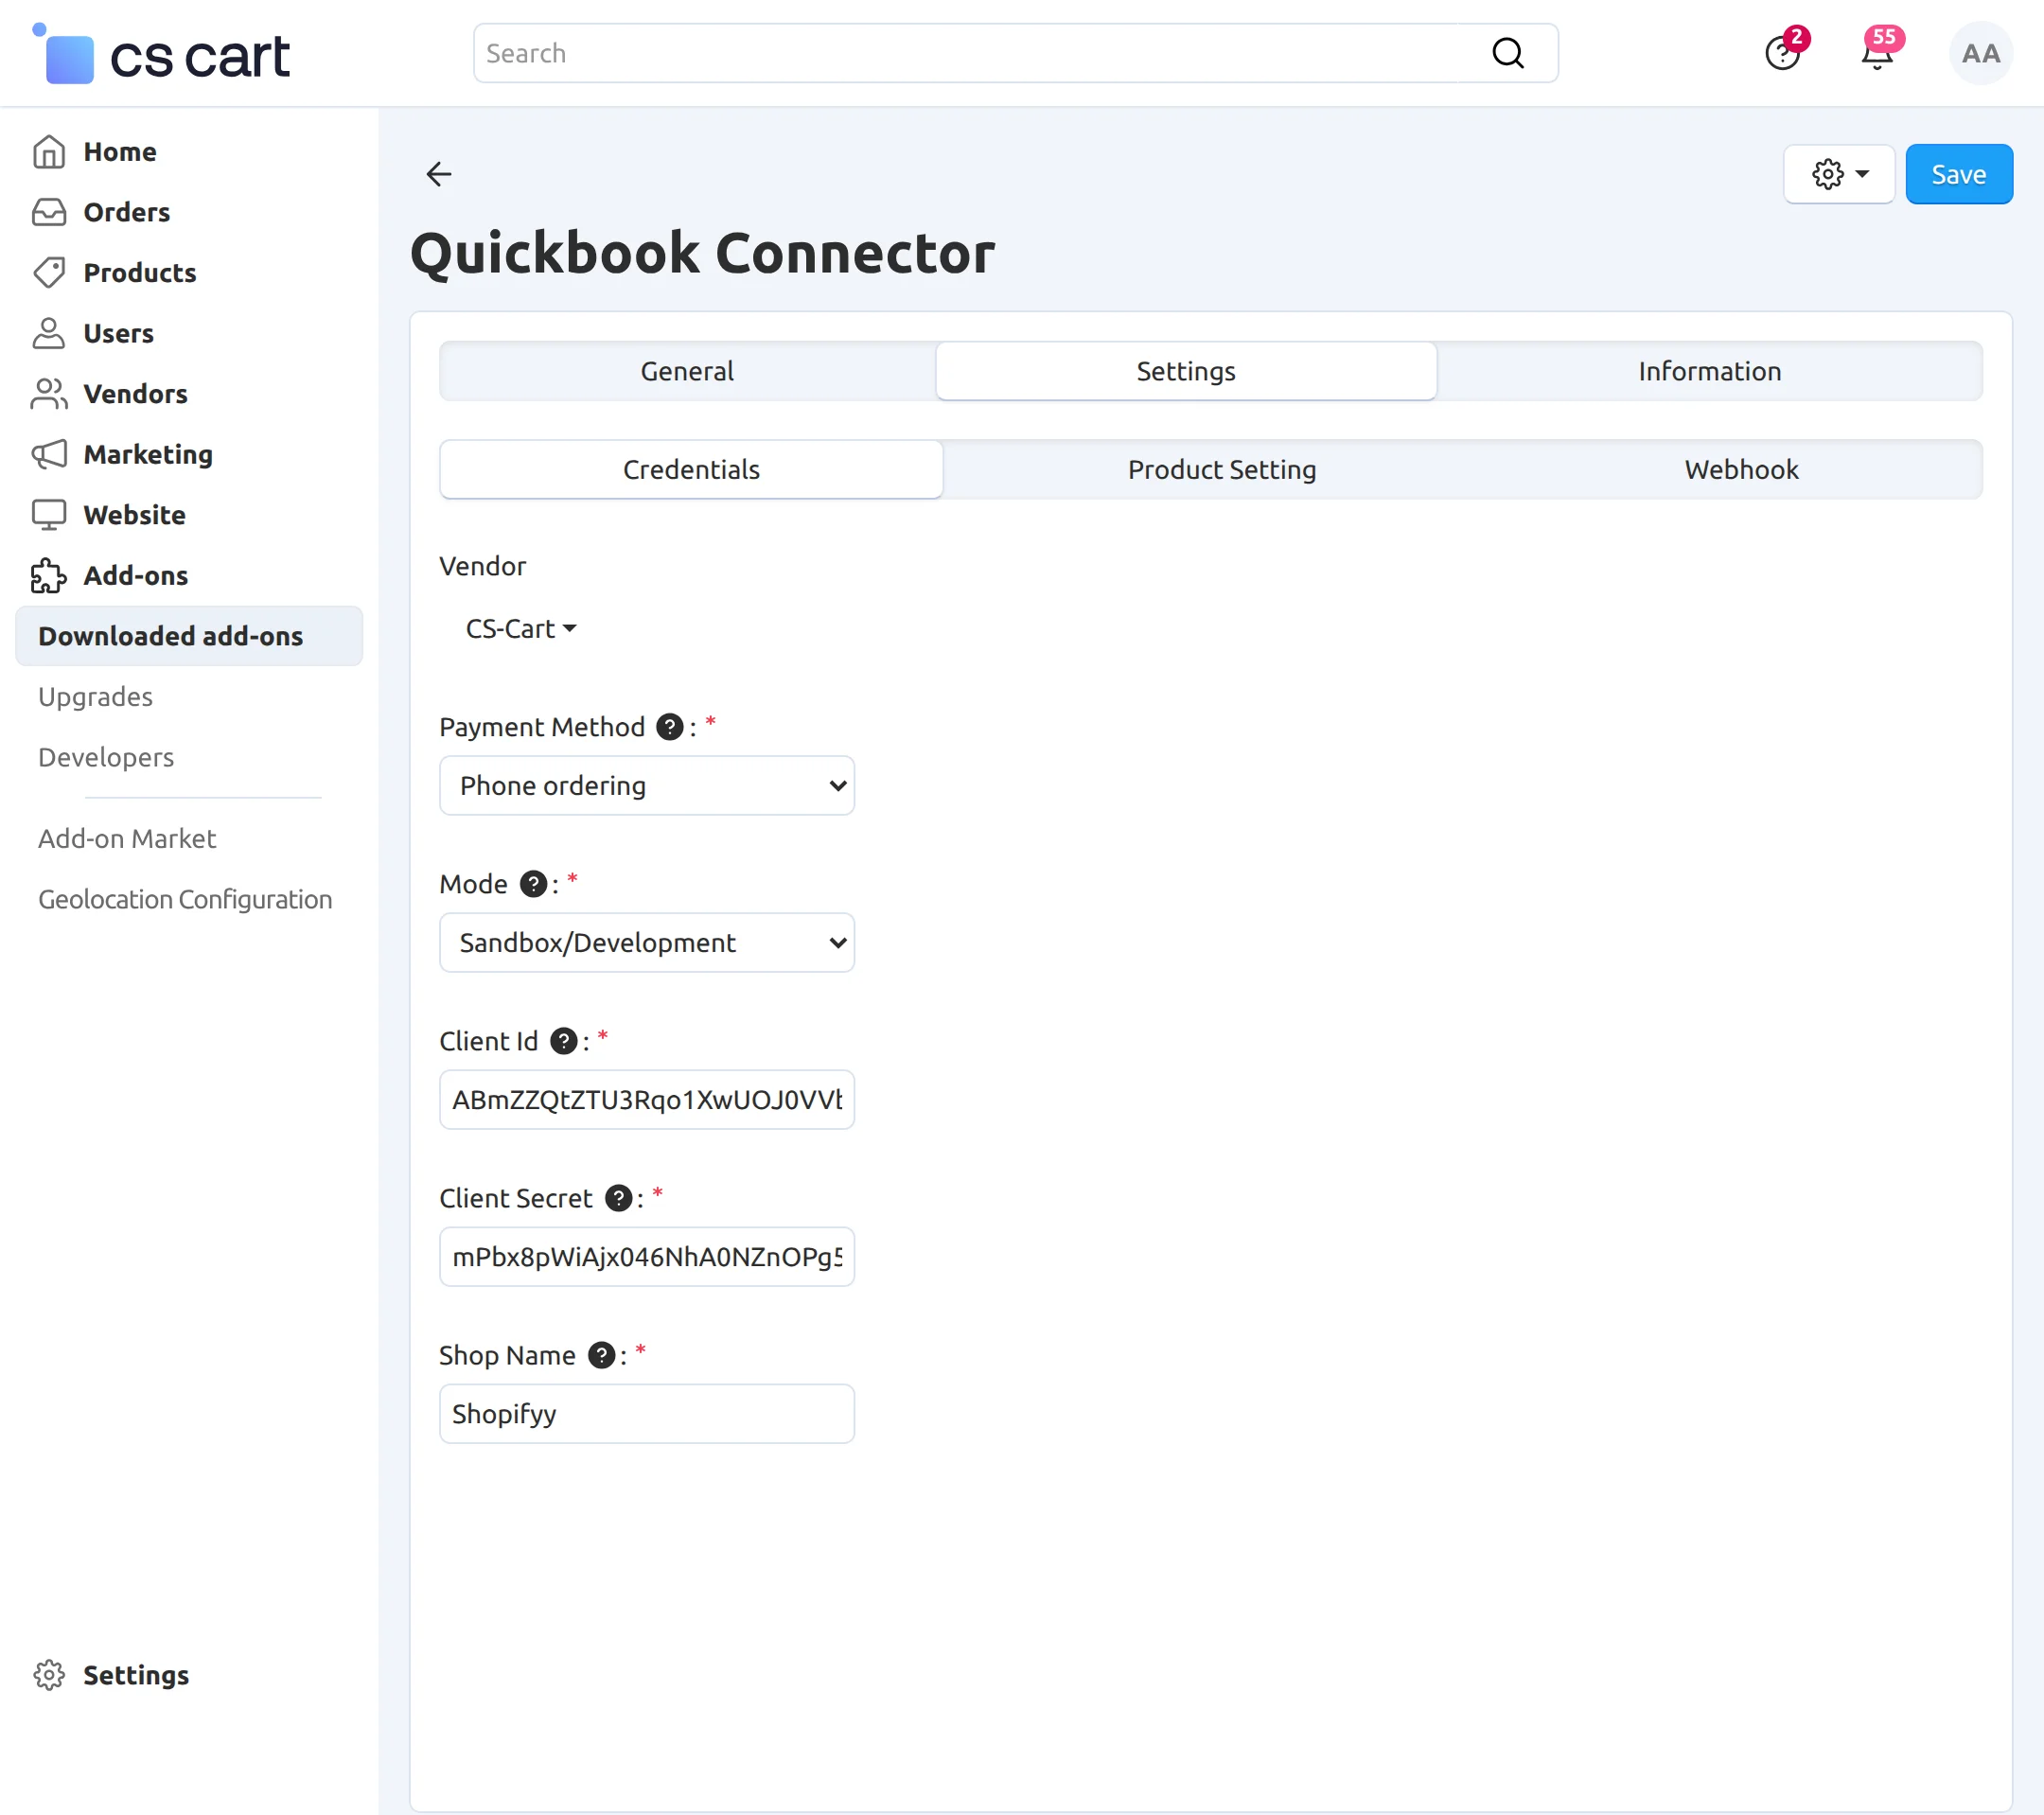
The admin can connect the QuickBooks account to the CS-Cart panel by entering the Client ID, Client Secret, and Shop Name.
- Payment Method: Choose the required payment method.
- Mode: Select the mode as either Sandbox or Live, depending on your requirements.
- Client ID: Enter the Client ID obtained from your QuickBooks account.
- Client Secret: Fill the Client Secret Key from your QuickBooks account.
Product Setting:
Fill in all the required fields to complete the configuration successfully.
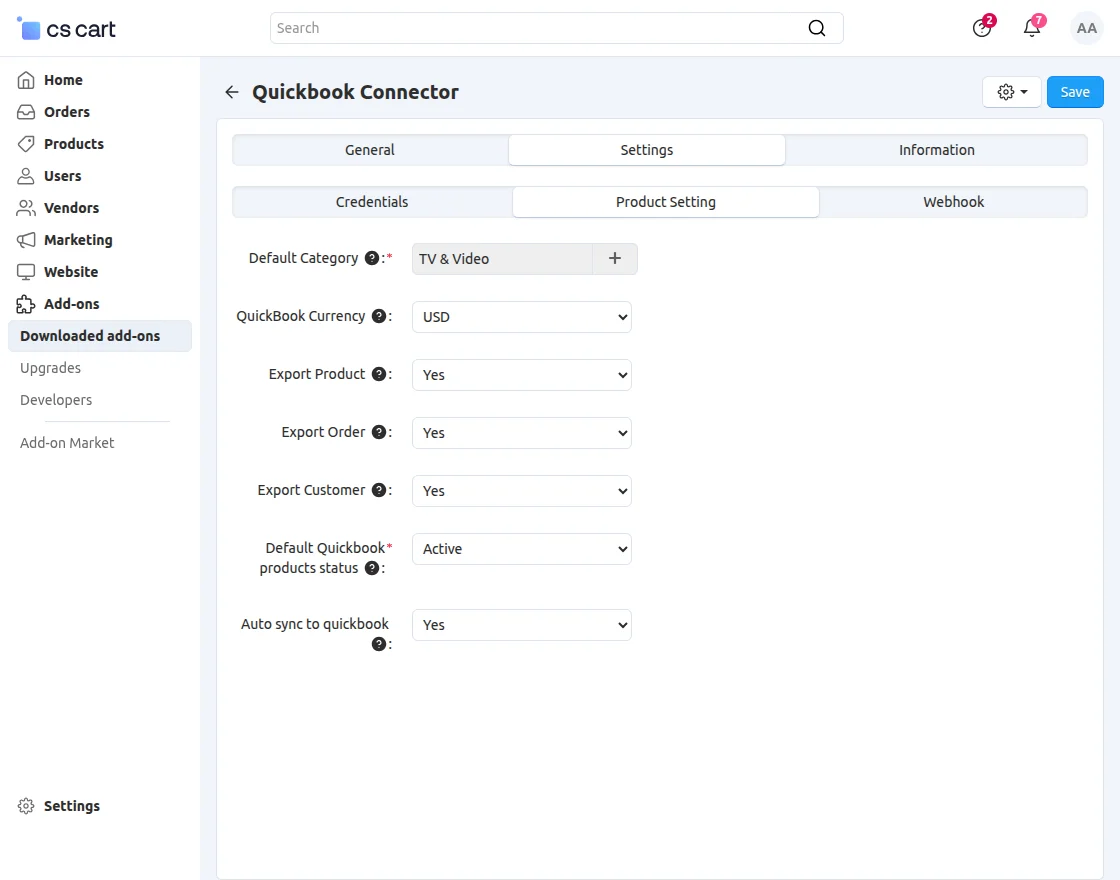
Category: Select default category
QuickBooks Currency: Select currency from the dropdown.
Export Product: Choose yes to export the product.
Order: Select yes to export orders.
Export Customers: Choose yes to export customers.
Default QuickBooks products status: Set the status as Active.
Auto sync to QuickBooks: Set the status to ‘Yes’ or ‘No’ to enable or disable automatic synchronization with QuickBooks.
Webhook:
Fill in all the required fields to enable seamless synchronization between QuickBooks and CS-Cart in both directions.
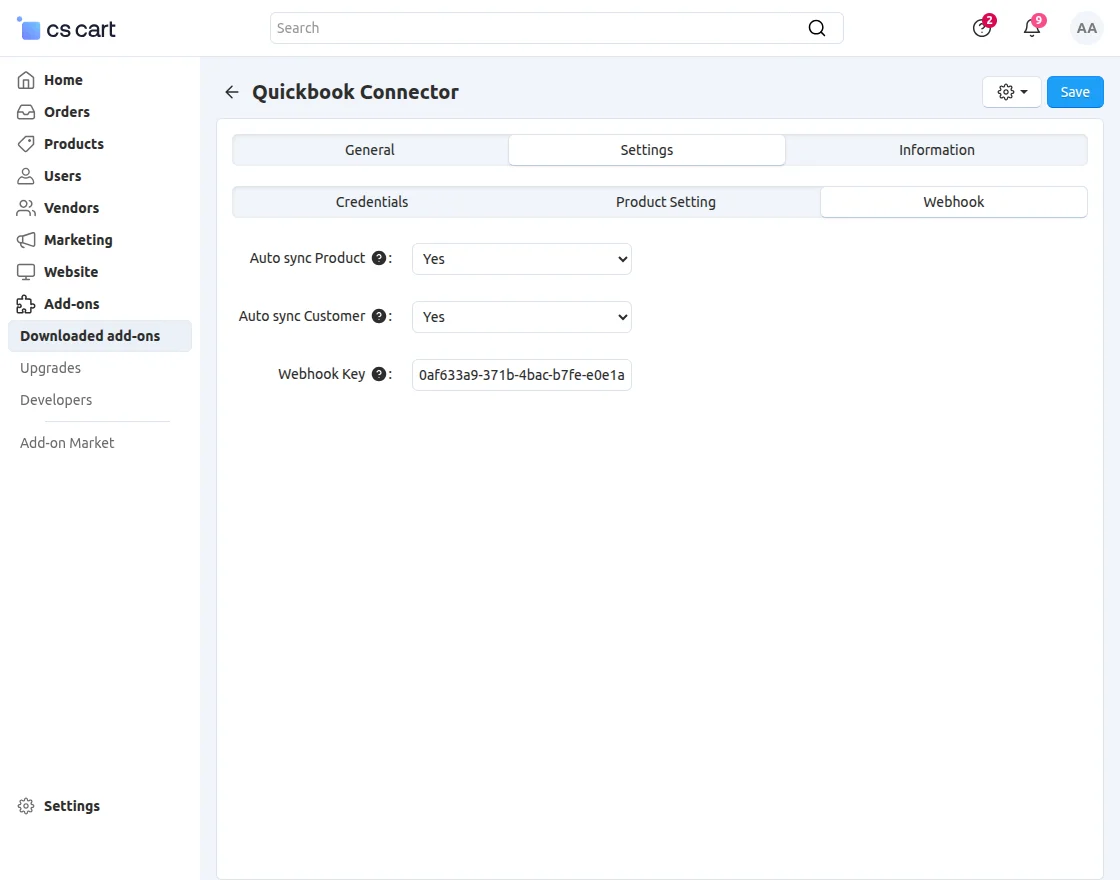
- Auto Sync Product: Select Yes to enable automatic synchronization of products between QuickBooks and CS-Cart in both directions.
- Auto Sync Customer: Select Yes to enable automatic synchronization of customers.
- Webhook Key: Enter the Webhook key obtained from your QuickBooks account.
How to get the QuickBooks Keys?
- Go to https://developer.intuit.com/, then click the Sign In option at the top right corner to open the sign-in page.
- On the Sign-in page, click “Create an account” to create a new account.


- Enter the required registration details, then click the Create Account button on the registration page.


After you click the Create Account option, the system creates your QuickBooks account and redirects you to a page where you can create an app.
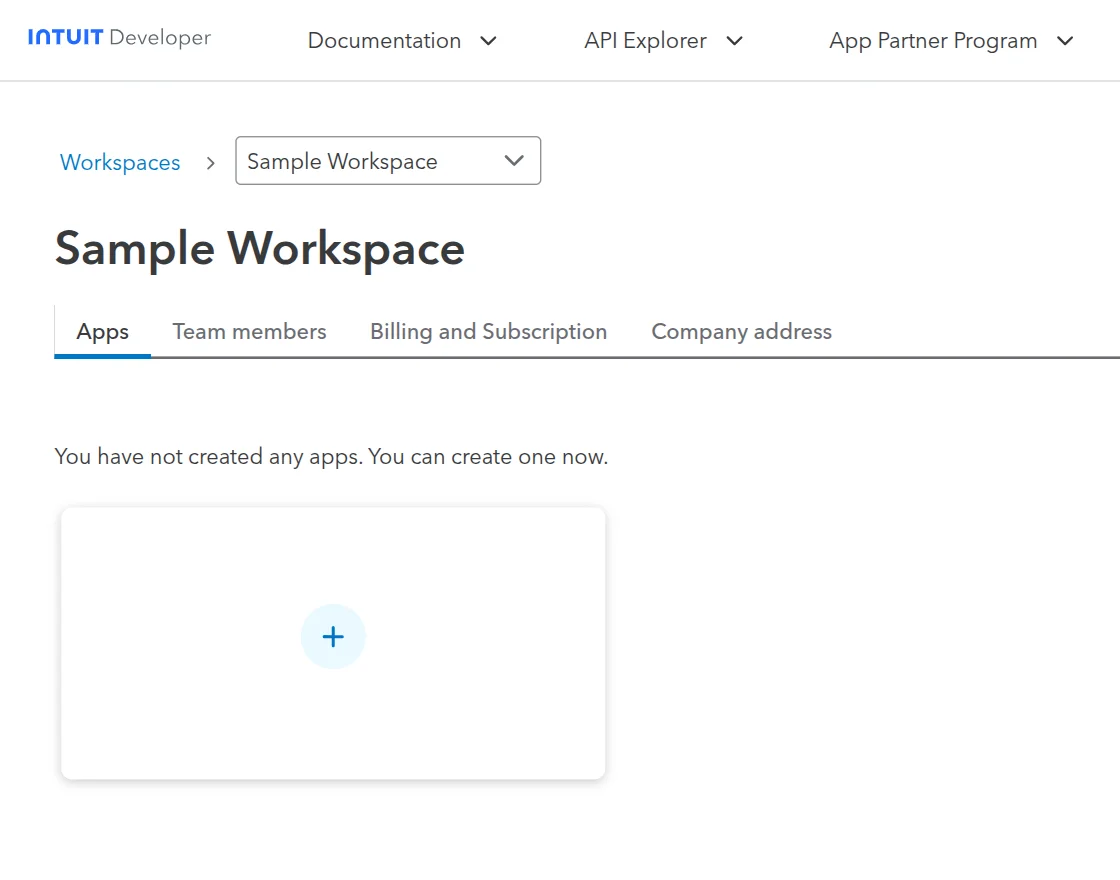
When you click Create an App, you need to select the development platform. In this case, choose QuickBooks Online and Payments.


The app developer will then see a screen where they can enter the workspace name, company information, and contact details.

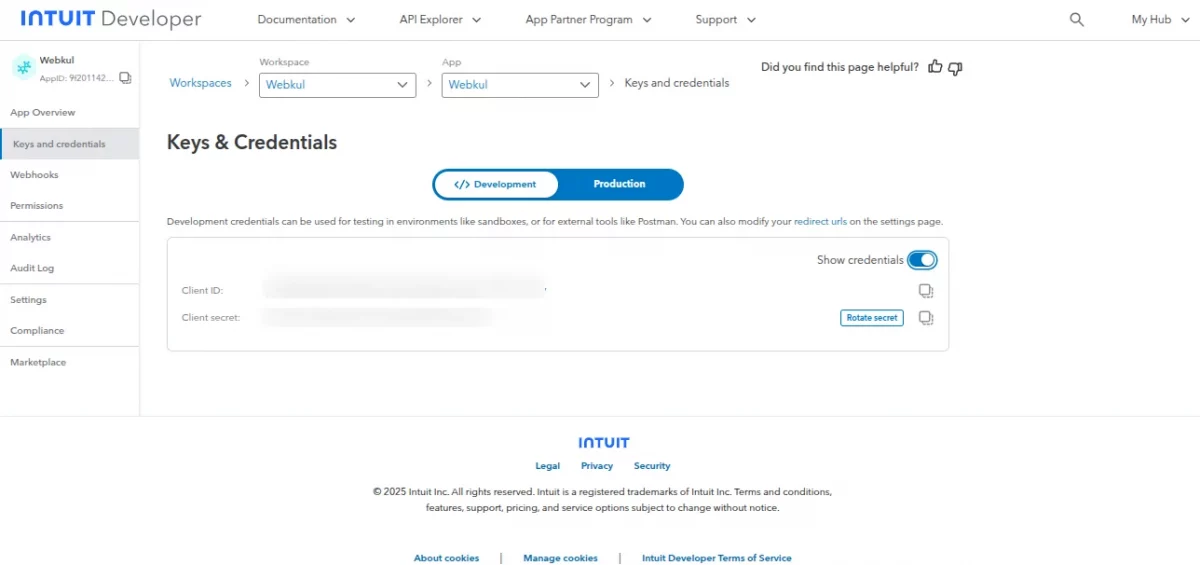
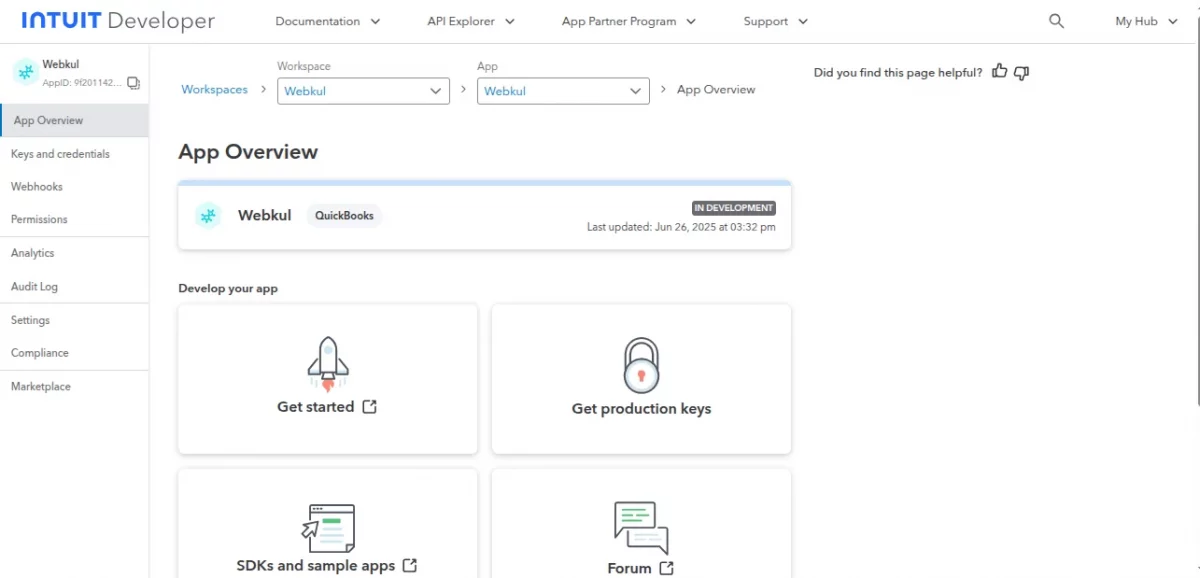
Keys And Credentials
After creating the app, navigate to the Keys & Credentials section, where you can view the Client ID and Client Secret Key.

Webhook
Here, the admin must have entered the Webhook URL as: your-instance-URL/index.php?dispatch=wk_quickbook.webhook

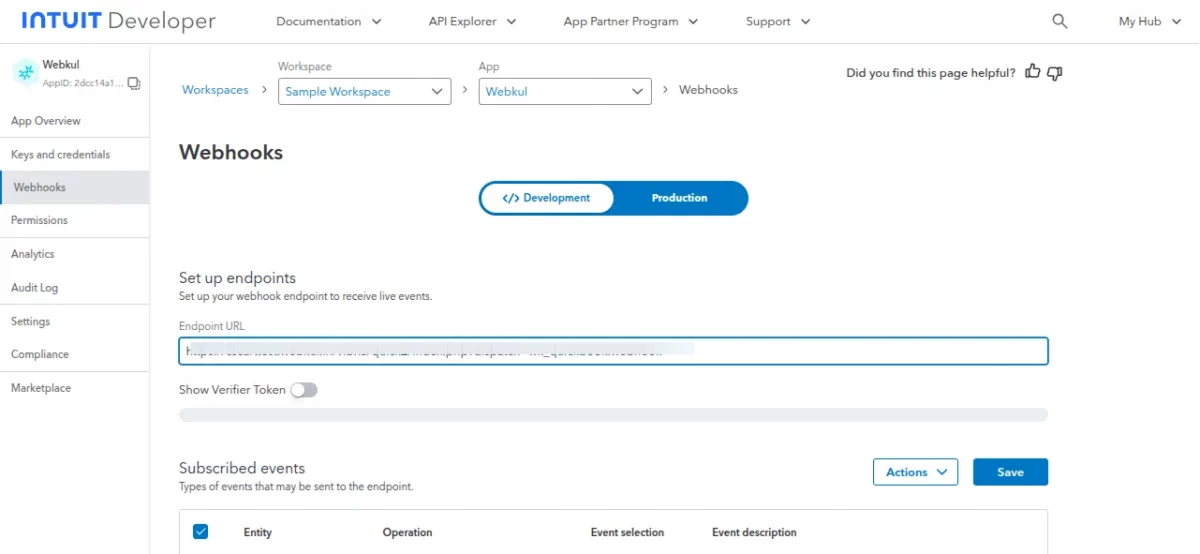
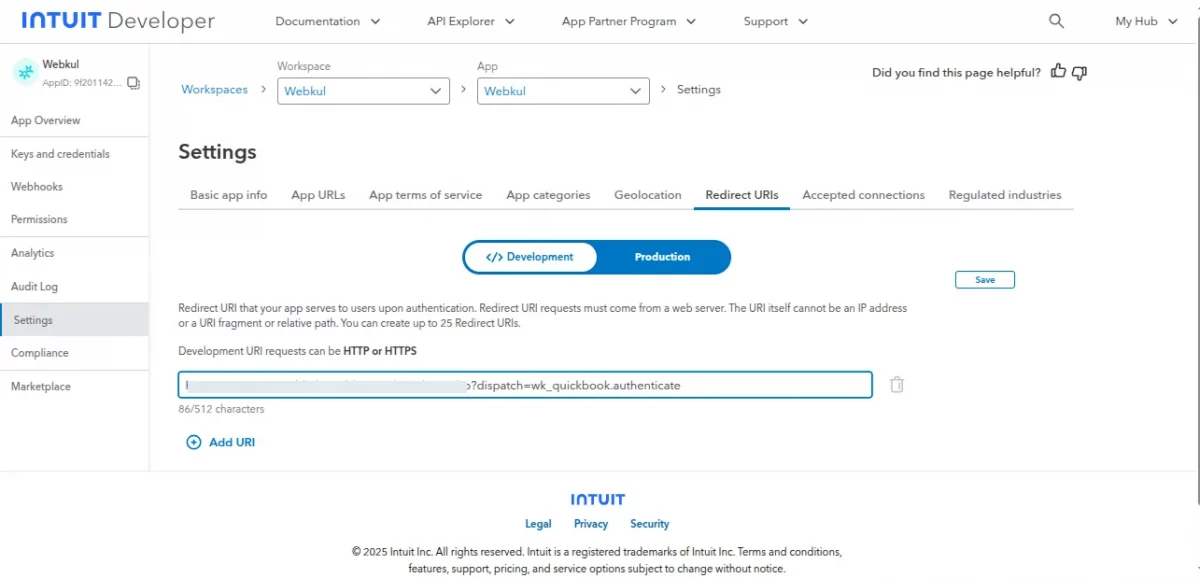
Redirect URI
Here, the admin must enter the CS-Cart redirect URL as: your-admin-URL?dispatch=wk_quickbook.authenticate.

Once you create the app, it appears on your QuickBooks dashboard.
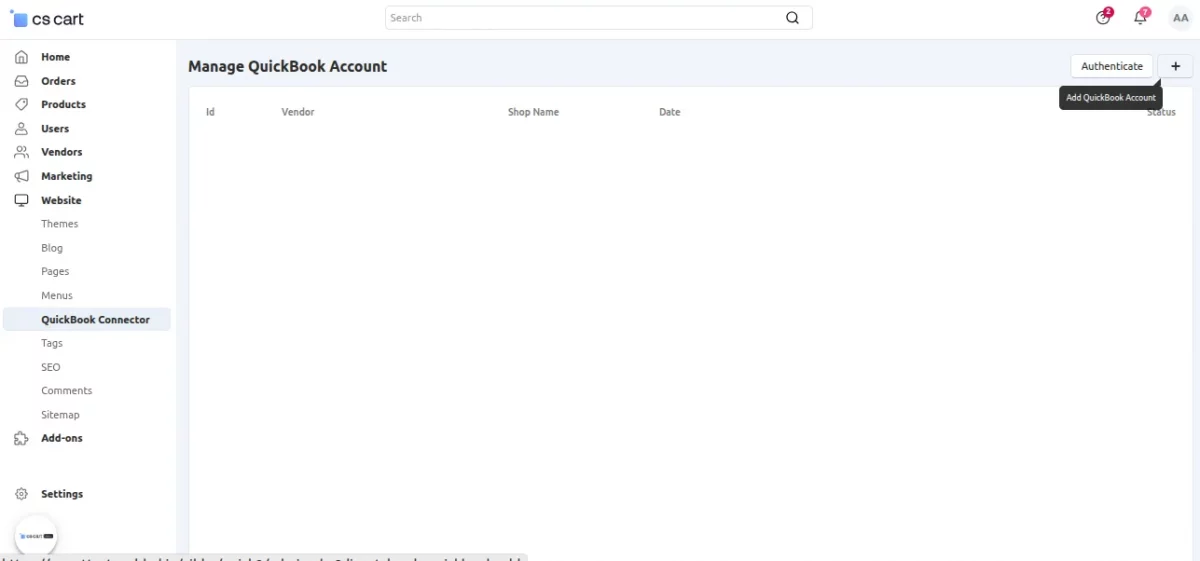
Manage QuickBooks Account
To configure the module, go to the Website >> QuickBooks Connector.
Click to Add QuickBooks Account.
Add the QuickBooks merchant account by entering all the required credentials from your QuickBooks account.
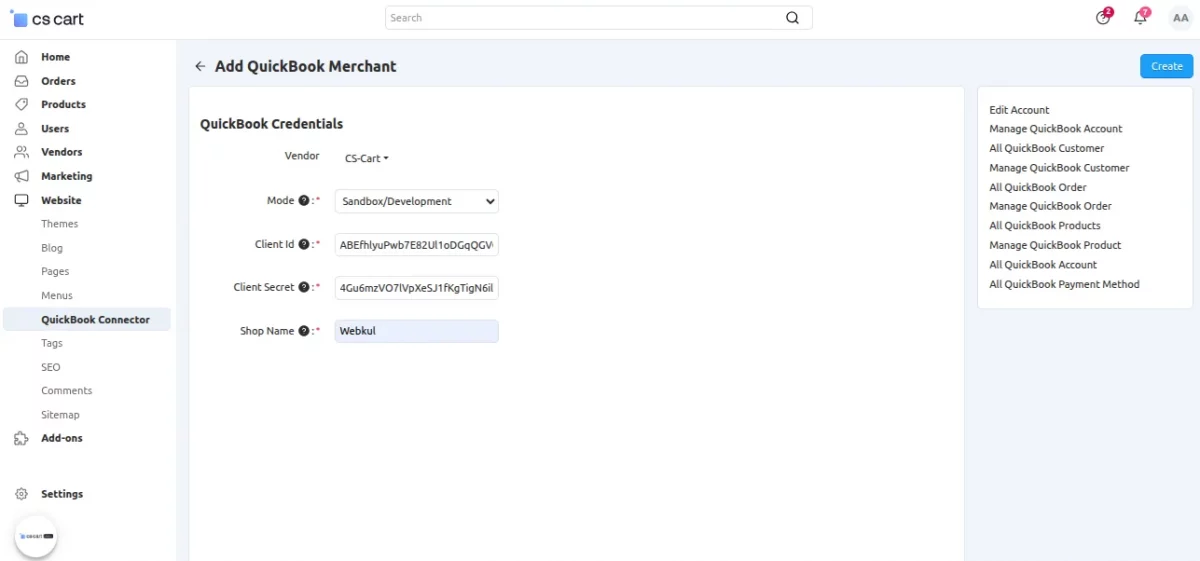
Click the Create button, and the system will redirect you to your QuickBooks account.
Next, select the company and click the Next button to proceed.
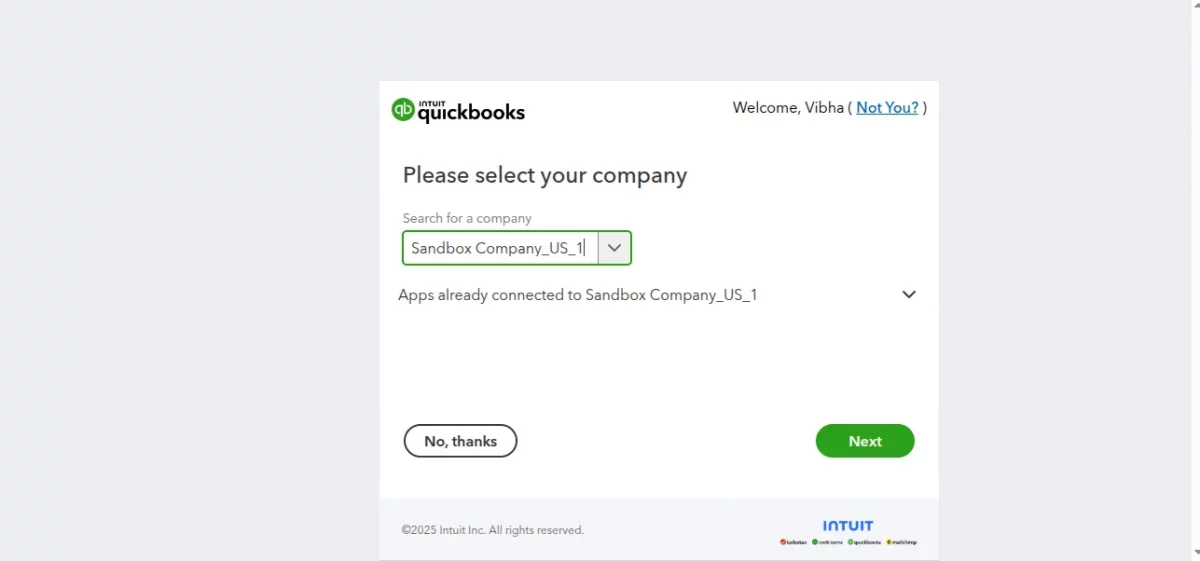
Your CS-Cart panel is now successfully connected to QuickBooks.

Set the selected QuickBooks account as the default account for all future transactions and integrations.
How To Synchronize – Customers, Orders, and Products
To synchronize customers between CS-Cart and QuickBooks, the admin needs to navigate to Website > QuickBooks Connector.
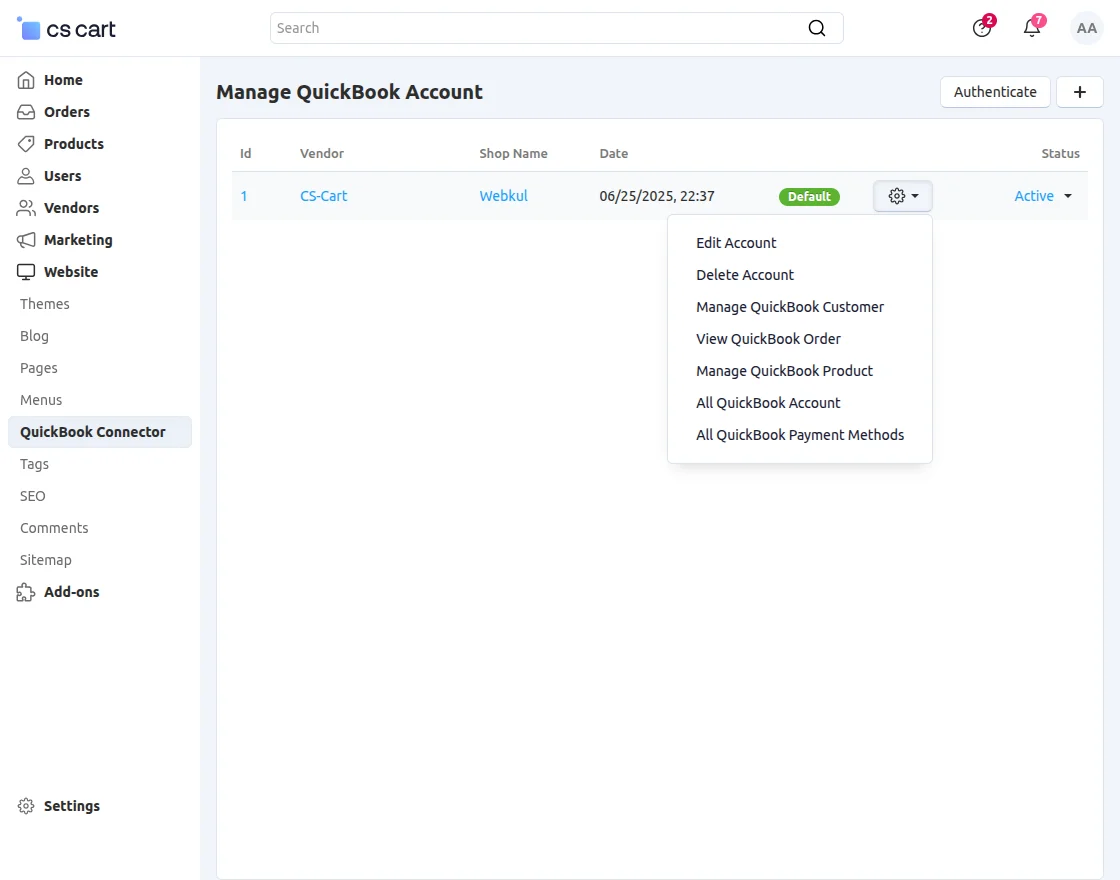
This section displays all added stores, and the admin manages each QuickBooks account individually.
Edit Account: The admin can edit the QuickBooks account here.
Delete Account: This option allows the admin to delete the QuickBooks account.
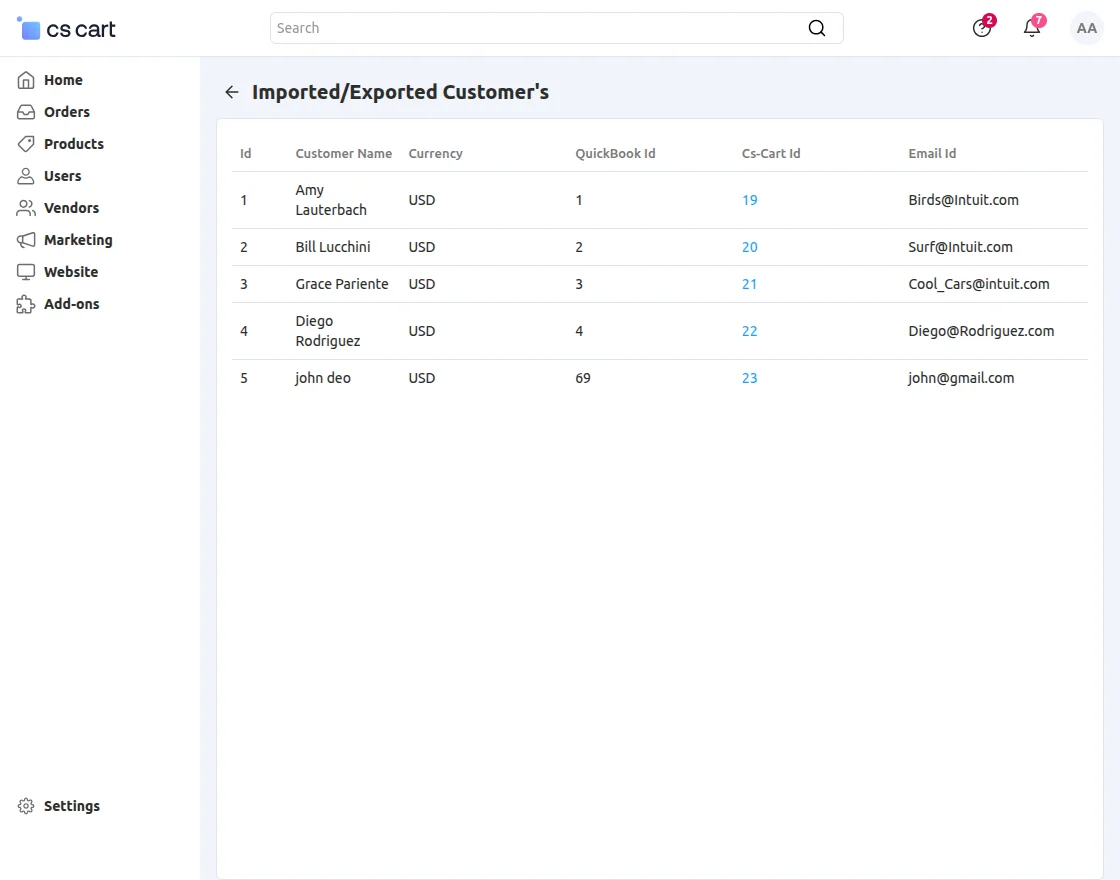
Manage QuickBooks Customers
Here, the admin can view the complete list of customers synced from QuickBooks.
All QuickBooks customers
From here, the admin can view all QuickBooks customers and import them into the CS-Cart store.

The admin can import individual customers or import multiple customers in bulk by selecting them from the list.
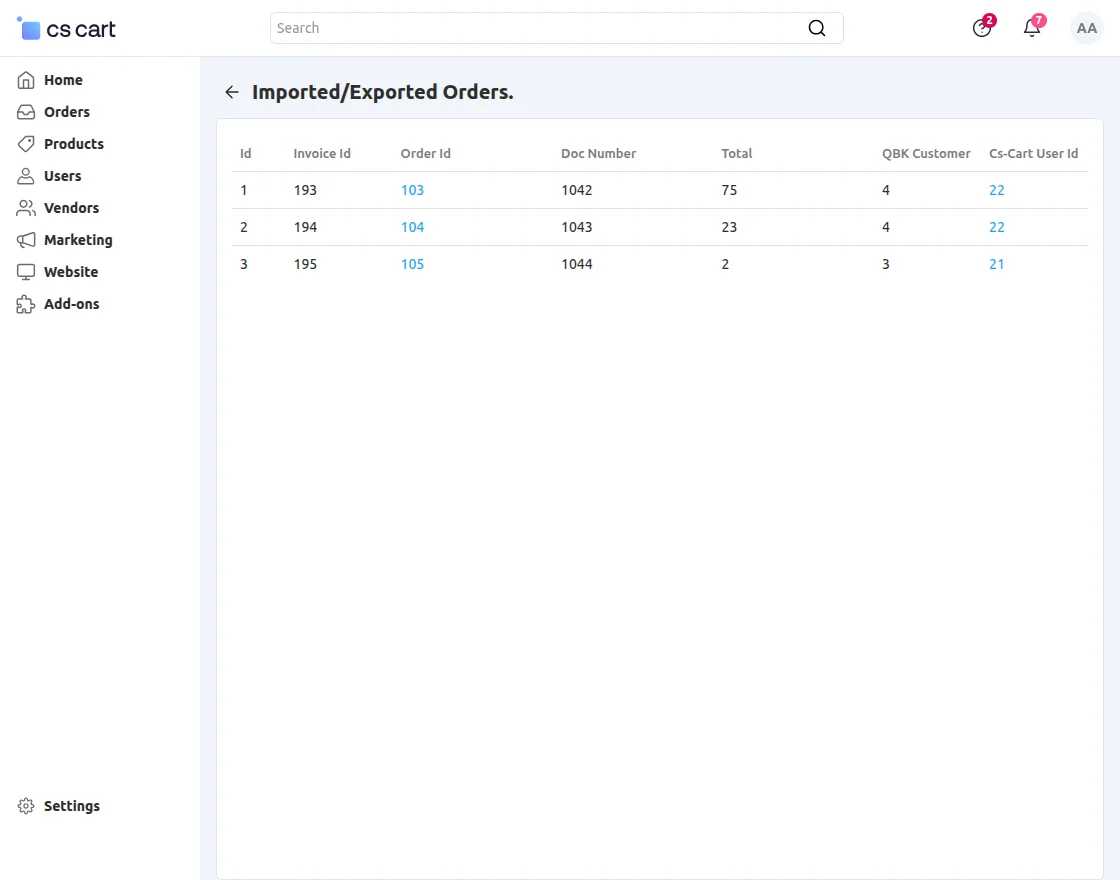
All QuickBooks Orders:
From this menu, the admin can view all orders that have been exported to or imported from QuickBooks, enabling efficient monitoring and management of order synchronization.
Manage QuickBooks Products:
The admin can use this section to view all products exchanged between CS-Cart and QuickBooks, whether imported or exported.
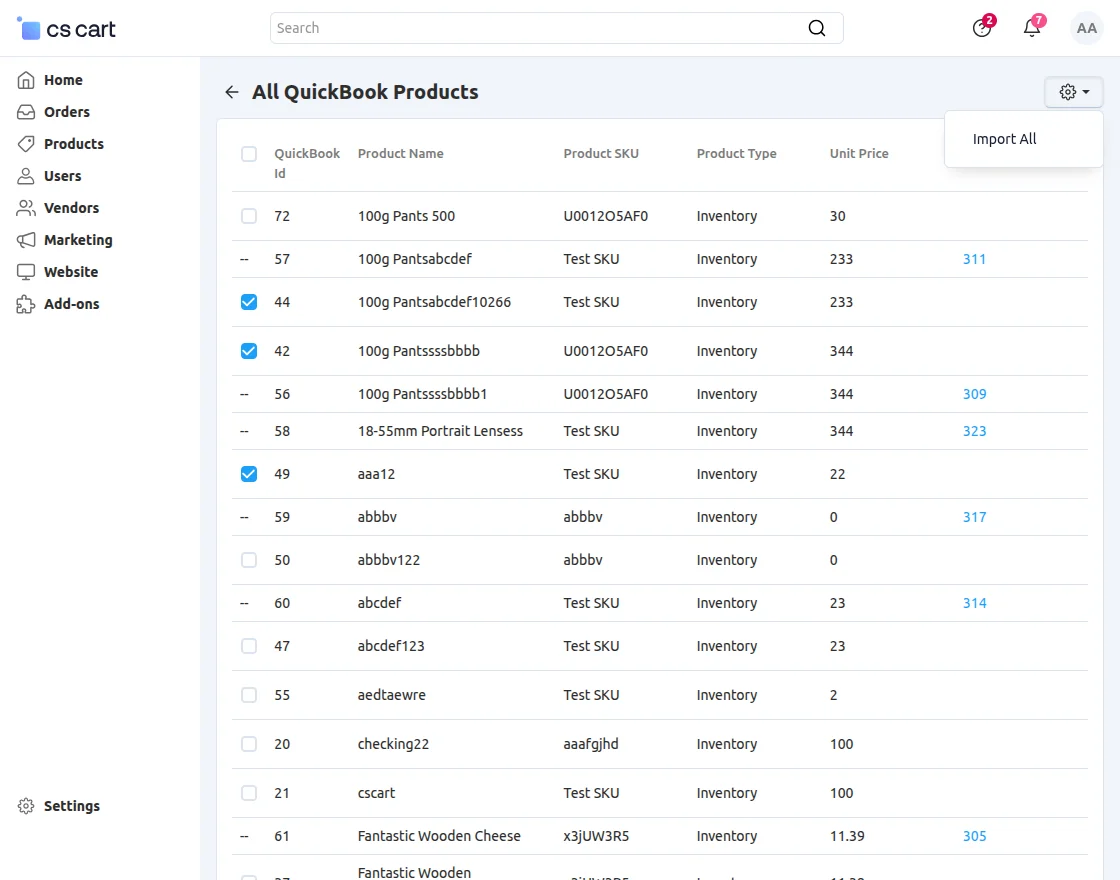
All QuickBooks Products:
The admin can use this section to manage all products synced between QuickBooks and CS-Cart, whether imported or exported.
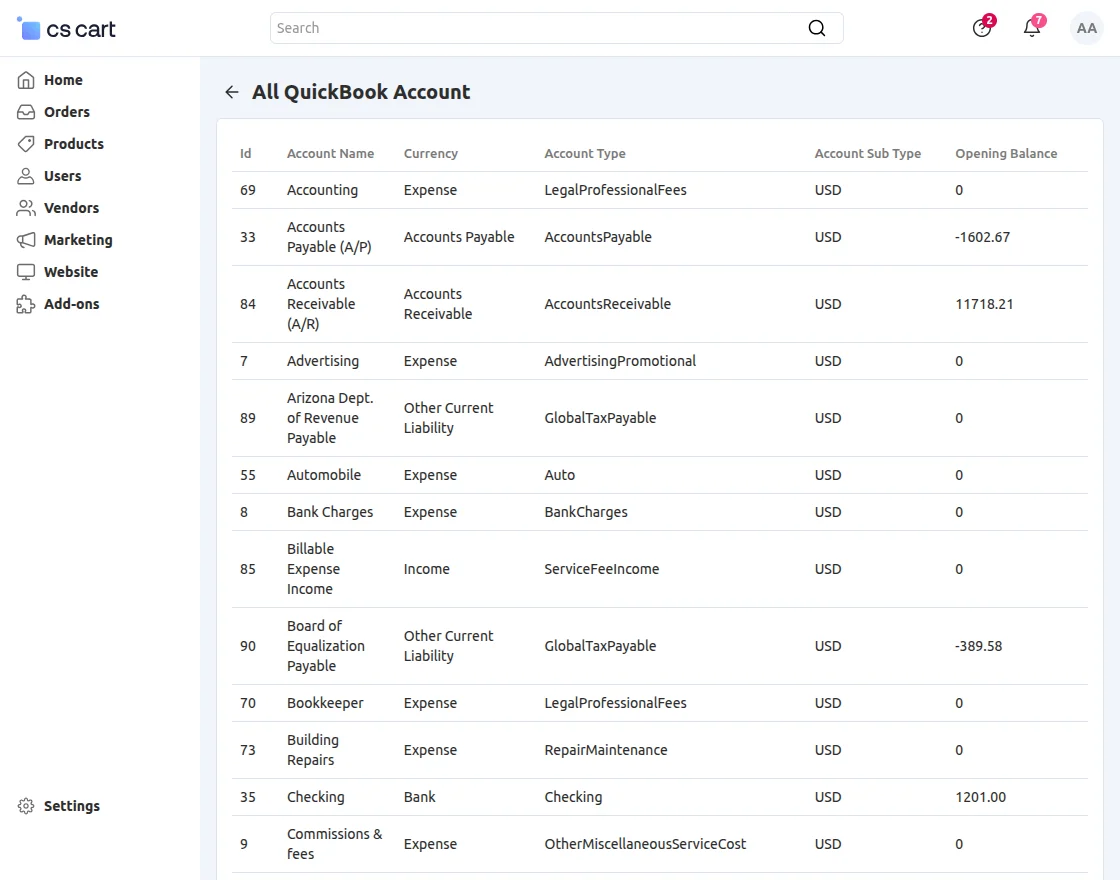
All QuickBooks Accounts
The admin can check all linked QuickBooks accounts here.
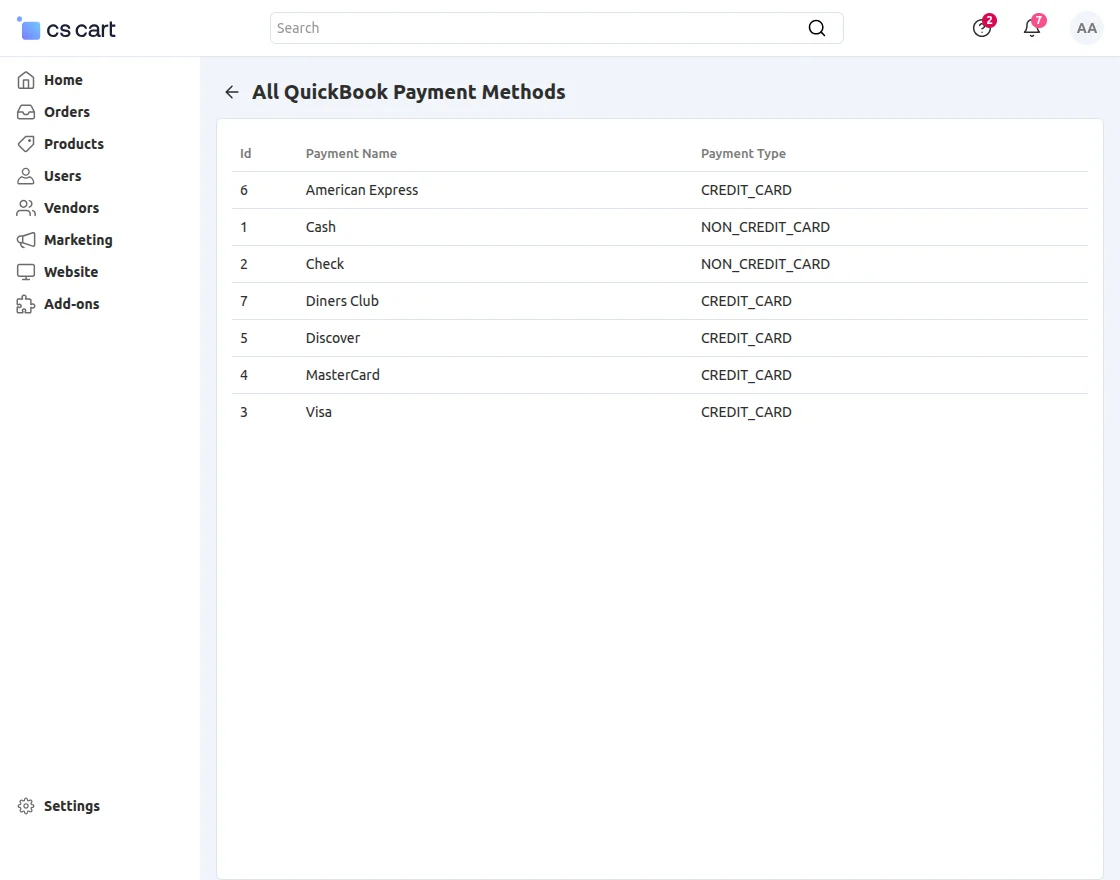
All QuickBooks Payment Methods
The admin can check all the available and created payment methods in QuickBooks.
Export Products, Orders, and Customers:
The admin can export products, orders, and customers from the admin panel either individually or in bulk.
The admin can view the exported data in both the CS-Cart admin panel and the QuickBooks dashboard.
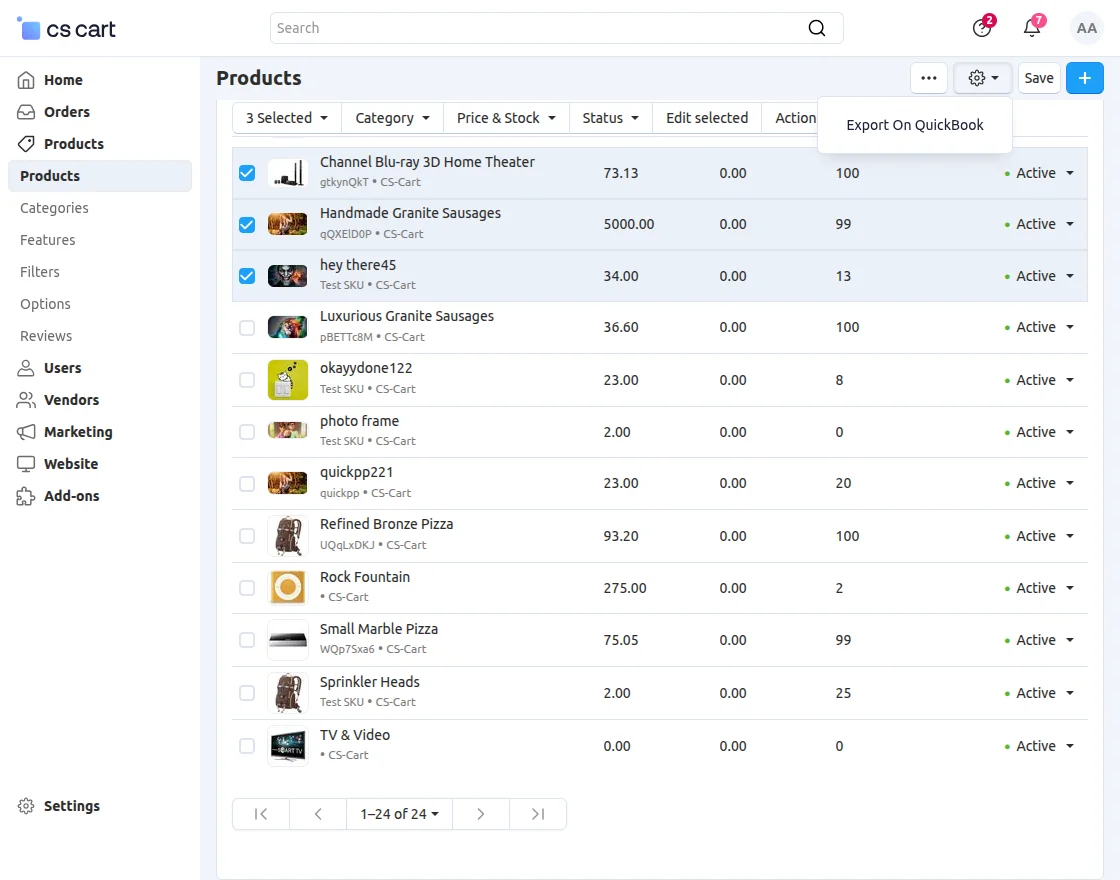
Export Product:
From the product section, the admin can export products by selecting them individually or choosing multiple products for bulk export.
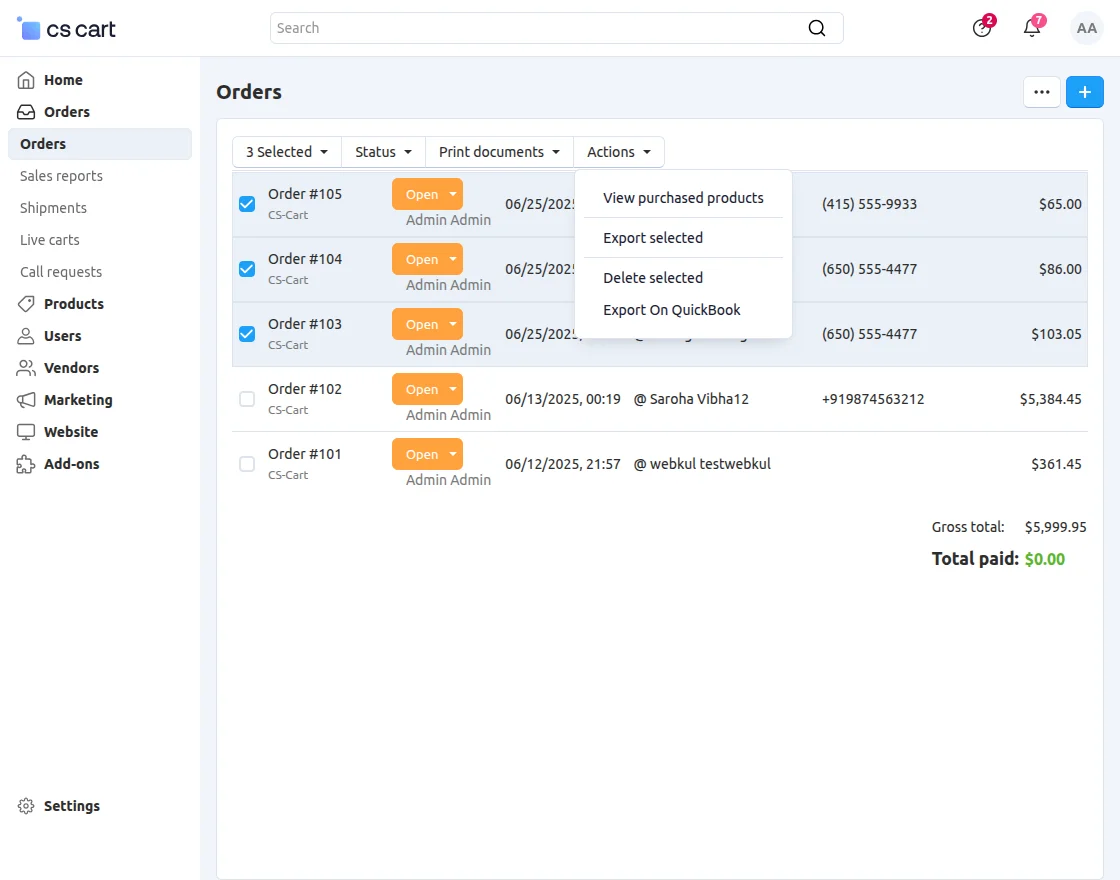
Export Orders:
The admin can export orders from CS-Cart to QuickBooks.
Note: All QuickBooks orders will automatically sync with the CS-Cart panel.
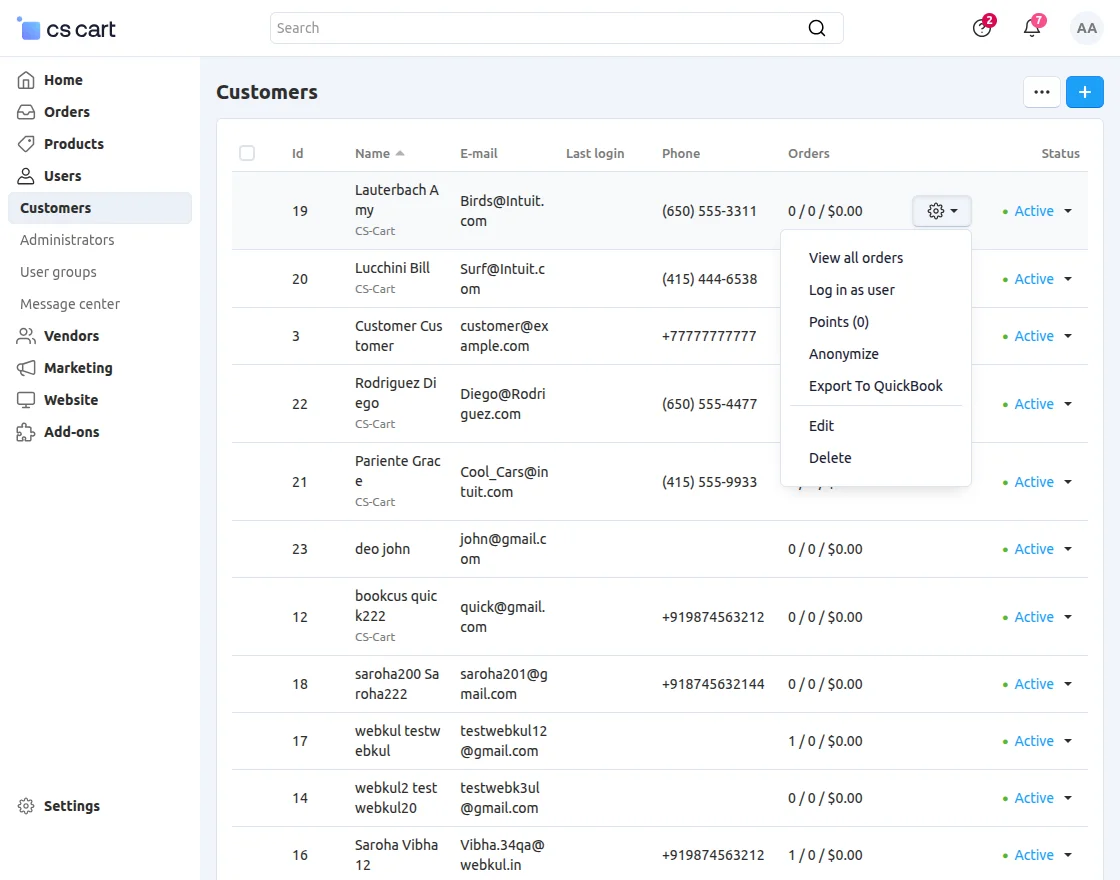
Export Customers:
The admin can export CS-Cart customers to the QuickBooks account individually.
Products, Customers, and Orders at QuickBooks End:
Products:


Customer:


Orders:


Support
If you have any questions, suggestions, or customization requests, feel free to contact us at support@webkul.com or submit a ticket at webkul.uvdesk.com.
Explore our premium-quality CS Cart Extensions to enhance your store functionality.
You can also explore our CS-Cart Development Services and Quality CS-Cart add-ons.