User Guide for CS-Cart Booking Reservation System
Table of Content
FeaturesInstallation(Booking Reservation System)Module Configuration(Booking Reservation System) | AdminModule Configuration(Booking Reservation System) | VendorBooking from Rule ManagerBooking OrdersCustomer View:Additionally, the system offers advanced features such as booking cancellation, calendar integration, and ICS invite functionality.Module Configuration(Booking Stores Calendar) | AdminModule Configuration(Store Calendar) | VendorImport Booking into Calendar Through .ICS FileSupport
CS-Cart Booking Reservation System enables vendors to sell rental (hourly/daily), appointment, and hotel bookings directly from the Multi-Vendor panel.
Customers can easily select their preferred time slots and quantities from the storefront.
Vendors can manage availability by blocking specific dates or defining multiple booking slots per day with separate capacities.
The system enables both vendors and customers to cancel bookings when required.
It also supports bulk booking rules, flexible pricing rules, advanced order filters, and seamless synchronization with Google Calendar and ICS invites.
These features ensure efficient and consistent booking management across both the storefront and vendor panel.
Note: Before installing the add-on, extract the downloaded package.
- Install the License Manager add-on first.
- Then install the required add-on.
- Follow the license activation steps to generate your license key.
Check the overview of the module CS-Cart Booking Reservation System
Features
-
Seamlessly integrates with the CS-Cart Multi-Vendor platform.
-
Allows easy configuration and management from the vendor panel.
-
Enables the vendor to create four booking types: rental (hourly), rental (daily), appointment, and hotel guest.
-
Allows both customers and vendors to cancel bookings when needed.
-
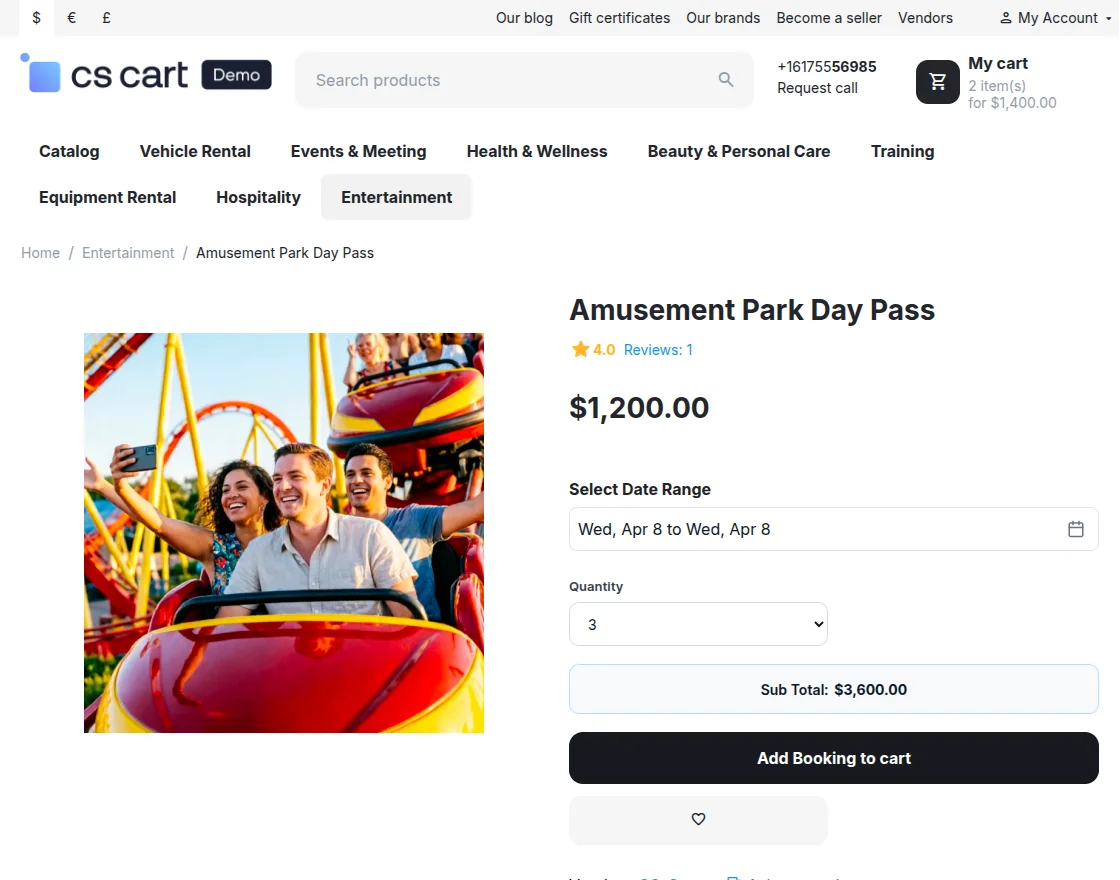
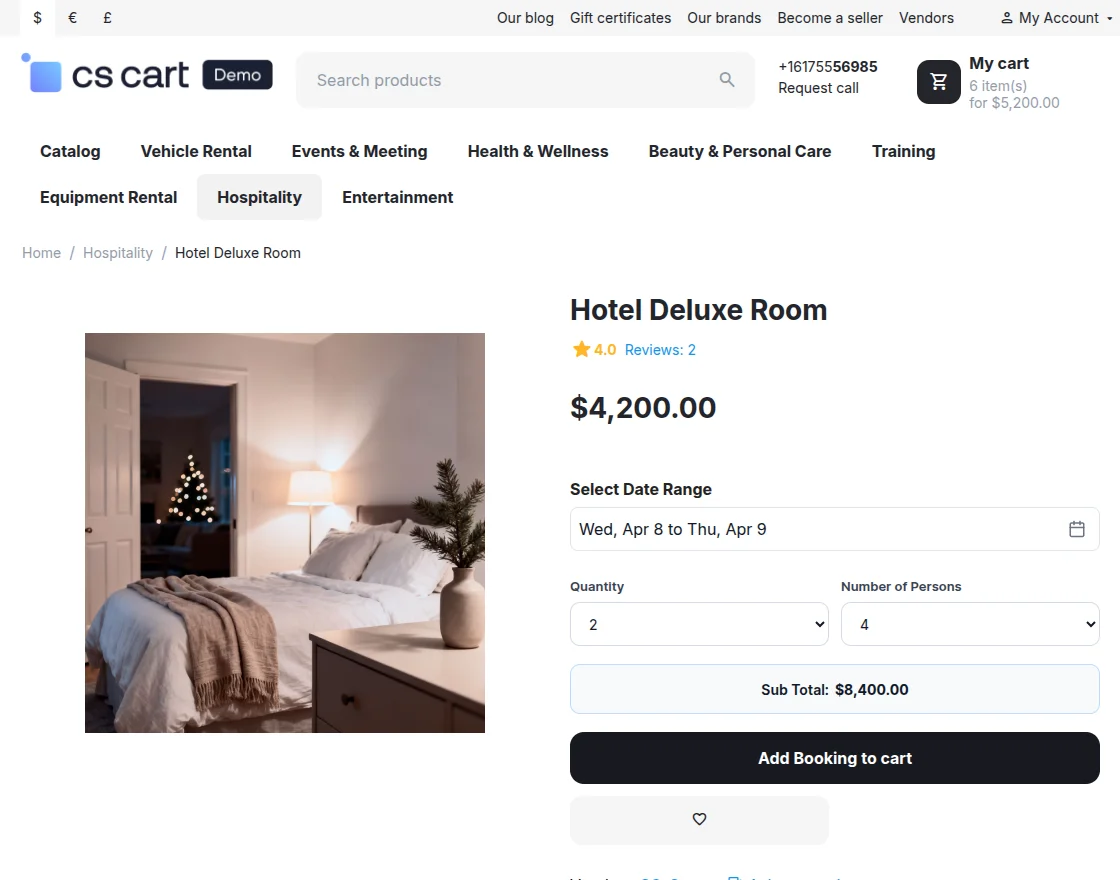
Let customers select their preferred booking slots directly from the storefront.
-
Enables customers to adjust product quantities for each booking.
-
Provides filters to quickly find booking-related orders from both the admin and vendor panels.
-
Supports bulk assignment of products through booking rules.
-
Allows vendors to fully customize booking-related text.
-
Enables vendors to block specific dates to prevent bookings.
- Syncs bookings with Google Calendar and sends calendar invites (ICS) via email.
-
Supports custom pricing rules configured per booking or rule.
Installation(Booking Reservation System)
You will receive a ZIP file named Booking. Extract the file, then compress each of the four add-on folders separately and upload them manually.
After downloading the CS-Cart Booking Reservation System add-on, you’ll get one zip file, one install.txt file, and a relevant User Guide manual doc. Read it carefully for proper configuration.
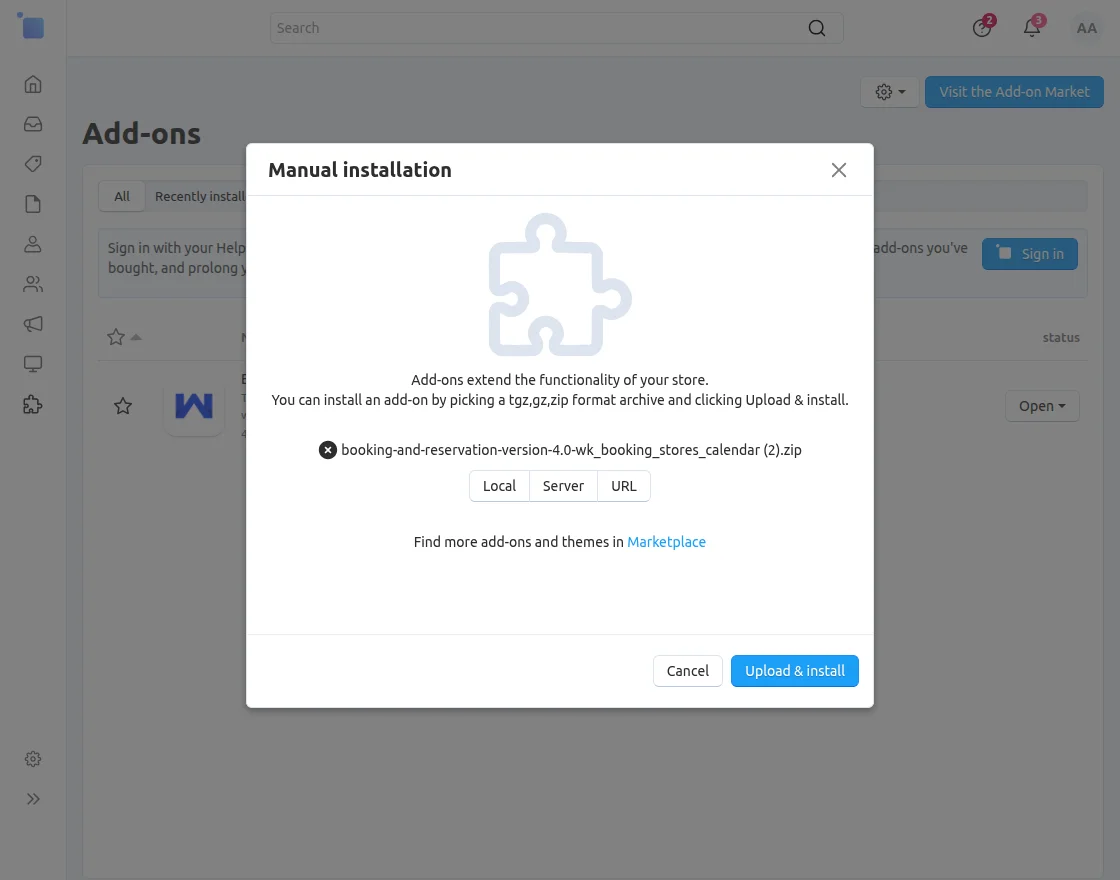
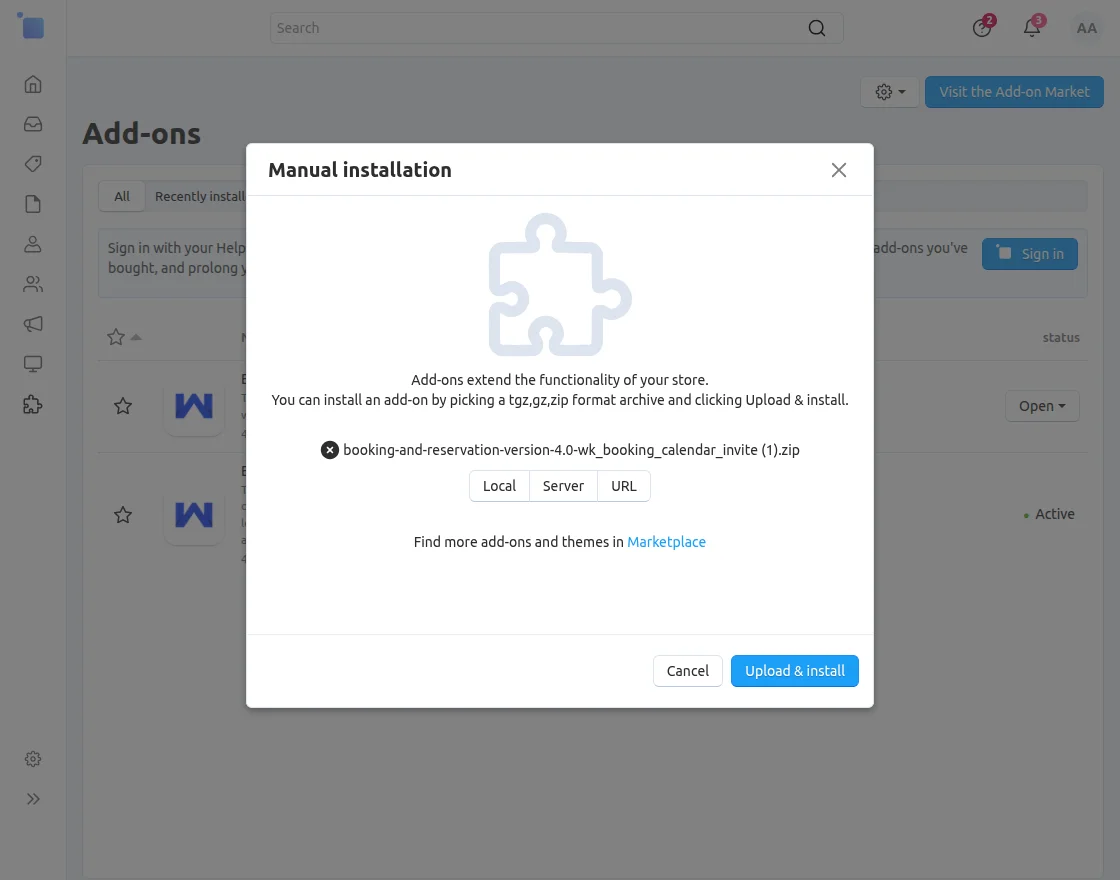
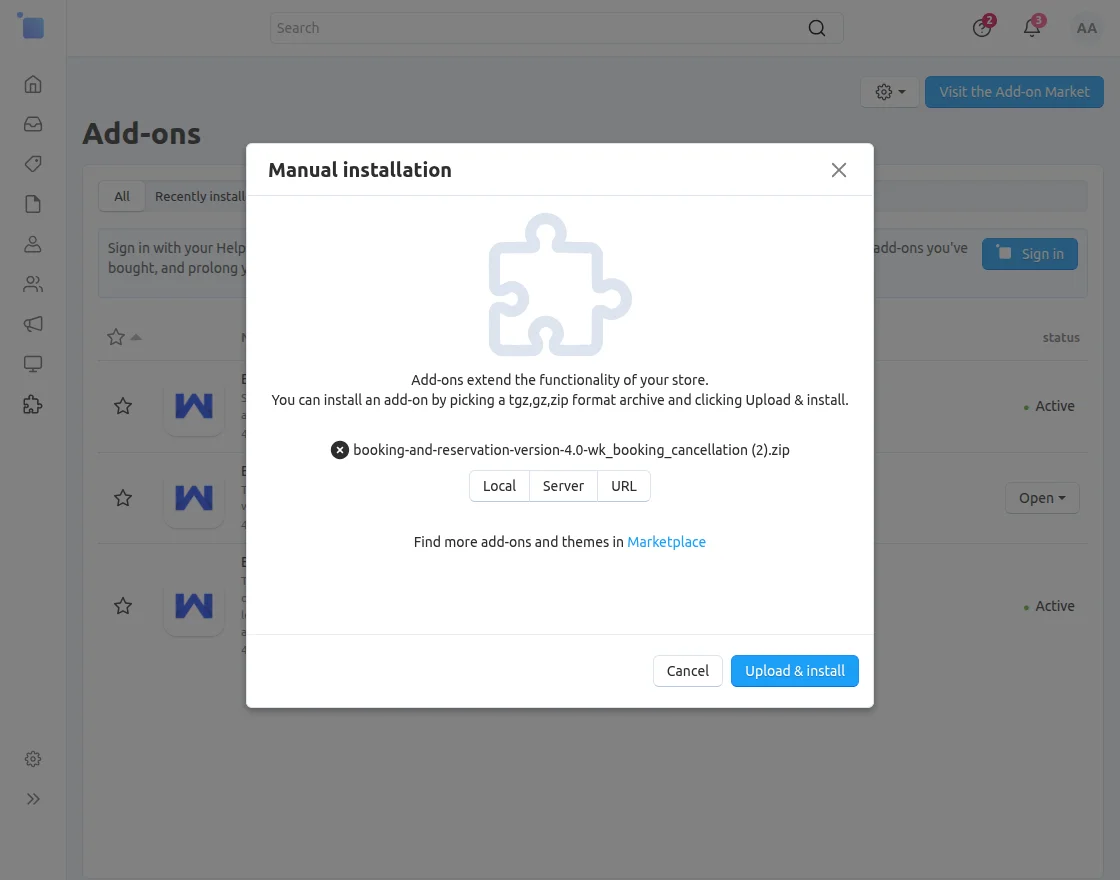
Go to Manage Add-ons, and click on “Manual Installation” as shown below in the snapshot.
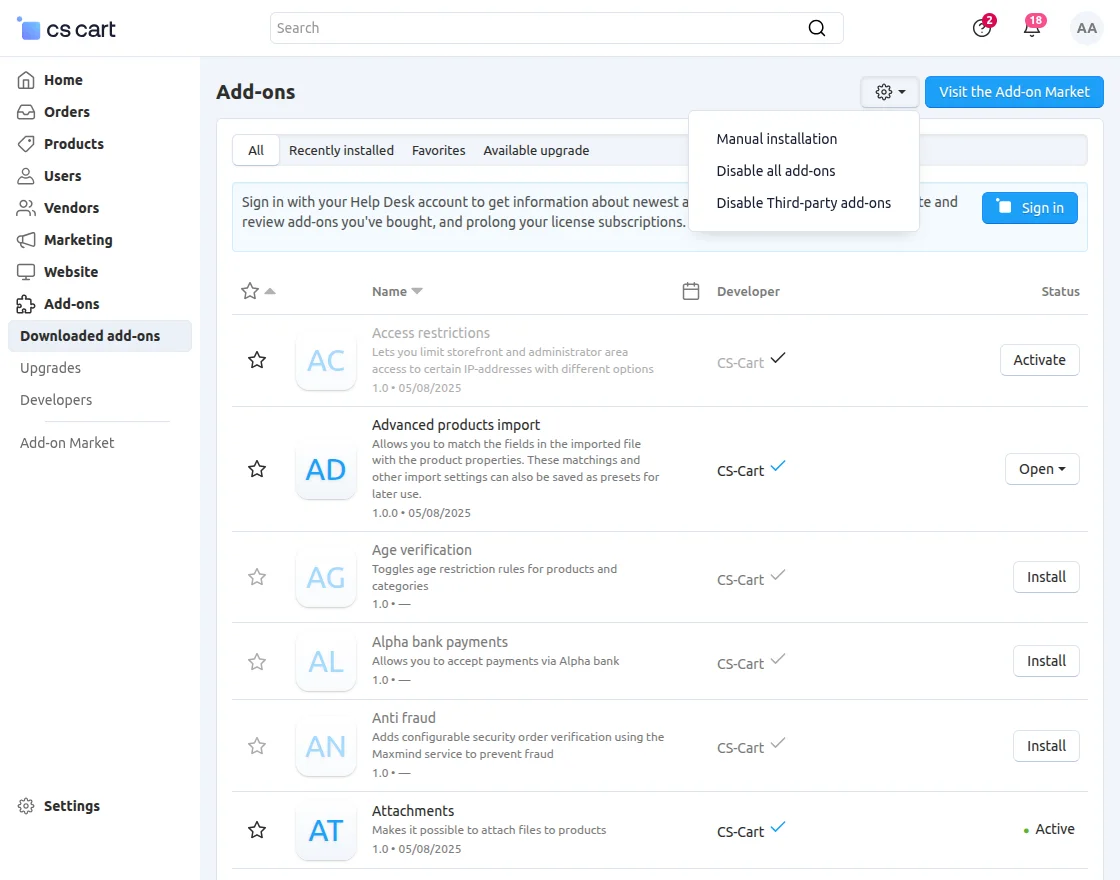

Click on “Local” to browse the zip file, and then click on “Upload & Install” as shown below in the snapshot.

Module Configuration(Booking Reservation System) | Admin
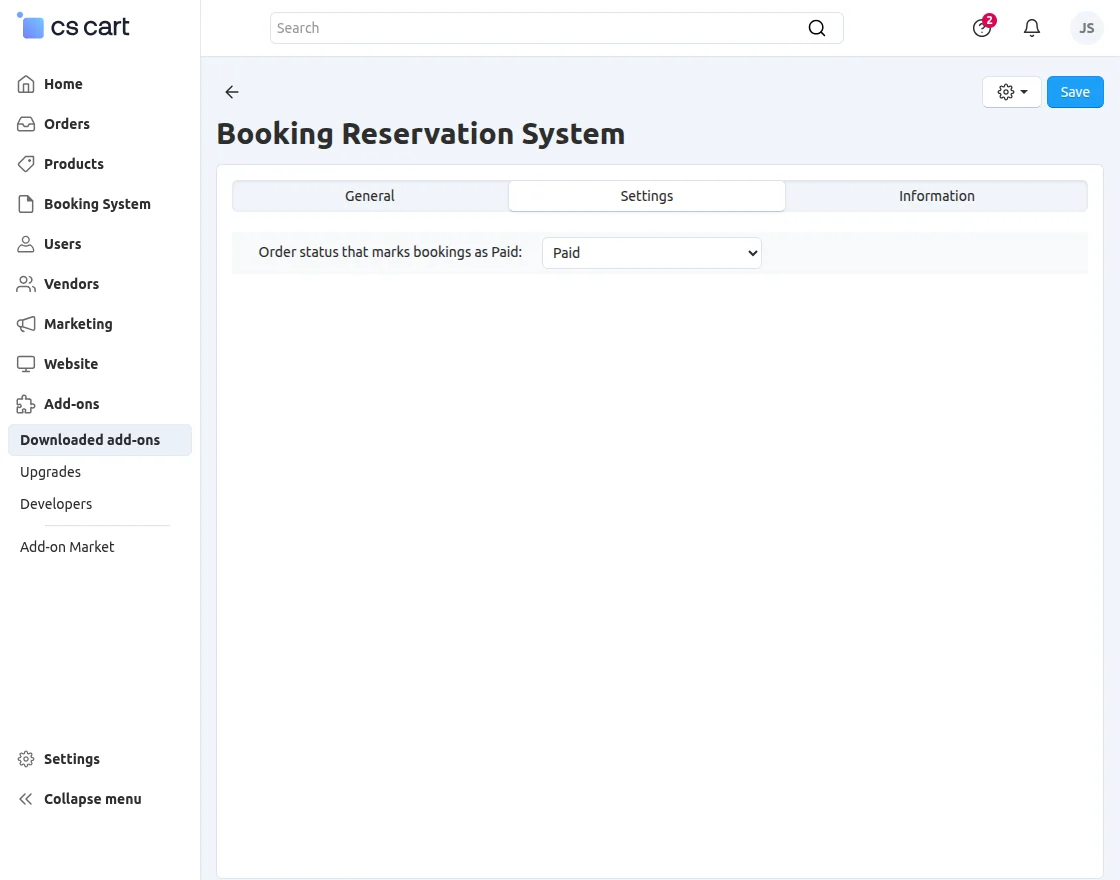
To mark a booking as paid, map the payment status with the corresponding order status in CS-Cart.
Module Configuration(Booking Reservation System) | Vendor

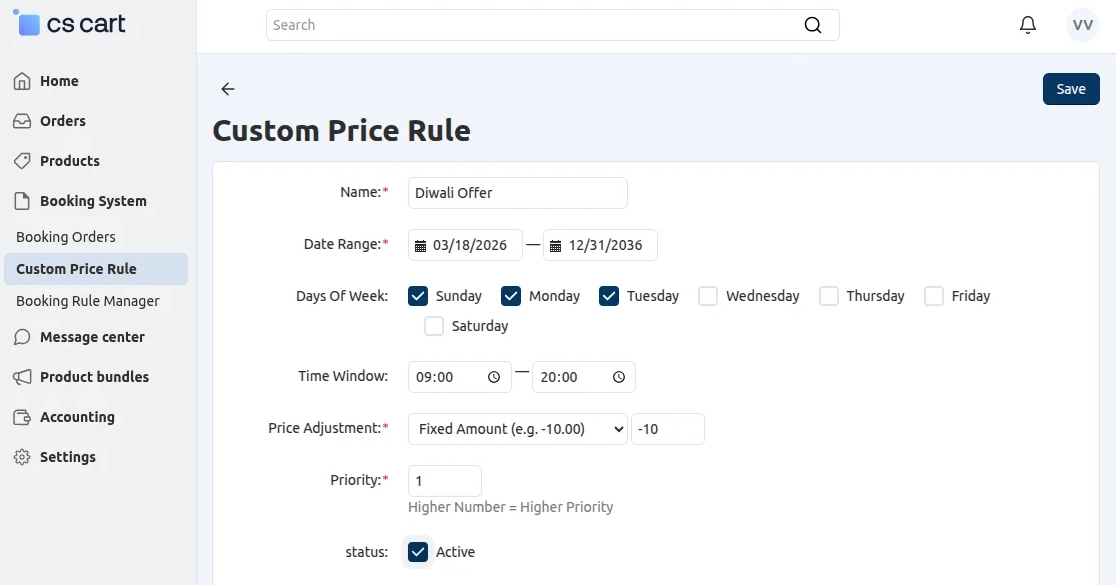
-
Name: Enter a name for the custom rule.
-
Date Range: Select the start and end date for the rule.
-
Days of the Week: Choose the days when the rule will apply.
-
Time Window: Set the time duration for the offer.
-
Price Adjustment: Enter the price or discount to apply.
-
Priority: Set the priority level for the rule.
-
Status: Enable or disable the rule.
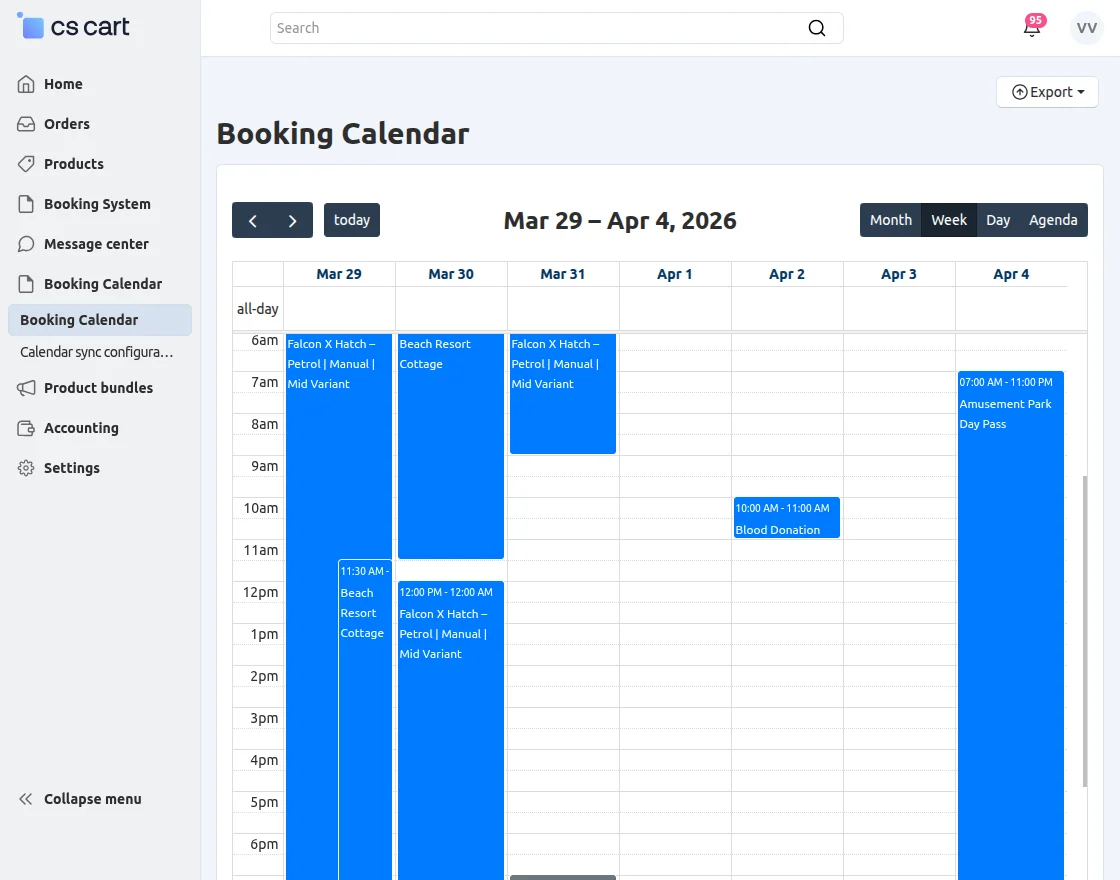
Bookings
Vendors can create bookings directly from the product or manage separate bookings through the Booking Rule Manager.
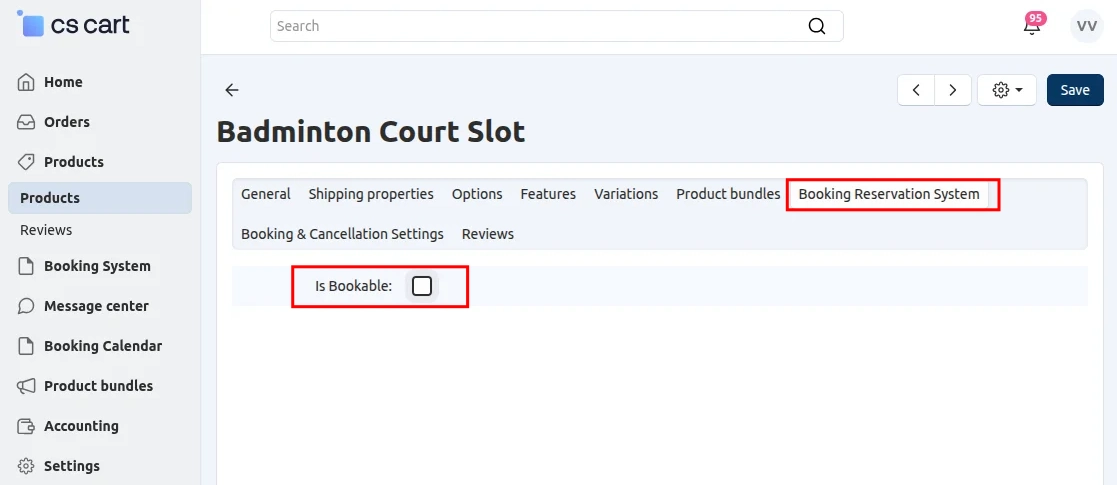
Booking from Products

-
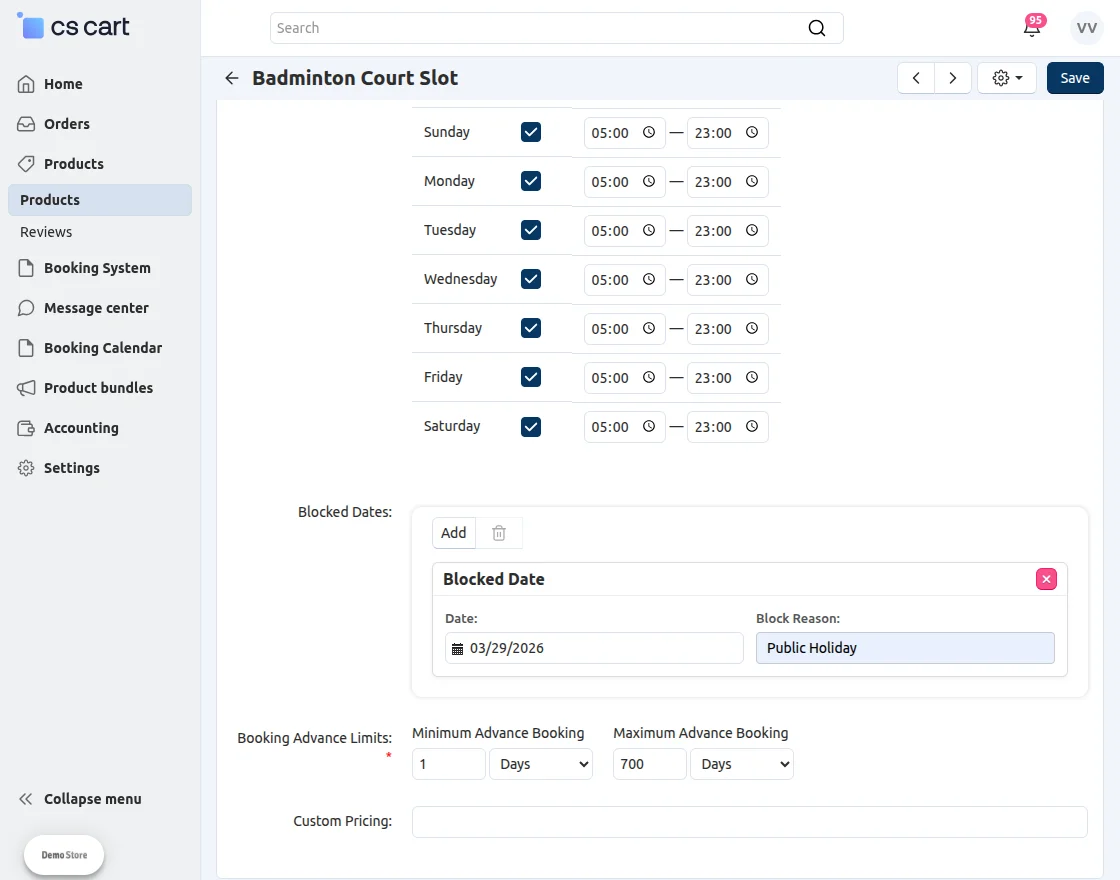
Blocked Dates: Select the dates when bookings will be unavailable.
-
Booking Advance Limits: Set the allowed time range for advance bookings.
-
Custom Price: Select and apply a pricing rule or offer.
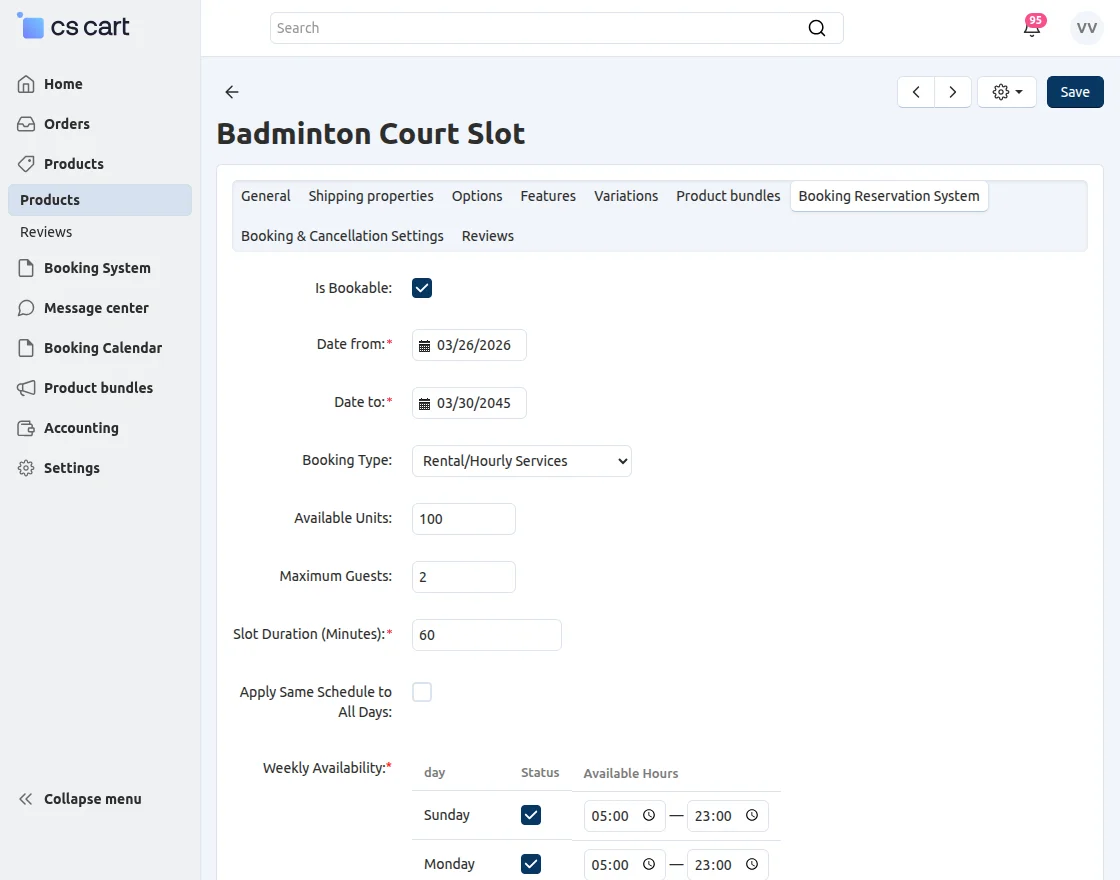
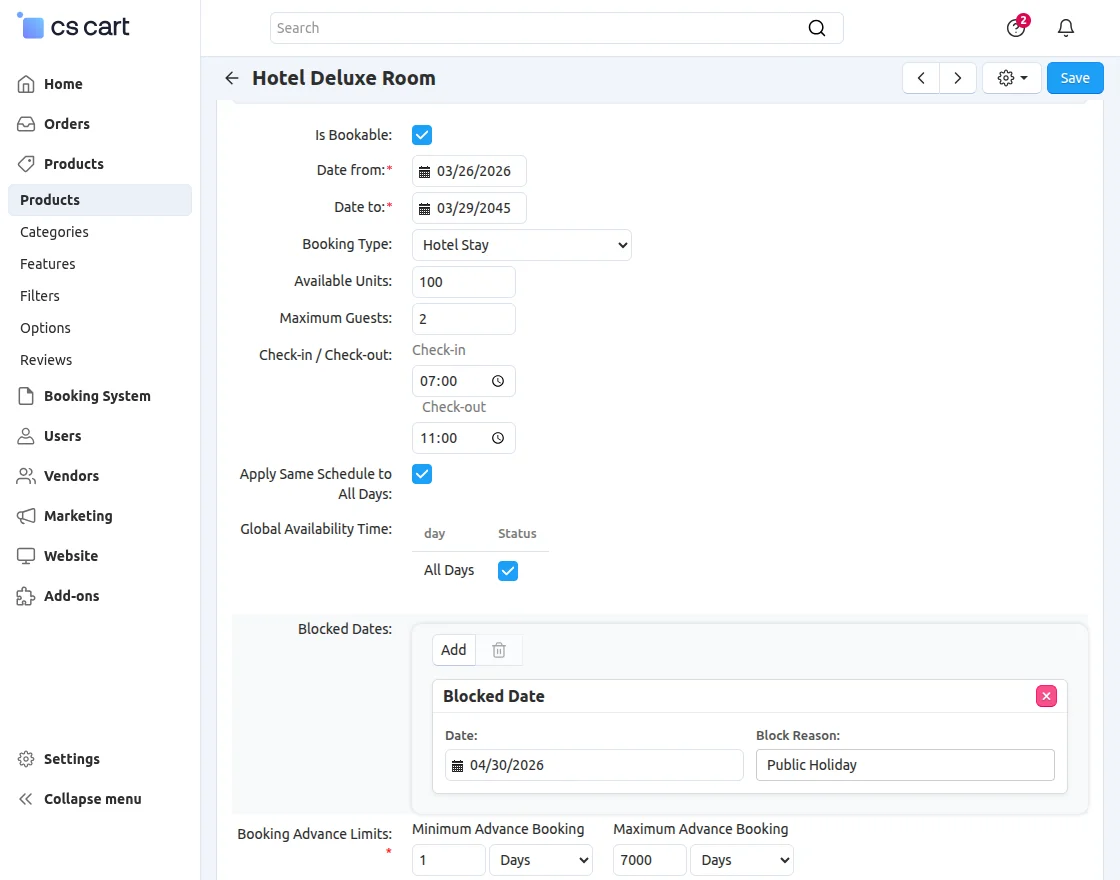
Rental Booking(Daily):
-
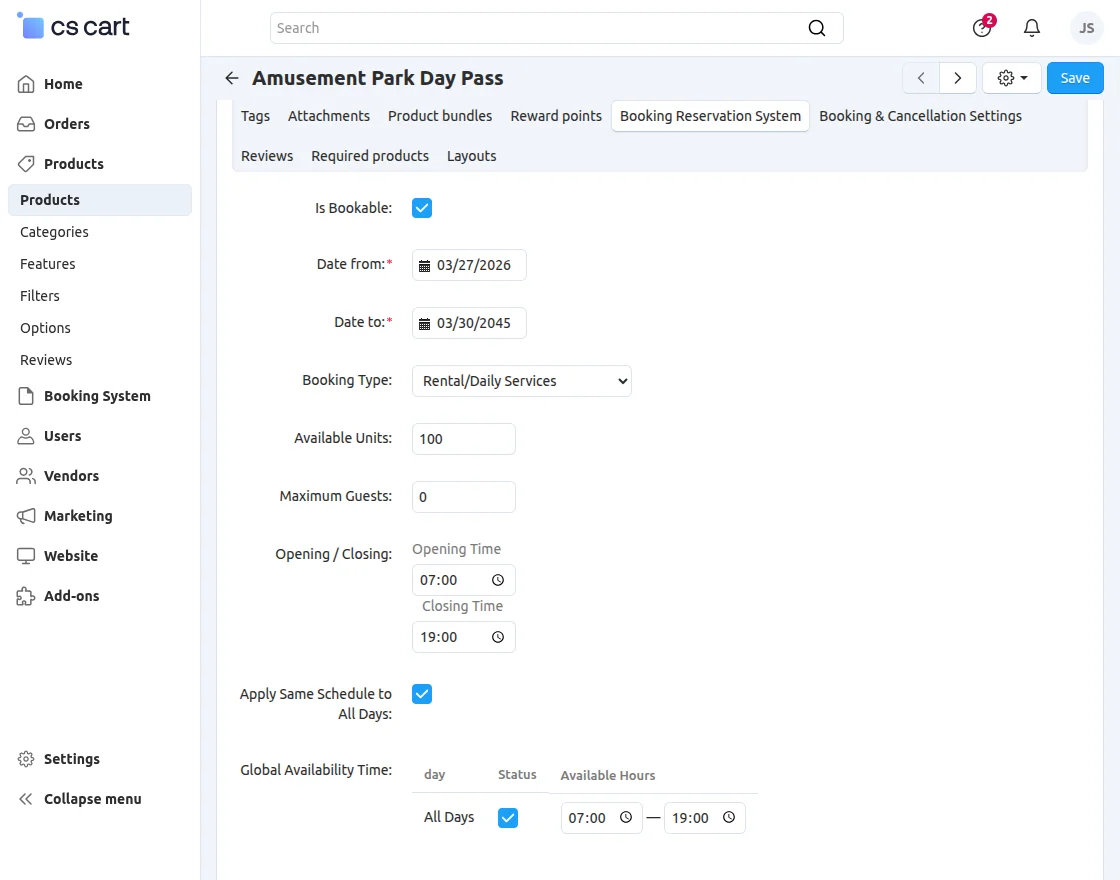
Date From: Select the booking start date.
-
Date To: Select the booking end date.
-
Available Units: Enter the total quantity available for booking.
-
Maximum Guests: Define the maximum number of guests allowed per booking.
-
Opening / Closing: Select the start and end dates for the booking period.
-
Apply Same Schedule to All Days: Enable this option to apply the same schedule across all days.
-
-
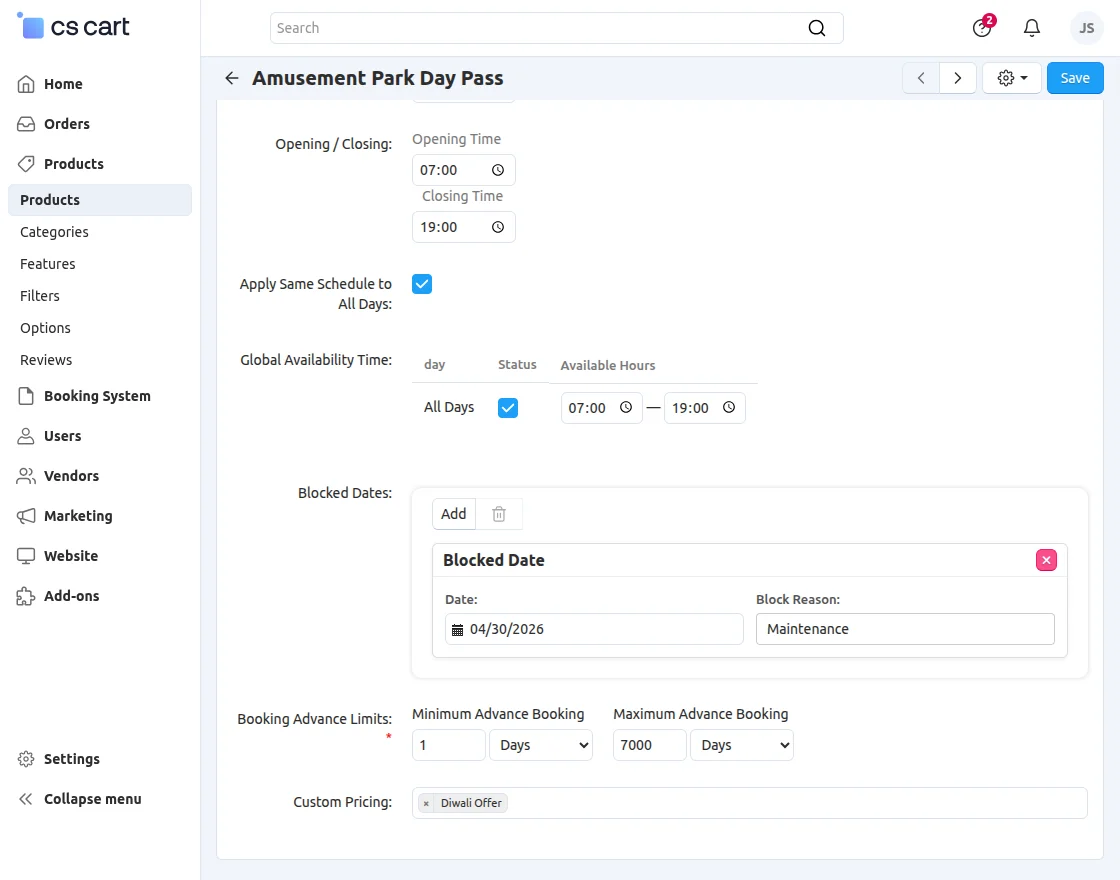
Blocked Dates: Select the dates when bookings will be unavailable.
-
Maximum Advance Limits: Set the allowed time range for advance bookings.
-
Custom Price: Select and apply a pricing rule or offer.
Appointment Booking:
For appointment bookings, the vendor should select Appointment as the booking type.

-
Date From: Select the booking start date.
- Date To: Select the booking end date.
-
Maximum Guests: Define the maximum number of guests allowed per booking.
-
Slots: Add and manage time slots for the booking.
-
Apply Same Schedule to All Days: Enable this option to apply the same schedule across all days.
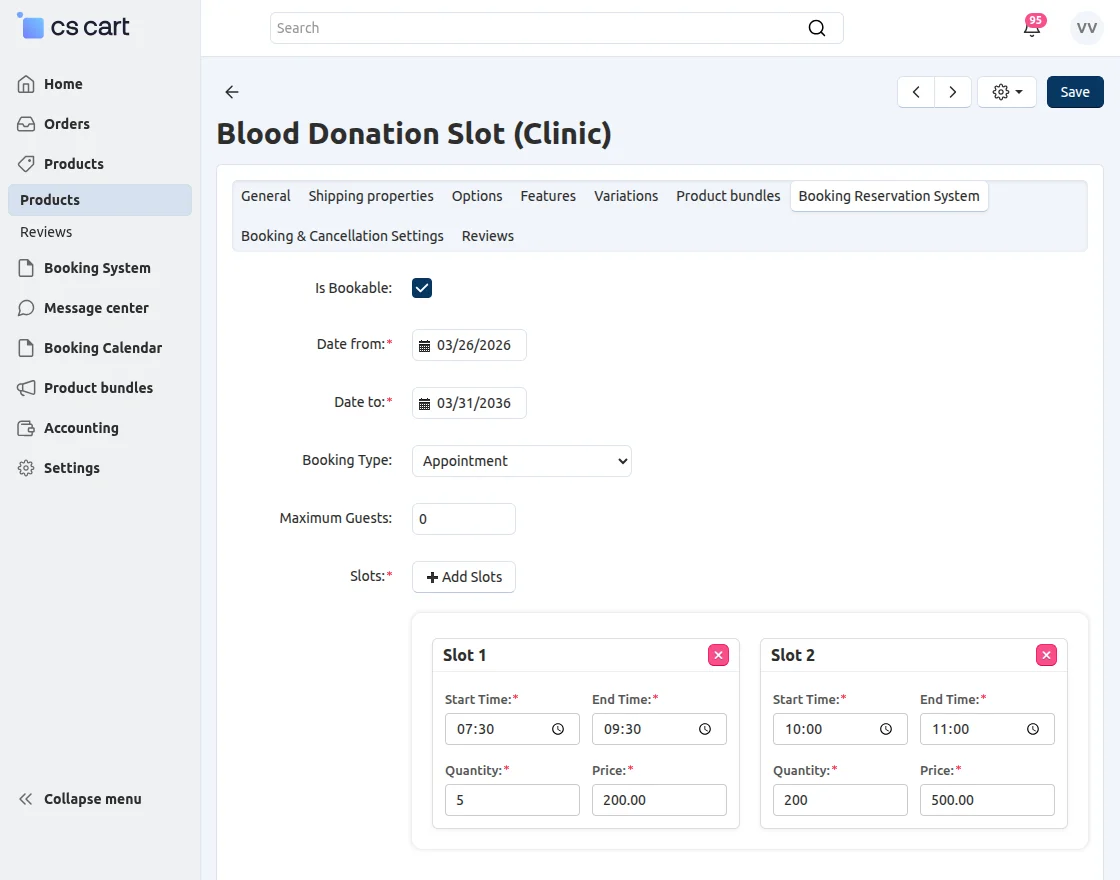
- Blocked Dates: Select the dates when bookings will be unavailable.
- Booking Advance Limits: Set the allowed time range for advance bookings.
- Custom Price: Select and apply a pricing rule or offer.
Hotel Stay
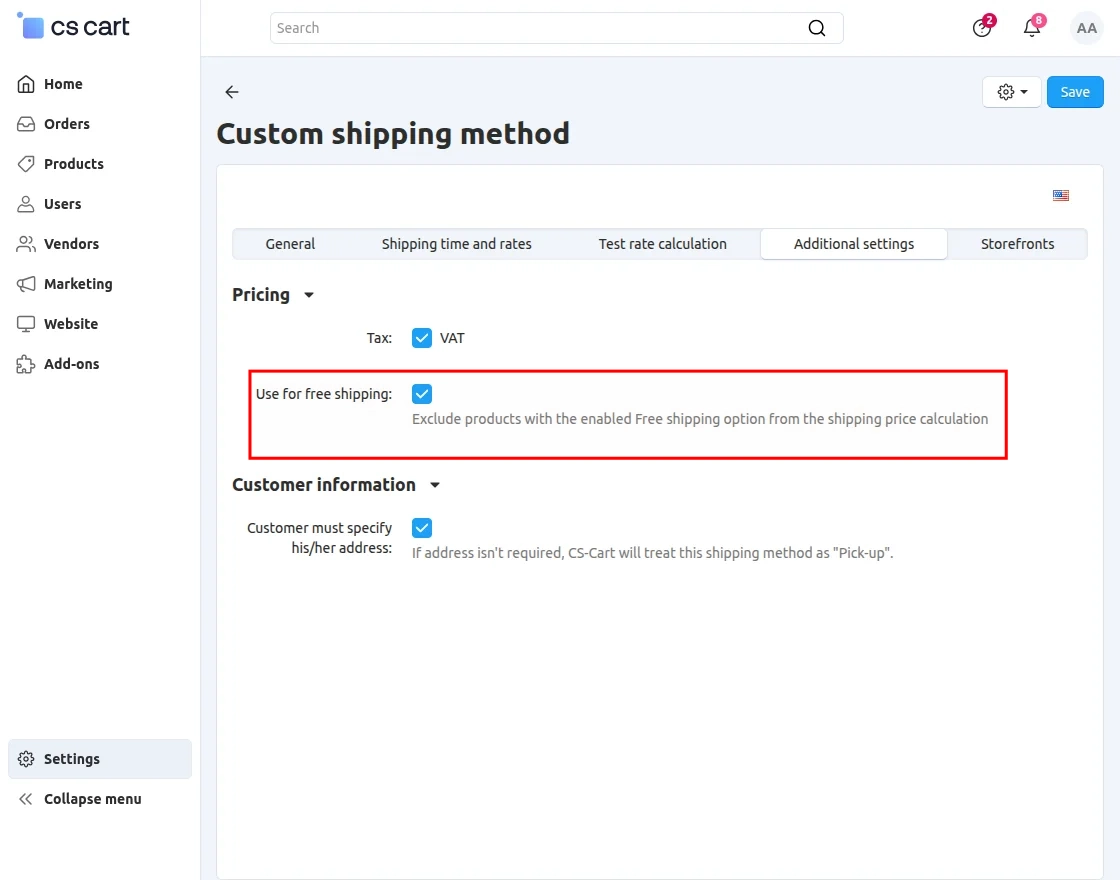
Open the required shipping method and go to the Additional tab. Enable the Free Shipping option and save the changes.
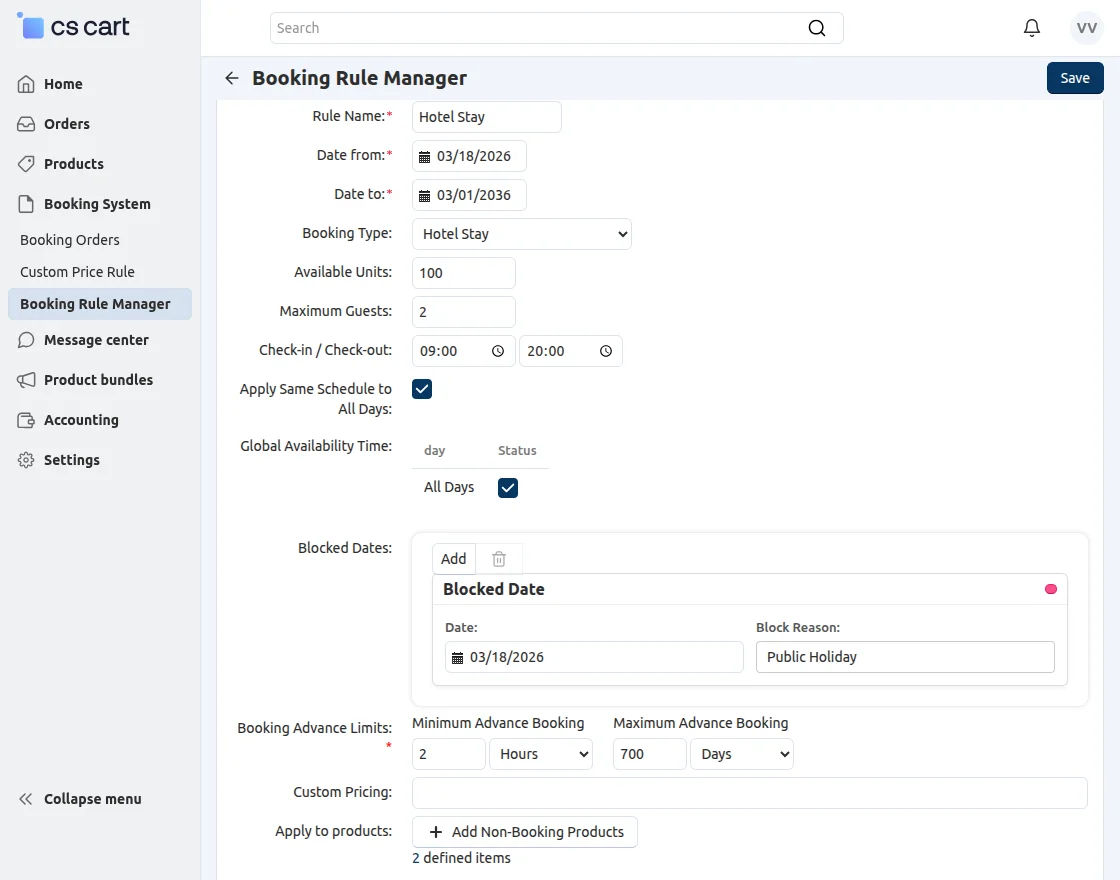
From the Booking Rule Manager, you can select the booking type, configure any booking type, and assign products in bulk.


Appointment Booking:
For appointment booking, users need to pick a date, select slots, and choose the quantity.

After selecting, users add the booking to the cart to proceed further.
Cart View:

Checkout View:
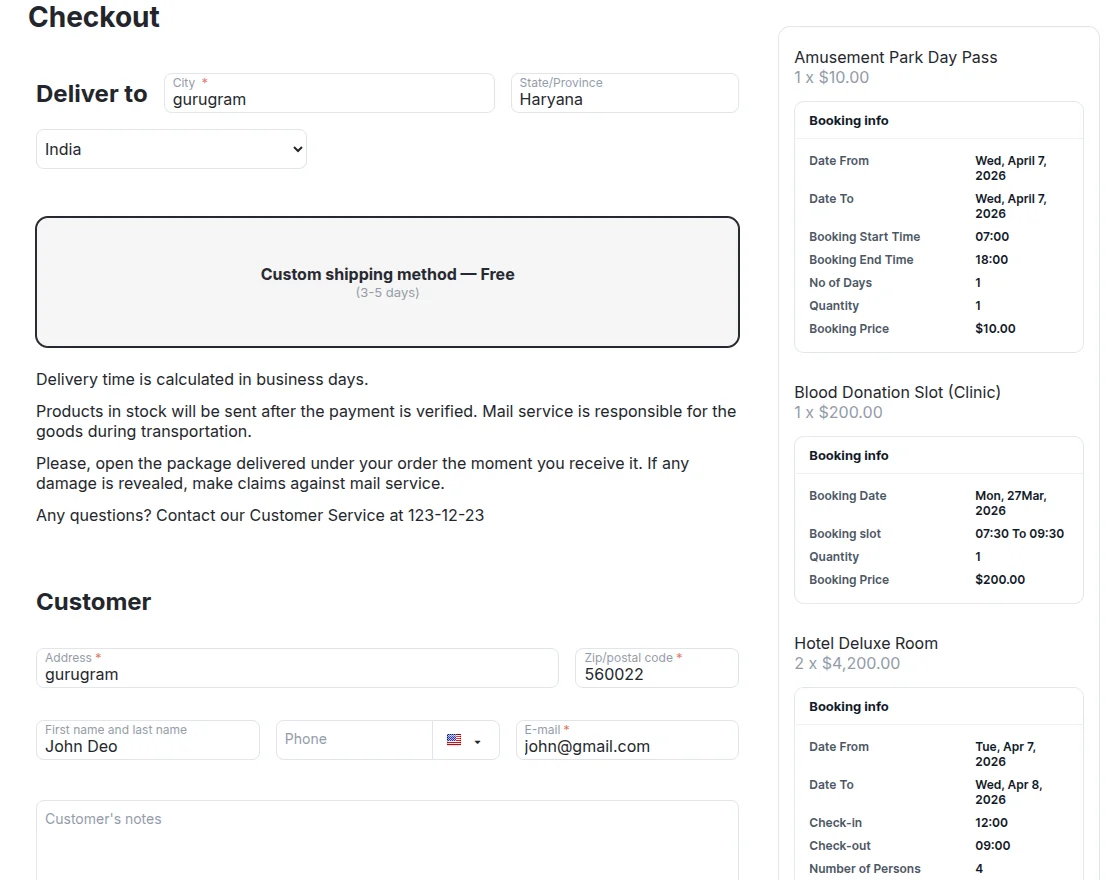
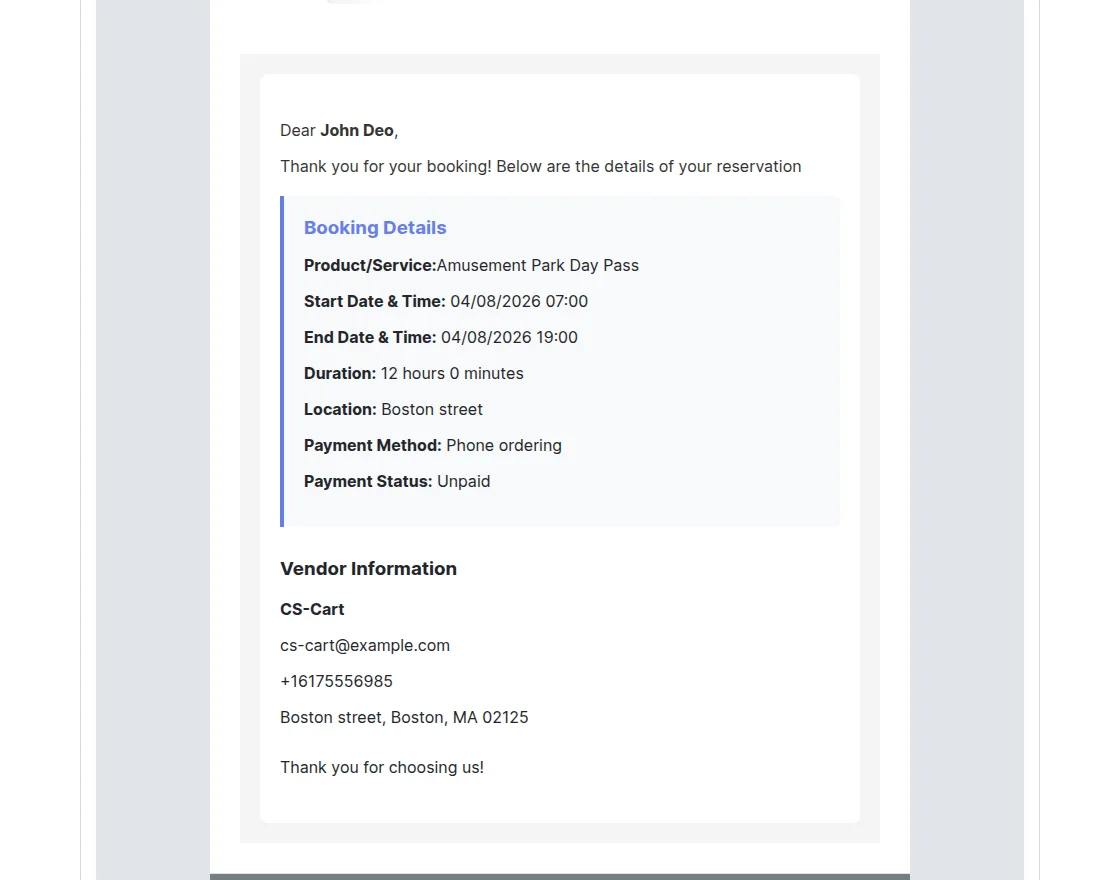
The customer can then place the order to confirm the reservation.
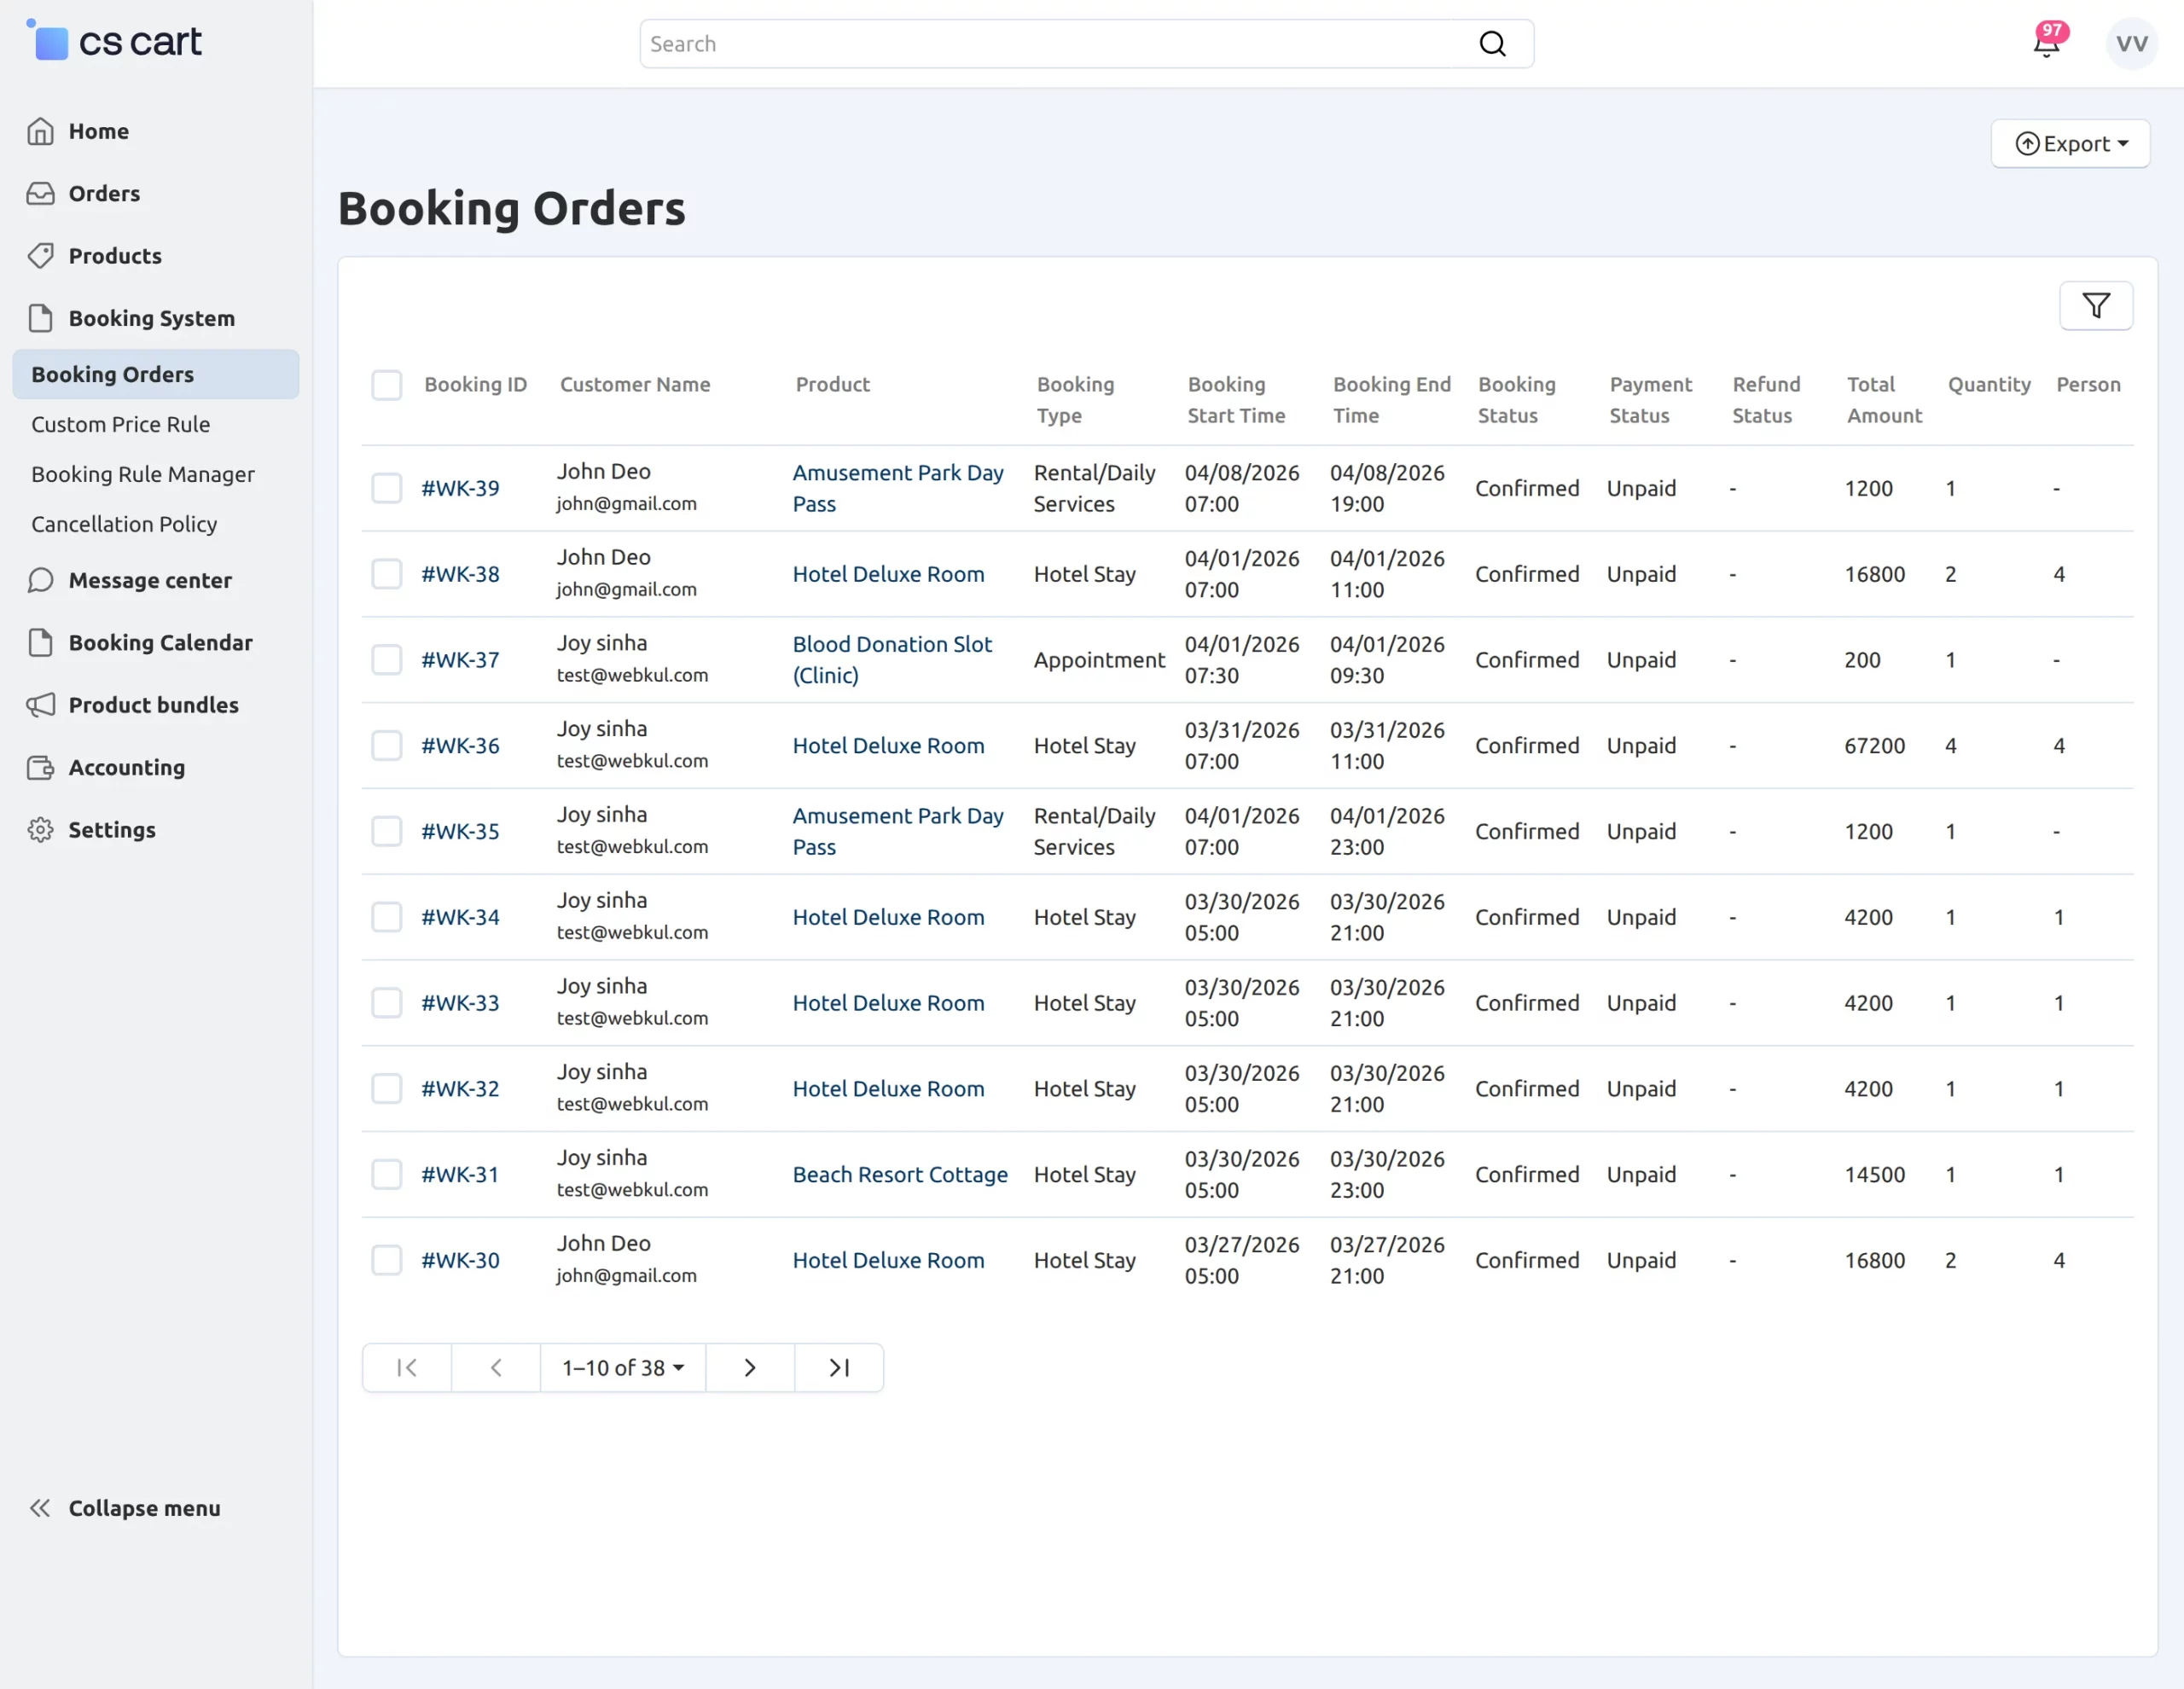
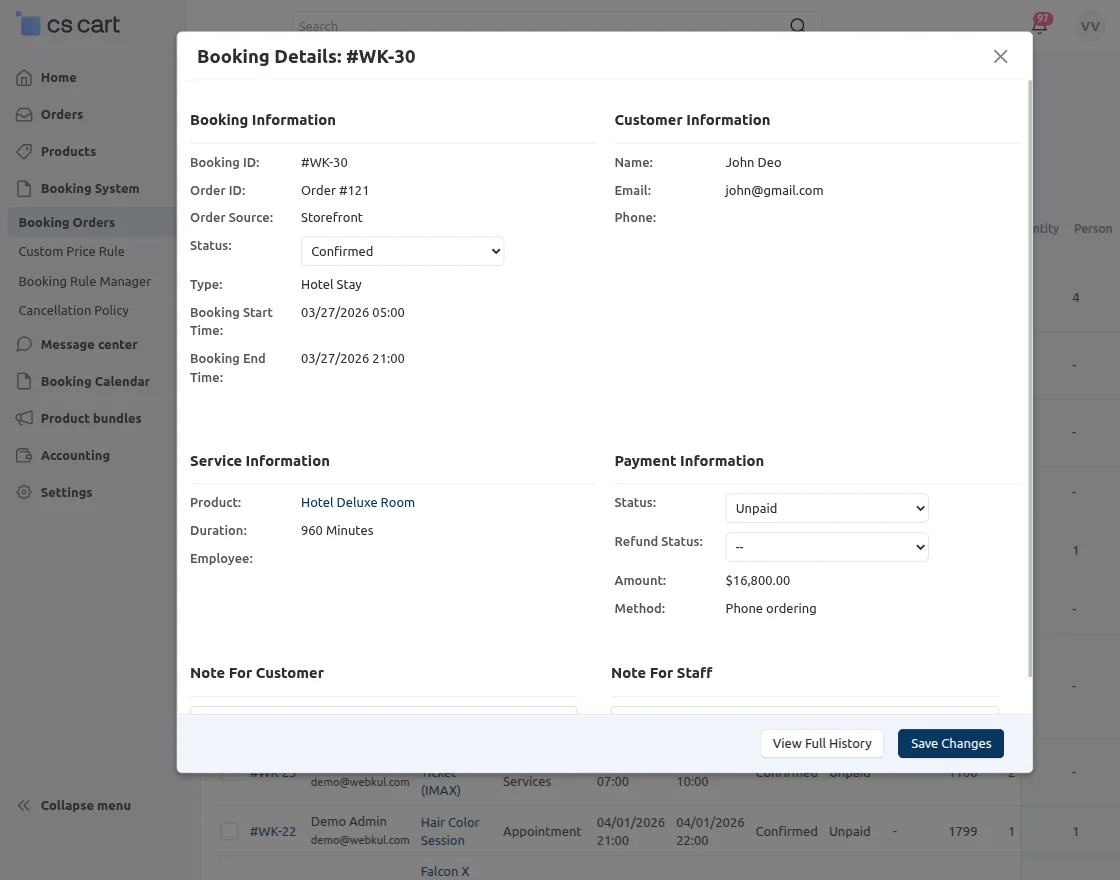
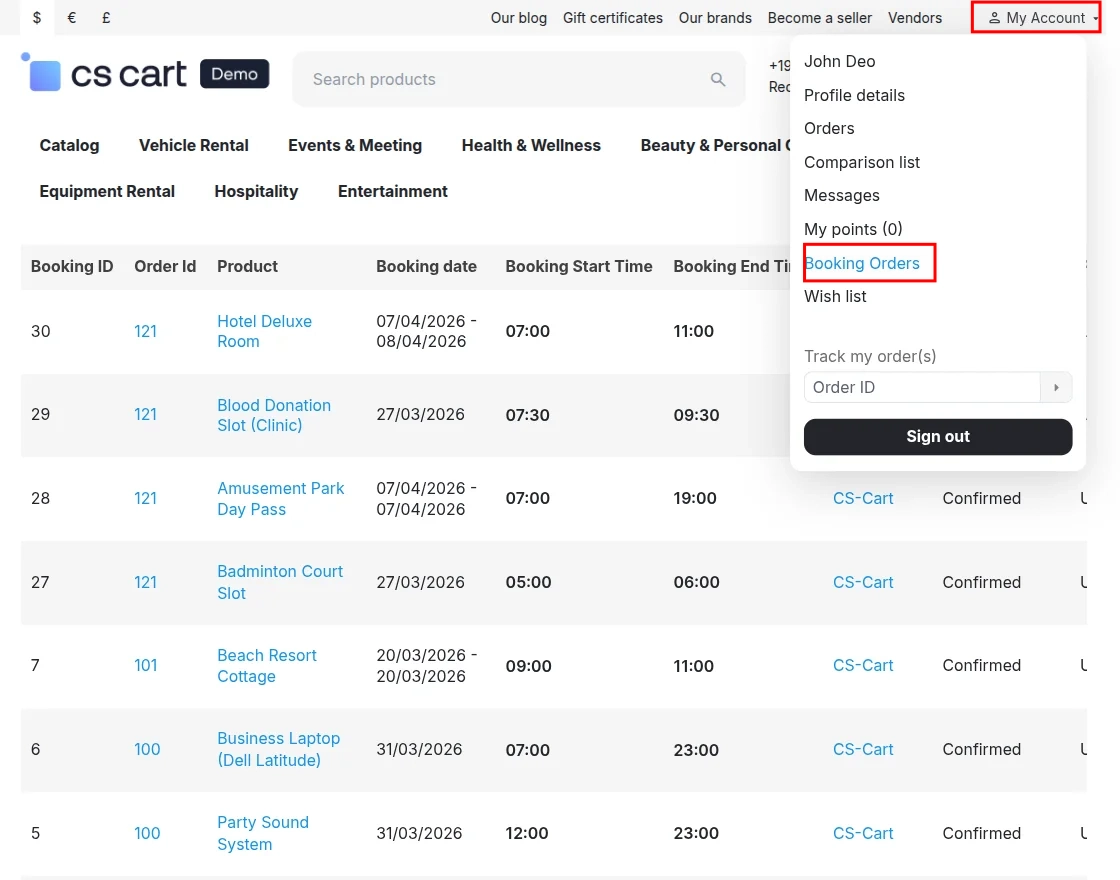
Booking Orders:

Installation
Click on “Local” to browse the zip file, and then click on “Upload & Install” as shown below in the snapshot.
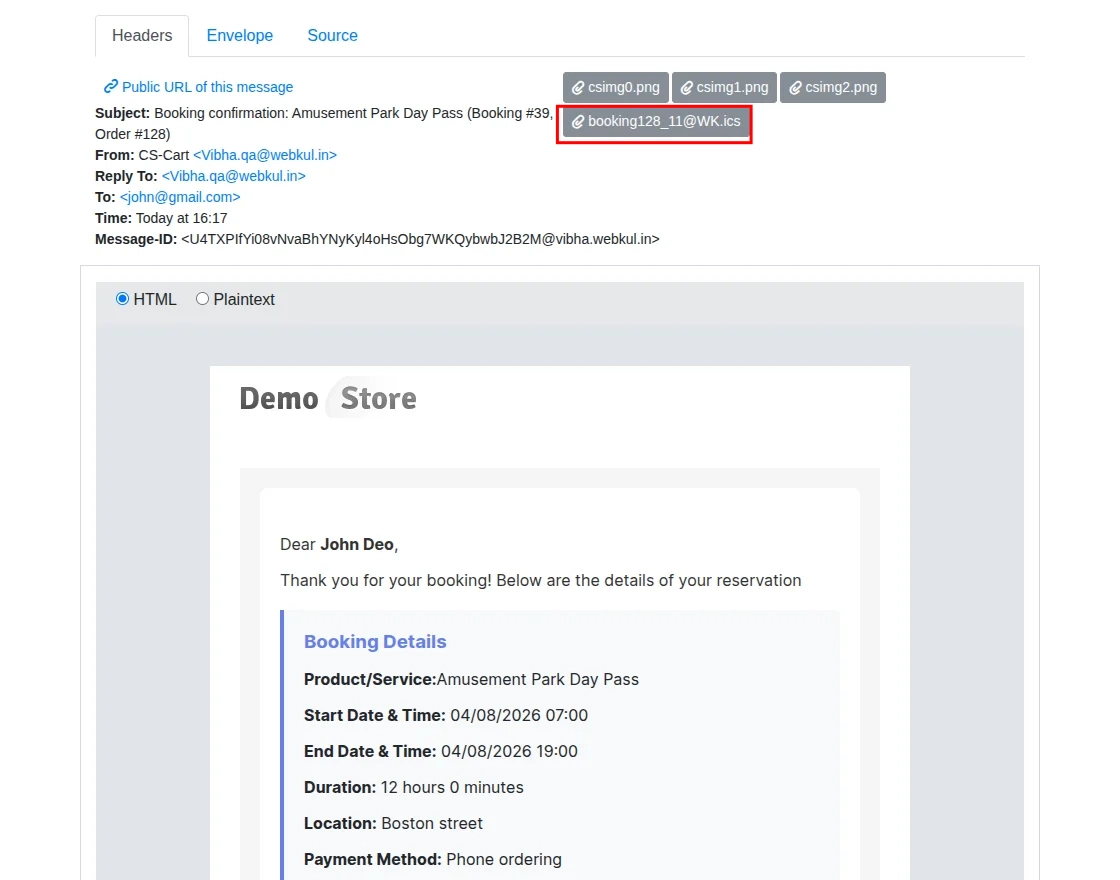
Booking calendar invites (ICS) are available in email notifications, allowing users to receive and add bookings directly to their calendars.
Note: Booking invites depend on the Store Calendar add-on, so the Booking Store Calendar add-on is required for this functionality.
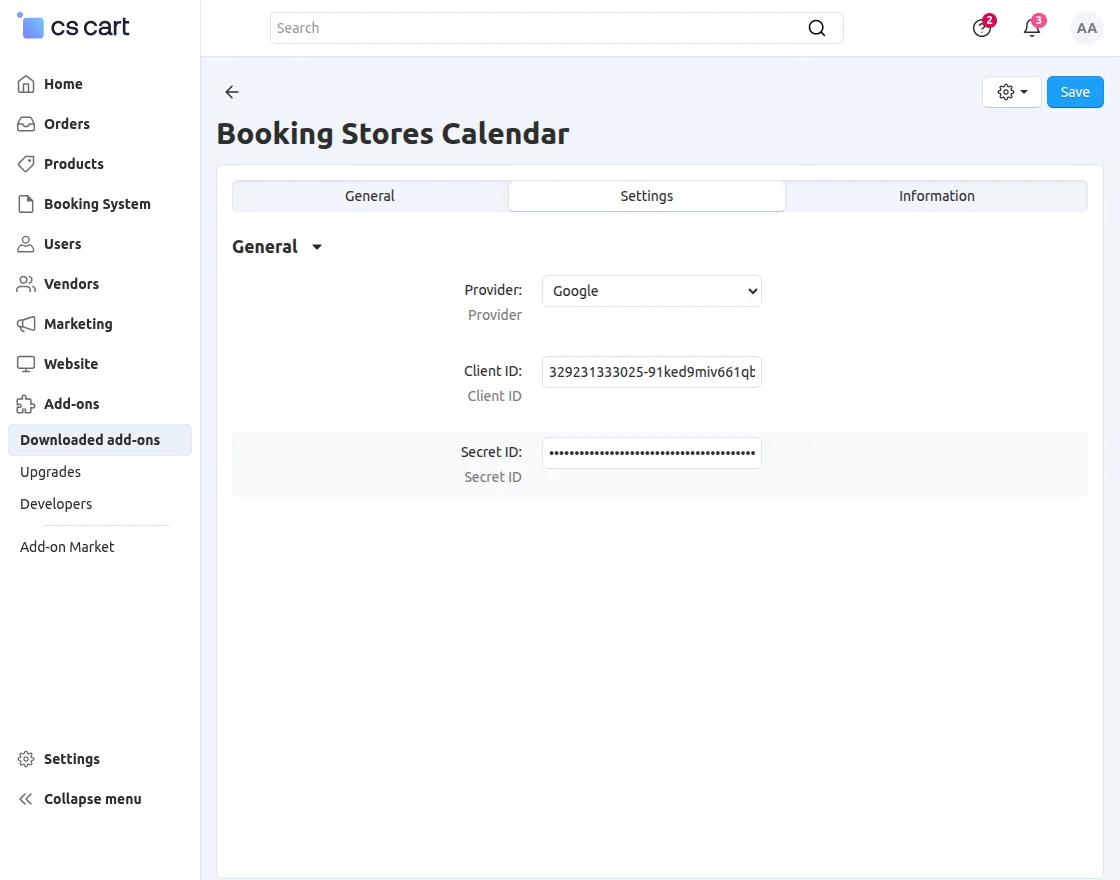
The admin needs to enter the Client ID and Client Secret in the configuration to sync booking data with Google Calendar.
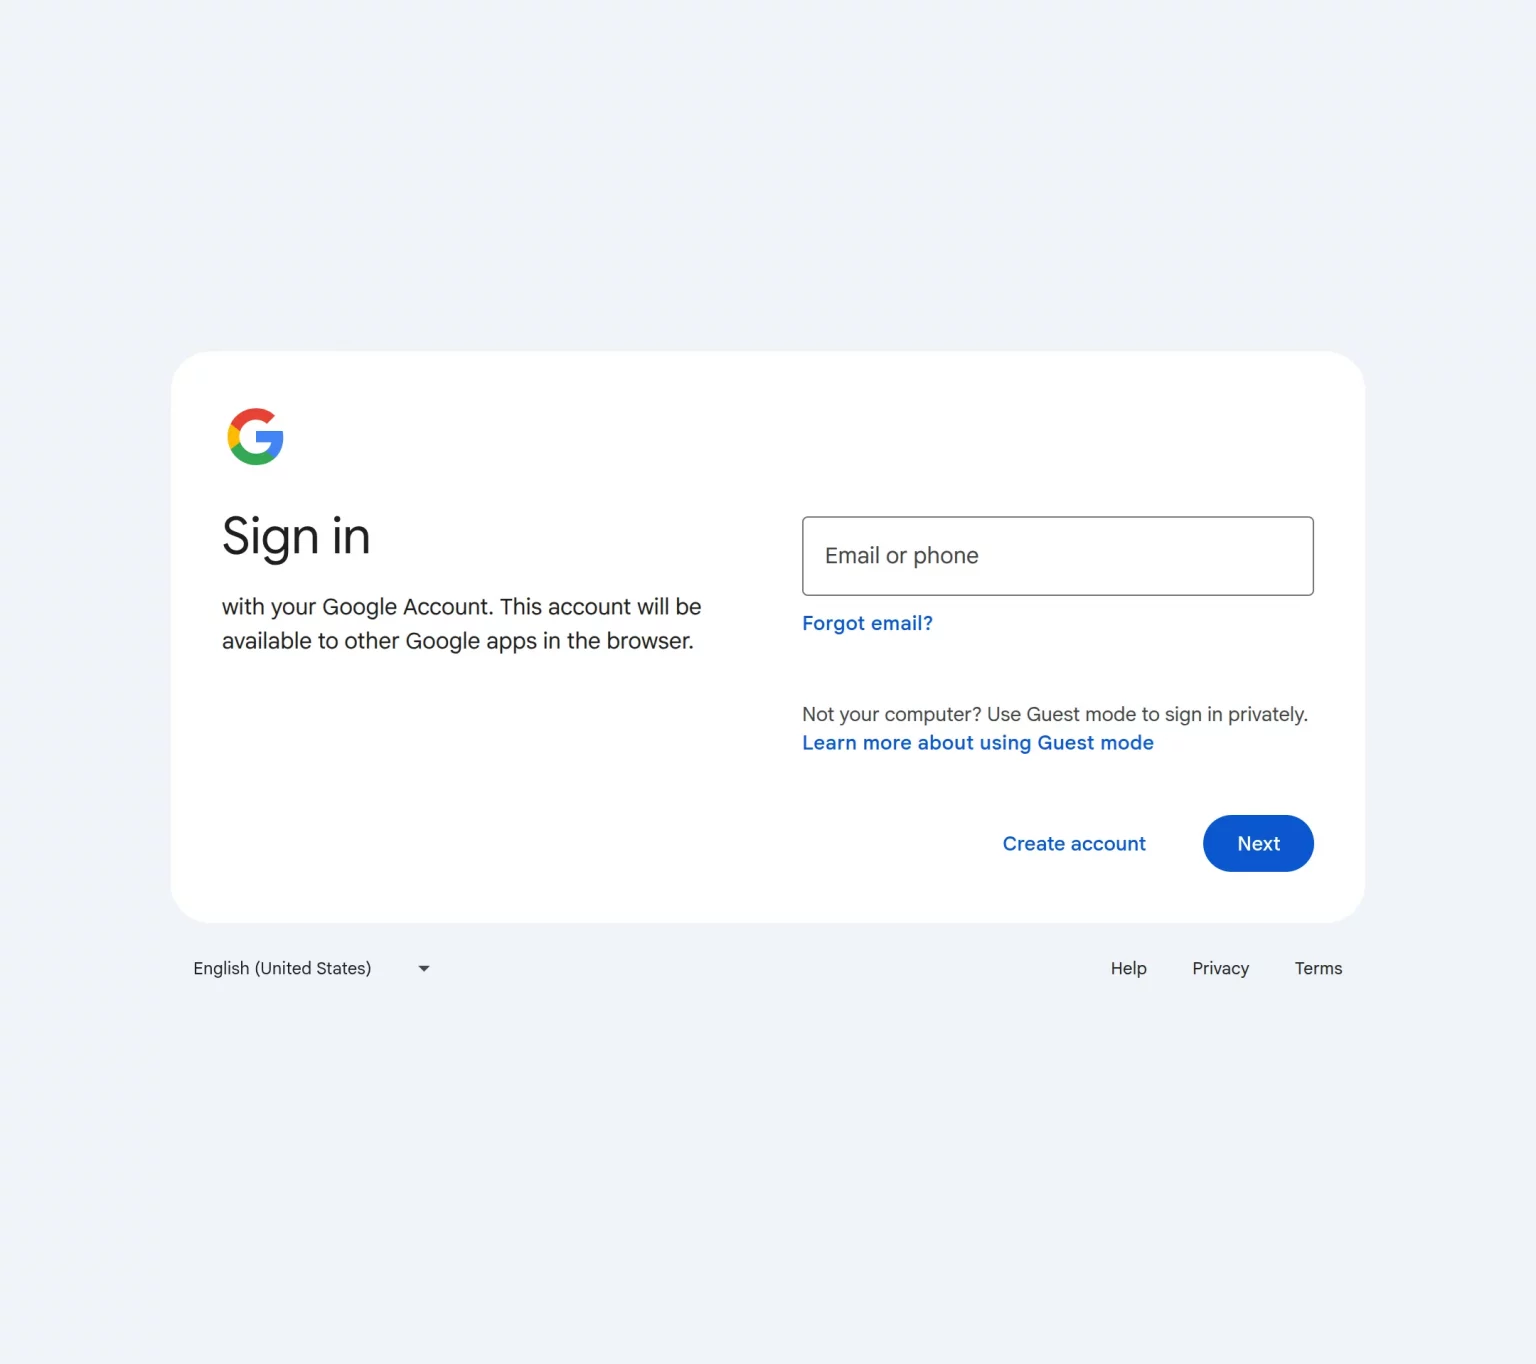
Before that, the admin needs to create a Google Developer Account by clicking here.

After logging in to the Google Cloud Platform, the admin needs to create a new project.
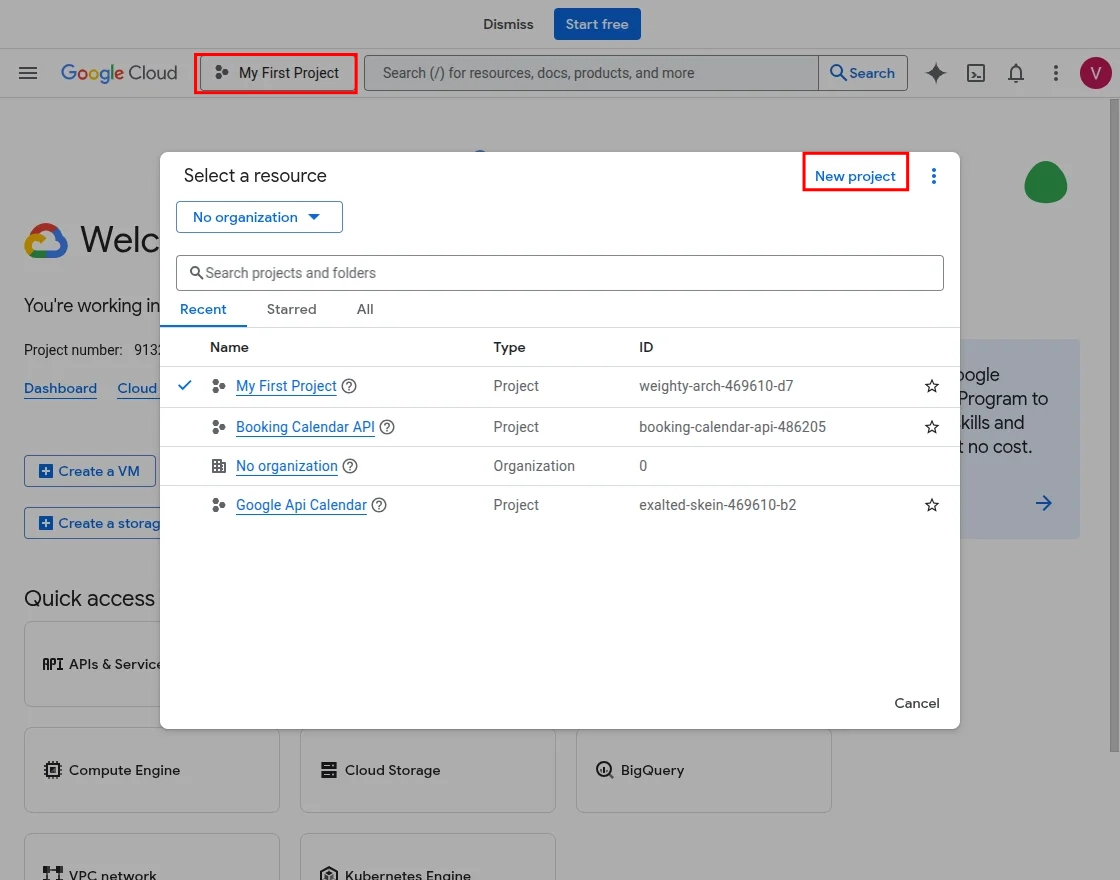
Select “New Project” to create a new project.

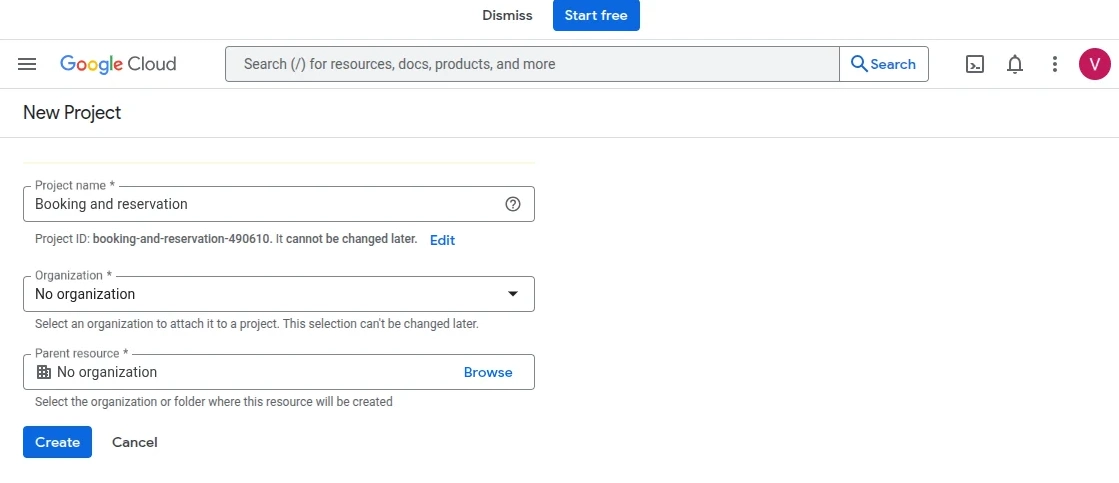
-
Project Name: Enter a name for the project.
-
Organization: Select the organization.
Once the admin has created a project, they need to navigate to the APIs and Services >> OAuth consent screen tab and then click on the CREATE button.
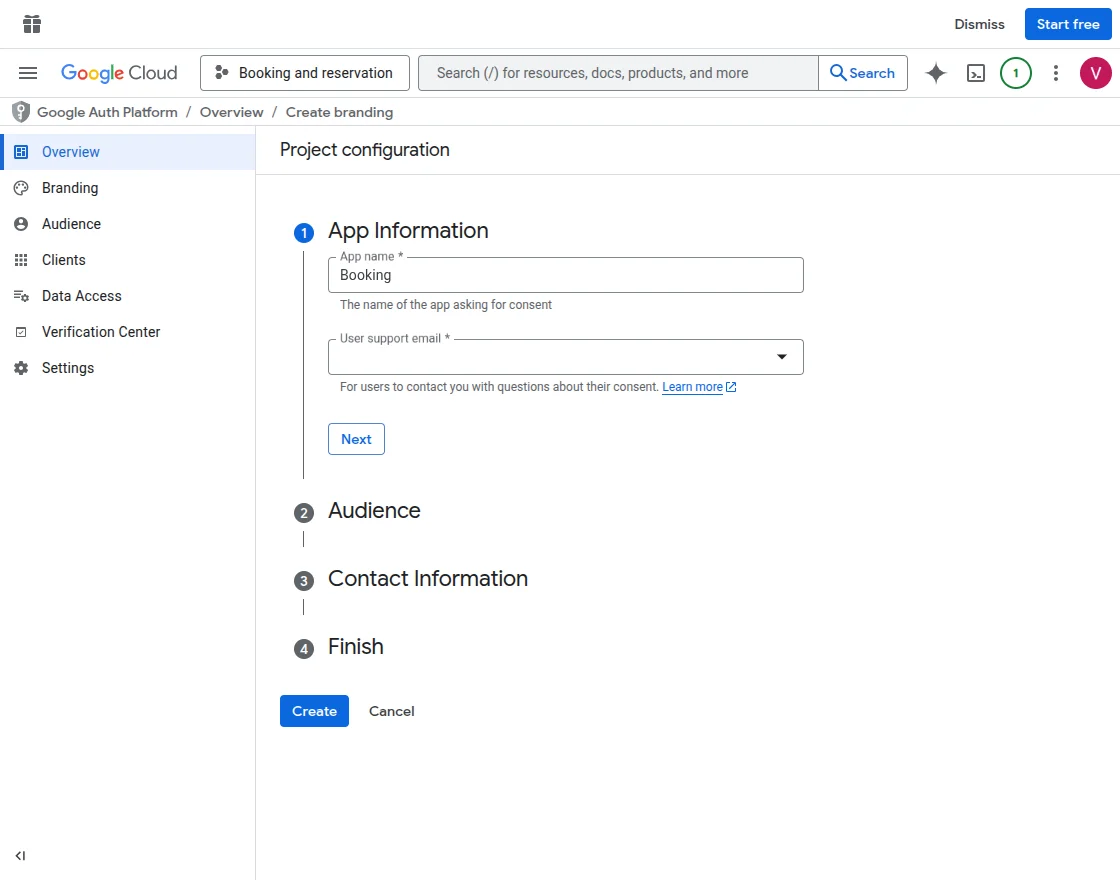
-
App Name: Enter the name of your application.
-
User Support Email: Enter the email address linked to your Google account.
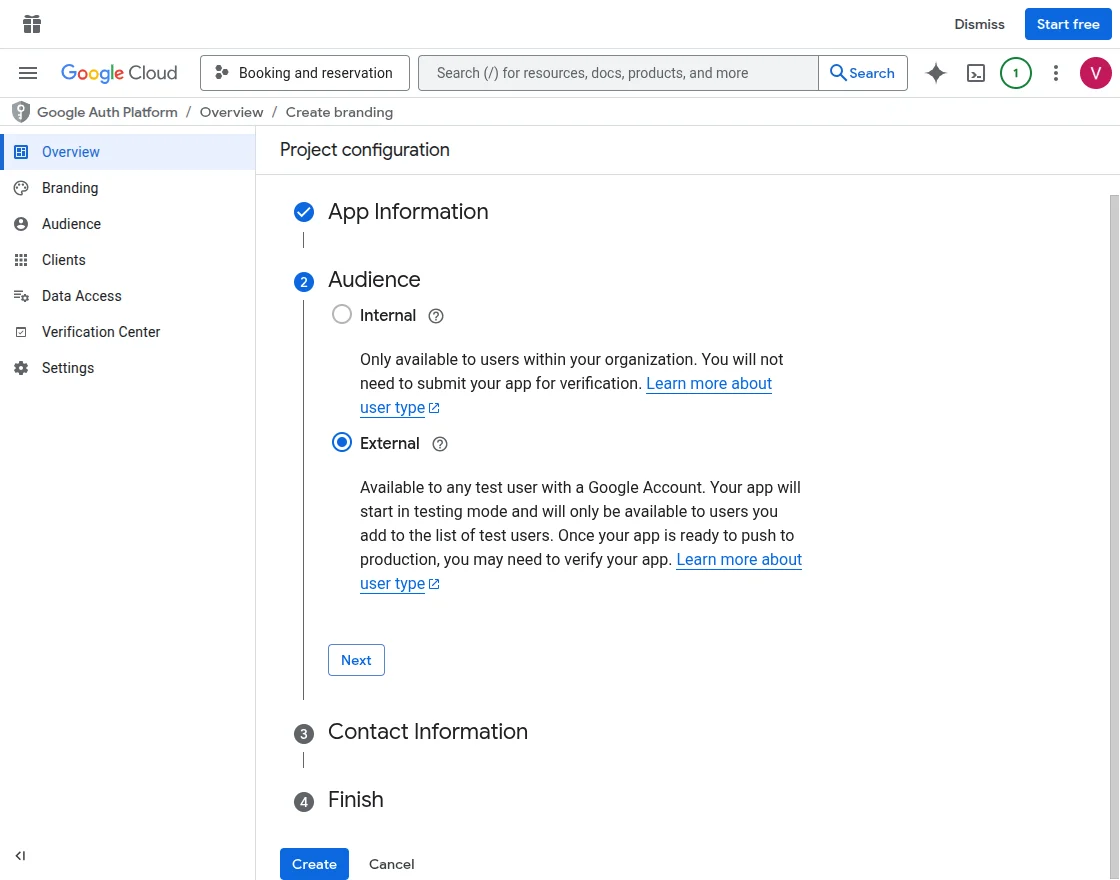
- Audience: Choose the audience for your application.
- Contact Information: Provide the necessary contact details for communication and support.
After entering all the required credentials, create the project.
Next, create an OAuth client to continue the setup process.
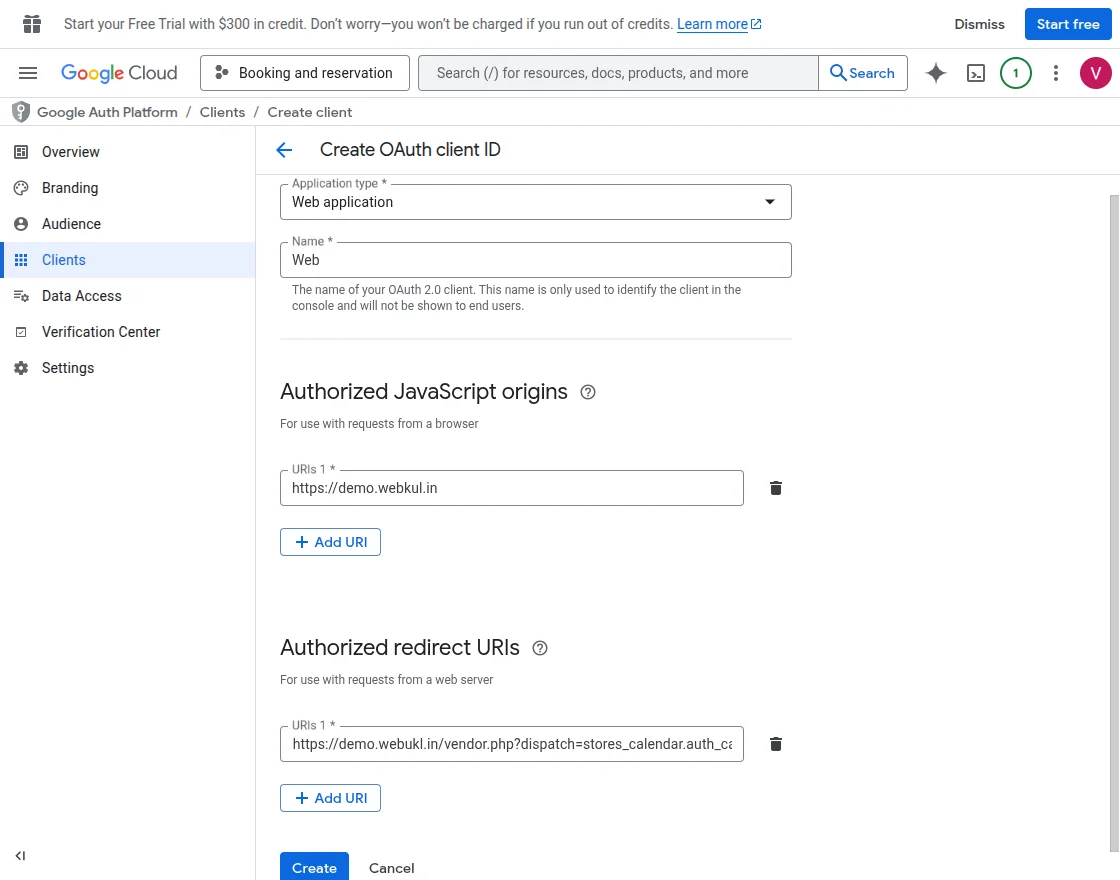
-
Application Type: Select the application type.
-
Name: Enter the application name.
-
Authorized JavaScript Origins: Enter your store URL.
-
Authorized Redirect URIs: Enter the redirect URL:
instance-url/vendor.php?dispatch=stores_calendar.auth_callback
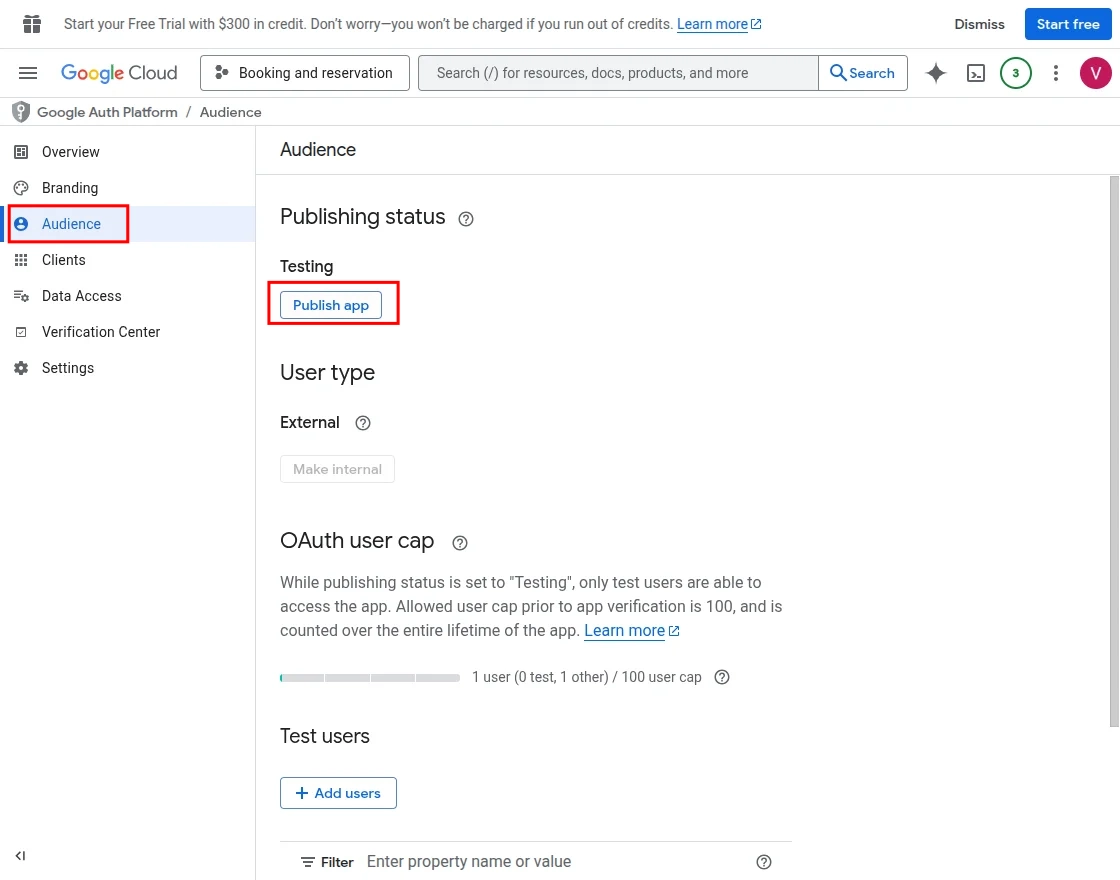
Publish the application.
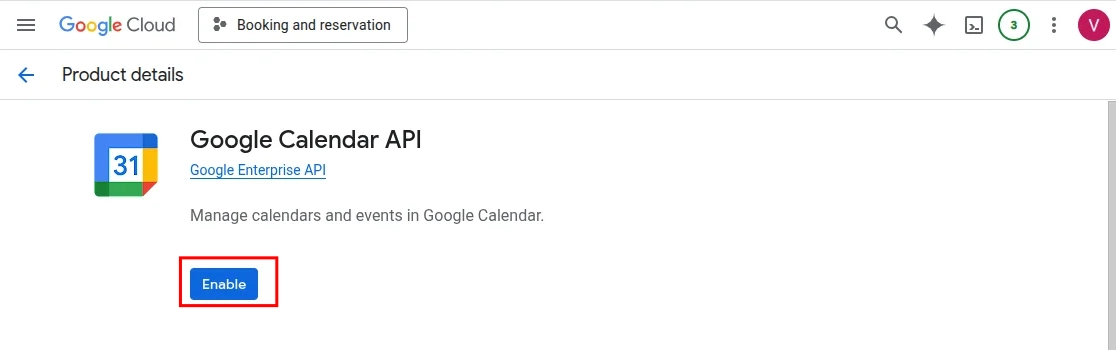
The admin needs to enable the Google Calendar API by navigating to APIs & Services >> Library >> Google Calendar API and enabling it.

Library Installation:
You need to download the library manually.
Navigate to the following location using the terminal:
app/addons/wk_booking_stores_calendar/lib/googleOauth
composer update
Module Configuration(Store Calendar) | Vendor
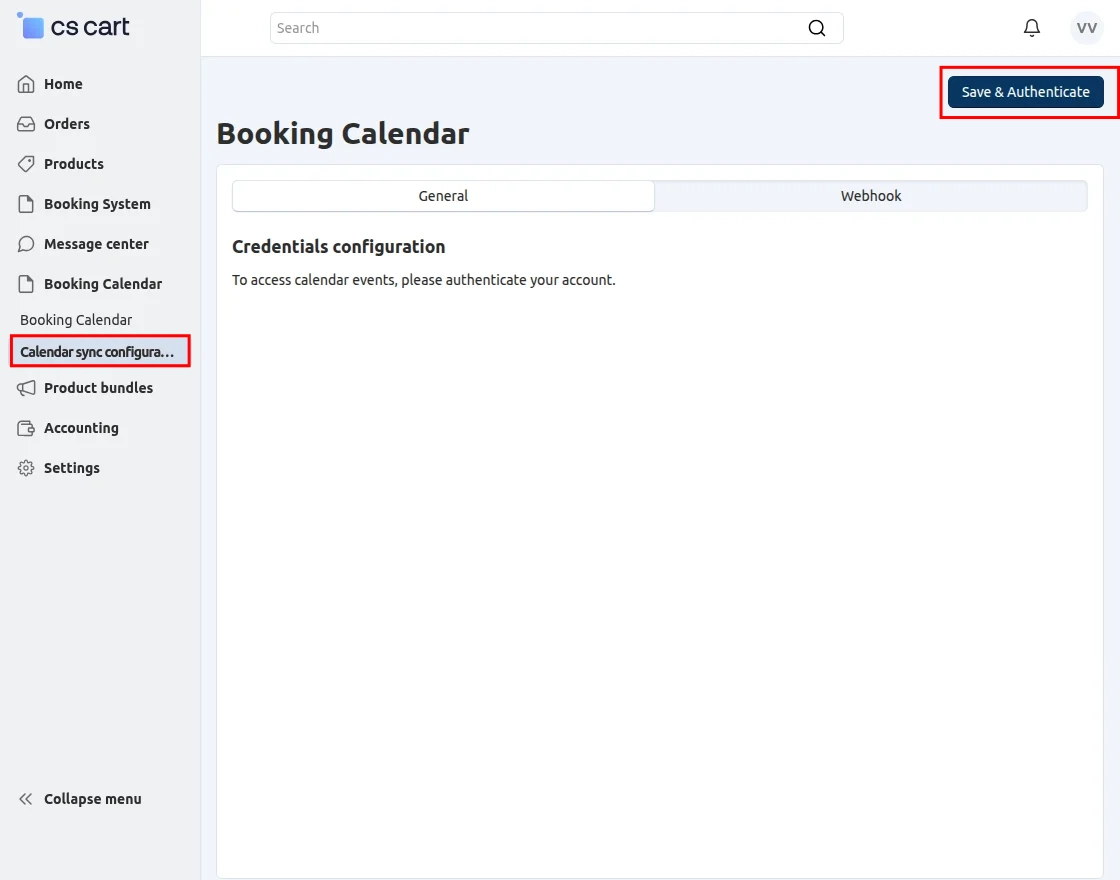
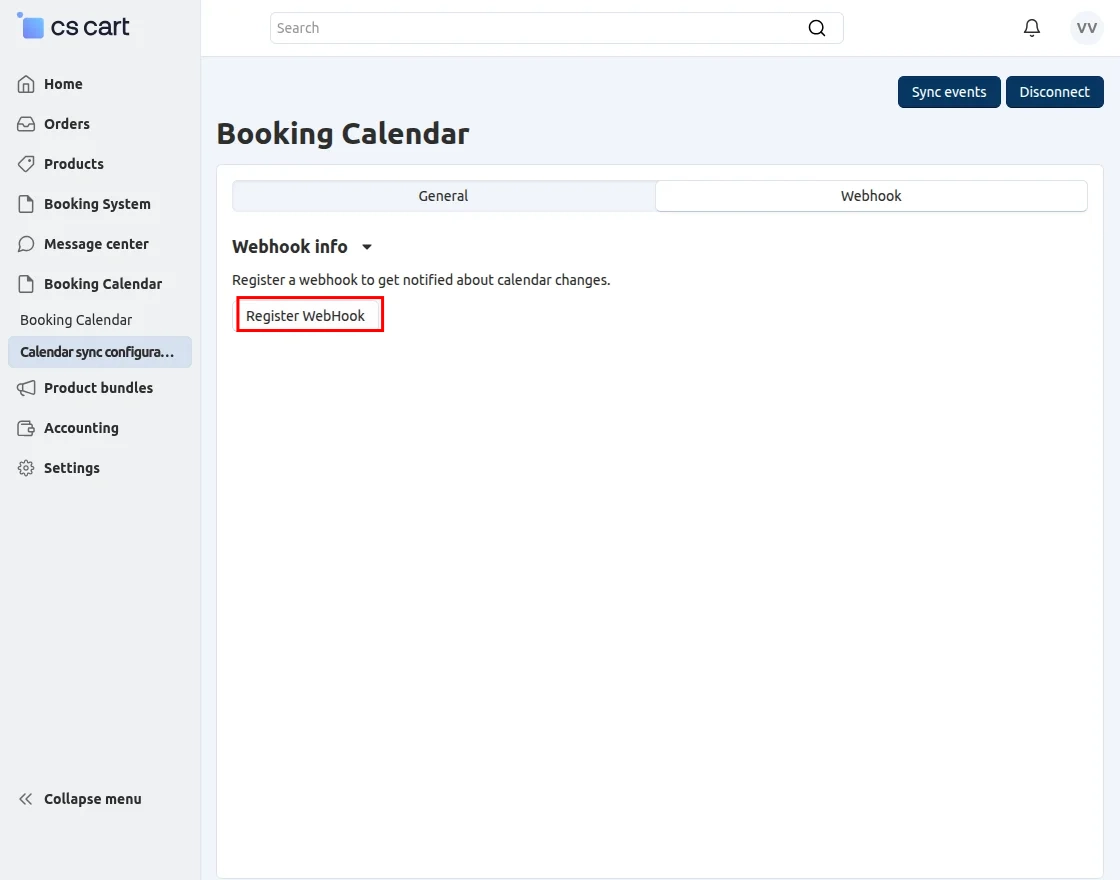
For authentication, the vendor needs to navigate to Booking Calendar >> Calendar Sync Configuration.

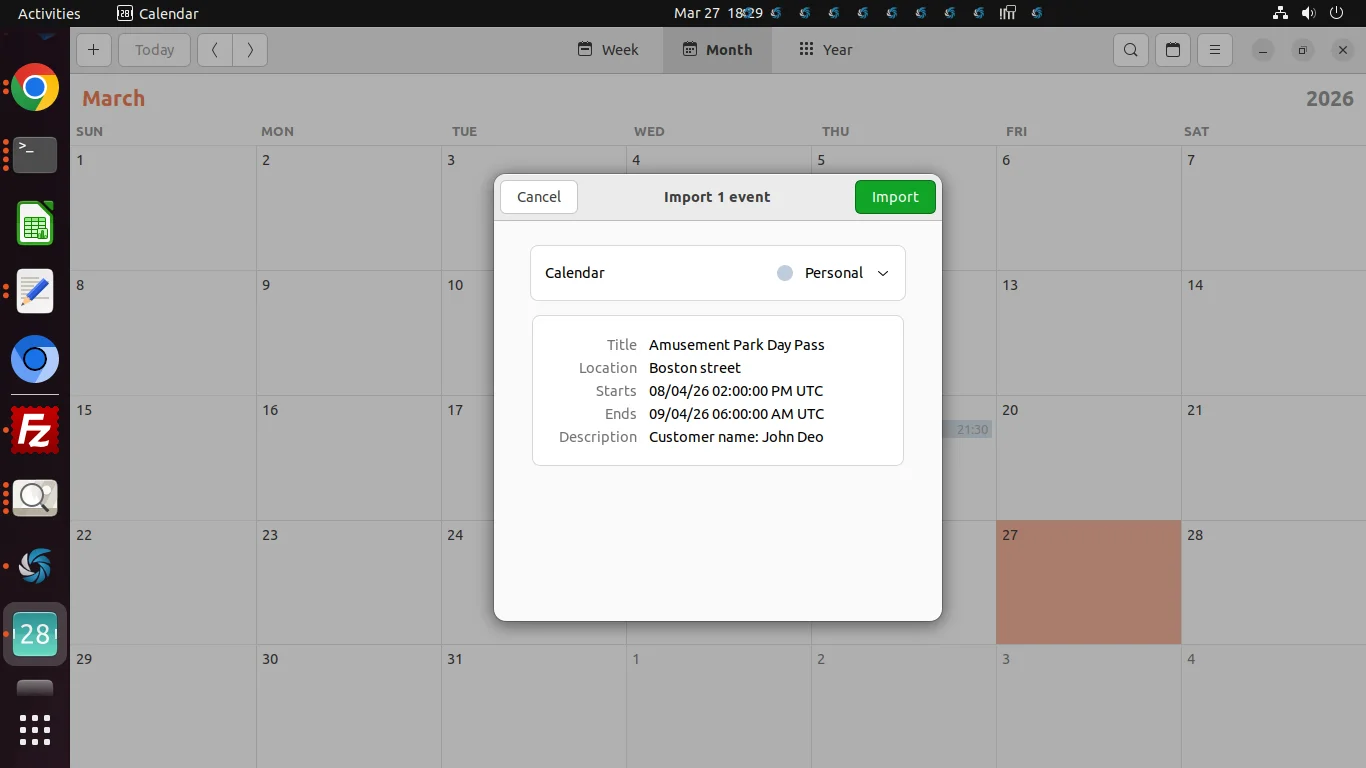
Click on the Import button to import bookings.
Support
For further any query feel free to contact us at http://webkul.uvdesk.com.
Please explore our cs-cart Development Services and Quality cs-cart add-ons .
Note: If you are using a Booking Reservation version lower than 4.0, do not update directly to the latest version, as it includes major database schema changes.
We do not recommend direct updates. If you still want to upgrade, our team can assist you with a paid update service.
Tags:
booking and reservation CS-Cart Booking And Reservation CS-Cart Booking And Reservation System CS-Cart Booking Reservation System webkul
View Comments (2)
Comment or Ask a Question
Quick Links