How to create custom layout for community pages in salesforce
In this blog we will learn how to create custom layout for community pages in salesforce using lightning components and using it through community builder.
Prerequisites
- Community should be enabled.
- Make sure that community template has Builder option.

Important keywords
1) implements=”forceCommunity:layout” – It makes the component available for custom layouts in community.
2) Aura.Component[] – Array of components.
create custom layout for community pages in salesforce
Create a new lightning component and write the following code:
<!--TestCustomLayout.cmp-->
<aura:component implements="forceCommunity:layout" access="global"> <!--Access should be global-->

    <!--
    /**
     * Webkul Software.
     *
     * @category  Webkul
     * @author    Webkul
     * @copyright Copyright (c) 2010-2016 Webkul Software Private Limited (https://webkul.com)
     * @license   https://store.webkul.com/license.html
     */
     -->

    <aura:attribute name="column1" type="Aura.Component[]" required="false"/>

    <div class="container">
    	<div class="contentPanel">
        	{!v.column1}
        </div>
    </div>

</aura:component>
Add some css to it:
/**
 * Webkul Software.
 *
 * @category  Webkul
 * @author    Webkul
 * @copyright Copyright (c) 2010-2016 Webkul Software Private Limited (https://webkul.com)
 * @license   https://store.webkul.com/license.html
**/

.THIS .contentPanel:before,
.THIS .contentPanel:after {
    content: "";
    display: table;
}
.THIS .contentPanel {
    width: 100%;
}
Using Custom Layout in Communities
Step 1: Open Community Builder.
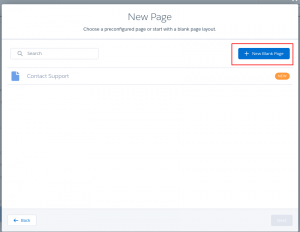
Step 2: Add a New Page

Click on New Blank Page.
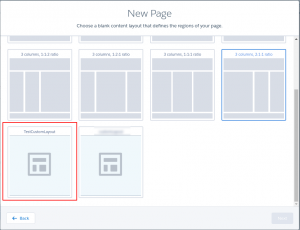
Step 3: You can view the layout you created. Select it for the page.
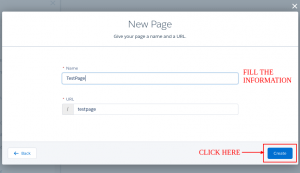
Step 4: Fill the information, and create page.
Output
Here is your output:
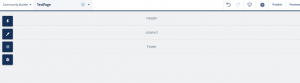
You can add the components to the layout.

Support
That’s all for how to create custom layout for community pages in salesforce, still have any issue feel free to add a ticket and let us know your views to make the code better https://webkul.uvdesk.com/en/customer/create-ticket/