User Guide for Bagisto Pet Commerce


Bagisto Pet Commerce makes it easier to build and manage a pet store storefront with Bagisto.
A pet store owner we spoke to had the catalog ready before the site was: forty kinds of kibble, eleven chew toys, a spreadsheet of suppliers, and a homepage that still said “Your Store Name Here”.
The blocker was never the products. It was that every change to the front page, whether a new banner, a seasonal grid or a category tile, meant opening a Blade file and hoping nothing else broke.
Bagisto Pet Commerce is the answer to that problem. It ships as the Waggin theme: a storefront package for Bagisto, the open-source Laravel eCommerce platform, with a pet-shaped home page assembled from seventeen editable sections, a mega menu that carries category imagery, four settings groups that appear only when the theme is live, and an installable PWA storefront.
This is the full guide. Part one gets the theme running, part two covers every screen you will touch in the admin, part three walks the storefront flow by flow from the home page to a placed order, and part four collects the operating details that are easier to know than to discover.
Part 1: Getting the theme running
Follow these steps to set up the Waggin Theme extension.
Merge the package
Unzip the extension and merge its packages/Webkul folder into your Bagisto project root so the package lives at:
packages/Webkul/Waggin
Register the PSR-4 namespace
Open the root composer.json and add the following line under the autoload.psr-4 section:
"Webkul\\Waggin\\": "packages/Webkul/Waggin/src"
Dump the autoloader
composer dump-autoload
Register the service provider
In Bagisto service providers are registered in bootstrap/providers.php. Add the following entry to the returned array:
Webkul\Waggin\Providers\WagginServiceProvider::class,
Run the installer
php artisan waggin-theme:install
Activating Bagisto Pet Commerce on a channel
Installed is not the same as active. Bagisto 2.4 keeps a theme gallery at Apperence -> Themes and a theme goes live only when a channel points at it.

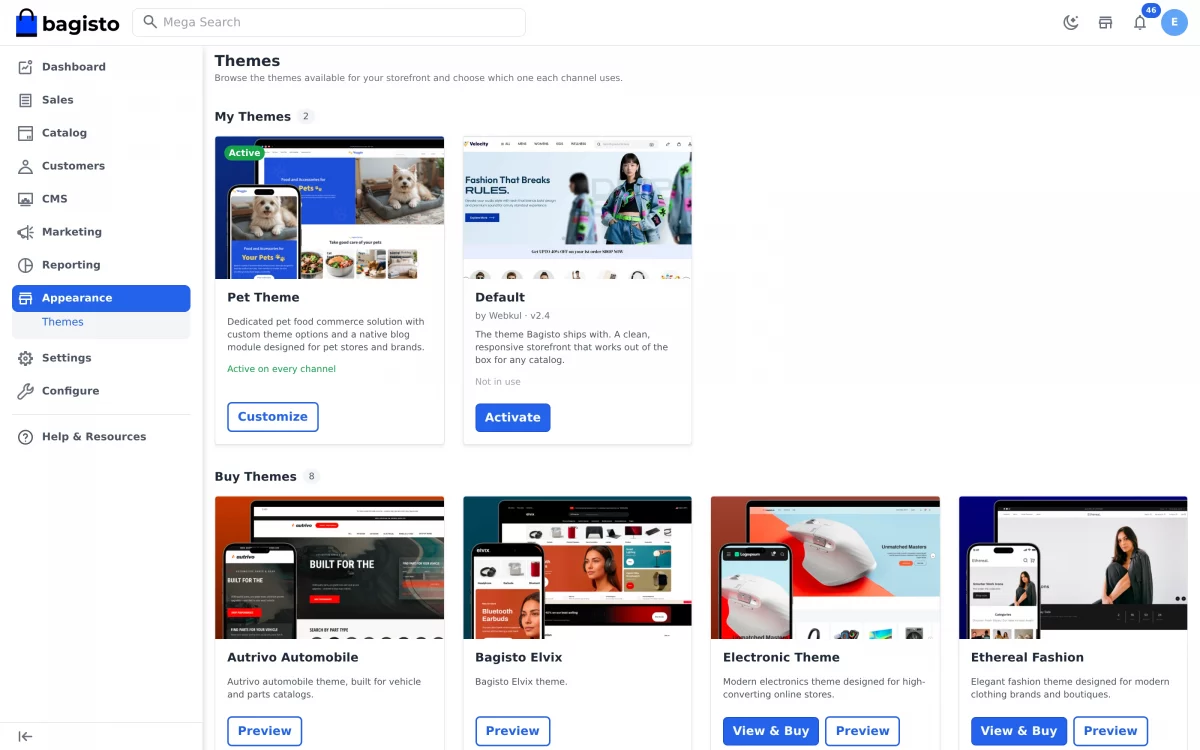
Pick Waggin, choose the channels, confirm. Three things are worth knowing :
- The confirmation asks the server what the switch will cost. Behind Activate sits an impact call that counts the section customizations each channel holds for its current theme, and reports them before anything is written. Those rows are not deleted, they simply stop being what the storefront reads.
- The package checks whether any channel uses the code
wagginbefore it boots its extras. Its shop routes and its settings block register only when the theme is active somewhere, so an installed-but-unused Waggin costs nothing at runtime. - Activation is per channel. One channel can run Waggin (Bagisto Pet Commerce) while another runs the default theme, and each keeps its own sections. The live Waggin demo shows the end state if you want to look before you switch.
Part 2: The admin side
The section editor
Appearence -> Themes -> Customize on the Waggin card opens the editor: the ordered section list on the left, a live storefront preview on the right, and Desktop / Tablet / Mobile widths across the top.
A channel selector and a locale selector sit above them, because sections are stored per theme, per channel, and their content is per locale.

Editing a section
Click a section and its fields open beside the preview. What you get depends on the type: a carousel gives you slides with an image, title, link and button; a grid gives you a title, a description and a product or category filter; a static content block gives you an HTML field and a CSS field.
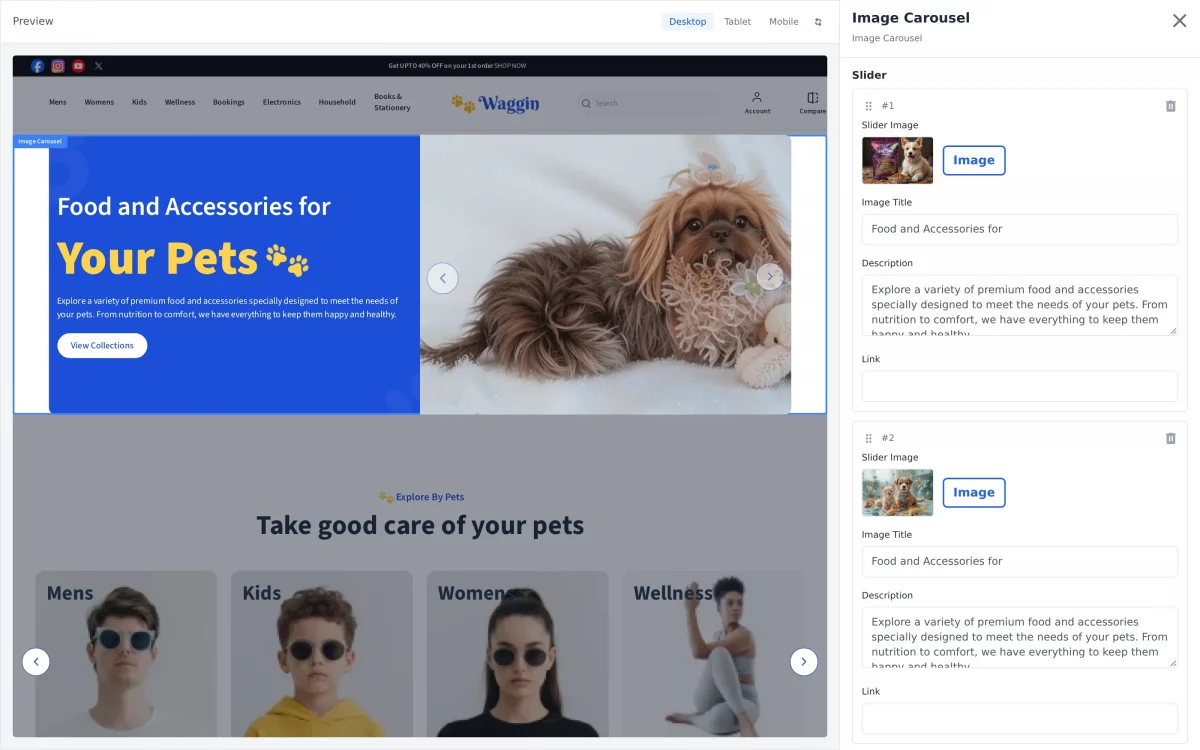
Grids and carousels are filter-driven, not hand-picked. A “New Products” grid is a filter on new products, so adding a product to the grid means flagging the product, not editing the section.
Adding a section
The + button creates a section against the theme and channel you are already editing, and it lands at the bottom of the list with its status off and its draft flag on. Core Bagisto offers image carousel, product carousel, category carousel, static content, services content and footer links.
Waggin adds two more of its own, Product Grid and Category Grid, by extending the section schema and the admin controller so both types pass validation. Only one footer_links section is allowed per theme and channel; a second is rejected rather than silently drawn twice.

Draft, preview, publish, discard
Edits do not go straight to the storefront. Saving writes a draft, the preview pane renders drafts, and a separate Publish promotes every draft on that theme and channel at once.
Discard throws them away. Alongside that you can toggle a section on or off, drag to reorder, duplicate one as a starting point, or delete it. The behaviour matches what the Bagisto user documentation describes for any 2.4 theme.
Categories and the images the menu needs
The category tree is the storefront’s navigation, so build it properly before you style anything.

A three-level tree suits a pet catalog: pets at the top (Dogs, Cats, Birds, Small Pets), product kind below (Food, Toys, Accessories), and the specific shelf at the bottom (Dry Dog Food, Rope & Tug Toys, Collars & Leashes). Assign each product to its leaf category and to the levels above it, because Bagisto does not roll children up into a parent listing for you.
Each category takes three kinds of image, and Waggin adds the third:
- Logo (110 x 110) is the tile picture in the category carousel and grid on the home page.
- Banner (1320 x 300) is the strip across the top of the category listing page.
- Menu Images (335 x 278) is Waggin’s own field, stored in category_menu_images with a type, path and position, converted to WebP on upload.

Menu images attach to the category rather than to a translation, so the same artwork is used in every locale. They fill the right-hand panel of the mega menu. The Bagisto source treats logo and banner as standard category media; menu images exist only while a Waggin-style theme is running.
Products
Products are ordinary Bagisto products. Simple, configurable, bundle, grouped, downloadable and booking types all render, each with its own Waggin view. Three fields do extra work in this theme:
- New and Featured decide which products the seeded “New Products Grid”, “Feature Products Grid” and “Featured Collection” sections pick up.
- Images are served through the theme’s own image cache templates, so upload the largest version you have and let the cache crop.
- Short description is the line under the price on the product page, and it is what the product card shows on hover.
The four theme settings
Activate Waggin and four configuration groups appear. They are ordinary core-config entries, following the usual Laravel configuration precedence, editable per locale where the field allows it.
Go to Configure -> General -> Design -> Session Images takes a left and a right image, drawn either side of the login, registration, forgot-password and reset-password pages.

Go to Configure -> Customer -> Settings -> Upload Profile Banner Image sets the banner across the top of every customer account page.
Configure -> Customer -> Settings -> Social Links has an enable toggle plus Facebook, Instagram, Twitter, YouTube and LinkedIn fields. Filled in, they become the icon row in the storefront’s top bar; switched off, the row disappears.

Configure -> Catalog -> Products -> Static Content takes a comma-separated string, such as Free 5-Day Delivery, 30-Day Returns, Vet-Approved Brands and prints it as the reassurance strip on every product page. One field, one strip, whole catalog.

Part 3: The storefront, flow by flow
The home page
Everything above the footer is sections, in the order you left them in the editor: hero carousel, “Explore By Pets”, “Explore By Category”, the product grids, the marketing blocks, the services strip.

The two category sections read the same data and differ in layout: a carousel that scrolls, and a grid that does not.

Product grids render cards with the New badge, price, rating and hover image, each pulled from the section’s filter.

Between the grids sit the static content blocks: the seasonal banner, the deals panel, the games and toys strip, the About Us block, the Instagram row and the brand logos. Each one is a static_content section holding an HTML field and a CSS field, so the layout is yours to change and nothing about it is driven by the catalog.

The installer seeds these blocks with placeholder copy, Lorem Ipsum included, so walk the home page once after installing and replace every one of them before a customer sees it.
And the services strip below the banner, the free delivery and wide variety row, is its own services_content section rather than part of the banner above it, so it is edited separately.
The header
The header carries the mega menu, search, locale and currency switchers, the account dropdown, compare and the mini cart. Hovering a top-level category opens its children in columns, with the category’s menu images alongside.

On mobile the same tree collapses into a drawer, and the top-bar social icons move into the footer panel.
Category listing
A category page draws its banner, its description, the filter rail and the product toolbar.

Filters come from the attributes marked filterable on that category; leave the set empty and the category falls back to every attribute flagged filterable in Catalog -> Attributes Price renders as a range slider, select attributes as checkbox lists, and each applied filter appears as a removable chip with Clear All beside it.
This is the part most pet stores get wrong, because Bagisto ships with a clothing-shaped demo attribute set.
Build the attributes your catalog actually sorts by, such as Pet Type, Life Stage, Brand, Flavour and Material, mark each one filterable, add it to the attribute family, then set the filter list per category so a food shelf is not offering a Material filter it has no values for.

The toolbar switches between grid and list layout, sorts (newest, price ascending or descending, alphabetical), and sets how many products load per page.
Search
Search runs from the header and lands on a results page that shares the category page’s filter rail and toolbar.
Bagisto supports both database and Elasticsearch search engines; the theme does not care which one is configured, but the engine decides whether you get typo tolerance and suggestions.

The product page

Top to bottom: gallery with zoom and thumbnails, name, price, short description, quantity changer, Add To Cart and Buy Now, then the static content strip from your settings, the attribute table, the full description and the review block.


Reviews show the rating breakdown and each approved review; customers submit from this page and an admin approves under Catalog -> Reviews before anything appears.
Social sharing sits beside the gallery, covering Facebook, X, LinkedIn, Pinterest, WhatsApp and email.
Wishlist and compare
Both are reachable from every product card and from the product page.

The wishlist lives under the customer’s account and moves items to the cart one at a time. Compare works for guests as well as signed-in customers, and lays the selected products out attribute by attribute.

Cart
The mini cart opens from the header with line items, a subtotal and a link through to the full cart. The cart page itself handles quantity changes, removals, the coupon field and a shipping estimate

Checkout
Checkout is one page in four steps: address, shipping method, payment method, then place the order. Signed-in customers get their saved addresses as selectable cards with “use the same address for shipping” ticked by default; guests get the address form inline, provided guest checkout is enabled on the products in the cart.

Shipping methods and payment methods are whatever you have enabled in Bagisto.
Flat rate and free shipping, cash on delivery, money transfer, PayPal, Stripe, Razorpay, PayU, PhonePe and PayGlocal all render in the theme’s own layout.
The order summary stays pinned beside the steps and updates as each choice is made; the Bagisto developer documentation covers adding a method of your own.

Sign in, register, recover
The session pages are where the session images from your settings appear, left and right of the form, behind the card.

Registration, forgot password and reset password use the same layout. If the Social Login module is installed, its buttons render here too; Waggin publishes its own version of that module’s view so the buttons match the theme.
The customer account
Every account page carries the profile banner and the customer’s initial.

The account navigation covers Profile, Address, Orders, Downloadable Products, Reviews and Wishlist. Order history is the one place where Waggin visibly replaces core behaviour.
it swaps the customer-facing order and downloadable-product datagrids for its own, so orders render as cards with a status pill instead of the default table.

From an order a customer can open the detail view, print the invoice, reorder, raise an RMA if that module is installed, or start an EU withdrawal where it applies.
Address stores the saved addresses with one marked default, and Downloadable Products lists the files from any downloadable order, with a per-file download link and the remaining download count.
Reviews collects everything the customer has written, with the rating, the date, the title and the body of each one.

Worth knowing before a customer asks: a review is not visible anywhere until an admin approves it under Catalog -> Reviews and it shows here in the customer’s account from the moment they submit it. So a shopper can see their own pending review on this page while it is still missing from the product page, which reads as a bug if you have not set the expectation.
Contact, newsletter and footer
The footer uses the footer_links section, display the link columns, which you can edit directly in the section editor. Everything around it comes from elsewhere: the newsletter subscribe field posts to Bagisto’s subscription endpoint, the social row is the Social Links setting from Part 2, the payment icons are theme assets, and the locale and currency switchers in the bottom bar list whatever the channel has enabled.

The seeded footer ships four columns of sample links, and duplicates them, so it is another block to edit rather than inherit. A contact form lives at /contact-us and mails the store using the theme’s own email layout.
With the Waggin Theme, setting up and managing a Bagisto pet commerce becomes simpler, from installation and channel activation to storefront customization. Its flexible sections and pet-focused design give store owners the tools to create a professional storefront without repeatedly modifying the code.
Support
So that is all for the Bagisto Pet Commerce guide.
For any further queries or assistance, you can drop us an email at support@webkul.com. You can also raise a ticket at our HelpDesk System.
Please explore our Laravel Development Services and Quality Bagisto Extensions.