Bagisto Google Tag Manager
Table of Content
Bagisto Google Tag Manager helps you manage tags with ease.
Tags are code snippets that collect information about visitors.
They can also track visitor behaviour across your store.
However, manually assigning tags to web pages can become tedious.
It can also make tag management a time-consuming task.
Therefore, integrate Google Tag Manager with Bagisto to manage marketing tags efficiently.
As a result, you can deploy tags without repeatedly changing your store code.
Google Tag Manager is a code management system for website tags.
It lets you add, update, and manage tags quickly.
With this module, you can connect your Bagisto store to Tag Manager.
First, enter the container ID in the Bagisto admin panel.
The module then injects the required snippet across the storefront.
When a customer views a product, the module publishes an event.
Similarly, customer sign-in and category views create events.
Add-to-cart and completed-order events are supported as well.
These events go into the Bagisto data layer.
Google Tag Manager then evaluates the matching triggers.
Finally, the matching tags can fire automatically.
The module also includes a ready-made Google Tag Manager container file.
You can export the file from the Bagisto admin panel.
Your configured IDs go into the exported container.
Next, import the file into your Google Tag Manager container.
The import creates the tags, triggers, and variables automatically.
Note
- Bagisto Google Tag Manager supports Bagisto’s multi-channel feature.
- Each channel can use its own Tag Manager container.
- The module supports the default Bagisto storefront theme.
- Events use the default storefront routes.
- The purchase event uses the default order success page.
- The module supports Google Analytics 4 (GA4).
- Google has deprecated Universal Analytics.
- This module does not support Universal Analytics.
- Login, register, and edit profile events publish customer details.
- Therefore, review these events against your privacy policy before enabling them.
Features of Bagisto Google Tag Manager
- Configure Google Tag Manager without editing a theme file.
- The module injects the Tag Manager snippet into the storefront head.
- It also injects the matching noscript iframe after the body tag.
- It works across product, category, search, cart, checkout, and account pages.
- Track product view and category view events.
- Track add to cart, remove from cart, and wishlist events.
- Track checkout, purchase, login, registration, profile, and search events.
- Push 14 Google Analytics 4 events into the data layer.
- Control the events with 12 individual switches.
- Purchase data includes order total, revenue, shipping, tax, and coupon.
- Payment and shipping methods are also available as separate events.
- Choose the product identifier that you send to Google.
- The product identifier can be the Bagisto product ID or SKU.
- Track Google Ads conversions using a Conversion Id.
- Enable Google Ads Remarketing with the required values.
- Download a container with 18 tags, 17 triggers, and 14 variables.
- Import tags in bulk instead of creating them individually.
- Deploy GA4 and other third-party tags from the same container.
- Enable or disable data collection with one master switch.
- The module includes an admin menu entry and ACL permissions.
- Measure ecommerce conversion and shopping behaviour in GA4.
- The module is available in 22 locales.
How the Bagisto Google Tag Manager Integration Works
The module generates the Tag Manager setup from your configuration.
Therefore, you do not need to build the complete setup manually.
First, configure the module and export the generated container file.
Then, import the file into your Google Tag Manager container.
Overall, the integration has four main steps.
- Configure — enter your Tag Manager and GA4 identifiers.
- Next, choose the product identifier and enable the required events.
- Add the Google Ads values if you use Google Ads.
- Save — save the configuration for the selected channel.
- Export — open the Google Tag Manager screen.
- Click Export JSON File to generate the container.
- Import — import the JSON file into your Tag Manager container.
- Finally, publish the imported container version.
The imported container contains the complete tracking setup.
For example, it includes the GA4 configuration and event tags.
It also includes the required triggers and data layer variables.
The Conversion Linker and Google Ads tags are included as configured.
As a result, you do not need to create these items one by one.
The Bagisto storefront publishes the data layer events.
Meanwhile, the imported container contains the tags that listen for them.
After importing and publishing, both parts work together.
How to Install Bagisto Google Tag Manager
The extension is a self-contained Bagisto package.
First, extract the downloaded folder before starting the installation.
- Place the package at
packages/Webkul/GoogleTagManager. - Register the package namespace in the root
composer.json. - Register the service provider in
bootstrap/providers.php. - Finally, run the autoloader and installer commands.
Register the namespace
"autoload": {
    "psr-4": {
        "Webkul\\GoogleTagManager\\": "packages/Webkul/GoogleTagManager/src/"
    }
}
Register the service provider
Webkul\GoogleTagManager\Providers\GoogleTagManagerServiceProvider::class,
Note: the package registers its Concord module internally.
Therefore, you do not need to edit config/concord.php.
Run the installer
composer dump-autoload

php artisan google-tag-manager:install
The command publishes the package assets.
It also clears the compiled caches.
Finally, the command shows a successful installation message.
After configuration changes, clear the cache again.
php artisan optimize:clear
Bagisto Google Tag Manager Configuration
First, log in to the Bagisto admin panel to configure the module.
Then go to Configure > General > Google Tag Manager.
The screen contains three configuration groups.
These groups are Tag Manager Setting, Google Ads Conversion Tracking, and Google Ads Remarketing.
All fields use the selected channel.
Therefore, select the required channel before configuring another store.
Tag Manager Setting
- Enable Status to turn the module on.
- Enter the numeric Tag Manager Account Id.
- Example Account Id:
6242021787. - Enter the Tag Manager Public Id.
- Use the
GTM-XXXXXXXformat for the Public Id. - Example Public Id:
GTM-PCX4SSVV. - Enter the numeric Tag Manager Container Id.
- Example Container Id:
191148207. - Enter the GA4 Measurement Id.
- Example Measurement Id:
G-LC3NBLLJBX. - Select ID or SKU as the Product Identifier.

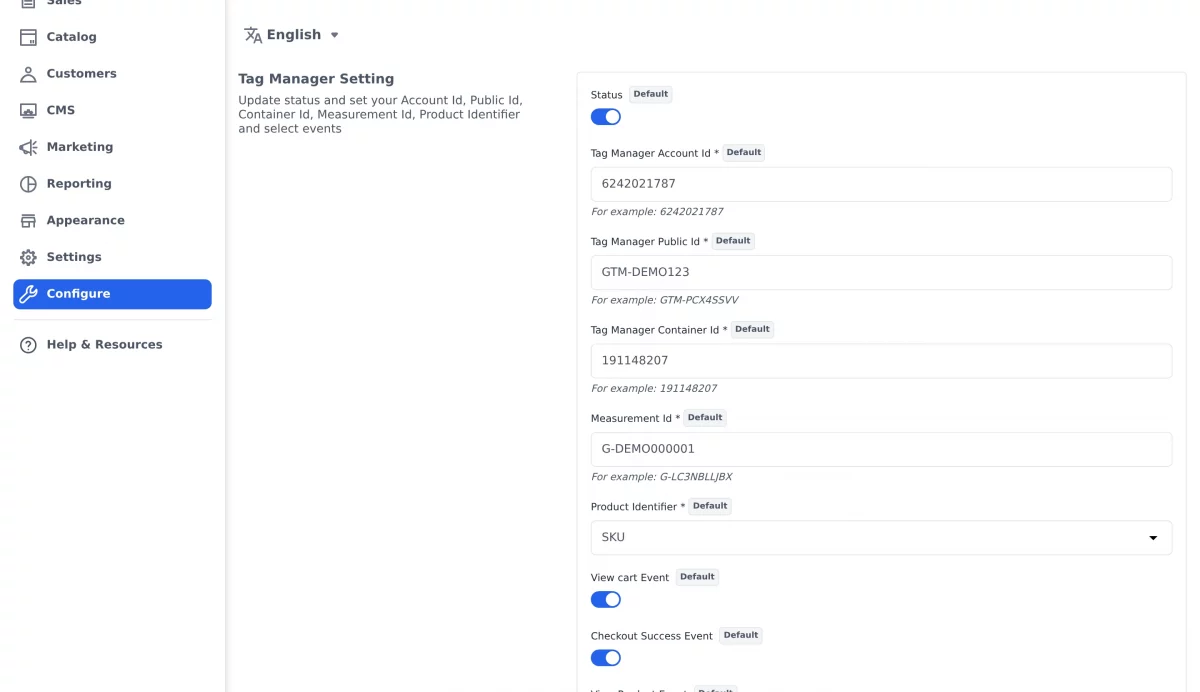
The Public Id loads the storefront Tag Manager snippet.
It connects the storefront to the selected container.
The Account Id and Container Id go into the export.
Likewise, the Measurement Id goes into the exported container.
Therefore, configure all required identifiers before exporting.
Events Settings
The same group contains switches for tracked storefront events.
Enable only the events that you want to send to Tag Manager.

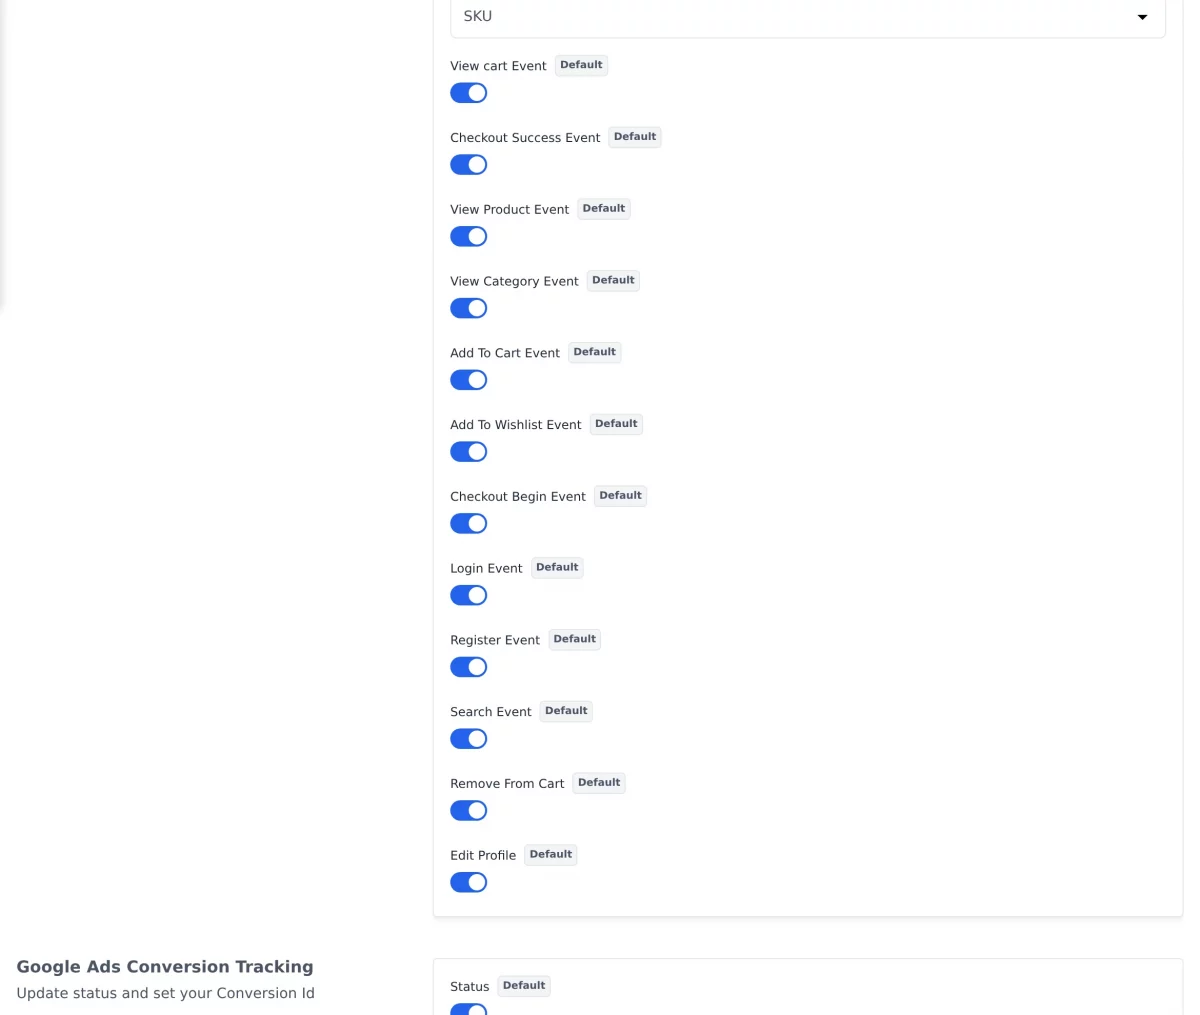
- Product Data — View Product Event tracks product page views.
- It publishes product ID, SKU, name, price, and currency.
- Category Data — View Category Event tracks category views.
- It publishes category information and displayed products.
- Cart Data tracks add, remove, and cart view events.
- Cart events publish items, quantities, prices, and currency.
- Checkout Data tracks the beginning of checkout.
- It publishes cart items, coupon, tax, and cart value.
- Purchase Data tracks completed orders.
- It publishes purchase, payment, and shipping information.
- Customer Data tracks login, registration, and profile events.
- Customer data includes details that the storefront publishes.
- Wishlist Data tracks products added to the wishlist.
- Search Data tracks searches made on the storefront.
Only enabled events appear on the storefront.
Therefore, a tag that never fires may use a disabled event.
Google Ads Conversion Tracking
Enable the Status for Google Ads Conversion Tracking.
Next, enter the numeric Conversion Id from Google Ads.
Do not include the AW- prefix in this field.

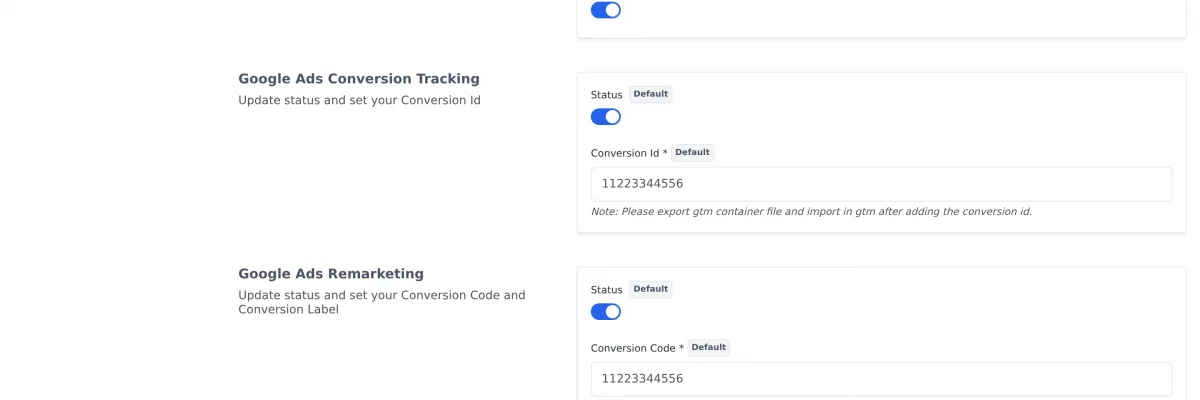
The storefront loads the Google Ads global site tag when you enable it.
The tag uses AW- followed by your Conversion Id.
The Conversion Id also goes into the exported container.
Therefore, re-export the container after changing this value.
Google Ads Remarketing
Enable Google Ads Remarketing to reach previous store visitors.
Then enter a numeric Conversion Code.
Also enter the required Conversion Label.
Example label: AbC-D_efG-h12_34-567.

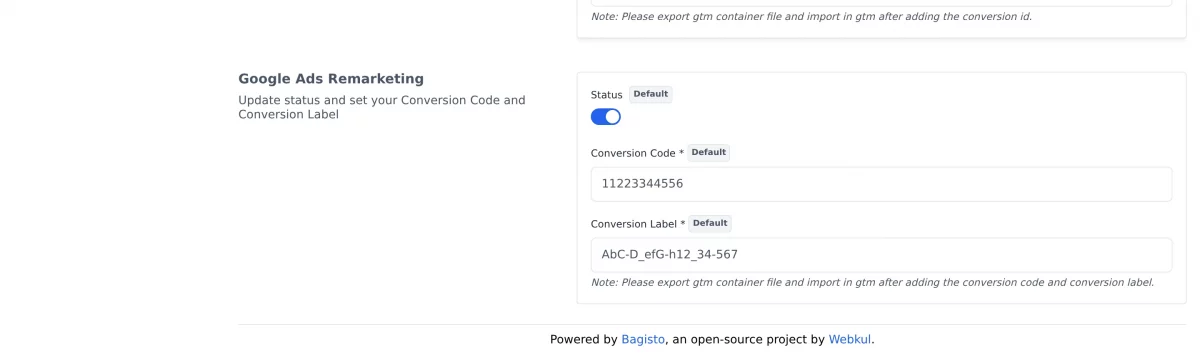
When enabled, the storefront fires the configured conversion event.
The event uses the Conversion Code and Conversion Label.
It uses a value of 1.0 and the current store currency.
Please note: this conversion call appears on every storefront page.
Therefore, it can report a conversion for each page view.
For one conversion per order, disable this group.
Then create a Google Ads conversion tag inside Tag Manager.
Use the purchase trigger that the imported container provides.
Also use the order transaction ID and value from the data layer.
Finally, save the configuration and clear the cache.
php artisan optimize:clear
Container File – Export from Bagisto and Import in Tag Manager
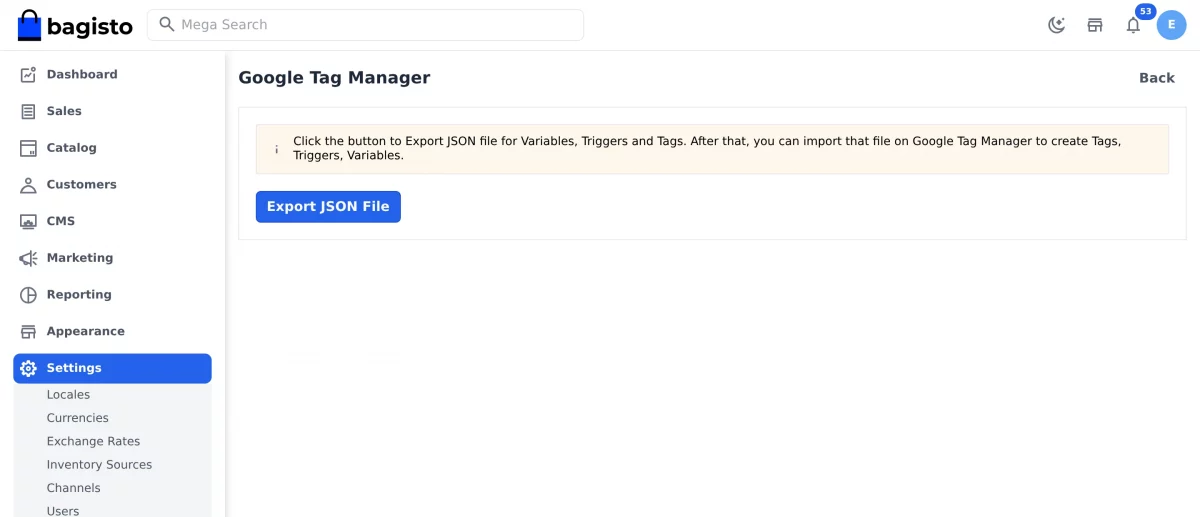
A Google Tag Manager entry appears in the admin sidebar.
It opens the container export screen.
The screen is available at /admin/settings/google-tag-manager.

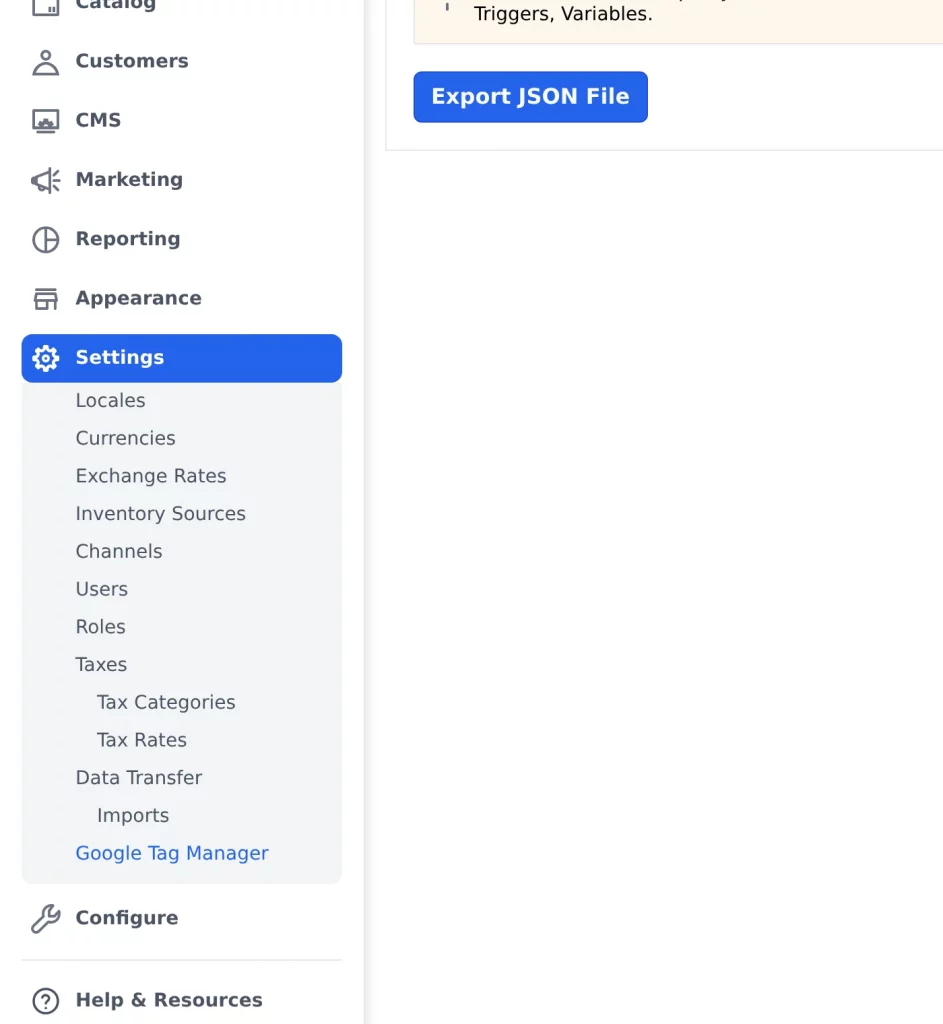
The admin can download the Google Tag Manager container file.
Click Export JSON File to generate the file.
The downloaded file is named bagisto-gtm.json.
The file is generated for the selected channel.
Your configured IDs go into the file.

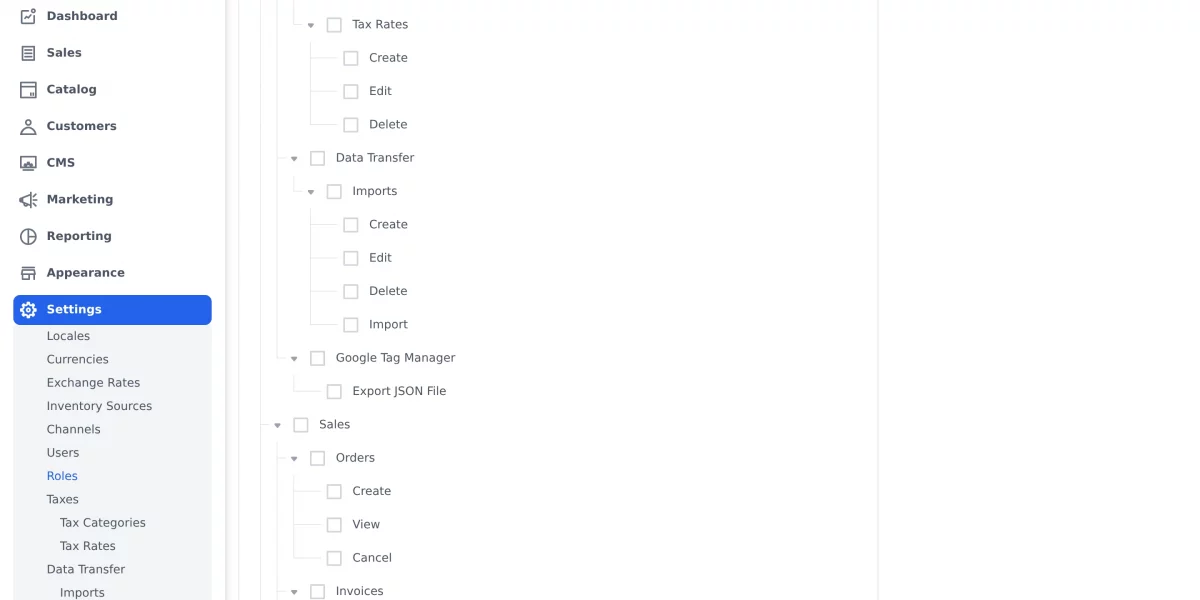
The export screen uses ACL permissions.
Go to Settings > Roles to manage these permissions.
The role needs the Google Tag Manager permission.
The Export JSON File permission controls the download button.

The exported file contains the complete container configuration.
Therefore, you do not need to finish the configuration manually.
Importing the file creates the tags, triggers, and variables.
Next, go to Tag Manager > Admin > Import Container.


- Choose the
bagisto-gtm.jsonfile downloaded from Bagisto. - Select an existing workspace or create a new workspace.
- Choose Merge or Overwrite.
- Review the changes and click Confirm.
- Finally, click Submit and publish the imported version.
Re-export whenever an ID changes.
The file uses your current configuration.
Therefore, re-export after changing the Measurement Id.
Also re-export after changing any Google Ads value.
What the imported container contains
The import creates the complete tracking configuration.
The container contains 18 tags.
It also contains 17 triggers.
In addition, there are 14 data layer variables.
Built-in variables include Page URL, Page Hostname, Page Path, Referrer, and Event.
- Google Analytics GA4 Configuration carries the Measurement Id.
- Conversion Linker fires on page view.
- 14 GA4 event tags are included in the container.
- These include
view_item,view_item_list, andview_cart. - They also include
add_to_cartandremove_from_cart. - Other events include
add_to_wishlistandbegin_checkout. - The purchase event is
purchase. - Payment and shipping events are also included.
- Customer events include
loginandsign_up. - The container also includes
searchandEdit. - Two Google Ads tags are included when enabled.
- Google Ads tags use the selected configuration values.
- 17 triggers support the configured events.
- 14 Data Layer Variables read the Bagisto ecommerce data.
Note on the two Google Ads tags: their names and configured values may appear reversed.
The Google Ads Remarketing tag contains the Conversion Id value.
The Google Ads Conversion Tracking tag contains the Conversion Code and Label.
Therefore, when checking the import, match tags by their configured values.
How to get the Google Tag Manager IDs?
First, create a Google Tag Manager account to obtain the required IDs.
Sign up through Google Tag Manager.
- Click the Create Account button.


Next, enter an account name according to your requirements.


Then specify the container name.
Select Web as the container platform.
Finally, click Create to continue.


Accept the Google Tag Manager Terms of Service.


The container ID appears in the top menu bar.
It uses the GTM-XXXXXXX format.
Enter this value in the Bagisto Tag Manager Public Id field.


You can also view the container ID under Accounts.


Account Id and Container Id
The Bagisto configuration also requires two numeric identifiers.
Both identifiers appear in the workspace URL.
tagmanager.google.com/#/container/accounts/6242021787/containers/191148207/workspaces
- Tag Manager Account Id follows
accounts/. - You can also find it under Admin > Account Settings.
- Tag Manager Container Id follows
containers/. - You can also find it under Admin > Container Settings.
How to get the Tracking ID or Measurement ID?
Sign in to Google Analytics to obtain the Measurement Id.


First, enter an account name during account creation.


Under Property creation, enter the property name.
Next, select the required time zone and currency.


Under Business details, select the industry category.
Also select the business size.


Select the relevant topics under Business objectives.


Then accept the Google Analytics Terms of Service.

Choose the platform from which you want to collect data.
For a Bagisto store, choose Web.


Next, go to Admin > Data Streams.
Click the Create stream button.


Open the Web stream details screen.
Copy the G-XXXXXXXXXX Measurement Id.
Finally, paste it into the Bagisto Measurement Id field.


It may take some time for the property to collect data.


How to Get Conversion ID and Label for Google Ads
First, sign in to your Google Ads account.


Then go to Goals > Conversions > Summary.

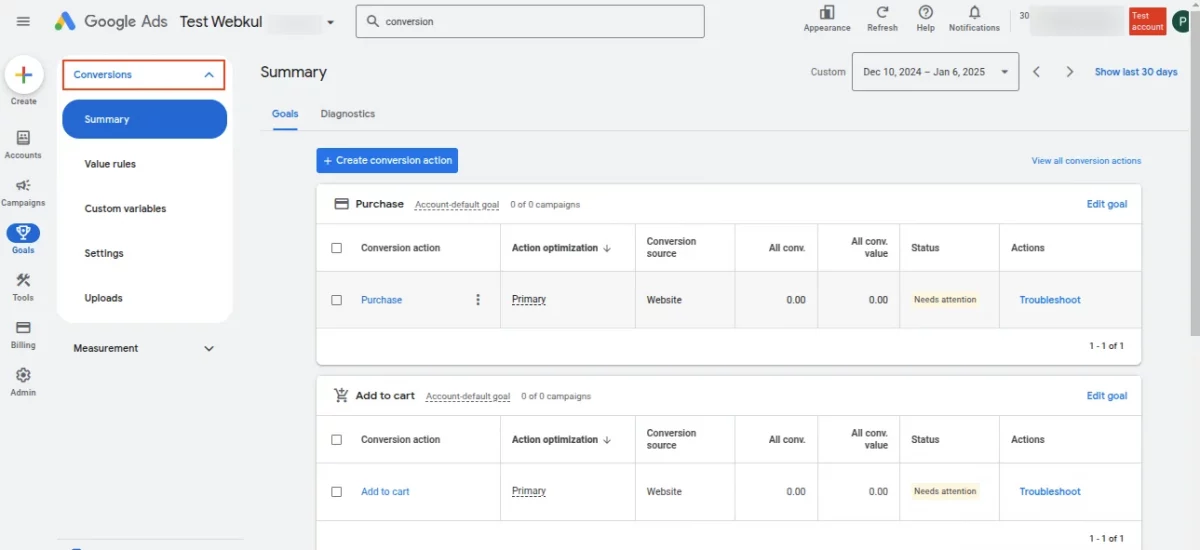
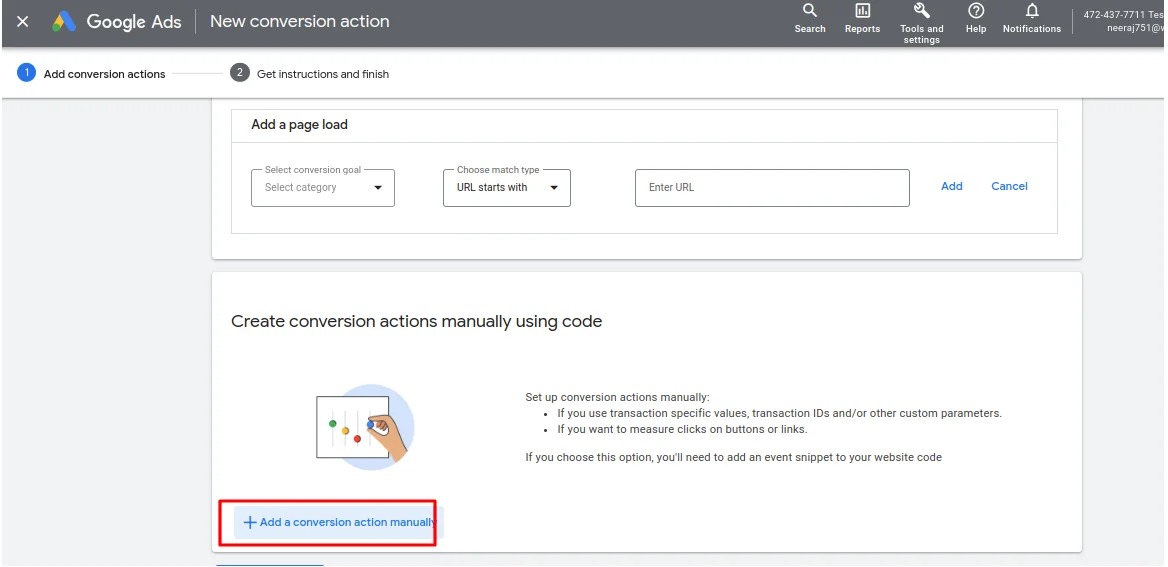
Create the conversion action that you want to use.

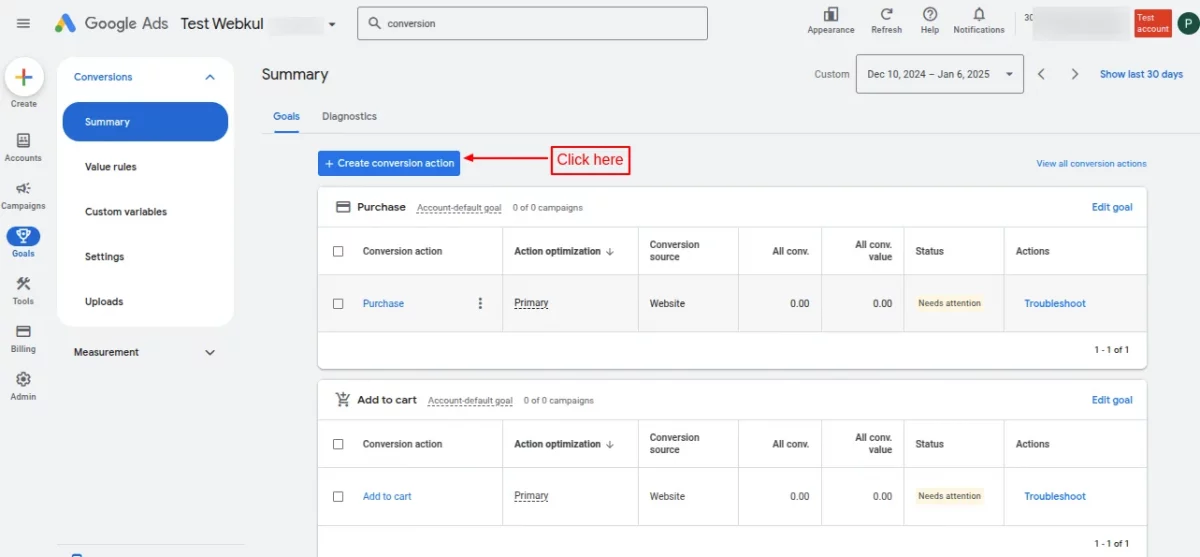
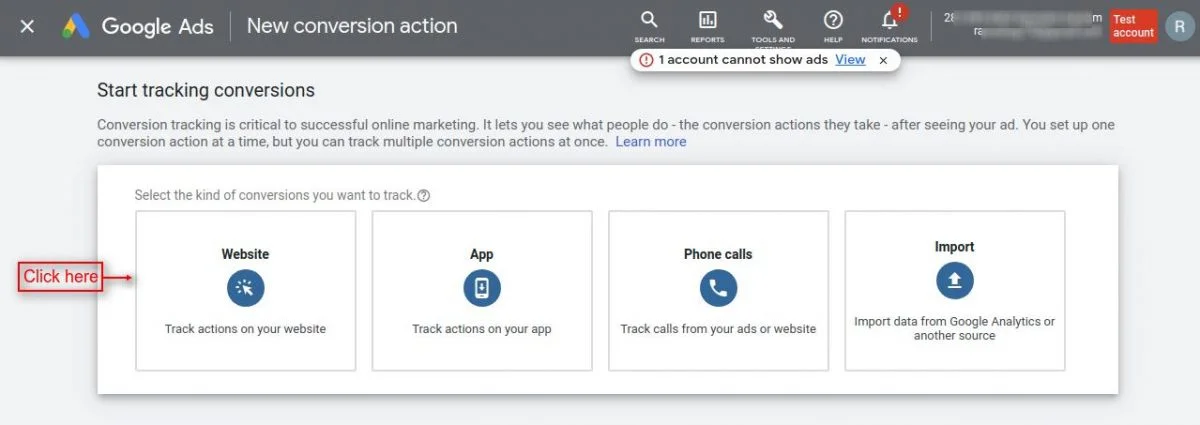
Next, select Website as the conversion source.

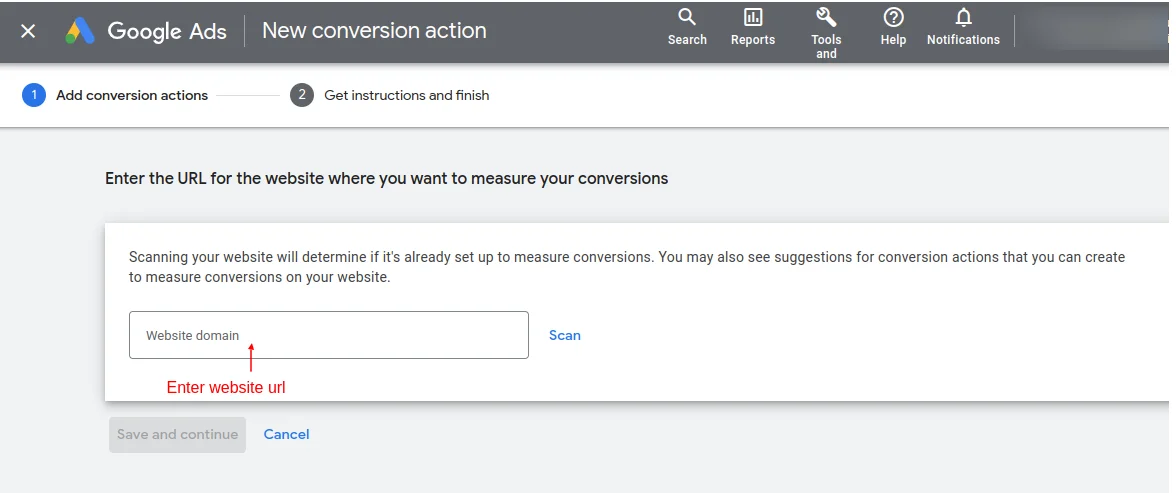
Enter your store URL.

Then create the required conversion action.

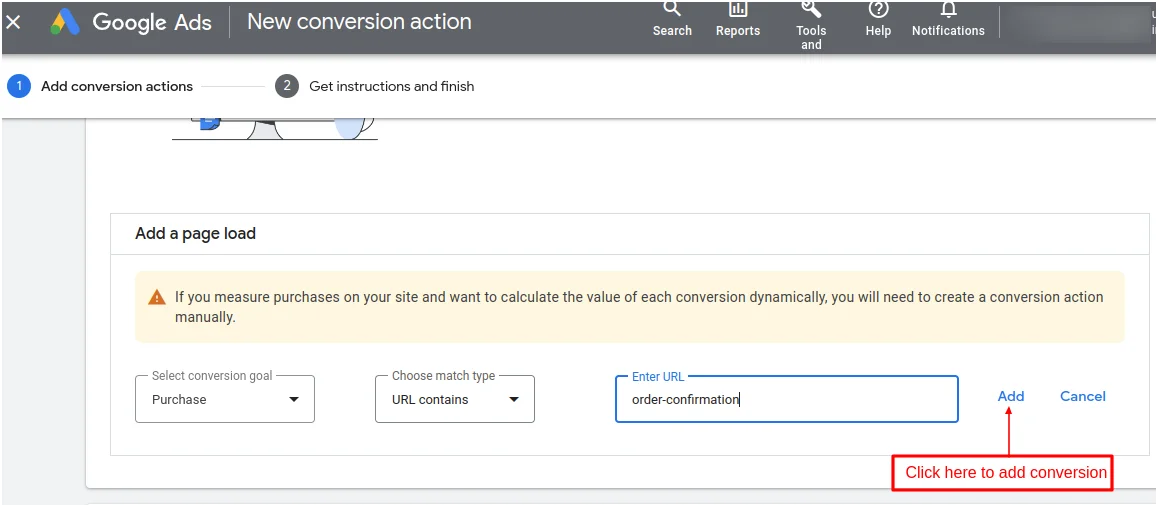
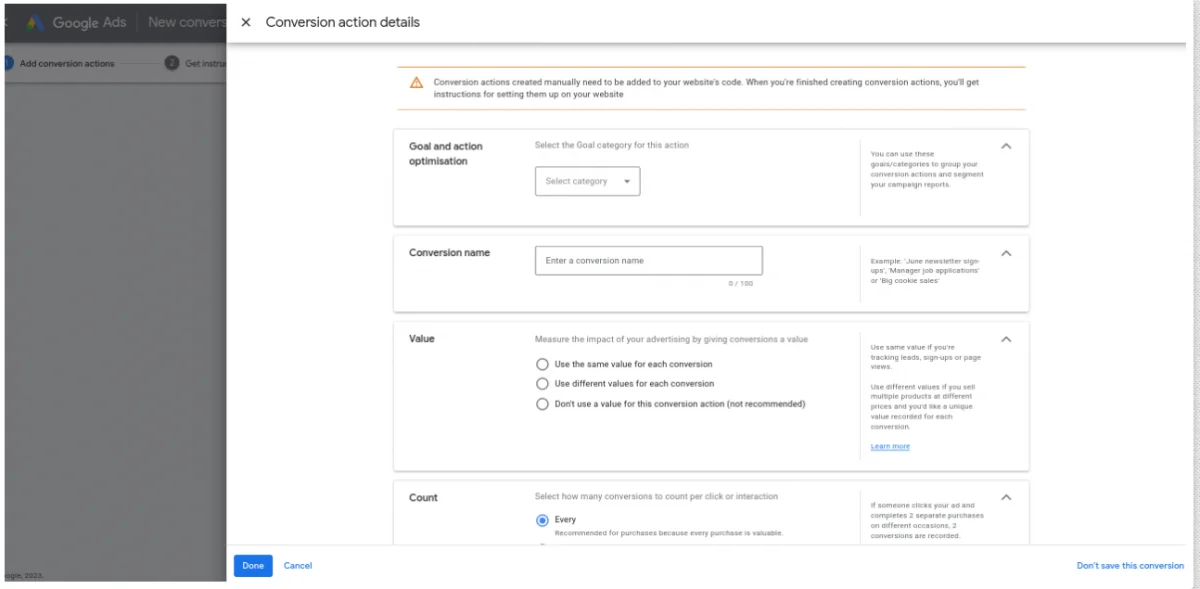
For a manual conversion, select the required events.


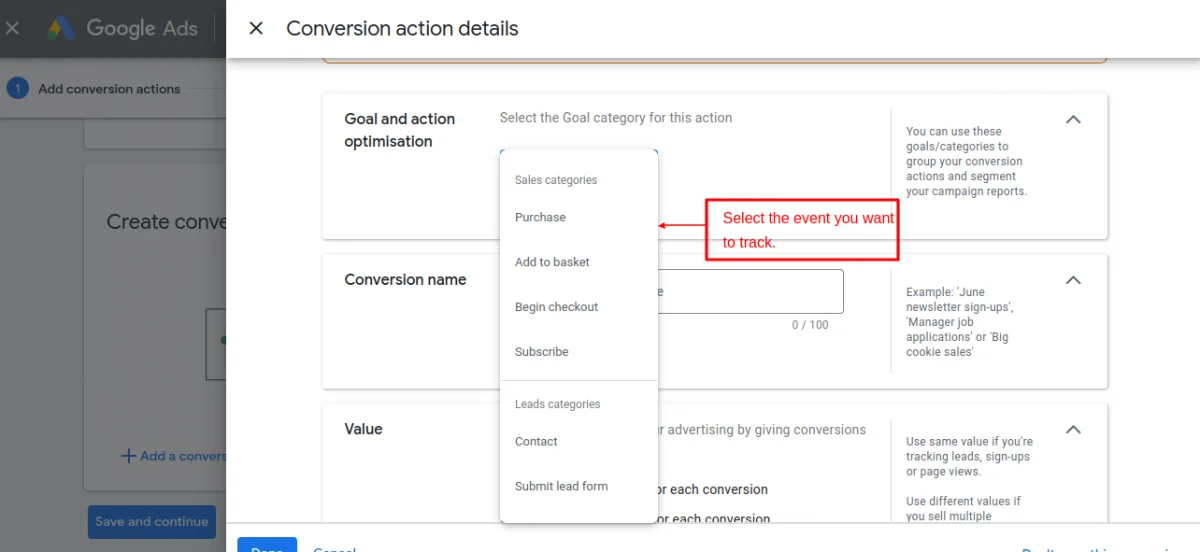
Click Done after selecting the events.

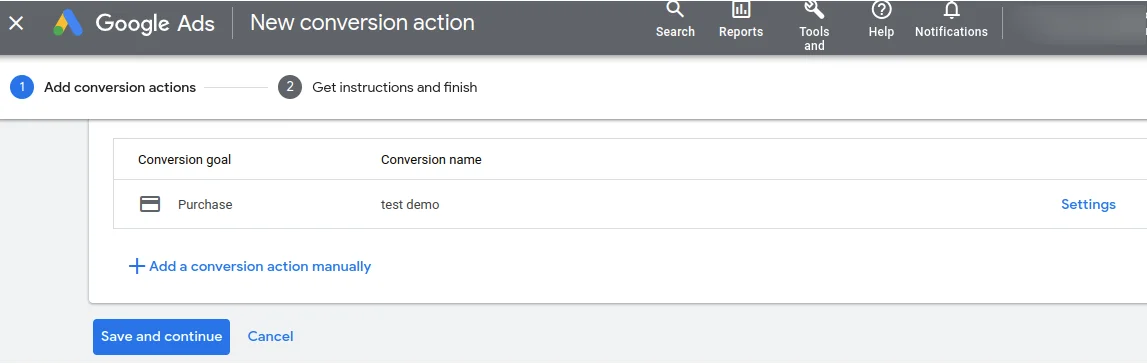
Add additional conversion actions manually if required.

Under Tag setup, choose Use Google Tag Manager.

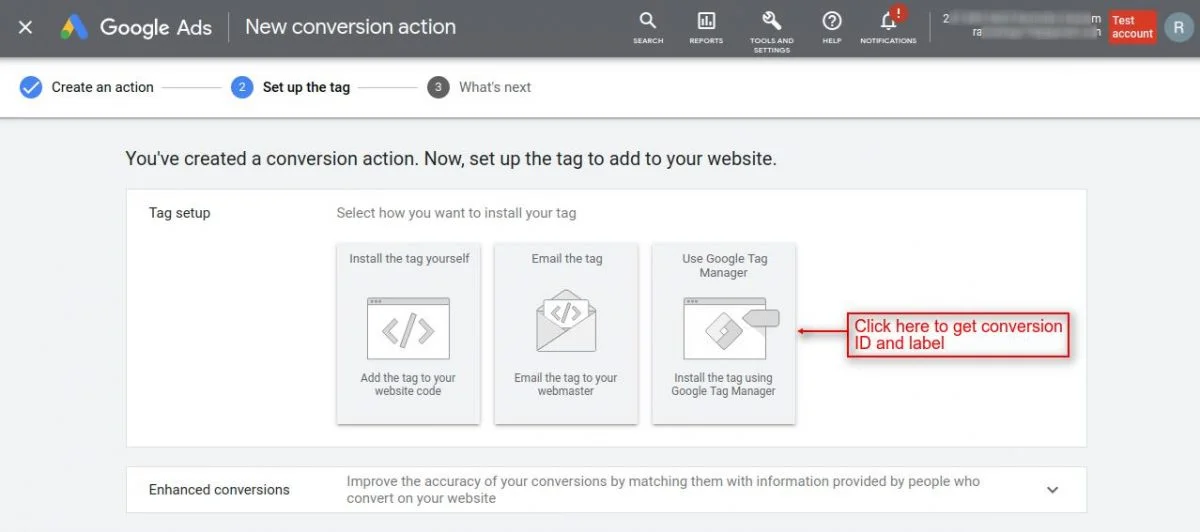

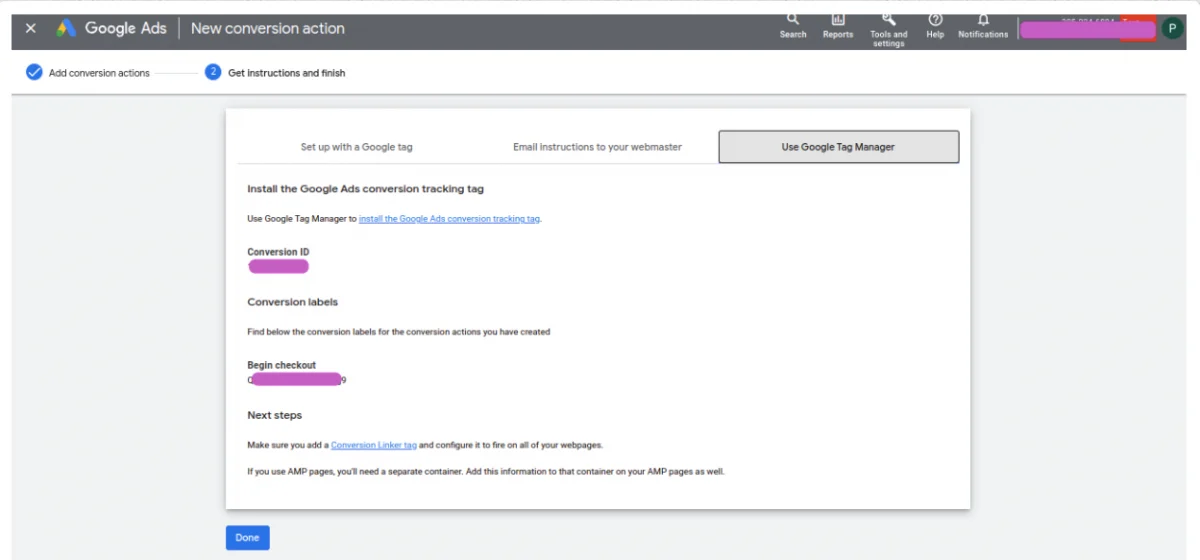
Copy the conversion ID into the Bagisto configuration.
Use the Conversion Id field under Conversion Tracking.
Use the Conversion Code field under Remarketing.
Enter digits only and omit the AW- prefix.
Finally, copy the conversion label into the Conversion Label field.
Deploy Google Analytics And Other 3rd Party Tags With Google Tag Manager
Bagisto Google Tag Manager can deploy GA4 and third-party tags.
The exported container already includes the GA4 configuration tag.
The tag contains your configured Measurement Id.
In addition, the container contains fourteen GA4 event tags.
These tags connect to the storefront events.
Import the file and publish the container version.
Therefore, you do not need to create the GA4 tags manually.
However, you can still add unsupported third-party tags manually.
Examples include advertising pixels and heatmap scripts.
Chat widgets can also run through Tag Manager.
Furthermore, the imported Bagisto triggers can support these tags.
Note: third-party tags require an ID from the relevant platform.
How to Add a Tag of Your Own (Optional)
This section is optional.
GA4 and Google Ads tags already exist in the imported container.
Therefore, follow these steps only for additional tags.
In Google Tag Manager, click Add a new tag.


Enter a name for the tag.
Next, click Tag Configuration to configure it.

Select the required tag type.


Then enter the ID supplied by the third-party platform.
For GA4 events, enter the required event name.


Choose an existing trigger or create a new trigger.
The Bagisto import already contains the supported event triggers.
Note: shared parameters belong on the GA4 configuration tag.
Therefore, GA4 event tags inherit parameters from the configuration tag.
How the Storefront Integration Works
The Bagisto storefront integration uses four main locations.
- Head — loads the Google Tag Manager script.
- The script uses the Tag Manager Public Id.
- Body — contains the Tag Manager noscript iframe.
- The body also receives the relevant data layer push.
- Product page — publishes the product view event.
- Footer — listens for cart and wishlist changes.
The footer component supports events without a page reload.
Meanwhile, the container snippet follows the Google Tag Manager format.
<!-- Google Tag Manager -->
<script>(function(w,d,s,l,i){w[l]=w[l]||[];w[l].push({'gtm.start':
new Date().getTime(),event:'gtm.js'});var f=d.getElementsByTagName(s)[0],
j=d.createElement(s),dl=l!='dataLayer'?'&l='+l:'';j.async=true;j.src=
'https://www.googletagmanager.com/gtm.js?id='+i+dl;f.parentNode.insertBefore(j,f);
})(window,document,'script','dataLayer','GTM-XXXXXXX');</script>
<!-- End Google Tag Manager -->
No tracking script enters the admin panel.
Likewise, the storefront renders nothing when Status is off.
Events View – Google Tag Manager
Bagisto publishes the data layer events on the storefront.
The imported container provides the tags and triggers.
It also provides the variables that read the data.
Before each event, the module clears the previous ecommerce object.
window.dataLayer = window.dataLayer || [];
dataLayer.push({ ecommerce: null });
dataLayer.push({
    'event': 'view_item',
    'ecommerce': { }
});
The following table lists the events that the module publishes.
| Event | Fires on | Controlled by |
|---|---|---|
| view_item | Product detail page | View Product Event |
| view_item_list | Category and product listing page | View Category Event |
| view_cart | Cart page | View cart Event |
| add_to_cart | Mini-cart update | Add To Cart Event |
| remove_from_cart | Cart item removal | Remove From Cart |
| add_to_wishlist | Wishlist addition | Add To Wishlist Event |
| begin_checkout | One-page checkout | Checkout Begin Event |
| purchase | Order success page | Checkout Success Event |
| add_payment_info | Order success page | Checkout Success Event |
| add_shipping_info | Order success page | Checkout Success Event |
| login | First page after sign-in | Login Event |
| sign_up | Customer account screen | Register Event |
| search | Search results page | Search Event |
| Edit | Customer profile page | Edit Profile |
Product Data
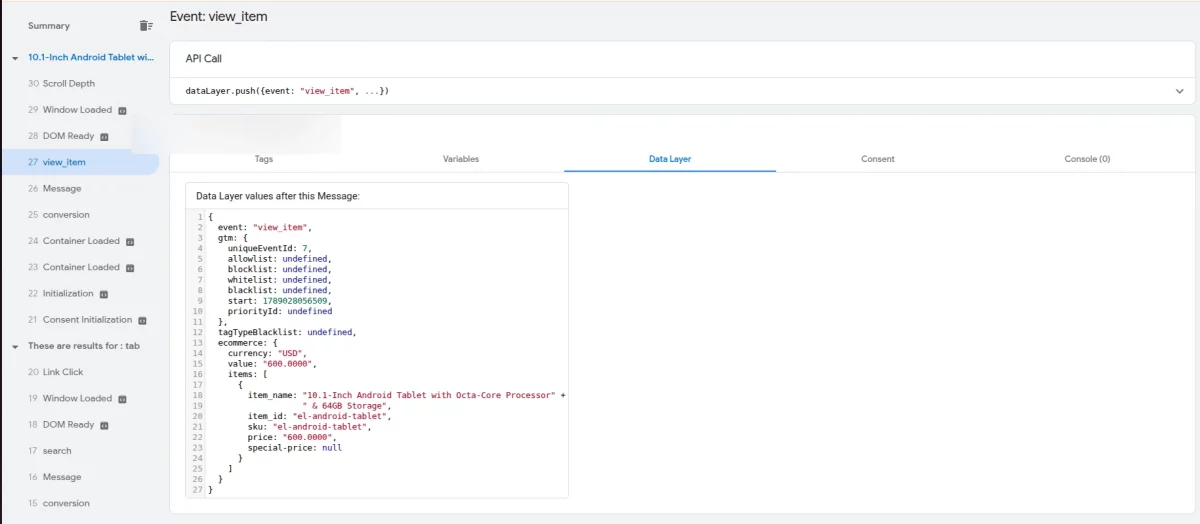
The product page publishes the view_item event.
The item ID follows the Product Identifier setting.
In addition, the SKU goes with the product information.


dataLayer.push({
    'event': 'view_item',
    'ecommerce': {
        'currency': 'USD',
        'value': '600.0000',
        'items': [{
            'item_name': '10.1-Inch Android Tablet with Octa-Core Processor & 64GB Storage',
            'item_id': 'el-android-tablet',
            'sku': 'el-android-tablet',
            'price': '600.0000',
            'special-price': null
        }]
    }
});

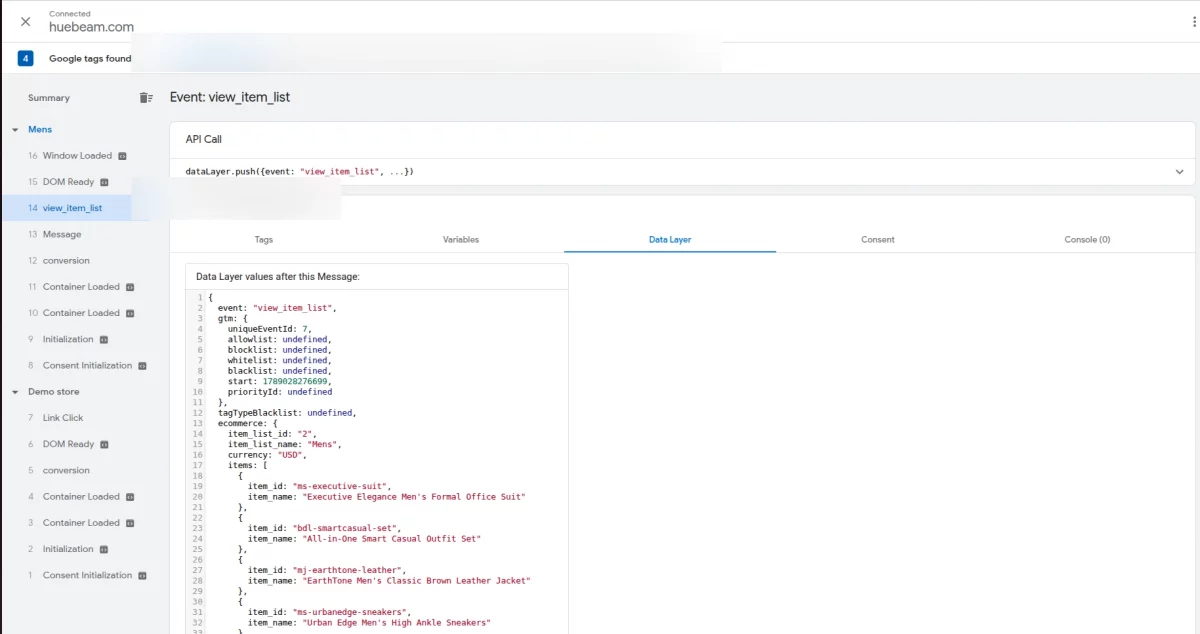
Category Data
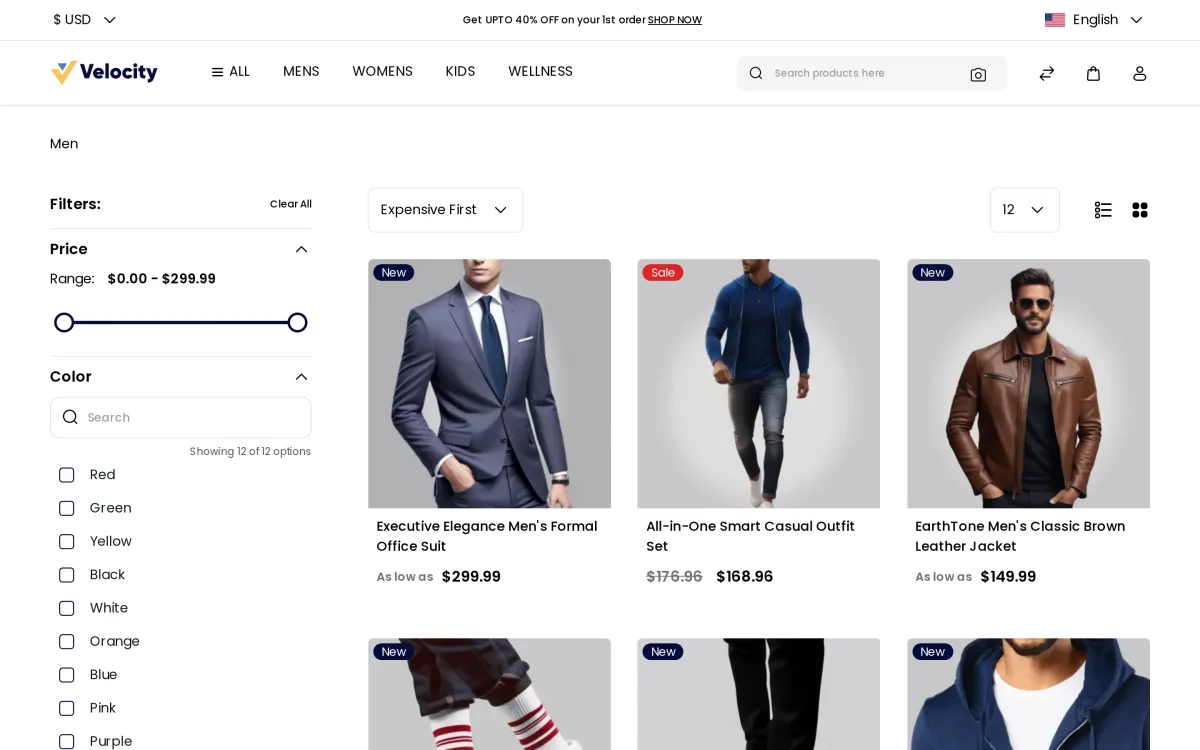
The module publishes a view_item_list event for category pages.
The event contains category and product listing information.

dataLayer.push({
    'event': 'view_item_list',
    'ecommerce': {
        'item_list_id': '2',
        'item_list_name': 'Mens',
        'currency': 'USD',
        'items': [
            { 'item_id': 'ms-executive-suit', 'item_name': 'Executive Elegance Suit' },
            { 'item_id': 'mj-earthtone-leather', 'item_name': 'EarthTone Leather Jacket' }
        ]
    }
});

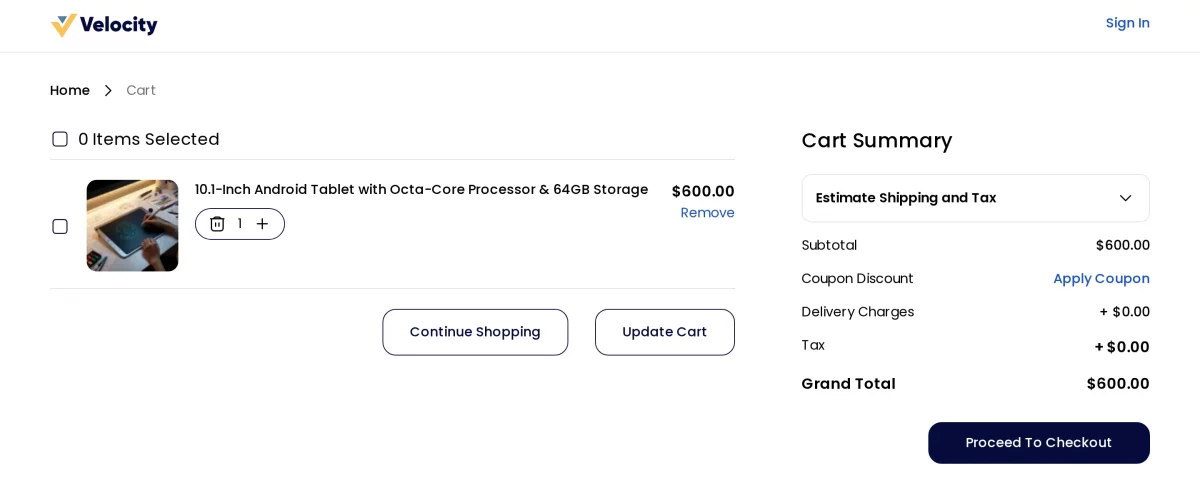
Cart Data
The cart page publishes the view_cart event.
The data layer contains the products currently in the cart.

dataLayer.push({
    'event': 'view_cart',
    'ecommerce': {
        'currency': 'USD',
        'items': [{
            'id': 41,
            'item_id': 'el-android-tablet',
            'item_name': '10.1-Inch Android Tablet with Octa-Core Processor',
            'sku': 'el-android-tablet',
            'quantity': 1,
            'price': 600
        }]
    }
});
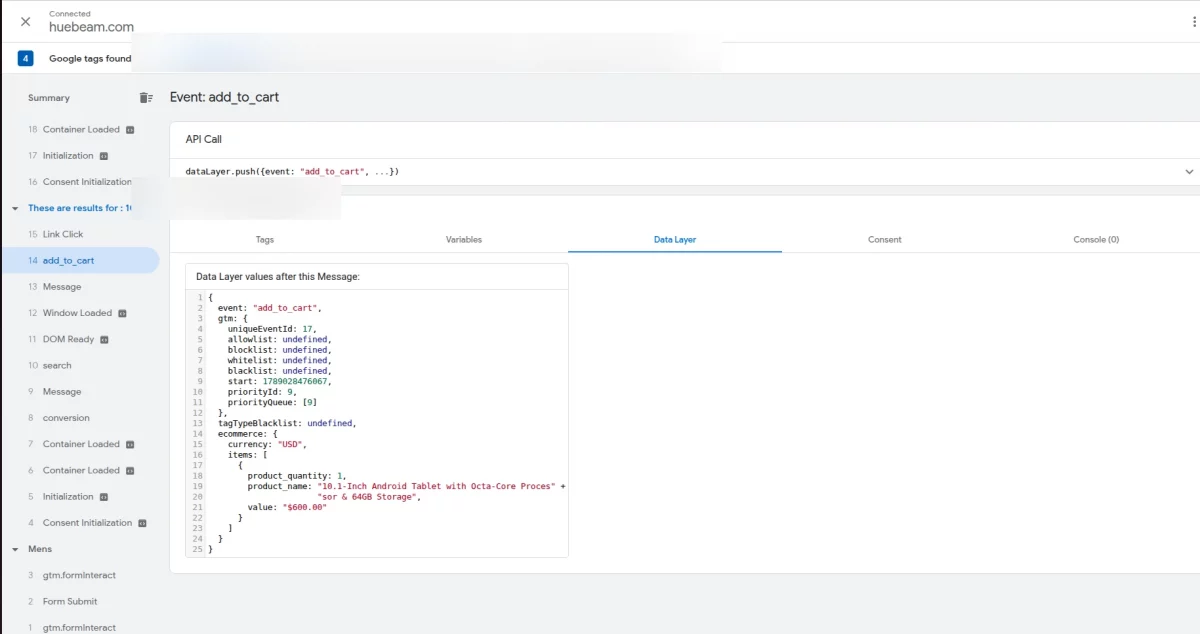
Meanwhile, the footer component pushes cart and wishlist events.
- add_to_cart fires when the mini-cart updates.
- The event contains product name, quantity, value, and currency.
- remove_from_cart fires after successful item removal.
- add_to_wishlist fires after a successful wishlist addition.
dataLayer.push({
    'event': 'add_to_cart',
    'ecommerce': {
        'currency': 'USD',
        'items': [{
            'product_name': '10.1-Inch Android Tablet with Octa-Core Processor',
            'product_quantity': 1,
            'value': '$600.00'
        }]
    }
});
Checkout Data
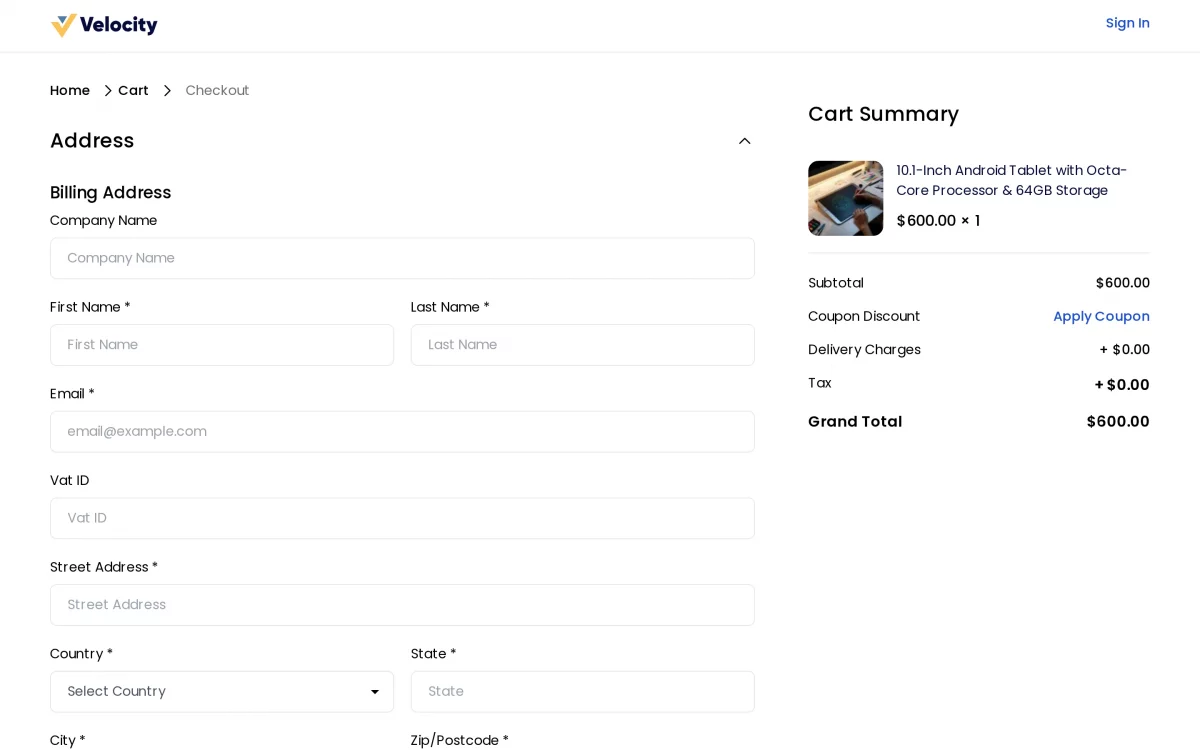
The one-page checkout publishes the begin_checkout event.
The event includes cart value, coupon, tax, and item data.
dataLayer.push({
    'event': 'begin_checkout',
    'ecommerce': {
        'currency': 'USD',
        'value': '600.00',
        'items': [{
            'item_id': 'el-android-tablet',
            'cart_id': 18,
            'item_name': '10.1-Inch Android Tablet with Octa-Core Processor',
            'sku': 'el-android-tablet',
            'quantity': 1,
            'coupon': null,
            'price': 600,
            'tax': 0
        }]
    }
});
Order Data
The order success page publishes the purchase information.
The event contains order, shipping, and payment information.
The Checkout Success Event switch controls these events.
dataLayer.push({
    'event': 'purchase',
    'ecommerce': {
        'transaction_id': '1000000123',
        'revenue': '619.99',
        'currency': 'USD',
        'shipping': '10.00',
        'tax': '9.99',
        'value': '619.99',
        'coupon': 'SUMMER10',
        'items': [{
            'item_id': 'el-android-tablet',
            'item_name': '10.1-Inch Android Tablet with Octa-Core Processor',
            'coupon': 'SUMMER10',
            'quantity': 1,
            'price': 600,
            'tax': 9.99
        }]
    }
});
- add_payment_info includes the payment method and order value.
- add_shipping_info includes the shipping method and order value.
dataLayer.push({
    'event': 'add_shipping_info',
    'ecommerce': {
        'id': '123',
        'revenue': '619.99',
        'currency': 'USD',
        'shipping_tier': 'flatrate_flatrate',
        'value': '619.99',
        'items': {
            'id': '123',
            'revenue': '619.99',
            'currency': 'USD',
            'shipping_tier': 'flatrate_flatrate',
            'user_firstname': 'John',
            'user_lastname': 'Doe',
            'value': '619.99'
        }
    }
});
Customer Data
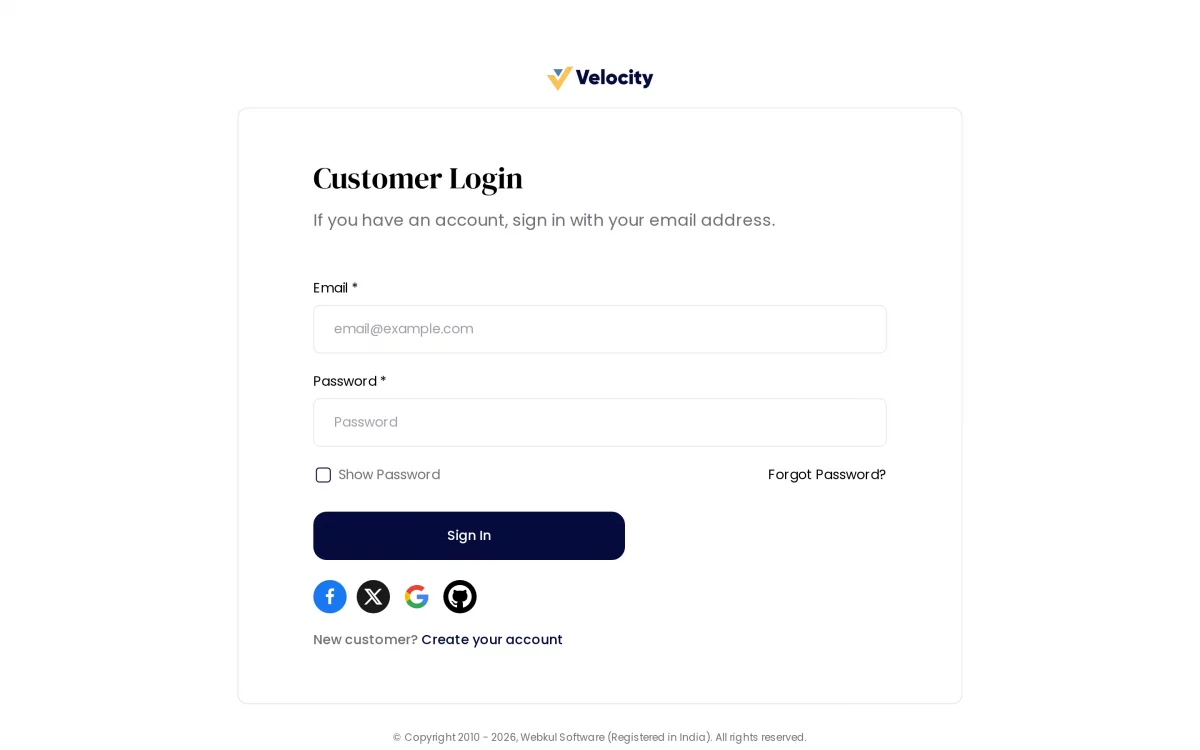
Customer login events appear in Google Tag Manager.
The data layer can contain customer name and email information.
dataLayer.push({
    'event': 'login',
    'ecommerce': {
        'method': 'website',
        'customerId': '57',
        'items': [{
            'firstName': 'John',
            'lastName': 'Doe',
            'email': 'john@example.com',
            'telephone': '9876543210'
        }]
    }
});
Normal account login and registration use website as the method.
However, Social Login can report the provider name instead.
The Edit event reports website.
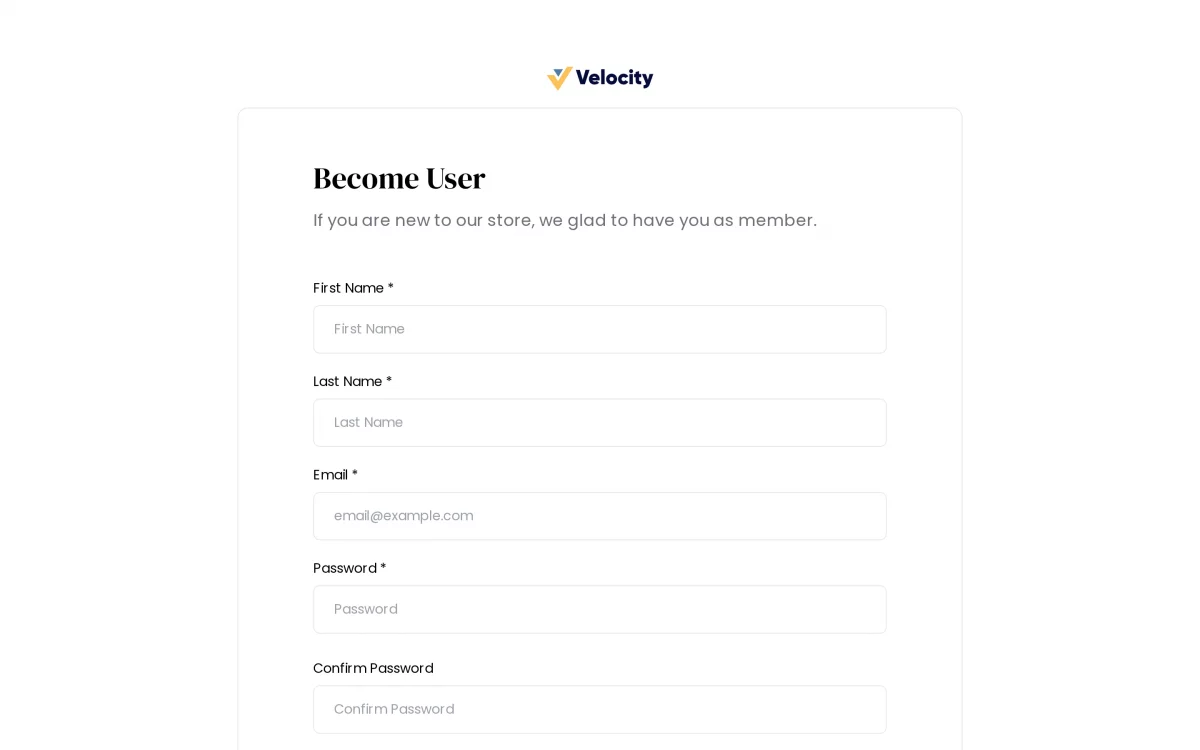
Next, the registration page publishes the sign-up event.
Search Data
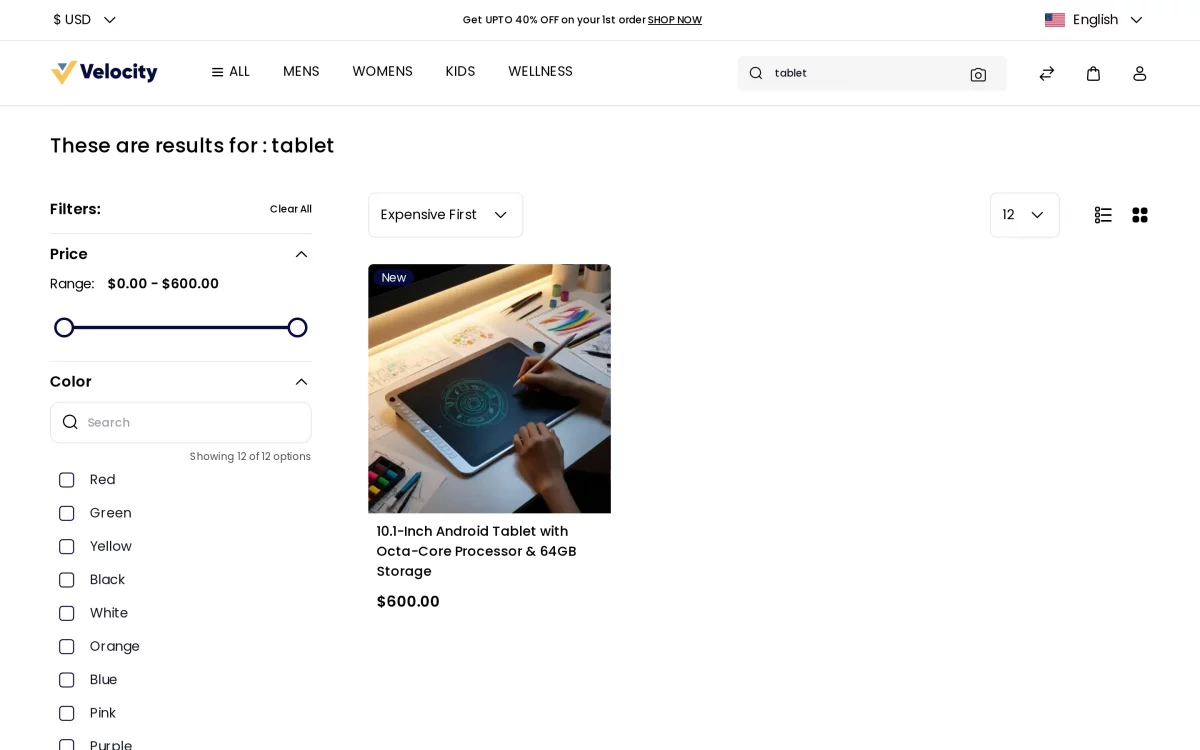
The search results page publishes the customer’s search term.
Then the GA4 tag maps the value to the search term parameter.
dataLayer.push({
    'event': 'search',
    'ecommerce': {
        'term': 'tablet'
    }
});
Google Ads Tracking on the Storefront
The module can also communicate with Google Ads through gtag.js.
The behaviour depends on the enabled Google Ads group.
- Conversion Tracking loads
gtag.jswith the Conversion Id. - The configuration uses the
AW-prefix. - Remarketing uses the configured Conversion Code and Label.
- The remarketing conversion event runs through the storefront.
<script async src="https://www.googletagmanager.com/gtag/js?id=AW-XXXXXXXXX"></script>
<script>
    window.dataLayer = window.dataLayer || [];
    function gtag(){dataLayer.push(arguments);}
    gtag('js', new Date());

    gtag('config', 'AW-XXXXXXXXX');
</script>
The imported Google Ads tags provide the same functionality.
However, Tag Manager works better for conversions that should fire once per order.
How to Verify the Tracking
- Check the container. Open a storefront page and search the source for
GTM-. - Your configured Public Id should appear in the Tag Manager snippets.
- If it does not appear, check the module Status.
- Then run
php artisan optimize:clear. - Inspect the data layer. Open the browser console.
- Type
dataLayerand inspect the available events. - Confirm that the expected ecommerce object is present.
- Use Google Tag Manager Preview. Click Preview.
- Then enter the store URL and browse the storefront.
- Check the events and tags shown by Tag Assistant.
- Finally, test the cart, checkout, and order flow.
- Confirm GA4 events. Open DebugView during preview.
- Use Reports > Realtime for ordinary traffic.
Ecommerce Conversion Rate
The analytics dashboard shows shopping behaviour.
It also shows checkout behaviour and ecommerce activity.
The module sends standard GA4 ecommerce events.
As a result, GA4 can display item views, carts, checkouts, and purchases.
Revenue, tax, and shipping data are also available.
Data display format on Google Analytics 4


Points to Remember
- The Public Id connects the storefront to Tag Manager.
- The numeric Account Id and Container Id support exports.
- Every configuration field uses the selected channel.
- Therefore, configure each channel separately when required.
- The export uses the selected channel.
- Re-export after changing the Measurement Id.
- Also re-export after changing any Google Ads value.
- Turning the module off stops storefront scripts and data pushes.
- Only enabled events appear on the storefront.
- Clear the cache after configuration changes.
- Use
php artisan optimize:clearto clear the cache. - Finally, review privacy requirements before enabling customer events.
This covers the main features of the Bagisto Google Tag Manager module.
We hope this guide helps you check the module functionality.
Also, let us know your views in the comments.
Support
For technical assistance, please raise a support ticket.
Use https://bagisto.uvdesk.com for support.
You can also email support@bagisto.com.
Explore our Bagisto development services.
You can also explore our Bagisto extensions.