Amazon Connector for Shopify
Do you sell on Amazon, the world’s largest eCommerce company & possibly the world’s largest online conglomerate?
If yes, then, you can effortlessly import all your products from Amazon to your Shopify store using the Amazon Connector app developed for Shopify.
A connector, dedicated to let you import products from your Amazon Seller Central account to your Shopify store and manage product inventories.
Let’s walk through the guide to use the Amazon Connector app on the Shopify store.
Installation
Go to the Shopify App Store and install the app by entering your store URL & clicking the Add app button.
Just after installing the app, the system will redirect you to the Amazon Connector app on your Shopify store and ask you to opt for a plan that suits your business needs.
MEMBERSHIP PLANS

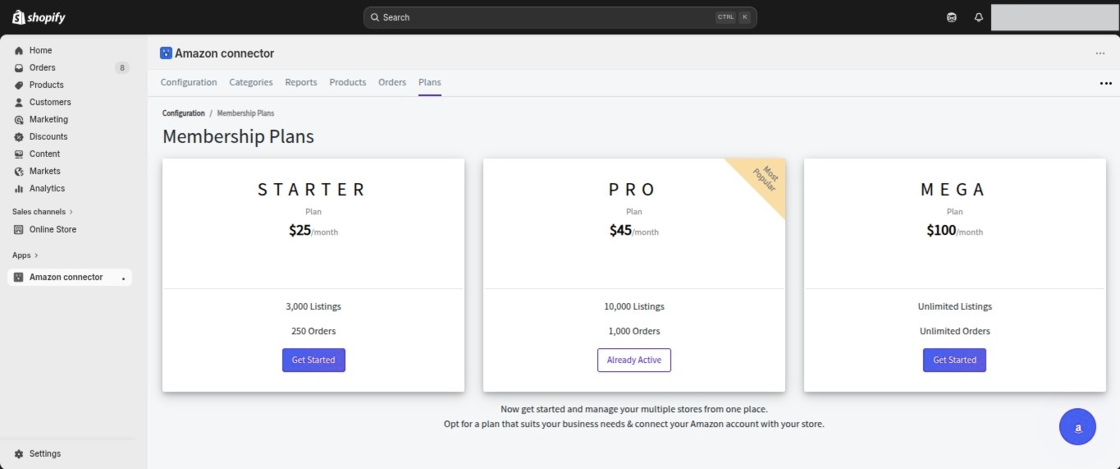
Just after selecting a plan, you need to complete the authorization process.
Once the authorization is completed, the system will provide you with the required details to request an account on Amazon.
Authorization Process
As soon as the Amazon Connector app gets installed in your Shopify store, complete the authorization process.
Firstly, click on the bottom right Amazon authorization widget.

Once you click on the widget, the system will redirect you to the Amazon Connector authorization pop-up window.
From there, you can enter the required details such as your domain name, select your region, and choose the country where your Amazon marketplace is operated.

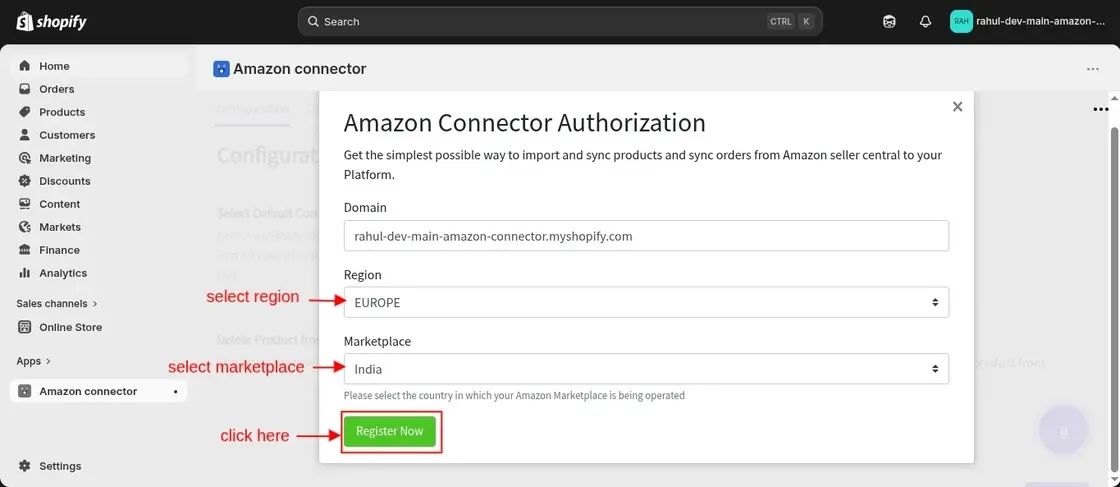
Once you click on the “Register Now” button, you will be redirected to the Amazon Seller Central login page.
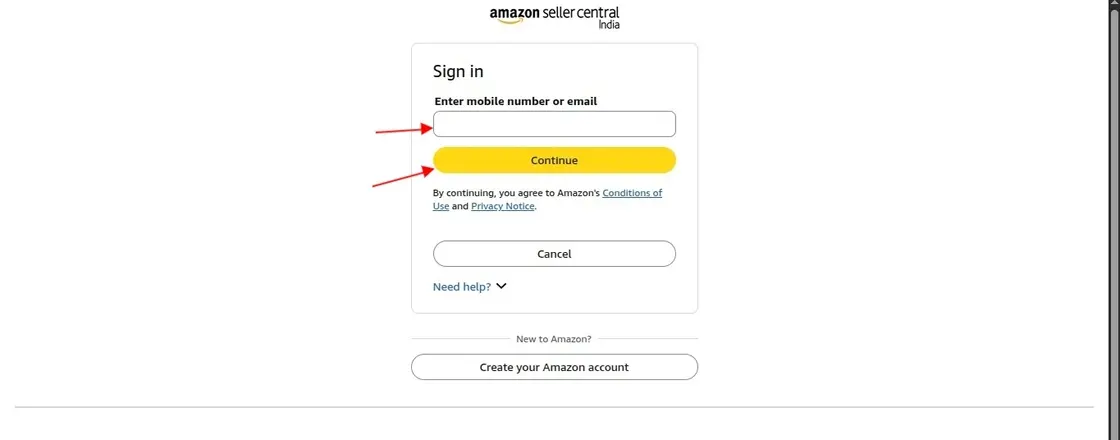
There, you can enter your registered mobile number or email address, click on “Continue,” and then proceed to enter your password.

After successful login, a new page will appear to authorize the Webkul Amazon Connector.
On this page, you need to grant the required permissions by selecting the checkbox and then proceed further.

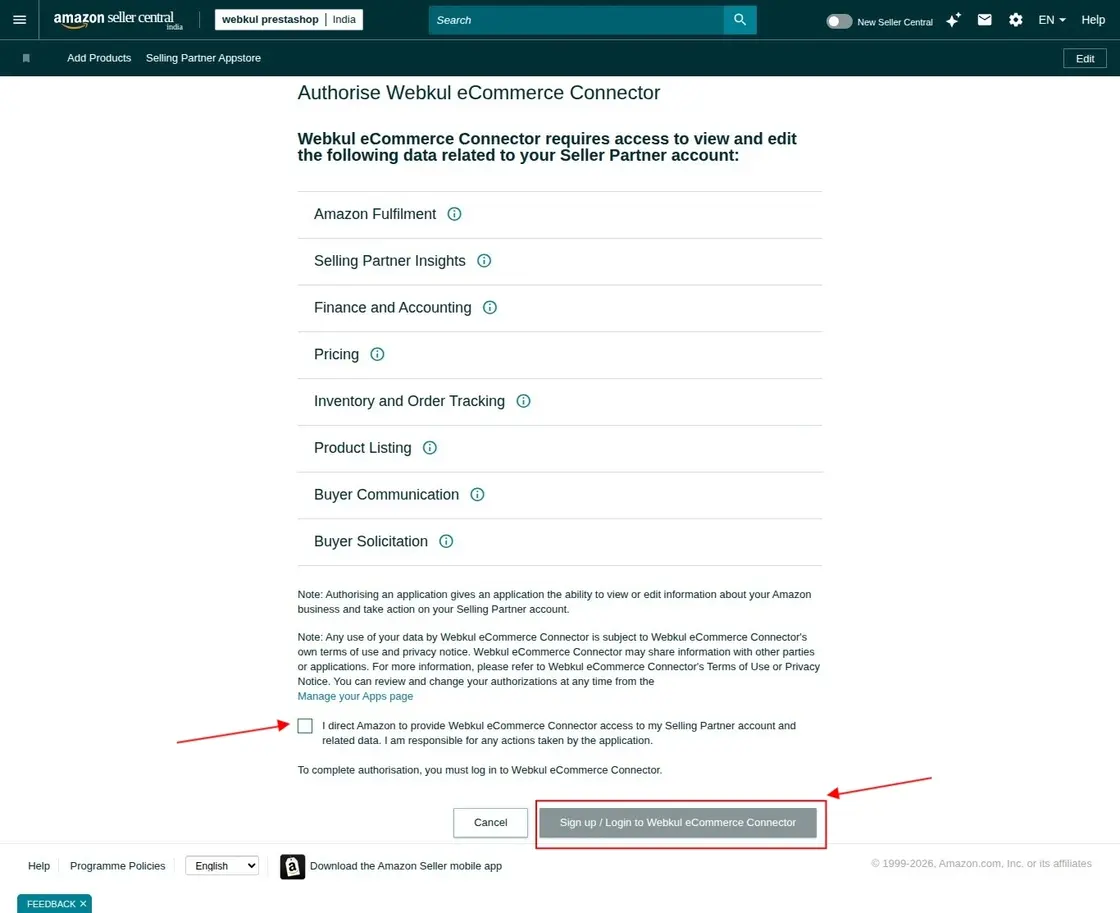
Once you click on the checkbox and select “Sign Up / Login to Webkul eCommerce Connector,” the system will successfully log you in to your account.
After that, the system will redirect you to the Amazon Connector app’s configuration page.
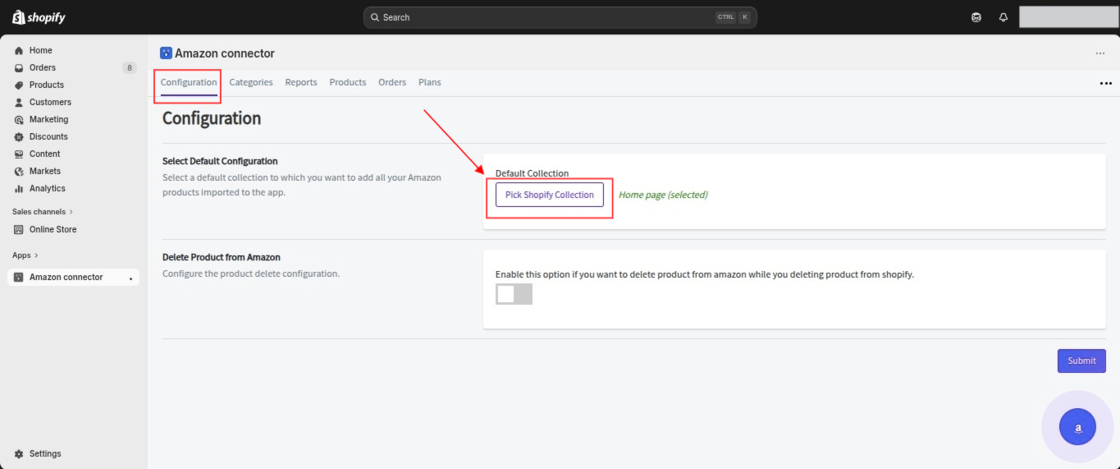
Configuration
From this section, you can choose a default collection to which you will be adding all your products imported from Amazon.
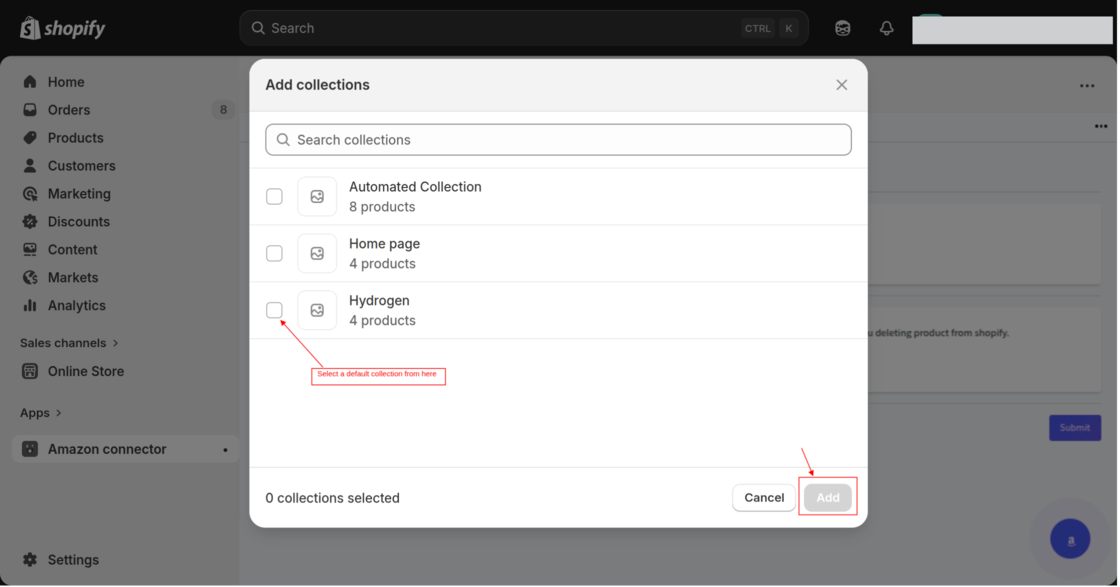
Pick one collection of your Shopify store as a default collection!
Select a collection & click the Add button.

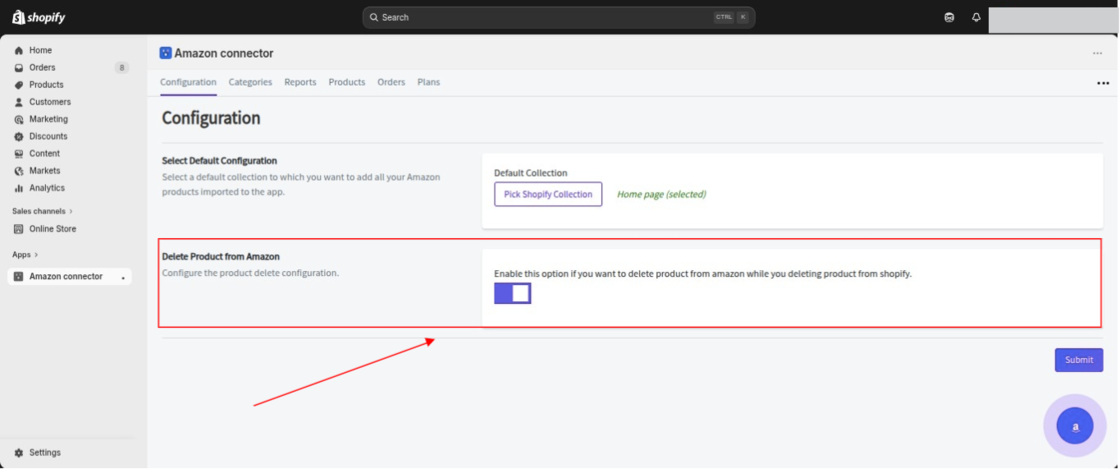
If you want a product to be automatically removed from your connected Amazon store when it is deleted from your Shopify store, enable the product sync/removal setting in the app.
You can enable the “Delete Product from Amazon” configuration in the Amazon Connector app.
Once you enable this setting, the system will automatically remove any product from your Amazon marketplace when you delete it from your Shopify store.
Note: When you update a product from the admin side, the system reflects the changes in the app. Additionally, it syncs the updated price and quantity with the seller’s Amazon end.
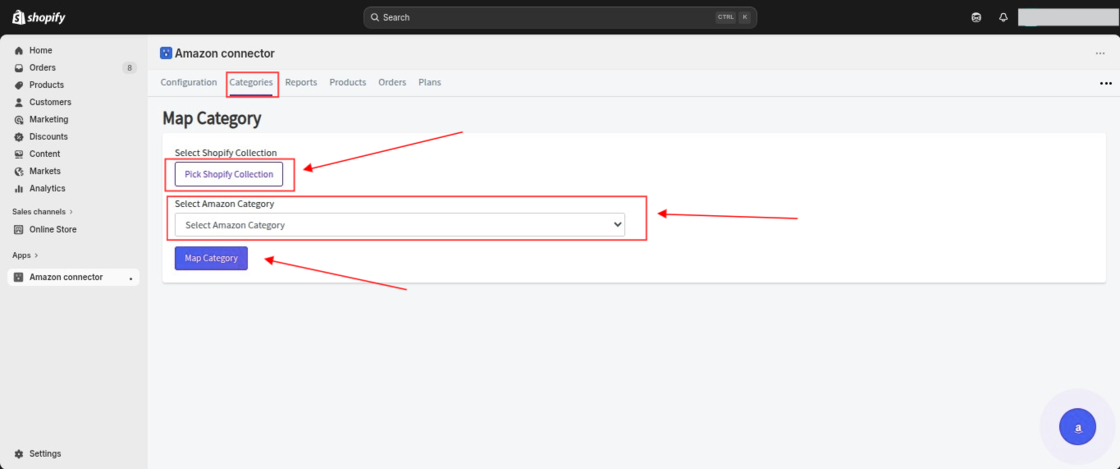
Categories
We provide an option that allows you to map your Amazon categories with your Shopify store collection.
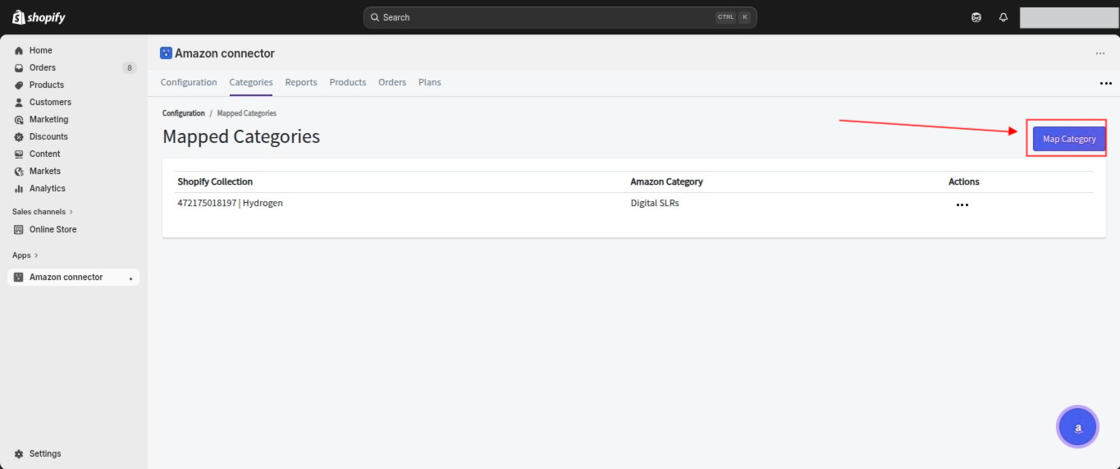
When you click on Map Category, you will see the option “Pick Shopify Collection.”
There, you need to select the Shopify collection that you want to map with the Amazon collection (category).
After that, select the corresponding Amazon category and click on Map Category to complete the mapping.
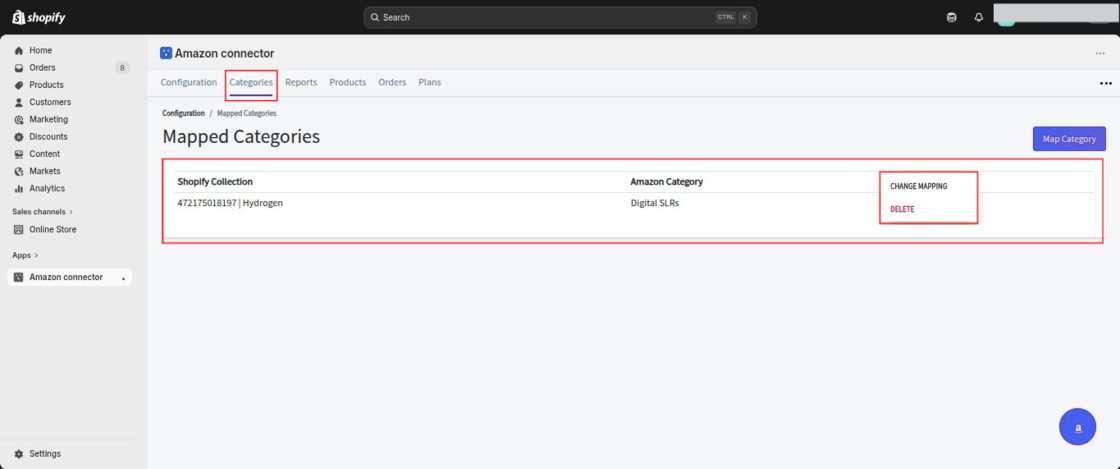
Once you map the Amazon category with your Shopify store category, the mapped category will start appearing in the Mapped Categories List.
From there, you can easily change mapping or delete the mapped category as needed.
REPORT
Report Request is the first process to connect your Amazon account with your Shopify store.
Once you request the product inventory report, Amazon will prepare the requested inventories before you import them into the app.
How to Request Report?
To import the products from Amazon to your Shopify store, first, you need to request a report from the app to Amazon.
After getting the request, the product report will be created on Amazon’s end.
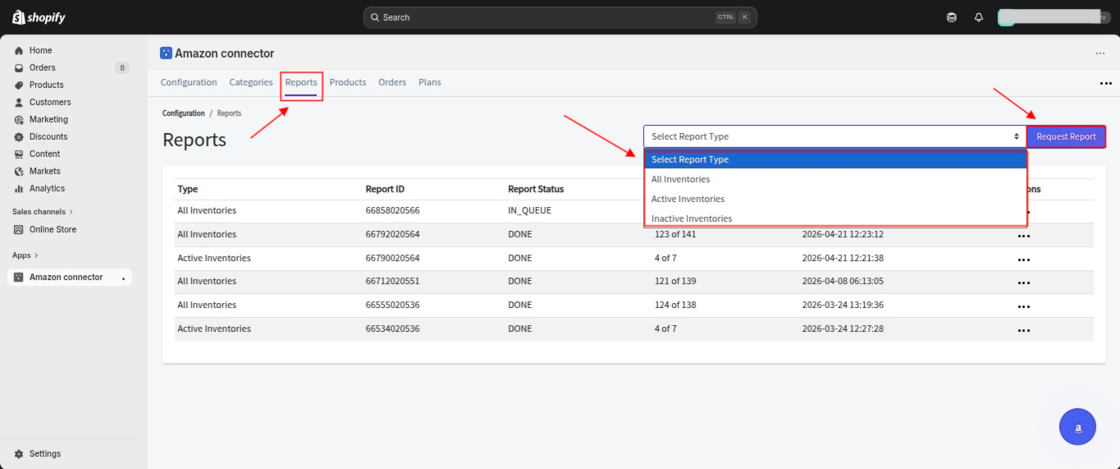
You can choose if you want to request reports for all product inventories, for active inventories or for inactive inventories.
Once the reported in created on Amazon, the same will reflect on the app from where you can import inventories.

From the listing, you can check the status of all the reports requested by you.
From the report listing, you can check the Report Type i.e.
All Inventories, Active Inventories or Inactive Inventories.
Report Status
It shows the status of the reports on Amazon, indicating whether they are in queue or done.
Import Status
This column lists the quantity of the requested products that are imported to the app.
N/A: Currently, no products imported to the app.
Moreover, you will have all the records of the report submitted date.
Product
Once you create the report (based on All Inventories, Active Inventories, or Inactive Inventories), click on Import Inventories under the Action tab after the system generates the report.
After that, the imported products will be visible in the Products section.
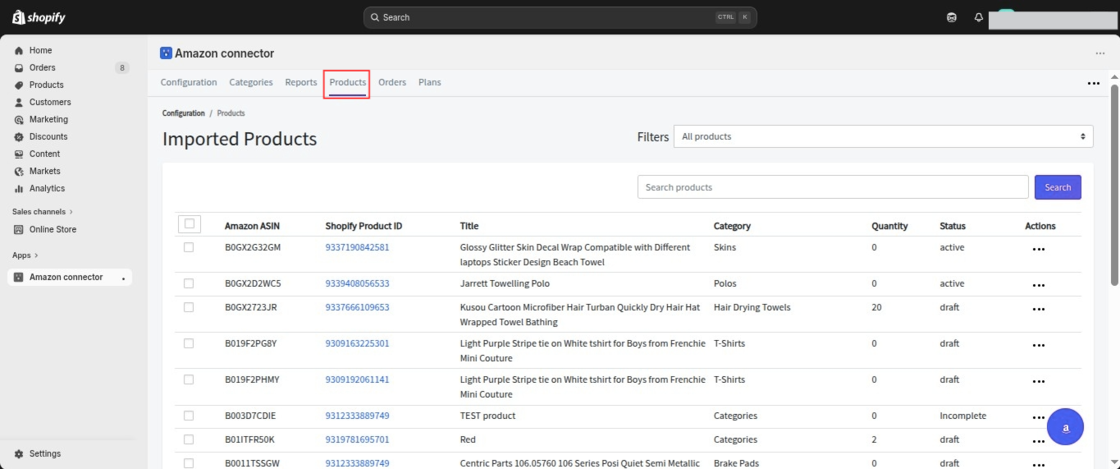
The product listing section includes:-
- Amazon ASIN i.e. Amazon Standard Identification Number that will be unique for a marketplace.
- Shopify Product ID : This shows the Shopify Product ID of the product that is either created on Shopify from Amazon or mapped with an existing Shopify product.
- Title of the products
- Category: Show the category of the product.
- Quantity: No. of products stocked.
- Status: Product status on Amazon whether active, inactive or draft.
How to Create Products on Shopify?
Once you import the inventory from Amazon to Shopify, all those products will start appearing in the Products section of the Amazon Connector app.
However, these products are not yet created on your Shopify store. At this stage, they will only be visible within the connector app.
Once you proceed with the product creation process, the system will create the products on your Shopify store.
To create the products on Shopify that you imported from Amazon, please follow the steps below:
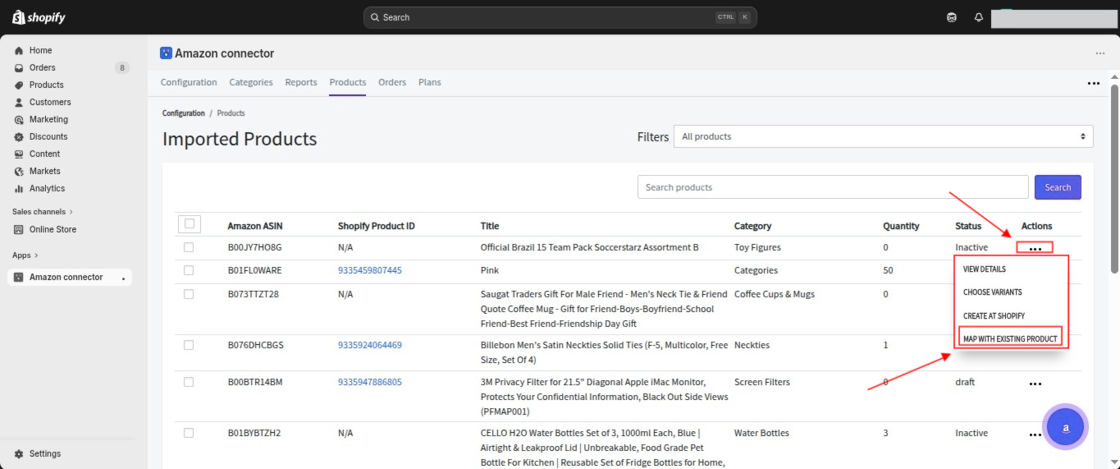
Amazon Connector App → Go to Products → Select the product → Click on the three dots under the Actions menu → Click on “Create at Shopify.”
After this, the selected product will be created on your Shopify store.

When you click on Create at Shopify, a pop-up window will appear asking you to either select the default collection set in the configuration or choose a new collection from your Shopify store.
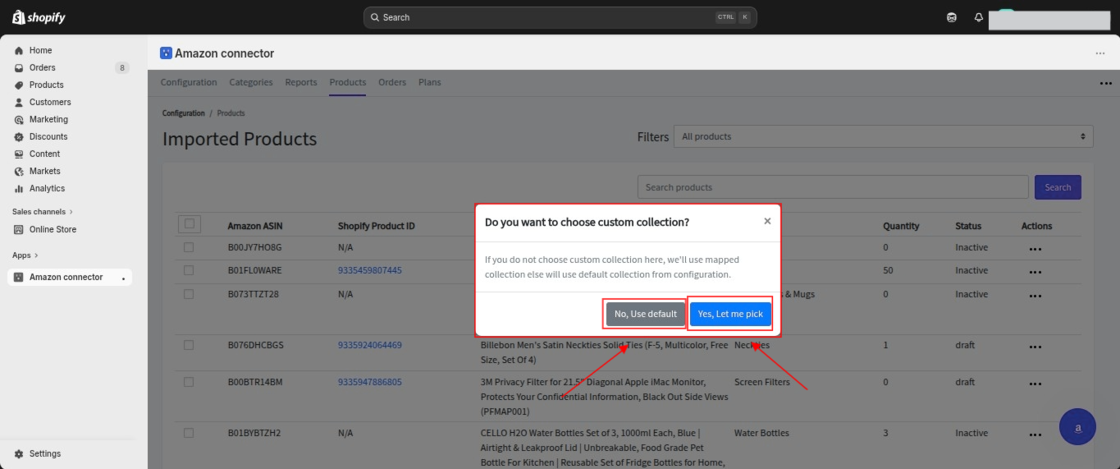
You can select the desired collection and proceed to create the product on Shopify.
Map with Existing Product
You will have the option to map Amazon products to an existing product in your Shopify store.
By clicking on Map with Existing Product, you need to select the product from your Shopify store with which you want to map the product imported from Amazon.
This will link the Amazon product with the selected existing Shopify product.
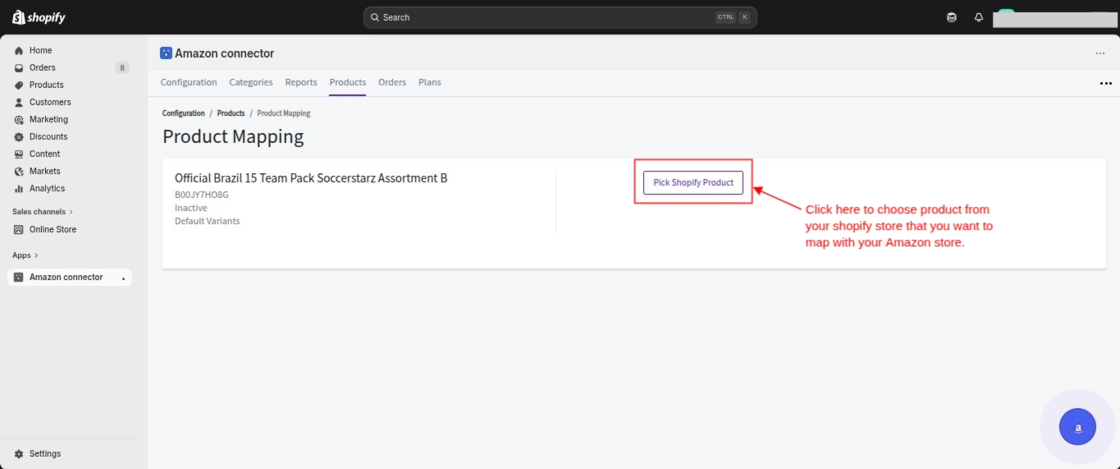
Select a product from your Shopify store & map it with the product imported from Amazon.
MAP PRODUCTS & VARIANTS
When you start mapping your Amazon product with a product from your Shopify store, first select the Shopify product that you want to map.
After selecting the product, you will be prompted to choose the variant. This allows you to map the variant from your Amazon store with the corresponding variant of the Shopify product.
Once you select the correct variant, please click on “Map Now” to complete the mapping process.
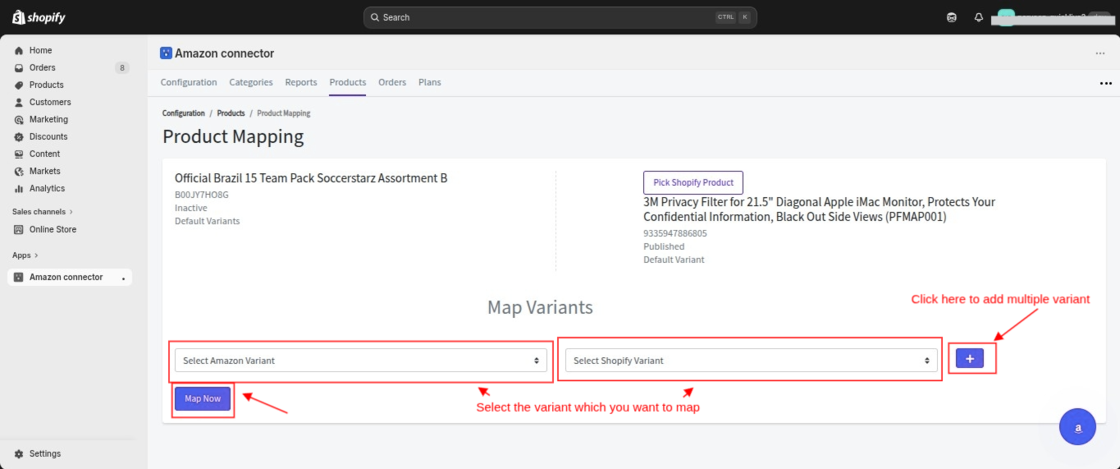
NOTE:- There can be multiple variants with the same ASIN on Amazon with the different seller SKUs.
Please make sure to choose a single variant of the product to successfully create it on your Shopify store.
This way, you can create & map products on your Shopify store.
If you want to directly create or update the variants of your Amazon product in your Shopify store.
You can do so by following the steps below:
Amazon Connector App → Go to Products → Select the product → Click on the three dots under the Actions menu → Choose Variants
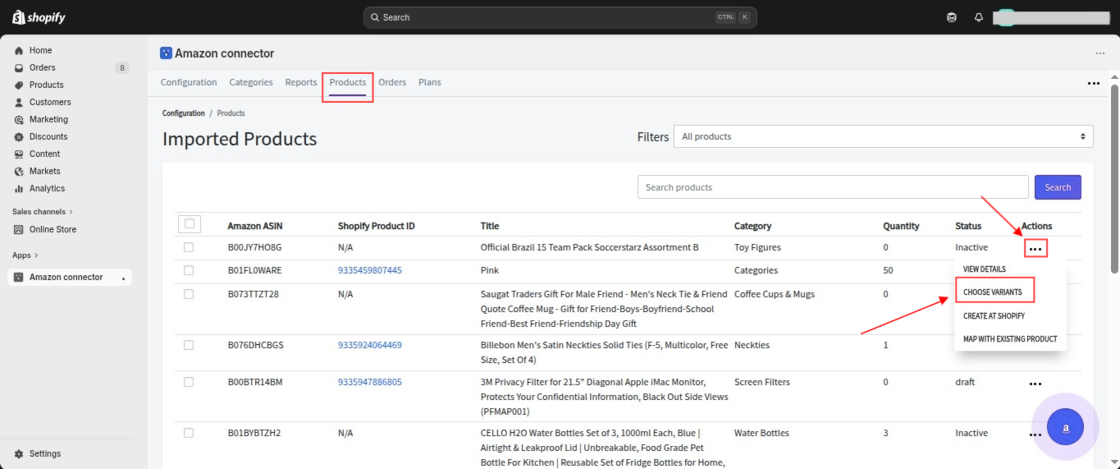
When you click on Choose Variants, you will be able to select the Amazon product variant that you want to create or update in your Shopify store.
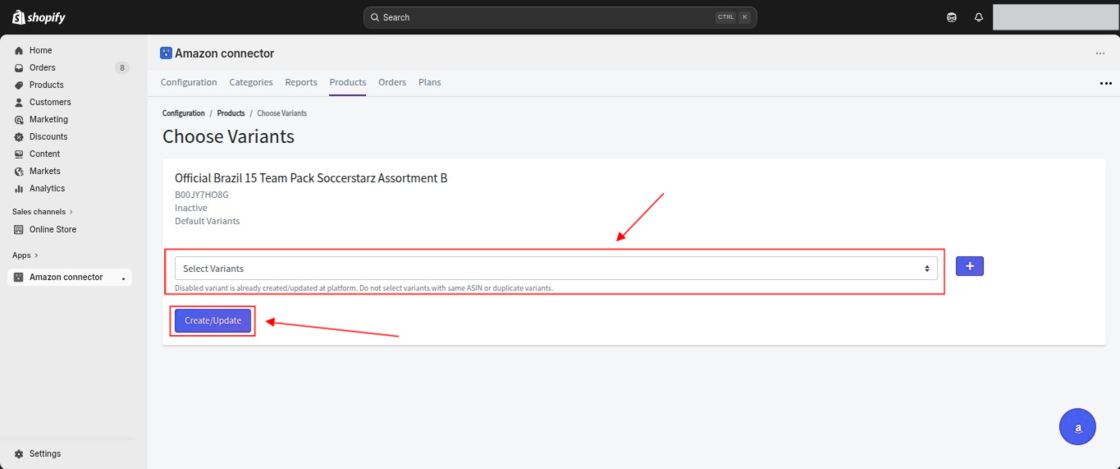
After selecting the variant, a popup will appear asking you to confirm whether you want to add the product to the default Shopify collection,
OR you can choose a specific collection from the available options.

Once you confirm the collection, the system will create or update the selected variant in your Shopify store accordingly.
Orders
Now, you can import orders from your Amazon store into the Amazon Connector app and then create those orders on your Shopify store as well.
To import orders from your Amazon store, please navigate to:
Shopify Admin > Amazon Connector App > Orders > Import Orders
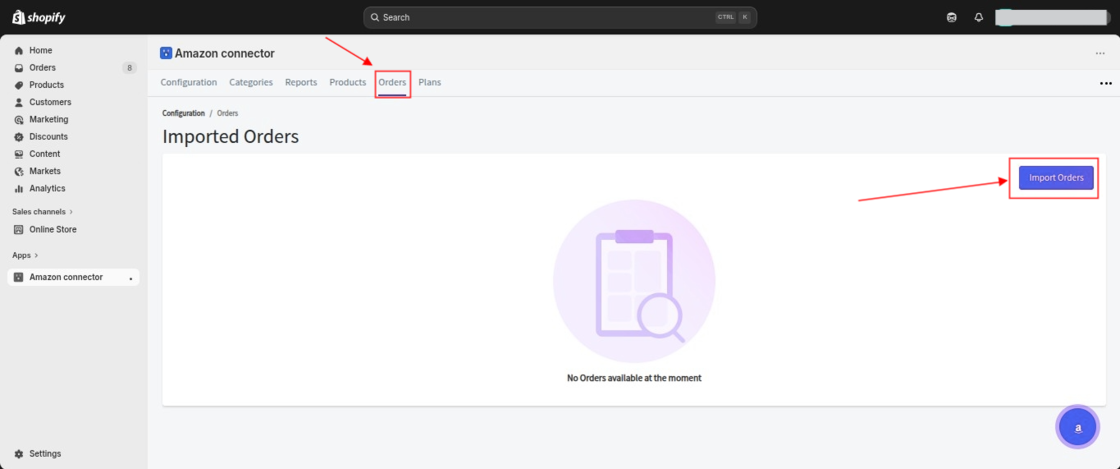
Once you click on Import Orders, a new page will open where you can import your Amazon orders using two methods:
1. Import Orders by Date: If you select this option, you can import orders from your Amazon store based on a specific date range into the Amazon Connector app.
2. Import Single Order: This option allows you to import a specific Amazon order using the Amazon Order ID.
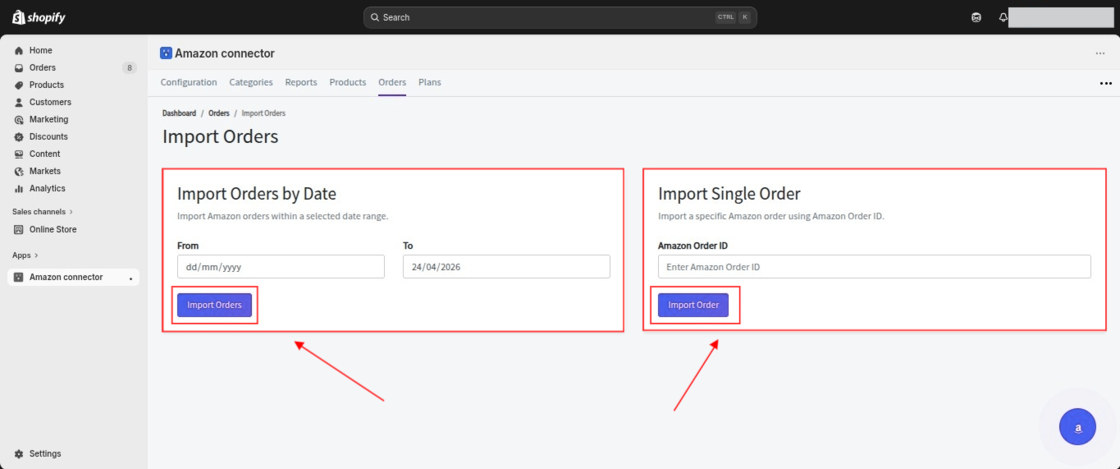
After selecting any of the methods, click on the Import Order button to proceed with importing the orders.
Once the orders are imported into the Amazon Connector app, they will be visible in the Orders section.

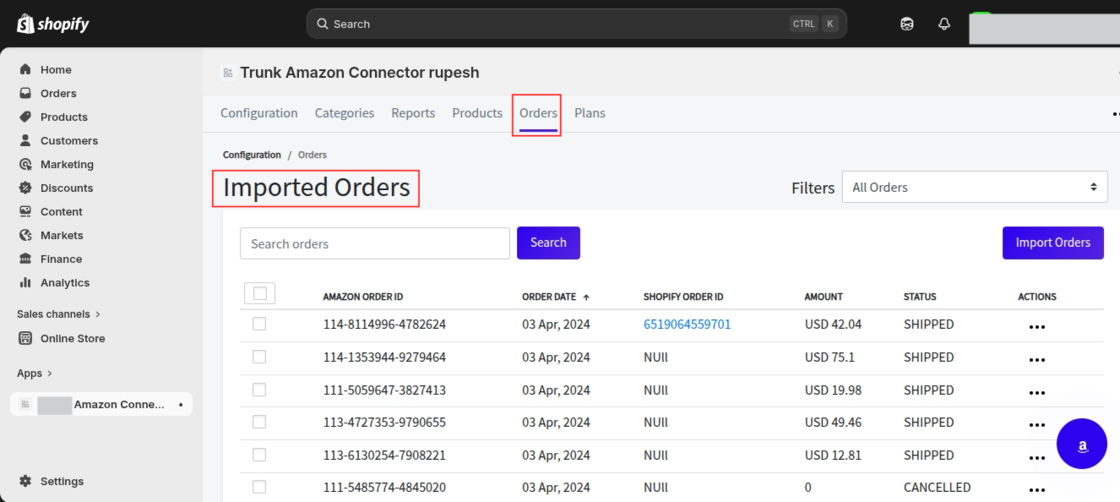
This way, Amazon orders are synced to your Shopify store.
Note: The system manages inventory automatically. If the inventory is not yet imported, it first imports the inventory and then proceeds to import the corresponding orders.
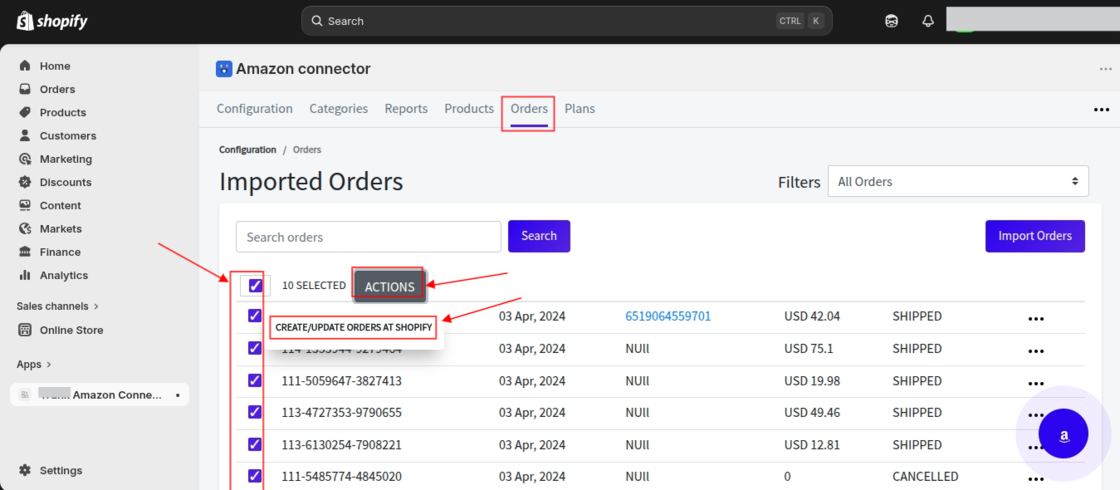
You can create or update Amazon orders in bulk by selecting the desired orders and clicking on the Actions button.
Then choose the Create/Update Orders at Shopify option.

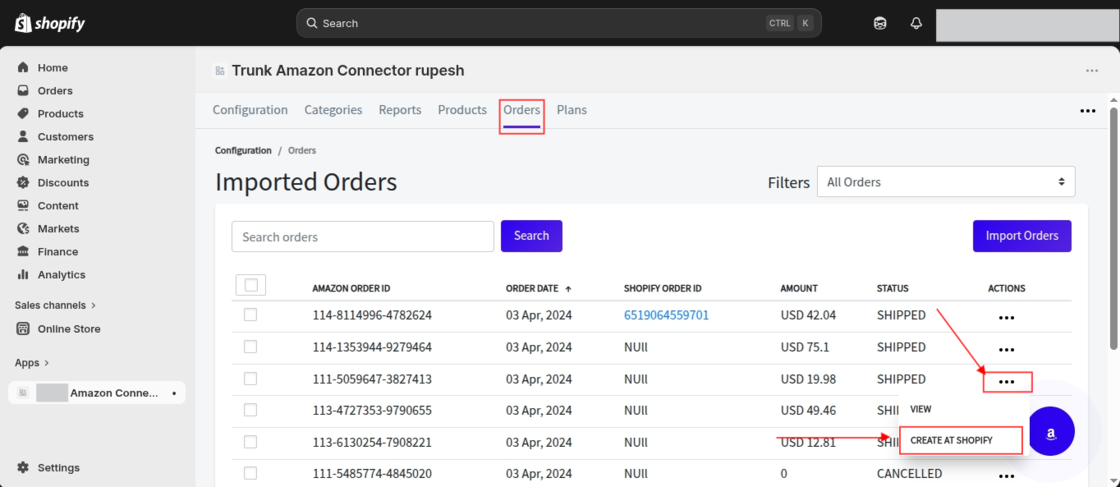
Create Order at Shopify
Now that you have imported your Amazon store orders into the Amazon Connector app, you can create those orders in your Shopify store.
To do this, navigate to:
Shopify Admin > Amazon Connector App > Orders
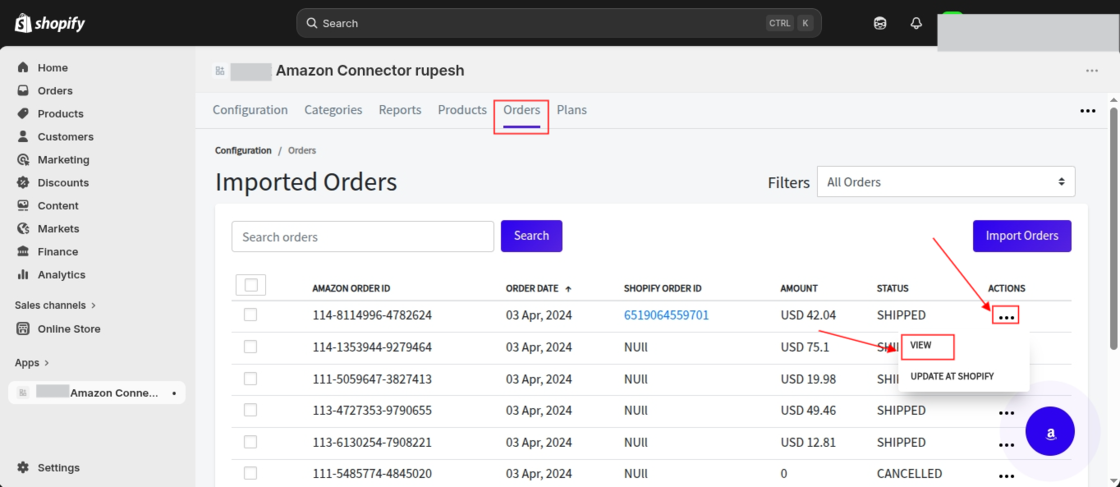
Then, click on the three dots next to the order you want to create in Shopify and select the Create at Shopify option.
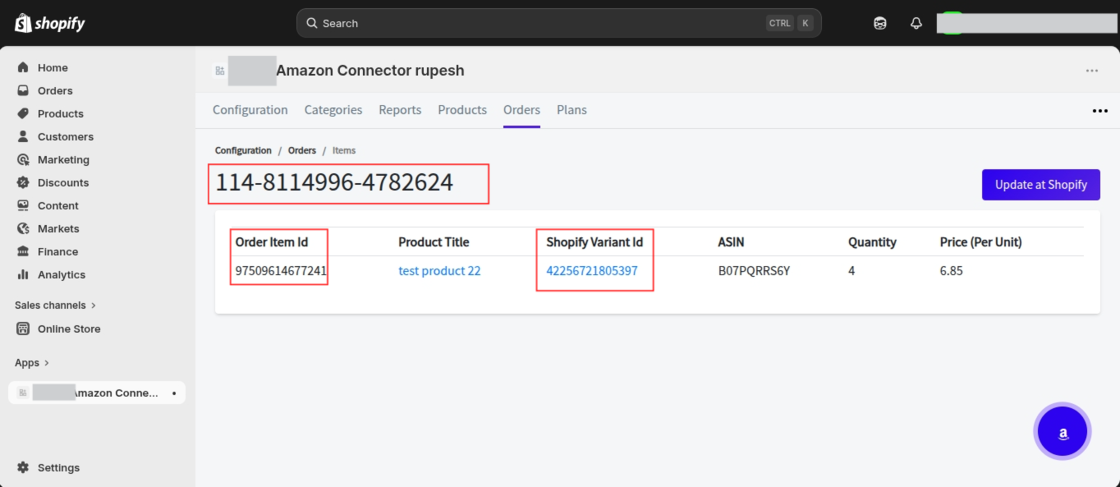
Once the order is created on Shopify, a Shopify Order ID will be generated. You can then view the order and check its details in the Orders section.
Note: While creating an order on Shopify, if the product is not yet available in your store, it will be created first.
After that, the corresponding order will be created automatically.
Update Order at Shopify
If you import an order that already exists on your Shopify store, the system displays an Update at Shopify option.
Using this option, you can update the existing order in your Shopify store.
Filter
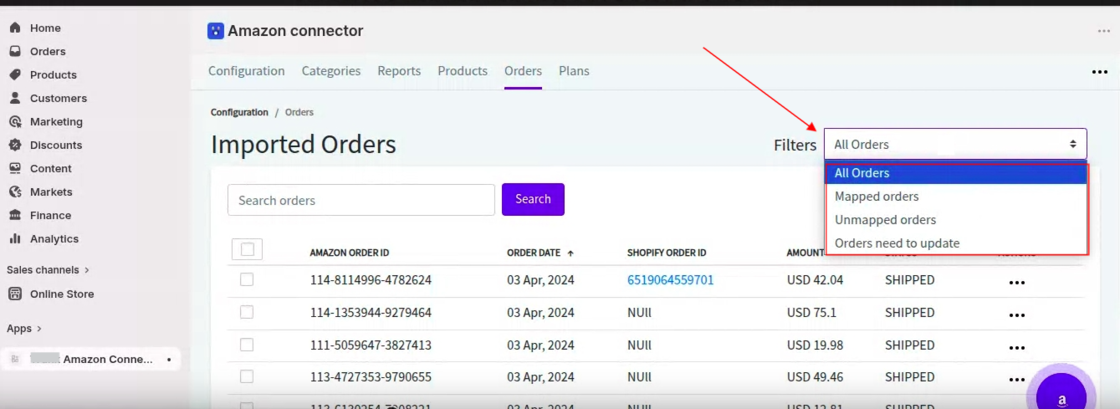
The app provides filtering options to help you manage orders efficiently based on the following categories:
- All Orders: Displays all imported orders in the list.
- Mapped Orders: Shows orders that have already been created on your Shopify store.
- Unmapped Orders: Displays orders that have not yet been created on your Shopify store.
- Orders Need to Update: Lists orders that require updates on your Shopify store.

Search
In the search section, you can search for orders using the Amazon Order ID, Shopify Order ID, or the order status.
Once you fulfill the order in your Shopify store, the system automatically updates the order status and shipment details on your Amazon store.
So, that was all about the Amazon Connector for Shopify Blog.
Check the DEMO STORE here!
Need Help?
If you need any kind of support, just raise a ticket at http://webkul.uvdesk.com/ or feel free to drop a mail at support@webkul.com.
Don’t have a Shopify store? Create One!
Keep in touch with us for more interesting blogs!