User Guide For Akeneo Omni AI Content Generator
Table of Content
Akeneo Omni AI Content Generator is an Akeneo connector designed to generate and enrich product content using multiple AI platforms.
The connector allows individuals to generate, enrich, and optimize product content using different AI platforms directly within Akeneo.
Unlike single-platform AI integrations, this connector supports multiple AI providers, letting users choose platforms, models, and prompts to fit their business needs.
It reduces manual effort, improves content consistency, and speeds up catalog enrichment, making AI-powered content management more efficient and reliable.
If you want to generate images for your product using OpenAI, you can check the module Akeneo AI Image Generator
Basic Requirements
- For the Akeneo installation, your Akeneo server should meet these system requirements.
- This module works with Akeneo 7.0.x. Download Akeneo from here
- Node and Yarn packages need to be install.
- If you want to use this extension in Akeneo EE Serenity mode, please contact us.
Features
- Support for multiple AI platforms and models.
- Supported platforms include: OpenAI, Google Gemini, Groq, Claude, Meta AI
- Flexible credential and prompt management.
- AI-powered content generation for single and bulk products.
- Content generation is supported for text and text area attributes.
- Multilingual product content support
- Scalable and future-ready architecture
Installation for Akeneo 7.x
Note:
CLI User must be the same as the FPM user, a good practice is to use the FPM user for installation.
Also, ownership/permissions for the Akeneo directory must be assigned to the FPM user. otherwise, you will face the permission issue during installation.
Composer Installation:
Read this blog: How to install Webkul Akeneo Connector via Composer
- Step 1: GET the Access Keys Raise a ticket
- Step 2: Add the Repository & Installation Script
Add this to your composer.json:
{
  "scripts": {
    "post-update-cmd": [
      "vendor/webkul/omni-ai-content-generator/src/Webkul/AkeneoOmniAIContentGenerator/install/config.sh COMPOSER=true NO_DOCKER=true"
    ],
    "post-install-cmd": [
      "vendor/webkul/omni-ai-content-generator/src/Webkul/AkeneoOmniAIContentGenerator/install/config.sh COMPOSER=true NO_DOCKER=true"
    ],
  "post-create-project-cmd": [
      "vendor/webkul/omni-ai-content-generator/src/Webkul/AkeneoOmniAIContentGenerator/install/config.sh COMPOSER=true NO_DOCKER=true"
    ]
  },
  "repositories": [{
    "type": "composer",
    "url": "https://akeneorepo.webkul.com/"
  }]
}
- Step 3: Install the extension using composer.
composer require webkul/omni-ai-content-generator
- Step 4: Fill the authentication.
- Step 5: Success Message
- Step 6: Clear Browser cache
Manual Installation:
- Unzip the respective extension zip and then merge “src” folder into akeneo project root directory.
Run the below command over the NO-DOCKER Instance from the PIM directory
./src/Webkul/AkeneoOmniAIContentGenerator/install/config.sh COMPOSER=false NO_DOCKER=true
Run the below command over the DOCKER Instance from the PIM directory
./src/Webkul/AkeneoOmniAIContentGenerator/install/config.sh COMPOSER=false NO_DOCKER=false
Uninstall-Module:
Run the below command over the NO-DOCKER Instance from the PIM directory
./src/Webkul/AkeneoOmniAIContentGenerator/uninstall/uninstall.sh COMPOSER=false NO_DOCKER=true
Run the below command over the DOCKER Instance from the PIM directory
./src/Webkul/AkeneoOmniAIContentGenerator/uninstall/uninstall.sh COMPOSER=false NO_DOCKER=false
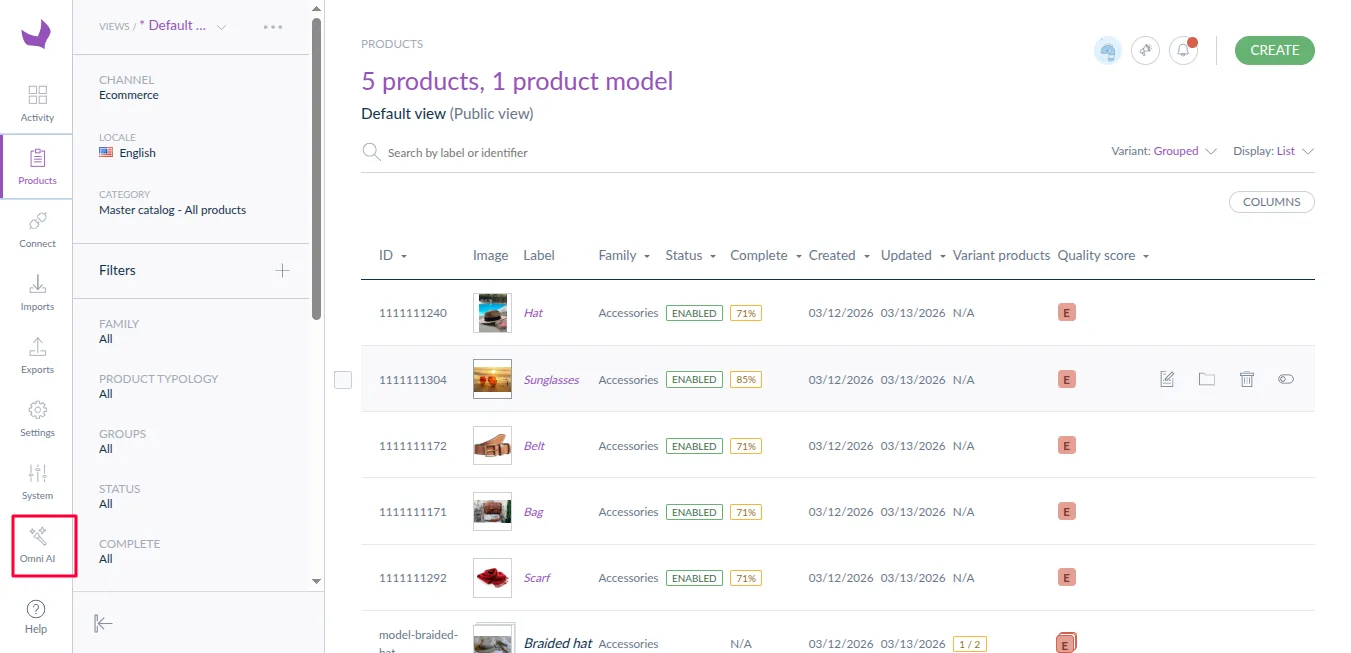
How to use Omni Ai Content Generator
After installation of the connector, the Omni AI icon will appear in the left-side navigation panel of Akeneo, as shown in the image below.

Step1: Add Credentials
The connector allows adding and managing multiple AI credentials. Multiple credentials can be created for the same AI platform, each with a unique name for easy identification.
Credentials include the API key, selected AI platform, and model.
Note: AI responses are generated using the credential selected at the time of execution.
Add AI Credentials
- Navigate and click on Omni AI icon in the Akeneo admin panel.
- Click on Credentials.
- Click Add Credential.

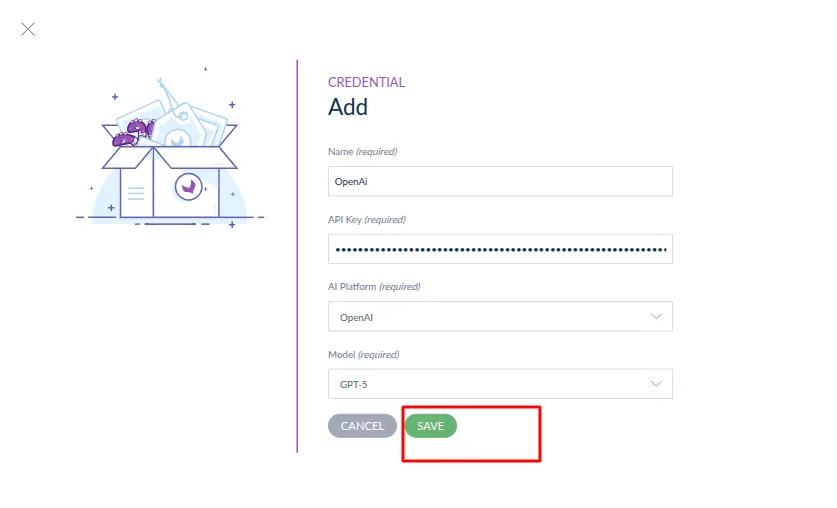
- Enter the Credential Name.
- Enter the API Key.
- Select the AI Platform.
- Select the AI Model.
- Click Save to successfully store the credential.
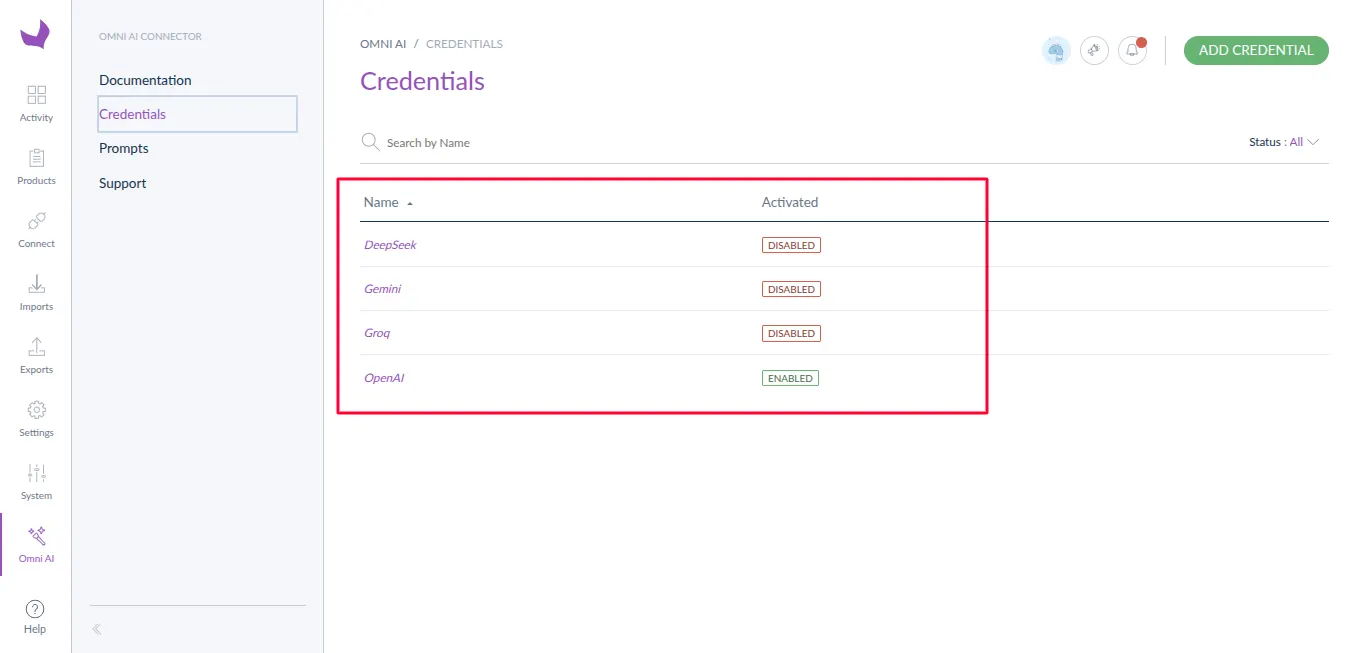
Credential Activation
Once a credential is saved, it is activated by default and will be used for AI content generation.
If multiple credentials are available, administrators can change the default credential status at any time.
Only the credentials marked as status: Enabled will be used during AI execution, as shown in the credentials listing.
The screenshot demonstrates that the active credential is used for AI operations.

AI Models Management
AI models are platform-specific and are fetched dynamically based on the selected AI platform and credentials.
Examples:
- OpenAI: GPT series models.
- Gemini: Gemini series models.
- Groq: LLaMA-based models like .
Note: Model performance, response speed, and output quality may vary depending on the selected AI platform, model, and external factors such as API limits.
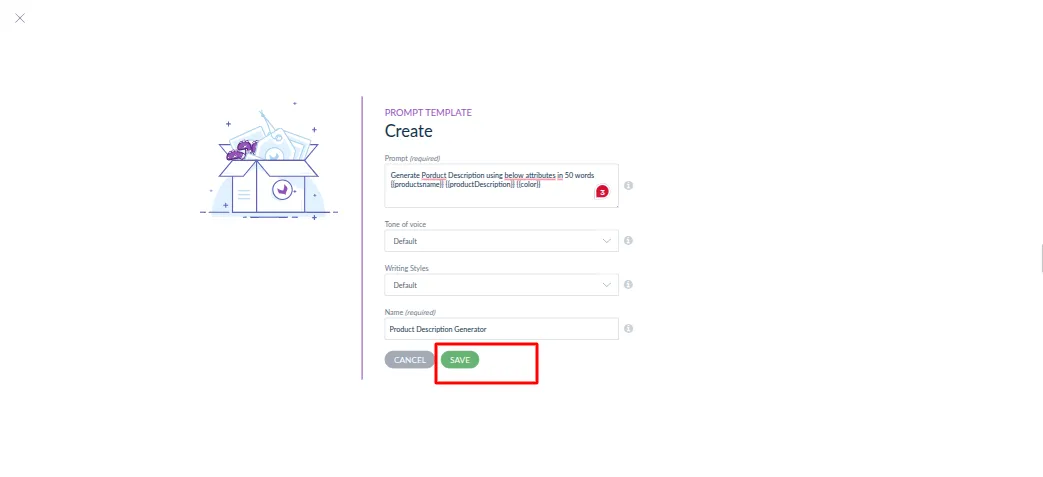
Step 2: Create AI Prompts
- Navigate to Omni AI → Prompts.
- Click on Create Prompt.
- Enter the Prompt Name (required).
- Select the Tone of Voice and Writing Style.
- In the Prompt field (required), write your instruction, for example: Generate a product description in 50 words using the following attributes: @name, @description, and @color.
- Click Save to store the prompt.
Note: Use @ to reference product attributes while creating prompts. These attributes are dynamically replaced with actual product values during AI generation.

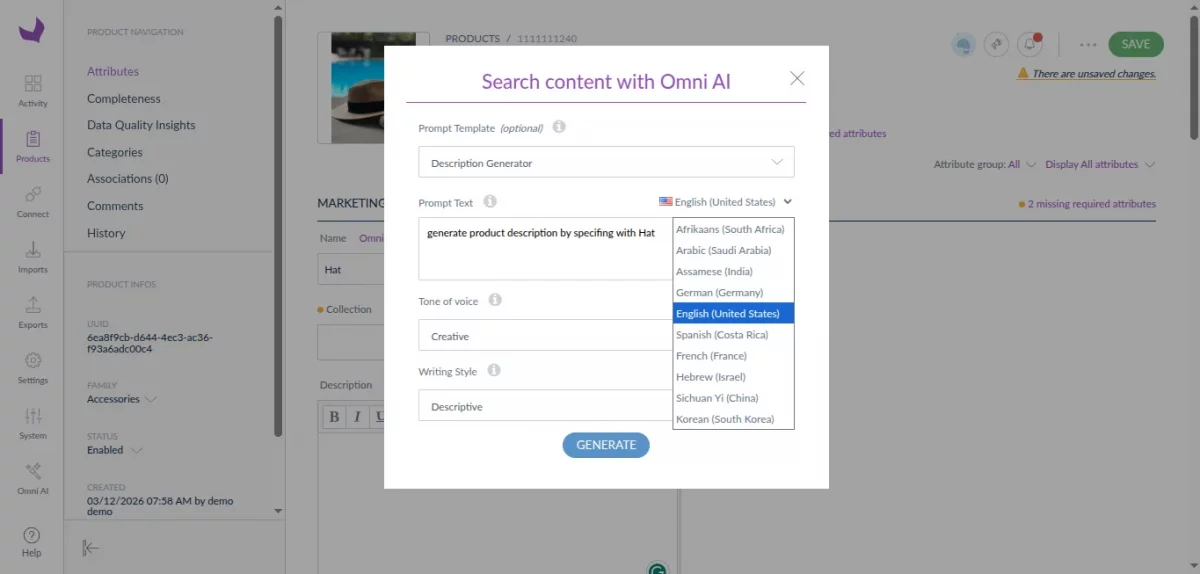
Step 3: AI Content Generation at Product Level
AI-generated content can be created directly from the product edit page using a target attribute.
- Navigate to Products in Akeneo and open a product in Edit mode.
- Select a target attribute of type Text or Textarea.
- Click on the Omni AI Search icon next to the selected attribute.

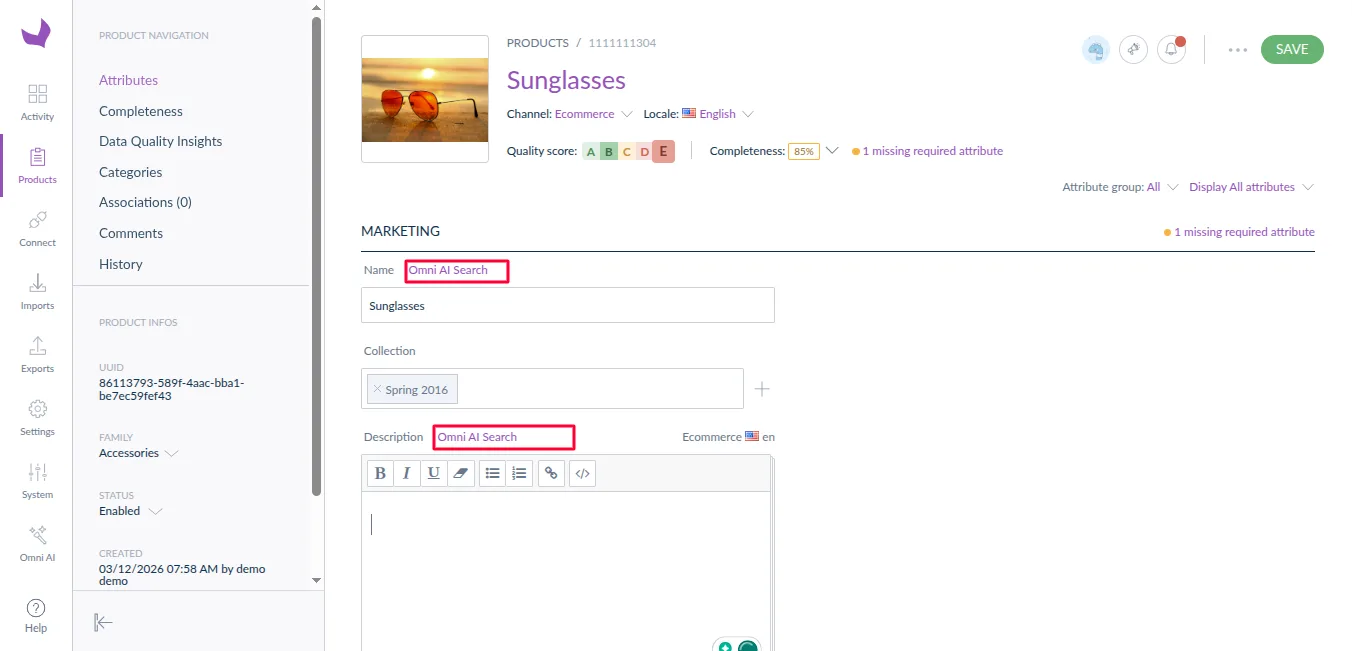
- The system automatically selects a prompt when you mark it as default.
- Otherwise, select a prompt manually from the list.
- Click Generate to create AI-powered content.

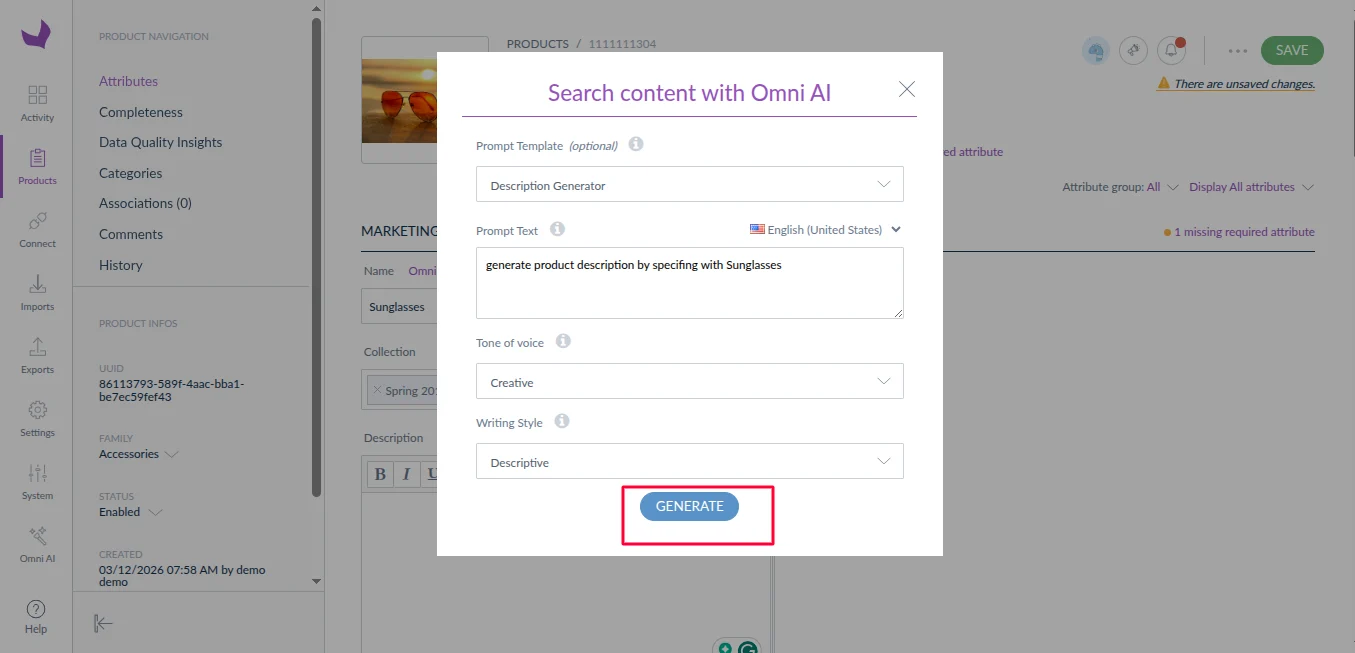
- Within a few seconds, the system will display the generated content in the preview box.
- Click Keep to insert the generated content into the attribute.

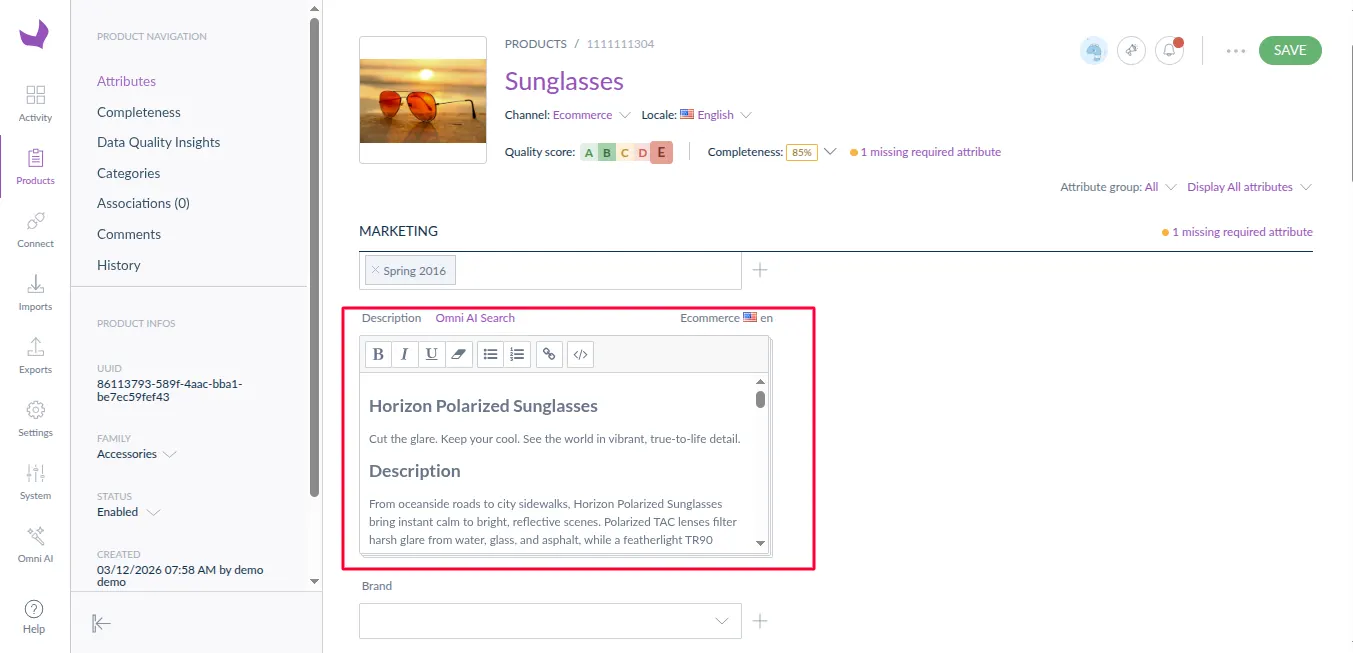
- After the insertion of generated content, click save to final update the product
Step 4: Bulk AI Content Generation
The connector supports product content generation for multiple products using bulk action.
Steps:
- Select multiple products
- Click on bulk action.
- Select Omni AI and click on Next
- Select a prompt, choose target attributes, and click on generate preview.
- The system will first show a generated preview sample so you can review the AI-generated content.

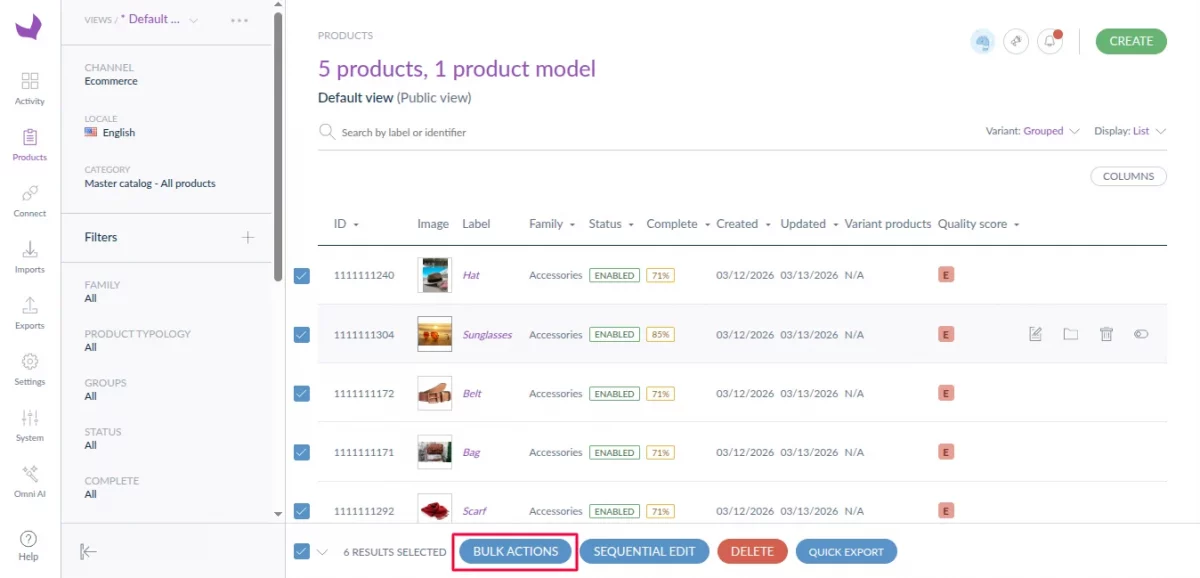

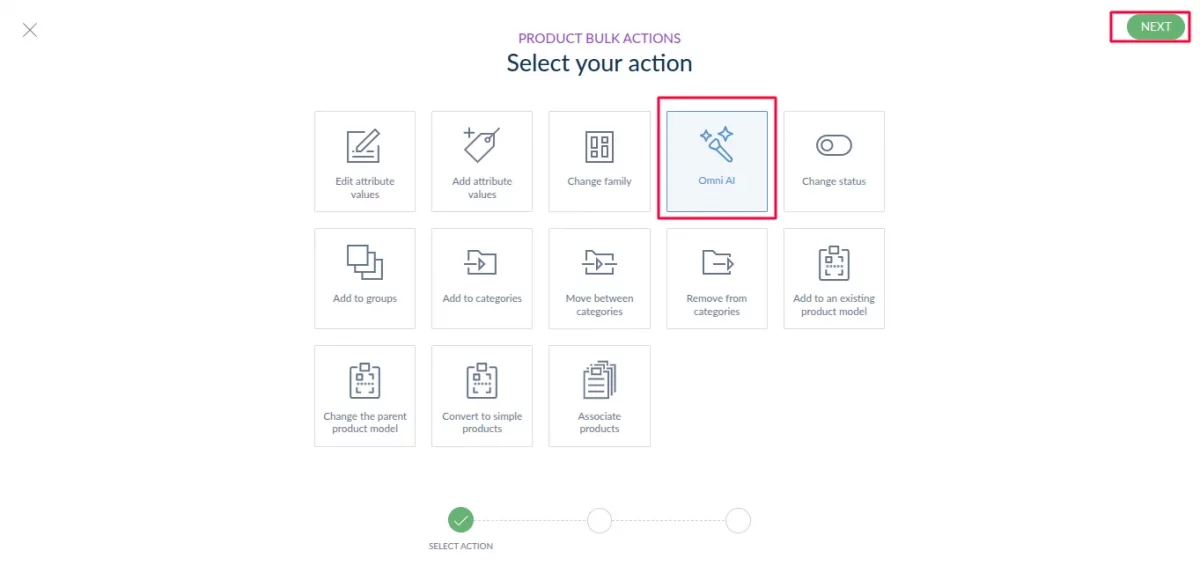
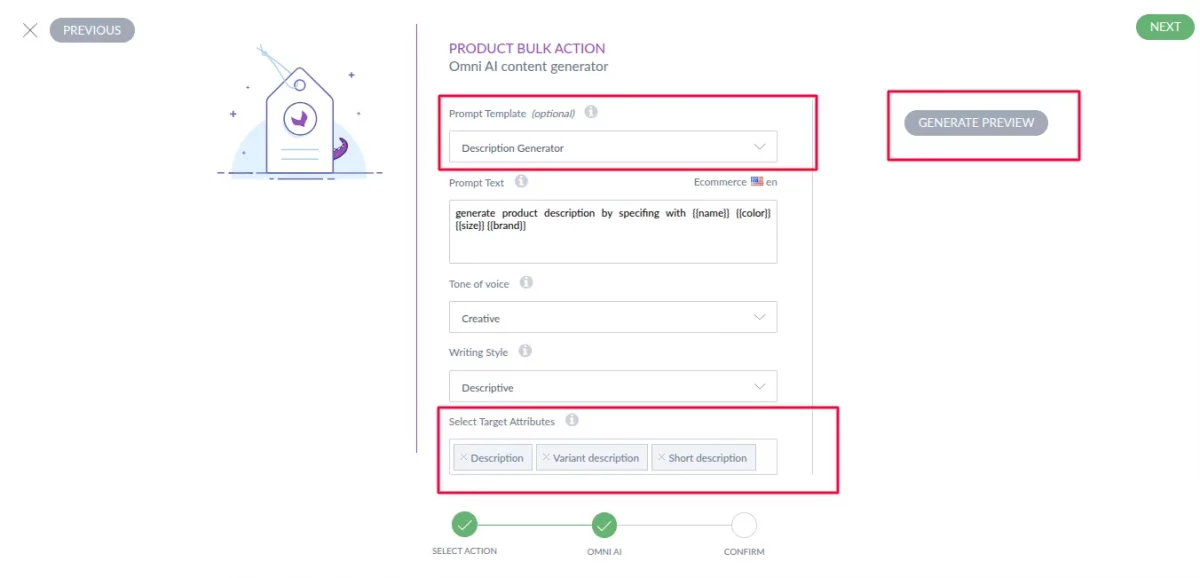

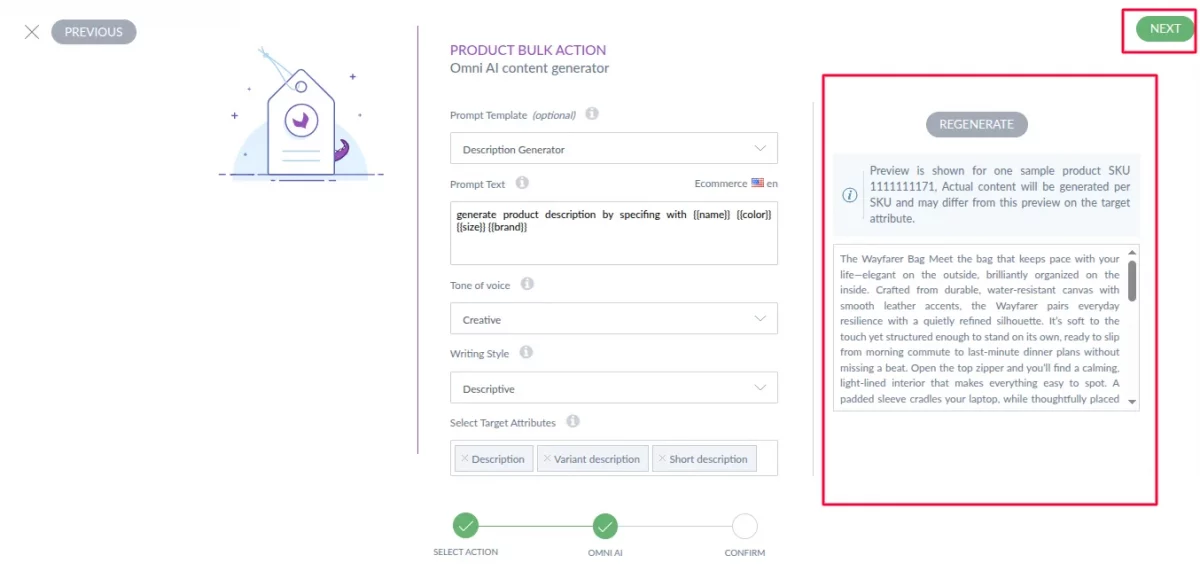
This feature is ideal for large catalogs and mass updates.
Multilingual Support
The connector supports multilingual content generation based on configured Akeneo locales.
Key highlights:
- The connector supports AI content generation in multiple locales.
- Output language depends on the selected locale and prompt language

Conclusion
Akeneo Omni AI Content Generator provides a flexible and scalable AI integration solution for Akeneo PIM.
Furthermore, supporting multiple AI platforms, credentials, and prompts allows businesses to choose configurations that best fit their requirements.
In addition, this versatility ensures seamless integration with existing workflows.
Consequently, teams can efficiently leverage AI for content generation and enrichment.
Support
Thank you for reading this documentation. For any queries or doubts, reach out to us at support@webkul.com. You can also raise a ticket at our HelpDesk System.
Please explore our Akeneo Development Services and Quality Akeneo Extensions.