Do you know that labels are the most effective way to catch your customer’s attention? And, it’s a fact that pictorial representation of any information creates more impact on customer’s minds. Whether the information is about any sale, new offer or specific discount, now easily convey that via attractive product labels. It became possible only because of the Prestashop Product Label module.
The module also provides some already available labels with it. However, it also has an option to create text labels or use google material icons as labels on the product. With all these options, the use of labels as per the choice of merchant becomes very easy.
Consider a case, where a merchant wants to apply labels to large number of products at any instant. What if he/she needs to apply it to all of them one by one? Then it might get hectic & a very lengthy process. Keeping in mind of such scenarios, there is also an option to apply labels to products in bulk. By filtering the product on certain grounds, you can easily apply multiple labels to all of them in single click.
NOTE: Prestashop Product Label module is compatible with PrestaShop version 8.x.x and multi-store feature.
Check the overview of the plugin in the video mentioned-below –
Features of the Prestashop Product Label module
- Easy to configure.
- Great increase in sales.
- Set global settings for the label like label visibility on various pages and dimensions.
- Display labels on various pages like product page, category page etc.
- Set the dimensions i.e. width and height of labels as per your requirements.
- Create as many labels as you want for a different type of sales promotions.
- Restrict the labels from applying to the products.
- Add both text and image labels. You can also add a Google material icon.
- Customise label display (font, text colour, background colour) on the product image.
- Select the positioning of the label on the product image.
- Display label randomly if the position of multiple labels is exactly the same.
- Set the validity for displaying the labels.
- Add a banner to the home page to provide more information about the labels.
- Choose a customer group to which you want to show the created labels.
- Show content along with the label assigned to the product.
- Customise the display of content (font, text colour, background colour and font size) as per your needs.
- Assign the labels individually or use bulk action for assigning labels to all products inside the category.
- Create label rules for assigning labels to all products falling under that rule.
- Create label rules based on the following parameters: Price rule, special offer, customer discount, best selling, feature product, new products, online-only, on sale and free shipping.
- If you select the “Special offer” Label rule type, then either assign label on the product or show Prestashop discount on the basis of specific price and catalog price rule e.g. 20%.
- A separate tab is available to customize the label (font, text color, background color, font size) and show it differently when “Special offer” is selected under “Label rule type” with Prestashop discount.
NOTE: Prestashop Product Label module is multi-shop compatible.
How to install the Prestashop Product Label module
- Firstly, go to the module manager in back office and click on ‘upload a module’.
- After that, drag and drop the module file or select the file from the system.
- In this way, the module installation will be successful.


How to configure the Prestashop Product Label module
You can also configure the module by clicking on the “Configure” button place right in front of the module name.


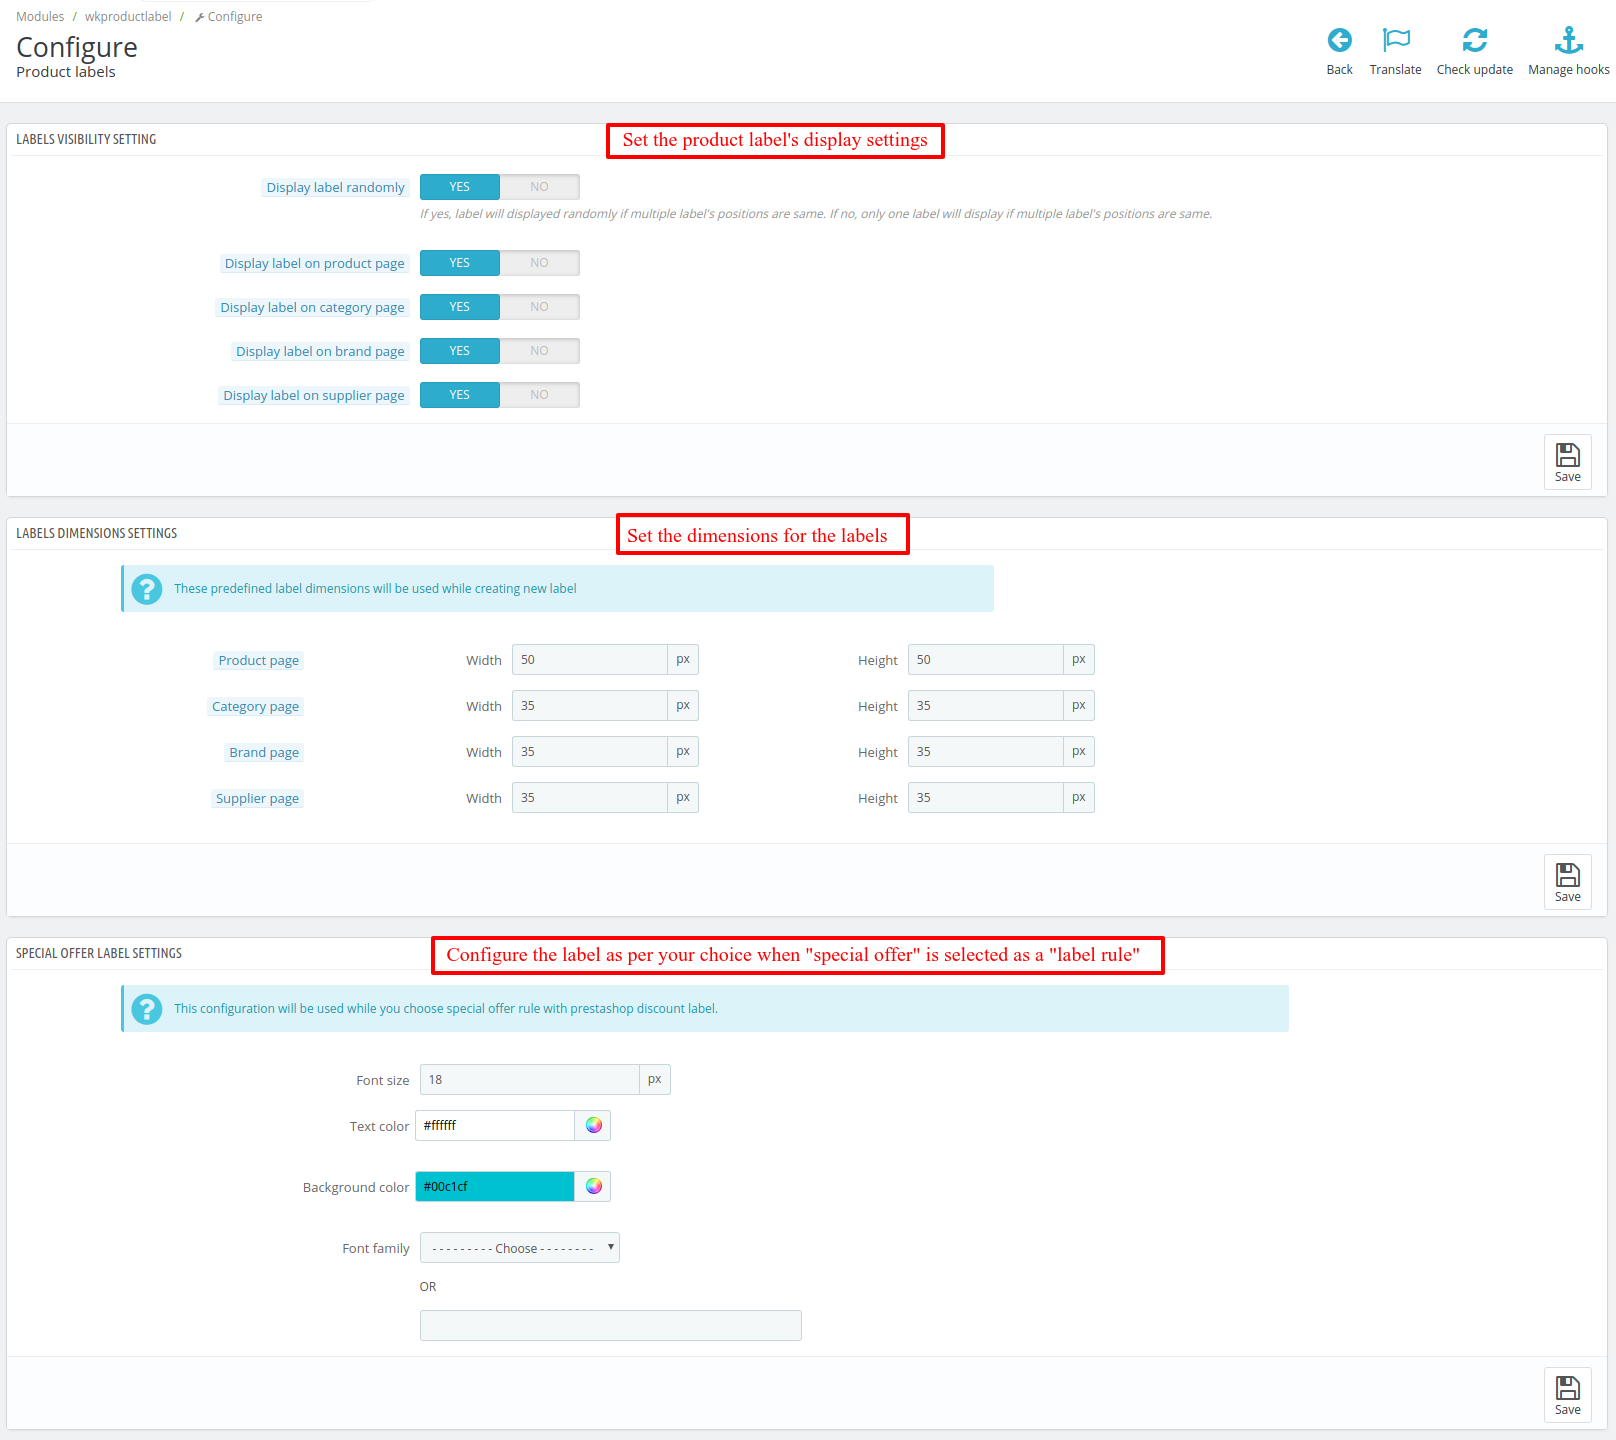
Display label randomly: Suppose you enable this option. And, you set the same position for multiple labels. Then the module will consider the very first created label for that position and all other labels will display randomly on the product images.
Display label on the product page: If set to yes, the label will show on the product page.
On the category page: If set to yes, the label will show on the category page.
Display label on brand page: If set to yes, the label will show on the brand page.
Display label on supplier page: If set to yes, the label will show on the supplier page.
LABELS DIMENSION SETTINGS

Under this section, set the dimension of the labels for various pages. By default, these dimensions will auto-fill while creating a label and it will only display for the image type label.
SPECIAL OFFER LABEL SETTINGS

A separate setting is available to customize the label (font, text color, background color). You can show it differently by selecting “Special offer” under the “Label rule type” with Prestashop discount. Also, you can set the position for special offer label.
Workflow
After the successful installation of the module, you’ll find a new tab called “Product labels” under the Catalog section.

Click on this new tab and you will further see the 3 options which will allow you to apply various functionalities on your created product labels.
Labels
First, let’s start with LABELS.
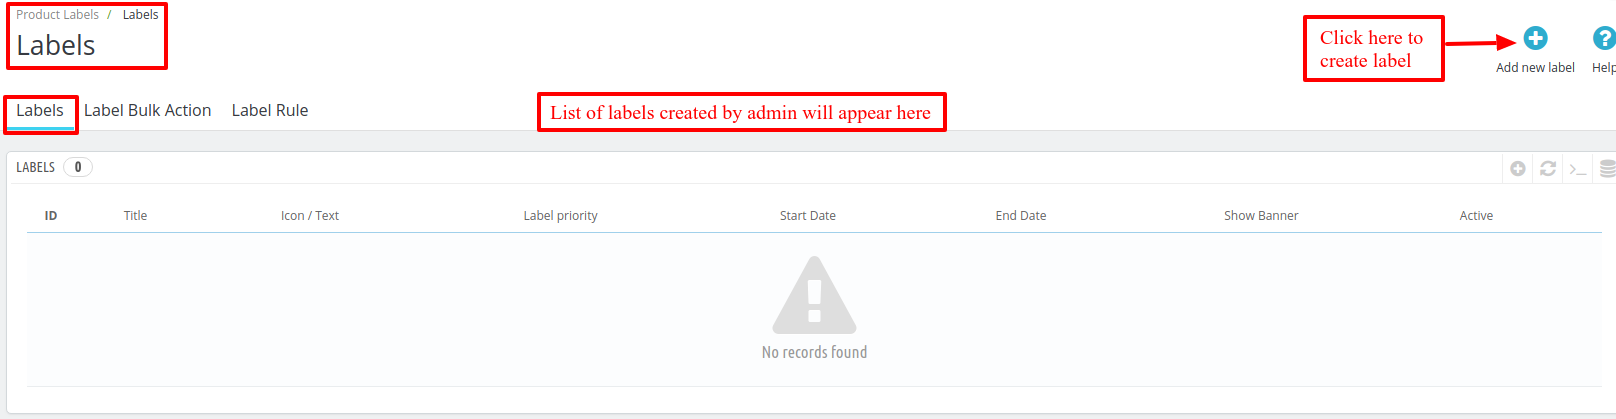
Once the admin clicks on the “Add New Label” button to create a new label, a form will open where the admin will have to fill the required details.

Title: Set the title for the label.
Display title on hover: Once you take a cursor on label, the title which you have set will display.
Description: Write a description for the label.
Icon type: Choose icon for the label. You can add image, text or google material icon for the label i.e. when you select “Image” option in icon type, a pop will be shown with the available icons. You can choose the appropriate one.
Else, you can add your own label by tapping on the “Add file” button.
- Display banner: Set to yes, if you want to display a banner on the homepage. If yes, choose the file.
- Label Priority: Choose the priority for the label if multiple labels are applied to the product image.
- Label start date and end date: Set the time validity for displaying the labels.
- Enabled: Select yes, if you want to display the label on the product images.
- Label position: You can set multiple positions but the label will display only on one position according to the first available position.
- Group access: Select the customer groups to which you want to show the label.
- Label pages: Select the pages on which you want to display the label and set the dimension accordingly.
- Display label with content: Set to yes, if you want to display the content on the product page along with the label and further customise the content (font, text color, background color) as per your requirements.
Let’s create another label using “text label” as “icon type”

Another label using “Google material icon” as “icon type”.

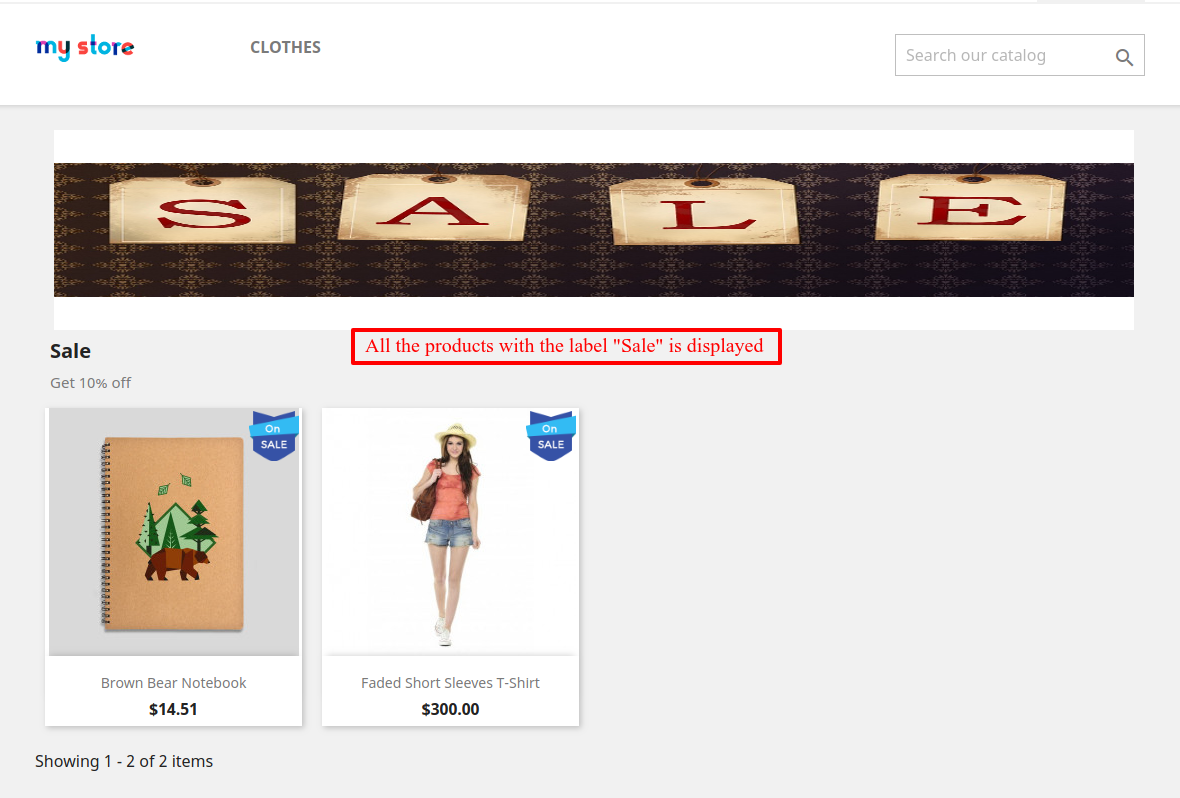
Banners will display on the homepage in the manner shown in the screenshot below.

Once you click on the banner saying “SALE”, then all the products with the labels “Sale” will display.
You can view list of all the labels under “Labels” section.

Now, after creating the labels, let’s proceed to apply them on the products.
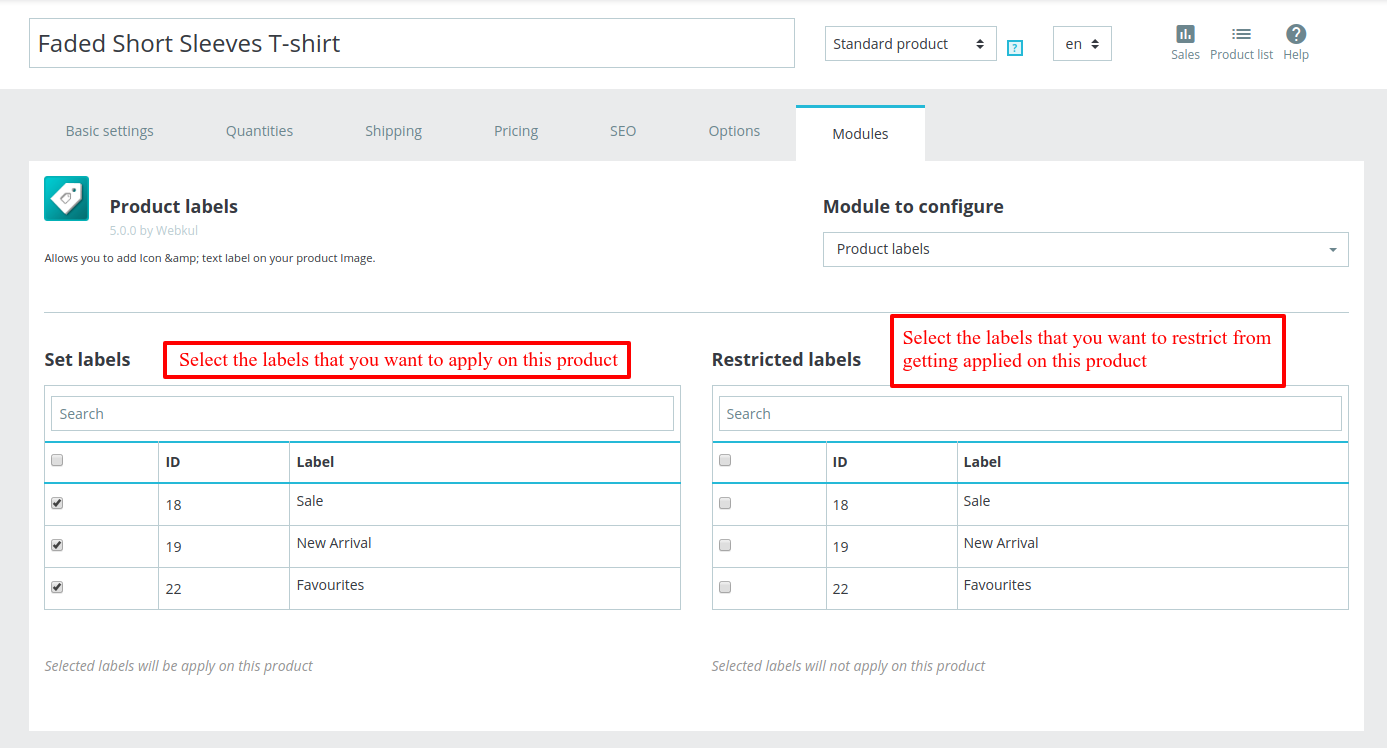
In order to apply the label to a product, follow the below process.
- Go to catalog & then products.
- Select the product on which you want to assign label
- Then go to modules section
- Now, click on the configure button.
Here is the view of the product along with labels on the front-end.

On the above screenshot, you might notice all the labels.
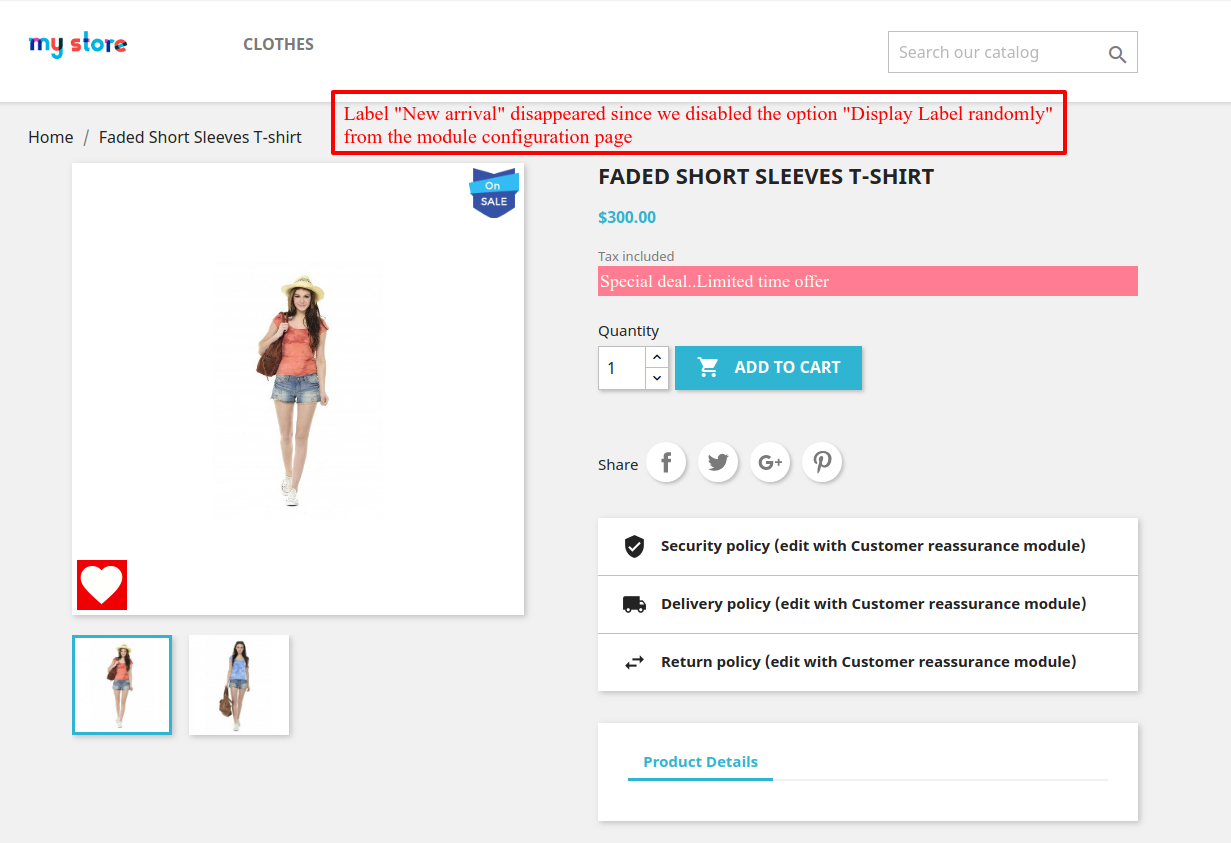
Note: While creating the labels, we set the position of the label “Sale” and “New Arrival” to 3. Now, among these two, the first created label will be set to position 3 and all other labels will display randomly. Because we set “Display Label randomly to Yes” in the module configuration.
Position of the label “Favourite” is set to 6.
If you disable the “Display Label randomly” option from the settings done while module configuration, then the label “New Arrival” will not get displayed since the position of the labels: “Sale” and “New Arrival” is set to 3.
Label bulk action
You can further configure the module by applying the Label bulk action and the Label rule on the product labels.

On clicking “Apply filter”, you can bulk assign the labels to the filtered products.


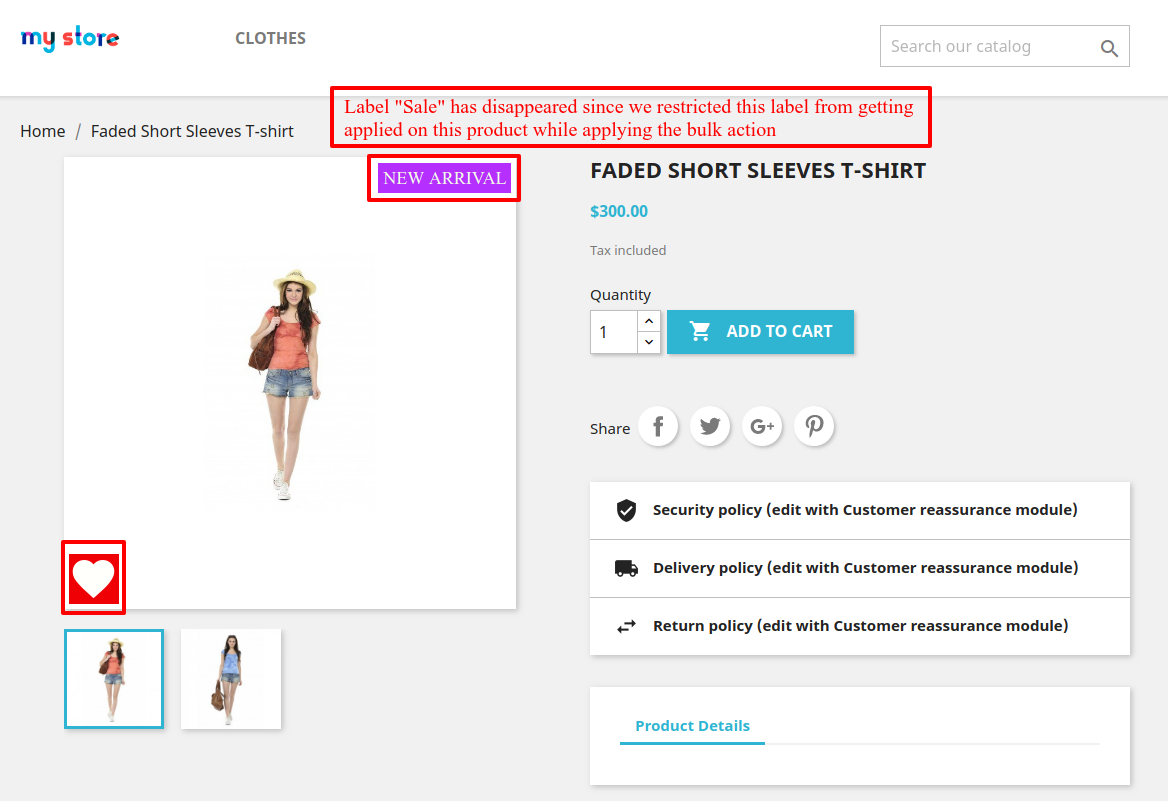
Now, while bulk assigning the labels on the products, if we talk about the product “Faded Short Sleeves T-shirt” with id 121, we have assigned the label “New Arrival” and “Favourites” and restricted the label “Sale” from getting applied on the product. Therefore, now the “Sale” will get unchecked from the “Set Labels” and will be checked automatically under the “Restricted Labels”. Earlier, all the labels were assigned on this product.
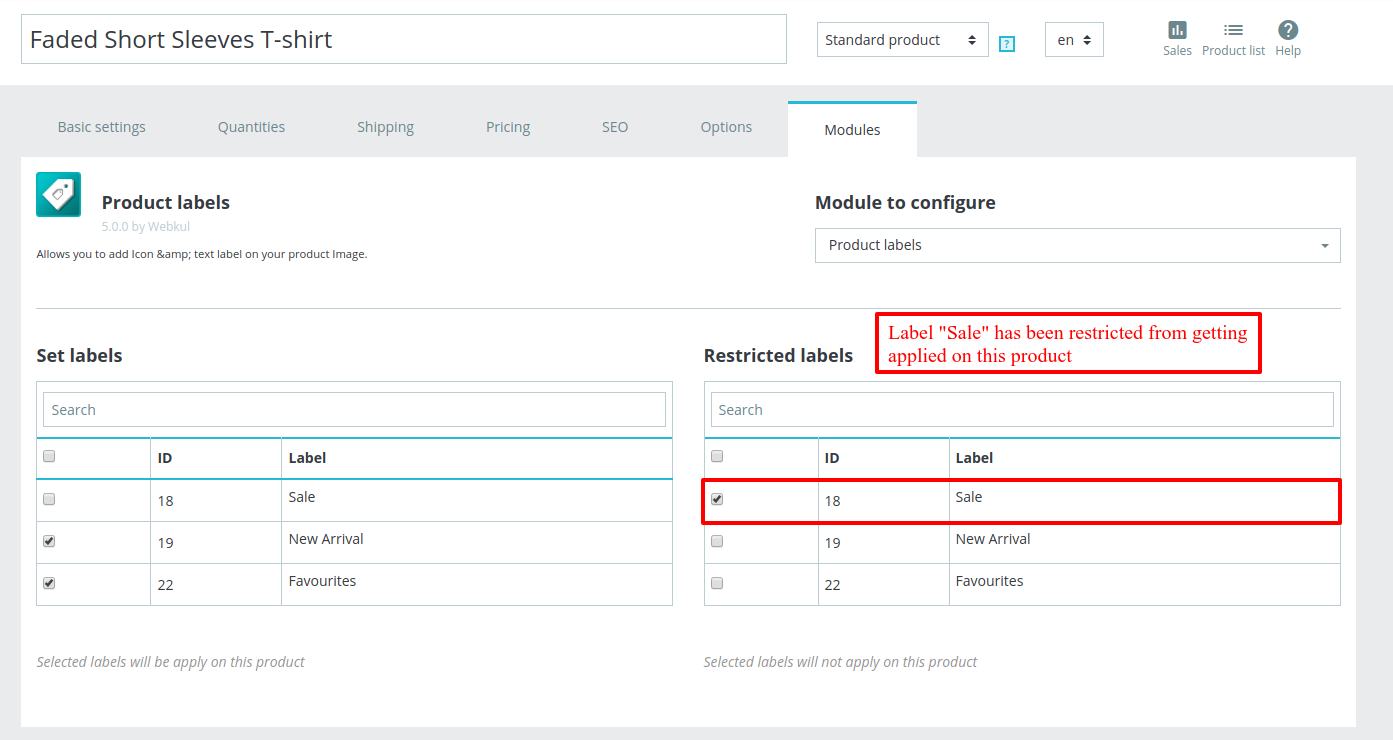
Since the label “Sale” is restricted, therefore, only the label “New Arrival” and “Favourites” will get displayed on the product image.
Label rules
Let’s further understand the module functionality by creating the “Label Rules”.
Rules allows you to add labels to massive selection(s). You can create as many rules as you want to apply labels to multiple products & categories.
You can create rules on the basis of following :
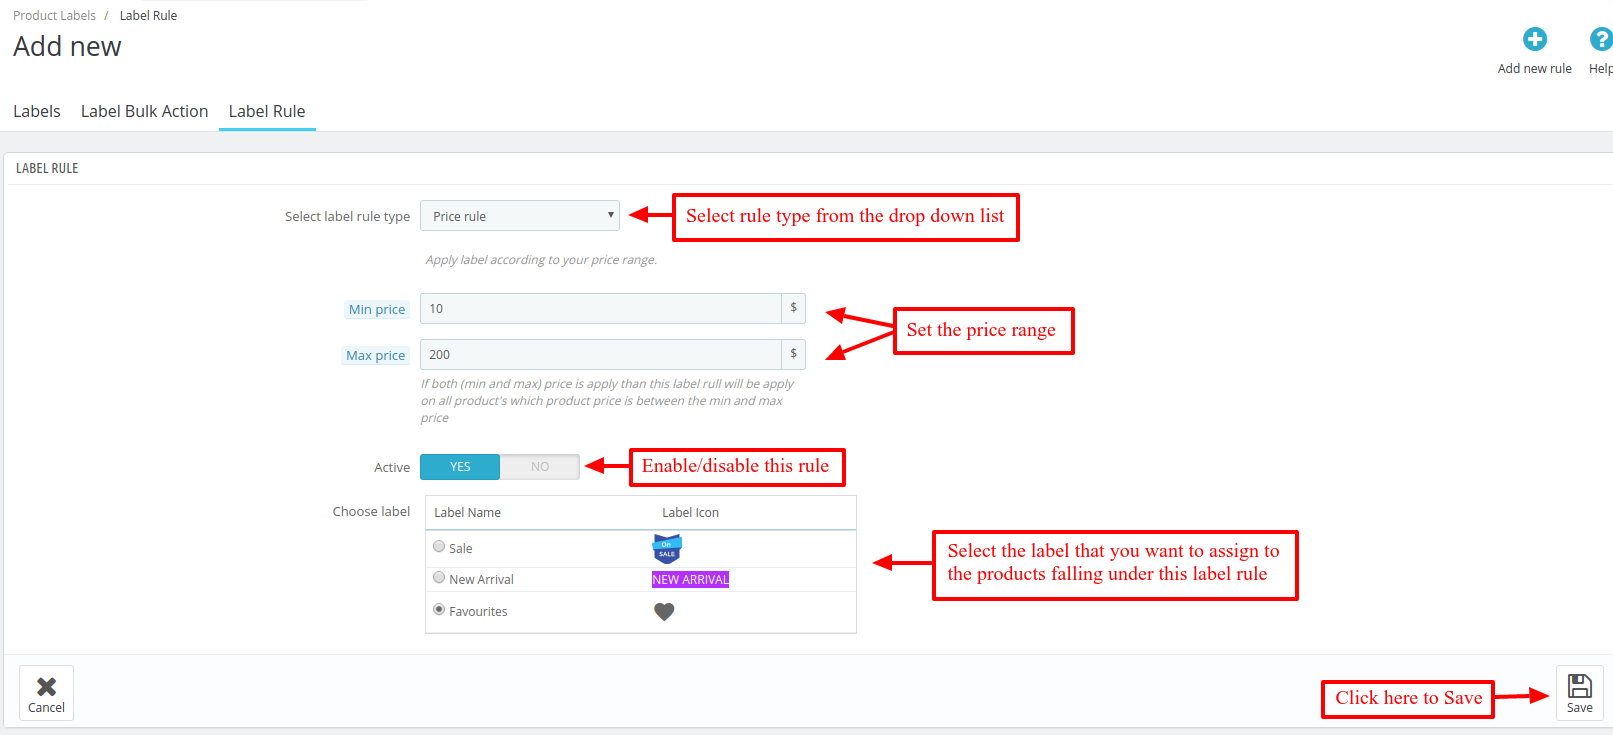
1. Price rule
2. Special offer
3. Customer discount
4. Best selling
5. Feature product
6. New product
7. Online only
8. On sale
9. Free shipping
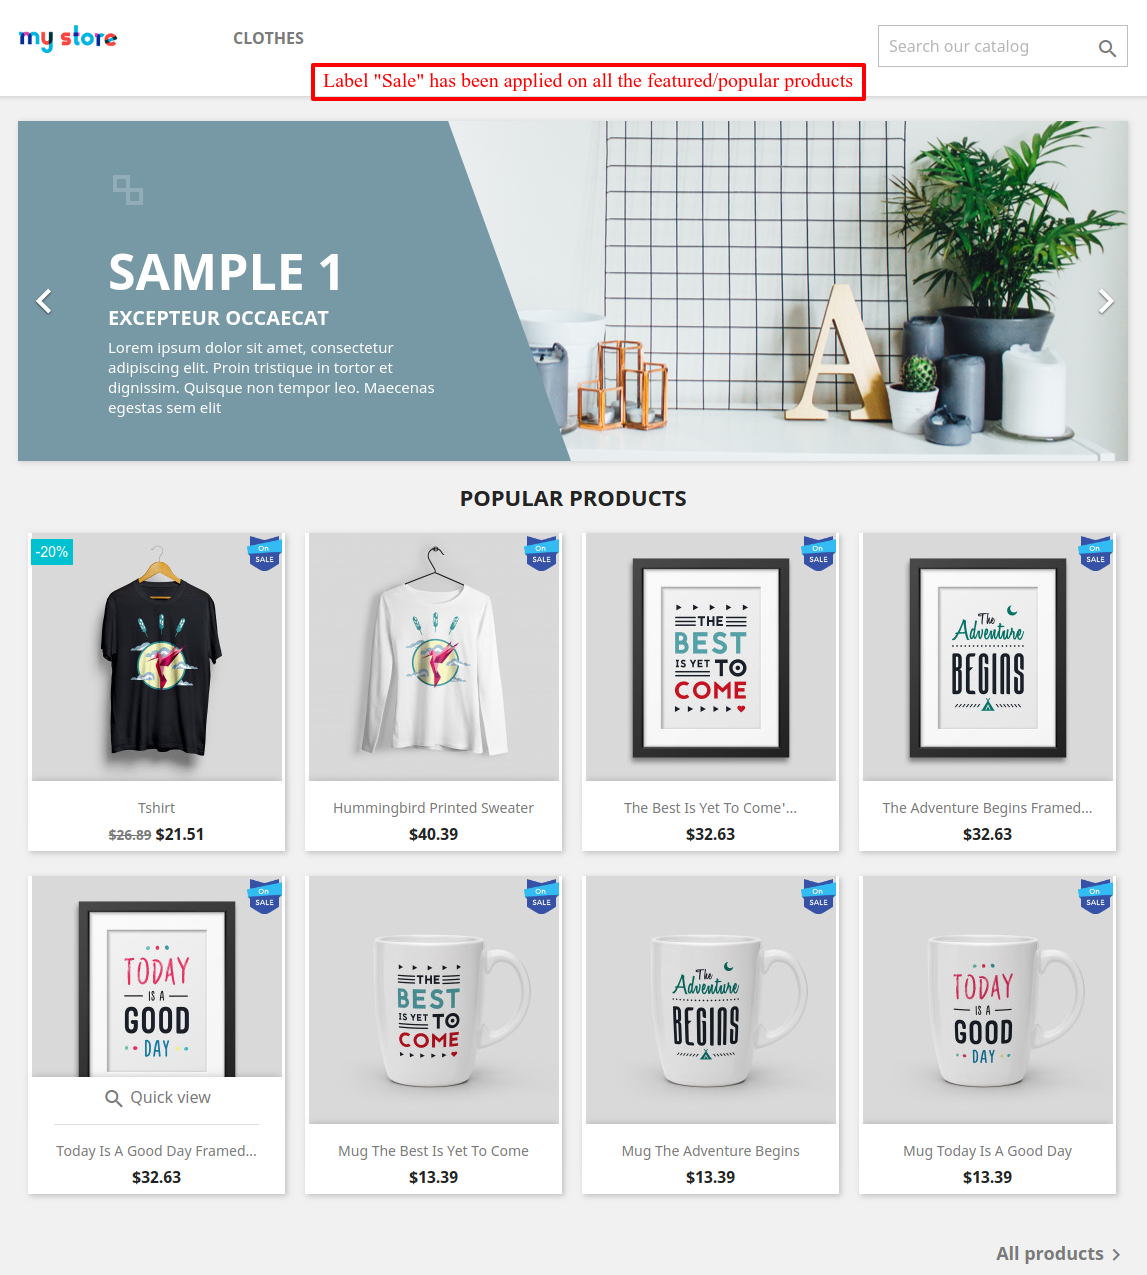
A rule is created in which all the products that falls under the featured product category will have the label “Sale” assigned on them.

Let’s create another Label Rule.
If selected “Special offer” Label rule type, either assign label on the product or show Prestashop actual discount on the basis of specific price and catalog price rule e.g. 20%


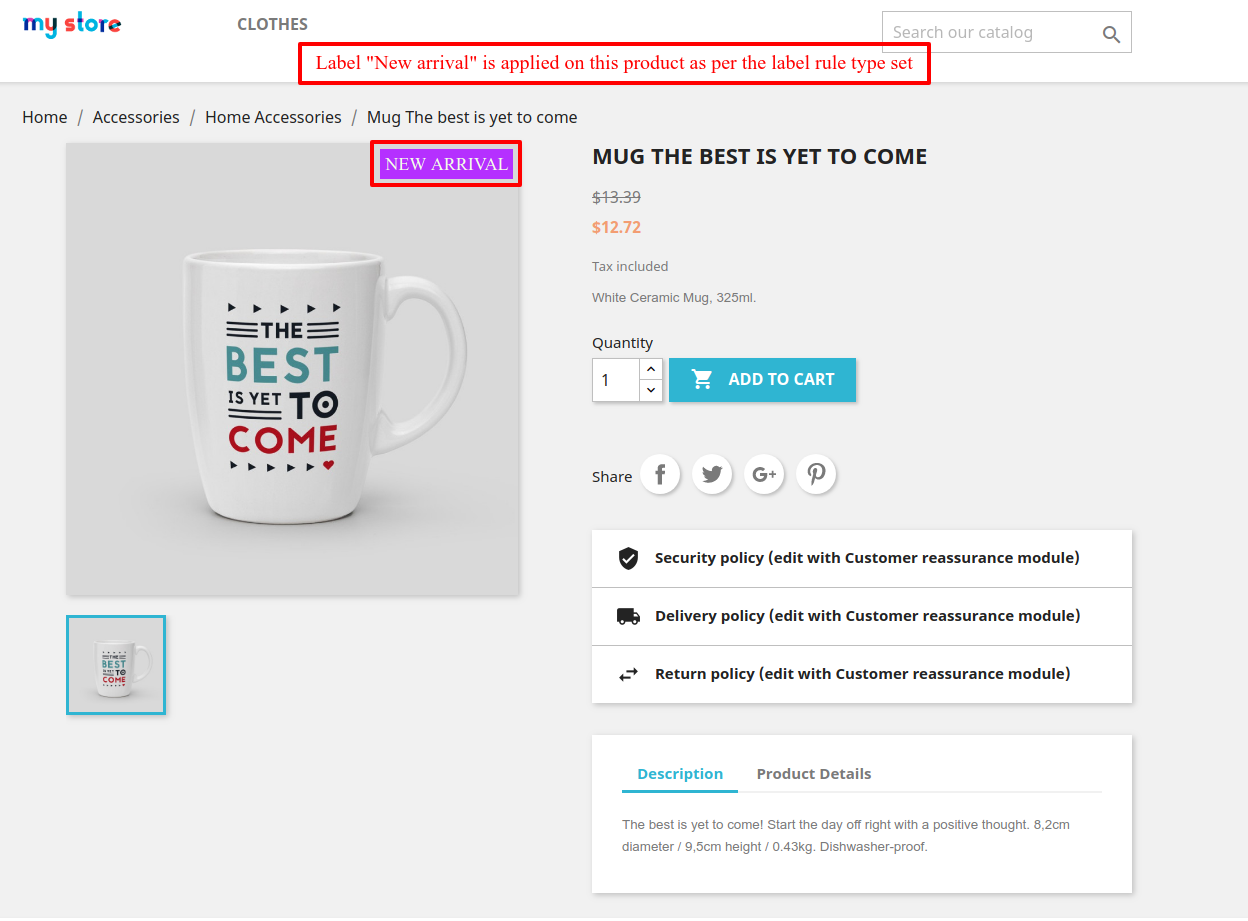
“New Arrival” label is applied on the product “Mug the best is yet to come” because on this product specific rule has been applied and “Special offer” label rule type can only be applied on the products on which either specific price or catalog price rule is applied.
Now, lets apply Prestashop discount when selected Special offer from the Label rule type.

Prestashop discount will set as per the settings you have set in the Configuration page.

In this, we tried to apply the label “Sale” because “featured product” label rule is also applied that we have created earlier.
Let’s create one more label rule.

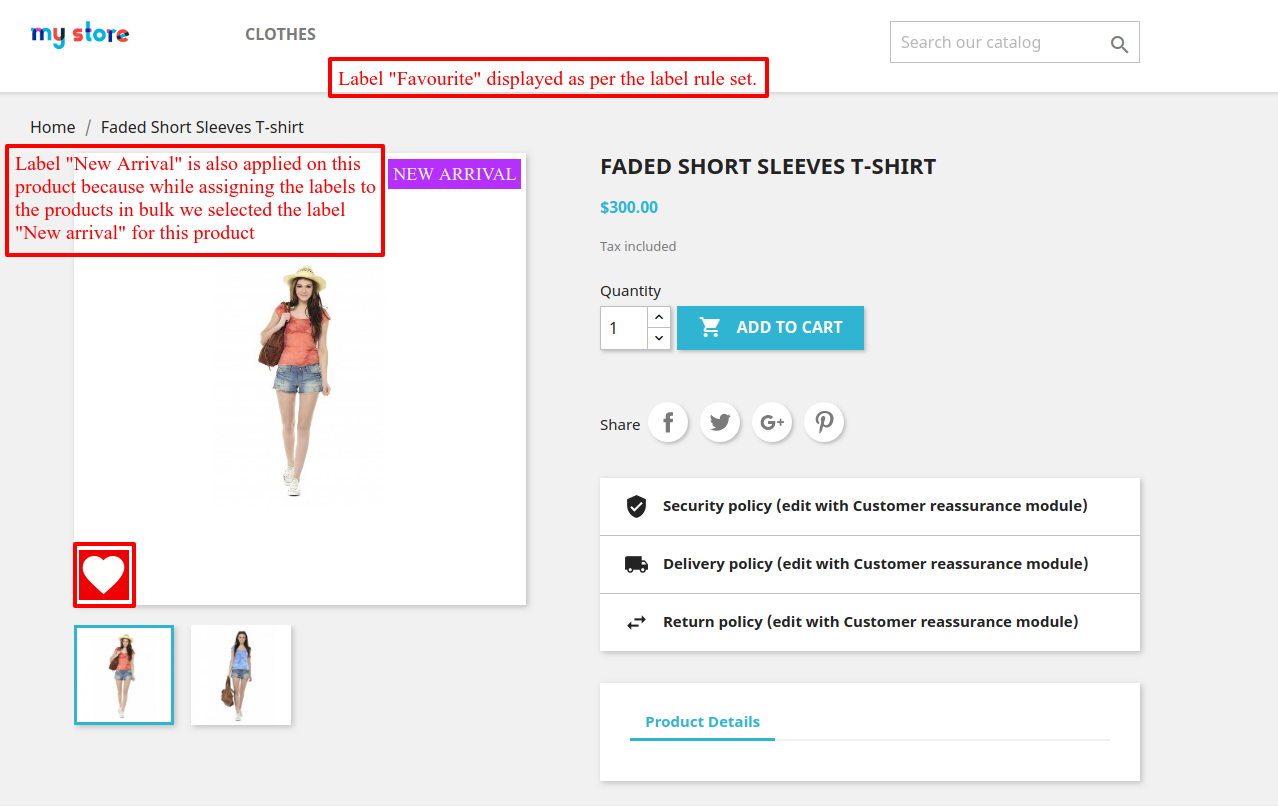
On this product, the label rule “price rule” is applied since the product price falls under the price range you set while creating the rule and the label “New Arrival” is applied because while assigning the labels to the product in bulk we selected the label “New arrival” on Faded short sleeves T-shirt having product id 120.
So, this was all about Prestashop Product Label Module. I hope this document will help you in checking the functionality of the module in a better way. Also, do let us know about your views in the comments.
Support
For any kind of technical assistance or query, please raise a ticket or send us a mail at [email protected]
Also, please explore our Prestashop development services and vast range of quality Prestashop addons.
Current Product Version - 5.3.3
Supported Framework Version - 8.x.x, 1.7.x.x

Be the first to comment.