Opencart Multi Vendor Bulk Product Upload add-on is super useful for bulk upload of products.
Using this Marketplace add-on, the sellers can upload their products in bulk using CSV, XML, and XLS files also the admin can bulk upload products for himself and into the seller’s store.
The admin and sellers will also be able to update their products in bulk and can export their products in bulk or by specific product selection.
Also, this module is an add-on of the Marketplace Module. To use this module you must have first installed the Opencart Marketplace module first.
Note
1. This extension will work with Webkul’s Opencart Marketplace version 2.2.0.0 and above.
2. zip archive extension needs to install on the server.
3. This module supports all templates and themes including the Journal theme.
4. Opencart Marketplace Product Mass Upload module supports the Multi-Store feature of default Opencart.
Watch the below video tutorial to understand the module workflow:
Features – Opencart Marketplace Product Mass Upload
- The Admin/Seller can Import Bulk product using the XML, XLS, and CSV file types.
- Admin/Seller can Update Bulk product using the XML, XLS, and CSV file types(in zip format only).
- Also, the Admin/Seller can Upload images in Bulk using the Zip file types.
- Admin/Sellers can get the ID data of various options like – Product, Catalog, Manufacturer, Filter, Download, Stock Status, Tax Classes, Customer Groups, and Attributes etc.
- The Admin can Upload products for the sellers.
- Export Product in Bulk/Specific products via email.
- The seller/admin can import the files that are exported.
- Multiple products in a single CSV, XML, and XLS file.
- If an SEO Url repeats then it will auto-generate with a 4 digit random character.
- The products can add in multi-languages.
- Fully dynamic and easy to use.
Opencart Marketplace Mobile App
This is a technology-based era where everything is simple even online shopping. We all know about shopping apps and its advantages-how it reduces and makes our shopping experience hassle proof.
So it is very important for all the Store owner to have a shopping app for providing a more convenient way to shop from their online store and now Webkul’s has launch its new app Opencart Marketplace Mobile App.
Also, Opencart Marketplace Mobile App converts your marketplace store for Opencart into a mobile app.
Your customers can easily purchase products on the go. They don’t need to have a laptop or desktop, they can easily explore your store through their smartphones.
It will not only benefit the store owner and customer it will benefit the sellers too. Sellers can see their dashboard, order history through the mobile app.
So what are you waiting for, you must now have an Opencart Marketplace Mobile App to be a step ahead.
- Seller list.
- The customer can contact the seller.
- Seller Collection.
- Market Place Sell Page
- Seller Profile.
- The user can review the seller.
- Seller Dashboard.
- The Seller Order History.
- Seller Location is mentioned on the map.
Installation
Installation of Opencart Marketplace Product Mass Upload for Opencart is very simple. After extracting the zip file, choose your Opencart Version Folder and in that, you will find folders admin, catalog, and ocmod folders.
Now copy the admin, catalog, demo and system folders into the root directory of your Opencart website.

If you are using a custom theme like Journal then we provide Journal theme patch (directory) in the module zip. While installing the module, navigate through Theme Patch->Journal2 folder and you will get “Catalog” folder. Just upload the “Catalog” folder into your Opencart root directory for the proper functioning of the module with the Journal Theme.

Once you upload the file, login to admin panel and from catalog section go to Extensions> Extension installer and upload the XML file. The XML file can be found in ocmod folder under module directory. Under the ocmod folder, you will find wk_mpmassupload.ocmod.xml file.

After Uploading The File Go To The Extensions > Modification and Click On “Refresh“.

Now, navigate to Sytem->Users -> Users Group and edit the administrator. Here, under Access Permission and Modify permission click select all for both options and click the Save button as shown below in the snapshot.

After That Under Extension > Modules, install the Marketplace Mass Upload module like this way.

Module Configuration
Now, after the installation completes, the admin can click on the edit button, another page to configure the extension will appear as shown below.
Here, the admin will –
- Either Enable or Disable the extension.
- Enable Keyword that will –
- If the product is being update then the SEO will contain SEO+Product Id.
- Also, if a new product adds then SEO will contain the provided SEO and random four characters.
- If the keyword is disable – The product will skip and error will be shown for that product.
- Set the Seller Allowed File Types – File types on which the sellers can upload
- Also, set the Seller Allowed Backup Files Types – Allow selective file types to be used by the seller for the backup files upload.
Now, navigate through Extensions->Modules->Marketplace and click the edit button. After this, go to the Catalog Configuration tab and under that go to the “Account” tab. Then for the “Allowed Account Menu” click the select all option and then click the Save button to save the configuration.
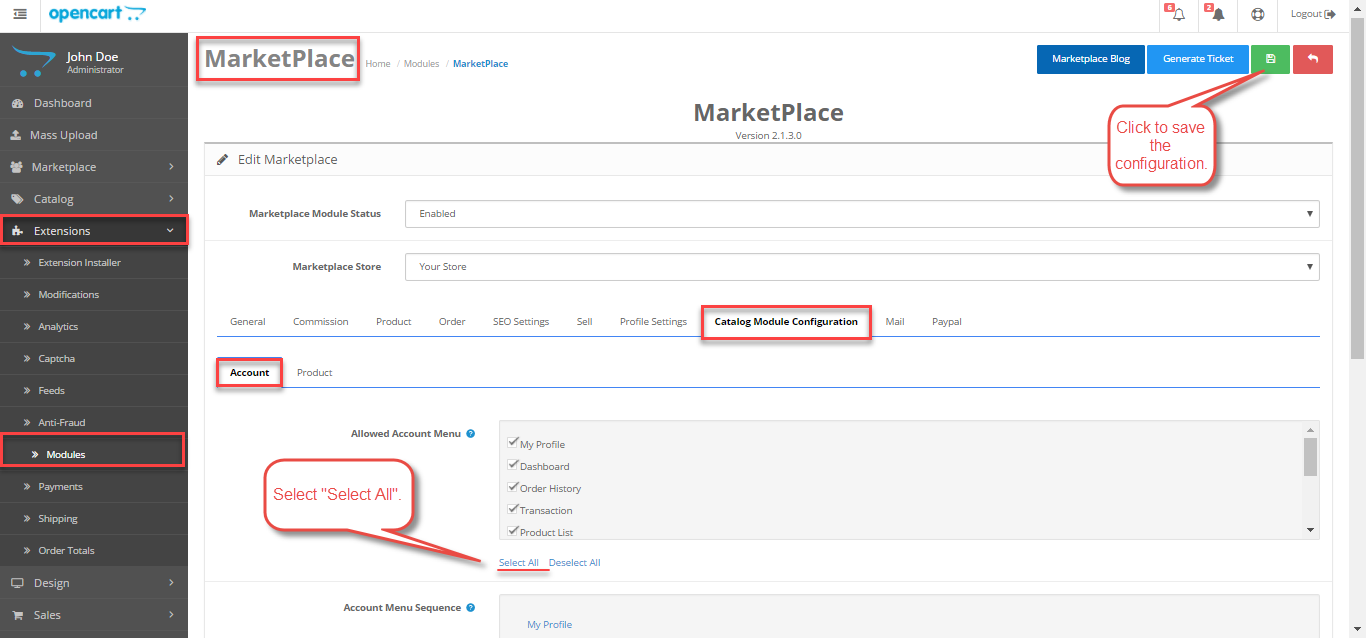 Here, go to the Product tab. Only the allowed product fields and the product tabs that admin selects from the backend will be available for the sellers to use while uploading and exporting their products.

Module Translation
As this Marketplace module supports multiple languages so this section will describe how to make the module work in different languages. Please check this link for language translation
Opencart Marketplace Product Mass Upload – Upload File(Admin’s End)
Using this module, you can allow importing the data from a file in XML, XLS and CSV format.
General
Step 1: To import the products navigate to Mass Upload >General menu option in the admin panel as shown below in the snapshot.

Here under the “General” tab, the admin will be able to –
- The admin can select the Data Flow Profile from the list of dropdown profiles.
- Admin can set Seller whose products are to be uploaded.
- Select the File Type as XML, XLS, and CSV. (For the below example, we have used XML file type for importing the products).
- Also, select the Option to upload – New Products Only or Update Old Products.
- Click the Upload button to upload the XML/XLS/CSV file (in zip format only).
After clicking the “Next” button, the products will import and you will see a confirmation message as per the snapshot below.
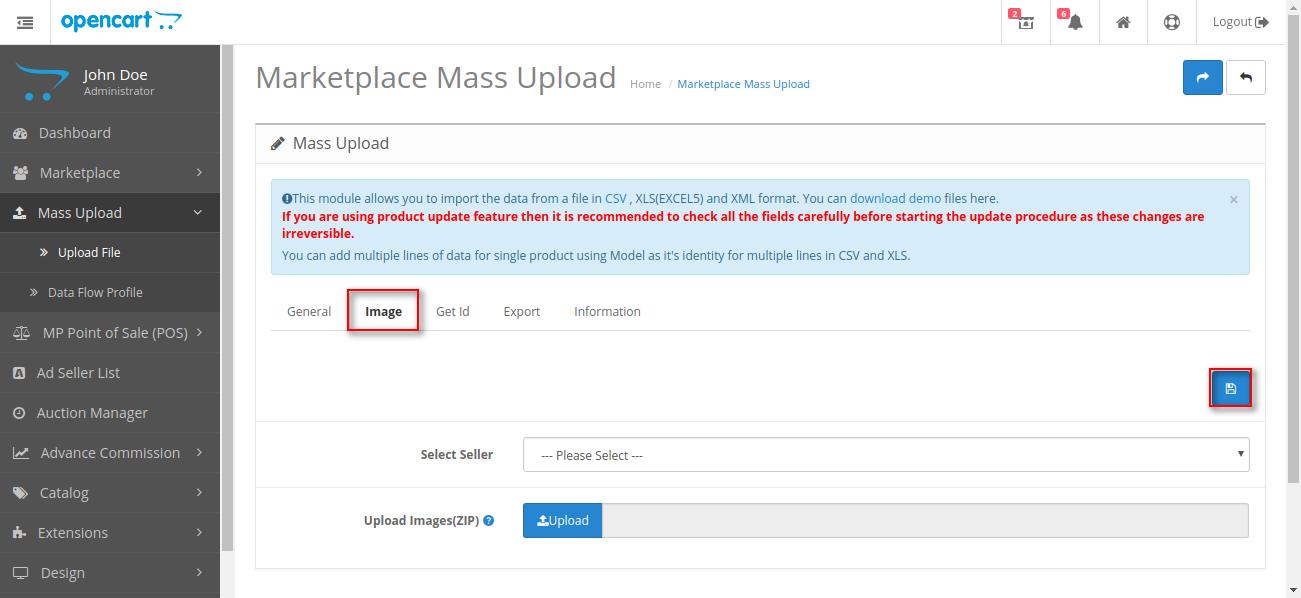
Images
The admin can upload the images in the Image section of the Mass Upload.
- Select the seller whose product images are needed to be uploaded.
- Upload the file in the zip format
- Click on the save button to add the image
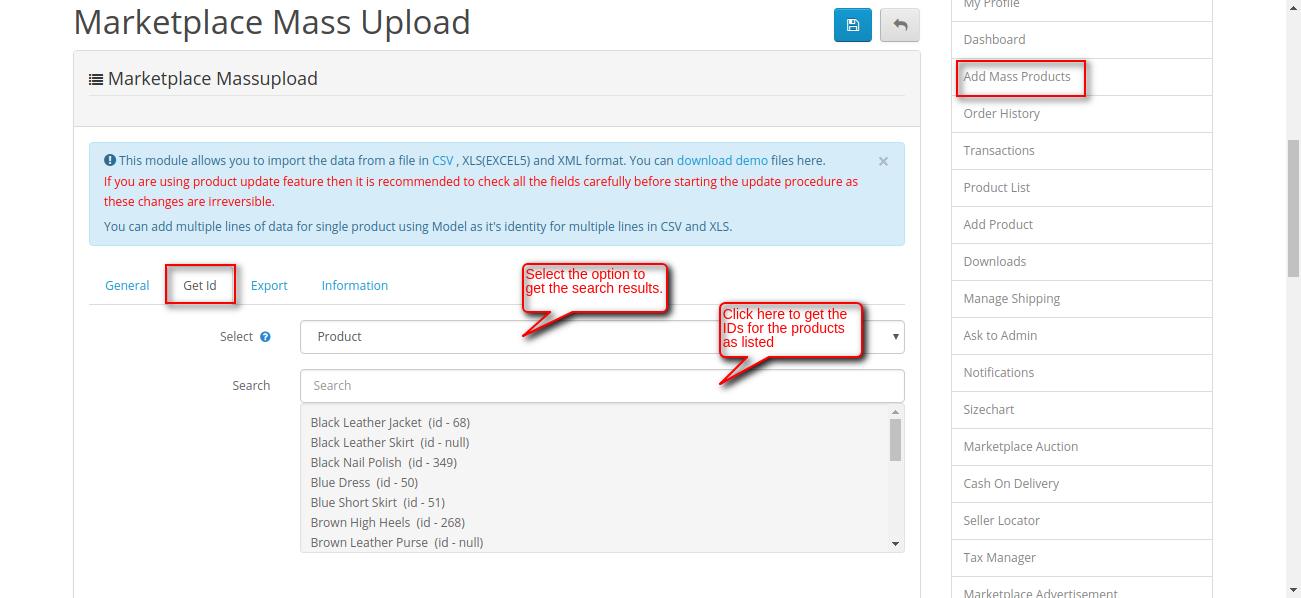
Get Id
Under this tab, the admin will be able to get the Ids for various fields like Products, Catalog, Manufacturer, Filter, Download, Stock Status etc.
After selecting an option, now click on the search box to display the IDs for the selected option.
For example – We select the option as “Product” and then we click on the search box. Now, you can see the Products display with their IDs. Similarly, the admin can get the IDs for the rest of the options(Catalog, Manufacturer, Filter, Download, and Stock Status etc).

Export
Under the Export tab, the admin can easily export the products for the marketplace sellers.
The admin needs to select the seller, the mail on which the exported file will be sent (Admin, seller, both), the Backup File Type(CSV, XML, XLS), the Download Type(Format of the export file – CSV, XML, XLS), and the Download Type as Bulk(all products of the seller exports) or Selection (only the selected products exports) as shown below in the snapshot.
Also, After making all the selections above, the admin will click on the Export button to export the products for the seller.
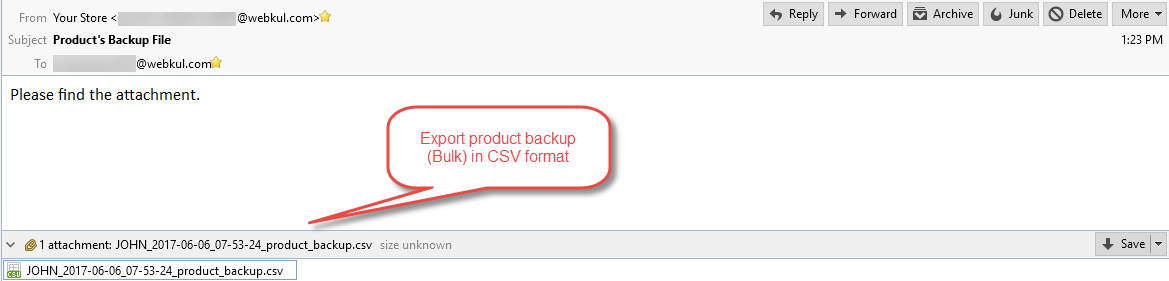
Now, after the export, the seller can find the exported file in their email as shown below in the snapshot.
CSV:

XML:

XLS:

Admin can find more information about the module under the Information tab as shown below in the snapshot.

Import the Exported Files
The files which are exported can be imported by simply uploading the Exported file at both, the admin and seller end.
Initially, under the Export section, the admin/seller needs to define the following fields:
Select Seller: The admin selects the seller from the given list.
Mail: Admin/seller configures whether the mail is to be sent to the admin or seller or both.
Backup File Type: The admin/seller chooses either of the three File Types, CSV, XML and XLS.
Select Download Type: Admin/seller chooses either Bulk or Selection.

The admin/seller can export the files by clicking the Export button on the top right corner of the page.
Now, the files which are exported can be imported under the General tab.
The admin needs to define the following under the General tab:
Data flow Profile: Admin/seller has to select the Data Flow Profile form the given list.
Select Select Seller: Seller is to be chosen by the admin.
File Type: The File Type must be same as the File Type chosen in the Export tab.
Upload New Products or Replace Old One’s: Admin/seller may choose either Add New Products Only or Update Old Products.
Upload Zip File: The zip file which was exported can be uploaded on clicking the upload button.
Thereafter, the admin/seller clicks on the Import button on the top right corner of the page.
This redirects the admin/seller to the Mass Upload Import Process page which displays the progress bar showing the Processing of the products import.

Note:
- The admin must add the images, which will be used on uploading the exported files (csv, xml and xls), with the following path, respectively:
- Image Path for Admin: image/catalog/massupload/
- The Image Path for Seller: image/wkseller/seller_id/
Opencart Marketplace Product Mass Upload – Data Flow Profile
The admin can create or edit the Data Flow Profile for the mass upload file as shown below 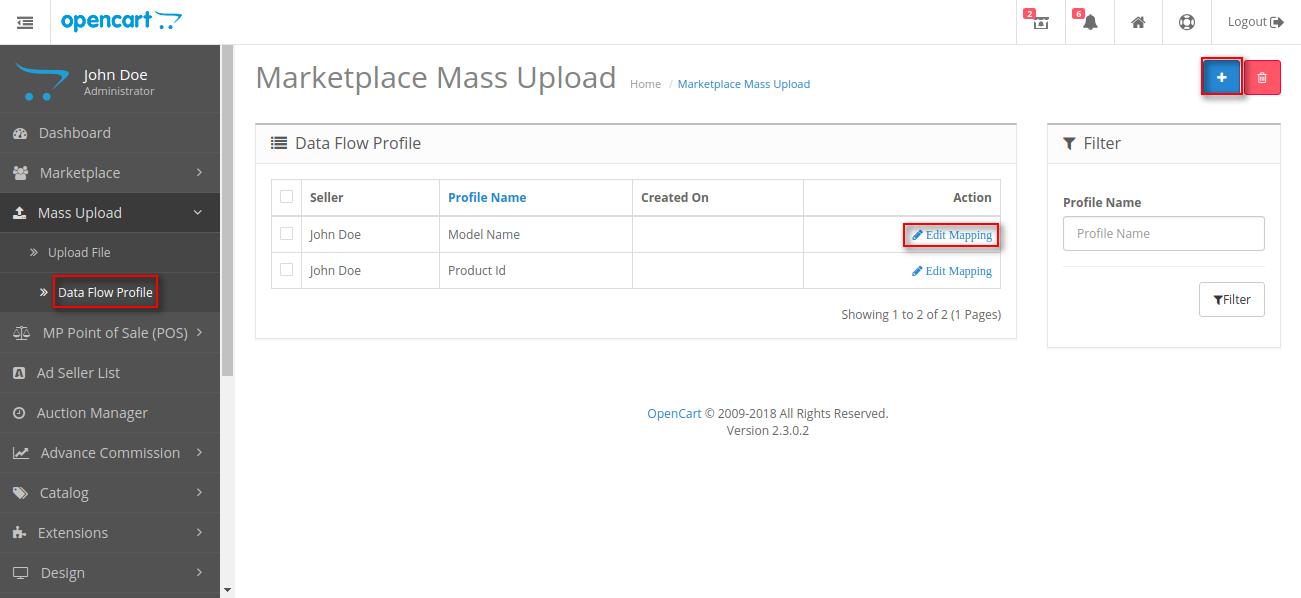
On adding the Data Flow Profile, the admin can add the profile name and add the database name and the name as defined in the files. This will help the database to get mapped between the file that is to be uploaded and database of Opencart.

Now, after mapping all the fields for the tabs click the “Save” button, after which you can see the success message as shown below in the snapshot.

Opencart Marketplace Product Mass Upload – Importing Data(Seller’s End)
Seller’s End
Using this module, the sellers can allow importing the data from a file in XML, XLS, and CSV format under their own account panel.
General
XML Example:
Step 1: To import the products navigate to Add Mass Products > Upload Product > General menu tab under the seller account section as shown below in the snapshot.

Here under the “General” tab, the Seller will be able to –
- Select the Data Flow Profile from the dropdown listed by seller.
The seller can also add/edit the Data Flow Profile for the files uploaded as shown in the image below

On adding the Data Flow Profile, the seller can set the profiles for which the data needs to be mapped.
- Select the File Type as XML/XLS/CSV.
- Now, Select the Option to upload – New Products Only(to upload the new products) or Update Old Products(Update the new Products).
- Click the Upload button to upload the file with the product data.
- Also, click the Upload button to upload the file with the image.
After setting up all the parameters, click the “Save” button at the top right-hand side. Now, after clicking the “Save Button” the file will get uploaded and the products will be imported under the “Product List” section of the seller’s account.

Get ID
 Under this tab, the seller will be able to get the Ids for Products, Catalog, Manufacturer, Filter, Download, and Stock Status etc.
After selecting an option, now click on the search box to display the IDs for the selected option.
For example – We have selected the option as “Product” and then we clicked on the search box. Now, you can see the product get displayed with their IDs. Similarly, the seller can get the IDs for the rest of the options (Products, Catalog, Filter, Download, and Stock Status etc).
Export
Now, the seller will be able to easily export their products.
The seller just needs to select the –
- Mail(the e–mail on which the exported file will be sent – Admin, Seller or Both).
- Backup File Type as – CSV, XML, or XLS.
- Download Type as – Bulk(all of the products will be exported) or Selection(Selected products will be exported).
Similarly, the seller will be able to select the backup file type as – XML, and XLS and the selected file types will be sent via email.
Information
Under this section, the seller will be able to see the information regarding the extension as shown below in the snapshot.
To know more, refer here-
That’s all for the Opencart Marketplace Product Mass Upload extension. Still, have issues or want to give your suggestions to make this module better just raise a ticket at webkul.uvdesk.com
Current Product Version - 3.4.1.2
Supported Framework Version - 2.x.x.x, 3.x.x.x

Thanks!