PrestaShop Marketplace Seller Price Comparison is an addon of the Marketplace module. By using this addon, the admin can create global products by converting store products into global products.
Sellers can assign single/multiple global products in any language to their shops with their own price, stock, description, image as well as can select the combination for the product. A new block on the global product page will display the list of all sellers selling the same global product. It will also contain details of the price and stock availability. This module will help buyers to compare the same product of different sellers.
Note: PrestaShop Marketplace Seller Price Comparison module is compatible with PrestaShop version 8.x.x.
Features
- Admin can create global products.
- An admin can create multiple products as global products.
- Admin can enable/disable the display of only lowest price global products on the category pages.
- A seller can assign global products to their shop.
- Admin can assign global products to marketplace sellers.
- Sellers can select the images to display on their global product page.
- Buyer can compare the same product of different sellers.
- Sellers list selling same global product will display on the product page.
- If an admin has made its own product as a global product, then the admin can enable/disable the activation of its product on deleting the global product.
- Admin can assign global product in any language to the seller.
- A seller can also assign global products in different languages.
- Separate products will exist for each language.
- Admin can set the criteria for displaying the lowest product on the category page.
- Sellers can also select the desired combination for the global product.
- Sellers can even select the image for the combination separately.
- Seller can specify the price and quantity for combination.
- A seller can add wholesale price on their assigned global product.
- Seller can select default category on their assigned global product.
- Seller/Admin can add features to their assigned global product.
- A seller/admin can apply specific shipping to their assigned global product.
- Seller/Admin can add SEO to their assigned global product.
- A seller/admin can add EAN, JAN, UPC, ISBN to their assigned global product.
- Seller/Admin can manage the visibility of assigned global product on the store.
- Seller/Admin can select the behaviour of order i.e. to allow/deny order when product is out of stock.
- Admin can allow/disallow sellers to assign multiple products with the same global product.
- A seller can view global product list and further can select and assign global product from the list.
- The module is multi-shop compatible.
How to install the module?
In order to install the module, you need to install the PrestaShop Advanced Multi-Vendor Marketplace module first.
After installing the marketplace module, you can now proceed to install the PrestaShop Marketplace Seller Price Comparison module.
- Firstly, Go to the Module Manager in Back office and click on ‘Upload a module’.
- After that, Drag and drop the module file or select the file from the system.
- In this way, the module installation will be successful.


How to configure the module?
After the successful installation of the module, an admin can configure the module.
Configuration

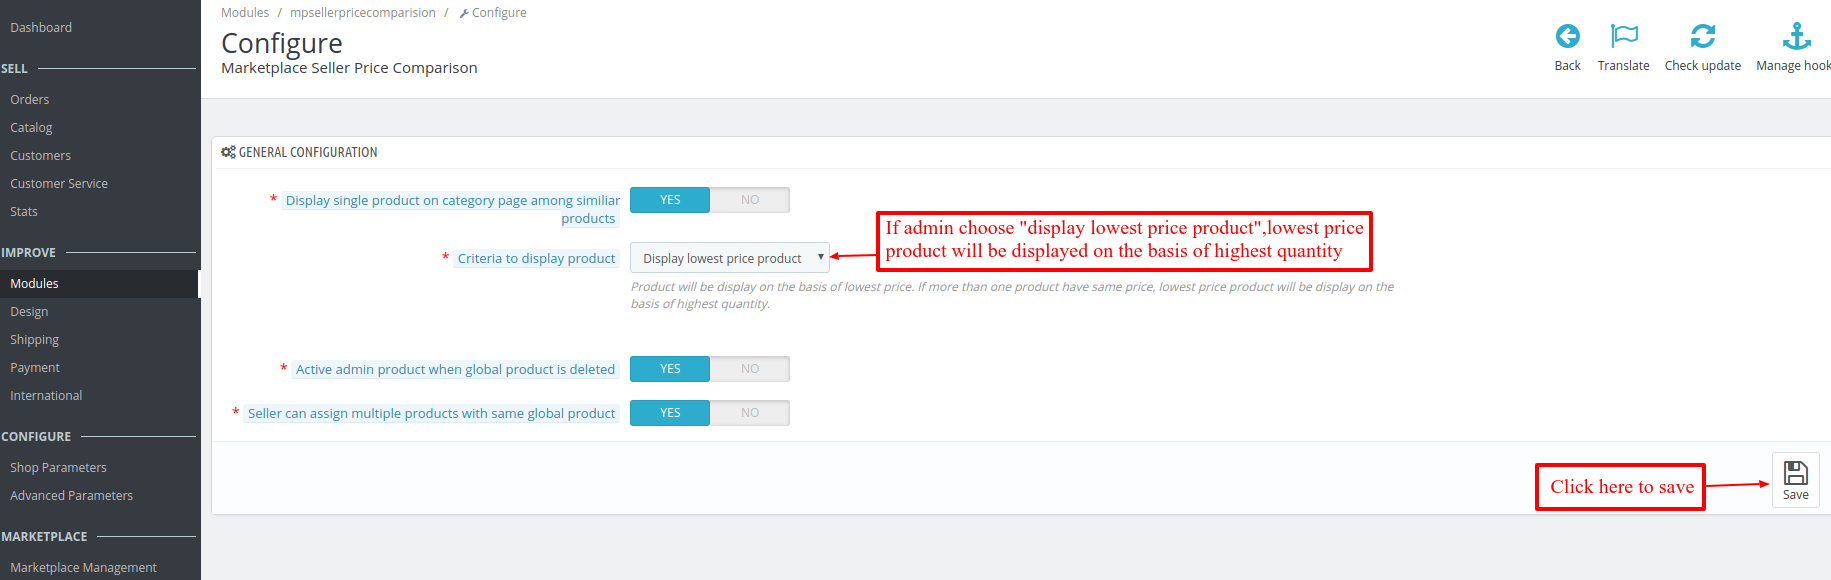
Note:-
- If you enable “single product”, then only the lowest price global product will display in the categories. And, all other products will display only in the comparison list.
- There are two criteria to display the product on the category page.
- Admin can choose to display the lowest price product or set the product.
- If you disable “single product”, then all the global products of different sellers will display in the categories.
- If admin delete the global product from the list, then admin can decide whether to enable/disable the product as admin’s normal product.
- Admin can allow the seller to assign multiple products to the same global product.
Workflow
After successful installation of the module, a new tab will be added in marketplace management under Manage seller product.
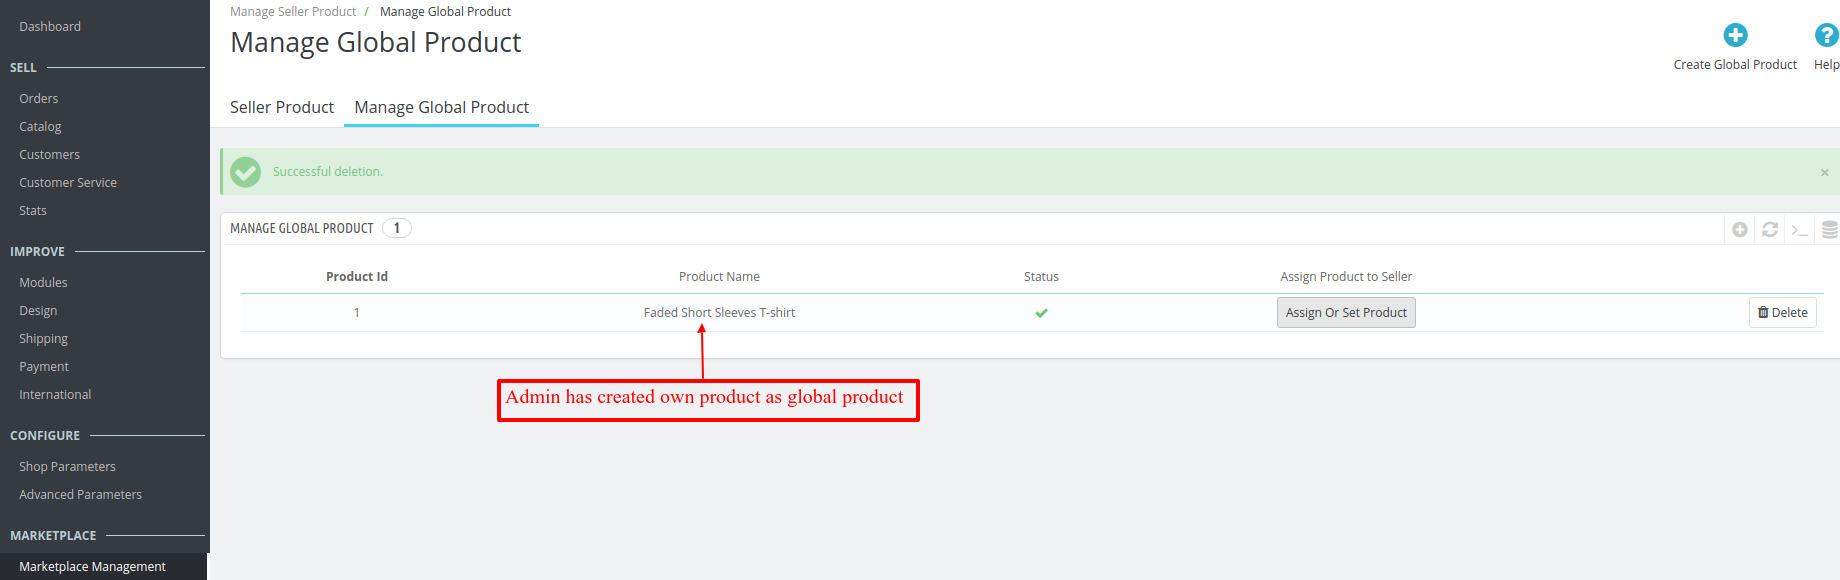
Go to marketplace management >Manage seller product > Manage global product. From here admin can create a global products. Click on the “Create global product” button to add a global product.

Admin can select single/multiple products to add as global products.

List of all the global products added by the admin will be shown here. Admin can assign these global products to sellers or also set the product to display from here.

Note:- If admin has added own product as global product then that product will be deactivated from the product list i.e. catalog->products. Refer to the screenshots:-

An admin can also choose to enable or disable the global products in bulk.

Assign global product
On the installation of the module, a new tab adds to the seller dashboard.

By clicking on the assign product tab, sellers can assign global products to their shops created by the admin at the back end.

Now from the above screenshots, it is clear that the seller has assigned a global product i.e. “Faded Short Sleeves T-shirt” to the shop. Similarly, sellers can assign or add as many global products as per requirement.
Seller can add image for their global product.

The seller can create different combinations for their global product and can also add features.


A seller can add shipping to their global product.

Products at the front end
Now, when a buyer will search for the created global product, then the list of products by different sellers will be displayed.

When a buyer clicks on a product from the list, then he/she lands on the product page. Here, he can see a new block displaying details of all the sellers who are offering this product.

Note:- In case admin deletes the global product, then all other assigned products to the same global products will not be deleted. Admin can also configure the module to enable its own product.
The seller can view their global product list.

Seller can assign multiple products to the same global product at different prices.

Back-End
Admin can assign the global product to any seller from back-end.
Go to Manage Global Product -> Assign/Set Lowest button

Set Lowest Product
If admin has selected the criteria as “Choose by Admin”, then the admin has to select the product among the list of sellers.


Front-end display of the category page if admin selects even one product.

This was all about the PrestaShop Marketplace Seller Price Comparison Module. I hope this document will help you in checking the functionality of the module in a better way.
Also, do let us know about your views in the comments.
Support
For any kind of technical assistance or query, please raise a ticket at http://webkul.uvdesk.com or send us a mail at [email protected]
Also, please explore our PrestaShop development services & vast range of featureful PrestaShop Addons.
Current Product Version - 5.1.1
Supported Framework Version - 1.7.x.x

Be the first to comment.